热门标签
热门文章
- 1Flutter(十五) 屏幕适配_flutter同样的组件怎么适配多端
- 2鸿蒙公布源码了吗,编码会馆-华为开源鸿蒙2.0来了!!源码放在gitee上
- 3这几款图片格式转换器帮助你轻松解决图片转换难题_相机拍的照片转格式
- 4QtPropertyBrowser(QtTreePropertyBrowser)改变Qss样式的几种方法!_qttreepropertybrowser 样式
- 5Thinkphp+workman+redis实现多进程异步任务处理_thinkphp 用redis 做异步
- 6基于卷积神经网络-长短期记忆网络结合多头注意力机制CNN-LSTM-multihead-Attention多维时序预测,多变量输入模型。matlab代码,2021b及其以上。评价指标包括:R2、M
- 7C#/Java 动态生成电子发票_发票代码规则 c#
- 8verilog 握手机制学习记录
- 9LangChain简明指南,LangChain是什么?可以用来做什么?
- 10一文看懂内存池原理及创建(C++实现)_内存池的工作原理
当前位置: article > 正文
Latex常用功能模板集合_title page latex模板
作者:2023面试高手 | 2024-03-15 02:08:05
赞
踩
title page latex模板
概览


使用须知
模板作者:亦梦亦醒乐逍遥
使用方法:新建自己的main.tex,把模板整个粘贴到main.tex中
在main.tex中,先把document部分里除了标题,摘要和目录的部分全部删掉,形成基本框架
之后每次要用到某个功能,直接将对应模块复制粘贴到main.tex中,修改一下参数即可
模板里面有导入图片和代码的操作,所以在编译之前应当先在工作目录放两个文件防止编译时导入错误:
- 示例图片.png
- 示例代码.py
模板里没有加引用,因为加了引用就得用bibtex编译链,太麻烦,所以只要你保证这两个文件路径存在(自己创建一个),就可以直接编译出来,比较方便。后面想加引用就自己加吧,不难。
latex代码
% 模板作者:亦梦亦醒乐逍遥
% 使用方法:新建自己的main.tex,把模板整个粘贴到main.tex中
%          在main.tex中,先把document部分里除了标题,摘要和目录的部分全部删掉,形成基本框架
%          之后每次要用到某个功能,直接将对应模块复制粘贴到main.tex中,修改一下参数即可

% 规定文档类型
%\documentclass[12pt, a4paper, oneside,draft]{ctexart} % 草稿模式
\documentclass[12pt, a4paper, oneside]{ctexart} % 成品模式


% ------------导包区(我自创的名字)导入宏包,根据需要去删改----------------
\usepackage{amsmath, amsthm, amssymb, graphicx}
\usepackage[bookmarks=true, colorlinks, citecolor=blue, linkcolor=black]{hyperref}
\usepackage{listings}
\usepackage{xcolor} % 自定义颜色
\definecolor{str_color}{RGB}{106,135,89}
\definecolor{background_color}{RGB}{43,43,43}
\definecolor{key_color}{RGB}{204,120,50}
\definecolor{comment_color}{RGB}{128,128,128}
\usepackage{subcaption} % 多图
\usepackage{booktabs} % 表格粗框线
\usepackage{float} % 使用H替代htbp来精确控制图片/表格的位置
\usepackage{algorithm} % 伪代码自动加框线
\usepackage{algorithmic} % 伪代码语句


% ------------导言区,这里规定了标题等各种功能信息-------------
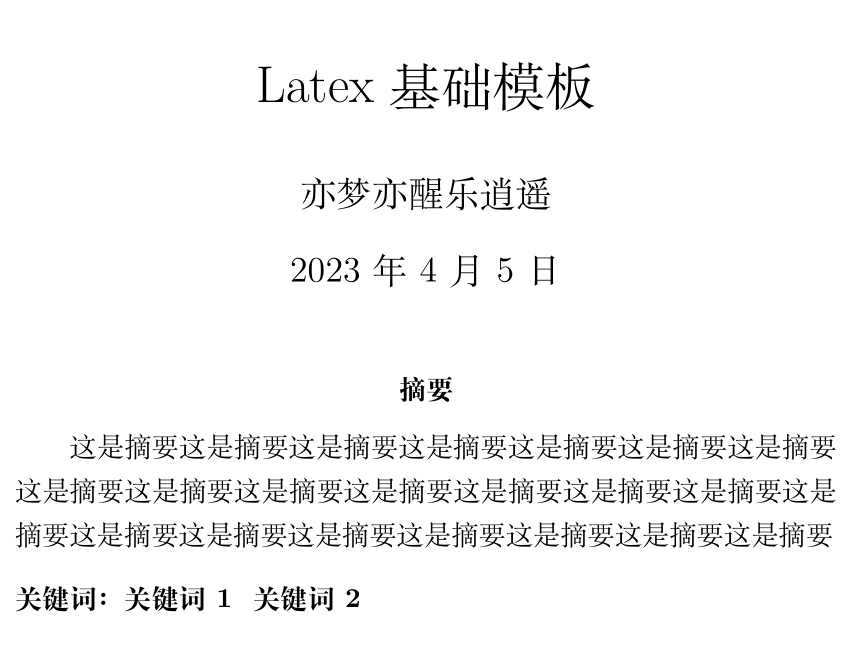
\title{Latex基础模板}
\author{亦梦亦醒乐逍遥}
\date{\today}
% 如果要使用页面操作,规定页面参数,就要用到geometry宏包
% 然后在导言区使用\geometry{left=2.54cm, right=2.54cm, top=3.18cm, bottom=3.18cm}
% 行间距也可以使用\linespread{1.5}来设置
% 页码也可以自定义\pagenumering{roman}

% 这里创造了很多定理环境,写中文定理,推论的时候可以用
\newtheorem{theorem}{定理}[section]
\newtheorem{definition}[theorem]{定义}
\newtheorem{lemma}[theorem]{引理}
\newtheorem{corollary}[theorem]{推论}
\newtheorem{example}[theorem]{例}
\newtheorem{proposition}[theorem]{命题}

% 设置直接生成的代码风格
\lstset{
    % 格式控制
    basicstyle=\small,% 设置基本字体
    numbers=left, %设置行号位置
    numberstyle=\tiny, %设置行号大小
    escapeinside=``, %逃逸字符(1左面的键),用于显示中文
    breaklines, %自动折行
    extendedchars=false, %解决代码跨页时,章节标题,页眉等汉字不显示的问题
    %xleftmargin=2em,xrightmargin=2em, aboveskip=1em, %设置边距
    tabsize=4, %设置tab空格数
    showspaces=false, %不显示空格
    frame=single, %设置边框格式
    % 颜色控制,本人独爱dracula风格。
    % 只能用注释断行,但是还是容易出现各种玄学问题
    basicstyle=\color{white},
    backgroundcolor=\color{background_color},
    keywordstyle=\color{key_color}, %设置关键字颜色
    stringstyle=\color{str_color}, % 设置字符串颜色
    commentstyle=\color{comment_color}, %设置注释颜色
}
% -------------正文区-----------------------

\begin{document}

\maketitle  % 这一句将上面导言区的设置实现出来

\begin{abstract}
    这是摘要这是摘要这是摘要这是摘要这是摘要这是摘要这是摘要这是摘要这是摘要
    这是摘要这是摘要这是摘要这是摘要这是摘要这是摘要这是摘要这是摘要这是摘要
    这是摘要这是摘要这是摘要这是摘要 \\[8pt] %调节间距
    \textbf{关键词:关键词1 \ 关键词2}
\end{abstract}

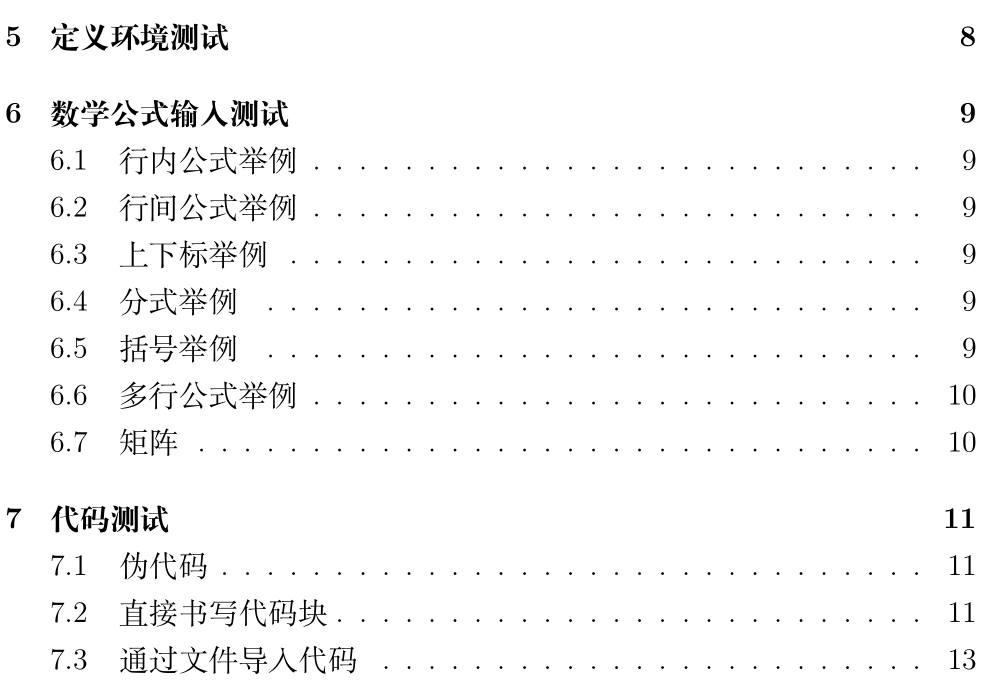
\tableofcontents %生成目录

正文部分,默认起一段空缩进两格,然后连起来的两行看做连续
要另起一段就空行,但是不管空多少行都是一段,不会多空行

分了章节以后,就可以用tableofcontents来自动生成目录

下面进行分章节测试

\section{字体测试}
使用newpage可以另起一页,在这一页进行局部字体的测试

\textup{textup 直立字体}

可见直立字体是默认字体

\textit{Italy 意大利斜体}

可见意大利斜体是比较花的,中文会变成楷体

\textsl{slope 倾斜}

可见倾斜就是手写印刷体,中文是铁打的楷体

\textsc{small capital 小型大写}

可见就是大写了以后用小写的大小,中文没有变化

\textbf{bond font加宽加粗字体}

可见就是简单的加宽加粗

以下字体都是相对于基本大小变化的

标准大小: Hello Latex.

\tiny Hello Latex.

\scriptsize Hello Latex.

\footnotesize Hello Latex.

\small Hello Latex.

\normalsize Hello Latex.

\large Hello Latex.

\Large Hello Latex.

\LARGE Hello Latex.

\huge Hello Latex.

\normalsize 恢复正常字体,否则后面就都是大字体

\newpage

\section{图片测试}

\subsection{单一图片}
本页单独插入一张图片试试水,从这里要加begin和end可以看出来
begin和end其实就和html里的封闭式标签相同,就连断行等操作都类似


% htbp 是自动选择插入位置,四个参数可以任意组合,h=here,t=top,b=bottom,p=?
% centering 是设置居中
% width 设置宽度,其实如果不规定高度就相当于缩放了
% label 相当于给图片设置一个别名,可以用于引用
% {}里填入相对url
% caption 设置图片标题,会显示出来


\begin{figure}[H] %可以用[H] 搭配float包精准控制位置,但是一定要留好地方放得下图片
\centering
\includegraphics[width=0.9\textwidth]{示例图片.png} % 等比例调节图片尺寸
\caption{图片标题会出现在下面}
\end{figure}

\subsection{多图插入之subcaption}
用到subcaption包,其竞争对手都已经很久没有更新过了

需要注意的是,subfigure的第一个参数是位置,第二个是宽度

我们还要善用textwidth这个参数,他可以获取父浮动体的宽度,然后还可以在左边乘系数来调节
\begin{figure}[H]
    \begin{subfigure}{0.5\textwidth} % 这里调节父浮动体的宽度
        \centering
        \includegraphics[width=0.7\textwidth]{示例图片.png} % 也可以浮动体内部调整图片大小
        \caption{图1}
    \end{subfigure}\begin{subfigure}{0.5\textwidth} %注意要并排的话,这里得连起来
        \centering
        \includegraphics[width=\textwidth]{示例图片.png}
        \caption{图2}
    \end{subfigure}
    %这里空行强调分行
    \begin{subfigure}{0.5\textwidth}
        \centering
        \includegraphics[width=\textwidth]{示例图片.png}
        \caption{图3}
    \end{subfigure}\begin{subfigure}{0.5\textwidth}
        \centering
        \includegraphics[width=\textwidth]{示例图片.png}
        \caption{图4}
    \end{subfigure}
    \caption{多图示例}
\end{figure}


\newpage
\section{表格测试}

\subsection{所见即所得表格生成网站}

这一页测试一下表格,但是听说表格挺麻烦,好在可以用。

https://www.tablesgenerator.com/


这个网址来进行可视化制作,所见即所得,出来的代码直接复制进来即可,
之后你再进行一点微调,比如调整大小之类的。

\subsection{理解表格元素}

\begin{table}[H]
    \centering
    \caption{这是最简单的表格,没有框,ccc代表每列都居中,
    }
    % 下面是表格体,经典的biginend
    \begin{tabular}{ccc}
        1 & 2 & 3 \\
        4 & 5 & 6 \\
        7 & 8 & 9
    \end{tabular}
\end{table}

这是一个可以控制大小以及加了粗线的表格

\begin{table}[H]
    \centering
    \caption{模拟退火策略对照结果}
    \scalebox{0.7} %控制表格大小
    {
        \begin{tabular}{c|l|c|r|c}% |代表列间加竖线,c代表这一列居中,l左r右对齐
            \toprule[2pt] % 加粗横线,但是这个会被竖线截断
            模拟退火  & 原始策略 & 仅随机重启10组 &仅协同搜索 & 完善策略  \\
            \hline % 自带横线,不会被竖线截断
            用例1 & 7038 & 7038 & 7038 &  7038 \\
            用例2 & 8366 & 8366 & 8366 &  8366 \\
            用例3 & 7166 & 7166 & 7166 &  7166 \\
            用例4 & 7312 & 7312 & 7312 &  7312 \\
            用例5 & 8003 & 8003 & 8003 &  8003 \\
            用例6 & 7779 & 7720 & 7720 &  7720 \\
            用例7 & 1457 & 1440 & 1431 &  1431 \\
            用例8 & 1973 & 1977 & 1975 &  1960 \\
            用例9 & 1111 & 1109 & 1111 &  1109 \\
            用例10 & 1981 & 1946 & 1949 &  1945 \\
            用例11 & 3277 & 3277 & 3280 &  3277 \\
            \bottomrule[2pt]
        \end{tabular}
    }
\end{table}

\newpage

\section{列表测试}
这一页测试一下列表,其实很容易就可以看出来,只要是自定义,那有序和无序就没有区别了
\subsection{有序列表}
\begin{enumerate}
    \item first
    \item second
    \item third
\end{enumerate}

\subsection{自定义有序列表}
\begin{enumerate}
    \item [(1)] first
    \item [(2] second
    \item [3)] third
\end{enumerate}
\subsection{无序列表}
\begin{itemize}
    \item first
    \item second
    \item third
\end{itemize}
\subsection{自定义无序列表}
\begin{itemize}
    \item [f] first
    \item [s] second
    \item [t] third
\end{itemize}

\newpage %新开一页
\section{定义环境测试}

这个定理就是我们经常用的定理,在前面需要导入包ams thm,
然后在导言区加入以下叙述newtheorem\{theorem\}\{定理\}[section],
接下来逐一理解一下这个叙述的作用。

\begin{enumerate}
    \item newtheorem的意思是新建一种环境,我们可以建造很多种环境,
    来叙述不同的定义
    \item {theorem}代表了我新建了一个标签就叫theorem
    \item 定理的意思是,在这个标签下我就默认显示这个文字,也可以自己覆盖
    \item section是一个参数,代表让环境,在每个section中自动编号
\end{enumerate}

现在来创建一个定理吧
\begin{theorem}[覆盖后的名称]
    定理内容,看到前面的那个编号了没有,如果没有section参数
    编号还是有的,但是和章节就没有关系了
\end{theorem}

我们来创建更多定理,但是你可以看到,如果我们想把这几个不同的定理统一计数,
可以添加[被绑定的标签名]参数在\{定理名称\}前面,比如

newtheorem\{lemma\}[theorem]\{引理\}
\begin{definition}
    这是一个定义
\end{definition}
\begin{lemma}
    这是一个引理
\end{lemma}
\begin{corollary}
    这是一个推论
\end{corollary}
\begin{example}
    这是一个例子
\end{example}
\begin{proposition}
    这是一个定理
\end{proposition}
\begin{proof}
    这是内置的证明环境
\end{proof}

\newpage

\section{数学公式输入测试}

数学公式的输入方法有很多,我也只是了解一部分,更多的可以去网上搜索,
肯定会有你喜欢的一种,关键在于你要会写latex公式,以及上下标的用法。

\subsection{行内公式举例}
这是一个行内公式$a+b>0$

目前发现底标$\displaystyle\lim_{n\to\infty}x_n=x$的写法需要displaystyle

不然会把趋近简单当成下标$\lim_{n\to\infty}x_n=x$

\subsection{行间公式举例}
这种写法的好处在于,这也是\textit{MarkDown}的写法
$$
a+b>0
$$

\subsection{上下标举例}
这是上标:$a^n$

这是下标:$a_n$

\subsection{分式举例}
frac写法的分式比较小$a^\frac{\frac{adfasdf}{fasdf}}{basdfasdf}$

dfrac写法的比较大$a^\dfrac{\frac{adfasdf}{fasdf}}{basdfasdf}$

\subsection{括号举例}
一般来说可以直接用括号$(1+\frac{1}{n})^n$

然后我们采用大尺寸括号$\left(1+\frac{1}{n}\right)^n$

emm,硬说有啥区别大概就是高了点?

我们来测试一下括号中加个分割线$\left(1+\middle|\frac{1}{n}\right)^n$
,但是你会发现也只能在大尺寸括号里用了

大括号需要转义:$\{a\}$

但是中括号不需要:$[a]$

如果你想用那种分段函数/方程组一样的大括号,请使用cases环境
$$
f(x)=\begin{cases}
    x, & x>0, \\
    -x, & x\leq0. \\
\end{cases}
$$
接下来我们逐一分析cases环境中的参数
\begin{enumerate}
    \item 同tabular,首先是分成一行一行的,行末加双反斜杠换行
    \item 每一行,第一部分是公式,之后是\&,然后是条件,最后是换行
    \item 写的时候不同部分最好空一格
\end{enumerate}

\subsection{多行公式举例}
这个常用于连等式,使用aligned环境
$$
\begin{aligned}
    a
    & =b+c \\
    & =d+e \\
    & =hhhh \\
\end{aligned}
$$
我们继续逐一分析aligned环境写法
\begin{enumerate}
    \item 首先写出左边公式,为了整洁可以现在就换行
    \item 然后每一行写 \& = 右公式,最后跟上双反斜杠分行
    \item 注意空格
\end{enumerate}


\subsection{矩阵}
这里说的矩阵是广义矩阵,区别只是外框形状不同
$$$$
bmatrix
$$
\begin{bmatrix}
    a & b & c & d \\
    d & c & b & a \\
\end{bmatrix}
$$
pmatrix
$$
\begin{pmatrix}
    a & b & c & d \\
    d & c & b & a \\
\end{pmatrix}
$$
vmatrix
$$
\begin{vmatrix}
    a & b & c & d \\
    d & b & b & a \\
\end{vmatrix}
$$
如果你想留空位,就留下空位,但两边的 \& 还是不能少
$$
\begin{bmatrix}
    a &   &   &   \\
      & b &   &   \\
      &   & c &   \\
      &   &   & d \\
\end{bmatrix}
$$
写法就不具体分析了

也和表格写法同,只不过要更简单,不用套标签,然后里面也只需要写行列就好

\section{代码测试}

\subsection{伪代码}

\begin{algorithm}
	%\textsl{}\setstretch{1.8} %控制行距
	\renewcommand{\algorithmicrequire}{\textbf{Input:}} %修改为Input ,Output
	\renewcommand{\algorithmicensure}{\textbf{Output:}}
	\caption{标题}
	\label{算法标签}
	\begin{algorithmic}[1]
        \REQUIRE 输入

        \ENSURE 给定条件

		\STATE Initialization:初始化

        \IF{IF条件} % IF ELSE -ENDIF
		\STATE 语句1
		\ELSE
		\STATE 语句2
		\ENDIF

        \FOR{条件}
        \STATE FOR循环体
        \ENDFOR

        \WHILE{while条件} % 循环 WhILE-ENDWHILE
		\STATE WHILE循环体
		\ENDWHILE

		\REPEAT % do loop循环,REPEAT-UNTIL
		\STATE repeat 循环体
		\UNTIL 终止条件

		\ENSURE  输出
	\end{algorithmic}

    \begin{algorithmic}[2]
        \STATE 一个算法框里可以放好多块算法语句
	\end{algorithmic}
\end{algorithm}

\subsection{直接书写代码块}
\begin{lstlisting}[language=Python]
    def gcd(a, b):
        if(b == 0):
            return a

        return gcd(b, a % b)
\end{lstlisting}

\subsection{通过文件导入代码}
总的来说还是推荐使用文件导入,一方面你用专门的编辑器写也很舒服,
在latex里写代码属实难受,另一方面,如果在latex里写,他给你放出的位置
就是绝对位置,什么意思呢?就是你如果在latex里缩进了多少绝对单位,那
出来的代码块就缩进多少,而导入就是直接按照相对位置导入了,不用被latex的缩进干扰

对了,值得一说的就是lstlisting环境里可以直接用\% 而不用转义,反正就是
给你原生态,包括前面的缩进
\lstinputlisting[language=Python]{示例代码.py}
\end{document}
- 1
- 2
- 3
- 4
- 5
- 6
- 7
- 8
- 9
- 10
- 11
- 12
- 13
- 14
- 15
- 16
- 17
- 18
- 19
- 20
- 21
- 22
- 23
- 24
- 25
- 26
- 27
- 28
- 29
- 30
- 31
- 32
- 33
- 34
- 35
- 36
- 37
- 38
- 39
- 40
- 41
- 42
- 43
- 44
- 45
- 46
- 47
- 48
- 49
- 50
- 51
- 52
- 53
- 54
- 55
- 56
- 57
- 58
- 59
- 60
- 61
- 62
- 63
- 64
- 65
- 66
- 67
- 68
- 69
- 70
- 71
- 72
- 73
- 74
- 75
- 76
- 77
- 78
- 79
- 80
- 81
- 82
- 83
- 84
- 85
- 86
- 87
- 88
- 89
- 90
- 91
- 92
- 93
- 94
- 95
- 96
- 97
- 98
- 99
- 100
- 101
- 102
- 103
- 104
- 105
- 106
- 107
- 108
- 109
- 110
- 111
- 112
- 113
- 114
- 115
- 116
- 117
- 118
- 119
- 120
- 121
- 122
- 123
- 124
- 125
- 126
- 127
- 128
- 129
- 130
- 131
- 132
- 133
- 134
- 135
- 136
- 137
- 138
- 139
- 140
- 141
- 142
- 143
- 144
- 145
- 146
- 147
- 148
- 149
- 150
- 151
- 152
- 153
- 154
- 155
- 156
- 157
- 158
- 159
- 160
- 161
- 162
- 163
- 164
- 165
- 166
- 167
- 168
- 169
- 170
- 171
- 172
- 173
- 174
- 175
- 176
- 177
- 178
- 179
- 180
- 181
- 182
- 183
- 184
- 185
- 186
- 187
- 188
- 189
- 190
- 191
- 192
- 193
- 194
- 195
- 196
- 197
- 198
- 199
- 200
- 201
- 202
- 203
- 204
- 205
- 206
- 207
- 208
- 209
- 210
- 211
- 212
- 213
- 214
- 215
- 216
- 217
- 218
- 219
- 220
- 221
- 222
- 223
- 224
- 225
- 226
- 227
- 228
- 229
- 230
- 231
- 232
- 233
- 234
- 235
- 236
- 237
- 238
- 239
- 240
- 241
- 242
- 243
- 244
- 245
- 246
- 247
- 248
- 249
- 250
- 251
- 252
- 253
- 254
- 255
- 256
- 257
- 258
- 259
- 260
- 261
- 262
- 263
- 264
- 265
- 266
- 267
- 268
- 269
- 270
- 271
- 272
- 273
- 274
- 275
- 276
- 277
- 278
- 279
- 280
- 281
- 282
- 283
- 284
- 285
- 286
- 287
- 288
- 289
- 290
- 291
- 292
- 293
- 294
- 295
- 296
- 297
- 298
- 299
- 300
- 301
- 302
- 303
- 304
- 305
- 306
- 307
- 308
- 309
- 310
- 311
- 312
- 313
- 314
- 315
- 316
- 317
- 318
- 319
- 320
- 321
- 322
- 323
- 324
- 325
- 326
- 327
- 328
- 329
- 330
- 331
- 332
- 333
- 334
- 335
- 336
- 337
- 338
- 339
- 340
- 341
- 342
- 343
- 344
- 345
- 346
- 347
- 348
- 349
- 350
- 351
- 352
- 353
- 354
- 355
- 356
- 357
- 358
- 359
- 360
- 361
- 362
- 363
- 364
- 365
- 366
- 367
- 368
- 369
- 370
- 371
- 372
- 373
- 374
- 375
- 376
- 377
- 378
- 379
- 380
- 381
- 382
- 383
- 384
- 385
- 386
- 387
- 388
- 389
- 390
- 391
- 392
- 393
- 394
- 395
- 396
- 397
- 398
- 399
- 400
- 401
- 402
- 403
- 404
- 405
- 406
- 407
- 408
- 409
- 410
- 411
- 412
- 413
- 414
- 415
- 416
- 417
- 418
- 419
- 420
- 421
- 422
- 423
- 424
- 425
- 426
- 427
- 428
- 429
- 430
- 431
- 432
- 433
- 434
- 435
- 436
- 437
- 438
- 439
- 440
- 441
- 442
- 443
- 444
- 445
- 446
- 447
- 448
- 449
- 450
- 451
- 452
- 453
- 454
- 455
- 456
- 457
- 458
- 459
- 460
- 461
- 462
- 463
- 464
- 465
- 466
- 467
- 468
- 469
- 470
- 471
- 472
- 473
- 474
- 475
- 476
- 477
- 478
- 479
- 480
- 481
- 482
- 483
- 484
- 485
- 486
- 487
- 488
- 489
- 490
- 491
声明:本文内容由网友自发贡献,不代表【wpsshop博客】立场,版权归原作者所有,本站不承担相应法律责任。如您发现有侵权的内容,请联系我们。转载请注明出处:https://www.wpsshop.cn/w/2023面试高手/article/detail/238425?site
推荐阅读
相关标签


