- 1计算机体系结构——虚拟内存技术_虚拟存储技术
- 2YOLOv8在NX上的tensorrt的加速部署(60帧率)
- 3Python利用opencv,采用多线程批量裁剪文件夹中图片(速度很快)_opencv 图片分割多快
- 4VSCode进行远程服务器代码调试运行、免密码秘钥设置(Remote Development)、常用问题解决(permissions are too open等)_vscode remote development
- 5python情感分析(真实案例完整流程)_python情感分析代码
- 6【深度学习】nnU-Net(优秀的前处理和后处理框架)
- 7基于微信小程序的作品集展示的设计与开发(源码+lw+部署文档+讲解等)_作品展示网站源码
- 8前端尚硅谷尚品汇Vue项目笔记_尚品汇笔记
- 9HTML学生个人网站作业设计:电影网站设计——钢铁侠电影下(9页) HTML+CSS+JavaScript 简单DIV布局个人介绍网页模板代码 DW学生个人网站制作成品下载_钢铁侠网页毕业设计
- 10腾讯云有哪些网站备案类型?_腾讯云域名备案网站服务类型
拉普拉斯锐化[原理及Python实现](含拉氏标定、拉普拉斯标定)
赞
踩
拉普拉斯锐化
[原理及Python实现](含拉氏标定、拉普拉斯标定)
原创文章;转载请注明出处:©️ Sylvan Ding
锐化处理的主要目的是突出灰度的过度部分。图像锐化的用途多种多样,应用范围从电子印刷和医学成像到工业检测和军事系统的制导等。利用图像微分可以增强边缘和其他突变(如噪声),而削弱灰度变化缓慢的区域。
定义
对于一维函数,其一阶微分的定义如下(差值):(为了与二维函数图像的微分保持一致,这里使用了偏导符号)
∂ f ∂ x = f ( x + 1 ) − f ( x ) \frac{\partial f}{\partial x} = f(x+1)-f(x) ∂x∂f=f(x+1)−f(x)
由此,不难推出其二阶微分(差分):
∂ 2 f ∂ x 2 = f ( x + 1 ) − f ( x − 1 ) + 2 f ( x ) \frac{\partial ^2f}{\partial x^2} = f(x+1)-f(x-1)+2f(x) ∂x2∂2f=f(x+1)−f(x−1)+2f(x)
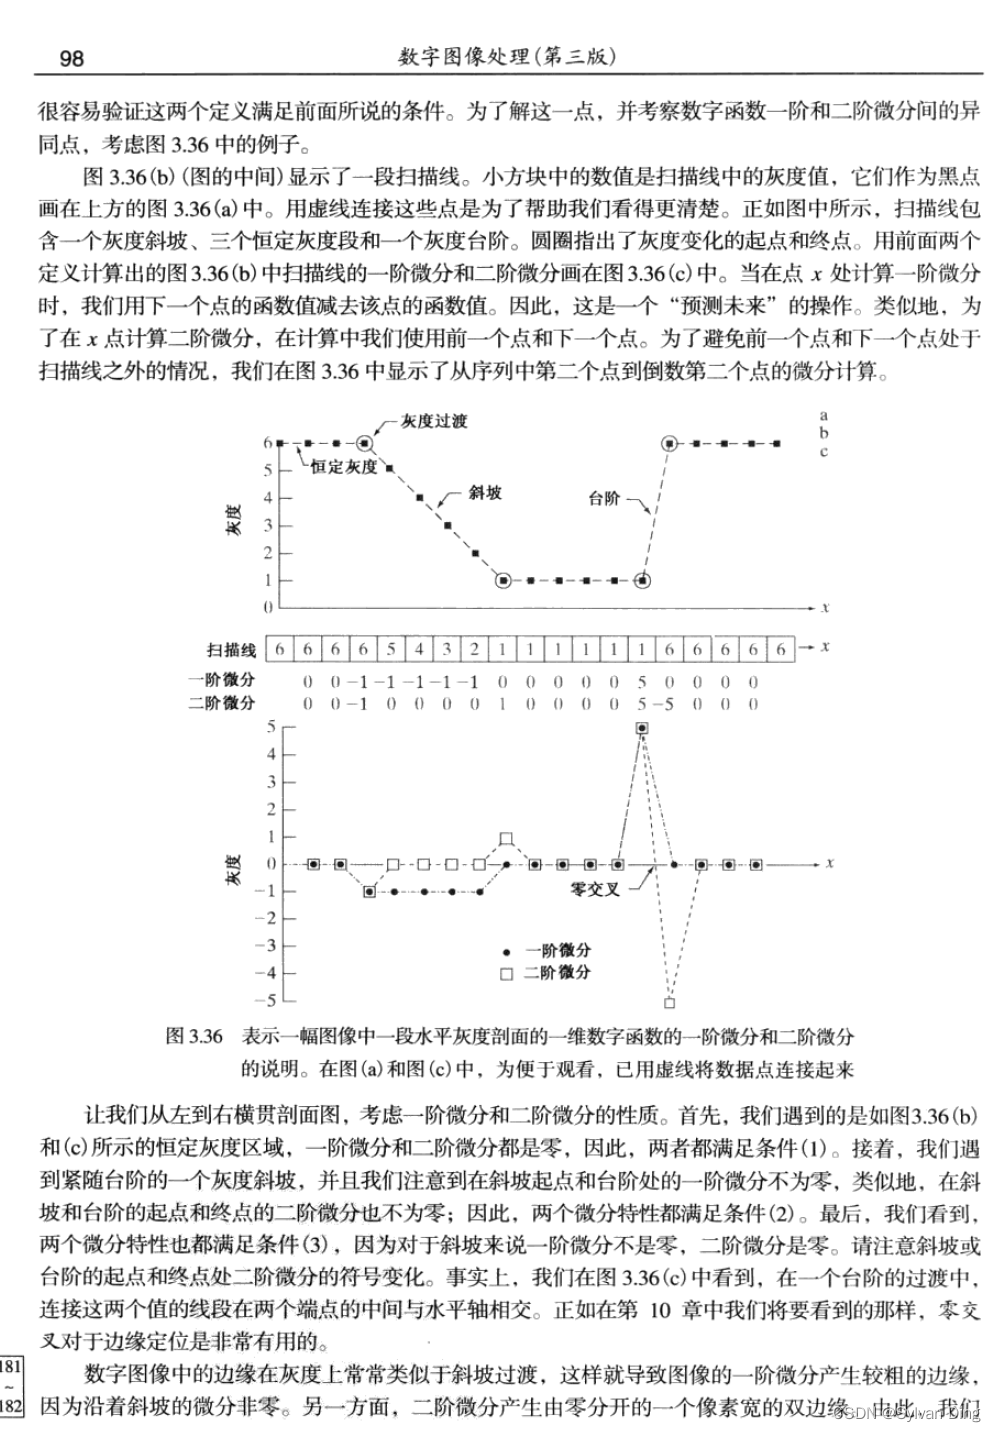
由上式可知,一阶微分需要"前瞻"一个值,而二阶微分不仅需要"前瞻"、还需要"后瞻"才能算出。所以在分析二阶微分的问题时,通常只考虑从第二个点到倒数第二个点的微分计算,以避免前一个点和下一个点不存在的情况。
对于二维函数图像 f ( x , y ) f(x,y) f(x,y),其拉普拉斯算子定义为:
∇ 2 f = ∂ 2 f ∂ x 2 + ∂ 2 f ∂ y 2 \nabla^{2} f=\frac{\partial^{2} f}{\partial x^{2}}+\frac{\partial^{2} f}{\partial y^{2}} ∇2f=∂x2∂2f+∂y2∂2f
在 x x x 方向和 y y y 方向上有:
∂ 2 f ∂ x 2 = f ( x + 1 , y ) + f ( x − 1 , y ) − 2 f ( x , y ) \frac{\partial^{2} f}{\partial x^{2}}=f(x+1, y)+f(x-1, y)-2 f(x, y) ∂x2∂2f=f(x+1,y)+f(x−1,y)−2f(x,y)
∂ 2 f ∂ y 2 = f ( x , y + 1 ) + f ( x , y − 1 ) − 2 f ( x , y ) \frac{\partial^{2} f}{\partial y^{2}}=f(x, y+1)+f(x, y-1)-2 f(x, y) ∂y2∂2f=f(x,y+1)+f(x,y−1)−2f(x,y)
故
∇ 2 f ( x , y ) = f ( x + 1 , y ) + f ( x − 1 , y ) + f ( x , y + 1 ) + f ( x , y − 1 ) − 4 f ( x , y ) \nabla^{2} f(x, y)=f(x+1, y)+f(x-1, y)+f(x, y+1)+f(x, y-1)-4 f(x, y) ∇2f(x,y)=f(x+1,y)+f(x−1,y)+f(x,y+1)+f(x,y−1)−4f(x,y)
核心思想
一阶微分表征了在某个方向上灰度的变化率,而二阶微分表征的是一阶微分的变化情况。对于灰度值的缓慢变化(斜坡过渡),一阶微分只能产生粗糙的边缘,但二阶微分可以形成"零交叉"(前后连个像素点间二阶微分差值很大,切连线与坐标轴相交,产生零点),比一阶微分更能反应出边界,在边缘检测中发挥着更加重要的作用。
由上述分析知,二阶微分在增强细节方面比一阶微分好得多,是适合锐化图像的立项特征,这就是拉普拉斯二阶微分算子锐化图像的核心思想。
构造拉普拉斯模版
拉普拉斯滤波通过滤波器模板(核)来实现。根据定义中对拉普拉斯算子的描述,不难得到:(模版1)
[
0
1
0
1
−
4
1
0
1
0
]
模版1中四个角均为
0
0
0,没有纳入拉普拉斯算子的线性计算中,因为这样构造出的模版只是在 x、y 坐标轴方向上求了二阶微分,那么可以考虑向定义中拉普拉斯算子里加入
4
5
∘
45^\circ
45∘、
13
5
∘
135^\circ
135∘ 的对角线方向的二阶微分。
∇ 2 f ( x , y ) = f ( x − 1 , y + 1 ) + f ( x + 1 , y + 1 ) + f ( x + 1 , y − 1 ) + f ( x − 1 , y − 1 ) + f ( x + 1 , y ) + f ( x − 1 , y ) + f ( x , y + 1 ) + f ( x , y − 1 ) − 8 f ( x , y ) \nabla^{2} f(x, y)=f(x-1, y+1)+f(x+1, y+1)+f(x+1, y-1)+f(x-1, y-1)+f(x+1, y)+f(x-1, y)+f(x, y+1)+f(x, y-1)-8 f(x, y) ∇2f(x,y)=f(x−1,y+1)+f(x+1,y+1)+f(x+1,y−1)+f(x−1,y−1)+f(x+1,y)+f(x−1,y)+f(x,y+1)+f(x,y−1)−8f(x,y)
那么,将对角方向灰度变化纳入锐化中的拉普拉斯扩展模版2:
[
1
1
1
1
−
8
1
1
1
1
]
锐化过程
拉普拉斯算子强调的是图像中灰度的突变,并不强调灰度级缓慢变化的区域,将原图像和拉普拉斯图像叠加,可以增强边界的灰度值,以实现锐化。
g ( x , y ) = f ( x , y ) − [ ∇ 2 f ( x , y ) ] g(x, y)=f(x, y)-\left[\nabla^{2} f(x, y)\right] g(x,y)=f(x,y)−[∇2f(x,y)]
其中, f ( x , y ) f(x,y) f(x,y) 为原图, g ( x , y ) g(x,y) g(x,y)为锐化后所得到的图像函数。
由于 ∇ 2 f ( x , y ) \nabla^{2} f(x, y) ∇2f(x,y) 拉普拉斯图像中既有负值也有正值,故在展示拉普拉斯图像时,负值会截断成灰度值 0,超过 255 的灰度值也会截断成 255,所以需要标定,本质上是归一化。
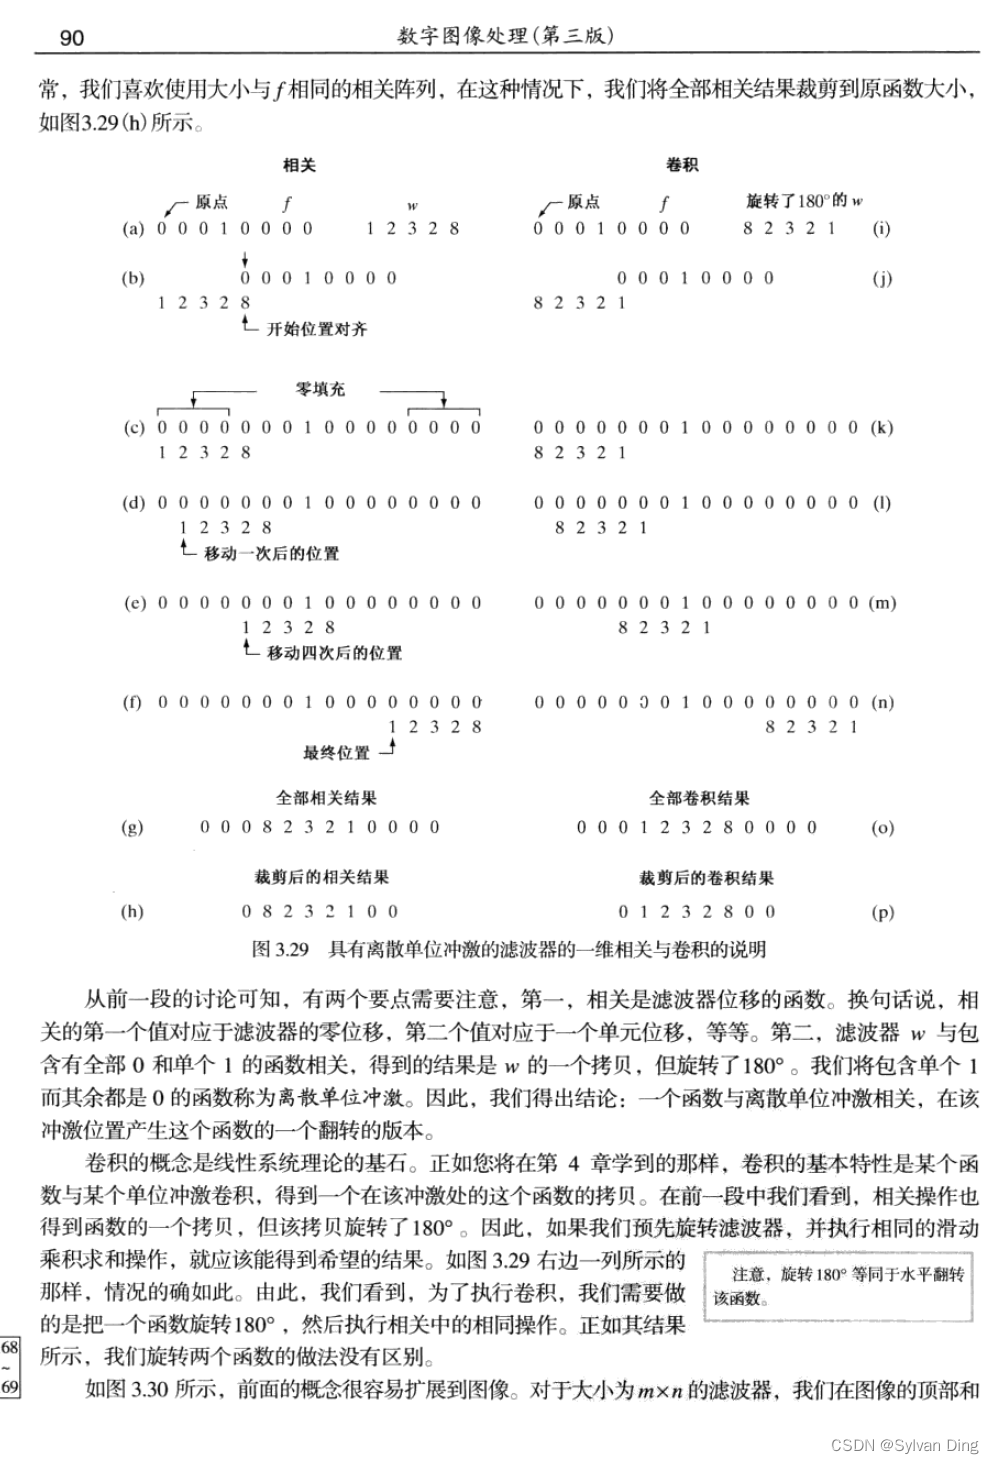
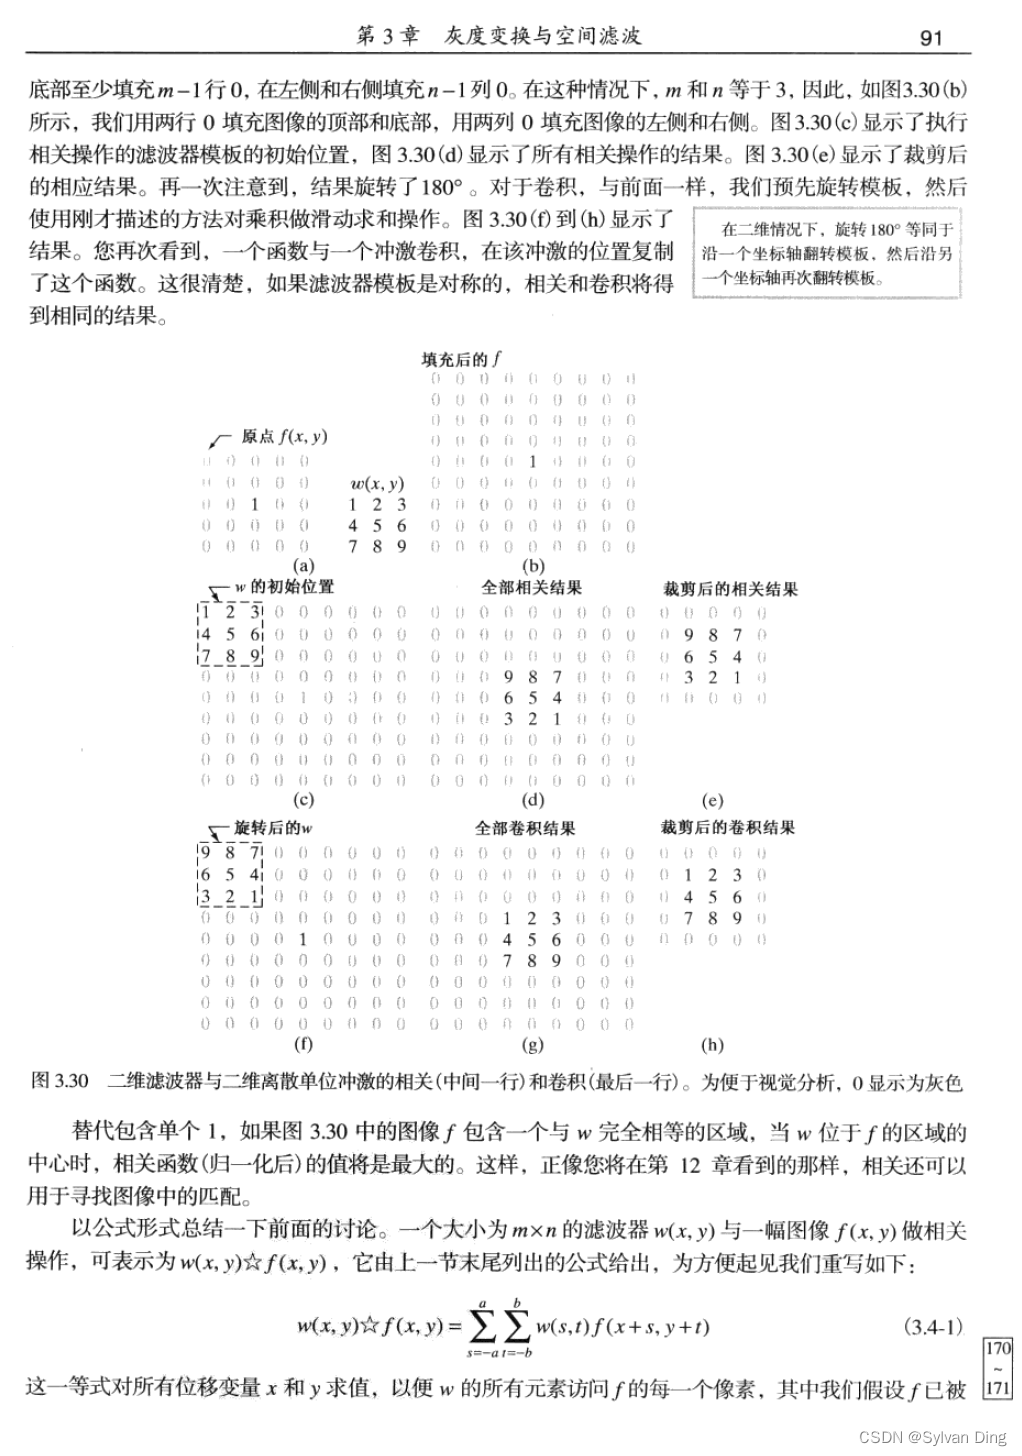
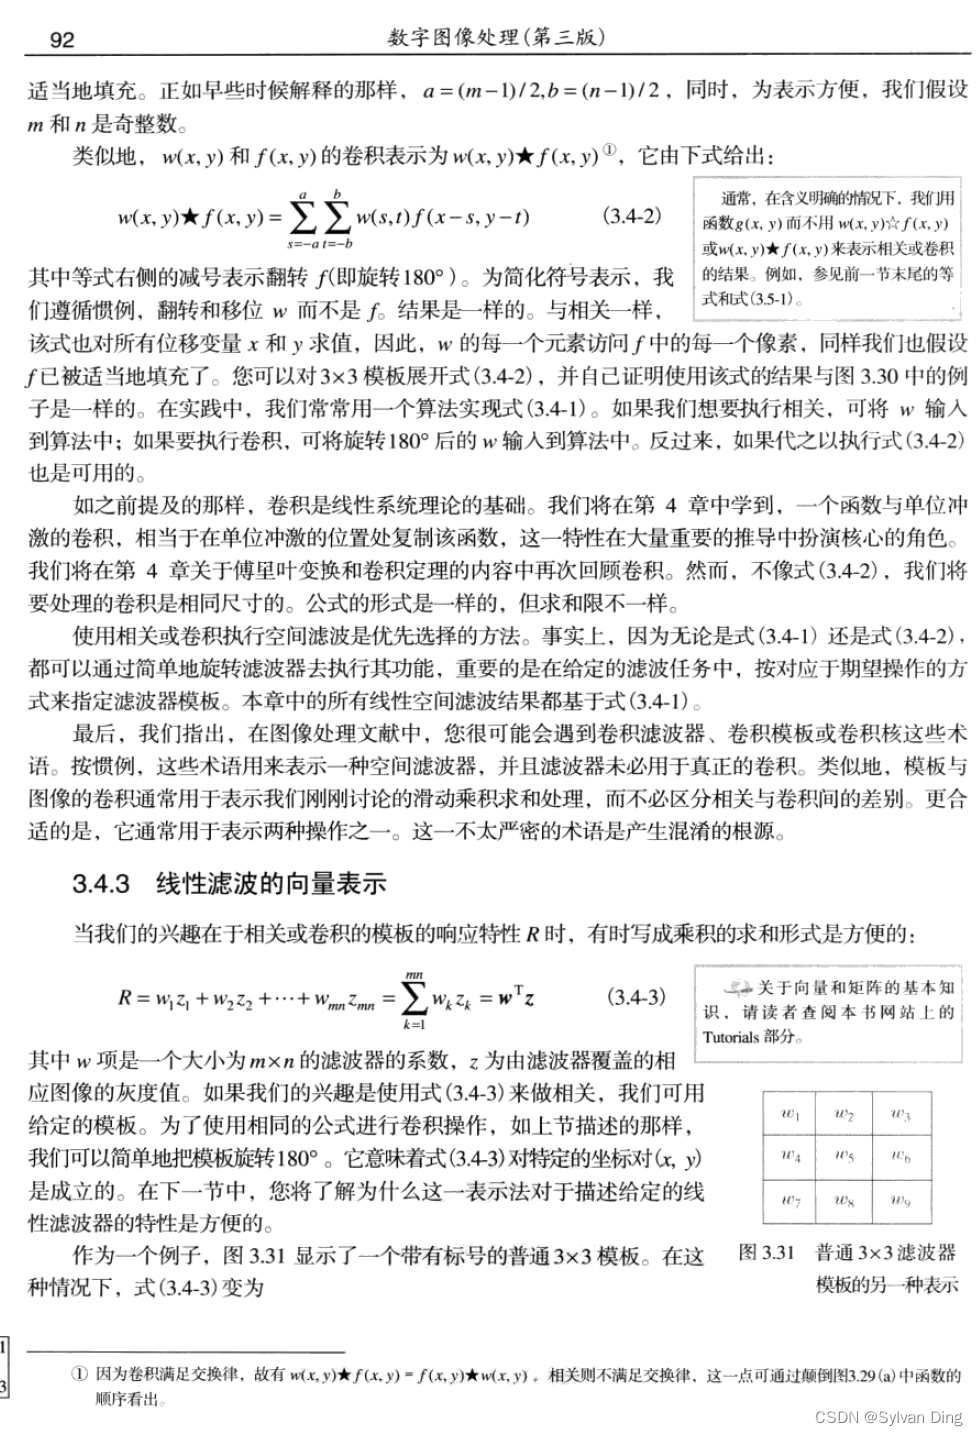
"卷积"过程中,为了避免产生黑边,所以边缘填充为镜像,对应openCV中BORDER_REFLECT_101.
二维卷积函数 filter2D
cv.filter2D(src, ddepth, kernel[, dst[, anchor[, delta[, borderType]]]]) -> dst
Convolves an image with the kernel.
The function applies an arbitrary linear filter to an image. In-place operation is supported. When the aperture is partially outside the image, the function interpolates outlier pixel values according to the specified border mode.
The function does actually compute correlation, not the convolution:
dst
(
x
,
y
)
=
∑
0
≤
x
′
<
kernel.cols
0
≤
y
′
<
kernel.rows
kernel
(
x
′
,
y
′
)
∗
src
(
x
+
x
′
−
anchor.
x
,
y
+
y
′
−
anchor.y
)
\operatorname{dst}(x, y)=\sum_{
That is, the kernel is not mirrored around the anchor point. If you need a real convolution, flip the kernel using flip and set the new anchor to (kernel.cols - anchor.x - 1, kernel.rows - anchor.y - 1).
Parameters:
- src: input image.
- dst: output image of the same size and the same number of channels as src.
- ddepth: desired depth of the destination image, if set to -1, it will keep the same as the input
- kernel: convolution kernel.
- anchor: default value (-1,-1) means that the anchor is at the kernel center.
- delta: optional value added to the filtered pixels before storing them in dst.
- borderType: pixel extrapolation method.
ddepth:
CV_8U (0…255)
CV_8S (-128…127)
CV_16U (0…65535)
CV_16S (-32768…32767)
…
Cis channel number, CV_8UC1 means 8 unsigned with a channel.
borderType:
cv2.BORDER_CONSTANT: It adds a constant colored border. The value should be given as a keyword argument
cv2.BORDER_REFLECT: The border will be mirror reflection of the border elements. Suppose, if image contains letters “abcdefg” then output will be “gfedcba|abcdefg|gfedcba“.
cv2.BORDER_REFLECT_101 or cv2.BORDER_DEFAULT: It does the same works as cv2.BORDER_REFLECT but with slight change. Suppose, if image contains letters “abcdefgh” then output will be “gfedcb|abcdefgh|gfedcba“.
cv2.BORDER_REPLICATE: It replicates the last element. Suppose, if image contains letters “abcdefgh” then output will be “aaaaa|abcdefgh|hhhhh“.
实验
使用模版1进行锐化的结果如下,从上到下依次为图片编号1、2、3、4:
- 原图
- 未标定的拉普拉斯图像
- 标定的拉普拉斯图像
- 拉普拉斯滤波后的图像
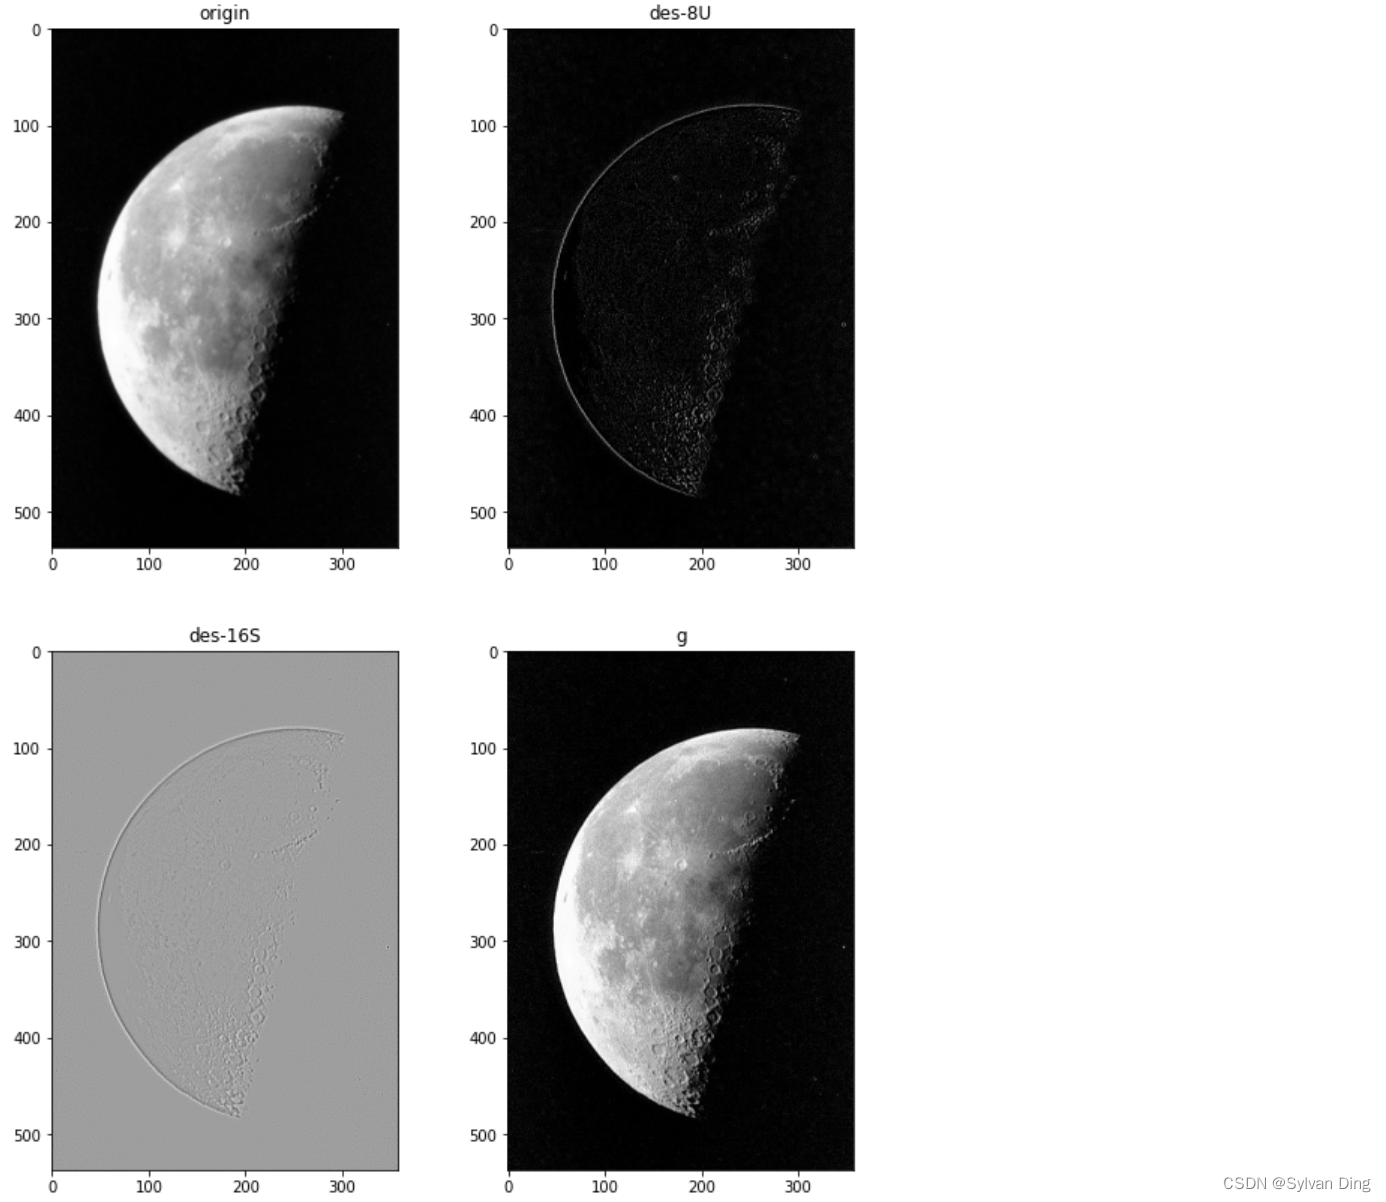
使用模版2进行锐化的结果如下:
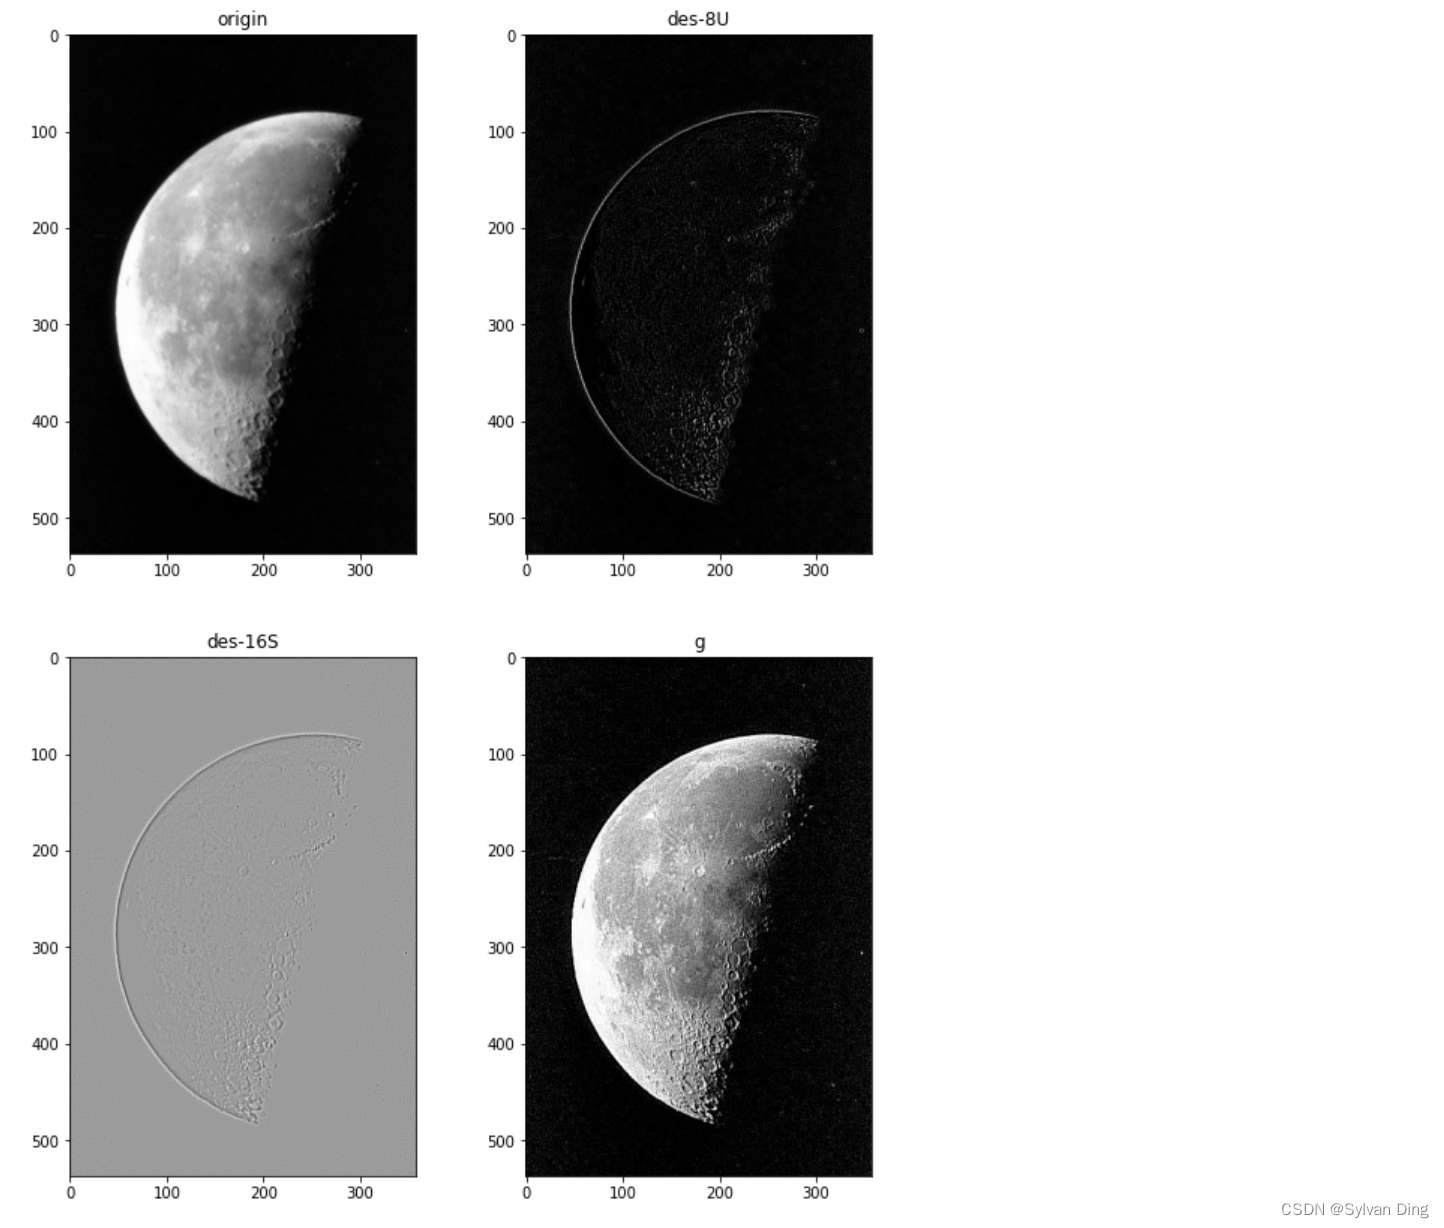
不难发现,模版2 比 模版1 效果更好。
代码
import cv2
import numpy as np
import matplotlib.pyplot as plt

def Laplace(img, kernel):

    des_8U = cv2.filter2D(img, -1, kernel=kernel, borderType=cv2.BORDER_DEFAULT)
    des_16S = cv2.filter2D(img, ddepth=cv2.CV_16SC1, kernel=kernel, borderType=cv2.BORDER_DEFAULT)

    g = img - des_16S
    g[g<0] = 0
    g[g>255] = 255

    plt.figure(figsize=(10,14))

    # origin, des_8U, des_16S, filtered
    plt.subplot(221)
    plt.imshow(img, cmap='gray')
    plt.title('origin')

    plt.subplot(222)
    plt.imshow(des_8U, cmap='gray')
    plt.title('des-8U')

    plt.subplot(223)
    plt.imshow(des_16S, cmap='gray')
    plt.title('des-16S')

    plt.subplot(224)
    plt.imshow(g, cmap='gray')
    plt.title('g')
    plt.show()

img0 = 'moon.tif'

f = cv2.imread(img0, cv2.IMREAD_GRAYSCALE)

kernel1 = np.asarray([[0, 1, 0],
                      [1, -4, 1],
                      [0, 1, 0]])

Laplace(f, kernel1)

kernel2 = np.asarray([[1, 1, 1],
                      [1, -8, 1],
                      [1, 1, 1]])

Laplace(f, kernel2)
- 1
- 2
- 3
- 4
- 5
- 6
- 7
- 8
- 9
- 10
- 11
- 12
- 13
- 14
- 15
- 16
- 17
- 18
- 19
- 20
- 21
- 22
- 23
- 24
- 25
- 26
- 27
- 28
- 29
- 30
- 31
- 32
- 33
- 34
- 35
- 36
- 37
- 38
- 39
- 40
- 41
- 42
- 43
- 44
- 45
- 46
- 47
- 48
预备知识
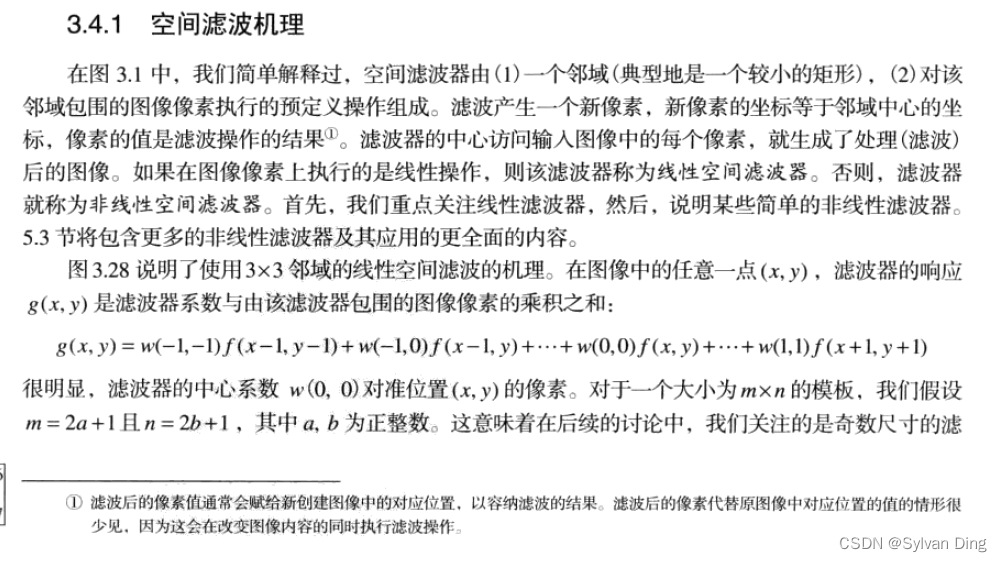
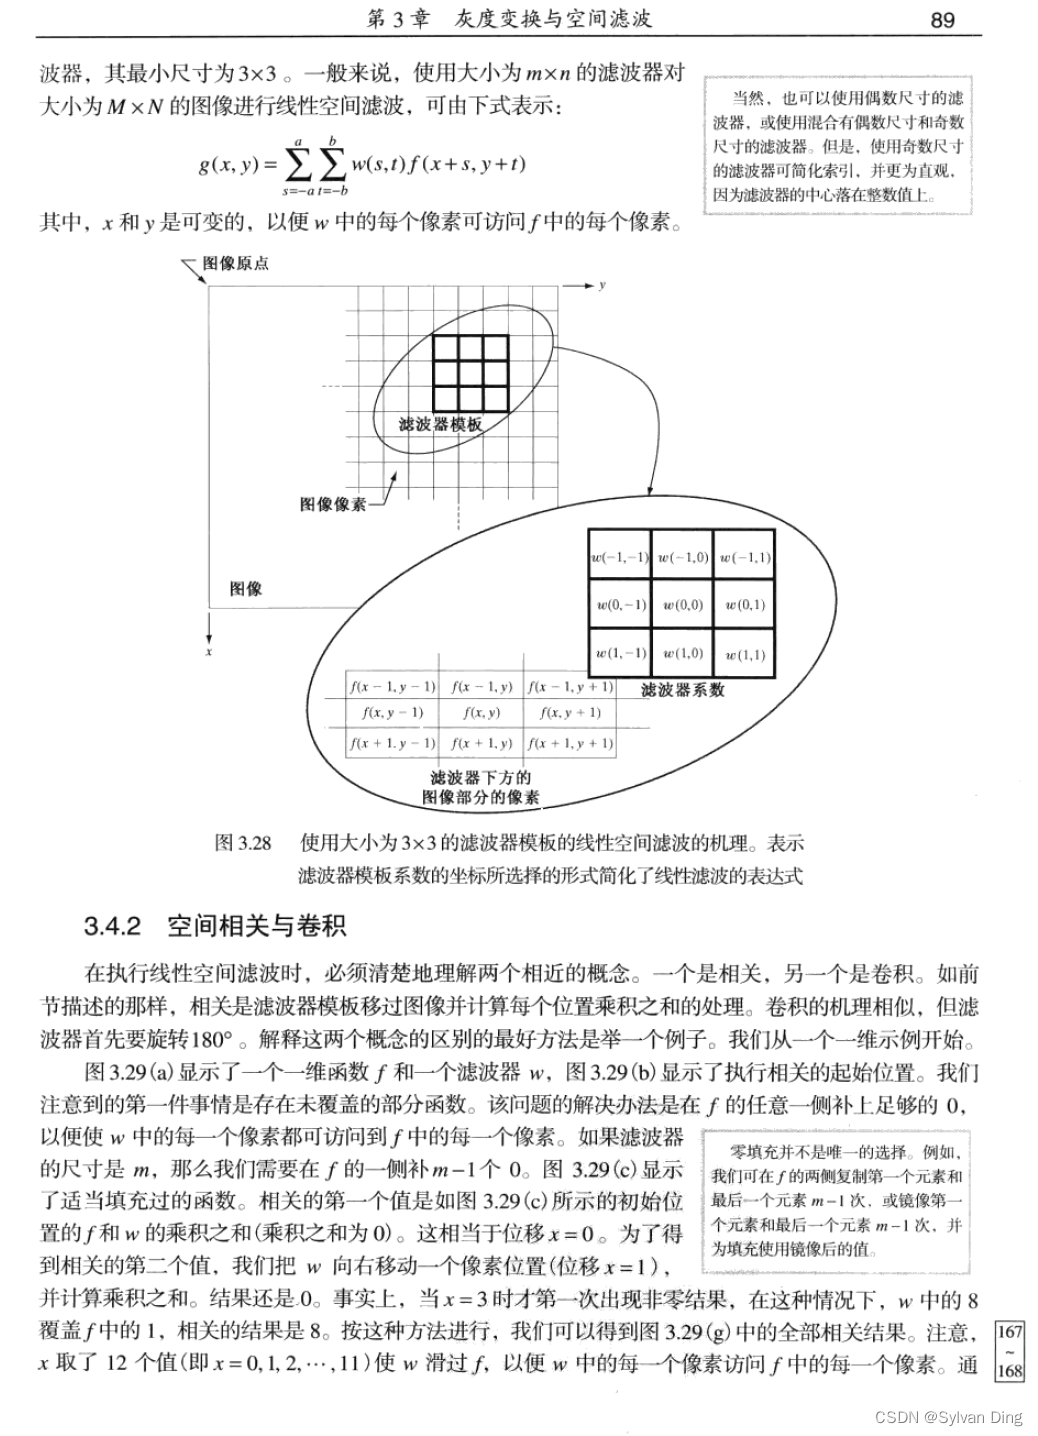

参考文献
- 数字图像处理:第3版,北京:电子工业出版社
- 图像分割——线检测——拉普拉斯标定(Matlab)
- 数据集下载地址


