热门标签
热门文章
- 1【Tools】如何在VSCode上使用C++ 保姆教程_vscode怎么运行c++代码
- 2存储虚拟化技术之解读
- 32023全国职业技能大赛云计算--高职组赛题卷⑤(私有云)_2023全国技能大赛云计算应用赛项+题目
- 4MVC、MVP、MVVM的区别_请简要说明mvc,mvp,mvvm三种模式的异同
- 5【简记】virt-manager查看虚拟机详情出现报错:启动详情报错:‘NoneType’ object has no attribute 'change_run_text'...
- 6Eclipse中配置和使用JDBC操作MySQL_eclipse jdbc
- 7Qt Designer 最新中文手册文档(Qt6)_pyqt6 designer 详解
- 8LeetCode-347. 前K个高频元素 Python3版本_python前k个高频元素 给定一个非空的整数数组,返回其中出现频率前k高的元素。例如
- 9今天看到一个不错的漫画网站(E文)_e-hentai
- 10Codeforces比赛规则梳理_codeforces加分规则
当前位置: article > 正文
vscode C/C++ 调试配置_vscodec语言调试配置
作者:盐析白兔 | 2024-02-07 14:02:47
赞
踩
vscodec语言调试配置
前言
操作系统与vscode版本
版本: 1.76.1 (user setup)
日期: 2023-03-08T16:32:00.131Z
Electron: 19.1.11
Chromium: 102.0.5005.196
Node.js: 16.14.2
V8: 10.2.154.26-electron.0
OS: Windows_NT x64 10.0.19045
沙盒化: No`
一、已有VSCODE环境可正常运行.c/.cpp文件
#include<bits/stdc++.h>
using namespace std;
int main()
{
    cout<<"hello world!"<<endl;
    // for(size_t i=0;i<=100;i++)
    // {
    //     cout<<"This is a test!"<<endl;
    //     cout<<i<<endl;
    // }
    return 0;
}
- 1
- 2
- 3
- 4
- 5
- 6
- 7
- 8
- 9
- 10
- 11
- 12

二、以test.cpp为例进行调试配置
1.按F5(启动调试)利用vscode自动生成tasks.json launch.json

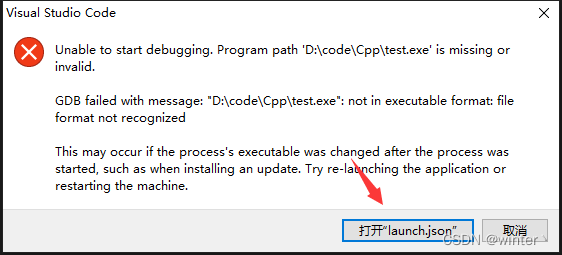


2.对tasks.json launch.json文件进行修改
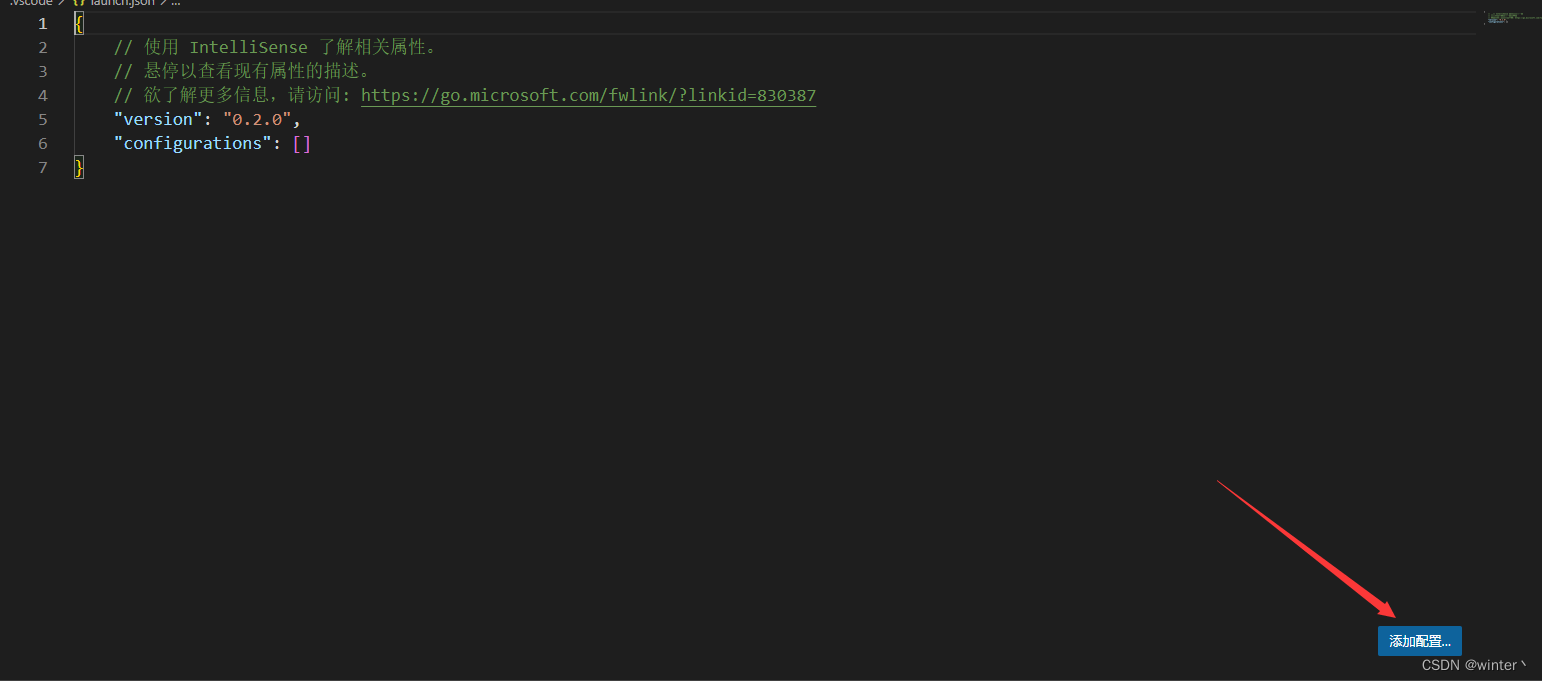
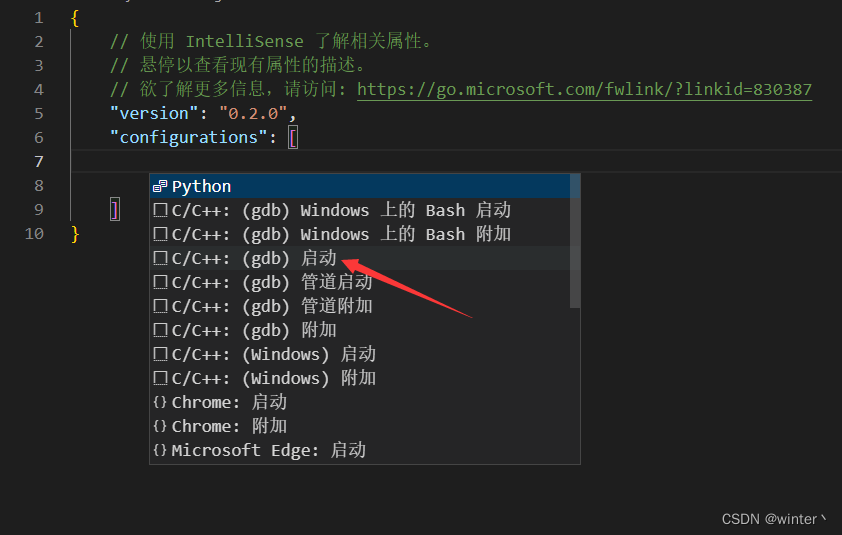
点击添加配置->选择C/C++(gdb)启动
生成后回到test.cpp文件中,点击终端->配置默认生成任务…
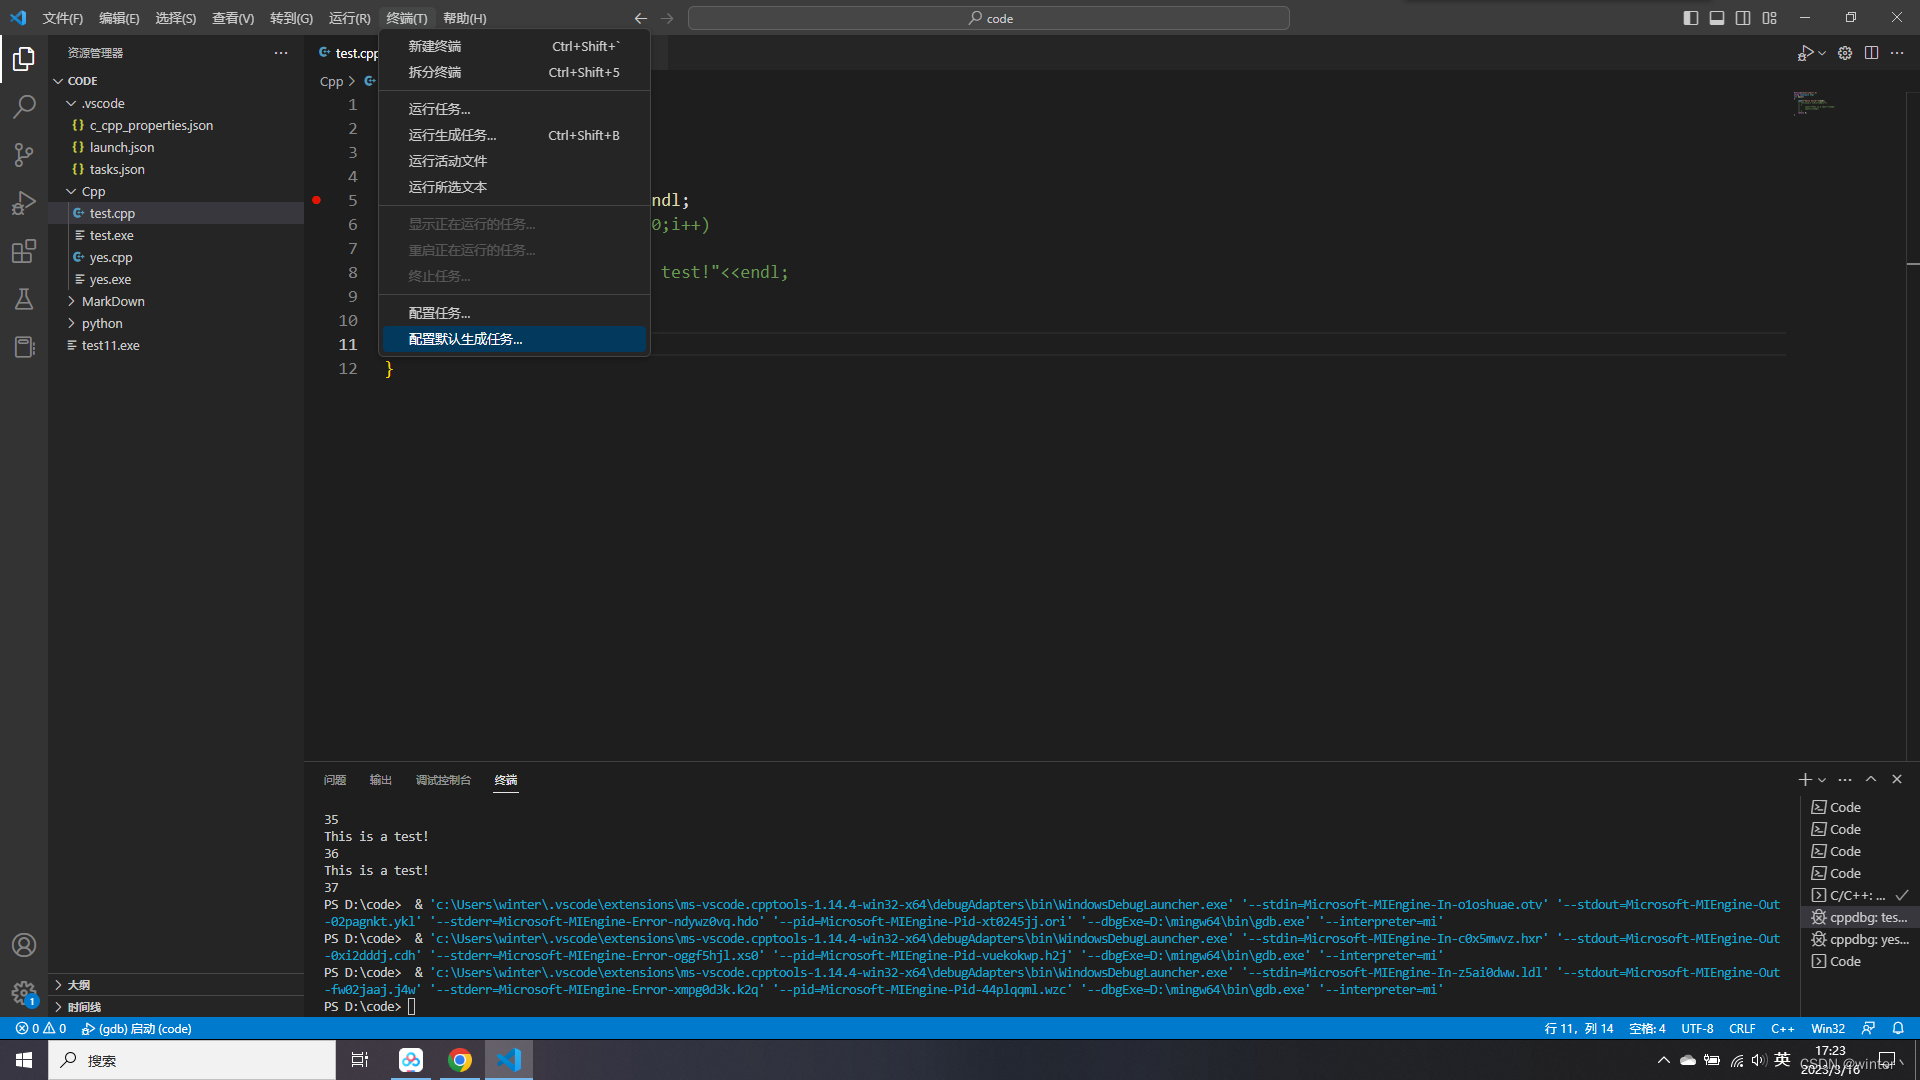

对生成的文件tasks.json与launch.json进行配置,第一步在launch.json加入
"preLaunchTask": "C/C++: g++.exe 生成活动文件"
- 1
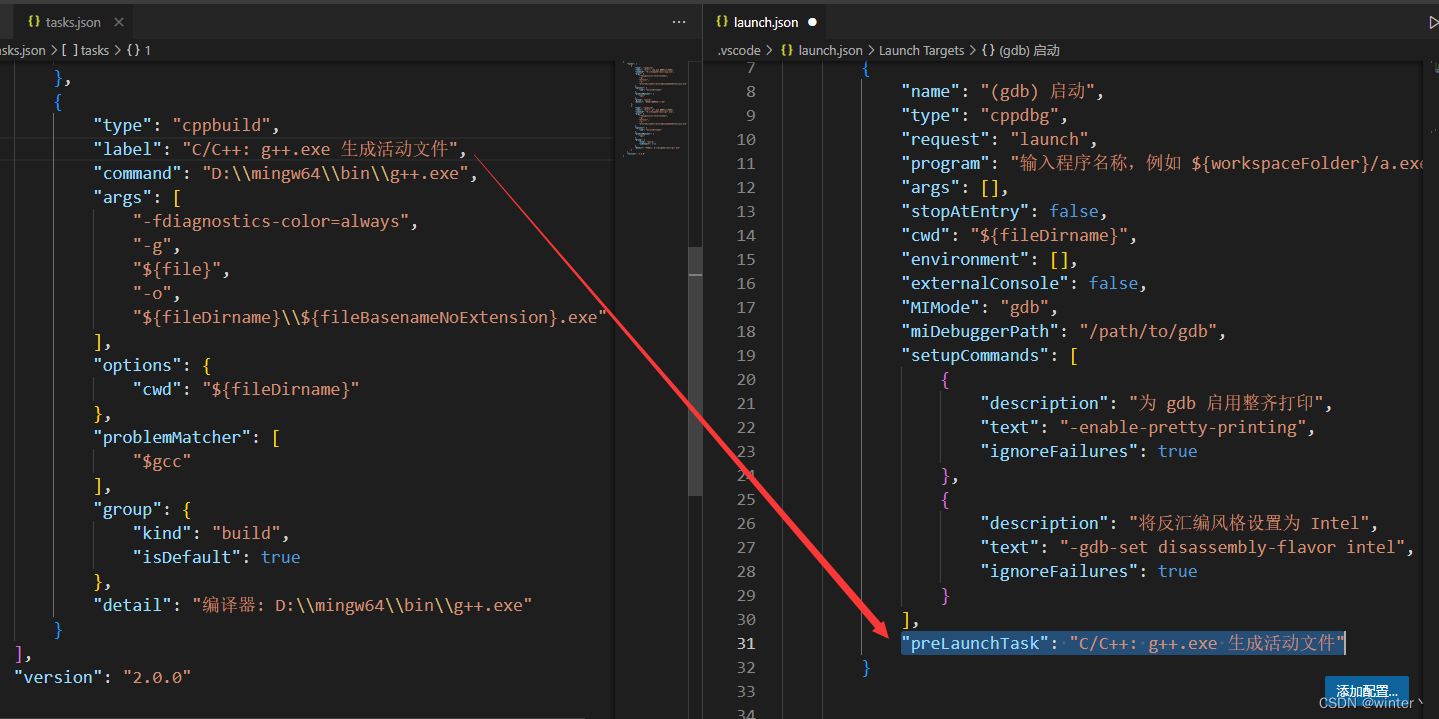
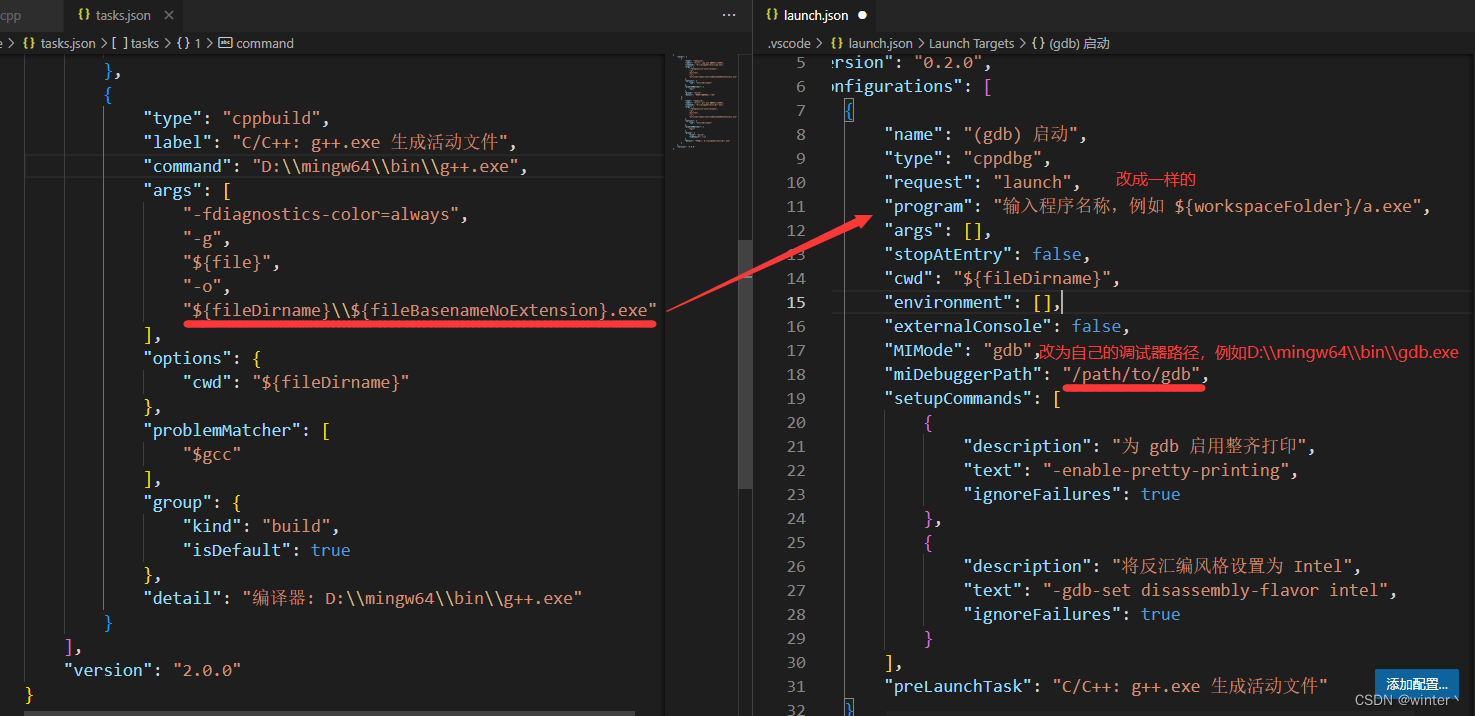
第二步,对launch.json进行如下修改
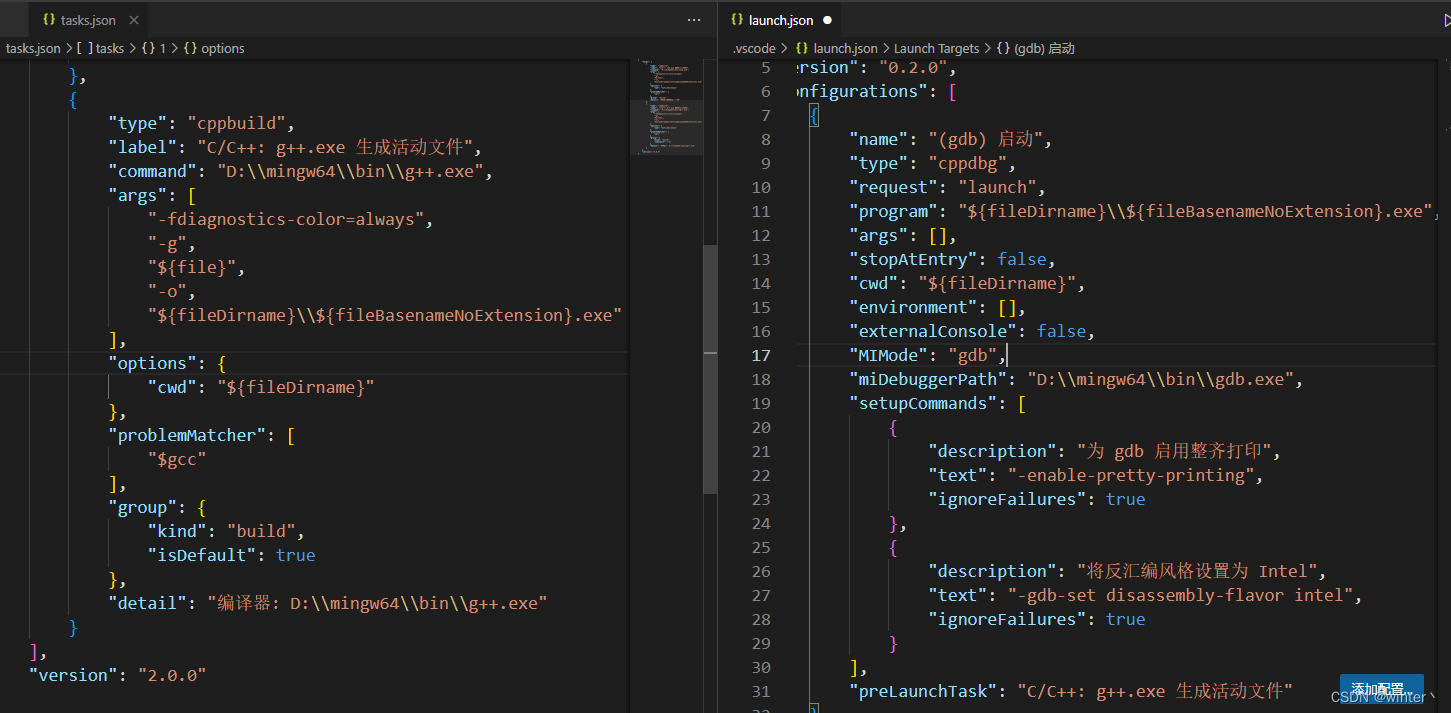
改好的tasks.json和launch.json文件如下图
将改好的文件保存,使用test.cpp测试一下
#include<bits/stdc++.h>
using namespace std;
int main()
{
    cout<<"hello world!"<<endl;
    for(size_t i=0;i<=100;i++)
    {
        cout<<"This is a test!"<<endl;
        cout<<i<<endl;
    }
    return 0;
}
- 1
- 2
- 3
- 4
- 5
- 6
- 7
- 8
- 9
- 10
- 11
- 12
在for循环内部两行代码打上断点,使用F5启动调试
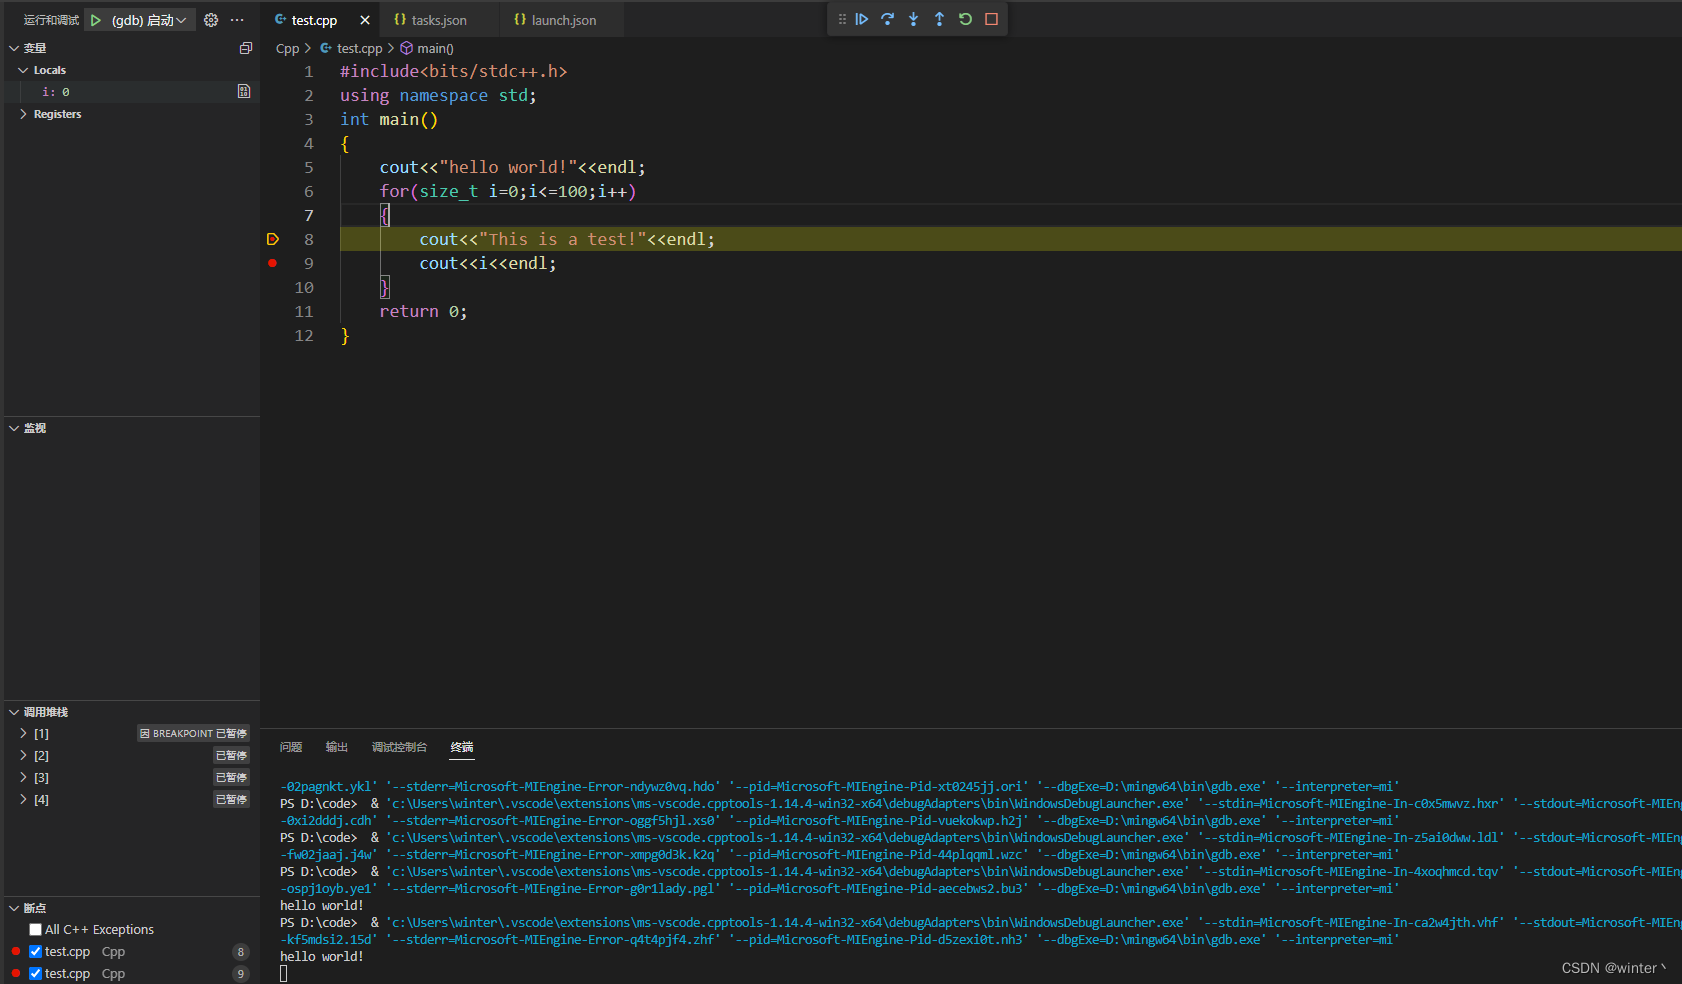
成功启动调试界面,使用步入按钮或者快捷键进行调试,程序正确运行
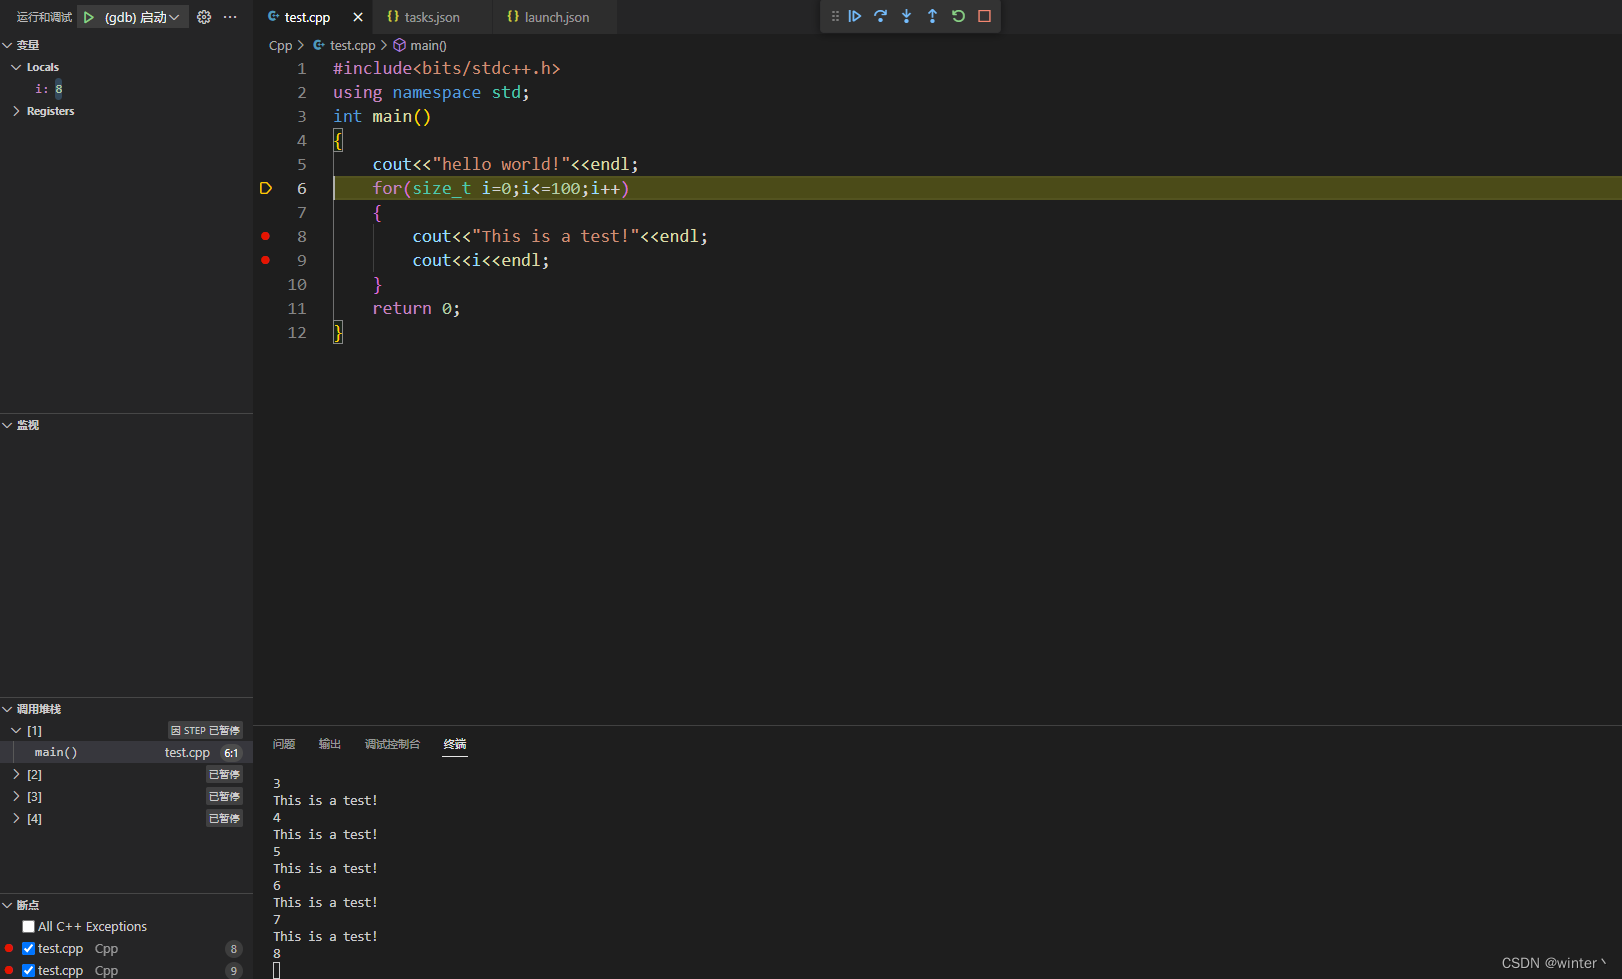
在test.cpp同目录下新建文件yes.cpp并在循环内部打上断点

#include<bits/stdc++.h>
using namespace std;
int main()
{
    long long sum=0;
    for(size_t i=0;i<100;i++)
    {
        sum+=i;
        cout<<sum<<endl;
    }
    return 0;
}
- 1
- 2
- 3
- 4
- 5
- 6
- 7
- 8
- 9
- 10
- 11
- 12
F5启动调试成功运行
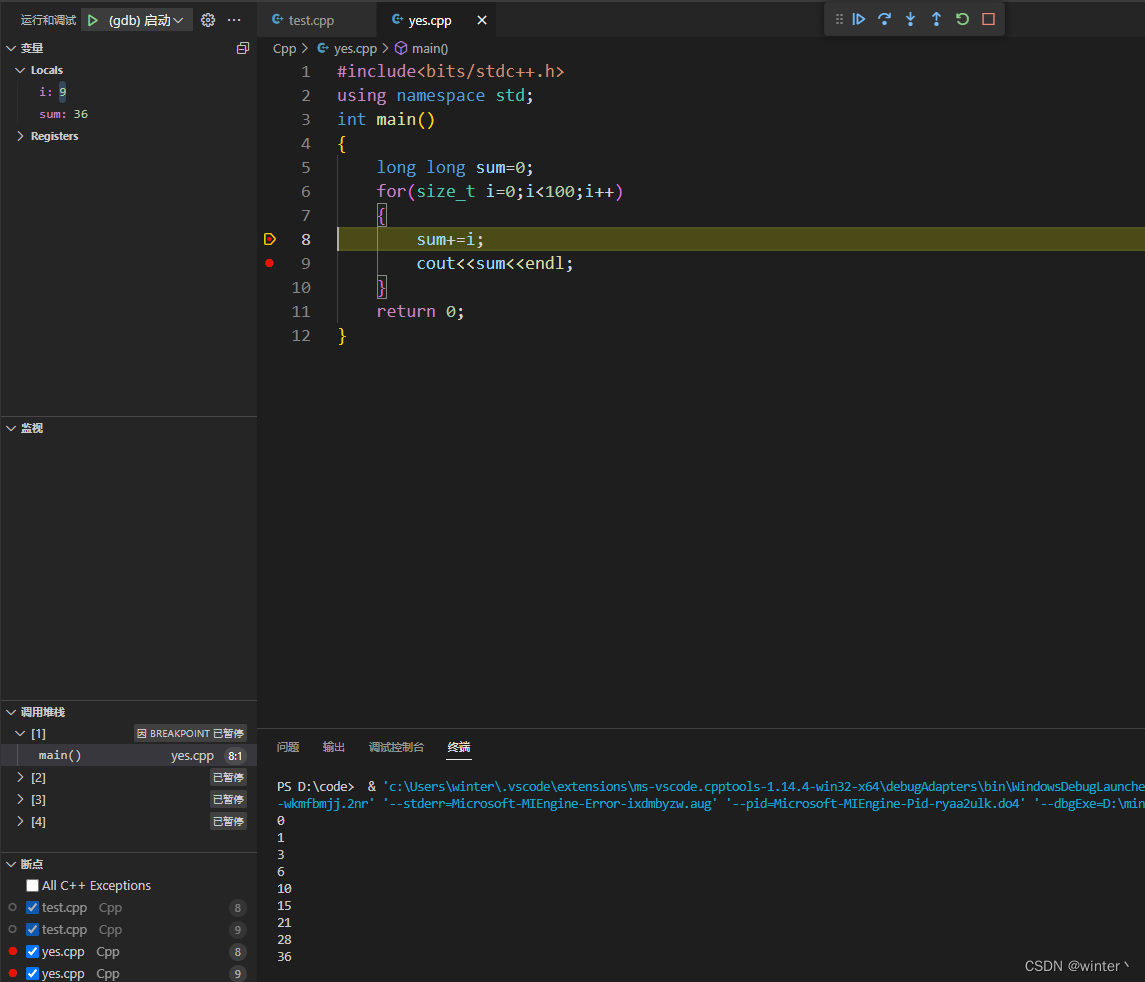
至此可以确保在当前目录下的所有.cpp文件均可使用配置后的tasks.json与launch.json进行调试
总结
本文介绍了C/C++在vscode中如何配置调试功能,利用调试功能可以更便于发现程序运行过程中存在的错误,相比于传统的手动模拟程序运行增加了一些效率。
本文介绍了Windows系统中配置方法并增加了一些适用性,wsl系统配置方法如下:
VScode 调试教程 tasks.json和launch.json的设置(超详细)
声明:本文内容由网友自发贡献,不代表【wpsshop博客】立场,版权归原作者所有,本站不承担相应法律责任。如您发现有侵权的内容,请联系我们。转载请注明出处:https://www.wpsshop.cn/w/盐析白兔/article/detail/65807
推荐阅读
相关标签


