
C++之Map&Set【AVL--VS--红黑树】
赞
踩
前言
在之前学习的STL中的Vector,List,Deque等都是属于序列式容器,序列容器就是以线性排列来存储某一指定类型的数据,并且该类容器并不会自动对存储的元素按照值的大小进行排序。今日所学习的Set,Map本质是一个平衡搜索二叉树,其中包含元素的值都是唯一的,按一定顺序,Set是直接通过key值进行读取和修改元素与 map关联容器不同,它只是单纯键的集合,Map是通过键值对进行查找。他们都是关联式容器,关联式容器也是用来存储数据的,与序列式容器不同的是,其里面存储的是<key,value>结构的键值对,在数据检索时比序列式容器效率更高
相信大家有一个疑问,为什么Set没有键值对为什么它还是关联式容器,因为Set它的内部存储是红黑树,是位置与值相关联。所以关联容器的判断标准并不是通过有无键值对进行判断。
目录
set的介绍
翻译:
● set是按照一定次序存储元素的容器
● 在set中,元素的value也标识它(value就是key,类型为T),并且每个value必须是唯一的。
set中的元素不能在容器中修改(元素总是const),但是可以从容器中插入或删除它们。
● 在内部,set中的元素总是按照其内部比较对象(类型比较)所指示的特定严格弱排序准则进行排序。
● set容器通过key访问单个元素的速度通常比unordered_set容器慢,但它们允许根据顺序对 子集进行直接迭代。
● set在底层是用二叉搜索树(红黑树)实现的。
注意:
● 与map/multimap不同,map/multimap中存储的是真正的键值对,set中只放value,但在底层实际存放的是由构成的键值对。
● set中插入元素时,只需要插入value即可,不需要构造键值对。
● set中的元素不可以重复(因此可以使用set进行去重)。
● 使用set的迭代器遍历set中的元素,可以得到有序序列
● set中的元素默认按照小于来比较
● set中查找某个元素,时间复杂度为:log^2 n ,如果用<algorithm>库的find,时间复杂度为:O(N)
● set中的元素不允许修改,因为修改后会破坏容器内元素的有序性,从而破坏set概念的完整性,引起set的非预期行为
● set中的底层使用二叉搜索树(红黑树)来实现。
set的使用
set的模板参数列表
template < class T,                        // set::key_type/value_type
           class Compare = less<T>,        // set::key_compare/value_compare
           class Alloc = allocator<T>      // set::allocator_type
           > class set;
T: set中存放元素的类型,实际在底层存储的键值对。
Compare:set中元素默认按照小于来比较
Alloc:set中元素空间的管理方式,使用STL提供的空间配置器管理
set的构造
| set的构造 | 函数声明 | 功能介绍 |
|---|---|---|
| empty (1) | explicit set (const key_compare& comp = key_compare(),
const allocator_type& alloc = allocator_type());
| 空容器构造函数 |
| range (2) | template <class InputIterator>
set (InputIterator first, InputIterator last,
const key_compare& comp = key_compare(),
const allocator_type& alloc = allocator_type());
| 范围构造函数; 用[first, last)区间中的元素构造set |
| copy (3) | set (const set& x); | set的拷贝构造 |
set的迭代器
| 函数声明 | 功能介绍 |
| begin | 返回set中起始位置元素的迭代器 |
| end | 返回set中末尾位置元素的迭代器 |
| 返回set第一个元素的反向迭代器,即end | |
| rend | 返回set最后一个元素下一个位置的反向迭代器, 即rbegin |
| cbegin | 返回set中起始位置元素后面的const迭代器 |
| cend | 返回set中最后一个元素后面的const迭代器 |
| crbegin | 返回set第一个元素的反向const迭代器,即cend |
| crend | 返回set最后一个元素下一个位置的反向const迭 代器,即crbegin |
set的容量
set修改操作
| 函数声明 | 功能介绍 |
| insert | 在set中插入元素x,实际插入的是构成的键值对,如果插入成功,返回<该元素在set中的位置,true>,如果插入失败,说明x在set中已经存在,返回<在set中的位置,false> |
| enderase | 删除set中position位置上的元素 |
| 交换set中的元素 | |
| clear | 将set中的元素清空 |
| find | 返回set中值为x的元素的位置 |
| count | 返回set中值为x的元素的个数 |
set的使用举例
- void Set_Test1()
- {
- set<int> s;
- s.insert(4);
- s.insert(7);
- s.insert(1);
- s.insert(15);
- s.insert(12);
- s.insert(18);
- s.insert(3);
-
- //set<int>::iterator it = s.begin();
- //for (auto e : s)
- //{
- // cout << *it << " ";
- // ++it;
- //}
- //cout << endl;
-
- //while (it != s.end())
- //{
- // cout << *it << " ";
- // ++it;
- //}
- //cout << endl;
-
- set<int>::iterator pos = s.find(15);
- cout << *pos << endl;
-
- set<int>::iterator it = s.begin();
-
- while (it != s.end())
- {
- cout << *it++ << " ";
- }
- cout << endl;
- s.erase(15);
-
- set<int>::iterator it1 = s.begin();
- while (it1 != s.end())
- {
- cout << *it1++ << " ";
- }
- cout << endl;
-
- cout << s.size() << endl;
- cout << s.max_size() << endl;
-
- //s.clear();
-
- //set<int>::iterator it2 = s.begin();
- //while (it2 != s.end())
- //{
- // cout << *it2++ << " ";
- //}
- //cout << endl;
-
- set<int> s1(s);
-
- set<int>::iterator it3 = s1.begin();
-
-
- for (auto e : s1)
- {
- cout << *it3 << " ";
- it3++;
- }
- cout << endl;
-
- //auto it4 = s1.find(7); //O(logN)
- auto it4 = find(s1.begin(), s1.end(), 7); //O(N)
- cout << *it4 << endl;
-
- }

键值对
用来表示具有一一对应关系的一种结构,该结构中一般只包含两个成员变量key和value,key代 表键值,value表示与key对应的信息。在学习二叉搜索树中,将其改成的KV树模型,就将原来参数<key_type>改成了<key_type,key_value>,之前是位置与值相关联,改之后是key与value相关联,通过key值找到对应value的信息,比如通过查找你的名字,就出现你的身份证信息,性别,居住地址等信息,这种键值对结构在日常生活中是经常使用的。
在Map中就会涉及键值对pair,class Alloc = allocator<pair<const Key,T> >,这里的pair其实就是一个结构体,通常是前面值用first,后面用second,代表前后的模板参数。需要注意:Key是不可以被修改,T是可以的。
SGI-STL中关于键值对的定义:
template <class T1, class T2>
struct pair {
typedef T1 first_type;
typedef T2 second_type;
T1 first;
T2 second;
pair(): first(T1()), second(T2())
{}
pair(const T1& a, const T2& b): first(a), second(b) {}
};
map的介绍
翻译:
● map是关联容器,它按照特定的次序(按照key来比较)存储由键值key和值value组合而成的元 素。
● 在map中,键值key通常用于排序和惟一地标识元素,而值value中存储与此键值key关联的 内容。键值key和值value的类型可能不同,并且在map的内部,key与value通过成员类型value_type绑定在一起,为其取别名称为pair: typedef pair value_type;
● 在内部,map中的元素总是按照键值key进行比较排序的。
● map中通过键值访问单个元素的速度通常比unordered_map容器慢,但map允许根据顺序 对元素进行直接迭代(即对map中的元素进行迭代时,可以得到一个有序的序列)。
● map支持下标访问符,即在[]中放入key,就可以找到与key对应的value。
● map通常被实现为二叉搜索树(更准确的说:平衡二叉搜索树(红黑树))。
map的使用
map的模板参数说明
template < class Key,                                     // map::key_type
           class T,                                       // map::mapped_type
           class Compare = less<Key>,                     // map::key_compare
           class Alloc = allocator<pair<const Key,T> >    // map::allocator_type
           > class map;
key: 键值对中key的类型
T: 键值对中value的类型
Compare: 比较器的类型,map中的元素是按照key来比较的,缺省情况下按照小于来比较,一般情况下(内置类型元素)该参数不需要传递,如果无法比较时(自定义类型),需要用户自己显式传递比较规则(一般情况下按照函数指针或者仿函数来传递)
Alloc:通过空间配置器来申请底层空间,不需要用户传递,除非用户不想使用标准库提供的空间配置器注意:在使用map时,需要包含头文件。
map的构造
| 函数声明 | 功能介绍 |
| 构造一个空的map |
map的迭代器
| 函数声明 | 功能介绍 |
| begin和end | begin:首元素的位置,end最后一个元素的下一个位置 |
| rbegin和rend | 与begin和end意义相同,但cbegin和cend所指向的元素不能修改 |
| cbegin和cend | 反向迭代器,rbegin在end位置,rend在begin位置,其 ++和--操作与begin和end操作移动相反 |
| crbegin和crend | 与rbegin和rend位置相同,操作相同, 但crbegin和crend所 指向的元素不能修改 |
map的容量与元素访问
| 函数声明 | 功能介绍 |
| empty | 检测map中的元素是否为空,是返回 true,否则返回false |
| size | 返回map中有效元素的个数 |
| operator[] | 返回去key对应的value |
对于operator[ ]还需要重点介绍,首先观察operator[]参数和返回值,传入参数key值,返回的是value的引用。传入key值通过关联关系找到value,还能对返回值value进行修改。
mapped_type& operator[] (const key_type& k);
下面函数关于perator[ ]的实现,首先我们需要清楚mapped_type()是调用value(second)的匿名对象,operator[ ]主要调用的insert。
mapped_type& operator[] (const key_type& k)
{
return (*((this->insert(make_pair(k,mapped_type()))).first)).second
}
insert的返回值pair<iterator,bool>,那再看看insert。
pair<iterator,bool> insert (const value_type& val);
Return value
The single element versions (1) return a pair, with its member pair::first set to an iterator pointing to either the newly inserted element or to the element with an equivalent key in the map. The pair::second element in the pair is set to true if a new element was inserted or false if an equivalent key already existed.
翻译:
insert返回值有两个参数,first被设置成迭代器指向插入一个新元素或映射到在map中key相等的元素。second被设置成true,如果已存在等效键则设置成false;
再度理解这段话的意思,如果插入新元素时存在等效键,second设置成false返回的是迭代器指向key映射的元素;如果插入新元素不存在等效键second设置成true,返回迭代器指向该元素。实际上在这里insert充当的是find功能,找到key然后对value进行操作。
为了更好的理解,我们将perator[ ]实现再度简化。
V& perator[ ](const K & K)
{
pair<iterator,bool> ret =insert (make_pair(K,V()));
return ret.first->second;
}
insert的pair返回的迭代器指向该元素位置(成功返回插入元素位置,失败则返回查找节点),该元素位置通过key再找到value。
insert的功能有三:插入,查找,修改
dict["insert"]; //插入
dict["迭代器"] = "itretor"; //插入+修改
dict["insert"] = "插入"; //修改
dict.insert(pair<string, string>("迭代器", "xxx")); //插入失败,搜索树只比较
cout << dict["迭代器"] << endl; //查找
注意:
在元素访问时,有一个与operator[ ]类似的操作at()(该函数不常用)函数,都是通过key找到与key对应的value然后返回其引用,不同的是:当key不存在时,operator[ ]用默认value与key构造键值对然后插入,返回该默认value,at()函数直接抛异常。
map中元素的修改
| 函数声明 | 功能简介 |
| 在map中插入键值对x,注意x是一个键值对, 返回值也是键值对:iterator代表新插入 元素的位置, bool代表释放插入成功 | |
| 删除position位置上的元素 | |
| 交换两个map中的元素 | |
| 将map中的元素清空 | |
| iterator find ( constkey_type& x ) | 在map中插入key为x的元素,找到返回该元 素的位置的迭代器,否则返回end |
| const_iterator find ( const key_type& x ) const | 在map中插入key为x的元素,找到返回该元 素的位置的const迭代器,否则返回cend |
| size_type count ( const key_type& x ) const | 返回key为x的键值在map中的个数,注意 map中key是唯一的,因此该函数的返回值 要么为0,要么为1,因此也可以用该函数来 检测一个key是否在map中 |
map的测试
- void Map_Test()
- {
- map<string, string> dict;
- dict.insert(pair<string, string>("排序", "sort"));
- dict.insert(pair<string, string>("查找", "find"));
- dict.insert(pair<string, string>("删除", "erase"));
- dict.insert(pair<string, string>("修改", "modify"));
- dict.insert(make_pair("交换", "swap"));
-
-
-
-
- //map<string, string>::iterator it = dict.begin();
- //用auto自动识别it类型
- auto it = dict.begin();
- while (it != dict.end())
- {
- //cout << (*it).first << ":"<< (*it).second << " ";
-
- //it -> oprate-> fist 通过指针指向结构的数据,数组中pair再指向first对应的数据
- cout << it->first << ":" << it->second << " ";
- ++it;
- }
- cout << endl;
-
- //记得加const 与& ,拷贝一颗树代价比较大,这里只是显示const + & 正好契合
- for (const auto& a : dict)
- {
- cout << a.first << ":" << a.second << " ";
- }
-
- }
注意:
● map中的的元素是键值对
● map中的key是唯一的,并且不能修改
● 默认按照小于的方式对key进行比较
● map中的元素如果用迭代器去遍历,可以得到一个有序的序列
● map的底层为平衡搜索树(红黑树),查找效率比较高$O(log_2 N)$
● 支持[ ]操作符,operator[ ]中实际进行插入查找。
multiset与multimap的介绍
翻译:
● multiset是按照特定顺序存储元素的容器,其中元素是可以重复的。
● 在multiset中,元素的value也会识别它(因为multiset中本身存储的就是组成 的键值对,因此value本身就是key,key就是value,类型为T). multiset元素的值不能在容器中进行修改(因为元素总是const的),但可以从容器中插入或删除。
● 在内部,multiset中的元素总是按照其内部比较规则(类型比较)所指示的特定严格弱排序准则进行排序。
● multiset容器通过key访问单个元素的速度通常比unordered_multiset容器慢,但当使用迭 代器遍历时会得到一个有序序列。
● multiset底层结构为二叉搜索树(红黑树)。
注意:
● multiset中再底层中存储的是的键值对
● mtltiset的插入接口中只需要插入即可
● 与set的区别是,multiset中的元素可以重复,set是中value是唯一的
● 使用迭代器对multiset中的元素进行遍历,可以得到有序的序列
● multiset中的元素不能修改
● 在multiset中找某个元素,时间复杂度为$O(log_2 N)$
● multiset的作用:可以对元素进行排序
翻译:
● Multimaps是关联式容器,它按照特定的顺序,存储由key和value映射成的键值对,其中多个键值对之间的key是可以重复的。
● 在multimap中,通常按照key排序和惟一地标识元素,而映射的value存储与key关联的内 容。key和value的类型可能不同,通过multimap内部的成员类型value_type组合在一起,
value_type是组合key和value的键值对: typedef pair value_type;
●在内部,multimap中的元素总是通过其内部比较对象,按照指定的特定严格弱排序标准对
key进行排序的。
●multimap通过key访问单个元素的速度通常比unordered_multimap容器慢,但是使用迭代 器直接遍历multimap中的元素可以得到关于key有序的序列。
● multimap在底层用二叉搜索树(红黑树)来实现。
注意:multimap和map的唯一不同就是:map中的key是唯一的,而multimap中key是可以 重复的。
multiset与multimap的使用
multiset和multimap的使用与set和map的使用基本是相差无几的,相信大家经过上面的学习,然后再参考文档,对于multiset和multimap的使用应该不成问题。
需要注意的是为什么multimap中没有重载operator[ ]操作,原因是multimap中有重复key值,如果通过key返回value时是不知道那个key与value相关联的。

在OJ中的使用
需要注意的是,这里由于稳定性原因不能使用sort,可以使用stable_sort,当两个值相等时,stable_sort可以比较等效值元素的相对顺序。这个如果使用greater就是调用pair,pair的比较特性是会对first与second都作比较,这里我们只需要比较first,然后根据值相同再比较等效值元素的相对顺序即可。
pair比较的实现:
- template <class T1, class T2>
- bool operator< (const pair<T1,T2>& lhs, const pair<T1,T2>& rhs)
- {
- return lhs.first<rhs.first || (!(rhs.first<lhs.first)
- && lhs.second<rhs.second);
- }
代码演示:
- class Solution {
- public:
- struct Compare
- {
- bool operator()(const pair<int ,string>& l, const pair<int ,string>& r)
- {
- return l.first > r.first ;
- }
- };
-
- vector<string> topKFrequent(vector<string>& words, int k) {
- map<string,int> countTree;
- for(auto ret : words)
- {
- countTree[ret]++;
- }
-
- vector<pair<int,string>> v;
- for(auto kv : countTree)
- v.push_back(make_pair(kv.second,kv.first));
-
- stable_sort(v.begin(),v.end(),Compare());
-
- vector<string> ret;
- for(size_t i=0;i< k ; ++i)
- {
- ret.push_back(v[i].second);
- }
-
- return ret;
- }
- };
如果是想使用sort,其实也是能实现的,直接改变Compair的比较逻辑,通过first比较大小,如果first相等时就可以比较second的元素顺序。
- struct Compare
- {
- bool operator()(const pair<int, string>& l, const pair<int, string>& r)
- {
- return l.first > r.first || (l.first == r.first && l.second > r.second);
- };
直接set起到去重和排序的功能,再通过双指针的方法进行取两数交集。
代码演示:
- class Solution {
- public:
- vector<int> intersection(vector<int>& nums1, vector<int>& nums2) {
- set<int> s1(nums1.begin(),nums1.end());
- set<int> s2(nums2.begin(),nums2.end());
- vector<int> ret;
-
- auto st1 = s1.begin();
- auto st2 = s2.begin();
-
- while( st1!=s1.end() && st2!=s2.end())
- {
- if(*st1 ==*st2)
- {
- ret.push_back(*st1);
- ++st1;
- ++st2;
- }
- else if(*st1 < *st2)
- {
- ++st1;
- }
- else
- ++st2;
-
- }
- return ret;
- }
- };
AVL树
AVL树的概念
二叉搜索树虽可以缩短查找的效率,但如果数据有序或接近有序二叉搜索树将退化为单支树,查 找元素相当于在顺序表中搜索元素,效率低下。

因此,两位俄罗斯的数学家G.M.Adelson-Velskii和E.M.Landis在1962年发明了一种解决上述问题的方法:当向二叉搜索树中插入新结点后,如果能保证每个结点的左右子树高度之差的绝对值不超过1(需要对树中的结点进行调整),即可降低树的高度,从而减少平均搜索长度。
一棵AVL树或者是空树,或者是具有以下性质的二叉搜索树:
●它的左右子树都是AVL树
●左右子树高度之差(简称平衡因子)的绝对值不超过1(-1/0/1)
如果一棵二叉搜索树是高度平衡的,它就是AVL树。如果它有n个结点,其高度可保持在$O(log_2 n)$,搜索时间复杂度O($log_2 n$)。
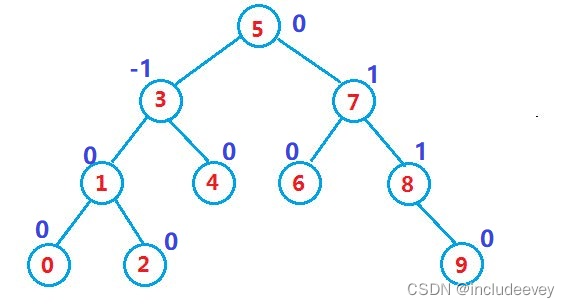
AVL树节点的定义
AVL树与搜索二叉树相比,AVL树会新增_parent节点和_bf,_bf(平衡因子)是为了记录左右子树的高度差,_parent(该节点的双亲)是为了在插入阶段的时候,避免节点链接的丢失。
templateclass T>
struct AVLTreeNode
{
pair<K, V> _kv;
AVLTreeNode<K, V>* _left; // 该节点的左孩子
AVLTreeNode<K, V>* _right; // 该节点的右孩子
AVLTreeNode<K, V>* _parent; // 该节点的双亲int _bf; // balance factor
AVLTreeNode(const T& data)
:_kv(kv)
, _left(nullptr)
, _right(nullptr)
, _parent(nullptr)
, _bf(0)
{}};
AVL树的插入(重)
对于AVL树的学习,我们采用分段式理解,AVL树在搜索二叉树的基础上引入了平衡因子,因此也可以将AVL树看做搜索二叉树,前面的步骤基本一样:先判断插入是否为nullptr,如果为nullptr直接在 _root 插入节点,如果不为nullptr就通过查找确定插入位置,插入时需要判断(插入值的大小)后选择插入在左子树还是右子树。
前部分代码如下:
- bool Insert(const pair<K, V>& kv)
- {
- if (_root == nullptr)
- {
- _root = new Node(kv);
- return true;
- }
-
- Node* parent = nullptr;
- Node* cur = _root;
- while (cur)
- {
- if (cur->_kv.first < kv.first)
- {
- parent = cur;
- cur = cur->_right;
- }
- else if (cur->_kv.first > kv.first)
- {
- parent = cur;
- cur = cur->_left;
- }
- else
- {
- return false;
- }
- }
-
- cur = new Node(kv);
- if (parent->_kv.first < kv.first)
- {
- parent->_right = cur;
- cur->_parent = parent;
- }
- else
- {
- parent->_left = cur;
- cur->_parent = parent;
- }
- }
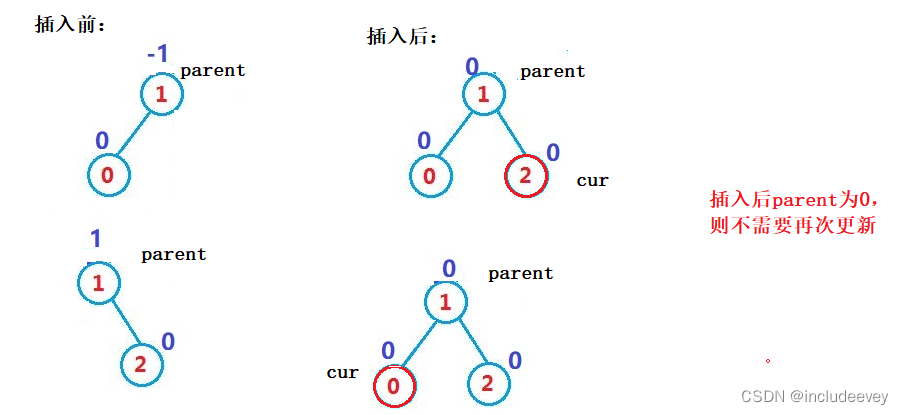
当先按照二叉搜索树的规则将节点插入到AVL树中后,新节点插入后,AVL树的平衡性可能会遭到破坏,此时就需要更新平衡因子。更新规则如下:
●新增在右子树,子树的父亲节点的平衡因子则++
●新增在左子树,子树的父亲节点的平衡因子则- -
●判断条件: cur==parent ->_left , cur==parent ->_right

当经过简单的更新后,我们发现并不能解决全部问题,平衡因子的范围(0,1,-1),我们通过++,- -在有些情况下会使得平衡因子变成(2,-2)。所以更新平衡因子后还需要考虑情况,这三种情况分别是:
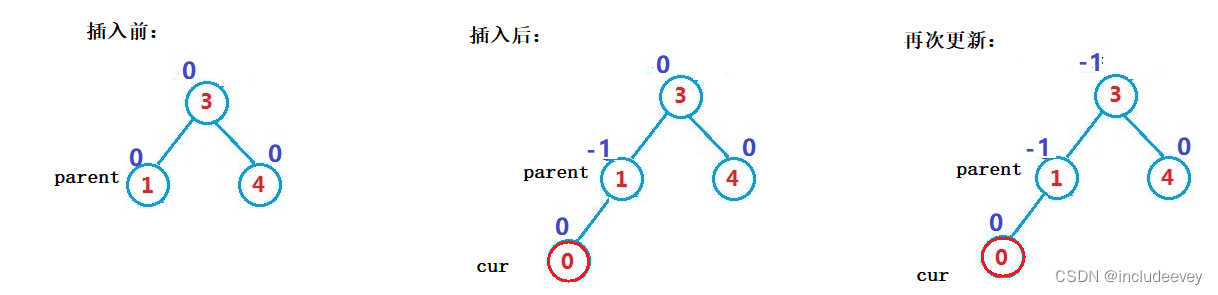
●如果Parent的平衡因子为 0,说明插入之前Parent的平衡因子为正负1,插入后被调整成 0,此时满足AVL树的性质,插入成功
●如果Parent的平衡因子为正负1,说明插入前Parent的平衡因子一定为 0,插入后被更新成正负1,此时以Parent为根的树的高度增加,需要继续向上更新。
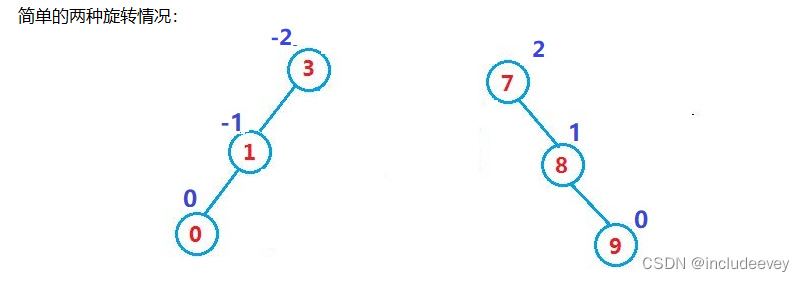
● 如果Parent的平衡因子为正负2,则Parent的平衡因子违反平衡树的性质,需要对其进行旋转处理
前两种情况代码如下,旋转后续在做深究:
- while (pParent)
- {
-
- // 更新双亲的平衡因子
- if (cur == parent->_left)
- {
- parent->_bf--;
- }
- else
- {
- parent->_bf++;
- }
-
- // 更新后检测双亲的平衡因子
- if (parent->_bf == 0)
- {
- break;
- }
- else if (parent->_bf == 1 || parent->_bf == -1)
- {
- cur = parent;
- parent = parent->_parent;
- }
- // 插入前双亲的平衡因子是0,插入后双亲的平衡因为为1 或者 -1 ,说明以双亲为根的二叉树
- // 的高度增加了一层,因此需要继续向上调整
-
- else if ()
- {
- // 双亲的平衡因子为正负2,违反了AVL树的平衡性,需要对以Parent
- // 为根的树进行旋转处理
- if(2 == Parent->_bf)
- {
- // ...
-
- }
- else
- {
- // ...
-
- }
- }
- return true;
- }
AVL树的旋转(重)
当插入后平衡因子不是(-1 0 1),说明AVL树已经不具备平衡性了。所以就需要对AVL树进行旋转,使得它满足平衡性。上述已经表明插入后parent的平衡因子为(2 || -2)说明满足旋转条件,旋转还需要根据节点插入位置的不同,AVL树的旋转分为四种:左单旋,右单旋,先左单旋再右单旋 ,先右单旋再左单旋 。
旋转的企图有四点:
●让这颗子树左右高度不超过1
●旋转过程中继续保持他是搜索树
●更新调整孩子节点的平衡因子
●让这颗子树的高度跟插入前保持一致
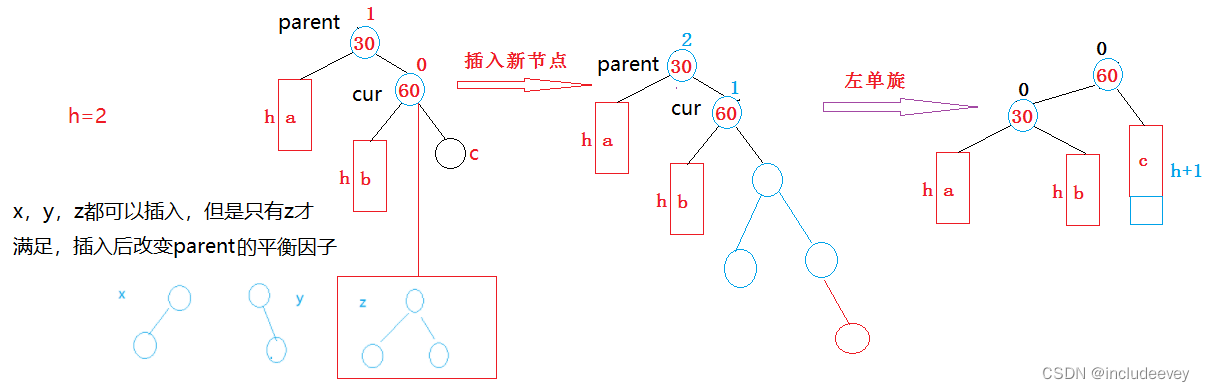
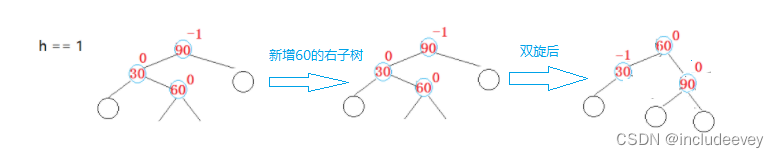
新节点插入较高右子树的右侧---右右:左单旋
首先我们应该明白这个图形的由来,当插入后parent的平衡因子为正2时,就表明未插入时parent为正1,又因为插入后parent的平衡因子需要增加,所以cur的平衡因子为0插入后会改变parent的平衡因子。

如上图在插入前,AVL树是平衡的,新节点插入到60的右子树(注意:此处不是右孩子)中,60右子树增加了一层,导致以30为根的二叉树不平衡,要让30平衡,只能将30右子树的高度减少一层,左子树增加一层,即将右子树往上提,这样30转下来,因为30比60小,只能将其放在60的左子树,而如果60有左子树,左子树根的值一定大于30,小于60,只能将其放在30的右子树,旋转完成后,更新节点的平衡因子即可。
上述是抽象图,h可以代表不同的高度,例如h=0时就此时的60就没有左子树,那么就不需要将60的左子树链接到30的右子树,如图:

当h=1时,c的左子树链接到30的右子树,60的左子树链接30,所以这个过程需要新建节点subR,subRL,避免链接时节点丢失,如图:

当h=2时,如图所示:
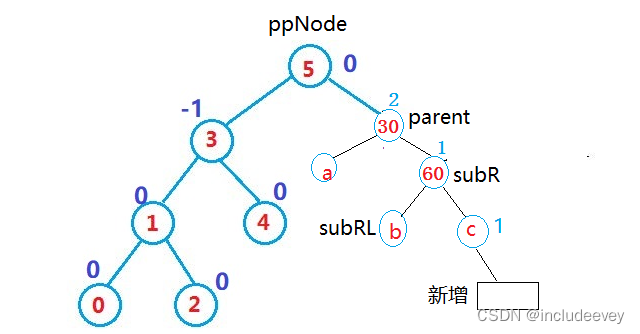
还有一点需要注意的是,当我们旋转之后,我们也不能确定parent就是_root,parent也有可能是别人的左子树或右子树,所以在操作之前就应该新建ppNode来保存parent->_parent。如果ppNode指向的左子树等于parent,parent就链接到ppNode->left,否则相反。如图所示:
这些逻辑都理清楚后,就是代码的实现,如下:
- //左单选
- void RotateL(Node* parent)
- {
- Node* subR = parent->_right;//parent的右子树节点
- Node* subRL = subR->_left;//parent右子树的左子树节点
-
- parent->_right = subRL;
-
- //当右子树为nullptr,则不需要进行链接父亲节点
- if (subRL)
- subRL->_parent = parent;
-
- Node* ppNode = parent->_parent;//parent的双亲节点
- subR->_left = parent;
- parent->_parent = subR;
-
- //if(parent == _root)
- if (ppNode == nullptr)
- {
- _root = subR;
- _root->_parent = nullptr;
- }
- else
- {
- if (ppNode->_left == parent)
- {
- ppNode->_left = subR;
- }
- else
- {
- ppNode->_right = subR;
- }
-
- subR->_parent = ppNode;
- }
-
- //更新平衡因子
- parent->_bf = subR->_bf = 0;
- }
新节点插入较高左子树的左侧---左左:右单旋
右单选实质跟左单旋的实现大差不差,这里就不深究,代码实现如下:
- //右单旋
- void RotateR(Node* parent)
- {
- Node* subL = parent->_left;
- Node* subLR = subL->_right;
-
- parent->_left = subLR;
- if (subLR)
- {
- subLR->_parent = parent;
- }
-
- Node* ppNode = parent->_parent;
- subL->_right = parent;
- parent->_parent = subL;
-
- //if (_root == parent)
- if (ppNode == nullptr)
- {
- _root = subL;
- _root->_parent = nullptr;
- }
- else
- {
- if (ppNode->_left == parent)
- {
- ppNode->_left = subL;
- }
- else
- {
- ppNode->_right = subL;
- }
-
- subL->_parent = ppNode;
- }
-
- subL->_bf = parent->_bf = 0;
- }
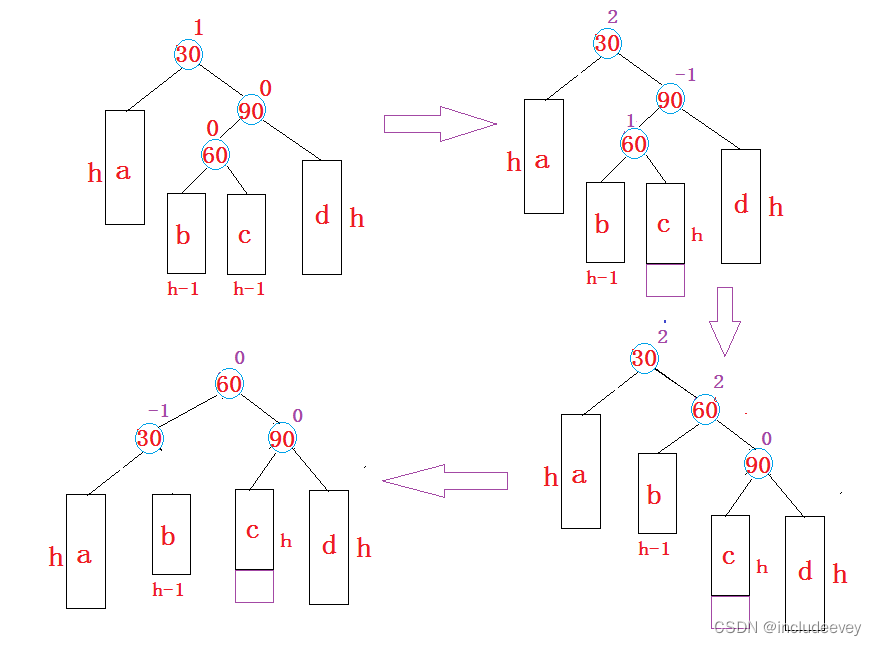
新节点插入较高左子树的右侧---左右:先左单旋再右单旋
在一些特定的情况下,我们发现仅仅是通过左单旋或者右单旋是不能解决问题的,例如下面的情况,左单旋后parent的平衡因子还是没有改变。
所以就需要先左单旋再右单旋,那么这里的左单旋是对parent的左子树(30),然后再对parent(90)进行右单旋。
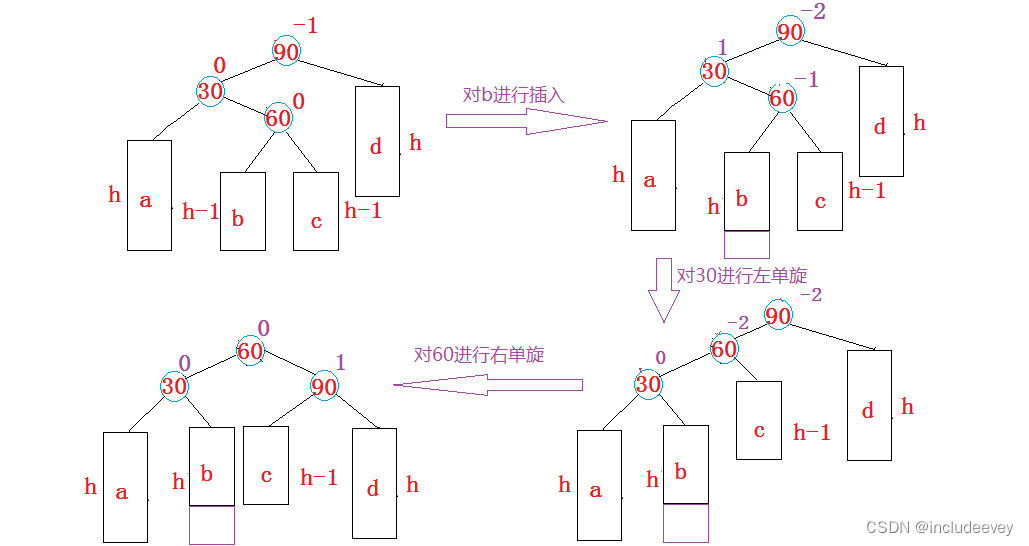
这里还需要根据不同的情况进行分析,例如当h=0的时候,60自己就是新增,当我们对30进行左旋,60进行右旋,我们发现他们的平衡因子都为0。

当h=1的时候,不管我们插入60的左子树,还是右子树,都会使得90的平衡因子为-2,30的平衡因子为1。但通过双旋后60的插入的是左子树,那么原来90的右子树为1,现在60的右子树为nullptr,不对90的右子树发生链接,所以最后90的平衡因子为1。

相反如果新增60的右子树,90的平衡因子为0,30的平衡因子为-1。
关于左右双旋代码,我们通过分析得知,它不仅仅是直接左旋父亲的左子树,右旋父亲节点就可以的,还需要判断父亲的左子树的平衡因子数,所以定义一个bf来记录父亲的左子树的平衡因子数,如果是subLR左子树插入,parent为1,subL为0,如果是subLR右子树插入则相反,代码如下:
- //先左单旋再右单旋
- void RotateLR(Node* parent)
- {
- Node* subL = parent->_left;
- Node* subLR = subL->_right;
- int bf = subLR->_bf;
-
- RotateL(parent->_left);
- RotateR(parent);
-
- if (bf == -1) // subLR左子树新增
- {
- subL->_bf = 0;
- parent->_bf = 1;
- subLR->_bf = 0;
- }
- else if (bf == 1) // subLR右子树新增
- {
- parent->_bf = 0;
- subL->_bf = -1;
- subLR->_bf = 0;
- }
- else if (bf == 0) // subLR自己就是新增
- {
- parent->_bf = 0;
- subL->_bf = 0;
- subLR->_bf = 0;
- }
- else
- {
- assert(false);
- }
- }
新节点插入较高右子树的左侧---右左:先右单旋再左单旋
右左双旋与左右双旋也基本是一样的,相信大家都自己理解了,这里都不用过多的介绍,代码如下:
- void RotateRL(Node* parent)
- {
- Node* subR = parent->_right;
- Node* subRL = subR->_left;
-
- int subRL_fd = subRL->_bf;
-
- RotateR(parent->_right);
- RotateL(parent);
-
- if (subRL_fd == 1)
- {
- subRL->_bf = 0;
- subR->_bf = 0;
- parent->_bf = -1;
- }
- else if (subRL_fd == -1)
- {
- subRL->_bf = 0;
- subR->_bf = 1;
- parent->_bf = 0;
- }
- else if (subRL_fd == 0)
- {
- subRL->_bf = 0;
- subR->_bf = 0;
- parent->_bf = 0;
- }
- else
- {
- assert(false);
- }
- }
AVL树的验证
AVL树是在二叉搜索树的基础上加入了平衡性的限制,因此要验证AVL树,可以分两步:
●验证其为二叉搜索树
○如果中序遍历可得到一个有序的序列,就说明为二叉搜索树
●验证其为平衡树
○每个节点子树高度差的绝对值不超过1(注意节点中如果没有平衡因子)
○节点的平衡因子是否计算正确
- //打印高
- int Height(Node* root)
- {
- if (root == nullptr)
- return 0;
-
- int lh = Height(root->_left);
- int rh = Height(root->_right);
-
- return lh > rh ? lh + 1 : rh + 1;
- }
-
- //判断是否为平衡二叉树
- bool IsBalance(Node* root)
- {
- if (root == nullptr)
- {
- return true;
- }
-
- int leftHeight = Height(root->_left);
- int rightHeight = Height(root->_right);
-
- if (rightHeight - leftHeight != root->_bf)
- {
- cout << root->_kv.first << "平衡因子异常" << endl;
- return false;
- }
-
- return abs(rightHeight - leftHeight) < 2
- && IsBalance(root->_left)
- && IsBalance(root->_right);
- }
验证用例:
- void TestAVLTree()
- {
- srand(time(0));
- const size_t N = 100000;
- AVLTree<int, int> t;
- for (size_t i = 0; i < N; ++i)
- {
- size_t x = rand();
- t.Insert(make_pair(x, x));
- //cout << t.IsBalance() << endl;
- }
-
- //t.Inorder();
-
- cout << t.IsBalance() << endl;
- }
AVL树的删除(了解)
AVL树也是二叉搜索树,可按照二叉搜索树的方式将节点删除,然后再更新平衡因子,只不过与删除不同的是,删除节点后的平衡因子更新,最差情况下一直要调整到根节点的位置。 具体实现可参考《算法导论》或《数据结构-用面向对象方法与C++描述》殷人昆版。
AVL树的性能
AVL树是一棵绝对平衡的二叉搜索树,其要求每个节点的左右子树高度差的绝对值都不超过1,这 样可以保证查询时高效的时间复杂度,即$log_2 (N)$。但是如果要对AVL树做一些结构修改的操 作,性能非常低下,比如:插入时要维护其绝对平衡,旋转的次数比较多,更差的是在删除时, 有可能一直要让旋转持续到根的位置。因此:如果需要一种查询高效且有序的数据结构,而且数 据的个数为静态的(即不会改变),可以考虑AVL树,但一个结构经常修改,就不太适合。
红黑树
上面介绍了AVL树,对于现在学习的红黑树来说是降低了难度的,但红黑树是比较抽象的,故此对于树的学习我们应该多画图来弥补我们想象的不足。总的来说红黑树的难度是比AVL简单的,因为红黑树是通过调节节点的颜色来减少旋转,调节节点的颜色则主要是为了控制左右子树在合适的路径长度进行旋转,左右子树的最大路径长呈约两倍关系。
红黑树的概念
红黑树,是一种二叉搜索树,但在每个结点上增加一个存储位表示结点的颜色,可以是Red或Black。 通过对任何一条从根到叶子的路径上各个结点着色方式的限制,红黑树确保没有一条路径会比其他路径长出俩倍,因而是接近平衡的。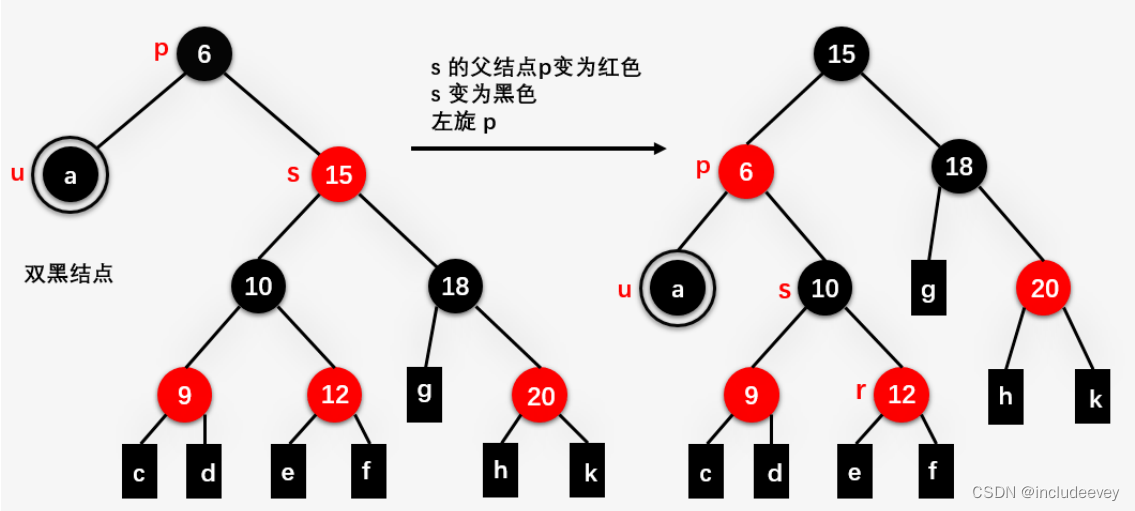
红黑树的性质
●每个结点不是红色就是黑色
●根节点是黑色的
●如果一个节点是红色的,则它的两个孩子结点是黑色的
●对于每个结点,从该结点到其所有后代叶结点的简单路径上,均包含相同数目的黑色结点
●每个叶子结点都是黑色的(此处的叶子结点指的是空结点)
思考:为什么满足上面的性质,红黑树就能保证:其最长路径中节点个数不会超过最短路径节点 个数的两倍?

红黑树节点的定义
为了更好的代码阅读性,这里用枚举0代表红色,1代表B黑色。与AVL树不同的是删除了平衡因子,增加了颜色节点。
- enum Colour
- { RED, BLACK,};
-
- template<class K, class V>
- struct RBTreeNode
- {
- pair<K, V> _kv;
- RBTreeNode<K, V>* _left;
- RBTreeNode<K, V>* _right;
- RBTreeNode<K, V>* _parent;
- Colour _col;
-
- RBTreeNode(const pair<K, V>& kv)
- :_kv(kv)
- , _left(nullptr)
- , _right(nullptr)
- , _parent(nullptr)
- , _col(RED)
- {}
- };
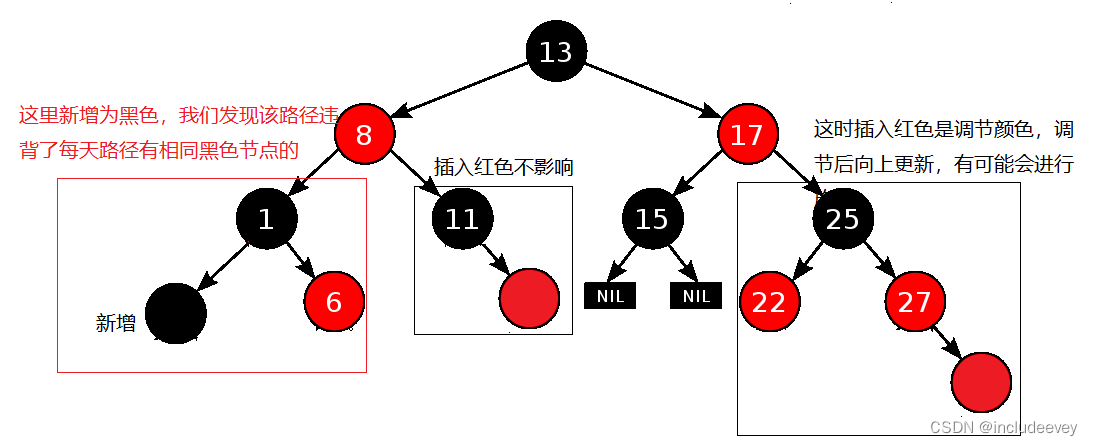
思考:在节点的定义中,为什么要将节点的默认颜色给成红色的?
插入红色节点树的性质可能不会改变,而插入黑色节点每次都会违反性质4。将节点设置为红色在插入时对红黑树造成的影响是小的,而黑色是最大的。所以将节点默认设置成红色,是为了尽可能减少在插入新节点对红黑树造成的影响。
红黑树结构
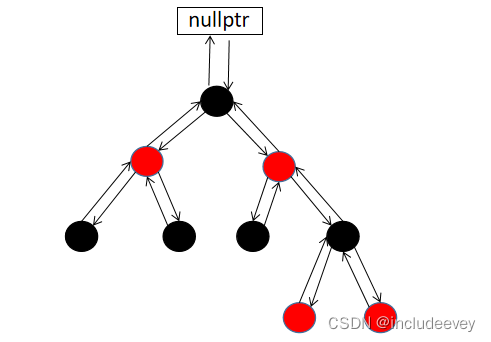
为了后续实现关联式容器简单,红黑树的实现中增加一个头结点,因为跟节点必须为黑色,为了 与根节点进行区分,将头结点给成黑色,并且让头结点的 Parent 域指向红黑树的根节点,Left域指向红黑树中最小的节点,Right域指向红黑树中最大的节点,如下:

红黑树的插入操作
红黑树是在二叉搜索树的基础上加上其平衡限制条件,因此红黑树的插入可分为两步:
●按照二叉搜索的树规则插入新节点
红黑树的插入也是一样的,如果插入时头结点为nullptr,直接对头节点(_root)进行插入操作,并将节点颜色设置成黑色,如果头节点为红色则无法向上调节(parent和cur为红则需要调节)。处理好头节点后,就按照二叉搜索的规则插入新节点,先通过循环找到插入节点(如果插入节点值大往右走,如果插入节点值小则相反)。找到节点后,判断好插入是在父亲的左边还是右边。
- bool Insert(const pair<K, V>& kv)
- {
- if (_root == nullptr)
- {
- _root = new Node(kv);
- _root->_col = BLACK;
- return true;
- }
-
- Node* parent = nullptr;
- Node* cur = _root;
-
- while (cur)
- {
- if (cur->_kv.first < kv.first)
- {
- parent = cur;
- cur = cur->_right;
-
- }
- else if (cur->_kv.first > kv.first)
- {
- parent = cur;
- cur = cur->_left;
- }
- else
- return false;
- }
-
- cur = new Node(kv);
- cur->_col = RED;
-
- if (parent->_kv.first < kv.first)
- {
- parent->_right = cur;
- parent = parent->_parent;
- }
- else
- {
- parent->_left = cur;
- parent = parent->_parent;
- }
- //..................................、
- //..................................
- }
●检测新节点插入后,红黑树的性质是否造到破坏
这里主要讨论的是左边插入,红黑树被破坏的情况。
插入后,我们就需要通过红黑树的性质来判断该树是否被破坏,如果被破坏我们又应该怎么样处理,不同的情况处理的方法也不一样。首先大家都知道插入是默认节点颜色是红色,因此双亲节点的颜色就应该是黑色,没有违法红黑树性质就不需要调整。但当我们插入的节点是红色并且它的双亲节点也是红色时,就违法了性质三:不能有连在一起的红色节点,此时需要对红黑树分情况来讨论:
约定: cur为当前节点,p(parent)为父节点,g(grandfather)为祖父节点,u(uncle)为叔叔节点
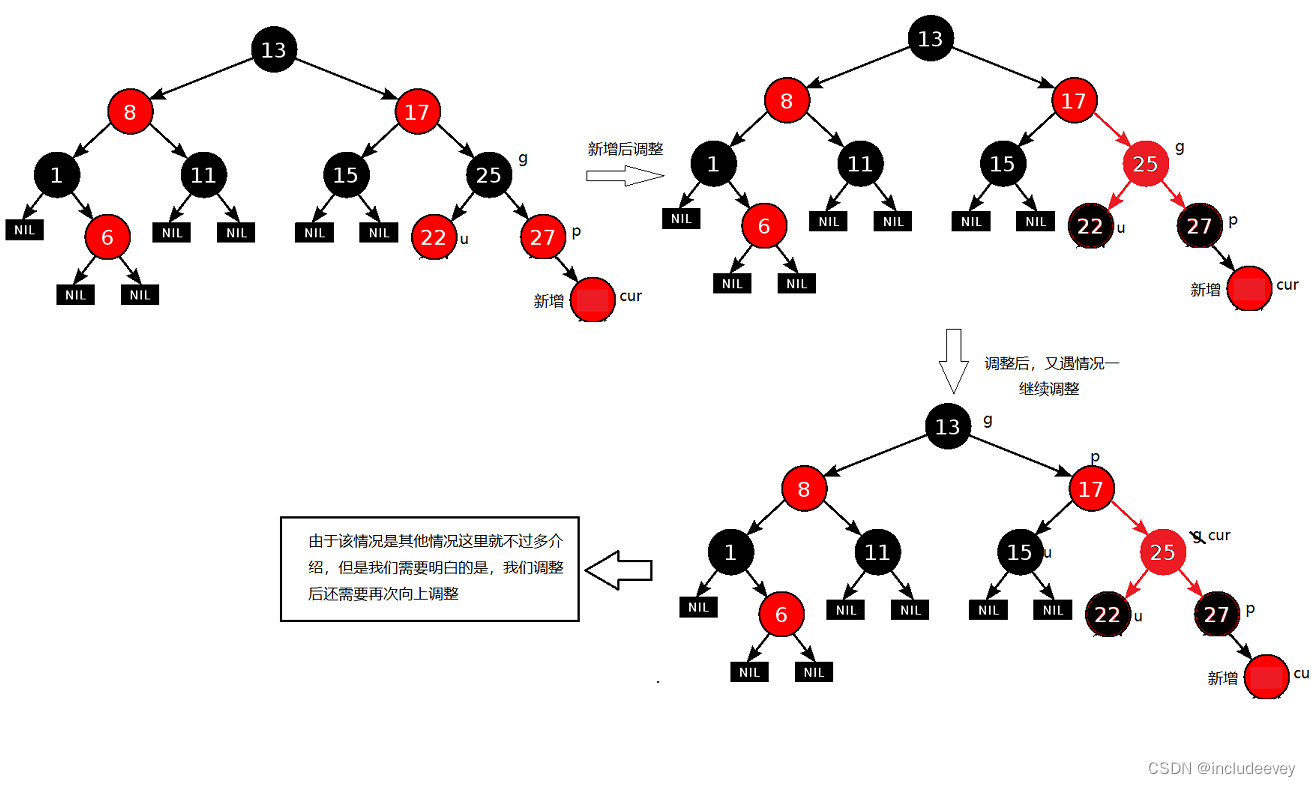
○情况一: cur为红,p为红,g为黑,u存在且为红
关于情况一,相信大家也很好理解parent与uncle都为红色,例如_root为黑色,_root就是parent一直插入,插入节点默认为红色,就会出现cur,parent与uncle都为红色。

但是这也只是很多情况中的一种,所以我们下面通过抽象的图来表示,上面这种情况也可能是下面a,b,c,d,e子树随便一种情况,下图就是抽象图。

向上调整的就相当于是一个动态,我们通过情况一调整后,grandfather变成红色,那么grandfather的parent也可能是红色,这个时候就需要再次向上更新。如图:
 ○情况二: cur为红,p为红,g为黑,u不存在/u存在且为黑(插入左子树)
○情况三: cur为红,p为红,g为黑,u不存在/u存在且为黑 (插入右子树)
这里我们将情况二和情况三一起讨论,因为他们正好是和情况一相反,而情况二与情况三的区别是插入的cur在parent的左边还是右边,如果在插入左子树为情况二,只需要旋转一次,如果插入右子树,则需要旋转两次。再次声明这里主要讨论的是整个树的左边被破坏的情况。
我们在具体来讨论情况二:cur为红,p为红,g为黑,u不存在/u存在且为黑。这里如果我们按照情况一的方法来改变时不行的,因为这里已经出现了情况四的错误,每个路径的黑色节点不一样。如何解决呢?我们不妨试一试旋转之后再改变节点颜色。

上述是节点下没有子树的情况,并且uncle还存在的情况,当uncle不存在呢?实质也是一样的,因为uncle不影响旋转和节点颜色的改变,颜色的改变其实只改变p,g,cur。

当然这些特例只是为了大家更好的理解,一棵树有数不清的情况,每棵树都有不同的情况,但是这都不影响,因为在循环的过程中,我们会对每个插入有问题的节点都进行调整,当每个问题都解决了,整棵树都不再有任何问题了。这里我们再来理解抽象图:
p为g的左孩子,cur为p的左孩子,则进行右单旋转;
相反,p为g的右孩子,cur为p的右孩子,则进行左单旋转,p、g变色--p变黑,g变红(在AVL数中已经介绍到选择,这里就不介绍了);

相信大家都已经发现了一个小细节,当我们旋转再改变节点的颜色后,parent为黑色,parent变成了原来的grandfather,这里我们就可以不用向上更新了,因为grandfather为红色,grandfather->_parent也为红色,再上一层就应该被处理了,况且这里parent(grandfather)为黑色上面即使是红色也不影响,下面为红也不影响。
对于情况三,其实就可以不用过多介绍,只是插入时位置不一样,导致一次旋转解决不了问题。跟AVL树的双旋基本是一样的。先对parent进行旋转,让情况三变成情况二,再用情况二方法处理即可。
p为g的左孩子,cur为p的右孩子,则针对p做左单旋转;
相反,p为g的右孩子,cur为p的左孩子,则针对p做右单旋转 则转换成了情况2

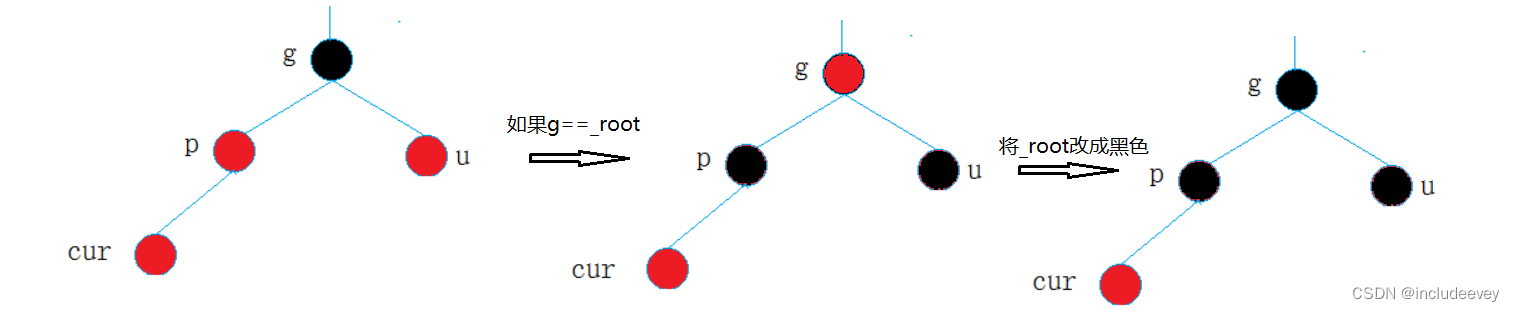
注意当我们处理完后,需要将根节点(_root)的颜色设置成黑色,原因是在情况一的时候可能会出现将根节点变成红色。
 步骤二代码如下:
- while (parent && parent->_col == RED)
- {
- Node* grandfater = parent->_parent;
- if (parent == grandfater->_left)
- {
- Node* uncle = grandfater->_right;
- // 情况一 uncle存在且为红
- if (uncle && uncle->_col == RED)
- {
- parent->_col = uncle->_col = BLACK;
- grandfater->_col = RED;
-
- cur = grandfater;
- parent = cur->_parent;
- }
- else
- {
- if (cur == parent->_left)
- {
- // 情况二
- RotateR(grandfater);
- parent->_col = BLACK;
- grandfater->_col = RED;
- }
- else
- {
- // 情况三
- RotateL(parent);
- RotateR(grandfater);
- cur->_col = BLACK;
- grandfater->_col = RED;
- }
-
- break;
- }
- }
- else
- {
- Node* uncle = grandfather->_left;
- if (uncle && uncle->_col == RED)
- {
- //情况一
- grandfather->_col = RED;
- parent->_col = BLACK;
- uncle->_col = BLACK;
-
- cur = grandfather;
- parent = cur->_parent;
- }
- else
- {
- if (parent->_right == cur)
- {
- //情况二
- RotateL(grandfather);
-
- parent->_col = BLACK;
- grandfather->_col = RED;
- }
- else
- {
- //情况三
- RotateR(parent);
- RotateL(grandfather);
-
- parent->_col = BLACK;
- grandfather->_col = RED;
- }
- break;
- }
- }
- }
- _root->_col = BLACK;
-
- return true;
- }
红黑树的删除,红黑树与AVL树的比较,红黑树的应用
红黑树的删除本节不做讲解,有兴趣的可参考:《算法导论》或者《STL源码剖析》
https://www.cnblogs.com/fornever/archive/2011/12/02/2270692.html
红黑树和AVL树都是高效的平衡二叉树,增删改查的时间复杂度都是O($log_2 N$),红黑树不追求绝对平衡,其只需保证最长路径不超过最短路径的2倍,相对而言,降低了插入和旋转的次数, 所以在经常进行增删的结构中性能比AVL树更优,而且红黑树实现比较简单,所以实际运用中红黑树更多。
在C++ STL库 -- map/set、mutil_map/mutil_set ,Java 库,linux内核,其他一些库中都运用到。
红黑树的测试
关于红黑树的测试,我们需要根据它的性质来测试,具体步骤如下:
●第一点:每个结点不是红色就是黑色 在枚举的时候就已经判断
●第二点:根节点是黑色的 直接判断 _root->_col != BLACK false 故此每个节点都会可能是根节点,该函数最好不使用递归
●第三点: 如果一个节点是红色的,则它的两个孩子结点是黑色的 通过递归的形式 判断parent 和 cur都是红则为false 退出 (因为第二点的原因,我们单独写一个递归函数(Check)判断第三点)
●第四点:对于每个结点,从该结点到其所有后代叶结点的简单路径上,均包含相同数目的黑色结点我们可以传入一个固定值ref(一条路径的黑色节点数)和初始黑色节点值BlackNum,再将这个两值传参到Check,通过递归进行判断:每次root更新到nullptr时就判断BlackNum==ref,切记传参BlackNum不能是引用,因为我们只需要在最后root更新到nullptr时做判断,返回上一个节点不变,通过依次递归到_root为nullptr时保证BlackNum不变。
测试代码如下:
- void Inorder()
- {
- _Inorder(_root);
- }
-
- void _Inorder(Node* root)
- {
- if (root == nullptr)
- return;
-
- _Inorder(root->_left);
- cout << root->_kv.first << ":" << root->_kv.second << endl;
- _Inorder(root->_right);
- }
- bool Check(Node* root, int blackNum, const int ref)
- {
- if (root == nullptr)
- {
- //cout << blackNum << endl;
- if (blackNum != ref)
- {
- cout << "违反规则4:当前路径的黑色节点数跟最左路径数不相等" << endl;
- return false;
- }
-
- return true;
- }
-
- if (root->_col == RED && root->_parent->_col == RED)
- {
- cout << "违反规则3:连续出现两次红节点" << endl;
- return false;
- }
-
- if (root->_col == BLACK)
- {
- ++blackNum;
- }
-
- return Check(root->_left, blackNum, ref)
- && Check(root->_right, blackNum, ref);
- }
-
- bool IsBalance()
- {
- if (_root == nullptr)
- {
- return true;
- }
-
- if (_root->_col != BLACK)
- {
- return false;
- }
-
- int ref = 0;
- Node* left = _root;
- while (left)
- {
- if (left->_col == BLACK)
- {
- ++ref;
- }
-
- left = left->_left;
- }
-
- return Check(_root, 0, ref);
- }
红黑树模拟实现STL中的map与set
模拟实现map与set时,虽然我们知道map和set底层是红黑树。但是具体的实现,还有很多的细节是不清楚的,这个时候我们就可以选择参考源代码(stl30),接下来就先参考源码(这里我们只参考核心结构,如果有兴趣去查看整个实现,就可以自己去查看)。
set源码展示(核心结构):
- template <class Key, class Compare = less<Key>, class Alloc = alloc>
- class set {
- public:
- typedef Key key_type;
- typedef Key value_type;
- typedef Compare key_compare;
- typedef Compare value_compare;
- private:
- typedef rb_tree<key_type, value_type,
- identity<value_type>, key_compare, Alloc> rep_type;
- rep_type t;
map源码展示(核心结构):
- template <class Key, class T, class Compare = less<Key>, class Alloc = alloc>
- class map {
- public:
- typedef Key key_type;
- typedef T data_type;
- typedef T mapped_type;
- typedef pair<const Key, T> value_type;
-
- private:
- typedef rb_tree<key_type, value_type,
- select1st<value_type>, key_compare, Alloc> rep_type;
- rep_type t; // red-black tree representing map
通过观察发现,set与map 的区别是:set传的是<Key,Key>,map传的是 <Key,pair>。map与set的实现都是调用的红黑树,这里我们就去看看红黑树的源码是如何做到既能实现set传参<Key,Key>又能实现map传参<Key,Key>。
- template <class Value>
- struct __rb_tree_node : public __rb_tree_node_base
- {
- typedef __rb_tree_node<Value>* link_type;
- Value value_field;
- };
-
- template <class Key, class Value, class KeyOfValue, class Compare,
- class Alloc = alloc>
- class rb_tree {
- protected:
- typedef void* void_pointer;
- typedef __rb_tree_node_base* base_ptr;
- typedef __rb_tree_node<Value> rb_tree_node;
-
- public:
- typedef rb_tree_node* link_type;
- protected:
- size_type node_count; // keeps track of size of tree
- link_type header;
- Compare key_compare;
在源码中,红黑树接受了map与set传入不同参数而且不影响查找,插入等操作,那么它如何做到的呢?它通过添加一个新的模板,这里set传的Key会通过模板参数接受,变成rb_tree_node(rb_tree_node==Key),map传的pair也会通过模板参数接受,rb_tree_node(pair)。这里的模板就起到一个转换的作用,不同参数传入BRTree都能使用。
 红黑树的改造
红黑树的改造,主要是目的是set与map同时复用一棵树。在红黑树节点的模拟中,我们发现模板参数从< class K,class V>,而改成了< class T>。set与map传不同参数(value),都可以通过这个节点进行进行转化后,RBTree进行接受。是为了更方便操作,在红黑树中增加迭代器。这些都可以参考源代码stl30。
源码红黑树的结构

这里实现红黑树的结构
●优点:代码简单
●缺点:只适用于二叉树
- #define _CRT_SECURE_NO_WARNINGS
- #pragma once
- #include <iostream>
- #include <utility>
-
- using namespace std;
-
- enum Colour
- {
- RED,
- BLACK,
- };
-
- //节点的模拟
- template< class T>
- struct RBTreeNode
- {
- T _date;
- RBTreeNode<T>* _left;
- RBTreeNode<T>* _right;
- RBTreeNode<T>* _parent;
- Colour _col;
-
- RBTreeNode(const T& date)
- :_date(date)
- , _left(nullptr)
- , _right(nullptr)
- , _parent(nullptr)
- , _col(RED)
- {}
- };
-
- //迭代器的模拟
- template<class T, class Ref, class Ptr>
- struct _RBTreeIterator
- {
- typedef RBTreeNode<T> Node;
- //提升阅读性
- typedef _RBTreeIterator<T, Ref, Ptr> Self;
- //为了解决普通迭代器转化成const迭代器,因为Self会随着传参而改变,iterator始终是普通迭代器
- typedef _RBTreeIterator<T, T&, T*> iterator;
- Node* _node;
-
- _RBTreeIterator(Node* node)
- :_node(node)
- {}
-
- //普通迭代器时,它是拷贝构造
- //const迭代器的时候,它是构造,支持用普通迭代器构造const迭代器
- _RBTreeIterator(const iterator &s)
- :_node(s._node)
- {}
-
- //接引用返回
- Ref operator*()
- {
- return _node->_date;
- }
-
- //指针返回
- Ptr operator->()
- {
- return &_node->_date;
- }
-
- //返回节点(重)
- //通过中序(左,根,右)进行返回节点,该节点的右子树为nullptr时返回父亲节点,不为nullptr时找到右子树的最左节点
- //当左,根都被访问后,判断当前节点是不是父亲的右子树,如果是证明当前节点的父亲节点已经被访问过
- //如果不是,向上更新,循环更新到当前节点不是父亲的右子树为止
- Self& operator++()
- {
- if (_node->_right)
- {
- Node* min = _node->_right;
- while (min->_left)
- {
- min = min->_left;
- }
- _node = min;
- }
- else
- {
- Node* cur = _node;
- Node* parent = cur->_parent;
-
- while (parent && parent->_right == cur)
- {
- cur = cur->_parent;
- parent = parent->_parent;
- }
- _node = parent;
- }
- return *this;
- }
-
- //--与++相反,访问顺序是(右,根,左)
- Self& operator--()
- {
- if (_node->_left)
- {
- Node* max = _node->_left;
- while (max->_right)
- {
- max = max->_right;
- }
- _node = max;
- }
- else
- {
- Node* cur = _node;
- Node* parent = cur->_parent;
- while (parent && parent->_left == cur)
- {
- cur = cur->_parent;
- parent = parent->_parent;
- }
- _node = parent;
- }
-
- return *this;
- }
-
- bool operator!=(const Self& s) const
- {
- return _node != s._node;
- }
-
- bool operator==(const Self& s) const
- {
- return _node == s._node;
- }
- };
-
- //红黑树的模拟:插入,访问开始/结束
-
- //T:value,红黑树层不知道传入数据,
- //KeyOfT:仿函数,通过KeyOfT来解析出想要的数据,
- //KeyOfT+T的作用是:为了让set和map同时复用一棵树,set可以直接通过key比较,而map需要pair的first进行比较
- template<class K, class T ,class KeyOfT>
- class RBTree
- {
- typedef RBTreeNode<T> Node;
- public:
- //实现const和非const
- typedef _RBTreeIterator<T, T&, T*> iterator;
- typedef _RBTreeIterator<T, const T&, const T*> const_iterator;
-
- //const版begin
- //set中任何状态都是不被修改的,顾为了解决set调用RBTree的begin和end返回值为const修饰
- //多写一个const版begin,当this被const修饰时,编译器识别后选择const版begin
- //好比在c++11中的cbegin
- const_iterator begin() const
- {
- Node* left = _root;
- while (left && left->_left)
- {
- left = left->_left;
- }
-
- return const_iterator(left);
- }
-
- const_iterator end() const
- {
- return const_iterator(nullptr);
- }
-
- //最小值为左子树的最左
- iterator begin()
- {
- Node* left = _root;
-
- while (left && left->_left)
- {
- left = left->_left;
- }
- return iterator(left);
- }
- //最大的下一个节点
- iterator end()
- {
- return iterator(nullptr);
- }
-
- //为了在map增加迭代器operator[],Insert的返回值就为pair<iterator, bool>
- //operator[]的实现:pair<iterator, bool> ret = insert(make_pair(key, V()));
- // return ret.first->second;
- pair<iterator, bool> Insert(const T& date)
- {
- if (_root == nullptr)
- {
- _root = new Node(date);
- _root->_col = BLACK;
- //成功插入date,
- return make_pair(iterator(_root),true);
- }
-
- //声明仿函数
- KeyOfT kof;
-
- Node* parent = nullptr;
- Node* cur = _root;
- while (cur)
- {
- if (kof(cur->_date) < kof(date))
- {
- parent = cur;
- cur = cur->_right;
- }
- else if (kof(cur->_date) > kof(date))
- {
- parent = cur;
- cur = cur->_left;
- }
- else
- {
- //失败,查找到当前节点
- return make_pair(iterator(cur), false);
- }
- }
-
- cur = new Node(date);
- Node* newnode = cur;
- cur->_col = RED;
- if (kof(parent->_date) < kof(date))
- {
- parent->_right = cur;
- cur->_parent = parent;
- }
- else
- {
- parent->_left = cur;
- cur->_parent = parent;
- }
-
- while (parent && parent->_col == RED)
- {
- Node* grandfater = parent->_parent;
- if (parent == grandfater->_left)
- {
- Node* uncle = grandfater->_right;
- // 情况一 uncle存在且为红
- if (uncle && uncle->_col == RED)
- {
- parent->_col = uncle->_col = BLACK;
- grandfater->_col = RED;
-
- cur = grandfater;
- parent = cur->_parent;
- }
- else
- {
- if (cur == parent->_left)
- {
- // 情况二
- RotateR(grandfater);
- parent->_col = BLACK;
- grandfater->_col = RED;
- }
- else
- {
- // 情况三
- RotateL(parent);
- RotateR(grandfater);
- cur->_col = BLACK;
- grandfater->_col = RED;
- }
- break;
- }
- }
- else // (parent == grandfater->_right)
- {
- Node* uncle = grandfater->_left;
- if (uncle && uncle->_col == RED)
- {
- parent->_col = uncle->_col = BLACK;
- grandfater->_col = RED;
-
- cur = grandfater;
- parent = cur->_parent;
- }
- else
- {
- if (cur == parent->_right)
- {
- RotateL(grandfater);
- parent->_col = BLACK;
- grandfater->_col = RED;
- }
- else
- {
- RotateR(parent);
- RotateL(grandfater);
- cur->_col = BLACK;
- grandfater->_col = RED;
- }
-
- break;
- }
- }
- }
- _root->_col = BLACK;
-
- return make_pair(iterator(newnode), true);
- }
-
- //左旋
- void RotateL(Node* parent)
- {
- Node* subR = parent->_right;
- Node* subRL = subR->_left;
-
- parent->_right = subRL;
- if (subRL)
- subRL->_parent = parent;
-
- Node* ppNode = parent->_parent;
- subR->_left = parent;
- parent->_parent = subR;
-
-
- if (ppNode == nullptr)
- {
- _root = subR;
- _root->_parent = nullptr;
- }
- else
- {
- if (ppNode->_left == parent)
- {
- ppNode->_left = subR;
- }
- else
- {
- ppNode->_right = subR;
- }
-
- subR->_parent = ppNode;
- }
- }
-
- //右旋
- void RotateR(Node* parent)
- {
- Node* subL = parent->_left;
- Node* subLR = subL->_right;
-
- parent->_left = subLR;
- if (subLR)
- {
- subLR->_parent = parent;
- }
-
- Node* ppNode = parent->_parent;
- subL->_right = parent;
- parent->_parent = subL;
-
- //if (_root == parent)
- if (ppNode == nullptr)
- {
- _root = subL;
- _root->_parent = nullptr;
- }
- else
- {
- if (ppNode->_left == parent)
- {
- ppNode->_left = subL;
- }
- else
- {
- ppNode->_right = subL;
- }
- subL->_parent = ppNode;
- }
- }
-
- void Inorder()
- {
- _Inorder(_root);
- }
-
- //打印
- void _Inorder(Node* root)
- {
- if (root == nullptr)
- return;
-
- _Inorder(root->_left);
- cout << root->_kv.first << ":" << root->_kv.second << endl;
- _Inorder(root->_right);
- }
-
- bool Check(Node* root, int blackNum, const int ref)
- {
- if (root == nullptr)
- {
- //cout << blackNum << endl;
- if (blackNum != ref)
- {
- cout << "违反规则:本条路径的黑色节点的数量跟最左路径不相等" << endl;
- return false;
- }
-
- return true;
- }
-
- if (root->_col == RED && root->_parent->_col == RED)
- {
- cout << "违反规则:出现连续红色节点" << endl;
- return false;
- }
-
- if (root->_col == BLACK)
- {
- ++blackNum;
- }
-
- return Check(root->_left, blackNum, ref)
- && Check(root->_right, blackNum, ref);
- }
-
- //判断平衡
- bool IsBalance()
- {
- if (_root == nullptr)
- {
- return true;
- }
-
- if (_root->_col != BLACK)
- {
- return false;
- }
-
- int ref = 0;
- Node* left = _root;
- while (left)
- {
- if (left->_col == BLACK)
- {
- ++ref;
- }
- left = left->_left;
- }
- return Check(_root, 0, ref);
- }
-
- private:
- Node* _root = nullptr;
- };
在该段代码中新增的迭代器,主要难点是operator++和operator--。

map与set的封装
map与set主要是对RBTree的封装使用 ,这里需要比较难以解决的就是set的迭代器不被const修饰,而map是需要const与非const修饰。而且他们同时复用的一棵树这是比较棘手的。
- //set.h
- #pragma once
- #include "RBTree_.h"
-
- namespace qhx
- {
- template <class K>
-
- class set
- {
- struct SetKeyOfT
- {
- const K& operator()(const K& key)
- {
- return key;
- }
- };
- public:
- //为了解决set(Key)不被修改的同时还保持与map复用同一棵树
- typedef typename RBTree<K, K, SetKeyOfT>::const_iterator iterator;
- typedef typename RBTree<K, K, SetKeyOfT>::const_iterator const_iterator;
-
- iterator begin() const
- {
- return _t.begin();
- }
-
- iterator end() const
- {
- return _t.end();
- }
-
- //iterator是const_iterator,return返回的是iterator
- //pair<iterator, bool> insert(const K& key)
- //{
- // return _t.Insert(key);
- //}
-
- //解决pair中iterator被const修饰
- pair<iterator, bool> insert(const K& key)
- {
- pair<typedef RBTree<K, K, SetKeyOfT>::iterator, bool> ret = _t.Insert(key);
- return pair<iterator, bool>(ret.first, ret.second);
- }
-
-
- private:
- RBTree<K, K, SetKeyOfT> _t;
- };
-
- //测试
- void test_set()
- {
- int a[] = { 4, 2, 6, 1, 3, 5, 15, 7, 16, 14 };
- set<int> s;
- for (auto e : a)
- {
- s.insert(e);
- }
-
- set<int>::iterator it = s.begin();
- while (it != s.end())
- {
- cout << *it << " ";
- ++it;
- }
- cout << endl;
-
- for (auto e : s)
- {
- cout << e << " ";
- }
- cout << endl;
- }
- }
- //map.h
- #pragma once
- #include "RBTree_.h"
- #include <string>
-
- namespace qhx
- {
- template<class K, class V>
- class map
- {
- struct MapKeyOfT
- {
- const K& operator()(const pair<const K, V>& kv)
- {
- return kv.first;
- }
- };
- public:
- //typename:因为这里::iterator没有初始化,编译器分不清这个是静态变量,还是类型
- //关于静态变量:成员变量的内存既不是在声明时分配,也不是在创建对象时分配,而是在初始化时分配
- //没有在类外初始化的静态成员变量不能被使用
- //所以当我们声明了静态成员变量后,想初始化那么就必须在类外进行初始化(使用作用域符号)
- //这里加上typename目的就是让编译器知道这是类型
- typedef typename RBTree<K, pair<const K, V>, MapKeyOfT>::iterator iterator;
- typedef typename RBTree<K, pair<const K, V>, MapKeyOfT>::const_iterator const_iterator;
-
- iterator begin()
- {
- return _t.begin();
- }
-
- iterator end()
- {
- return _t.end();
- }
-
- const_iterator begin()const
- {
- return _t.begin();
- }
-
- const_iterator end() const
- {
- return _t.end();
- }
-
- pair<iterator, bool> insert(const pair<const K, V>& kv)
- {
- return _t.Insert(kv);
- }
-
- V& operator[](const K& key)
- {
- pair<iterator, bool> ret = insert(make_pair(key, V()));
- return ret.first->second;
- }
-
-
- private:
- RBTree<K, pair<const K, V>, MapKeyOfT> _t;
- };
-
- void test_map()
- {
- int a[] = { 4, 2, 6, 1, 3, 5, 15, 7, 16, 14 };
- map<int, int> m;
- for (auto e : a)
- {
- m.insert(make_pair(e,e));
- }
-
- map<int,int>::iterator it = m.begin();
- while (it != m.end())
- {
- //it->first++;
- //it->second++;
- cout << it->first << ":"<< it->second << " ";
- ++it;
- }
- cout << endl;
-
- map<string, int> countMap;
- string arr[] = { "ƻ", "", "㽶", "ݮ", "ƻ", "", "ƻ", "ƻ", "", "ƻ", "㽶", "ƻ", "㽶" };
- for (auto& e : arr)
- {
- countMap[e]++;
- }
-
- for (auto& kv : countMap)
- {
- cout << kv.first << ":" << kv.second << endl;
- }
- }
- }
测试代码Test.h
- #define _CRT_SECURE_NO_WARNINGS
-
- #include "RBTree_.h"
- #include "Map.h"
- #include "Set.h"
-
- int main()
- {
- qhx::test_map();
- qhx::test_set();
-
- return 0;
- }
这些代码对于学习是有很大的提升的,有必要敲一下的,同时也对写源码的大神们表示佩服,如果有需要源码的同学也可以私信。
☺ [ 作者 ] includeevey
声明:本文内容由网友自发贡献,不代表【wpsshop博客】立场,版权归原作者所有,本站不承担相应法律责任。如您发现有侵权的内容,请联系我们。转载请注明出处:https://www.wpsshop.cn/blog/CPP/detail/34076
- 在C++中,模板是一种泛型编程(GenericProgramming)的工具,它允许程序员编写通用的、与数据类型无关的代码。使用模板,你可以编写函数或类,使其能够适用于多种数据类型而不需要重复编写多份相似的代码。函数模板允许你编写一个通用的... [详细]
赞
踩
- 指向函数的指针详解,以及如何使用指向函数的指针变量做函数参数。指向函数的指针作为函数参数,是C语言实际应用中的一个比较深入的部分。_指向函数的指针指向函数的指针指向函数的指针详解,以及如何使用指向函数的指针变量做函数参数指向函数的指针作为函... [详细]
赞
踩
- MFC用循环方式写入列表内容,为LIstControl定制表头列宽对齐方式,给列表加上整行选中的属性以及添加网格线,表格_mfc表格控件mfc表格控件目录一、ListControl列表控件属性1.ListControl2.View属性二、O... [详细]
赞
踩
- 报错为“error:‘B’doesnotnameatype”,就是因为在A类中使用B*b之前没有声明或定义B类,如果在第一行加上一句前置声明“classB;”,就不会有这样的问题了。C++编译报错:doesnotnameatype在一个源文... [详细]
赞
踩
- 快速入门OpenCV,啥都有(持续更新)_opencvc++opencvc++数据类型(版本4.6.0)CV_8U:占8位的unsignedCV_8UC(n):占8位的unsignedcharCV_8UC1:占8位的unsignedchar... [详细]
赞
踩
- 实用的图书馆管理系统应该至少包括一下功能:1、上传:新进图书以及基本信息的输入2、删除:旧图书以及基本信息的删除3、显示:显示图书馆已有的所有图书4、查找:查询要借阅的图书信息5、借阅:实现用户办理借阅手续6、归还:实现用户办理归还手续系统... [详细]
赞
踩
- 学习编程,一个趁手的编辑器肯定是少不了的。我作为一个对编辑器要求挺高的菜鸟,这里叙述一下我对各个编辑器的看法和使用情况。(我主要使用语言是c,c++和部分的python,所以这里并没有对其他语言的编辑器的详细概括)。_clion和visua... [详细]
赞
踩
- 本篇文章介绍了继承,多继承出现的菱形继承问题以及使用虚继承解决菱形继承的问题!!!【C++干货铺】继承|多继承|虚继承=============================================================... [详细]
赞
踩
- C++11lock_guard和unique_lock简介,使用以及其相应的原理实现_c++lock_guardc++lock_guard文章目录前言一、简介1.1lock_guard1.2RAII1.3原理二、unique_lock2.1... [详细]
赞
踩
 WebSocket是Web服务器的一个组件,WebSocket是一种基于TCP的新的网络传输协议,它实现了浏览器与服务器全双工通信——浏览器只需要完成一次握手,两者之间就可以创建持久性的连接,并进行双向数据传输。深度理解:前端发送请求建立连... [详细]
赞
踩
- 本篇文章着重讲解了C++的异常处理方式,包括try,catch,throw三个关键字的用法以及RAII思想在异常体系中的使用.还讲解了自定义异常体系的设计和C++库中的异常体系.内附代码和图文讲解,看完就能学会!【C++高阶(七)】C++异... [详细]
赞
踩
- 我们之前说过,继承是面向对象的三大特性。面向对象的三大特性:封装、继承、多态。封装在类和对象体现出。C++中的继承(一)文章目录前言概念访问限定符基类和派生类的赋值转换继承中的作用域派生类的默认成员函数构造函数拷贝构造析构函数继承的其他一些... [详细]
赞
踩
- 什么是结构体,结构体的声明、定义、初始化、以及传参,匿名结构体类型,如何通过结构体来实现链表数据结构,结构体在内存中是如何存储的(即:结构体内存对齐),什么是内存对齐_结构体结构体本期介绍... [详细]
赞
踩
- libxlsxwriter一款开源C库,可以用来写xlsx文件_libxlsxwriterlibxlsxwriterC++如何写Excel?大家时间都这么宝贵,没有起因的问题是不值得被优先研究的。这篇博客的起因就是希望找到一个比较合适于C+... [详细]
赞
踩
 Websocket是一种基于TCP协议的全双工通信协议,它使得客户端和服务器之间可以进行实时的双向通信。相对于传统的HTTP协议只能通过客户端发送请求,然后等待服务端的响应,WebSocket可以让客户端和服务器在任何时候都可以相互发送消息... [详细]
赞
踩
- VsCode安装和配置C++环境详细全流程_vscode安装c++vscode安装c++目录一、下载安装VsCode1、下载VsCode2、安装VsCode3.下载安装中文插件(可选择性跳过)二、MinGW编译器的下载和配置1、下载MinG... [详细]
赞
踩
- 使用STM32F407ze获取MQ-2烟雾传感器模块的测量值_mq2烟雾传感器mq2烟雾传感器认识MQ-2模块与其工作原理 MQ-2型烟雾传感器属... [详细]
赞
踩
- 详细解释了结构体的创建,声明和使用,以及结构体内存对齐_结构体c语言结构体c语言初识结构体一.结构体声明1.结构体的概念2.声明二.结构体的基础使用三.结构体变量的定义和初始化四.空结构体五.柔性数组1.定义2.使用六.结构体内存对齐七.位... [详细]
赞
踩
- 一文带你初步认识面向对象、类和对象C++初识类和对象前言上一期我们介绍了一些C++入门的基础知识,本期我们来介绍面向对象。初步认识一下面向对象和面向过程、类、以及封装!本期内容介绍面向过程和面向对象类的引入类的定义类的访问限定符和封装类的作... [详细]
赞
踩
- 偏最小二乘的r语言实现,及主成分选取的规则_r语言偏最小二乘回归分析r语言偏最小二乘回归分析首先打开Rstudio,点击tools—>globaloptions创建工作环境这部分设置工作目录,一般数据和结果就放这里面。a<-re... [详细]
赞
踩
Copyright © 2003-2013 www.wpsshop.cn 版权所有,并保留所有权利。

