
热门标签
热门文章
- 1【学习笔记】Rider调试unity【 联调、断点调试等】(决定弃用vscode了)_rider 调试
- 2Unity 开发微信小游戏_unity 微信小游戏
- 3基于HTML5 的人脸识别活体认证的实现方法
- 4OpenCV实现人脸识别简单程序
- 5Unity之获取用户地理位置_unity获取本机ip地址
- 610分钟学会使用python实现人脸识别(附源码)
- 7JavaScript人脸检测的实现方法
- 8Unity控制相机旋转、移动、缩放等功能_unity鼠标控制相机
- 9用unity插件AVProVideo制作一个视频播放器
- 10Unity 数据读取|(四)Json文件解析(Newtonsoft.Json ,Litjson,JsonUtility,SimpleJSON)_unity解析json数组
当前位置: UNITY > 正文
2023最新unity 发布exe程序背景透明穿透_unity 透明窗口
作者:程序代码艺术家 | 2023-12-20 18:01:27
赞
踩
unity 透明窗口
由于网上的一些帖子比较老了,好多人评论不能用黑屏之类的。这边重新整理个最新的,亲测可用。
先大体概括下,一共就几处设置,一个脚本。
一、设置
普通渲染的项目摄像机的Clear Flags选择Solid Color,颜色为黑色(0,0,0,0)。
使用HDRP的项目,关闭掉摄像机上的脚本:HDAdditionalCameraData,摄像机默认的backgroundType,Sky改为Color,颜色为黑色(0,0,0,0)见下图。
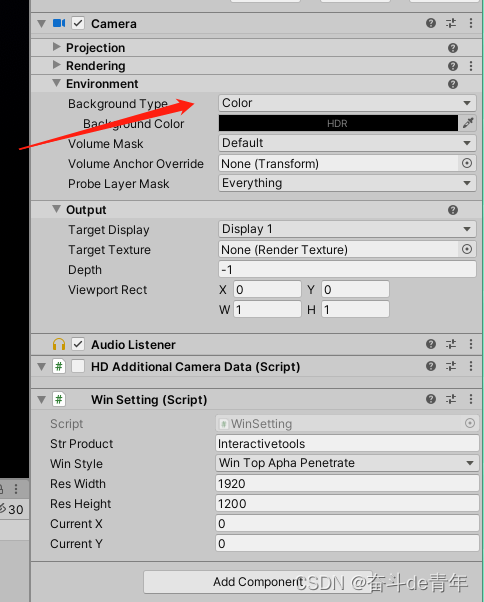
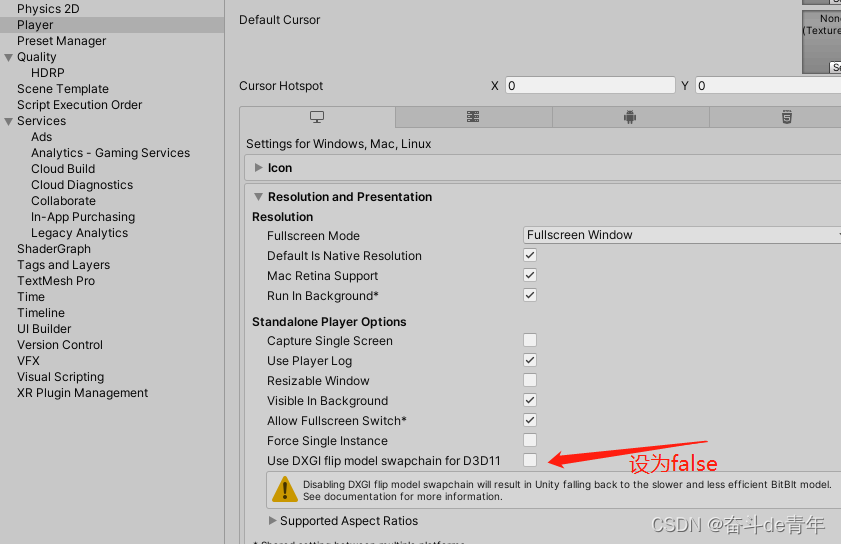
↓↓↓特别注意下图,所使用的unity版本如果没有下面的选项则不用管。
下面放上脚本:
- using UnityEngine;
- using System.Collections;
- using System;
- using System.Runtime.InteropServices;
- using System.IO;
-
- /// <summary>
- /// 一共可选择三种样式
- /// </summary>
- public enum enumWinStyle
- {
- /// <summary>
- /// 置顶
- /// </summary>
- WinTop,
- /// <summary>
- /// 置顶并且透明
- /// </summary>
- WinTopApha,
- /// <summary>
- /// 置顶透明并且可以穿透
- /// </summary>
- WinTopAphaPenetrate
- }
- public class WinSetting : MonoBehaviour
- {
-
- #region Win函数常量
- private struct MARGINS
- {
- public int cxLeftWidth;
- public int cxRightWidth;
- public int cyTopHeight;
- public int cyBottomHeight;
- }
-
- [DllImport("user32.dll")]
- static extern IntPtr FindWindow(string lpClassName, string lpWindowName);
- [DllImport("user32.dll")]
- static extern int SetWindowLong(IntPtr hWnd, int nIndex, int dwNewLong);
-
- [DllImport("user32.dll")]
- static extern int GetWindowLong(IntPtr hWnd, int nIndex);
-
- [DllImport("user32.dll")]
- static extern int SetWindowPos(IntPtr hWnd, int hWndInsertAfter, int X, int Y, int cx, int cy, int uFlags);
-
- [DllImport("user32.dll")]
- static extern int SetLayeredWindowAttributes(IntPtr hwnd, int crKey, int bAlpha, int dwFlags);
-
- [DllImport("Dwmapi.dll")]
- static extern uint DwmExtendFrameIntoClientArea(IntPtr hWnd, ref MARGINS margins);
- [DllImport("user32.dll")]
- private static extern int SetWindowLong(IntPtr hWnd, int nIndex, uint dwNewLong);
- private const int WS_POPUP = 0x800000;
- //设定一个新的扩展风格
- private const int GWL_EXSTYLE = -20;
- // 定义窗体样式,-16表示设定一个新的窗口风格
- private const int GWL_STYLE = -16;
- private const int WS_EX_LAYERED = 0x00080000;
- private const int WS_BORDER = 0x00800000;
- private const int WS_CAPTION = 0x00C00000;
- private const int SWP_SHOWWINDOW = 0x0040;
- private const int LWA_COLORKEY = 0x00000001;
- private const int LWA_ALPHA = 0x00000002;
- private const int WS_EX_TRANSPARENT = 0x20;
- //
- private const int ULW_COLORKEY = 0x00000001;
- private const int ULW_ALPHA = 0x00000002;
- private const int ULW_OPAQUE = 0x00000004;
- private const int ULW_EX_NORESIZE = 0x00000008;
- #endregion
- //
- public string strProduct;//项目名称
- public enumWinStyle WinStyle = enumWinStyle.WinTop;//窗体样式
- //
- public int ResWidth;//窗口宽度
- public int ResHeight;//窗口高度
- //
- public int currentX;//窗口左上角坐标x
- public int currentY;//窗口左上角坐标y
- //
- private bool isApha;//是否透明
- private bool isAphaPenetrate;//是否要穿透窗体
- // Use this for initialization
- void Awake()
- {
- Screen.fullScreen = false;
- #if UNITY_EDITOR
- print("编辑模式不更改窗体");
- #else
- switch (WinStyle)
- {
- case enumWinStyle.WinTop:
- isApha = false;
- isAphaPenetrate = false;
- break;
- case enumWinStyle.WinTopApha:
- isApha = true;
- isAphaPenetrate = false;
- break;
- case enumWinStyle.WinTopAphaPenetrate:
- isApha = true;
- isAphaPenetrate = true;
- break;
- }
- //获得窗口句柄
- IntPtr hwnd = FindWindow(null, strProduct);
- //
- if (isApha)
- {
- //去边框并且透明
- SetWindowLong(hwnd, GWL_EXSTYLE, WS_EX_LAYERED);
- // 获得当前样式
- int intExTemp = GetWindowLong(hwnd, GWL_EXSTYLE);
- if (isAphaPenetrate)//是否透明穿透窗体
- {
- SetWindowLong(hwnd, GWL_EXSTYLE, intExTemp | WS_EX_TRANSPARENT | WS_EX_LAYERED);
- }
- //
- SetWindowLong(hwnd, GWL_STYLE, GetWindowLong(hwnd, GWL_STYLE) & ~WS_BORDER & ~WS_CAPTION); //无边框、无标题栏
- SetWindowPos(hwnd, -1, currentX, currentY, ResWidth, ResHeight, SWP_SHOWWINDOW);
- var margins = new MARGINS() { cxLeftWidth = -1 };// 边距内嵌值确定在窗口四侧扩展框架的距离 -1为没有窗口边框
- //
- DwmExtendFrameIntoClientArea(hwnd, ref margins);
-
- SetLayeredWindowAttributes(hwnd, 0, 255, 1);
- }
- else
- {
- //单纯去边框
- SetWindowLong(hwnd, GWL_STYLE, WS_POPUP);
- SetWindowPos(hwnd, -1, currentX, currentY, ResWidth, ResHeight, SWP_SHOWWINDOW);
- }
- #endif
- }
- }

随便扔到哪,我是扔到摄像机上了,说下参数填写,见下图1图2
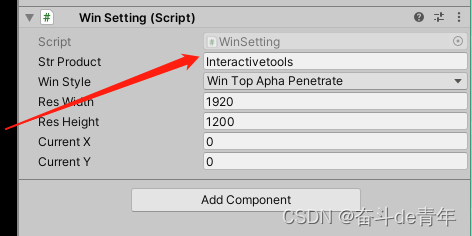
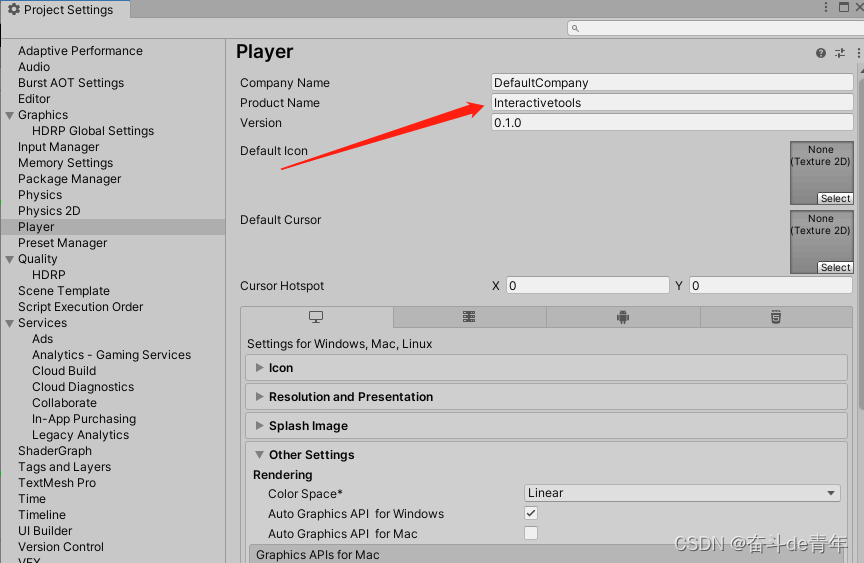
挂上脚本后,strproduct要和图2处的ProductName填写的一样,老版本的unity导出的exe名字也要一样,,新版的unity只要选择存放的文件夹,名字不用管。
下面是效果
普通的
unity 发布exe透明穿透(普通)
HDRP的
unity 发布exe透明穿透(HDRP)
声明:本文内容由网友自发贡献,不代表【wpsshop博客】立场,版权归原作者所有,本站不承担相应法律责任。如您发现有侵权的内容,请联系我们。转载请注明出处:https://www.wpsshop.cn/blog/UNITY/detail/34369
推荐阅读
- 这篇文章主要为大家详细介绍了pythonopencv3实现人脸识别程序,具有一定的参考价值,感兴趣的小伙伴们可以参考一下windows,python,opencv3,人脸识别,xml,DevBox,在线流程图,编程,编程问答,程序员,开发者... [详细]
赞
踩
- 文章浏览阅读1k次。区别在于,Asset是在编辑器中管理和引用的资源,而Resource是在运行时动态加载的资源。Unity采用的方案明显是第二种,它会对Assets文件夹下的所有文件生成一个名称相同,扩展名为meta的文件,包括文件夹也会... [详细]
赞
踩
 文章浏览阅读1.3k次,点赞30次,收藏31次。Post-Processing是一块内容很多知识,想要学习好这块简单大家还是多去网上查阅资料。因为博客嘛,整理简单的东西还可以,太复杂了就显得不够用了。我会整理我学习的步骤给大家,大家也去看看... [详细]
赞
踩
- 文章浏览阅读4.1k次,点赞83次,收藏87次。本文将使用ShaderGraph制作一个根据坐标控制溶解的位置,物体靠近局部溶解的效果,可以直接拿到项目中使用。下面就开始看一下具体的制作流程,然后自己动手制作一个吧!【UnityShader... [详细]
赞
踩
- 文章浏览阅读601次。[游戏开发][Unity]Xlua生成wrap文件报错、打AB包Wrap报错[游戏开发][Unity]Xlua生成wrap文件报错、打AB包Wrap报错 Xlua生成wrap文件,自带添加了ref字段报错例如... [详细]
赞
踩
- 文章浏览阅读972次,点赞44次,收藏50次。Unity的多语言本地化是一个很实用的功能,它可以帮助游戏支持多种语言,让不同语言的玩家都能够更好地体验游戏。而实现本地化的方案也有很多种,各个方案之间也各有优劣,后面也会对多个方案进行介绍学习... [详细]
赞
踩
- 文章浏览阅读2.6k次,点赞4次,收藏14次。UnityMetaQuest混合现实MR透视Passthrough开发环境配置_unityvrunityvr文章目录... [详细]
赞
踩
- 文章浏览阅读4.1k次,点赞36次,收藏96次。ShaderGraph是Unity中的一个可视化工具,用于创建和编辑图形着色器。其意义在于简化编写复杂着色器的过程,减少对具体编程语言的依赖,使艺术家和设计师可以更方便地创建各种美术效果。使用... [详细]
赞
踩
- 文章浏览阅读1.1w次,点赞17次,收藏77次。unity新手向:通过实例化实现简单的射击功能。_unity3d发射子弹unity3d发射子弹前言:对于射击类游戏,相信大家并不陌生。那么想要实现这一功能,我们通常会使用两种方法:1.射线追踪... [详细]
赞
踩
 文章浏览阅读2k次,点赞4次,收藏6次。ThreadPool中有若干数量的线程,如果有任务需要处理时,会从线程池中获取一个空闲的线程来执行任务,任务执行完毕后线程不会销毁,而是被线程池回收以供后续任务使用。当线程池中所有的线程都在忙碌时,又... [详细]
赞
踩
- 文章浏览阅读1.2k次,点赞3次,收藏4次。如何通过环信IMSDK实现用户管理、好友系统(联系人管理)及聊天消息管理功能。_环信im环信im文章目录... [详细]
赞
踩
- 文章浏览阅读4.2k次,点赞36次,收藏96次。ShaderGraph是Unity中的一个可视化工具,用于创建和编辑图形着色器。其意义在于简化编写复杂着色器的过程,减少对具体编程语言的依赖,使艺术家和设计师可以更方便地创建各种美术效果。使用... [详细]
赞
踩
- 文章浏览阅读1.4k次。在Unity中,UI缩放模式定义了UI元素在屏幕上的缩放方式。Unity提供了三种UI缩放模式:ConstantPixelSize(固定像素大小)、ScaleWithScreenSize(按屏幕大小缩放)和Const... [详细]
赞
踩
 文章浏览阅读5k次,点赞11次,收藏42次。上面设置的值表示,当粒子效果数量达到100以后,它就会为了保护计算机,当前面一波的粒子效果消失之后,才会去进行下一波的粒子效果的显示,这是一种保护性能、设置上限的方法,也是一种保护性能‘设置上限的... [详细]
赞
踩
 众所周知,工欲善其事必先利其器,有一个好的工具可以让我们事半功倍,有一个好用的网站更是如此!但是好用的网站真的太多了,收藏夹都满满的(但是几乎没打开用过unity学习网站Unity相关网站整理大全众所周知,工欲善其事必先利其器,有一个好的工... [详细]
赞
踩
 (1)熟悉Unity中UI界面的设计与编写;(2)熟悉UI界面中场景转换,UI与场景内容相互关联的方式。(3)熟悉Unity中MySQL数据库的操作新建一个Unity场景,在此场景中实现如下功能:(1)自行设计一个登录、注册UI界面;(2)... [详细]
赞
踩
 unity如何生成exe文件_unity导出exeunity导出exe场景:unity如何生成exe文件方法在Unity中,可以通过以下步骤生成exe文件:在Unity界面中,点击菜单栏的“File”,选择“BuildSettings”。在... [详细]
赞
踩
- 本人是在学习完c,c++,数据结构算法,操作系统网络这些基础的课程之后,打算学习自己喜欢的游戏开发方向的东西,然后在B站上自学了几天unity,用到unity的触发器,碰撞,刚体,以及一个简单的ui界面,但是本人目前没有c#的学习经验,但是... [详细]
赞
踩
- Unity——在C#中调用C++动态链接库(DLL)。打开VS,新建一个C++空项目,自命名项目名称与位置。如果Unity已经在运行并且Dll已经存在,那么新的Dll写入生成会失败,此时需要关掉Unity再重新生成。_unity调用c++动... [详细]
赞
踩
- 最近有个Holoens2识别灭火器实体交互的项目,大概有2-3年没有搞MR的项目了,重新看一下,以前没有记录的习惯,现在慢慢培养一下。小Dome链接:link好记性不如烂笔头!unity使用Vuforia扫描实体物体交互文章目录前言一、Vu... [详细]
赞
踩
相关标签

