
【v8初体验】利用yolov8训练COCO数据集或自定义数据集_yolo训练coco数据集
赞
踩
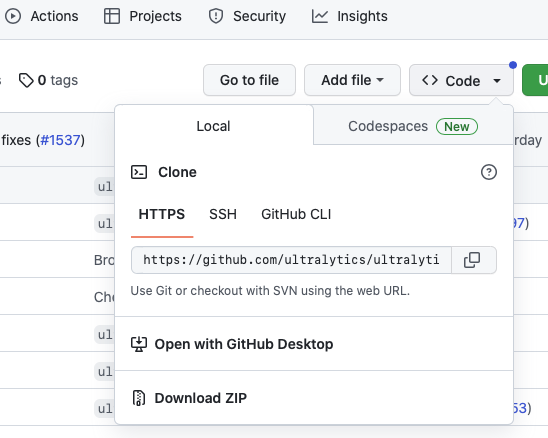
github地址:https://github.com/ultralytics/ultralytics
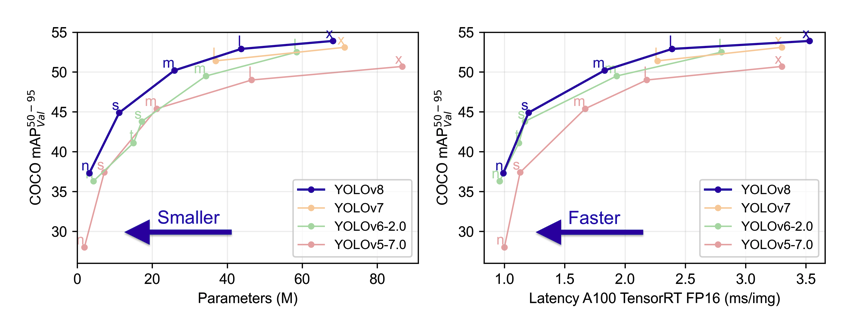
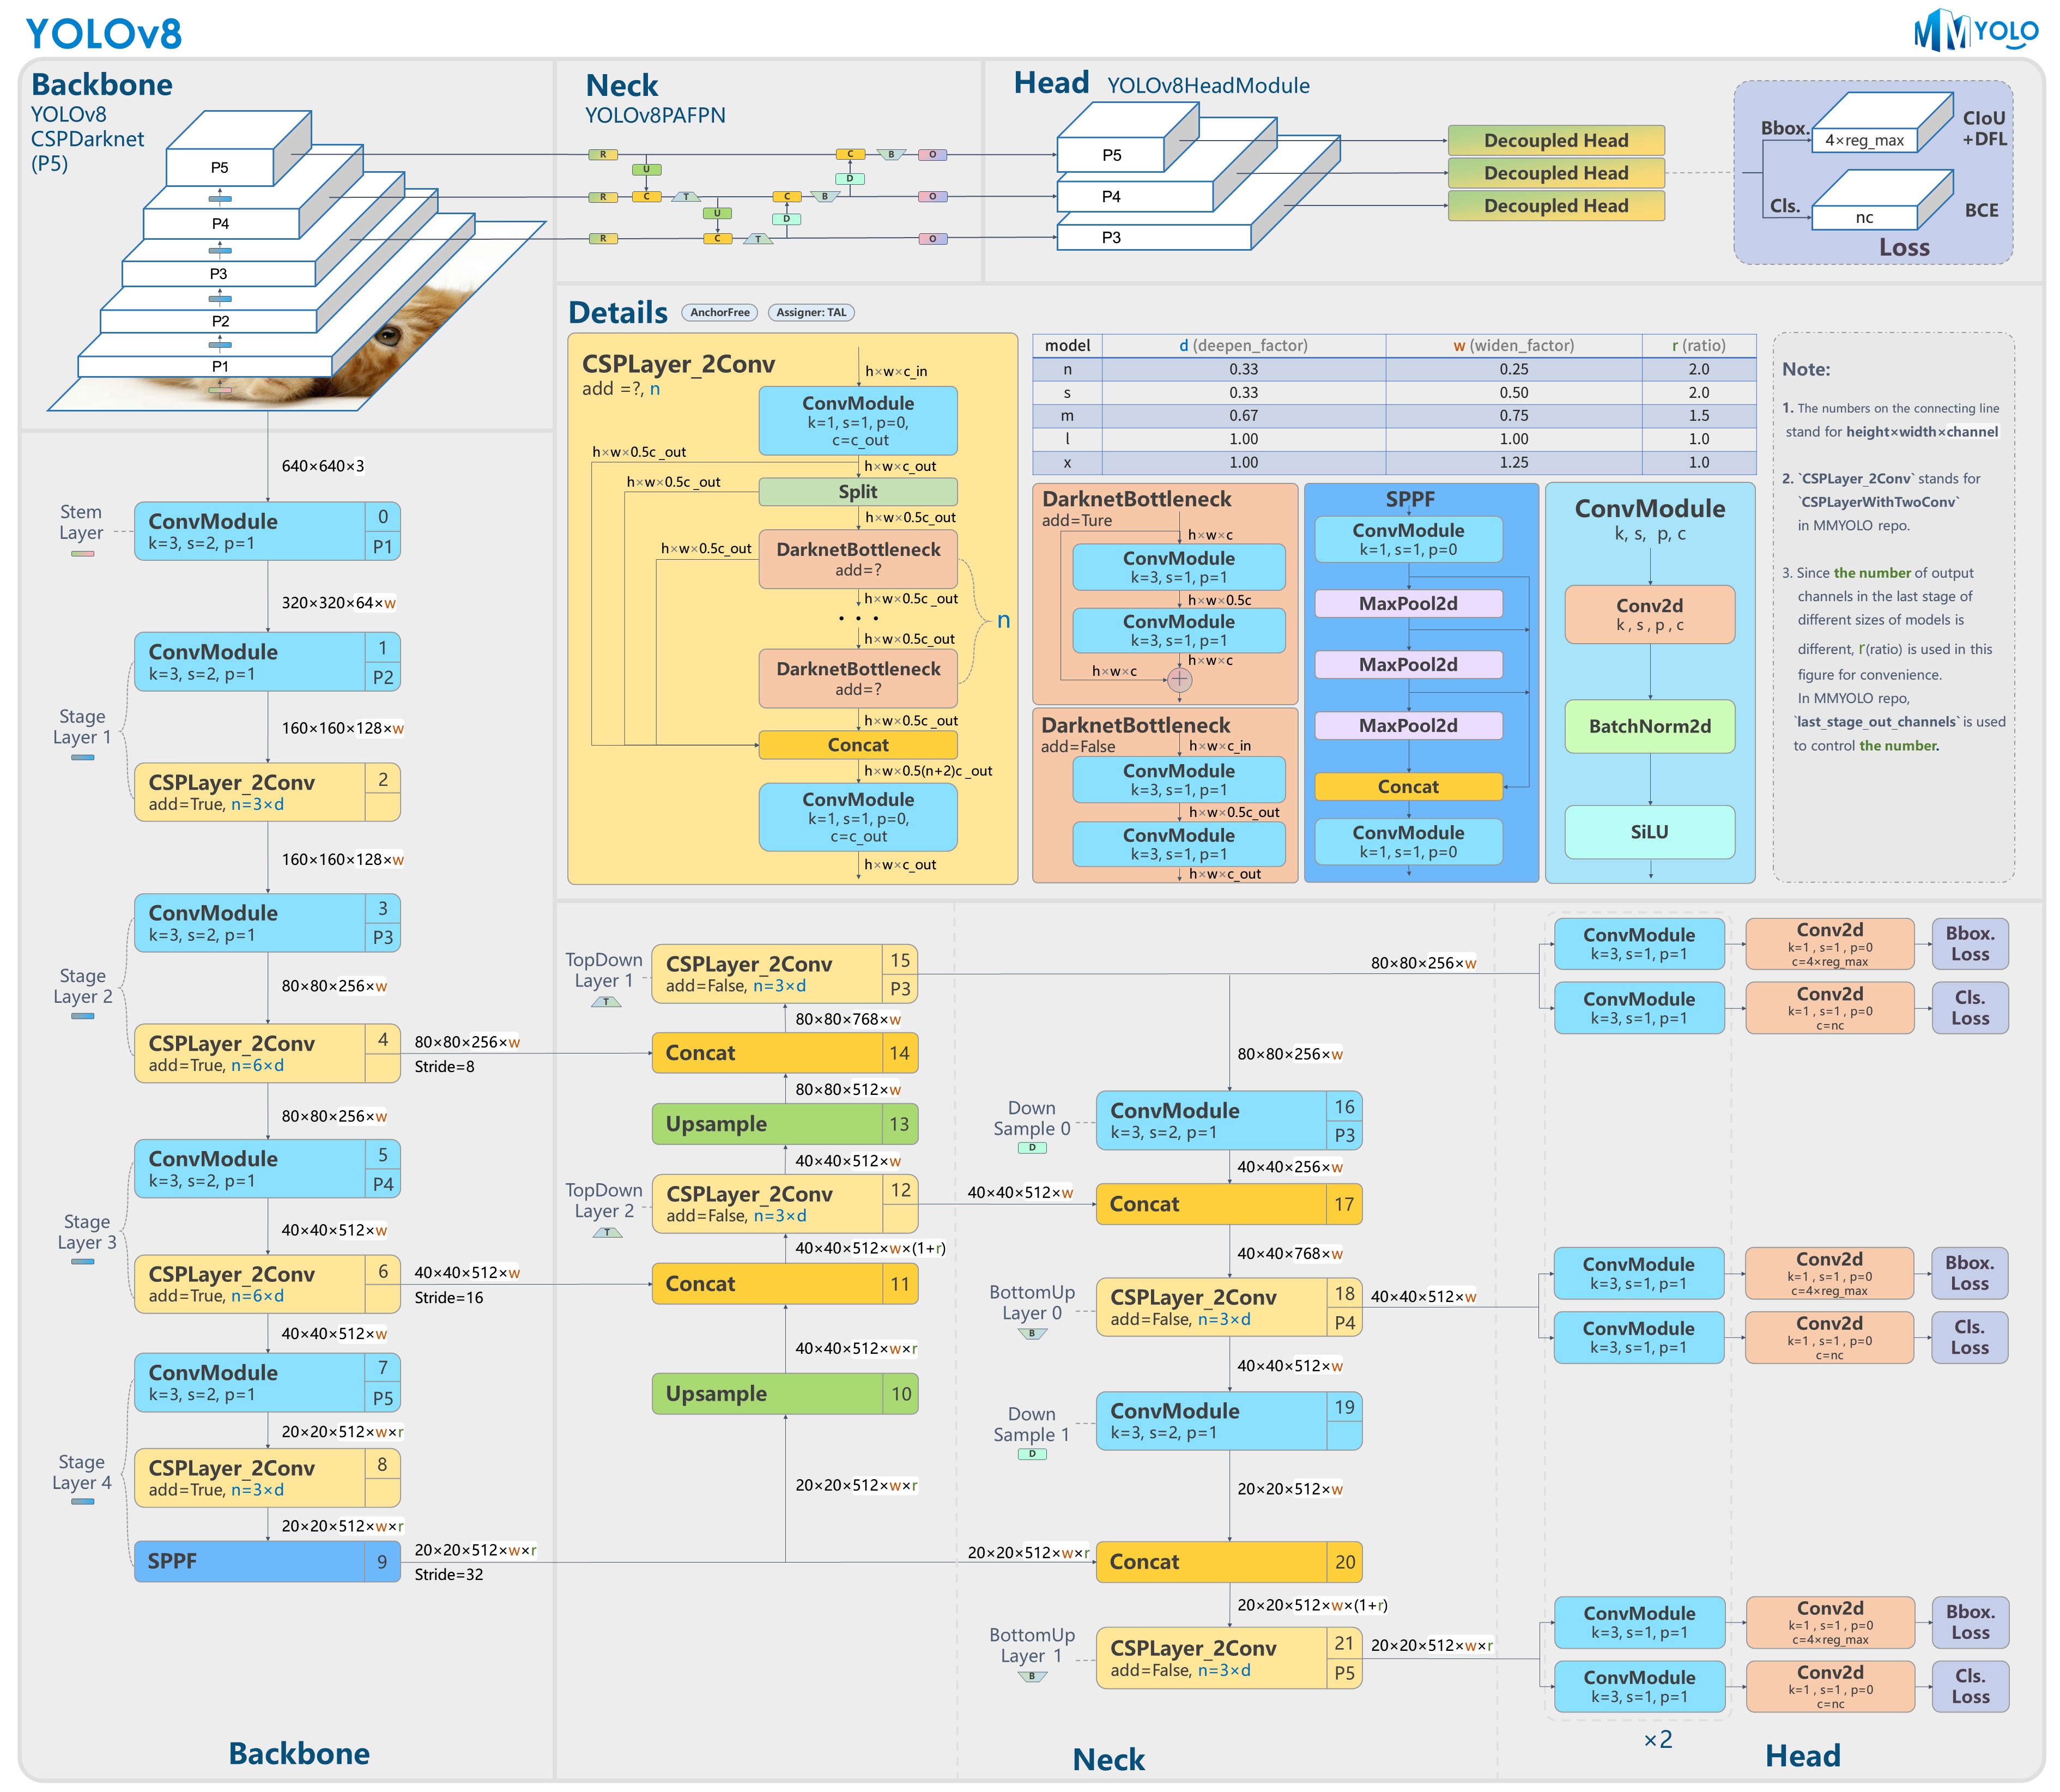
YOLOv5目前仍然是很受到大家环境的,v8作为v5的升级之作效果的提升也非常明显,但相比YOLOv5确实没有作出较大改进,主要改进如下:
Backbone: 主干部分主要是将所有C3模块更换成C2f模块,C2f借鉴了YOLOv7的思想,个人感觉应该是这种多分支的残差连接给予了模型更丰富的梯度信息。
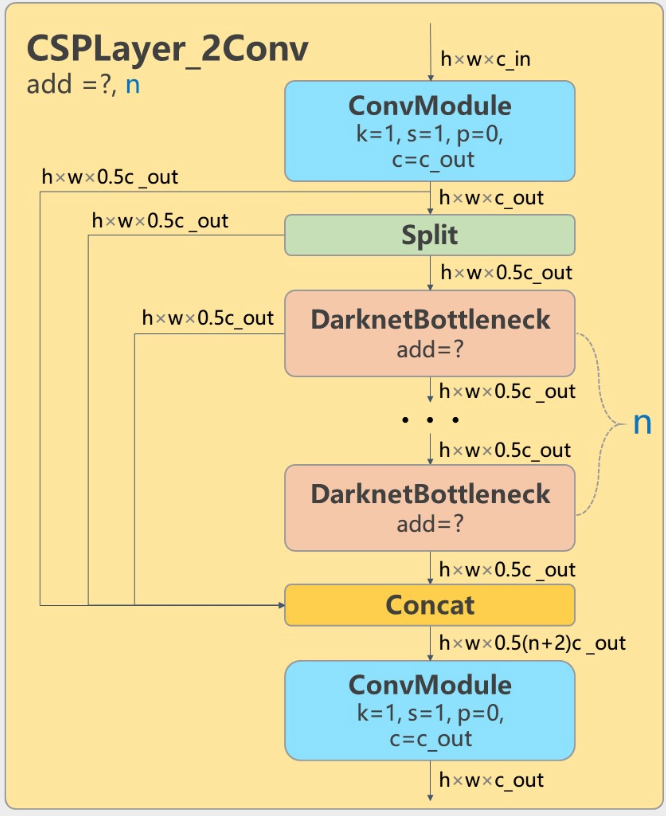
C2f模块
官方代码解析:
这段代码对应路径为ultralytics/nn/modules.py
torch.split()的作用是把一个tensor拆分为多个tensor,相当于是concat的逆过程,定义如下:
torch.split(tensor, split_size_or_sections, dim=0) 第二个参数就是自定义想怎么在第三个维度上怎么切分,YOLOv8中利用split函数实现而不是像其他一些模块利用1*1卷积对同一个tensor降纬两次。
由于每个有几个DarknetBottleneck就会分出几个分支作为残差最后concat到一起,所以代码中将每个分支都extend到一个list中,最后将这个list中所有的tensor在通道维度进行堆叠,堆叠后的tensor再经过一个1*1卷积进行降维。
- class C2f(nn.Module):
- # CSP Bottleneck with 2 convolutions
- def __init__(self, c1, c2, n=1, shortcut=False, g=1, e=0.5): # ch_in, ch_out, number, shortcut, groups, expansion
- super().__init__()
- self.c = int(c2 * e) # hidden channels
- self.cv1 = Conv(c1, 2 * self.c, 1, 1)
- self.cv2 = Conv((2 + n) * self.c, c2, 1) # optional act=FReLU(c2)
- self.m = nn.ModuleList(Bottleneck(self.c, self.c, shortcut, g, k=((3, 3), (3, 3)), e=1.0) for _ in range(n))
-
- def forward(self, x):
- y = list(self.cv1(x).chunk(2, 1))
- y.extend(m(y[-1]) for m in self.m)
- return self.cv2(torch.cat(y, 1))
-
- def forward_split(self, x):
- y = list(self.cv1(x).split((self.c, self.c), 1))
- y.extend(m(y[-1]) for m in self.m)
- return self.cv2(torch.cat(y, 1))

Neck:仍然使用主流的PAFPN,除了将所有的C3模块更换成C2f外,还将YOLOv5中上采样前的CBS(Conv+BN+SiLU)模块全都去掉了,C2f模块后直接就进行上采样。如下图所示:
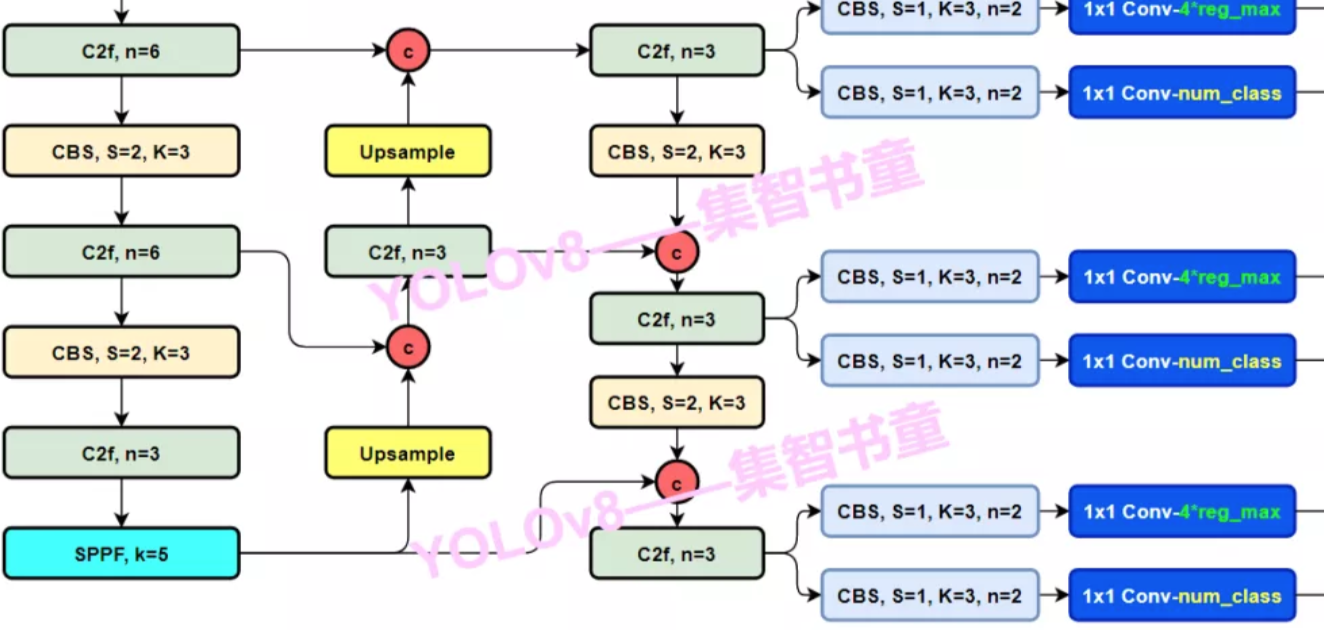
YOLOv8
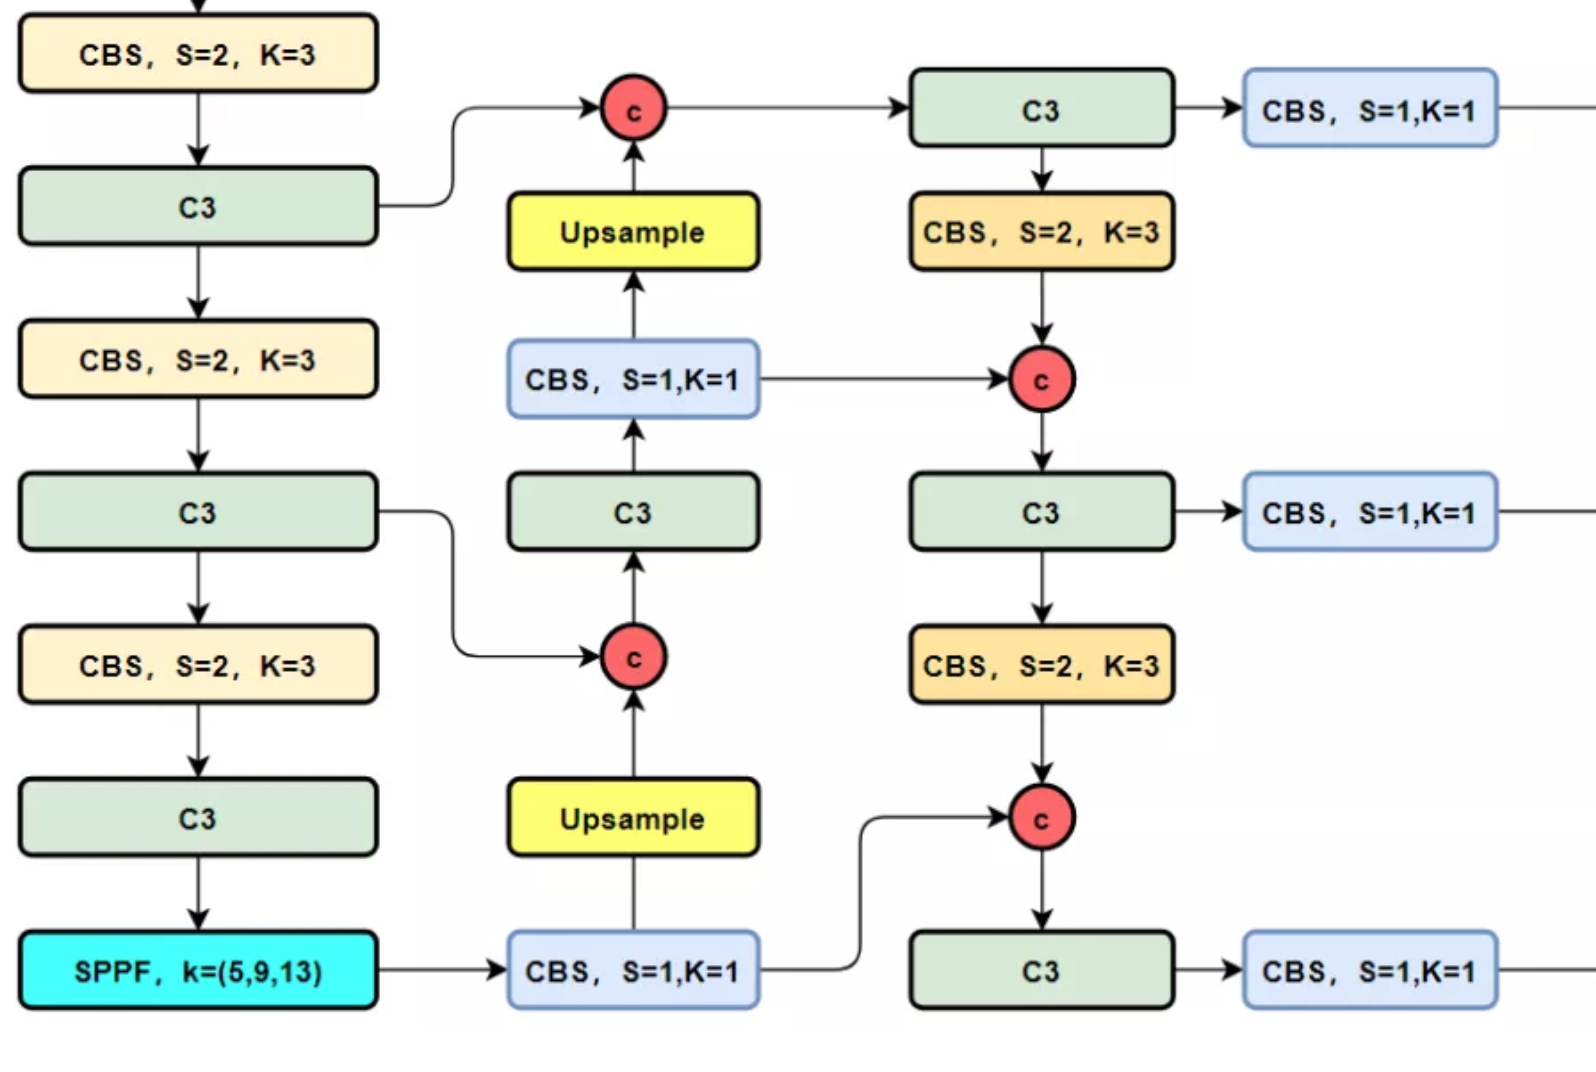
YOLOv5
Head:YOLOv8也不再使用的传统的YOLOhead,开始使用YOLOX提出的Decoupled-Head。将分类和回归任务分离,之前的YOLOhead是合在一起的。双分支目前已经成为主流,例如YOLOv6;PP-YOLOE这些主流的检测器。
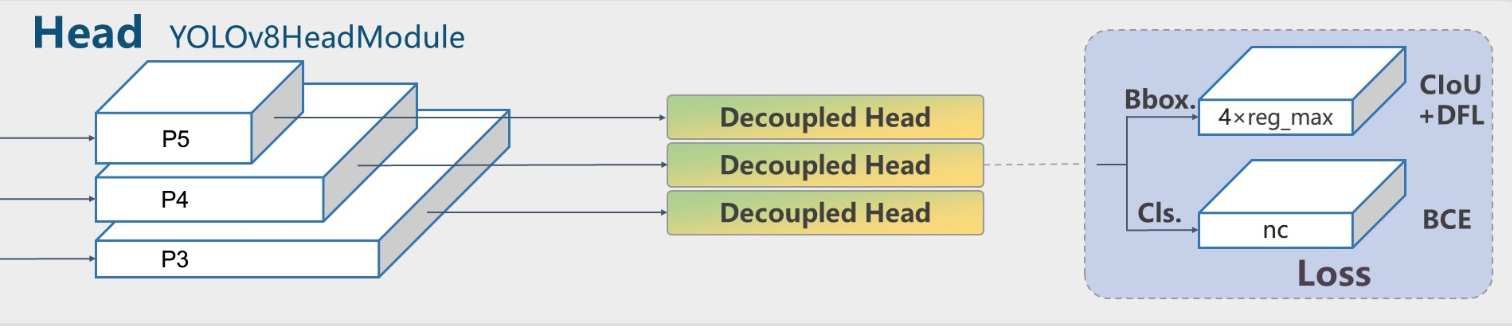
但同时和YOLOX还是有差别的,去掉了Obj这个输出分支(框内是否包含物体的得分)
Loss: YOLOv8的标签分配策略从MaxIOU更换成了Task-Aligned,同时变成了Anchor-free的检测器,分类损失为VFLloss 回归损失为 CIOU loss+DFLloss
命令行
- git clone https://github.com/ultralytics/ultralytics.git
- cd ultralytics
- pip install -e .
或者前往官方下载压缩包https://github.com/ultralytics/ultralytics
pip install ultralytics
命令行:
- wget http://images.cocodataset.org/zips/train2017.zip
- wget http://images.cocodataset.org/annotations/annotations_trainval2017.zip
-
- wget http://images.cocodataset.org/zips/val2017.zip
- wget http://images.cocodataset.org/annotations/stuff_annotations_trainval2017.zip
-
- wget http://images.cocodataset.org/zips/test2017.zip
- wget http://images.cocodataset.org/annotations/image_info_test2017.zip
官网下载到本地:
https://cocodataset.org/#download
本教程使用的设备为NVIDIA 3090
实验环境:
python 3.8
torch-1.12.1+cu113
yolov8仅支持YOLO格式的标签,COCO的默认标签为JSON格式,所以需要将COCO格式转换为YOLO格式。
如果训练COCO数据集的话一定要按照这个格式,摆放目录images,labels这两个目录名不可以改变
因为在内部已经写好了就这么去找数据,如果不按照这个规则写就会报错:No labels found in
- datasets
- |
- coco
- |
- images
- |
- train2017
- val2017
- labels
- |
- train2017
- val2017
先把文件结构搭建好在创建一个py文件运行即可,里面的一些路径叫不准的情况下就换成绝对路径,使用相对路径容易出错,该代码可将COCO格式转换为YOLO格式并保存在labels/下。这里需要运行两次,train和val都需要转换。
- import os
- import json
- from tqdm import tqdm
- import argparse
-
- parser = argparse.ArgumentParser()
- parser.add_argument('--json_path', default='datasets/coco/annotations/instances_train2017.json',type=str, help="input: coco format(json)")
- parser.add_argument('--save_path', default='datasets/coco/labels/train2017', type=str, help="specify where to save the output dir of labels")
- arg = parser.parse_args()
-
- def convert(size, box):
- dw = 1. / (size[0])
- dh = 1. / (size[1])
- x = box[0] + box[2] / 2.0
- y = box[1] + box[3] / 2.0
- w = box[2]
- h = box[3]
-
- x = x * dw
- w = w * dw
- y = y * dh
- h = h * dh
- return (x, y, w, h)
-
- if __name__ == '__main__':
- json_file = arg.json_path # COCO Object Instance 类型的标注
- ana_txt_save_path = arg.save_path # 保存的路径
-
- data = json.load(open(json_file, 'r'))
- if not os.path.exists(ana_txt_save_path):
- os.makedirs(ana_txt_save_path)
-
- id_map = {} # coco数据集的id不连续!重新映射一下再输出!
- for i, category in enumerate(data['categories']):
- id_map[category['id']] = i
-
- # 通过事先建表来降低时间复杂度
- max_id = 0
- for img in data['images']:
- max_id = max(max_id, img['id'])
- # 注意这里不能写作 [[]]*(max_id+1),否则列表内的空列表共享地址
- img_ann_dict = [[] for i in range(max_id+1)]
- for i, ann in enumerate(data['annotations']):
- img_ann_dict[ann['image_id']].append(i)
-
- for img in tqdm(data['images']):
- filename = img["file_name"]
- img_width = img["width"]
- img_height = img["height"]
- img_id = img["id"]
- head, tail = os.path.splitext(filename)
- ana_txt_name = head + ".txt" # 对应的txt名字,与jpg一致
- f_txt = open(os.path.join(ana_txt_save_path, ana_txt_name), 'w')
- '''for ann in data['annotations']:
- if ann['image_id'] == img_id:
- box = convert((img_width, img_height), ann["bbox"])
- f_txt.write("%s %s %s %s %s\n" % (id_map[ann["category_id"]], box[0], box[1], box[2], box[3]))'''
- # 这里可以直接查表而无需重复遍历
- for ann_id in img_ann_dict[img_id]:
- ann = data['annotations'][ann_id]
- box = convert((img_width, img_height), ann["bbox"])
- f_txt.write("%s %s %s %s %s\n" % (id_map[ann["category_id"]], box[0], box[1], box[2], box[3]))
- f_txt.close()
yolov8仅支持YOLO格式的标签,如果自定义数据集标签COCO格式,所以需要将COCO格式转换为YOLO格式。参考上面COCO数据集转YOLO的代码。
如果自定义数据集是XML标签的形式需要将XML转为YOLO格式,在开始前如果没有进行数据集的划分
可以通过下面的代码先对数据集进行划分生成对应的txt文件
- import os
- import random
- #训练集与验证集的划分比例
- trainval_percent = 0.4
- train_percent = 0.6
- xmlfilepath = '/Annotations' #标签文件
- txtsavepath = '/JPEGImages'#图片文件
- total_xml = os.listdir(xmlfilepath)
-
- num = len(total_xml)
- list = range(num)
- tv = int(num * trainval_percent)
- tr = int(tv * train_percent)
- trainval = random.sample(list, tv)
- train = random.sample(trainval, tr)
-
- ftest = open('/test.txt', 'w') #生成的test.txt路径
- ftrain = open('/train.txt', 'w')#生成的train.txt路径
-
- for i in list:
- name = total_xml[i][:-4] + '\n'
- if i in trainval:
- ftest.write(name)
- else:
- ftrain.write(name)
-
- ftrain.close()
- ftest.close()
数据集划分好后会在指定路径下生成test.txt和train.txt文件
在开始正式XML转YOLO前需要提前创建好数据集的目录依然要求提前准备好,结构如下:
构建好创建一个py文件进行XML转YOLO格式:
- import xml.etree.ElementTree as ET
- import pickle
- import os
- from os import listdir, getcwd
- from os.path import join
-
-
- sets = ['train','test']#生成txt的文件名称
- classes = ['crack']#你自定义模型的类别都要放在这个列表
-
-
- # 进行归一化操作
- def convert(size, box): # size:(原图w,原图h) , box:(xmin,xmax,ymin,ymax)
- dw = 1./size[0] # 1/w
- dh = 1./size[1] # 1/h
- x = (box[0] + box[1])/2.0 # 物体在图中的中心点x坐标
- y = (box[2] + box[3])/2.0 # 物体在图中的中心点y坐标
- w = box[1] - box[0] # 物体实际像素宽度
- h = box[3] - box[2] # 物体实际像素高度
- x = x*dw # 物体中心点x的坐标比(相当于 x/原图w)
- w = w*dw # 物体宽度的宽度比(相当于 w/原图w)
- y = y*dh # 物体中心点y的坐标比(相当于 y/原图h)
- h = h*dh # 物体宽度的宽度比(相当于 h/原图h)
- return (x, y, w, h) # 返回 相对于原图的物体中心点的x坐标比,y坐标比,宽度比,高度比,取值范围[0-1]
-
-
- def convert_annotation(image_id):
- '''
- 将对应文件名的xml文件转化为label文件,xml文件包含了对应的bunding框以及图片长款大小等信息,
- 通过对其解析,然后进行归一化最终读到label文件中去,也就是说
- 一张图片文件对应一个xml文件,然后通过解析和归一化,能够将对应的信息保存到唯一一个label文件中去
- labal文件中的格式:calss x y w h 同时,一张图片对应的类别有多个,所以对应的bunding的信息也有多个
- '''
- # 对应的通过year 找到相应的文件夹,并且打开相应image_id的xml文件,其对应bund文件
- in_file = open('/home/rui.tang/datasets1/mydata/Annotations/%s.xml' % (image_id), encoding='utf-8')
- # 准备在对应的image_id 中写入对应的label,分别为
- # <object-class> <x> <y> <width> <height>
- out_file = open('/home/rui.tang/datasets1/mydata/labels/%s.txt' % (image_id), 'w', encoding='utf-8')
- # 解析xml文件
- tree = ET.parse(in_file)
- # 获得对应的键值对
- root = tree.getroot()
- # 获得图片的尺寸大小
- size = root.find('size')
- # 如果xml内的标记为空,增加判断条件
- if size != None:
- # 获得宽
- w = int(size.find('width').text)
- # 获得高
- h = int(size.find('height').text)
- # 遍历目标obj
- for obj in root.iter('object'):
- # 获得difficult ??
- difficult = obj.find('difficult').text
- # 获得类别 =string 类型
- cls = obj.find('name').text
- # 如果类别不是对应在我们预定好的class文件中,或difficult==1则跳过
- if cls not in classes or int(difficult) == 1:
- continue
- # 通过类别名称找到id
- cls_id = classes.index(cls)
- # 找到bndbox 对象
- xmlbox = obj.find('bndbox')
- # 获取对应的bndbox的数组 = ['xmin','xmax','ymin','ymax']
- b = (float(xmlbox.find('xmin').text), float(xmlbox.find('xmax').text), float(xmlbox.find('ymin').text),
- float(xmlbox.find('ymax').text))
- print(image_id, cls, b)
- # 带入进行归一化操作
- # w = 宽, h = 高, b= bndbox的数组 = ['xmin','xmax','ymin','ymax']
- bb = convert((w, h), b)
- # bb 对应的是归一化后的(x,y,w,h)
- # 生成 calss x y w h 在label文件中
- out_file.write(str(cls_id) + " " + " ".join([str(a) for a in bb]) + '\n')
-
-
- # 返回当前工作目录
- wd = getcwd()
- print(wd)
-
-
- for image_set in sets:
- '''
- 对所有的文件数据集进行遍历
- 做了两个工作:
- 1.将所有图片文件都遍历一遍,并且将其所有的全路径都写在对应的txt文件中去,方便定位
- 2.同时对所有的图片文件进行解析和转化,将其对应的bundingbox 以及类别的信息全部解析写到label 文件中去
- 最后再通过直接读取文件,就能找到对应的label 信息
- '''
- # 先找labels文件夹如果不存在则创建
- if not os.path.exists('/datasets/mydata/labels/'):
- os.makedirs('/datasets/mydata/labels/')
- # 读取在ImageSets/Main 中的train、test..等文件的内容
- # 包含对应的文件名称
- image_ids = open('/datasets/mydata/ImageSets/%s.txt' % (image_set)).read().strip().split()
- # 这个生成的txt文件是携带路径信息的txt文件用于模型加载数据
- list_file = open('/datasets1/mydata/%s.txt' % (image_set), 'w')
- # 将对应的文件_id以及全路径写进去并换行
- for image_id in image_ids:
- list_file.write('/datasets/mydata/images/%s.jpg\n' % (image_id))
- # 调用 year = 年份 image_id = 对应的文件名_id
- convert_annotation(image_id)
- # 关闭文件
- list_file.close()
运行后会在指定路径下生成两个txt文件,包含了数据的绝对路径。到这里我们需要进入ultralytics/ultralytics/datasets/.yaml 创建一个yaml文件,然后将下面内容复制并更改为你需要的:
- # Train/val/test sets as 1) dir: path/to/imgs, 2) file: path/to/imgs.txt, or 3) list: [path/to/imgs1, path/to/imgs2, ..]
- path: ../datasets/mydata # 数据路径
- train: train.txt # 上面生成的带有绝对路径的txt文件
- val: test.txt #
- test: #不用管
-
- # 自定义数据要检测的类别 索引+类别
- names:
- 0: crack
模型训练,模型验证,模型预测,模型转换同下面的内容
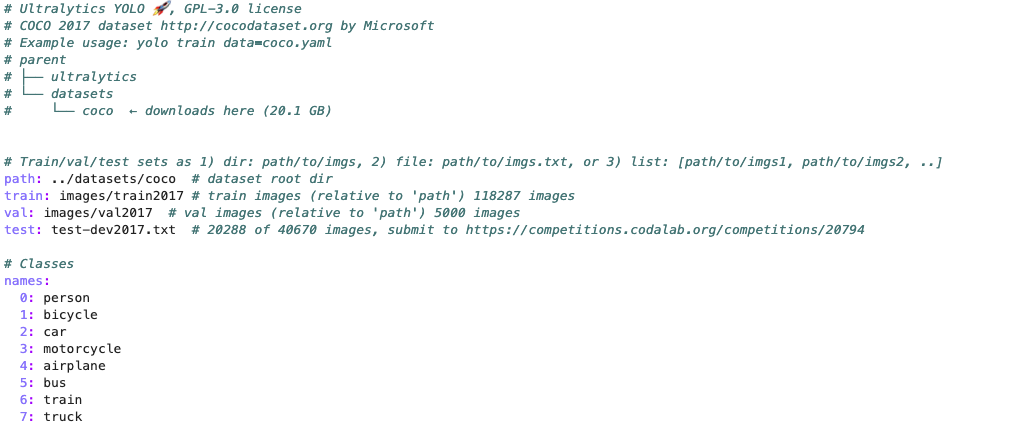
在开始训练前需要去设置一些yaml文件,路径ultralytics/datasets/coco.yaml
把下面的路径设置好
接下来开始正式训练:
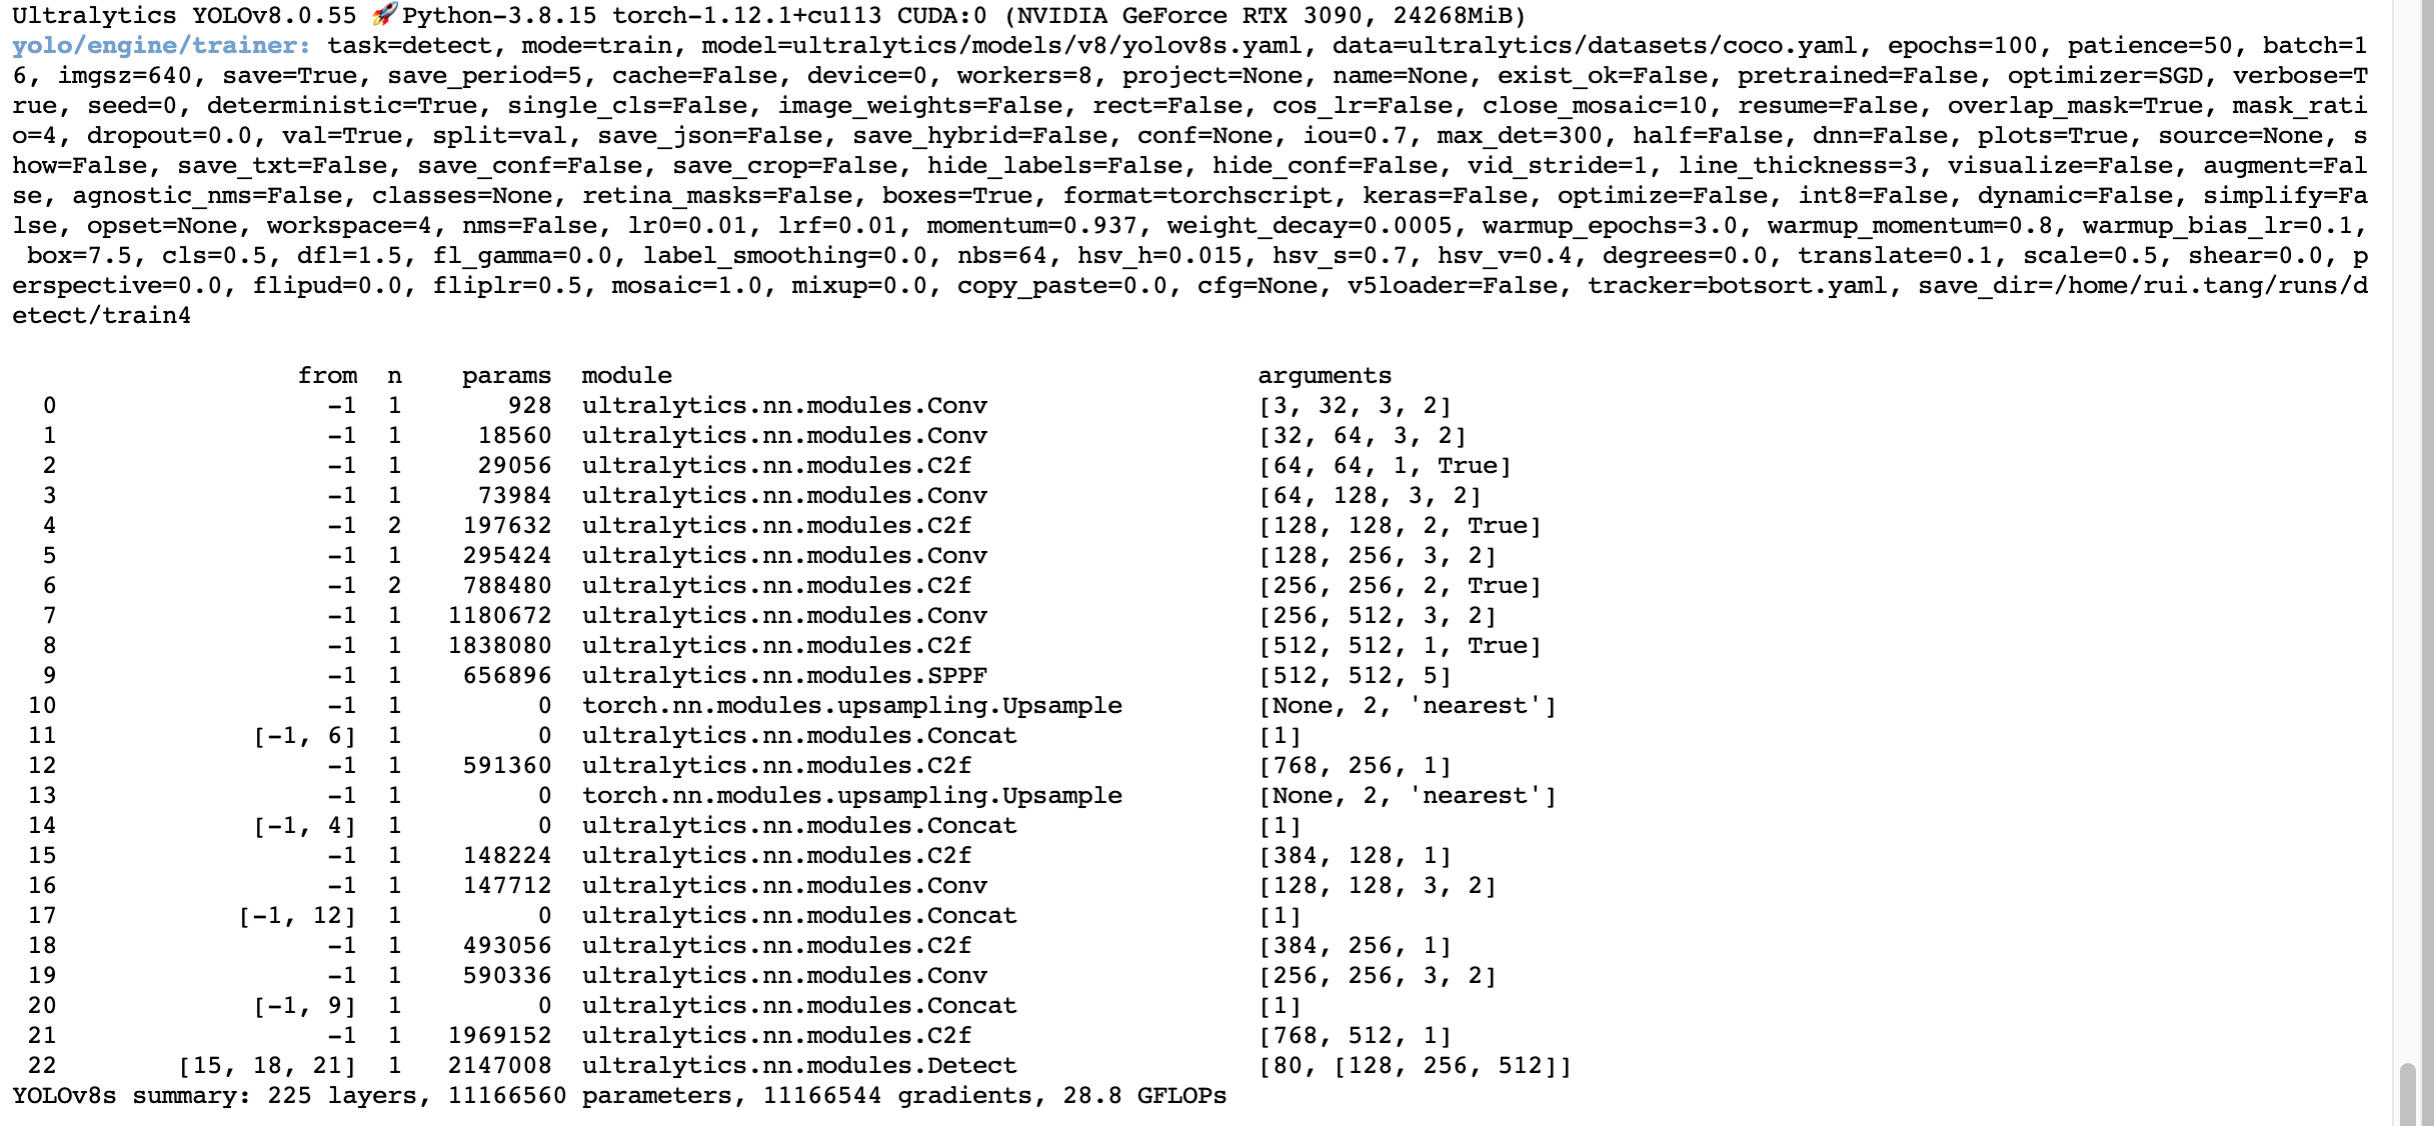
YOLOv8可以使用正常的python脚本进行训练也可以使用yolo这个命令行进行训练yolo命令行就是命令行传入参数,本教程应用python脚本进行讲解,在同级目录下创建train.py文件,可以提前准备好预训练权重。
- from ultralytics import YOLO
-
- # Load a model
- model = YOLO('ultralytics/models/v8/yolov8s.yaml').load('yolov8s.pt')
-
- # Train the model
- model.train(data='ultralytics/datasets/coco.yaml', epochs=100, imgsz=640,save_period=5,device=0)
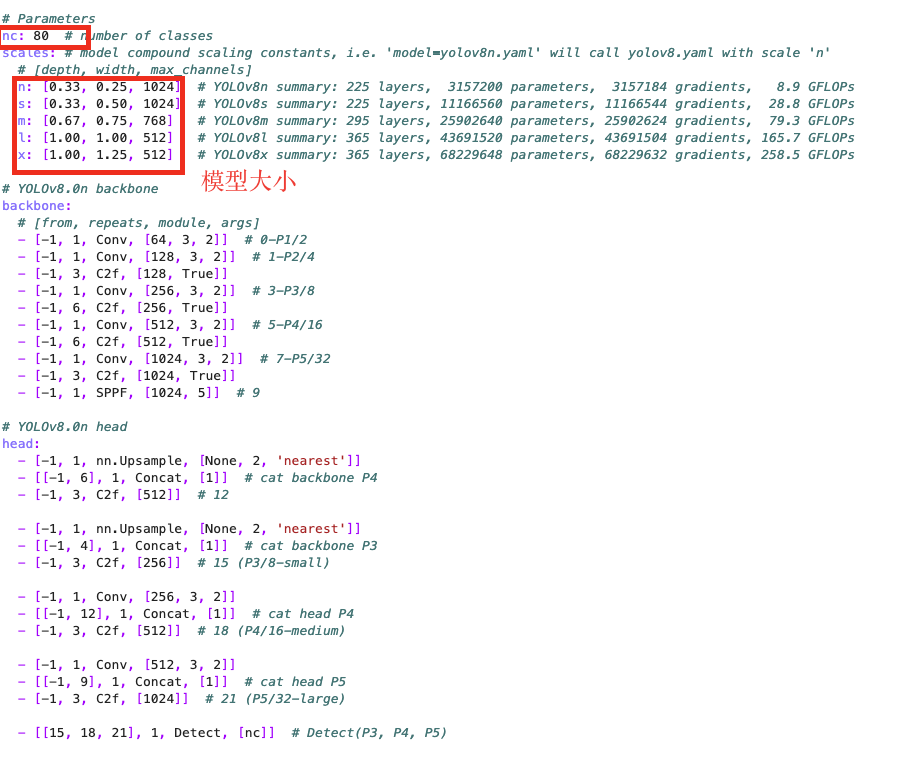
模型yaml文件地址ultralytics/ultralytics/models/v8/yolov8.yaml 我们发现只有一个yolov8.yaml文件但是如果你想用任何大小的模型直接在yolov8s或者yolov8x,这里就会自动匹配scales里的模型,此外nc为类别在训练自己数据集的情况下自行更改,下面的backbone和head就是整个模型的搭建过程。
在上面的训练代码中model.train(data='ultralytics/datasets/coco.yaml', epochs=10, imgsz=640,save_period=5,device=0)我只设置了少部分参数,如果需要个性化配置他可以参考下面的表格进行传参。参考:https://docs.ultralytics.com/modes/train/或者ultralytics/ultralytics/yolo/cfg/default.yaml查看默认参数配置的yaml文件
Key | Value | Description |
model | None | 权重路径 |
data | None | 数据路径yaml |
epochs | 100 | 训练多少轮 |
patience | 50 | 如果没有明显上升就停止的轮次 |
batch | 16 | 批次大小 |
imgsz | 640 | 数据输入尺寸 |
save | True | save train checkpoints and predict results |
save_period | -1 | 训练几轮保存一次权重 |
cache | False | 使用缓存加载数据 |
device | None | device to run on, i.e. cuda device=0 or device=0,1,2,3 or device=cpu |
workers | 8 | number of worker threads for data loading (per RANK if DDP) |
project | None | project name |
name | None | experiment name |
exist_ok | False | whether to overwrite existing experiment |
pretrained | False | whether to use a pretrained model |
optimizer | 'SGD' | optimizer to use, choices=['SGD', 'Adam', 'AdamW', 'RMSProp'] |
verbose | False | whether to print verbose output |
seed | 0 | random seed for reproducibility |
deterministic | True | whether to enable deterministic mode |
single_cls | False | train multi-class data as single-class |
image_weights | False | use weighted image selection for training |
rect | False | support rectangular training |
cos_lr | False | use cosine learning rate scheduler |
close_mosaic | 10 | mosaic数据增强最后十轮关闭 |
resume | False | 断点续训 |
lr0 | 0.01 | initial learning rate (i.e. SGD=1E-2, Adam=1E-3) |
lrf | 0.01 | final learning rate (lr0 * lrf) |
momentum | 0.937 | SGD momentum/Adam beta1 |
weight_decay | 0.0005 | optimizer weight decay 5e-4 |
warmup_epochs | 3.0 | warmup epochs (fractions ok) |
warmup_momentum | 0.8 | warmup initial momentum |
warmup_bias_lr | 0.1 | warmup initial bias lr |
box | 7.5 | box loss gain |
cls | 0.5 | cls loss gain (scale with pixels) |
dfl | 1.5 | dfl loss gain |
fl_gamma | 0.0 | focal loss gamma (efficientDet default gamma=1.5) |
label_smoothing | 0.0 | label smoothing (fraction) |
nbs | 64 | nominal batch size |
overlap_mask | True | masks should overlap during training (segment train only) |
mask_ratio | 4 | mask downsample ratio (segment train only) |
dropout | 0.0 | use dropout regularization (classify train only) |
val | True | validate/test during training |
train一下看看效果

如果需要进行多卡训练需要改两个参数:
model.train(device=[0,1,2,3],batch=128),有几张卡就几个索引,同时batch可以根据你设置的卡的数量增加批次大小
这里直接使用YOLOv8官方下载的YOLOv8s.pt进行推理,在同级目录下创建eval.py
- from ultralytics import YOLO
-
- # Load a model
- model = YOLO('yolov8s.pt') # load an official model
- # Validate the model
- metrics = model.val(data='ultralytics/datasets/coco.yaml',iou=0.7,conf=0.001,half=False,device=0) # no arguments needed, dataset and settings remembered
- metrics.box.map # map50-95
- metrics.box.map50 # map50
- metrics.box.map75 # map75
- metrics.box.maps # a list contains map50-95 of each category
同样model.val()里面可以设置很多的参数参照:
data | None | path to data file, i.e. coco128.yaml |
imgsz | 640 | image size as scalar or (h, w) list, i.e. (640, 480) |
batch | 16 | number of images per batch (-1 for AutoBatch) |
save_json | False | save results to JSON file |
save_hybrid | False | save hybrid version of labels (labels + additional predictions) |
conf | 0.001 | object confidence threshold for detection |
iou | 0.6 | intersection over union (IoU) threshold for NMS |
max_det | 300 | maximum number of detections per image |
half | True | use half precision (FP16) |
device | None | device to run on, i.e. cuda device=0/1/2/3 or device=cpu |
dnn | False | use OpenCV DNN for ONNX inference |
plots | False | show plots during training |
rect | False | support rectangular evaluation |
split | val | dataset split to use for validation, i.e. 'val', 'test' or 'train |
val一下看看效果:

官方给的在COCOval上的推理结果是44.9怎么查了0.4个点,PS:表示疑惑
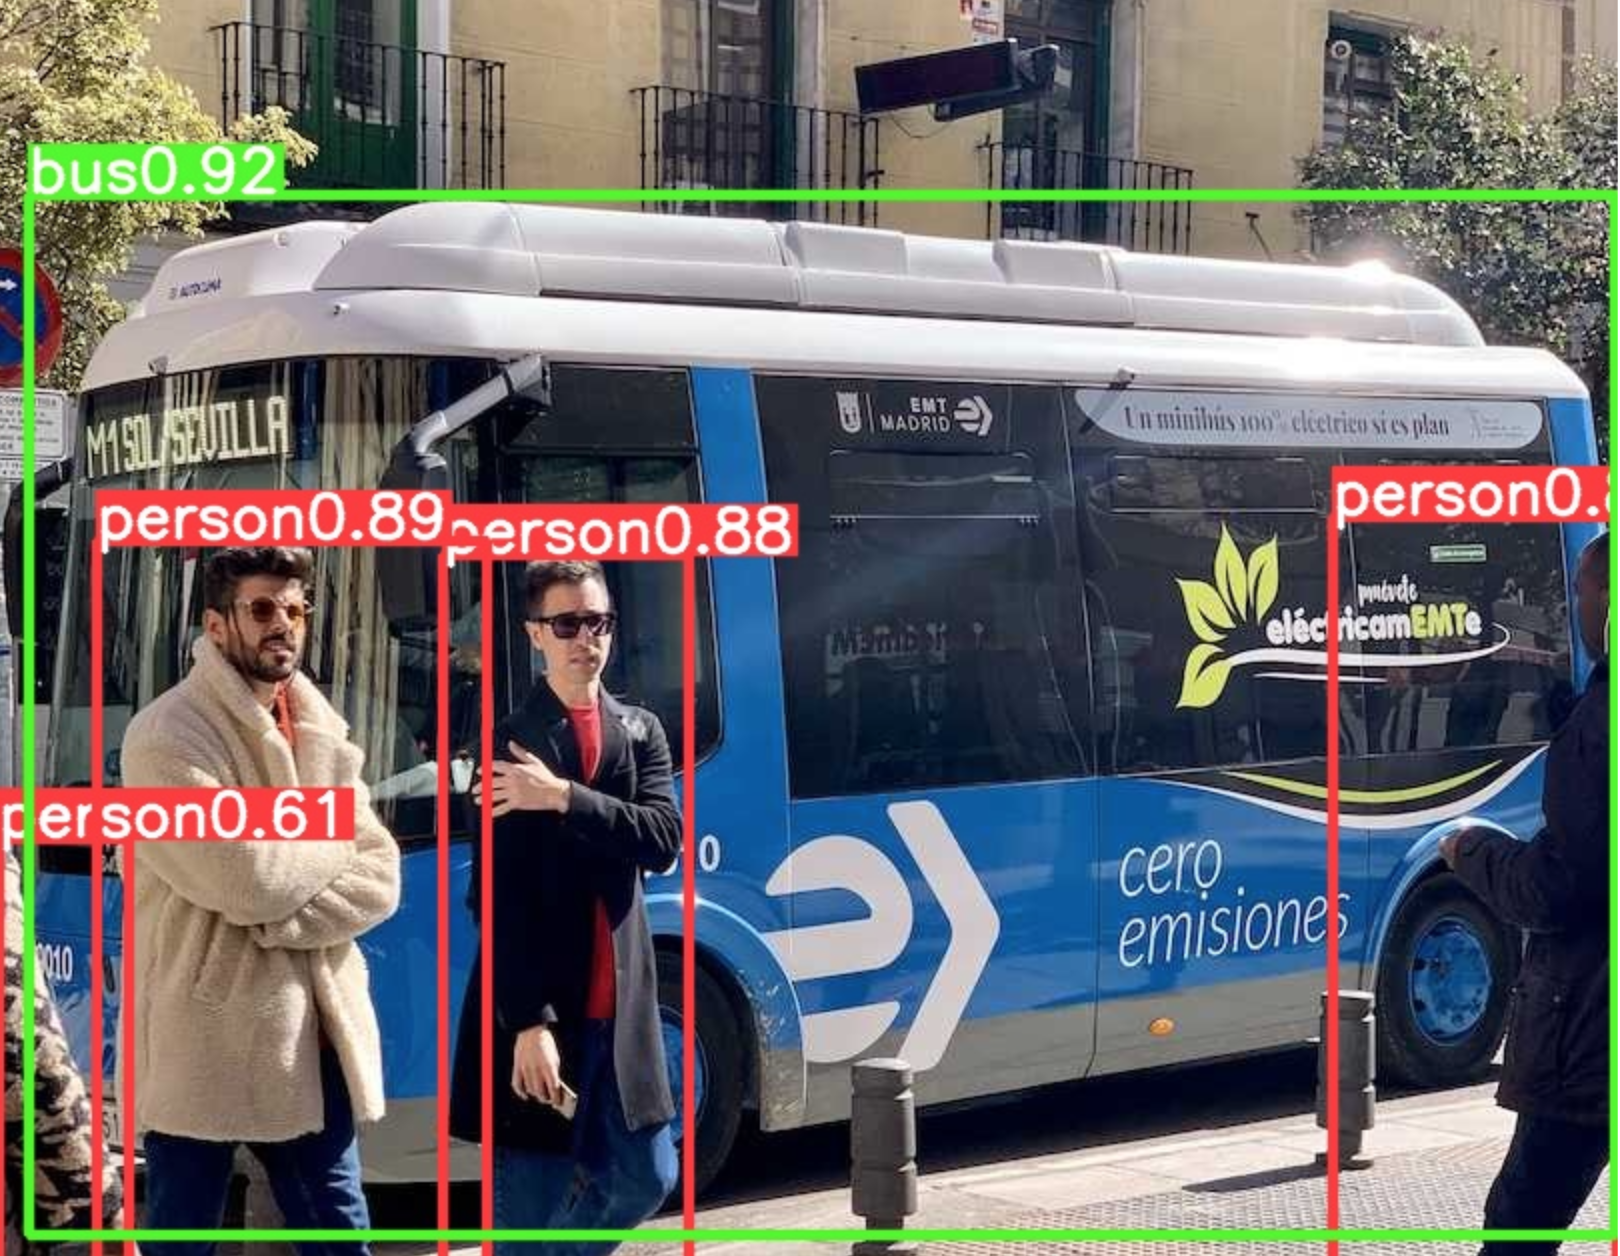
在同名文件创建predict.py文件
- from ultralytics import YOLO
- import cv2
- # Load a model
- model = YOLO('yolov8s.pt') # load an official model
-
- # Predict with the model
- results = model.predict('ultralytics/assets/bus.jpg',classes=0,save=True) # predict on an image
- # res_plotted = results[0].plot()
- # cv2.imwrite("result.jpg", res_plotted)
也可以通过results[0].plot()利用opencv进行自定义路径存储,这个results里面的包含预测到的全部信息,并且可以通指定的函数获得具体的值,方便利用这些值做其他的一些操作。例如
- results = model.predict(inputs)
- boxes = results[0].boxes
- box = boxes[0] # returns one box
- boxes.xyxy # 将位置信息转换成左上角右下角
- boxes.xywh # 将位置信息转换成中心宽高
- boxes.xyxyn # box with xyxy format but normalized, (N, 4)
- boxes.xywhn # box with xywh format but normalized, (N, 4)
- boxes.conf # 输出该预测框的置信度
- 输出结果:
- tensor([0.92131], device='cuda:0')
- boxes.cls #输出类别索引
- 输出结果:
- tensor([5], device='cuda:0')
- boxes.data # raw bboxes tensor, (N, 6) or boxes.boxes
- 输出结果:
- tensor([[ 15.03568, 228.48239, 808.17395, 748.12640, 0.92131, 5.00000]], device='cuda:0')
model.predict() 可以传入的一些参数
source | 图片或者视频 | |
show | False | 是否显示结果 |
save_txt | False | 将结果保存为 .txt 文件 |
save_crop | False | 保存裁剪后的图像和结果 |
hide_labels | False | 隐藏标签 |
hide_conf | False | 隐藏自信度 |
vid_stride | False | 视频帧率步幅 |
line_thickness | 3 | 边界框厚度 |
visualize | False | 可视化模型特征 |
augment | False | 应用图像增强预测源 |
agnostic_nms | False | class-agnostic nms |
classes | 直接输入索引的类别 0 or [0,1,2] | |
retina_masks | False | 使用高分辨率分割掩码 |
boxes | True | |
save | True | 是否保存结果 |
conf | 0.25 | 置信度 |
imgsz | 640 | resize |
YOLOv8比较有意思的传参是这个classes给定一个类别索引预测的时候会只预测相应类别的目标。
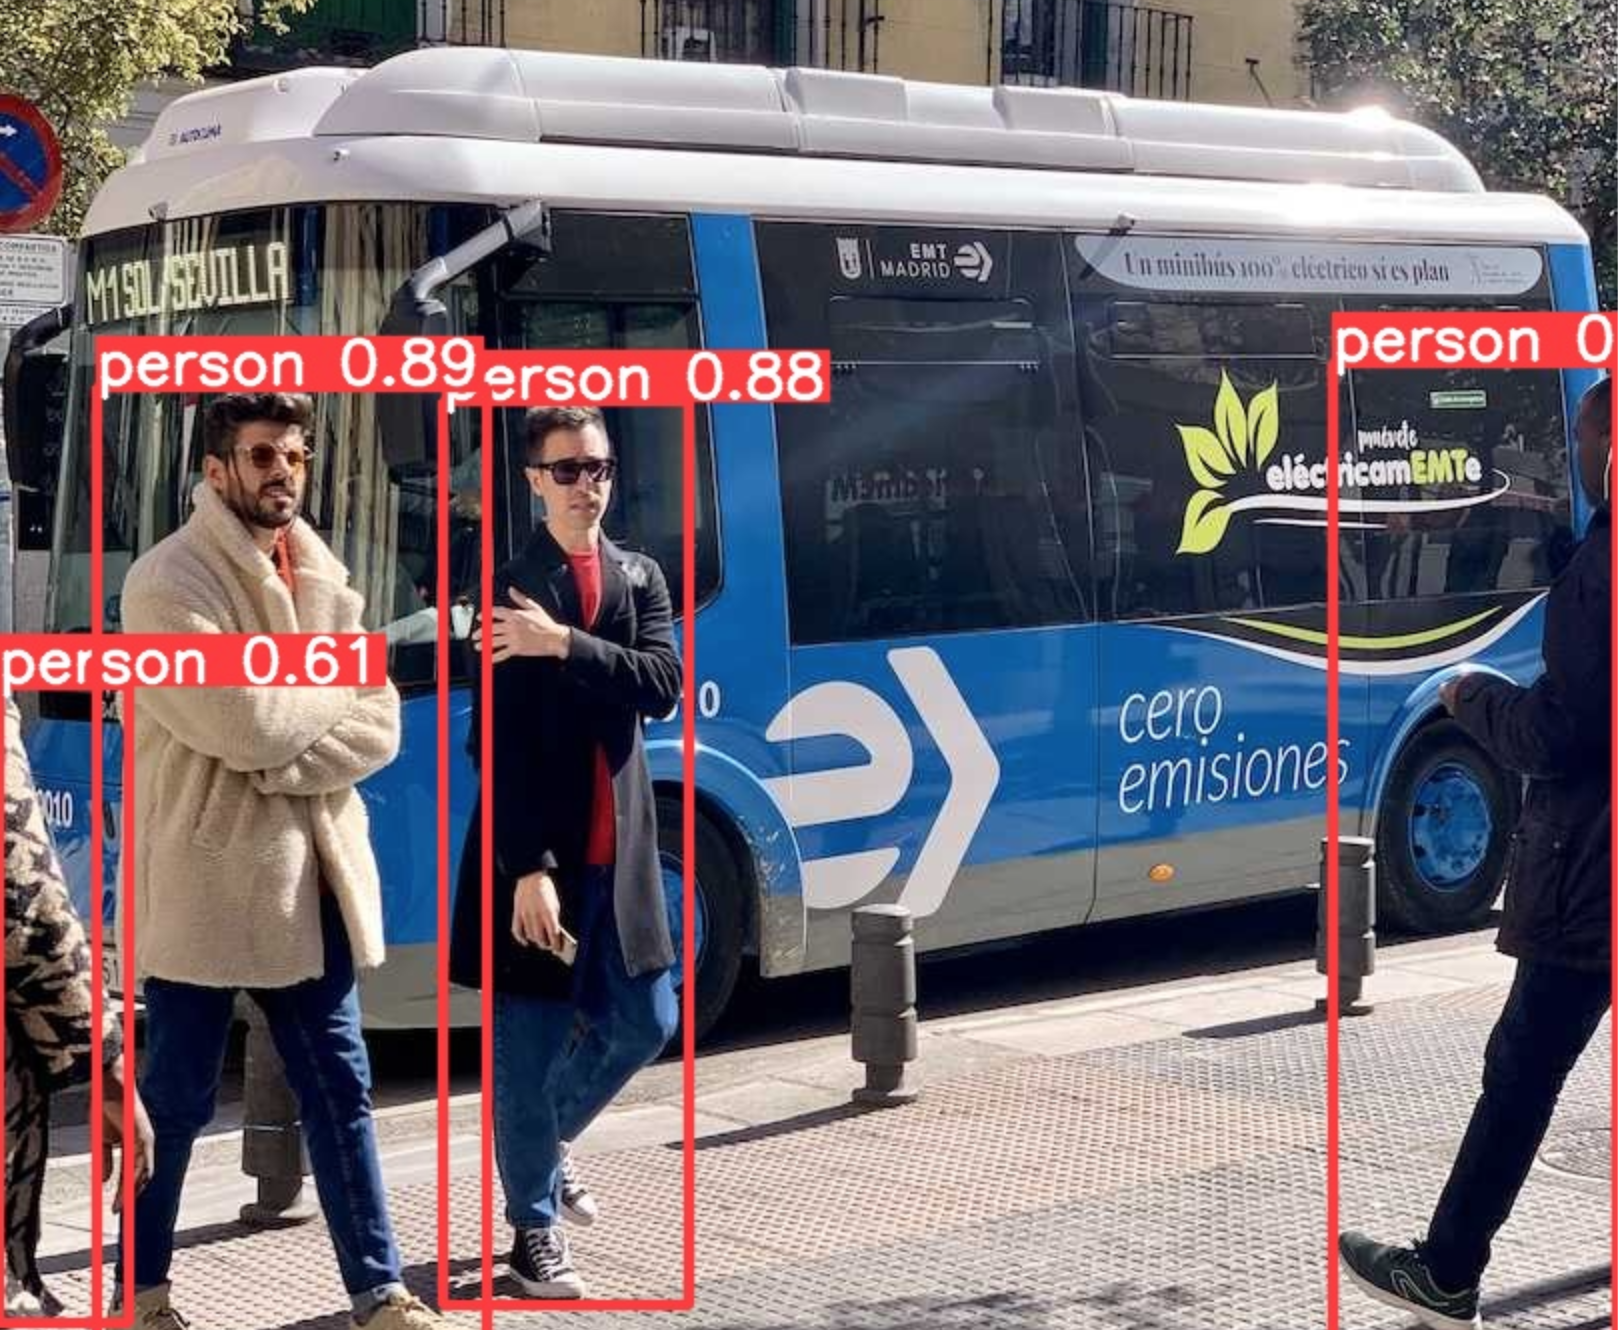
除了上面提到的进行预测的方法,YOLOv8还支持很多格式的输入例如opencv PIL等,也就是说可以在函数外部对数据进行自定义的前处理,这些处理可以是任意形式的最后只需要将格式转化为模型可接受的格式即可。
- from ultralytics import YOLO
- from PIL import Image
- import cv2
-
- model = YOLO("model.pt")
- # accepts all formats - image/dir/Path/URL/video/PIL/ndarray. 0 for webcam
- results = model.predict(source="0")
- results = model.predict(source="folder", show=True) # Display preds. Accepts all YOLO predict arguments
-
- # from PIL
- im1 = Image.open("bus.jpg")
- results = model.predict(source=im1, save=True) # save plotted images
-
- # from ndarray
- im2 = cv2.imread("bus.jpg")
- results = model.predict(source=im2, save=True, save_txt=True) # save predictions as labels
-
- # from list of PIL/ndarray
- results = model.predict(source=[im1, im2]
目前YOLOv8支持的模型转换
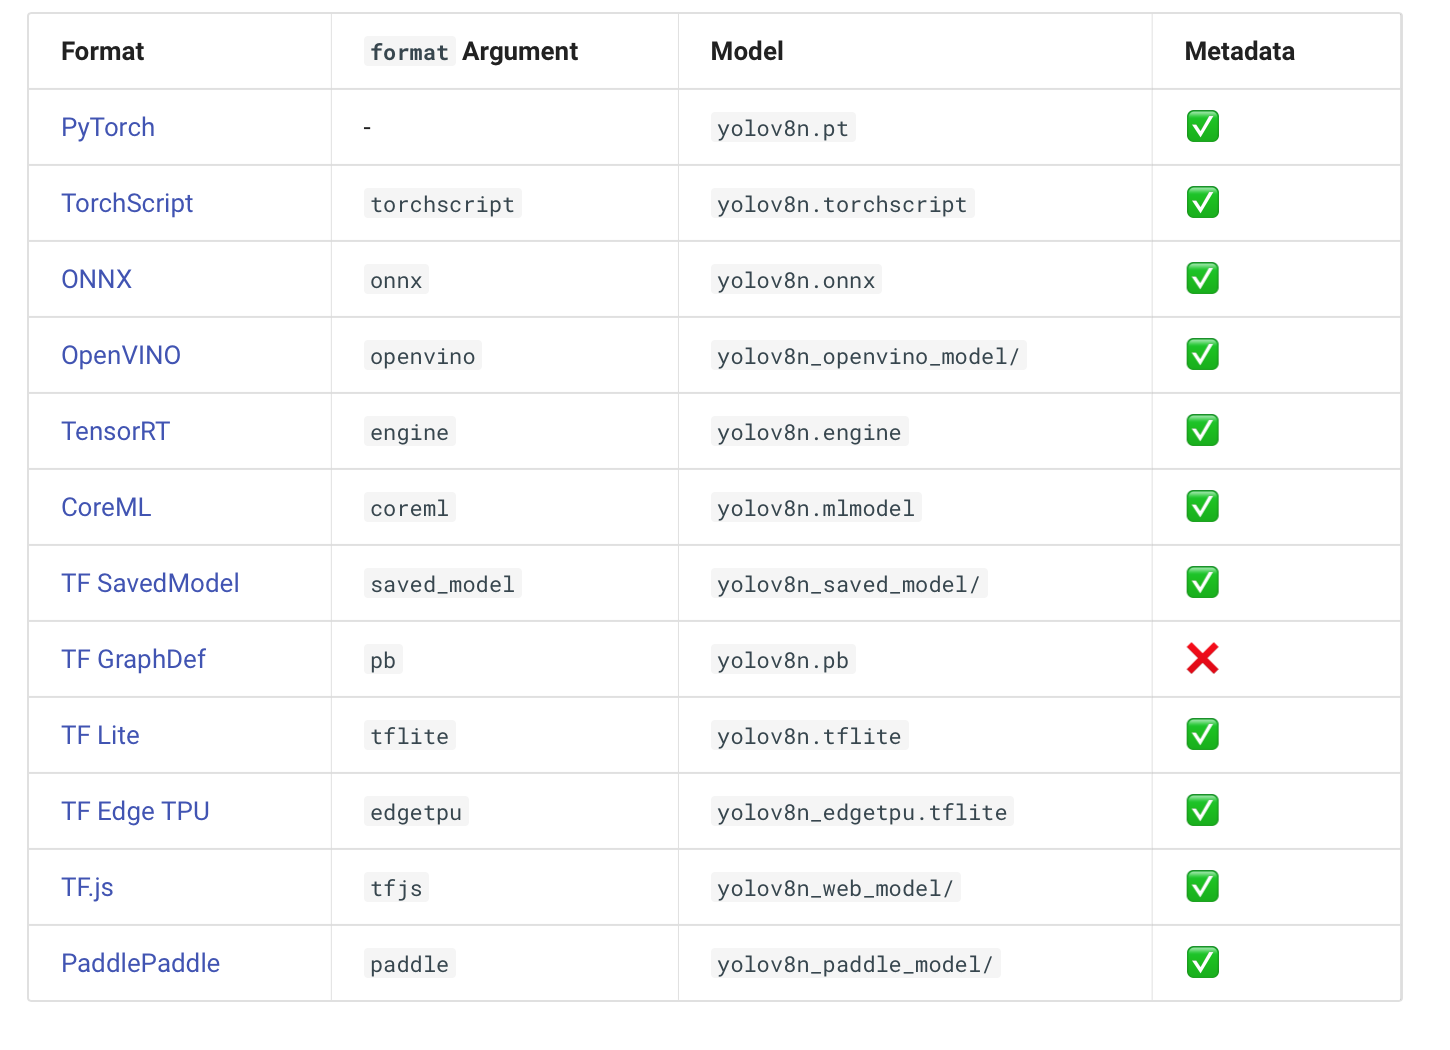
本教程以ONNX为例
- from ultralytics import YOLO
-
- model = YOLO("model.pt")
- model.fuse()
- model.info(verbose=True) # Print model information
- model.export(format='onnx',imgsz=640,dynamic=True,opset=11)
Key | Value | Description |
format | 'torchscript' | 导出那种模型 |
imgsz | 640 | 输入尺寸 |
keras | False | 使用Keras导出TF SavedModel |
optimize | False | TorchScript: optimize for mobile |
half | False | FP16 quantization |
int8 | False | INT8 quantization |
dynamic | False | ONNX/TF/TensorRT: 动态输入 |
simplify | False | ONNX: simplify model |
opset | None | ONNX: opset version (optional, defaults to latest) onnx转换版本默认最新的 |
workspace | 4 | TensorRT: workspace size (GB) |
nms | False | CoreML: add NMS |
使用onnx进行推理也是很方便的,直接model=YOLO(.onnx)就可以了。
感谢你观看,有问题可以直接评论。
- 文章浏览阅读6.9k次,点赞26次,收藏138次。LSTM(LongShort-TermMemory)是一种常用的循环神经网络(RNN)模型,用于处理序列数据,具有记忆长短期的能力。在时间序列预测中,LSTM既可以多元预测机制又可以作为单元... [详细]
赞
踩
- 计算机视觉是一门研究如何使机器“看”的科学,更进一步的说,就是是指用摄影机和电脑代替人眼对目标进行识别、跟踪和测量等机器视觉,并进一步做图形处理,使电脑处理成为更适合人眼观察或传送给仪器检测的图像。作为一个科学学科,计算机视觉研究相关的理论... [详细]
赞
踩
- 本文全面回顾了目标检测技术的演进历程,从早期的滑动窗口和特征提取方法到深度学习的兴起,再到YOLO系列和Transformer的创新应用。通过对各阶段技术的深入分析,展现了计算机视觉领域的发展趋势和未来潜力。人工智能-目标检测:发展历史、技... [详细]
赞
踩
- OpenCV+OCR识别图像验证码中指定颜色文字!【OpenCV+OCR】计算机视觉:识别图像验证码中指定颜色文字文章目录1.写在前面2.读取验证码图像3.生成颜色掩码4.生成黑白结果图5.OCR文字识别6.测试结果【作者主页】:吴秋霖【作... [详细]
赞
踩
- 本文全面探讨了人脸识别技术的发展历程、关键方法及其应用任务目标,深入分析了从几何特征到深度学习的技术演进。_人脸识别技术的发展历程人脸识别技术的发展历程目录一、人脸识别技术的发展历程早期探索:20世纪60至80年代技术价值点:自动化与算法化... [详细]
赞
踩
- 材料设计和发现:通过机器学习和深度学习算法,预测材料的性质和特性,在材料研究和开发中起到重要的作用。例如,使用AI算法可以快速分析材料的光学、电学和磁学性能,预测材料的力学性能和耐久性能等。材料制备和加工:AI可以帮助优化材料制备和加工工艺... [详细]
赞
踩
- 讲述BP神经网络原理,并通过Python语言,分别导入numpy、sklearn和pytorch库完成编程。_bp神经网络bp神经网络一、人工神经网络1.1人工神经网络理论人工神经网络(ArtificialNeuralNetwork,ANN... [详细]
赞
踩
 关于人类大脑建模的数学公式主要涉及到神经元网络、激活函数、学习算法等方面。这里是一些常见的数学公式(使用Markdown和LaTeX语法)。【人工智能】关于人类大脑模型的一些数学公式关于人类大脑模型的一些数学公式文章目录关于人类大脑模型的一... [详细]
赞
踩
- 大家好,我是微学AI,今天给大家介绍一下人工智能(pytorch)搭建模型13-pytorch搭建RBM(受限玻尔兹曼机)模型,调通模型的训练与测试。RBM(受限玻尔兹曼机)可以在没有人工标注的情况下对数据进行学习。其原理类似于我们人类学习... [详细]
赞
踩

