
- 1Linux文件系统保护最佳实践:Tripwire
- 2Objective-C runtime机制(8)——OC对象从创建到销毁_oc封装的对象如何销毁
- 3volatile几个特性_c语言 volatile三个特性
- 4linux下搭建golang开发环境_linux 搭建nexus golang
- 5Linux的strace工具使用
- 6Python之binascii中被废弃的函数b2a_hex()和a2b_hex()
- 7【mysql学习篇】分页查询&连接查询索引优化剖析_mysql开发技巧 - 分页和索引
- 8Java环境的搭建_java环境搭建
- 9[转]信息安全相关理论题(四)_网上陌生人给你发送补丁文件正确的操作是不下载文件
- 10IDEA无法识别项目中的Java类_idea不识别java文件
react项目总结_react项目经验
赞
踩
本文章主要是源自实际项目开发项目的总结,一些思考是参考了看过的文章,做了一篇总结,demo是跑过的,可以放心食用。
目录
4.class组件中使用shouldComponentUpdate
一.组件通信
1.父组件向子组件通信
- 向子组件传递props
- <ChildList list={this.state.list} />
- <ChildSettings {...this.state.options} />
- 父组件调用子组件中的方法
1)函数组件:父组件useRef()创建一个ref,通过ref属性附加到子组件上,子组件用forwardRef来获取传递给它的ref,配合useImperativeHandle使用可以自定义暴露给父组件的方法
- // 父组件
- import { useRef } from "react";
- const childRef = useRef();
-
- useEffect(() => {
- childRef.current.childFunc();
- }, []);
-
- return (
- <div>
- <Child ref={childRef} />
- </div>
- );
-
- // 子组件
- import { forwardRef, useImperativeHandle } from "react";
-
- const Child = forwardRef((props, ref) => {
- useImperativeHandle(ref, () => ({
- childFunc() {
- return logChild();
- },
- }));
- const logChild = () => {
- console.log("---child-----");
- };
- return <div>child</div>;
- });
-
- export default Child;

2)class组件:子组件通过调用父组件的props方法,将子组件本身暴露出去,父组件可直接使用子组件内的方法,不想暴露给父组件的方法可以用static关键字定义静态方法
- // 父组件
- export default class Parent extends React.Component {
- onClick = () => {
- this.childRef.childFunc();
- };
-
- render() {
- return (
- <div>
- <Child
- onRef={(ref) => {
- this.childRef = ref;
- }}
- />
- <button onClick={this.onClick}>click</button>
- </div>
- );
- }
- }
-
- // 子组件
- class Child extends React.Component {
- componentDidMount() {
- this.props.onRef(this);
- }
-
- static myFunc = () => {
- console.log('本方法不暴露给父组件');
- };
-
- childFunc = () => {
- console.log("---child-----");
- };
-
- render() {
- return <div>child</div>;
- }
- }
- export default Child;
2.子组件向父组件通信
父组件向子组件传递props方法,子组件主动调用该方法,将需要的信息作为参数传递到父组件的作用域中
- // 父组件
- <ChildSelector
- value={this.state.selectedValue}
- onSelect={(selectedValue) => {
- this.setState({
- selectedValue
- })
- }}
- />
-
- // 子组件
- onSelect = (value) => {
- this.props.onSelect(value);
- }
3.跨级组件通信
使用Context共享组件树上能够全局访问的数据。注:Child1为Child的子组件
1)React.createContext(defaultValue)创建Context对象,订阅了Context对象的组件会从组件树中找到离自身最近的Provider中读取到当前的context,Context对象会返回Provider组件,允许Consumer消费组件订阅context的变化
- // context/AppContext.js
- import { createContext } from "react";
-
- export default createContext({
- name: "",
- changeName: () => {},
- });
2)函数组件:子组件使用useContext(),接收一个context对象,返回该context的当前值
- // 根组件
- import { useState } from "react";
- import Child from "./Child";
- import Context from "./context/AppContext";
-
- const Parent = () => {
- const [name, setName] = useState("defaultName");
-
- const changeName = (name) => {
- setName(name);
- };
-
- return (
- <Context.Provider value={{ name, changeName }}>
- <Child />
- </Context.Provider>
- );
- };
-
- export default Parent;
-
- // 子组件Child1
- import { useContext } from "react";
- import Context from "./context/AppContext";
-
- const Child1 = () => {
- const context = useContext(Context);
-
- return <div onClick={() => context.changeName("Child")}>{context.name}</div>;
- };
-
- export default Child1;
3)class组件:子组件contextType属性会被重新赋值为一个由 React.createContext() 创建的 Context 对象
- // 根组件
- import Child from "./Child";
- import Context from "./context/AppContext";
-
- export default class Parent extends React.Component {
- state = {
- name: "defaultName",
- };
-
- changeName = (name) => {
- this.setState({
- name,
- });
- };
-
- render() {
- return (
- <Context.Provider
- value={{ name: this.state.name, changeName: this.changeName }}
- >
- <Child />
- </Context.Provider>
- );
- }
- }
-
- // 子组件Child1
- import { Component } from "react";
- import Context from "./context/AppContext";
-
- class Child1 extends Component {
- static contextType = Context;
-
- render() {
- return (
- <div onClick={() => this.context.changeName("Child")}>
- {this.context.name}
- </div>
- // 16.x版本后可写成,不需要定义contextType
- <Context.Consumer>
- {({ name, changeName }) => {
- return <div onClick={() => changeName("Child")}>{name}</div>;
- }}
- </Context.Consumer>
- );
- }
- }
- export default Child1;
4.兄弟组件通信
利用useReducer和context实现,可模仿一个简单的redux,useReducer传入reducer和defaultState,返回当前state和dispatch,通过context传给各个子组件,让子组件共享state和修改state
- // types.js
- export const EXAMPLE_TEST = "EXAMPLE_TEST";
-
- // reducer.js
- import * as Types from "./types";
-
- export const defaultState = {
- count: 0,
- };
-
- export default (state, action) => {
- switch (action.type) {
- case Types.EXAMPLE_TEST:
- return {
- ...state,
- count: action.count,
- };
- default: {
- return state;
- }
- }
- };
-
- // action.js
- import * as Types from "./types";
-
- export const onChangeCount = (count) => ({
- type: Types.EXAMPLE_TEST,
- count: count + 1,
- });
- // 根组件
- import React, { useReducer } from "react";
- import Context from "./context";
- import reducer, { defaultState } from "./reducer";
- import Child from "./Child";
- import Child1 from "./Child1";
-
- function ReducerCom() {
- const [state, dispatch] = useReducer(reducer, defaultState);
-
- return (
- <Context.Provider value={{ state, dispatch }}>
- <Child />
- <Child1 />
- </Context.Provider>
- );
- }
-
- export default ReducerCom;
-
- // Child.js
- import React, { useEffect, useContext } from "react";
- import { onChangeCount } from "./action";
- import Context from "./context";
-
- const Child = () => {
- const context = useContext(Context);
-
- useEffect(() => {
- // 监听变化
- console.log("变化执行啦");
- }, [context.state.count]);
-
- return (
- <button
- onClick={() => context.dispatch(onChangeCount(context.state.count))}
- >
- 点击加 1
- </button>
- );
- };
-
- export default Child;
-
- // Child1.js
- import React, { useContext } from "react";
- import Context from "./context";
-
- const Child1 = () => {
- const context = useContext(Context);
-
- return (
- <div>
- <p>{context.state.count}</p>
- </div>
- );
- };
-
- export default Child1;
5.无嵌套关系的组件通信
- 使用redux、mobx、flux等状态管理器
- 使用发布-订阅模式
- // EventEmitter.js
- class EventEmitter {
- constructor() {
- this.subscribers = {};
- }
- on(type, fn) {
- if (!this.subscribers[type]) {
- this.subscribers[type] = [];
- }
-
- this.subscribers[type].push(fn);
- }
- off(type, fn) {
- let listeners = this.subscribers[type];
- if (!listeners || !listeners.length) return;
- this.subscribers[type] = listeners.filter((v) => v !== fn);
- }
- emit(type, ...args) {
- let listeners = this.subscribers[type];
- if (!listeners || !listeners.length) return;
- listeners.forEach((fn) => fn(...args));
- }
- }
-
- export default new EventEmitter();
- // 组件1
- const Child = () => {
- const [name, setName] = useState("defaultName");
-
- useEffect(() => {
- EventEmitter.on("changeName", (name) => {
- setName(name);
- });
- return EventEmitter.off();
- }, []);
-
- return <div>{name}</div>;
- };
-
- // 组件2
- const Child1 = () => {
- const changeChildName = () => {
- EventEmitter.emit("changeName", "change name from child2");
- };
-
- return <button onClick={changeChildName}>click</button>;
- };
二、避免重复渲染
1.隔离独立渲染的子组件
用React.memo隔离组件形成独立的渲染单元,避免父组件重新渲染造成子组件也重新渲染,可以用于不依赖于父组件状态渲染的子组件,函数组件和class也可以用useMemo和pureComponent实现。
export default React.memo(Child);1)函数组件:useMemo的第二个参数是依赖项数组,某个依赖项改变时才会重新渲染子组件。
- {useMemo(
- () => (
- <Child />
- ),
- []
- )}
2)class组件:用React.pureComponent
export default class Child extends React.PureComponent {}2.与渲染无关的变量不用state来管理数据
触发this.setState或者useState,只要state改变就会触发渲染,与在render中是否引用无关,可以直接把数据绑定在this上,或者使用useRef做数据缓存。
1)函数组件
- const App = ({name}) => {
- const nameRef = useRef('defaultName');
-
- useEffect(() => {
- nameRef.current = name;
- })
-
- return <div>hello world!</div>;
- }
2)class组件
- class App extends React.Component{
- name = 'defaultName';
-
- componentDidMount() {
- this.name = this.props.name;
- }
-
- render () {
- return <div>hello world!</div>;
- }
- }
3.批量更新state、合并state
class组件如果在一个函数中setState了三次,会触发三次setState,但是不会渲染三次,因为react会合并成一次做批量更新,但是在异步函数中会多次渲染,批量更新失效。
demo如下:
- const Parent = () => {
- const [a, setA] = useState(0);
- const [b, setB] = useState(0);
- const [c, setC] = useState(0);
-
- const handleClick = () => {
- setA(a + 1);
- setB(b + 1);
- setC(c + 1);
- };
-
- console.log("----render----");
-
- return (
- <div>
- {a}---{b}---{c}
- <button onClick={handleClick}>click</button>
- </div>
- );
- };
-
- export default Parent;
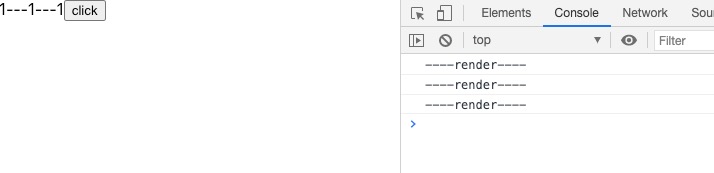
效果如下:点击三次,才会render三次
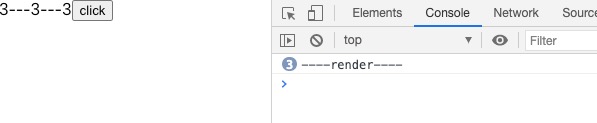
如果是异步的更改state
- const handleClick = () => {
- setTimeout(() => {
- setA(a + 1);
- setB(b + 1);
- setC(c + 1);
- }, 0);
- };
效果如下:点击一次,就会render三次,说明没有合并更新
解决方案:
1)手动批量更新可以用react-dom中的unstable_batchedUpdates,三次更新就会合并成一次
- import { unstable_batchedUpdates } from 'react-dom';
- const handleClick = () => {
- setTimeout(() => {
- unstable_batchedUpdates(() => {
- setA(a + 1);
- setB(b + 1);
- setC(c + 1);
- });
- }, 0);
- };
2)合并state:用一个setState改变多个state,或者一个useState保存多个state
4.class组件中使用shouldComponentUpdate
使用shouldComponentUpdate控制组件是否需要重新渲染
- shouldComponentUpdate(nextProps, nextState) {
- if(nextState.id != this.state.id ) {
- return true;
- }
- return false;
- }
5.绑定事件尽量不使用箭头函数
使用箭头函数每次渲染都会创建一个新的时间处理器,子组件每次都会被渲染。
1)函数组件:子组件使用React.memo配合父组件用useCallback包裹props方法,实现父组件渲染不影响子组件的渲染
- <Child onClick={handleClick} />
- // 如果用箭头函数绑定事件父组件还是会影响子组件的渲染
- <Child onClick={(value) => handleClick(value)} />
-
- const handleClick = useCallback((value) => {
- console.log(value);
- }, []);
2)class组件:不用箭头函数,子组件用React.memo包裹即可
三、代码优化
1.大量的props
如果需要将大量的props传递到一个组件中,那么可以思考以下几点:
1)该组件是否做了多件事,一个组件应该只做一件事,将该组件拆分成多个小组件是否会更合理;
2)组件是否可以被合成,如果组件中有很多不相干的逻辑,就可以考虑拆分再重新组合;
3)是否传递了很多配置有关的props,比如带分页配置的表格组件,可以将多个配置的props合成一个options,可以更好的控制组件选项,也更规范。
2.不兼容的props
避免组件之间传递不兼容的props,例如有一个<Input/>组件功能是把输入的小写英文都转变成大写,过了一段时间,想将它用于电话号码的处理,虽然都是用的input元素,但是明显电话号码的处理用不上之前的功能,并且毫无关联,这时候也可以分割组件明确职责,如果有共享的逻辑可以放到hooks中
3.props经过处理变为state
一般常规做法是,子组件内创建一个state,当props的值改变时再改变state,但是如果只是基于props通过计算得到新的state可以用useMemo来代替useState。
- const Child = ({ count }) => {
- const formatCount = (value) => {
- return value + 10;
- };
-
- const formattedCount = useMemo(() => {
- return formatCount(count);
- }, [count]);
-
- //const [formattedCount, setFormattedCount] = useState(count);
-
- //useEffect(() => {
- // setFormattedCount(formatCount(count));
- //}, [count]);
-
- return <div>{formattedCount}</div>;
- };
-
- export default Child;
4.使用枚举管理状态
在编写组件时,很容易用很多个布尔值来表示组件当前的状态,比如isLoading、isFinished等等,虽然技术可行,但是很难推断组件当前处于什么状态,不容易维护,可以用一个枚举的状态来表示。
- function Component() {
- const [isLoading, setIsLoading] = useState(false)
- const [isFinished, setIsFinished] = useState(false)
- const [hasError, setHasError] = useState(false)
-
- const fetchSomething = () => {
- setIsLoading(true)
-
- fetch(url)
- .then(() => {
- setIsLoading(false)
- setIsFinished(true)
- })
- .catch(() => {
- setHasError(true)
- })
- }
-
- if (isLoading) return <Loader />
- if (hasError) return <Error />
- if (isFinished) return <Success />
-
- return <button onClick={fetchSomething} />
- }
-
- // 改造后
- function Component() {
- const [status, setStatus] = useState('loading')
-
- const fetchSomething = () => {
- setStatus('loading')
-
- fetch(url)
- .then(() => {
- setStatus('finished')
- })
- .catch(() => {
- setStatus('error')
- })
- }
-
- if (status === 'loading') return <Loading />
- if (status === 'error') return <Error />
- if (status === 'finished') return <Success />
-
- return <button onClick={fetchSomething} />
- }
5.自定义Hook
1)场景一:通用查询表格
- const [list, setList] = useState([]);
- const [loading, setLoading] = useState(false);
- const [paginator, setPaginator] = useState({
- page: 1,
- pageSize: 20,
- });
-
- const fetchList = (fetchStatus) => {
- setLoading(true);
- getList({
- pageSize: paginator.pageSize,
- pageNo: paginator.page,
- name,
- }).then((res) => {
- setList(res.data);
- setLoading(false);
- }).catch(() => {
- setLoading(false);
- });
- };
-
- const handlePageSelect = (page, pageSize) => {
- setPaginator({ ...paginator, page, pageSize });
- };
-
- useEffect(() => {
- fetchList();
- }, [paginator.page, paginator.pageSize]);
-
- <Table rowMax={list && list.length} loading={loading} data={list} column={columns} />
- <Pagination
- prev
- next
- first
- last
- recordCount={total}
- pageSize={paginator.pageSize}
- activePage={paginator.page}
- onSelect={handlePageSelect}
- />
自定义组件 useTable.js
输入:查询列表的接口、【除了分页器之外的参数】、【处理列表数据的函数】、【请求接口完毕的回调】
输出:list、loading、getData函数、分页的配置项
- import { useState, useEffect } from 'react';
-
- const useTable = (getListData, extraParam = {}, handleData, callback) => {
- const [paginator, setPaginator] = useState({
- recordCount: 0,
- pageSize: 20,
- pageNo: 1,
- });
-
- const [list, setList] = useState([]);
- const [loading, setLoading] = useState(false);
-
- useEffect(() => {
- getData();
- }, [paginator.pageNo, paginator.pageSize]);
-
- const onSelect = (pageNo, pageSize) => {
- if (!isNaN(pageNo)) {
- const paginator = { ...paginator, pageSize, pageNo };
- setPaginator(paginator);
- }
- };
-
- // 调用接口,获取数据
- const getData = (pageNoParam, newParam) => {
- // 搜索条件改变查询的时候,当前页数重置为1
- const pageNo = !isNaN(pageNoParam) ? pageNoParam : paginator.pageNo;
- const paginatorExtra = { pageNo, pageSize: paginator.pageSize };
- setLoading(true);
- const params = newParam || extraParam;
- getListData &&
- getListData({ ...params, ...paginatorExtra })
- .then((res = { data: [] }) => {
- const data = res.data;
- const recordCount = res.total || res.count;
- let list = [];
- if (handleData) {
- list = handleData(data);
- } else {
- list = data.map((item) => {
- // 默认以id为key
- return { key: item.id, ...item };
- });
- }
- // 因为使用这个hook的地方可以手动调用getData,所以分页器在这里赋值
- setPaginator({ ...paginatorExtra, recordCount });
- setList(list);
- setLoading(false);
- callback && callback(list);
- })
- .catch((err) => {
- setLoading(false);
- });
- };
-
- return {
- list,
- loading,
- getData,
- tableProps: {
- prev: true,
- next: true,
- first: true,
- last: true,
- recordCount: paginator.recordCount,
- pageSize: paginator.pageSize,
- activePage: paginator.pageNo,
- pageNo: paginator.pageNo,
- onSelect,
- },
- };
- };
-
- export default useTable;
使用useTable()
- const { list, tableProps, loading, getData } = useTable(
- getList,
- { teamId, productName, status },
- (data) => {
- return data.map((item) => {
- return { ...item, id: item.uuid };
- });
- }
- );
-
- <Button type="primary" onClick={() => getData(1)}>查询</Button>
- <Table border rowMax={list.length} data={list} loading={loading} column={columns} />
- <Pagination {...tableProps} />
2)场景二:封装useInterval代替setInterval
为什么不直接使用setInterval?
如下面的例子,在组件加载时定义一个定时器,卸载组件时也清空定时器,但是useEffect只会执行一次,setInterval中拿到的始终是第一次渲染时拿到的count为1,所以界面上始终上显示的是2。
为了解决这个问题,把useEffect的第二个参数改成[count],这样就会每次拿到最新的count,但是每次count更改,定时器就会不停的新增和移除。
- funtion Counter() {
- const [count, setCount] = useState(1);
-
- useEffect(() => {
- const id = setInterval(() => {
- console.log(count); // 此时的count始终是1
- setCount(count + 1);
- }, 1000);
- return () => clearInterval(id);
- }, []);
-
- return <div>{count}</div>;
- };
解决办法1:函数式更新,useState 中的set方法可接收函数,该函数将接收之前的state,返回一个更新后的值。这样定时器每次拿到的是最新的值。
setCount((count) => count + 1);解决办法2:用useRef将定时器函数提取出来,每次定时器触发的时候,都能获取到最新的count。
- const myRef = useRef(null);
- myRef.current = () => {
- setCount(count + 1);
- };
- useEffect(() => {
- const id = setInterval(() => {
- myRef.current();
- }, 1000);
- return () => clearInterval(id);
- }, []);
定义useInterval.js
- import { useEffect, useRef } from 'react';
-
- const useInterval = (callback, delay) => {
- const savedCallback = useRef();
-
- useEffect(() => {
- savedCallback.current = callback;
- }, [callback);
-
- useEffect(() => {
- let id;
- function tick() {
- savedCallback.current(() => {
- clearInterval(id);
- });
- }
- if (!isNaN(delay)) {
- id = setInterval(tick, delay);
- return () => clearInterval(id);
- }
- }, [delay]);
- };
- export default useInterval;
使用useInterval.js
- useInterval((clear) => {
- setCount(count + 1);
- }, 1000);
四、其他优化
1.使用React.Fragment减少额外标签
每个组件都必须要唯一一个父标签,如果该标签只是为了当父标签,没有其他额外的用途,则可以用片段fragment包裹子元素,节省渲染器渲染额外的元素的工作量。
2.避免使用内联样式属性
添加的内联样式是js对象不是真正的样式,需要花费更多的时间转换为等效的css样式属性,才会应用样式。
3.优化条件渲染
安装和卸载 React 组件是昂贵的操作,所以用条件渲染减少安装和卸载组件。执行不同的if else语句切换渲染的组件,没有更改的部分不需要用条件控制,不必要每次改变state的时候都卸载并重新安装
五、懒加载
1.懒加载React组件、第三方依赖组件
React16.6版本中,新增了React.lazy函数,可以动态加载React组件,配合webpack的code splitting,当用import()时,webpack监测到这个语法会自动进行代码分割,只有当组件被加载,对应的资源才会导入;Suspense组件可以指定在js加载完成之前的loading。适合路由懒加载、Tab切换、单个资源很大、第三方依赖组件很大的场景。
- import React, { Suspense, useState } from "react";
-
- const App = () => {
- const [showChild, setShowChild] = useState(false);
-
- const Child = React.lazy(() => import("./Child"));
-
- return (
- <div>
- <button
- onClick={() => {
- setTimeout(() => {
- setShowChild(true);
- }, 2000);
- }}
- >
- click
- </button>
-
- {showChild && (
- <Suspense fallback={<div>loading...</div>}>
- <Child />
- </Suspense>
- )}
- </div>
- );
- };
效果:2s后加载2.chunk.js
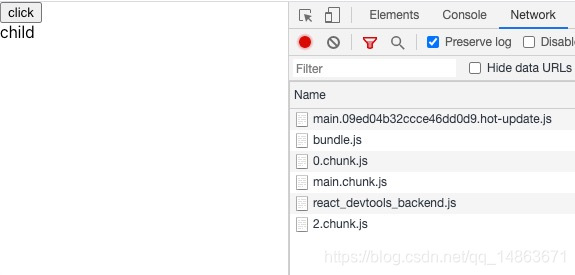
我们也可以指定这个js的名字
const Child = React.lazy(() => import(/* webpackChunkName: "child" */"./Child"));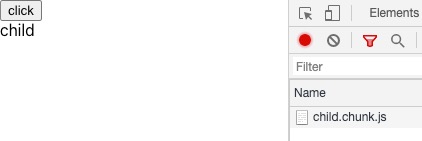
因为网络问题或者组件内部错误导致资源加载失败时,可能会导致页面白屏,可以用Error Boundaries组件来优雅降级。
- class ErrorBoundary extends React.Component {
- state = { hasError: false };
- static getDerivedStateFromError(error) {
- return { hasError: true };
- }
- componentDidCatch(error, errorInfo) {
- console.log(error, errorInfo);
- }
- render() {
- if (this.state.hasError) {
- return <p>资源加载失败,请稍后重试</p>;
- }
- return this.props.children;
- }
- }
-
- // App组件
- {showChild && (
- <ErrorBoundary>
- <Suspense fallback={<div>loading...</div>}>
- <Child />
- </Suspense>
- </ErrorBoundary>
- )}
2.不用React.lazy懒加载
- import React, { useState, Component } from "react";
- // 异步按需加载component
- const asyncComponent = (getComponent) => {
- return class AsyncComponent extends Component {
- static Component = null;
- state = { Component: AsyncComponent.Component };
-
- componentDidMount() {
- if (!this.state.Component) {
- getComponent().then(({ default: Component }) => {
- AsyncComponent.Component = Component;
- this.setState({ Component });
- });
- }
- }
- render() {
- const { Component } = this.state;
- if (Component) {
- return <Component {...this.props} />;
- }
- return <div>loading...</div>;
- }
- };
- };
-
- const App = () => {
- const [showChild, setShowChild] = useState(false);
-
- const Child = asyncComponent(() =>
- import(/* webpackChunkName: "child" */ "./Child")
- );
-
- return (
- <div>
- <button
- onClick={() => {
- setTimeout(() => {
- setShowChild(true);
- }, 2000);
- }}
- >
- click
- </button>
-
- {showChild && <Child />}
- </div>
- );
- };
- 用scrapy-redis进行分布式爬虫需要连接redis数据库,在settings方法中直接设置REDIS_URL='redis://127.0.0.1:6379’连接,其他的设置网上有很多教程,SCHEDULER=“scrapy_red... [详细]
赞
踩
- 查看内核的每个包的安装情况,以137的版本为基准进行对比,发现146的包应该有linux-headers-5.4.0-146-generic、linux-hwe-5.4-headers-5.4.0-146、linux-image-5.4.0... [详细]
赞
踩
- 用追马的时间种草吧牛刀小试-C++推箱子小游戏参考文档C++笔记:推箱子小游戏copy函数memcpy()函数用法(可复制数组)使用memcpy踩出来的坑,值得注意完整代码/*********************************... [详细]
赞
踩
- 静态库需要放到项目中,他会跟随项目一同打包为exe文件,所以如果exe用到的组件较多,那么他的文件体积会很大,并且每个程序的代码区都会有一份静态库,会造成空间浪费。动态链接库是独立在exe外边的,它属于资源共享,谁想用谁就调用它即可,并且升... [详细]
赞
踩
- Hi,大家好,这里是丹成学长,今天向大家介绍一个学长做的单片机项目教程:MPU6050姿态解算大家可用于课程设计或毕业设计单片机-嵌入式毕设选题大全及项目分享:https://blog.csdn.net/m0_71572576/articl... [详细]
赞
踩
- ubuntu20.04安装完没法连wifi,可能有如下两种原因,因为年这两种原因都排除了后成功获得联网功能,所以安安也不清楚具体是那个原因:1.启动了安全模式。2.没有安装网卡驱动。_ubuntu20.04没有连接wifi选项ubuntu2... [详细]
赞
踩
- 中国(上海)国际技术进出口博览会“技术,让生活更精彩”中国(上海)国际技术进出口博览会“技术,让生活更精彩”中国(上海)国际技术进出口博览会(上交会CSITF),自成立以来,已经发展成为国内最具影响力的技术交流盛会之一。作为经国务院批准,由... [详细]
赞
踩
- 一、安装redis因为是在CentOS系统下安装的,并且是服务器。遇到的困难有点多不过。1.首先要下载相关依赖首先先检查是否有c语言的编译环境,你问我问什么下载这个,我只能说它是下载安装redis的前提,就像水和鱼一样。rpm-qgcc``... [详细]
赞
踩
- 在这幅图中我们可以很清晰地看到爬虫与反爬虫是如何进行斗智斗勇的。在学习使用爬虫时,我们制作出来的爬虫往往是在“裸奔”,非常的简单。简单低级的爬虫有一个很大的优点:速度快,伪装度低。如果你爬取的网站没有反爬机制,爬虫们可以非常简单粗暴地快速抓... [详细]
赞
踩
- 在企业内部创建一个公共的Golang模块工程可以帮助提高代码复用性和开发效率。本文将从如何创建一个公共的Golang工程开始,指导你一步步创建它、并引入到你的工程中。_goland配置私有仓库goland配置私有仓库在企业内部创建一个公共的... [详细]
赞
踩
- 学习Python要怎么接单做兼职呢,今天小编给大家分享几个基本入门接私活的资源,让大家轻松学Python,实现经济独立。首先,Python兼职分为以下三种:人生中的第一桶金竟然是python兼职赚来的!Python接单渠道分享学习Pytho... [详细]
赞
踩
- 手写一个抽屉组件基于vue的过渡动画样式(点击消息提醒,从右侧弹出抽屉)transition+v-show/v-if<transitionname="show"mode="out-in"@before-enter='tr... [详细]
赞
踩
- 原创_spring框架用到的设计模式spring框架用到的设计模式Spring框架中使用了以下设计模式:1.InversionofControl(IoC):Spring框架的核心思想就是IoC,它通过依赖注入(DI)来实现对象的装配和管理。... [详细]
赞
踩
- 三种分布式爬虫策略:(1)Slaver端从Master端拿任务(Request/url/ID)进行数据抓取,在抓取数据的同时也生成新任务,并将任务分配给Master端。Master端只有一个Redis数据库,负责对Slaver提交的任务进行... [详细]
赞
踩
- 1.多态1.C++中的虚函数的作用主要是实现了多态的机制。关于多态,简而言之就是用父类型别的指针指向其子类的实例,然后通过父类的指针调用实际子类的成员函数。这种技术可以让父类的指针有“多种形态”,这是一种泛型技术。2.所谓泛型技术,说白了就... [详细]
赞
踩
 微信小程序零食商城系统设计和实现主要功能设计:首页、网站公告、购物车、我的、零食分类、零食搜索、订单、购物车、评论、收藏、点赞、点踩、个人中心、用户充值、用户管理、零食分类管理、零食管理、系统管理、订单管理_springboot商城实战项目... [详细]
赞
踩
- 满意答案ganchai2018.12.20采纳率:53%等级:10已帮助:423人“C语言”面向过程和面向对象的区别是:面向过程是着重于其中程序设计的算法、语言的运用,如设计不同功能的函数。面向对象,按书上说是在C语言的基础上发展起来的,通... [详细]
赞
踩
- 好的,那么这里是一个简单的元旦特效代码供你参考:#导入需要的模块importtimeimportrandom#定义打印元旦问候的函数defprint_greetings():#定义元旦问候语列表greetings=["元旦快乐!","新年快... [详细]
赞
踩
- 一、qt自定义控件4–进度条控件效果展示_qt进度条显示图片qt进度条显示图片一、qt自定义控件4–进度条控件效果展示二、原理说明绘制过程大致分为5步:1.绘制整个页面背景(如果要用在其他窗体上则忽略此步骤,并设置背景透明)。2.绘制文字(... [详细]
赞
踩
- 在JetsonOrinNanoCLB上安装Yolov5有必要记录一下过程,以便后续无脑重装,让我们开始。_jetsonnano部署yolov5jetsonnano部署yolov5 在网上找了好多... [详细]
赞
踩

