
- 1程序员如何赚到自己人生中的第一桶金?是100万还会是1000万,大家不妨一起探讨一下!...
- 2区块链钱包分类及BIP协议
- 3ubuntu 20.04 WIFI适配器找不到问题_ubuntu20.04无wifi adapter
- 4怎样利用PowerBulider的Datawindow建立中国式的动态报表_powerbuilder datawindow 图表
- 5【Kubernetes 系列】 一文带你吃透 K8S 中Pod 的生命周期_简述下k8s pod 生命周期
- 6Python之Selenium知识总结_python selenium
- 7Spring boot 自定义banner的在线制作
- 8人工智能之配置环境教程二:在Anaconda中创建虚拟环境安装GPU版本的Pytorch及torchvision并在VsCode中使用虚拟环境_conda下载torchvision
- 9python文件操作_python 文件操作
- 10一文解读,网络安全行业人才需求情况《网络安全产业人才发展报告》_网络安全人才需求分析
Yolov8教程,安装,训练,推理速度太强悍了,详细教学
赞
踩
YOLOv8依旧是Ultralytics的巨作,这是备受赞誉的实时对象检测和图像分割模型的最新版本。 YOLOv8 建立在深度学习和计算机视觉的前沿进步之上,在速度和准确性方面提供无与伦比的性能。 其流线型设计使其适用于各种应用程序,并可轻松适应从边缘设备到云 API 的不同硬件平台。
yolov8的推理速度对比如下,极大的提高了训练速度。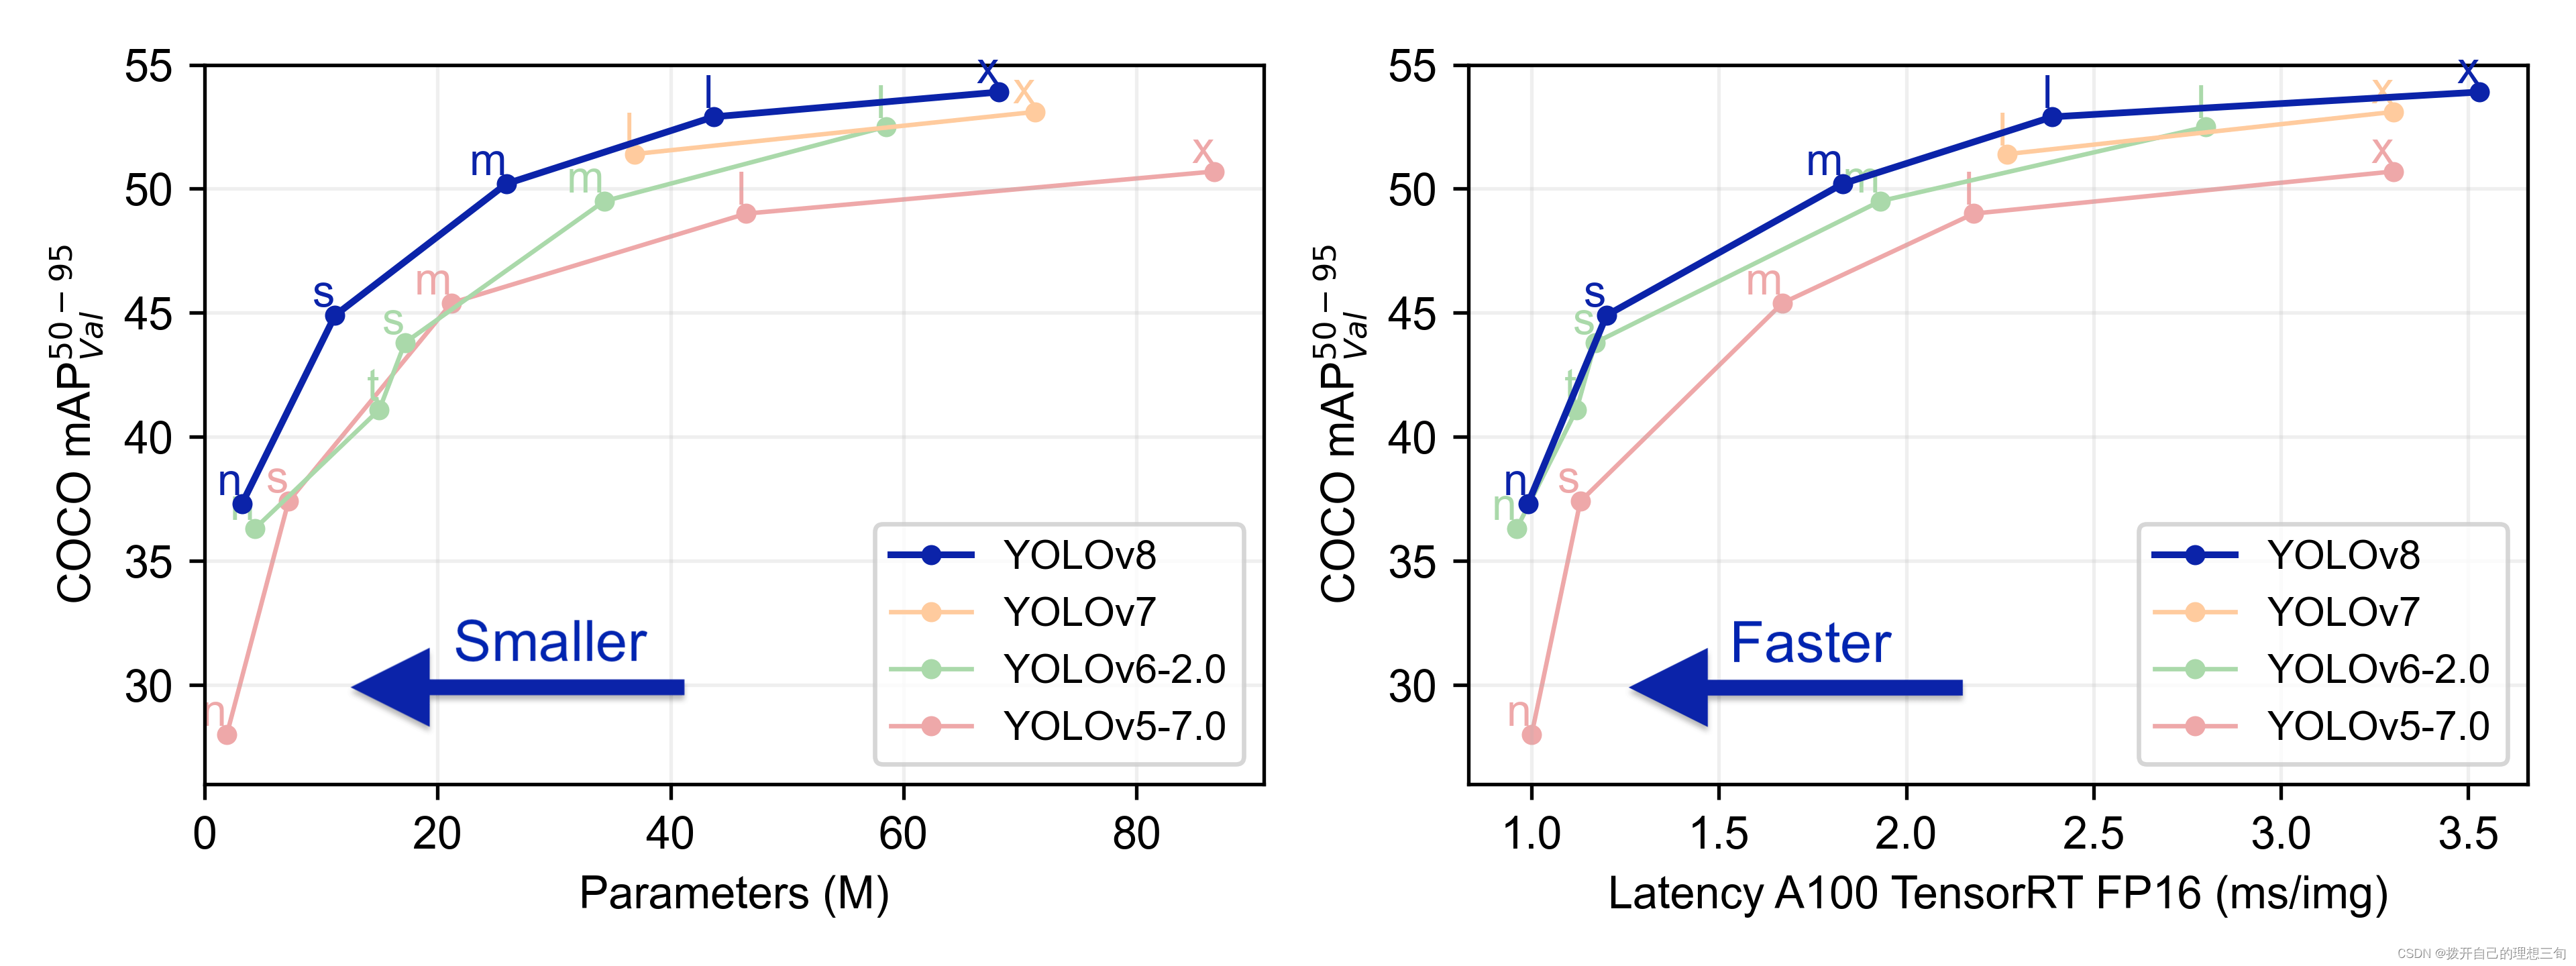
1、安装:
官方提供了两种形式的安装方法,这里如果只是玩玩的话建议使用是一种方法安装,为了扩展,开发的可以是第二种方法安装(本文采用的是第二种方法,为了更好的管理项目)
- #方法一(建议)
- pip install ultralytics
-
- #方法二
-
- git clone https://github.com/ultralytics/ultralytics
- cd ultralytics
- pip install -e .
2、使用yolov8:
这里也分为两种方法
1、命令行
| Syntax | yolo TASK MODE ARGS Where TASK (optional) is one of [detect, segment, classify] |
| Train | yolo train data=coco128.yaml model=yolov8n.pt epochs=10 lr0=0.01 |
| Predict | yolo predict model=yolov8n-seg.pt source='https://youtu.be/Zgi9g1ksQHc' imgsz=320 |
| Val | yolo val model=yolov8n.pt data=coco128.yaml batch=1 imgsz=640 |
| Export | yolo export model=yolov8n-cls.pt format=onnx imgsz=224,128 |
| Special | yolo help yolo checks yolo version yolo settings yolo copy-cfg yolo cfg |
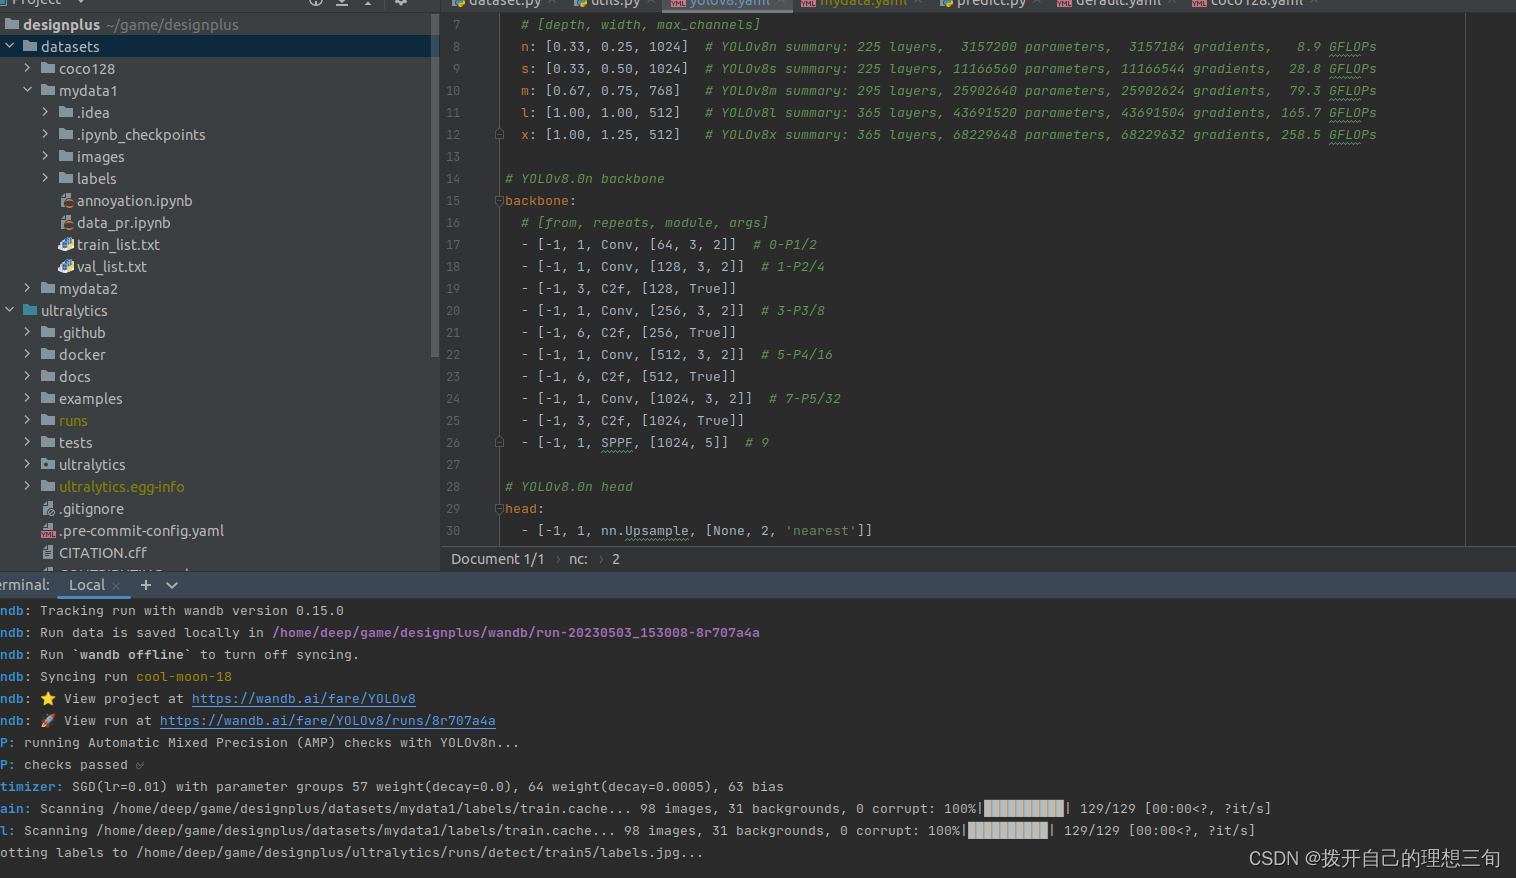
下面是在命令行训练的例子:

在运行这个代码的时候可能会有些慢,因为要下载数据集和预训练权重,请小伙伴们耐心等待。
但是考虑到外网等问题,我将数据集和预训练权重放到了百度网盘网盘上,更新后的百度网盘地址需要的可以自取
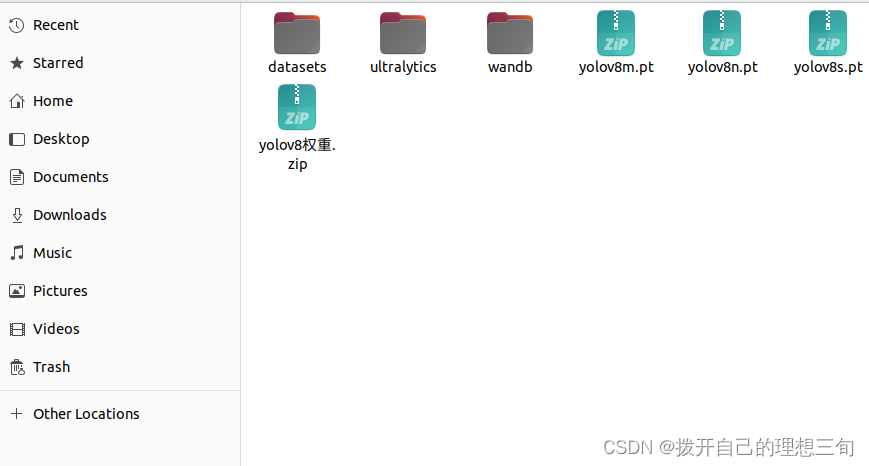
我们可以找到我们下载的yolov8的位置,这里初始是只有ultralytics一个文件夹,我们新建一个datasets文件夹,并将从网盘下载的coco128移动到datasets文件夹内,将下载的权重移动到和ultralytics同层次的文件夹内。(在这里第二种方法下载yolov8的优势就体现出来了,可以很方便的找到对应的文件。
如果我们需要训练自己的数据集,我们的数据集可以按照coco128的形式整理,然后放到dataset下就可以(推荐大家使用makesense标注数据,直接为yolo格式的txt文件)。然后为在这里将标注的xml文件转为txt文件的代码,供大家参考。
- import xml.etree.ElementTree as ET
-
- import pickle
- import os
- from os import listdir , getcwd
- from os.path import join
- import glob
-
- classes = ["cone tank", "water horse bucket"]
-
- def convert(size, box):
-
- dw = 1.0/size[0]
- dh = 1.0/size[1]
- x = (box[0]+box[1])/2.0
- y = (box[2]+box[3])/2.0
- w = box[1] - box[0]
- h = box[3] - box[2]
- x = x*dw
- w = w*dw
- y = y*dh
- h = h*dh
- return (x,y,w,h)
-
- def convert_annotation(image_name):
- in_file = open('./indata/'+image_name[:-3]+'xml') #xml文件路径
- out_file = open('./labels/train/'+image_name[:-3]+'txt', 'w') #转换后的txt文件存放路径
- f = open('./indata/'+image_name[:-3]+'xml')
- xml_text = f.read()
- root = ET.fromstring(xml_text)
- f.close()
- size = root.find('size')
- w = int(size.find('width').text)
- h = int(size.find('height').text)
-
-
-
-
- for obj in root.iter('object'):
- cls = obj.find('name').text
- if cls not in classes:
- print(cls)
- continue
- cls_id = classes.index(cls)
- xmlbox = obj.find('bndbox')
- b = (float(xmlbox.find('xmin').text), float(xmlbox.find('xmax').text), float(xmlbox.find('ymin').text),
- float(xmlbox.find('ymax').text))
- bb = convert((w,h), b)
- out_file.write(str(cls_id) + " " + " ".join([str(a) for a in bb]) + '\n')
-
- wd = getcwd()
-
- if __name__ == '__main__':
-
- for image_path in glob.glob("./images/train/*.jpg"): #每一张图片都对应一个xml文件这里写xml对应的图片的路径
- image_name = image_path.split('\\')[-1]
- convert_annotation(image_name)

大家把数据整理完成之后需要进入ultralytics文件夹内的datasets文件夹下新建mydata.yaml
其中mydata.yaml文件内部的内容是将coco128.yaml文件的内容复制进去,对其的修改如下图所示: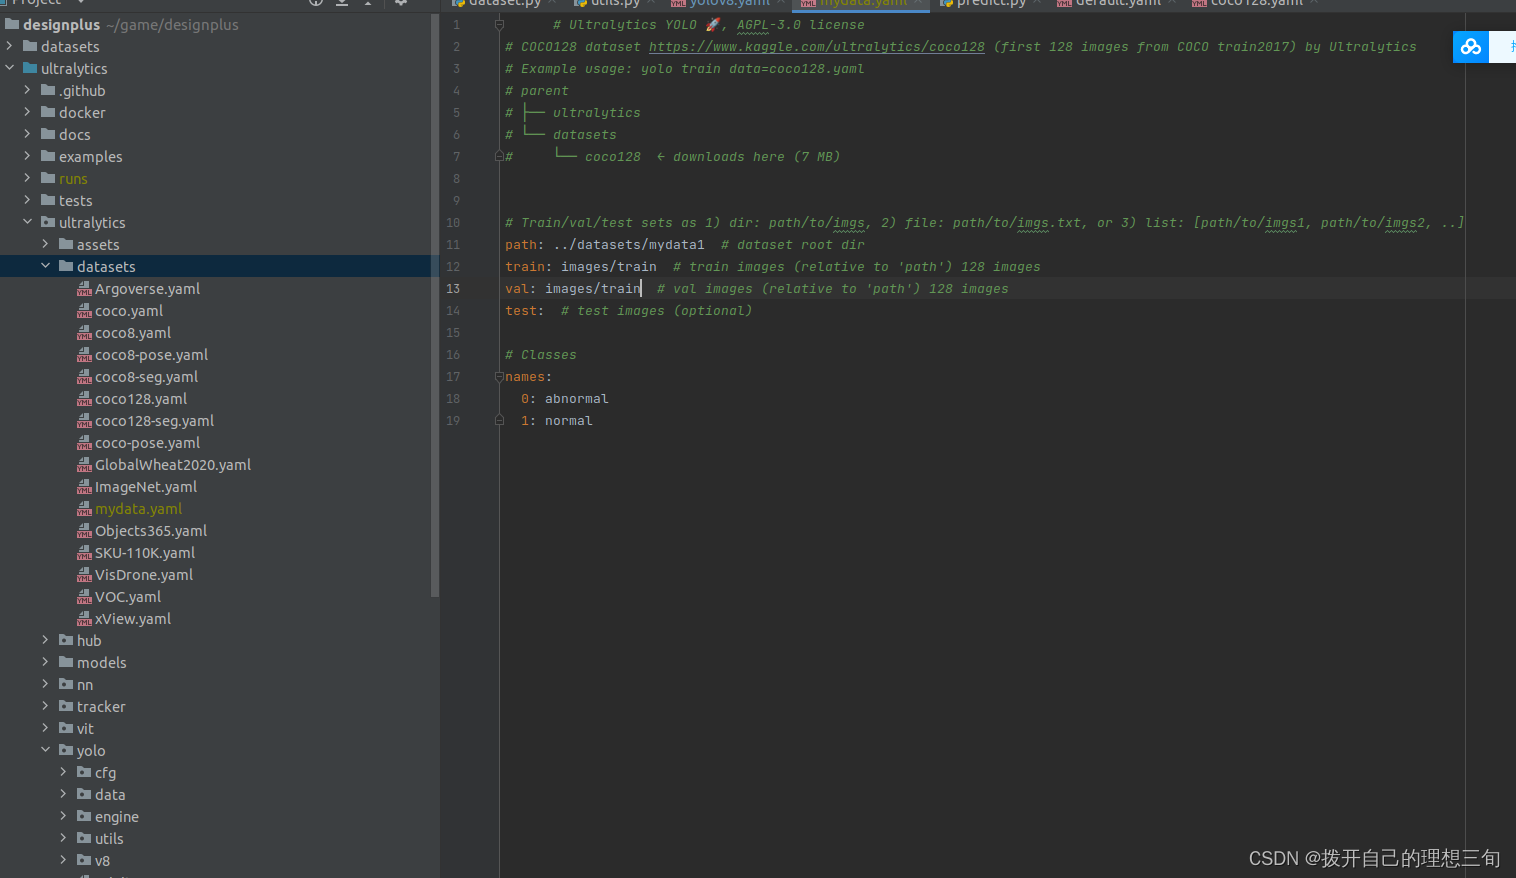
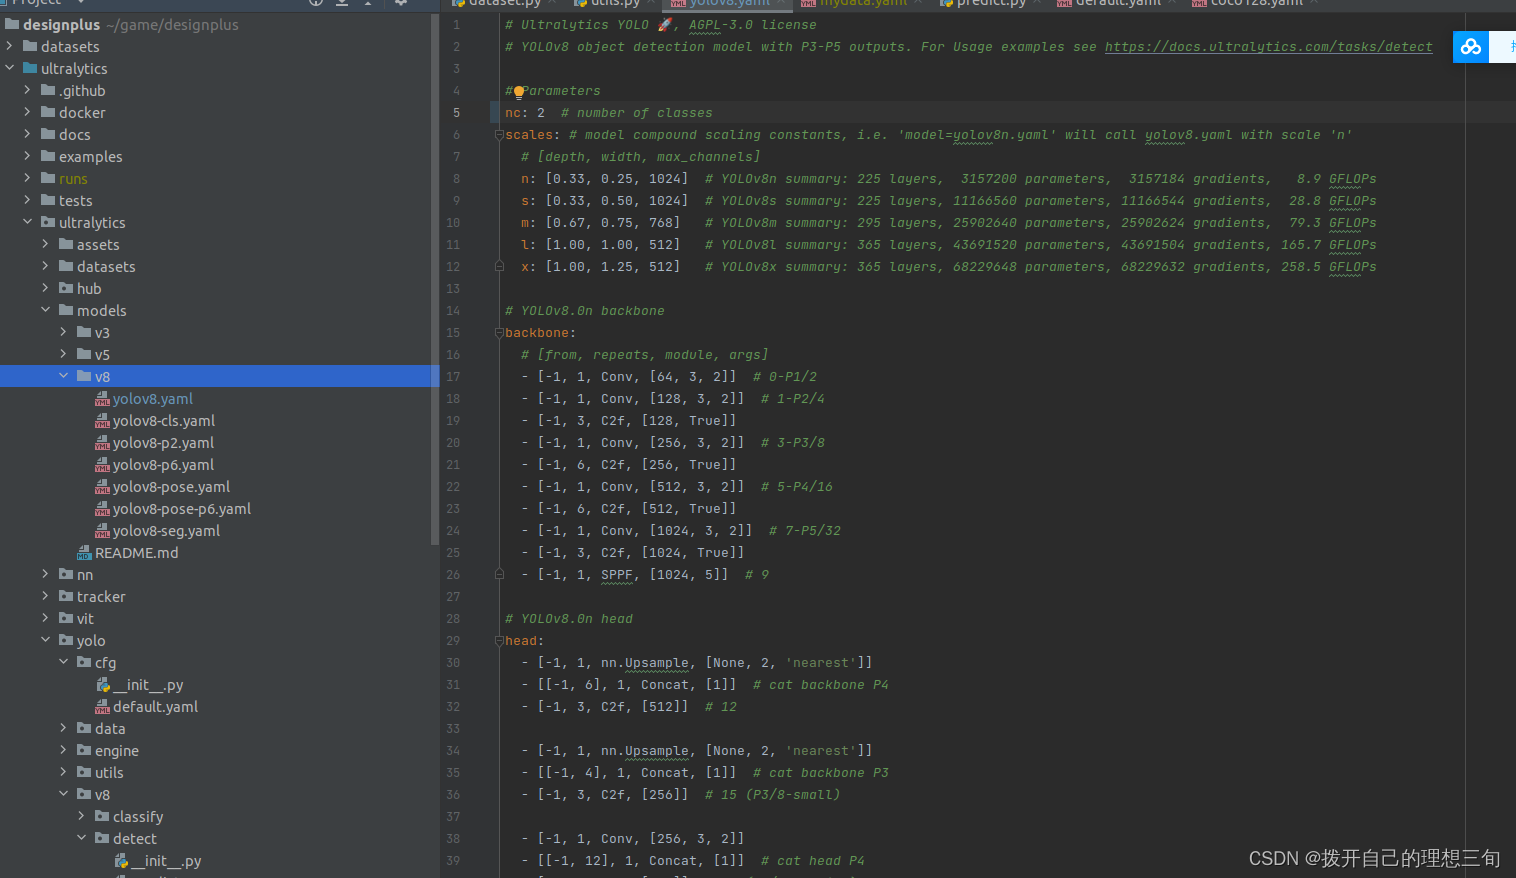
最后还需要修改ultralytics文件夹内的models文件夹的v8文件夹内yolov8.yaml,将其的nc由80改为你数据集的类别,我这里是两类。
到这里就可以运行代码,训练我们自己的数据了
eg:
2、使用python代码运行
- from ultralytics import YOLO
-
- # Create a new YOLO model from scratch
- model = YOLO('yolov8n.yaml')
-
- # Load a pretrained YOLO model (recommended for training)
- model = YOLO('yolov8n.pt')
-
- # Train the model using the 'coco128.yaml' dataset for 3 epochs
- results = model.train(data='coco128.yaml', epochs=3)
-
- # Evaluate the model's performance on the validation set
- results = model.val()
-
- # Perform object detection on an image using the model
- results = model('https://ultralytics.com/images/bus.jpg')
-
- # Export the model to ONNX format
- success = model.export(format='onnx')
3、使用yolov8推理视频
话不多说,先放代码
- import cv2
- from ultralytics import YOLO
-
- # 模型加载权重
-
- model = YOLO('yolov8n.pt')
-
- # 视频路径
- video_path = "path/to/your/video/file.mp4"
- cap = cv2.VideoCapture(video_path)
-
- # 对视频中检测到目标画框标出来
- while cap.isOpened():
- # Read a frame from the video
- success, frame = cap.read()
-
- if success:
- # Run YOLOv8 inference on the frame
- results = model(frame)
-
- # Visualize the results on the frame
- annotated_frame = results[0].plot()
-
- # Display the annotated frame
- cv2.imshow("YOLOv8 Inference", annotated_frame)
-
- # Break the loop if 'q' is pressed
- if cv2.waitKey(1) & 0xFF == ord("q"):
- break
- else:
- # Break the loop if the end of the video is reached
- break
-
- # Release the video capture object and close the display window
- cap.release()
- cv2.destroyAllWindows()
没了没了,yolov8大概就这么多吧,然后给大家一个避坑技巧就是大家使用强制转化的图片训练的时候会有一个警告
warning:corrupt JPEG restored and saved
大家可以把图片用opencv打开之后再保存即可代码如下:
- import os
- import cv2
- dataDir="images/val1/"
- saveDir="images/val/"
- if not os.path.exists(saveDir):
- print('ok')
- os.makedirs(saveDir)
- for one_pic in os.listdir(dataDir):
- one_path=dataDir+one_pic
- one_img=cv2.imread(one_path)
- new_path=saveDir+one_pic
- cv2.imwrite(new_path, one_img)
- YOLOv8是一种物体检测算法,是YOLO系列算法的最新版本。YOLO(YouOnlyLookOnce)是一种实时物体检测算法,其优势在于快速且准确的检测结果。YOLOv8在之前的版本基础上进行了一系列改进和优化,提高了检测速度和准确性。Y... [详细]
赞
踩
- 全球麦穗检测是植物表型分析领域的一个挑战,主要目标是检测图像中的小麦麦穗。这种检测在农业领域具有重要意义,可以帮助农民评估作物的健康状况和成熟度。然而,由于小麦麦穗在视觉上具有挑战性,准确检测它们是一项艰巨的任务。全球麦穗检测的挑战在于准确... [详细]
赞
踩
- article
Jetson Xavier NX 下 yolov8 tensorrt模型部署(Jetpack5.1.2、CUDA11.4、Cudnn8.6.0、Tensorrt8.5.2)_yolov8在jetson上部署
JetsonXavierNX下yolov8tensorrt模型部署流程记录及问题处理,本文使用的是TensorRT-Alpha封装库,基于tensorrt+cuda,实现模型的gpu加速。_yolov8在jetson上部署yolov8在je... [详细]赞
踩
- 1)iAFF加入Neck替代Concat;2)Conv替换为GhostConv;3)加入C3Ghost;YOLOv8-Seg改进:特征融合系列篇|多尺度特征融合iAFF,提升小目标检测能力|轻量级创新高效结合GhostConv... [详细]
赞
踩
- article
YOLOv8/YOLOv7/YOLOv5/YOLOv4/Faster-rcnn系列算法改进【NO.77】引入百度最新提出RT-DETR模型中AIFI模块_yolov8、v5、 fasterrcnn 改进插件rt-detr
引入百度最新提出RT-DETR模型中AIFI模块_yolov8、v5、fasterrcnn改进插件rt-detryolov8、v5、fasterrcnn改进插件rt-detr 前言作为当前先进的深度学习目标检测算法YOLOv8,已... [详细]赞
踩
- yolov8的环境搭建,和自定义训练集如何训练_yolov8训练自己的数据集yolov8训练自己的数据集记录一下yolov8的环境搭建,后续会更新v8模型的代码详解以及涨点改进策略。conda环境直接去yolov8官网:... [详细]
赞
踩
- YOLOv8是Ultralytics最新的基于YOLO的目标检测模型系列,提供最先进的性能。_yolov8训练自己的数据集yolov8训练自己的数据集本文实现了俩种环境的设置,一种是windows的CPU版本,还有服务器上的GPU版本。CP... [详细]
赞
踩
- YOLOv8是一种基于深度神经网络的目标检测算法,它是YOLO(YouOnlyLookOnce)系列目标检测算法的最新版本。YOLOv8的主要改进包括:更高的检测精度:通过引入更深的卷积神经网络和更多的特征层,YOLOv8可以在保持实时性的... [详细]
赞
踩
- 至此,整个训练预测阶段完成。此过程同样可以在linux系统上进行,在数据准备过程中需要仔细,保证最后得到的数据准确,最好是用显卡进行训练。有问题评论区见!_yolov8训练自己的数据集yolov8训练自己的数据集目录0、引言1、环境准备2、... [详细]
赞
踩
- 准备一份YOLO系列的数据集,这里就不演示voc转txt了,自己准备一个现成的就好。如果玩过YOLOv5的,数据集直接可以拿来用。数据集放在YOLOv8的大目录下data.yaml文件放在如图目录下yaml的格式可以仿照YOLOv8里的co... [详细]
赞
踩
- 图1.1:YOLOv8初始测试YOLOv8????于2023年1月10日由Ultralytics发布。它在计算机视觉方面提供了进展,带来了对我们感知、分析和理解视觉世界的巨大创新。它将为各个领域带来前所未有的可能性。在速度、准确性和架构方面... [详细]
赞
踩
 基于opencvC++推理yolov8模型(onnx),完整代码_yolov8c++yolov8c++TensorRT系列之Windows10下yolov8tensorrt模型加速部署TensorRT系列之Linux下yolov8tenso... [详细]
赞
踩
- TensorRT通过优化深度学习模型来提高推理速度,减少延迟。这对于实时处理应用(如视频分析、机器人导航等)至关重要。:TensorRT优化了模型以在GPU上高效运行,这意味着更低的内存占用和更高的吞吐量。对于资源受限的环境或在多任务并行处... [详细]
赞
踩
- 该文主要是对yolov8的检测、分类、分割、姿态应用使用c++进行dll封装,并进行调用测试。_c++部署分类c++部署分类该文主要是对yolov8的检测、分类、分割、姿态应用使用c++进行dll封装,并进行调用测试。0.模型准备openv... [详细]
赞
踩
- article
【Yolov8 Opencv C++系列保姆教程】Yolov8 opencv c++ 版本保姆教程,Yolov8训练自己的数据集,实现红绿灯识别及红绿灯故障检测 ,红绿灯故障识别。_用c++ 调用 yolov8
Yolov8OpencvC++系列保姆教程,通过一个红绿灯识别的案例,实现了Yolov8的应用全流程的过程,整个算法最终只依赖了opencv,部署会更加方便、易用。基于Yolov8训练自己的数据集,实现红绿灯识别及红绿灯故障检测,红绿灯故障... [详细]赞
踩
- 但是我read模型的时候报错:ERRORduringprocessingnodewith2inputsand1outputs:[Reshape]:(/model.22/dfl/Reshape_output_0)fromdomain='ai.... [详细]
赞
踩
- YOLOV8C++opecv_dnn模块部署。opencv编译需时间久,GPU版本可实时,有问题私信留言。yolov8opencv废话不多说:opencv>=4.7.0opencv编译不做解释,需要的话翻看别的博主的编译教程代码饱含V... [详细]
赞
踩
- yolov8opencvdnn部署自己的模型yolov8opencvdnn部署自己的模型源码地址本人使用的opencvc++github代码,代码作者非本人使用github源码结合自己导出的onnx模型推理自己的视频推理条件windows1... [详细]
赞
踩

