
- 1【期中考试-整数反转】_给出一个32位的有符号整数n,请将该数进行反转(正负符号不变,其余数字反转)。 反转
- 2【实验】交换机及VLAN的三层配置_一个vlan10的数据帧从sw1进sw3出,请分别简述两交换机连接端口为access与trunk状况
- 3c#与java的区别_c# java对比
- 4字节跳动技术支持面试小记
- 5基于Python的HTTP隧道安全性分析:魔法背后的锁与钥匙
- 6NOIP/CSP算法竞赛对拍四步曲(windows + NOILinux2.0环境)详细举例_csp 对拍
- 7码云Pages搭建个人静态网站之旅_码云托管静态网页
- 8Git切换远程仓库地址三种方法_git 切换 origin
- 9daily-question-02(前端每日一题02)
- 10情感分类之数据处理_情感分类输出 de csv
React进阶学习
赞
踩
一、React进阶
1、React脚手架
npx create-react-app my-app
- 1
2、react
const React = {
	createElement,
	Component
}
- 1
- 2
- 3
- 4
React.createElement: 创建虚拟DOM
React.Component: 实现自定义组件
3、react-dom
主要是render逻辑。
ReactDOM.render: 渲染真实DOM
4、Redux
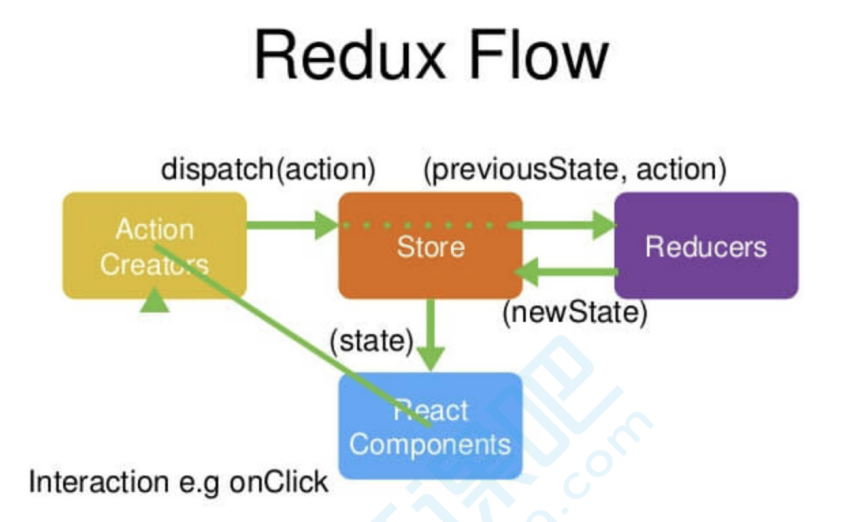
5、组件通讯
props
使用:函数组件通过props接收数据,类组件通过this.props接收数据。
特点:传递任意类型的数据;props是只读的对象;
props深入
- children属性
- props校验
Mouse.propTypes = {
	children: PropTypes.func.isRequired
}
- 1
- 2
- 3
- props默认值
Mouse.defaultProps = {
	children: ""
}
- 1
- 2
- 3
三种方式
- 父传子
- 子传父
通过回调函数实现
class Parent extends React.Component{
	getMsgCallback = data=>{
		console.log(data)
	}
	render(){
		return (
			<div>
				<Child getMsgCallback={this.getMsgCallback}>
			</div>
		)
	}
}

class Child extends React.Component{
	handleClick= ()=>{
		this.props.getMsgCallback("子传父")
	}
	render(){
		return (
			<div>
				<button onClick={this.handleClick}/>
			</div>
		)
	}
}

- 1
- 2
- 3
- 4
- 5
- 6
- 7
- 8
- 9
- 10
- 11
- 12
- 13
- 14
- 15
- 16
- 17
- 18
- 19
- 20
- 21
- 22
- 23
- 24
- 25
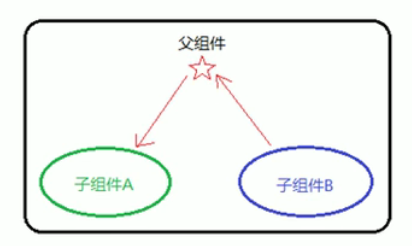
- 兄弟组件
状态提升
Context
跨组件传递数据
const {Provider,Consumer}=React.createContext()

<Provider value="">
</Provider>

<Consumer>
{data => {}}
</Consumer>
- 1
- 2
- 3
- 4
- 5
- 6
- 7
- 8
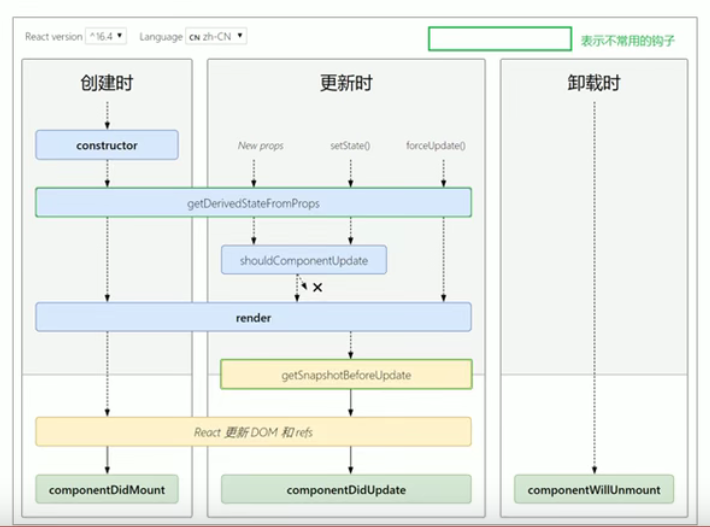
6、组件的生命周期
- 只有类组件才有生命周期
- 不能在render钩子函数中调用setState函数
- 在componentDidUpdate钩子函数中调用setState函数,要比较更新前后的状态是否相同
常用钩子函数:
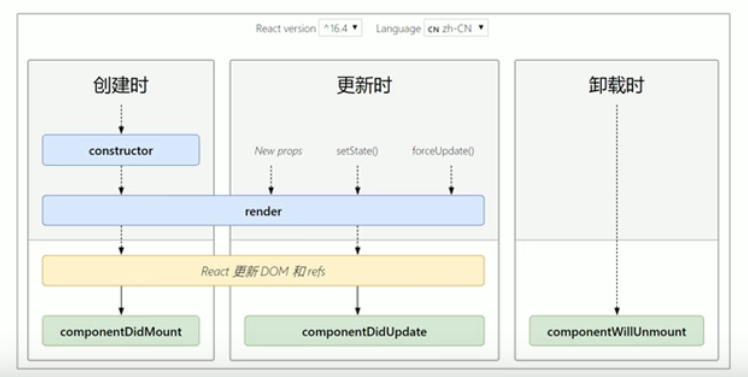
旧版钩子函数:

新版钩子函数:
7、render props模式
实现状态逻辑复用,状态指的是state,逻辑指的是setState。
class Mouse extends React.Component{
	render(){
		return this.props.render(this.state)
	}
}

<Mouse render={(mouse)=><p>鼠标当前位置{mouse.x},{mouse.y}</p>}/>
- 1
- 2
- 3
- 4
- 5
- 6
- 7
children代替render属性
class Mouse extends React.Component{
	render(){
		return this.props.children(this.state)
	}
}

<Mouse>
{(mouse)=><p>鼠标当前位置{mouse.x},{mouse.y}</p>}
</Mouse>
- 1
- 2
- 3
- 4
- 5
- 6
- 7
- 8
- 9
添加props校验
import PropTypes from 'prop-types'

Mouse.propTypes = {
	children: PropTypes.func.isRequired
}
- 1
- 2
- 3
- 4
- 5
8、高阶组件
高阶组件之于组件相当于手机壳之于手机。
- 目的:实现状态逻辑复用
- 装饰模式
- HOC,实际上是一个函数
const EnhancedComponent = withHOC(WrappedComponent)
- 1
function withMouse(WrappedComponent){
	class Mouse extends React.Component{
		return <WrappedComponent {...this.state}/>
	}
	return Mouse
}

const MousePosition = withMouse(Position)

<MousePosition/>
- 1
- 2
- 3
- 4
- 5
- 6
- 7
- 8
- 9
- 10
问题1
得到两个组件名称相同
解决1
设置displayName能在调试时区分不同组件
Mouse.displayName = `WithMouse${getDisplayName(WrappedComponent)}`

function getDisplayName(WrappedComponent){
	return WrappedComponent.displayName || WrappedComponent.name || 'Component'
}
- 1
- 2
- 3
- 4
- 5
问题2
props丢失
解决2
<WrappedComponent {...this.state} {...this.props}/>
- 1
二、React原理
1、setState函数
作用:修改state;更新组件
注意:
异步更新数据;
多次调用setState函数只触发一次重新渲染;
setState(updater[,callback]),第二个参数在状态更新且页面完成渲染后立即执行某个操作;
// 经典写法
this.setState({
	count: this.state.count+1
})

// 推荐写法,多次调用setState函数的顺序更符合人类的思维顺序
this.setState((state,props)=>{
	return {
		count: state.count+1
	}
})
- 1
- 2
- 3
- 4
- 5
- 6
- 7
- 8
- 9
- 10
- 11
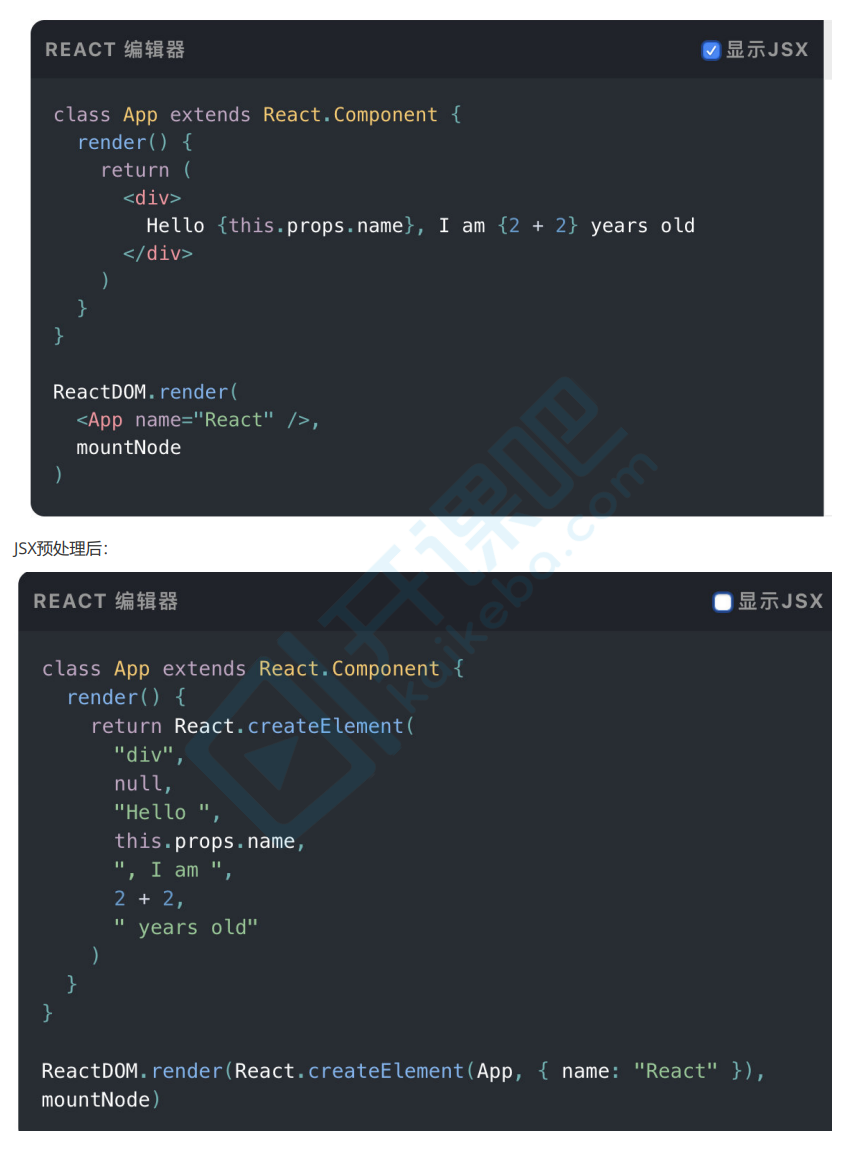
2、JSX语法的转化过程
JSX是createElement函数的简化语法。
JSX语法被@babel/preset-react插件编译为creatElement函数。
React元素:描述看到的内容。

JSX和JSX预处理后的代码:
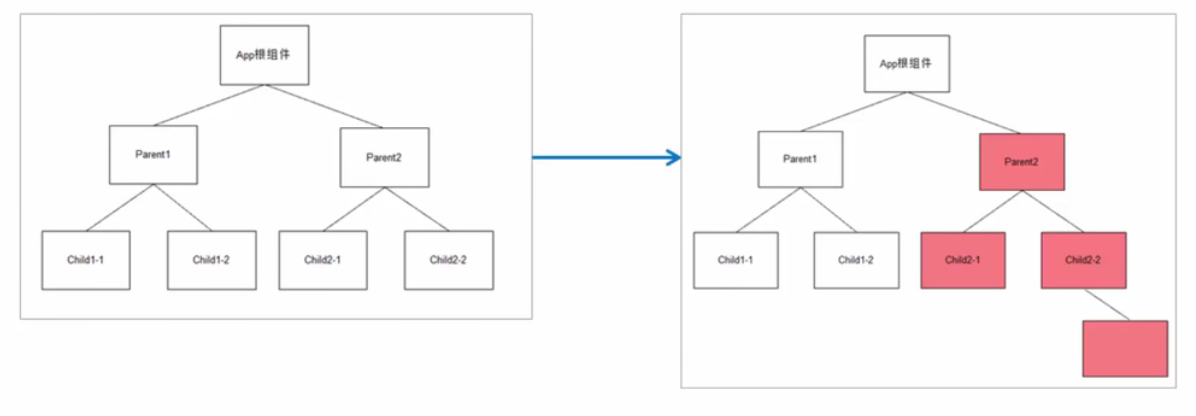
3、组件更新机制
4、组件性能优化
减轻state
只存储与渲染相关的数据
避免不必要的渲染
使用钩子函数shouldComponentUpdate(nextProps, nextState)
纯组件
自动实现了shouldComponentUpdate钩子函数;
使用浅层对比,对于引用类型,只比较对象的地址;
const newObj = {...state.obj, number: 2}
setState({obj: newObj})

this.setState({
	list: [...this.state.list, {新数据}]
})
- 1
- 2
- 3
- 4
- 5
- 6
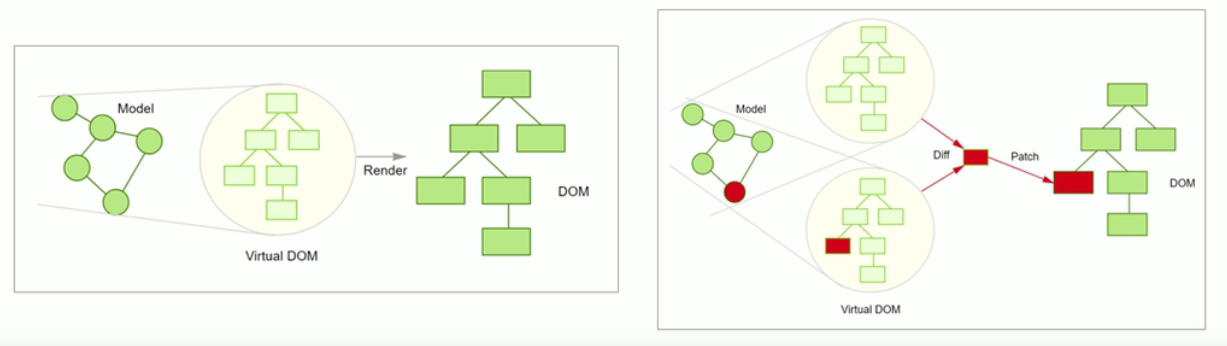
5、React的部分更新
实现:虚拟DOM配合Diff算法
虚拟DOM:React元素,本质是JS对象,描述UI。用JS对象表示DOM信息和结构,当状态变更的时候,重新渲染这个JS的对象结构
const element={
	type: 'h1',
	props: {
		className: 'greeting',
		children: 'Hello JSX'
	}
}
- 1
- 2
- 3
- 4
- 5
- 6
- 7
Diff过程:
三、React路由
- 功能:从一个视图导航到另一个视图
- 使用:配置路由和组件
- 常用组件:
Router组件,推荐用HistoryRouter
Link组件
Route组件,能够指定路由组件的位置 - 路由的执行过程:

- 编程式导航
通过JS代码实现页面跳转
push(path)
go(n) - 匹配模式
- 模糊匹配
默认匹配模式,pathname以path开头就匹配成功,pathname是Link组件的to,path是Route组件的path - 精确匹配
添加exact属性
- 模糊匹配
<Route exact path="/" component=... />
- 1
四、租房移动Web实践
核心业务
在线找房、用户登陆、房源发布
技术栈
React核心库:react、react-dom、react-router-dom
脚手架:create-react-app
数据请求:axios
UI组件库:antd-mobile
其他组件库:react-virtualized、formik+yup、react-spring
百度地图API
node-sass依赖
注意node-sass依赖的问题,多次yarn操作后可以成功安装,但默认情况下node-sass的版本与node的版本不一致。(着实纳闷)
condition:
node -v v14.17.3
node-gyp -v v3.8.0
- 1
- 2
target:
yarn add node-sass@4.12.0
- 1
problem:
gyp verb `which` failed Error: not found: python2
- 1
solution:
yarn add global production windows-build-tools
- 1
H5的地理位置API
- 获取的地理位置与GPS、IP地址、WIFI和蓝牙的MAC地址、GSM/CDMS的ID有关。手机优先使用GPS定位,笔记本最准确的定位是WIFI。
- 只能获得经纬度信息。
navigator.geolocation.getCurrentPosition(position => {
  console.log('当前位置信息:', position)
})
- 1
- 2
- 3
百度地图API
使用步骤:
- 引入百度地图API的JS文件,替换自己的密钥
- 在index.css设置全局样式
- 创建Map组件,配置路由。在Map组件中,创建地图容器元素,并设置样式
- 创建地图实例
- 设置中心点坐标
- 初始化地图,并设置展示级别
地图找房
- 百度地图标注
文本覆盖物label - 缩放级别
- 缩放事件
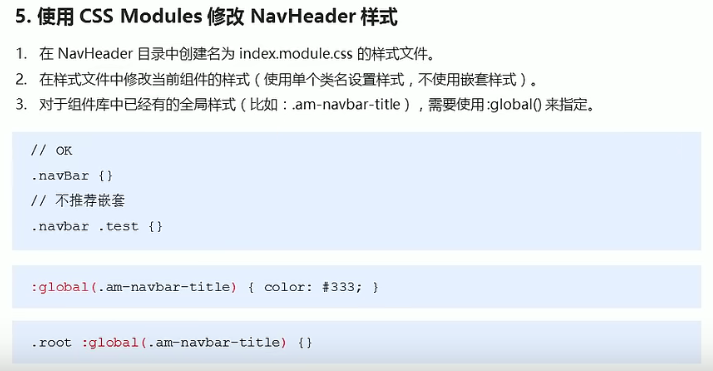
组件间样式覆盖问题
solution
- 手动处理,定义不同类名
- CSS IN JS
- CSS Modules,React脚手架已集成
说明:对CSS类名重命名,保证每个类名的唯一性。所有类名都有局部作用域。
实现:webpack的css-loader
命名:BEM规范(Block块、Element元素、Modifier)
React脚手架中的命名:文件名、类名、hash - styled-components
- CSS Modules,React脚手架已集成
案例
- 这里我们导入了自己写的loadCancelorderData并调用他虽然loadCancelorderData和loadBalanceData都是异步的但是我们并不需要考虑先后执行的问题因为他们之间并不关联谁先谁后执行影响不大。这里我们还是... [详细]
赞
踩
- article
reify:fsevents: sill reify mark deleted [ ‘E:\\VS_CODE\\react-basic\\node_modules\\fsevents‘ ]
reify:fsevents:sillreifymarkdeleted['E:\\VS_CODE\\react-basic\\node_modules\\fsevents']_reify:fsevents:sillreifymarkdele... [详细]赞
踩
- 前言大家好,我是虚竹,今天给大家分享一下我是如何快速通关打怪搭建ReactNative跨端开发环境,并使用大家非常熟悉的开发工具VSCode来编写丝滑般的代码。编写丝滑般代码会再下一篇输出,包括项目实战经验总结和踩坑,如目录架构、函数式编程... [详细]
赞
踩
- electron+umiJS4-react-搭建桌面应用-使用umjs4搭建electron_umi加electron如何结合umi加electron如何结合1、打开命令行工具,切换路劲到工作空间下,执行一下脚本,创建项目 npx... [详细]
赞
踩
- 1、介绍ESLint是一个可扩展,每条规则独立,被设计为完全可配置的lint工具。可以用来检测代码,避免低级错误可以用来规范代码的开发风格,统一代码习惯。2、为什么使用ESLint?统一代码规范:在开发中,可能会遇到很多不同的同事同时开发一... [详细]
赞
踩
- 根据《2019年度JavaScript趋势报告》显示,目前React在前端领域流行度最高,Vue排名位居第二,但从“使用过并且将再次使用”的比例来看,Vue和React相比仍有不小差距。React之所以这么受欢迎,得益于它自身优势:灵活性和... [详细]
赞
踩
- 点击蓝字关注我们国内Vue那么火,为什么大厂都以React居多?其实框架并没有好坏之分,只有适不适合。比如是比较小的项目,那肯定是用Vue更合适,毕竟在业务不复杂的情况下,V..._为什么大厂react为什么大厂react点击蓝字关注我们国... [详细]
赞
踩
- 在互联网不断发展的今天,前端程序员们也不断面临着新的挑战,在这个变化多端、不断革新自己的领域,每一年都有新的美好事物在发生。从去年微信小程序的诞生,到今年的逐渐火热,以及异军突起的轻应用、百度小程序等的出现,前端可以延伸的领域已经越来越广,... [详细]
赞
踩
- 面对当今前端界两座大山一样的主流框架,React和Vue,相信很多小伙伴都或多或少都产生过这样疑问,而这样的问题也往往很让人头疼和犹豫不决:业务场景中是不是团队用什么我就用什么?如果选择了其中一个使用,那为什么不用另一个?这两个框架各有什么... [详细]
赞
踩
- 简介React是Facebook开源的一个用于构建用户界面的Javascript库,已经应用于Facebook及旗下Instagram。和庞大的AngularJS不同,React专注于MVC架构中的V,即视图。这使得React很容易和开发者... [详细]
赞
踩
- 大家好,我是ConardLi。2161天!这是React团队从计划为React增加并发渲染的能力,到React18可用版本发布所花费的时间。为啥中间花费了这么长的时间?中间又发生了哪些有趣的故事?我们回到2016年,来回顾一下React并发... [详细]
赞
踩
- 其实对于一个合格的前端来说,两个都要学习掌握。不能通过比较做出取舍,比较只是为了更好地了解这两者。对我而言:1.如果自己新开发项目,应该会选vue,现有生态圈的支持一般也够用了;2.如果做二次开发,因为有好多开源项目本身就是基于react的... [详细]
赞
踩
- 作为前端广受欢迎的两个框架,React和Vue几乎是面试必考的内容。特别是到了中高级前端岗,企业需要考察你对两个框架的应用,也会从源码层面考察你对框架的掌握程度,比如:Compute..._vuereactdiff不同思维导图vuereac... [详细]
赞
踩
- 我使用Vue和React已经很长一段时间了,两个框架上实践代码量都在10万行以上。不得不说两者都是很nice的,帮助开发者减少很多工作量,这类框架是现代化前端开发必备的。然而Vue和React两者之间的选择并不像选择苹果或香蕉一样简单,两者... [详细]
赞
踩
- 大家好,我是沐华。我发现很多5年以上前端,简历上写的基本都是熟练使用Vue2、Vue3、React并阅读源码对其实现原理有自己的理解,实际问起来却不免让人唏嘘_会vue不会react的前端多么会vue不会react的前端多么大家好,我是沐华... [详细]
赞
踩
- 大厂技术高级前端Node进阶点击上方程序员成长指北,关注公众号回复1,加入高级Node交流群作者|褚杏娟核子可乐 近期,React团队正在更新React文档。期间,Vue.js作者尤雨溪发布推特称,新的React文档应该向初学者推荐Vite... [详细]
赞
踩
- 1.数据流不同vue可以用v-model实现双向绑定,而react一直提倡单向绑定2.模板渲染方式不同React是通过JSX渲染模板。可以使用JS的原生语法完成渲染。如条件(if),循环(for)等vue是通过一种拓展的HTML语法进行渲染... [详细]
赞
踩
- 在当今快速发展的前端领域中,Vue和React作为两个备受瞩目的前端框架,已经成为许多开发者的首选。这两个框架凭借其出色的设计和强大的功能,在构建现代化、高效性能的Web应用方面扮演着重要角色。Vue和React都以其独特的特点吸引了众多开... [详细]
赞
踩
- 思考一下,如何识别网站用的是Vue框架,还是React框架?本文以Vue为例,来看看如何检测任意网站使用的框架是Vue。面对这个问题时,起初可能没有太多的思路,我起初的想法是..._微信读书网页版用vue微信读书网页版用vue思考一下,如何... [详细]
赞
踩
- [react]react的虚拟DOM和vue的虚拟DOM有什么区别?React是数据先生成vdom,然后对比vdom(实现上并非先后顺序,两棵树边遍历边生成新的树),最后通过新的DOM树渲染。Vue是数据先进性对比,先通过数据的不同,再去更... [详细]
赞
踩

