
热门标签
热门文章
- 1Android studio安装虚拟机的问题,解决AMD处理器无法安装虚拟机,虚拟机运行失败的问题。AMD CPU电脑安装Android Studio详细步骤以及无法成功install HAXM的解决_android studio device manager
- 2Eclipse连接Mysql超详细教程
- 3R语言ggplot2可视化:使用ggpubr包的ggboxplot函数可视化箱图、使用font函数自定义坐标轴刻度线数值标签(xy.text)字体的大小、颜色、样式(粗体、斜体)_ggpubr坐标轴粗细
- 4python 脚本作为Windows服务启动_python转windows服务
- 5Python之pip命令指定安装源和版本_pip 指定源
- 6在项目中使用TS封装 axios,一次封装永久使用_ts 封装 axios
- 7什么是大模型?一文读懂大模型的基本概念
- 8【职业规划】第二篇:程序员分级之中级程序员_java人员评级
- 9谈谈我们公司如何做Code Review
- 10Ubuntu下安装Python环境_sudo apt-get install python2需要密码如何处理
当前位置: article > 正文
zynq-linux的相关脚本分析_打开控制终端,执行settings64.sh脚本
作者:代码维护者 | 2024-01-31 18:57:12
赞
踩
打开控制终端,执行settings64.sh脚本
米联客公司提供的zynq-linux的相关脚本分析,欢迎讨论。
参考视频连接https://www.bilibili.com/video/BV1WE411g7dY?p=7
一.全局重要的两个sh文件
settings64.sh

usage() {
    echo "Purpose: To configure the developing environment automatically"
    echo "Version: V2018.06"
    echo "Usage  : source $(basename ${BASH_SOURCE})"
    exit 0;
}
打印函数,其中
basename:bashname命令用于获取路径中的文件名或路径名
   1: [aliyunzixun@xxx.com lianxi]# basename /etc/passwd
   2: passwd
 BASH_SOURCE:
 https://www.junmajinlong.com/shell/bash_source/

 expr "$*" : ".*--help" > /dev/null && usage
 "$*"的含义: https://zhuanlan.zhihu.com/p/57784678
 :的含义:空命令, 等价于 “NOP”
 >:含义为输出到
 上式的含义为将一些help信息输出到/dev/null,并调用usage()脚本。


 # => Make sure the script is being source'd, not executed.  Otherwise, environment variables set here will not stick.
if [ ${BASH_SOURCE[0]} == "$0" ]; then
    printf "\033[31m[ERROR]\033[0m Please execute the script, such as: source `basename "$0"`\n" && exit 1
fi
需要采用source执行该脚本。上述033 31m是对字体进行设置


#------------------------------------------------------------------------------
# The basic directory
#------------------------------------------------------------------------------
# => Directory containing the running script (as required)
export ZN_SCRIPTS_DIR="$(cd $(dirname ${BASH_SOURCE}) && pwd)"
设置变量ZN_SCRIPTS_DIR为当前脚本所在目录,后面的&&pwd含义不清楚。

# => Import local function from common.sh
if [ -f "${ZN_SCRIPTS_DIR}/common.sh" ]; then
    source ${ZN_SCRIPTS_DIR}/common.sh
else
    printf "\033[31m[ERROR]\033[0m Could not find file '${ZN_SCRIPTS_DIR}/common.sh'\n" &&  return 1
fi
执行当前目录下的common.sh文件。

# => The Top Directory (as required)
export ZN_TOP_DIR="$(dirname $ZN_SCRIPTS_DIR)"
export ZN_TOP_NAME="$(basename $ZN_TOP_DIR)"
dirname:是找当前文件夹或文件的上一级目录的路径
basename:是找当前文件夹上一级文件夹的名字

# => The Boards Directory (as required)
export ZN_BOARDS_DIR="${ZN_TOP_DIR}/boards"
# => The Sources Directory (as required)
export ZN_SOURCES_DIR="${ZN_TOP_DIR}/sources"
# => The Documents Directory (as required)
export ZN_DOCUMENTS_DIR="${ZN_TOP_DIR}/documents"
# => The Packages (as required)
export ZN_DOWNLOADS_DIR="${ZN_TOP_DIR}/packages"
# => Host tools, cross compiler, utilities (as required)
export ZN_TOOLS_DIR=${ZN_TOP_DIR}/tools

# => Invoke a second make in the output directory, passing relevant variables
# check that the output directory actually exists
mkdir -p ${ZN_BOARDS_DIR} ${ZN_SOURCES_DIR} ${ZN_DOCUMENTS_DIR} ${ZN_DOWNLOADS_DIR} ${ZN_TOOLS_DIR}
创建相应的子目录。

#------------------------------------------------------------------------------
# Project basic settings
#------------------------------------------------------------------------------
下面是导出一些关键变量:
# => The Board Name
# export ZN_BOARD_NAME="zybo"
  export ZN_BOARD_NAME="z1458"
# export ZN_BOARD_NAME="z1459"
# export ZN_BOARD_NAME="miz702a"
# export ZN_BOARD_NAME="miz702b"
echo_info "板子名称: ${ZN_BOARD_NAME}"

# => The Board Directory
export ZN_BOARD_DIR="${ZN_BOARDS_DIR}/${ZN_BOARD_NAME}"
echo_info "板子目录: ${ZN_BOARD_DIR}"

# => The Project Name
# export ZN_PROJECT_NAME="base"
  export ZN_PROJECT_NAME="bundle"
# export ZN_PROJECT_NAME="axi_tft"
# export ZN_PROJECT_NAME="axi_vdma"
# export ZN_PROJECT_NAME="keyboard"
# export ZN_PROJECT_NAME="lab"
# export ZN_PROJECT_NAME="debian"
# export ZN_PROJECT_NAME="ubuntu"
echo_info "项目名称: ${ZN_PROJECT_NAME}"

# => The Project Version
export ZN_PROJECT_VERSION=${ZN_PROJECT_VERSION:-1.0}
echo_info "项目版本: ${ZN_PROJECT_VERSION}"

# => The Project Directory
export ZN_PROJECT_DIR="${ZN_BOARD_DIR}/${ZN_PROJECT_NAME}"
echo_info "项目目录: ${ZN_PROJECT_DIR}"

# => The Build Output Directory
export ZN_OUTPUT_DIR=${ZN_PROJECT_DIR}/output
export ZN_TARGET_DIR=${ZN_OUTPUT_DIR}/target
export ZN_ROOTFS_MOUNT_POINT=${ZN_OUTPUT_DIR}/rootfs
export ZN_SDCARD_MOUNT_POINT=${ZN_OUTPUT_DIR}/sdcard

# => The System Images Directory
export ZN_IMGS_DIR=${ZN_PROJECT_DIR}/images

创建相关的文件夹。
# => Invoke a second make in the output directory, passing relevant variables
# check that the output directory actually exists
mkdir -p ${ZN_BOARD_DIR} ${ZN_PROJECT_DIR} ${ZN_OUTPUT_DIR} ${ZN_TARGET_DIR} \
    ${ZN_ROOTFS_MOUNT_POINT} ${ZN_SDCARD_MOUNT_POINT} ${ZN_IMGS_DIR}


#------------------------------------------------------------------------------
设置与FPGA相关的文件目录
# System Hardware Design
# 1. Configure PS
# 2. Develop RTL/IP
# 3. Add/Integrate IP
# 4. Genrate Bitstream
# 5. Export to SDK
# 6. Standalone applications
#------------------------------------------------------------------------------
# => Current Vivado/LabTool/SDK Version (Example:2015.4).
# export VIVADO_VERSION="${VIVADO_VERSION:-2013.4}"
# export VIVADO_VERSION="${VIVADO_VERSION:-2014.4}"
# export VIVADO_VERSION="${VIVADO_VERSION:-2014.4}"
# export VIVADO_VERSION="${VIVADO_VERSION:-2016.4}"
# export VIVADO_VERSION="${VIVADO_VERSION:-2017.4}"
  export VIVADO_VERSION="${VIVADO_VERSION:-2018.2}"

# => Vivado工程名称(根据项目需求进行修改)
export ZN_VIVADO_PROJECT_NAME=system
echo_info "工程名称: ${ZN_VIVADO_PROJECT_NAME}"

# => Vivado工程路径(根据项目需求进行修改)
export ZN_VIVADO_PROJECT_DIR="${ZN_PROJECT_DIR}/fpga/${ZN_VIVADO_PROJECT_NAME}"
echo_info "工程路径: ${ZN_VIVADO_PROJECT_DIR}"

# => SDK工程路径(根据项目需求进行修改)
export ZN_SDK_PROJECT_DIR="${ZN_VIVADO_PROJECT_DIR}/${ZN_VIVADO_PROJECT_NAME}.sdk"

# => Block design name(根据项目需求进行修改)
export ZN_BD_NAME="system"

# => Vivado export a hardware description file for use whith the SDK
export ZN_HW_DESC_FILE_DIR="${ZN_SDK_PROJECT_DIR}/${ZN_BD_NAME}_wrapper_hw_platform_0"

# => Standalone Application
export ZN_STANDALONE_DIR=${ZN_PROJECT_DIR}/standalone

# => Invoke a second make in the output directory, passing relevant variables
# check that the output directory actually exists
mkdir -p ${ZN_VIVADO_PROJECT_DIR} ${ZN_STANDALONE_DIR}


#------------------------------------------------------------------------------
# Describe the toolchain for developing an embedded Linux operating system
#------------------------------------------------------------------------------
# => ARCH指明目标体系架构,即编译好的内核运行在什么平台上,如x86、arm或mips等
export ARCH=arm

# => 设置交叉编译工具
# http://www.wiki.xilinx.com/Install+Xilinx+tools
export ZN_TOOLCHAIN_PATH=${ZN_TOOLS_DIR}/cross_compiler
if [ -d "${ZN_TOOLCHAIN_PATH}/bin" ]; then
    export PATH=$PATH:${ZN_TOOLCHAIN_PATH}/bin
    if which arm-linux-gnueabihf-gcc > /dev/null 2>&1 ; then
        export ZN_TOOLCHAIN_PREFIX=arm-linux-gnueabihf
        export CROSS_COMPILE=${ZN_TOOLCHAIN_PREFIX}-
    elif which arm-xilinx-linux-gnueabi-gcc > /dev/null 2>&1 ; then
        export ZN_TOOLCHAIN_PREFIX=arm-xilinx-linux-gnueabi
        export CROSS_COMPILE=${ZN_TOOLCHAIN_PREFIX}-
    else
        echo_error "Could not find the cross compiler" && return 1
    fi
else
    echo_error "Could not find the cross compiler" && return 1
fi

# => Scale the maximum concurrency with the number of CPUs.
# 方法一:
export MAKE_JOBS="-j$(nproc)"
export PARALLEL_MAKE="-j$(nproc)"
获取处理器的核数:$(nproc)
# 方法二:
# # http://www.verydemo.com/demo_c131_i121360.html
# NUMBER_THREADS=`cat /proc/cpuinfo | grep "processor" | wc -l`
# # Do not run with really big numbers unless you want your machine to be dog-slow!
# if [ ${NUMBER_THREADS} -le 8 ] ; then
#     export MAKE_JOBS="-j${NUMBER_THREADS}"
#     export PARALLEL_MAKE="-j${NUMBER_THREADS}"
# else
#     export MAKE_JOBS="-j`expr ${NUMBER_THREADS} / 2`"
#     export PARALLEL_MAKE="-j`expr ${NUMBER_THREADS} / 2`"
# fi


#------------------------------------------------------------------------------

# System Software Development
#------------------------------------------------------------------------------
# => FSBL
# ==> Create the First Stage Boot Loader (FSBL) or U-BOOT spl bootloader
export ZN_FSBL_NAME=zynq_fsbl
# export ZN_FSBL_DIR=${ZN_STANDALONE_DIR}/zynq_fsbl
# ==> Invoke a second make in the output directory, passing relevant variables
# check that the output directory actually exists
# mkdir -p ${ZN_FSBL_DIR}
设备树相关
# => Device Tree
# ==> DTG (Device Tree Generator)
export ZN_DTG_DIR=${ZN_SOURCES_DIR}/dtg

# ==> DTS (Device Tree Source)
export ZN_DTS_NAME="system-top.dts"
export ZN_DTS_DIR=${ZN_PROJECT_DIR}/dts

# ==> DTB (Device Tree Blob)
export ZN_DTB_NAME="devicetree.dtb"
export ZN_DTB_DIR=${ZN_TARGET_DIR}

# ==> DTC (Device Tree Compiler) {{{
# When enabling verified boot you are going to build device tree files,
# therefore you also must install the device tree compiler.

# 方法一:单独下载dtc源码
# export ZN_DTC_DIR=${ZN_TOOLS_DIR}/dtc
# export PATH=${ZN_DTC_DIR}:$PATH

# 方法二:使用内核里的dtc(注:已经将该部分移到Linux小节进行配置)
# export ZN_DTC_DIR=${ZN_KERNEL_DIR}/scripts/dtc
# export PATH=${ZN_DTC_DIR}:$PATH

# 方法三: Ubuntu 12.04 LTS (Precise Pangolin) and later provide a version
# which is recent enough:
# sudo apt-get install device-tree-compiler
# }}}

# ==> Invoke a second make in the output directory, passing relevant variables
# check that the output directory actually exists
mkdir -p ${ZN_DTG_DIR} ${ZN_DTS_DIR}
# => Build U-Boot
# ==> ssbl : this folder stores all the U-Boot code.
export ZN_UBOOT_DIR=${ZN_SOURCES_DIR}/u-boot
# The uImage target of the Linux kernel compilation needs a recent mkimage tool
# which is actually built during U-Boot compilation as explained further below.
# Ensure that one is included in PATH:
export PATH=${ZN_UBOOT_DIR}/tools:$PATH
表示追加$PATH全局变量。
# ==> Configure the bootloader for the Zynq target
if [ "${ZN_BOARD_NAME}" = "zybo" ]; then
    export ZN_UBOOOT_DEFCONFIG=zynq_zybo_defconfig

elif [ "${ZN_BOARD_NAME}" = "z1458" ]; then
    export ZN_UBOOOT_DEFCONFIG=zynq_z1458_defconfig

elif [ "${ZN_BOARD_NAME}" = "z1459" ]; then
    export ZN_UBOOOT_DEFCONFIG=zynq_z1459_defconfig

elif [ "${ZN_BOARD_NAME}" = "miz702a" ]; then
    export ZN_UBOOOT_DEFCONFIG=zynq_miz702a_defconfig

elif [ "${ZN_BOARD_NAME}" = "miz702b" ]; then
    export ZN_UBOOOT_DEFCONFIG=zynq_miz702b_defconfig

else
    echo_error "Does not support ${ZN_BOARD_NAME}" && return 1
fi
# ==> Invoke a second make in the output directory, passing relevant variables
# check that the output directory actually exists
mkdir -p ${ZN_UBOOT_DIR}

# => Build Linux
# ==> kernel : this folder stores the object files (not sources) of the kernel
# build process.
export ZN_KERNEL_DIR=${ZN_SOURCES_DIR}/kernel
export KSRC=${ZN_KERNEL_DIR}

# ==> modules : this folder stores the user kernel  modules. This is the place
# to create custom kernel modules.  Each module has to be in a subfolder of
# this one.
export ZN_MODULE_DIR=${ZN_SOURCES_DIR}/modules

# ==> 使用内核里的dtc
export ZN_DTC_DIR=${ZN_KERNEL_DIR}/scripts/dtc
export PATH=${ZN_DTC_DIR}:$PATH

# ==> Configure the Linux Kernel for the Zynq target
if [ "${ZN_BOARD_NAME}" = "zybo" ]; then
    export ZN_LINUX_KERNEL_DEFCONFIG=xilinx_zybo_defconfig

elif [ "${ZN_BOARD_NAME}" = "z1458" ]; then
    export ZN_LINUX_KERNEL_DEFCONFIG=xilinx_z1458_defconfig

elif [ "${ZN_BOARD_NAME}" = "z1459" ]; then
    export ZN_LINUX_KERNEL_DEFCONFIG=xilinx_z1459_defconfig

elif [ "${ZN_BOARD_NAME}" = "miz702a" ]; then
    export ZN_LINUX_KERNEL_DEFCONFIG=xilinx_miz702a_defconfig

elif [ "${ZN_BOARD_NAME}" = "miz702b" ]; then
    export ZN_LINUX_KERNEL_DEFCONFIG=xilinx_miz702b_defconfig

else
    echo_error "Does not support ${ZN_BOARD_NAME}" && return 1
fi

# ==> Invoke a second make in the output directory, passing relevant variables
# check that the output directory actually exists
mkdir -p ${ZN_KERNEL_DIR} ${ZN_MODULE_DIR}

# => The root filesystem (buildroot, debian, ubuntu)
if [ "${ZN_PROJECT_NAME}" = "ubuntu" ]; then
    export ZN_ROOTFS_TYPE="ubuntu"

elif [ "${ZN_PROJECT_NAME}" = "debian" ]; then
    export ZN_ROOTFS_TYPE="debian"

else
    export ZN_ROOTFS_TYPE="buildroot"
fi

echo_info "文件系统: ${ZN_ROOTFS_TYPE}"
if [ "${ZN_ROOTFS_TYPE}" = "debian" ]; then
    export ZN_ROOTFS_DIR=${ZN_SOURCES_DIR}/rootfs/${ZN_ROOTFS_TYPE}

elif [ "${ZN_ROOTFS_TYPE}" = "ubuntu" ]; then
    export ZN_ROOTFS_DIR=${ZN_SOURCES_DIR}/rootfs/${ZN_ROOTFS_TYPE}

elif [ "${ZN_ROOTFS_TYPE}" = "buildroot" ]; then
    export ZN_ROOTFS_DIR=${ZN_SOURCES_DIR}/rootfs/${ZN_ROOTFS_TYPE}
    # setup Buildroot download cache directory
    export BR2_DL_DIR=${ZN_DOWNLOADS_DIR}/buildroot

    # ==> Configure the buildroot for the Zynq target
    if [ "${ZN_BOARD_NAME}" = "zybo" ]; then
        export ZN_BUILDROOT_DEFCONFIG=zynq_zybo_defconfig

    elif [ "${ZN_BOARD_NAME}" = "z1458" ]; then
        export ZN_BUILDROOT_DEFCONFIG=zynq_z1458_defconfig

    elif [ "${ZN_BOARD_NAME}" = "z1459" ]; then
        export ZN_BUILDROOT_DEFCONFIG=zynq_z1459_defconfig

    elif [ "${ZN_BOARD_NAME}" = "miz702a" ]; then
        export ZN_BUILDROOT_DEFCONFIG=zynq_miz702a_defconfig

    elif [ "${ZN_BOARD_NAME}" = "miz702b" ]; then
        export ZN_BUILDROOT_DEFCONFIG=zynq_miz702b_defconfig

    else
        echo_error "Does not support ${ZN_BOARD_NAME}" && return 1
    fi

    # => Ramdisk Constants
    export ZN_BLOCK_SIZE=1024
    export ZN_RAMDISK_SIZE="$((128 * 1024))" # 128MB

    # ==> Invoke a second make in the output directory, passing relevant variables
    # check that the output directory actually exists
    mkdir -p ${BR2_DL_DIR}

else
    echo_error "There is no root filesystem" && exit 1
fi

# ==> Invoke a second make in the output directory, passing relevant variables
# check that the output directory actually exists
mkdir -p ${ZN_ROOTFS_DIR}

#------------------------------------------------------------------------------
# Application Development
# SDK: Build & Compile Application Code
#------------------------------------------------------------------------------
# => Linux Application
export ZN_APPS_DIR=${ZN_SOURCES_DIR}/applications

# => Invoke a second make in the output directory, passing relevant variables
# check that the output directory actually exists
mkdir -p ${ZN_APPS_DIR}

#------------------------------------------------------------------------------
# Adding the Directory to the Path
#------------------------------------------------------------------------------
export PATH=${ZN_SCRIPTS_DIR}:$PATH

for dir in $( ls ${ZN_SCRIPTS_DIR}/ ); do
    if [ -d "${ZN_SCRIPTS_DIR}/${dir}" ]; then
        export PATH=${ZN_SCRIPTS_DIR}/${dir}:$PATH
    fi
done

if [ -d "${ZN_SCRIPTS_DIR}/rootfs/${ZN_ROOTFS_TYPE}" ]; then
    export PATH="${ZN_SCRIPTS_DIR}/rootfs/${ZN_ROOTFS_TYPE}":$PATH
fi

# => The end
export ZN_CONF_DONE="done"

- 1
- 2
- 3
- 4
- 5
- 6
- 7
- 8
- 9
- 10
- 11
- 12
- 13
- 14
- 15
- 16
- 17
- 18
- 19
- 20
- 21
- 22
- 23
- 24
- 25
- 26
- 27
- 28
- 29
- 30
- 31
- 32
- 33
- 34
- 35
- 36
- 37
- 38
- 39
- 40
- 41
- 42
- 43
- 44
- 45
- 46
- 47
- 48
- 49
- 50
- 51
- 52
- 53
- 54
- 55
- 56
- 57
- 58
- 59
- 60
- 61
- 62
- 63
- 64
- 65
- 66
- 67
- 68
- 69
- 70
- 71
- 72
- 73
- 74
- 75
- 76
- 77
- 78
- 79
- 80
- 81
- 82
- 83
- 84
- 85
- 86
- 87
- 88
- 89
- 90
- 91
- 92
- 93
- 94
- 95
- 96
- 97
- 98
- 99
- 100
- 101
- 102
- 103
- 104
- 105
- 106
- 107
- 108
- 109
- 110
- 111
- 112
- 113
- 114
- 115
- 116
- 117
- 118
- 119
- 120
- 121
- 122
- 123
- 124
- 125
- 126
- 127
- 128
- 129
- 130
- 131
- 132
- 133
- 134
- 135
- 136
- 137
- 138
- 139
- 140
- 141
- 142
- 143
- 144
- 145
- 146
- 147
- 148
- 149
- 150
- 151
- 152
- 153
- 154
- 155
- 156
- 157
- 158
- 159
- 160
- 161
- 162
- 163
- 164
- 165
- 166
- 167
- 168
- 169
- 170
- 171
- 172
- 173
- 174
- 175
- 176
- 177
- 178
- 179
- 180
- 181
- 182
- 183
- 184
- 185
- 186
- 187
- 188
- 189
- 190
- 191
- 192
- 193
- 194
- 195
- 196
- 197
- 198
- 199
- 200
- 201
- 202
- 203
- 204
- 205
- 206
- 207
- 208
- 209
- 210
- 211
- 212
- 213
- 214
- 215
- 216
- 217
- 218
- 219
- 220
- 221
- 222
- 223
- 224
- 225
- 226
- 227
- 228
- 229
- 230
- 231
- 232
- 233
- 234
- 235
- 236
- 237
- 238
- 239
- 240
- 241
- 242
- 243
- 244
- 245
- 246
- 247
- 248
- 249
- 250
- 251
- 252
- 253
- 254
- 255
- 256
- 257
- 258
- 259
- 260
- 261
- 262
- 263
- 264
- 265
- 266
- 267
- 268
- 269
- 270
- 271
- 272
- 273
- 274
- 275
- 276
- 277
- 278
- 279
- 280
- 281
- 282
- 283
- 284
- 285
- 286
- 287
- 288
- 289
- 290
- 291
- 292
- 293
- 294
- 295
- 296
- 297
- 298
- 299
- 300
- 301
- 302
- 303
- 304
- 305
- 306
- 307
- 308
- 309
- 310
- 311
- 312
- 313
- 314
- 315
- 316
- 317
- 318
- 319
- 320
- 321
- 322
- 323
- 324
- 325
- 326
- 327
- 328
- 329
- 330
- 331
- 332
- 333
- 334
- 335
- 336
- 337
- 338
- 339
- 340
- 341
- 342
- 343
- 344
- 345
- 346
- 347
- 348
- 349
- 350
- 351
- 352
- 353
- 354
- 355
- 356
- 357
- 358
- 359
- 360
- 361
- 362
- 363
- 364
- 365
- 366
- 367
- 368
- 369
- 370
- 371
- 372
- 373
- 374
- 375
- 376
- 377
- 378
- 379
- 380
- 381
- 382
- 383
- 384
- 385
- 386
- 387
- 388
- 389
- 390
- 391
- 392
- 393
- 394
- 395
- 396
- 397
- 398
- 399
- 400
- 401
- 402
- 403
- 404
- 405
common.sh
#!/bin/bash
###############################################################################
# 版    权:米联客
# 技术社区:www.osrc.cn
# 功能描述:一些常用函数
# 版 本 号:V1.0
###############################################################################
# => Writing a Warning Message to the Console Window
echo_warn() {
    local msg="$1"
    printf "\033[33m[WARNING] \033[0m";
    printf "$msg\n";
}
export -f echo_warn

# => Writing a Infomation Message to the Console Window
echo_info() {
    local msg="$1"
    printf "\033[32m[INFO] \033[0m";
    printf "$msg\n";
}
export -f echo_info

# => Writing a Error Message to the Console Window
echo_error() {
    local msg="$1"
    printf "\033[31m[ERROR] \033[0m";
    printf "$msg\n";
}
export -f echo_error

# => Writing a Warning Message to the Console Window
print_warn() {
    local msg="$1"
    printf "\033[33m$msg\033[0m";
}
export -f print_warn

# => Writing a Infomation Message to the Console Window
print_info() {
    local msg="$1"
    printf "\033[32m$msg\033[0m";
}
export -f print_info

# => Writing a Error Message to the Console Window
print_error() {
    local msg="$1"
    printf "\033[31m$msg\033[0m";
}
export -f print_error

# => Writing a Error Message to the Console Window and exit
error_exit() {
    local msg="$1"
    printf "\033[31m[ERROR] \033[0m";
    printf "$msg\n";
    exit 1;
}
export -f error_exit
- 1
- 2
- 3
- 4
- 5
- 6
- 7
- 8
- 9
- 10
- 11
- 12
- 13
- 14
- 15
- 16
- 17
- 18
- 19
- 20
- 21
- 22
- 23
- 24
- 25
- 26
- 27
- 28
- 29
- 30
- 31
- 32
- 33
- 34
- 35
- 36
- 37
- 38
- 39
- 40
- 41
- 42
- 43
- 44
- 45
- 46
- 47
- 48
- 49
- 50
- 51
- 52
- 53
- 54
- 55
- 56
- 57
- 58
- 59
- 60
- 61
- 62
二.uboot相关的sh文件
2.1cfg_boot.sh
#!/bin/bash
###############################################################################
# 版    权:米联客
# 技术社区:www.osrc.cn
# 功能描述:1. 清除配置文件和编译中间结果
#           2. 重新配置 U-Boot
#           3. 编译开发所需要的工具
# 版 本 号:V1.0
###############################################################################
# => Setting The Development Environment Variables
if [ ! "${ZN_CONFIG_DONE}" ];then
    echo "[ERROR] 请以“source settings64.sh”的方式执行 settings64.sh 脚本。" && exit 1
fi
在settings64.sh文件的最后会将该变量变为DONE。

# => Filename of the running script.
ZN_SCRIPT_NAME="$(basename ${BASH_SOURCE})"
dirname:是找当前文件夹或文件的上一级目录的路径
basename:是找当前文件夹上一级文件夹的名字

###############################################################################
# => The beginning
echo_info "[ $(date "+%Y/%m/%d %H:%M:%S") ] Starting ${ZN_SCRIPT_NAME}"

# => Make sure the source is there
if [ "`ls -A ${ZN_UBOOT_DIR}`" = "" ]; then
    error_exit "Can't find the source code of u-boot"
else
    cd ${ZN_UBOOT_DIR}
fi
ZN_UBOOT_DIR在setting64.sh中设置,进入该目录下后会执行如下操作。
# => 1. Cleaning the Sources
# => 2. To configure the sources for the intended target.
# => 3. Prepare for compiling the source code


# => 1. Cleaning the Sources
echo_info "To delete all build products as well as the configuration"
make distclean || error_exit "Failed to make distclean"

# => 2. To configure the sources for the intended target.
echo_info "Configure u-boot on the ${ZN_UBOOT_DIR}"
make ${ZN_UBOOOT_DEFCONFIG} || error_exit "Failed to make ${ZN_UBOOOT_DEFCONFIG}"
ZN_UBOOOT_DEFCONFIG为uboot的配置文件,在setting64.sh中设定。

# => 3. Prepare for compiling the source code
echo_info "Prepare for compiling the source code"
make tools || error_exit "Failed to make tools"

make的目标为tools
# => The end
echo_info "[ $(date "+%Y/%m/%d %H:%M:%S") ] Finished ${ZN_SCRIPT_NAME}"
###############################################################################
- 1
- 2
- 3
- 4
- 5
- 6
- 7
- 8
- 9
- 10
- 11
- 12
- 13
- 14
- 15
- 16
- 17
- 18
- 19
- 20
- 21
- 22
- 23
- 24
- 25
- 26
- 27
- 28
- 29
- 30
- 31
- 32
- 33
- 34
- 35
- 36
- 37
- 38
- 39
- 40
- 41
- 42
- 43
- 44
- 45
- 46
- 47
- 48
- 49
- 50
- 51
- 52
- 53
- 54
- 55
2.2save_uboot_defconfig.sh
#!/bin/bash
###############################################################################
# 版    权:米联客
# 技术社区:www.osrc.cn
# 功能描述:保存配置文件到硬盘
# 版 本 号:V1.0
###############################################################################
# => Setting The Development Environment Variables
if [ ! "${ZN_CONFIG_DONE}" ];then
    echo "[ERROR] Please source the settings64.sh script first" && exit 1
fi

# => Filename of the running script.
ZN_SCRIPT_NAME="$(basename ${BASH_SOURCE})"

###############################################################################
# => The beginning
echo_info "[ $(date "+%Y/%m/%d %H:%M:%S") ] Starting ${ZN_SCRIPT_NAME}"

# => Make sure the source is there
if [ "`ls -A ${ZN_UBOOT_DIR}`" = "" ]; then
    error_exit "Can't find the source code of u-boot"
fi

# => To save bootloader config use the command :
echo_info "To save bootloader config"
make -C ${ZN_UBOOT_DIR} savedefconfig
if [ $? != 0 ]; then
    error_exit "Failed to save defconfig"
else
    cp ${ZN_UBOOT_DIR}/defconfig ${ZN_UBOOT_DIR}/configs/${ZN_UBOOOT_DEFCONFIG}
fi
将uboot目录下的defconfig文件拷贝到uboot/configs文件夹下,并重新命名为${ZN_UBOOOT_DEFCONFIG}

# => The end
echo_info "[ $(date "+%Y/%m/%d %H:%M:%S") ] Finished ${ZN_SCRIPT_NAME}"
###############################################################################
- 1
- 2
- 3
- 4
- 5
- 6
- 7
- 8
- 9
- 10
- 11
- 12
- 13
- 14
- 15
- 16
- 17
- 18
- 19
- 20
- 21
- 22
- 23
- 24
- 25
- 26
- 27
- 28
- 29
- 30
- 31
- 32
- 33
- 34
- 35
- 36
- 37
2.3make_uboot.sh
#!/bin/bash
###############################################################################
# 版    权:米联客
# 技术社区:www.osrc.cn
# 功能描述:编译并安装 U-Boot
# 版 本 号:V1.0
###############################################################################
# => Setting The Development Environment Variables
if [ ! "${ZN_CONFIG_DONE}" ];then
    echo "[ERROR] Please source the settings64.sh script first" && exit 1
fi

# => Filename of the running script.
ZN_SCRIPT_NAME="$(basename ${BASH_SOURCE})"

###############################################################################
# => The beginning
echo_info "[ $(date "+%Y/%m/%d %H:%M:%S") ] Starting ${ZN_SCRIPT_NAME}"

# => Make sure the source is there
if [ "`ls -A ${ZN_UBOOT_DIR}`" = "" ]; then
    error_exit "Can't find the source code of u-boot"
else
    cd ${ZN_UBOOT_DIR}
fi

# => Building the U-Boot bootloader is a part of the Xilinx design flow.
echo_info "Build U-Boot on the ${ZN_UBOOT_DIR}"
make ${MAKE_JOBS}
if [ $? -eq 0 ]; then
 shell脚本中$?是指上一次命令执行的成功或者失败的状态。如果成功就是0,失败为1.。语句if [ $? -eq 0 ] 是判断if语句的上一个命令执行如果成功就执行if中的语句,否则就执行else中的内容。
    ###
    # 1. U-Boot normally
    ###
    cp ${ZN_UBOOT_DIR}/u-boot ${ZN_TARGET_DIR}/u-boot.elf

    ###
    # 2. U-Boot SPL
    ###
    if [ -f "${ZN_UBOOT_DIR}/u-boot.img" ]; then
        cp ${ZN_UBOOT_DIR}/u-boot.img        ${ZN_TARGET_DIR}
        cp ${ZN_UBOOT_DIR}/spl/boot.bin      ${ZN_TARGET_DIR}
    fi

    echo_info "U-Boot - Build OK"
else
    error_exit "U-Boot - Build Failed"
fi

# => The end
echo_info "[ $(date "+%Y/%m/%d %H:%M:%S") ] Finished ${ZN_SCRIPT_NAME}"
###############################################################################
	uboot分为uboot-spl和uboot两个组成部分。SPL是Secondary Program Loader的简称,第二阶段程序加载器,这里所谓的第二阶段是相对于SOC中的BROM来说的,之前的文章已经有所介绍,SOC启动最先执行的是BROM中的固化程序。

	BROM会通过检测启动方式来加载第二阶段bootloader。uboot已经是一个bootloader了,那么为什么还多一个uboot spl呢?

	这个主要原因是对于一些SOC来说,它的内部SRAM可能会比较小,小到无法装载下一个完整的uboot镜像,那么就需要spl,它主要负责初始化外部RAM和环境,并加载真正的uboot镜像到外部RAM中来执行。

	所以由此来看,SPL应该是一个非常小的loader程序,可以运行于SOC的内部SRAM中,它的主要功能就是加载真正的uboot并运行之。
————————————————
版权声明:本文为CSDN博主「程序猿Ricky的日常干货」的原创文章,遵循CC 4.0 BY-SA版权协议,转载请附上原文出处链接及本声明。
原文链接:https://blog.csdn.net/rikeyone/article/details/51646200
- 1
- 2
- 3
- 4
- 5
- 6
- 7
- 8
- 9
- 10
- 11
- 12
- 13
- 14
- 15
- 16
- 17
- 18
- 19
- 20
- 21
- 22
- 23
- 24
- 25
- 26
- 27
- 28
- 29
- 30
- 31
- 32
- 33
- 34
- 35
- 36
- 37
- 38
- 39
- 40
- 41
- 42
- 43
- 44
- 45
- 46
- 47
- 48
- 49
- 50
- 51
- 52
- 53
- 54
- 55
- 56
- 57
- 58
- 59
- 60
- 61
- 62
三.kernel相关的sh文件
该文件加下的sh文件与uboot问价夹下相同,功能也相同。
3.1cfg_kernel.sh
#!/bin/bash
###############################################################################
# 版    权:米联客
# 技术社区:www.osrc.cn
# 功能描述:1. 清除配置文件和编译中间结果
#           2. 重新配置内核
#           3. 编译开发所需要的工具
# 版 本 号:V1.0
###############################################################################
# => Setting The Development Environment Variables
if [ ! "${ZN_CONFIG_DONE}" ];then
    echo "[ERROR] 请以“source settings64.sh”的方式执行 settings64.sh 脚本。" && exit 1
fi

# => Filename of the running script.
ZN_SCRIPT_NAME="$(basename ${BASH_SOURCE})"

###############################################################################
# => The beginning
echo_info "[ $(date "+%Y/%m/%d %H:%M:%S") ] Starting ${ZN_SCRIPT_NAME}"

# => Make sure the source is there
if [ "`ls -A ${ZN_KERNEL_DIR}`" = "" ]; then
    error_exit "Can't find the source code of kernel"
else
    cd ${ZN_KERNEL_DIR}
fi

# => 1. Cleaning the Sources
echo_info "To delete all build products as well as the configuration"
make distclean || error_exit "Failed to make distclean"

# => 2. To configure the sources for the intended target.
echo_info "Configure Linux kernel on the ${ZN_KERNEL_DIR}"
make ${ZN_LINUX_KERNEL_DEFCONFIG} || error_exit "Failed to make ${ZN_LINUX_KERNEL_DEFCONFIG}"

# => 3. Prepare for compiling the source code
echo_info "Prepare for compiling the source code"
make prepare scripts || error_exit "Failed to make prepare scripts"

# => The end
echo_info "[ $(date "+%Y/%m/%d %H:%M:%S") ] Finished ${ZN_SCRIPT_NAME}"
###############################################################################
- 1
- 2
- 3
- 4
- 5
- 6
- 7
- 8
- 9
- 10
- 11
- 12
- 13
- 14
- 15
- 16
- 17
- 18
- 19
- 20
- 21
- 22
- 23
- 24
- 25
- 26
- 27
- 28
- 29
- 30
- 31
- 32
- 33
- 34
- 35
- 36
- 37
- 38
- 39
- 40
- 41
- 42
- 43
- 44
3.2save_kernel_defconfig.sh
#!/bin/bash
###############################################################################
# 版    权:米联客
# 技术社区:www.osrc.cn
# 功能描述:保存配置文件到硬盘
# 版 本 号:V1.0
###############################################################################
# => Setting The Development Environment Variables
if [ ! "${ZN_CONFIG_DONE}" ];then
    echo "[ERROR] Please source the settings64.sh script first" && exit 1
fi

# => Filename of the running script.
ZN_SCRIPT_NAME="$(basename ${BASH_SOURCE})"

###############################################################################
# => The beginning
echo_info "[ $(date "+%Y/%m/%d %H:%M:%S") ] Starting ${ZN_SCRIPT_NAME}"

# => Make sure the source is there
if [ "`ls -A ${ZN_KERNEL_DIR}`" = "" ]; then
    error_exit "Can't find the source code of kernel"
fi

# => To save kernel config use the command :
echo_info "To save kernel config"
make -C ${ZN_KERNEL_DIR} savedefconfig
if [ $? != 0 ]; then
    error_exit "Failed to save defconfig"
else
    cp ${ZN_KERNEL_DIR}/defconfig ${ZN_KERNEL_DIR}/arch/arm/configs/${ZN_LINUX_KERNEL_DEFCONFIG}
fi

# => The end
echo_info "[ $(date "+%Y/%m/%d %H:%M:%S") ] Finished ${ZN_SCRIPT_NAME}"
###############################################################################
- 1
- 2
- 3
- 4
- 5
- 6
- 7
- 8
- 9
- 10
- 11
- 12
- 13
- 14
- 15
- 16
- 17
- 18
- 19
- 20
- 21
- 22
- 23
- 24
- 25
- 26
- 27
- 28
- 29
- 30
- 31
- 32
- 33
- 34
- 35
- 36
- 37
3.3make_kernel.sh
#!/bin/bash
###############################################################################
# 版    权:米联客
# 技术社区:www.osrc.cn
# 功能描述:1. 编译并安装内核
#           2. 编译并安装设备树
#           3. 编译并安装内核模块(注意:需要先准备好根文件系统)
# 版 本 号:V1.0
###############################################################################
# => Setting The Development Environment Variables
if [ ! "${ZN_CONFIG_DONE}" ];then
    echo "[ERROR] Please source the settings64.sh script first" && exit 1
fi

# => Filename of the running script.
ZN_SCRIPT_NAME="$(basename ${BASH_SOURCE})"

###############################################################################
# => The beginning
echo_info "[ $(date "+%Y/%m/%d %H:%M:%S") ] Starting ${ZN_SCRIPT_NAME}"

# => Make sure the source is there
if [ "`ls -A ${ZN_KERNEL_DIR}`" = "" ]; then
    error_exit "Can't find the source code of kernel"
else
    cd ${ZN_KERNEL_DIR}
fi

# => Make sure the target directory is there
[[ ! "${ZN_TARGET_DIR}" ]] && error_exit "Can't find the target directory"

# => 1. Compiling the Kernel
echo_info "Building the kernel image on the ${ZN_KERNEL_DIR}"
make ${MAKE_JOBS} UIMAGE_LOADADDR=0x8000 uImage
if [ $? -eq 0 ]; then
    echo_info "Installing the Kernel Image"
    cp -a ${ZN_KERNEL_DIR}/arch/arm/boot/zImage ${ZN_TARGET_DIR}
    cp -a ${ZN_KERNEL_DIR}/arch/arm/boot/uImage ${ZN_TARGET_DIR}
    cp -a ${ZN_KERNEL_DIR}/arch/arm/boot/uImage ${ZN_TARGET_DIR}/uImage.bin
else
    error_exit "Kernel Image - Build Failed"
fi

# => 2. Compiling the Device Tree Binaries
echo_info "Building the Device Tree Binaries on the ${ZN_DTS_DIR}"

${ZN_DTC_DIR}/dtc -I dts -O dtb -o ${ZN_DTB_DIR}/${ZN_DTB_NAME} ${ZN_DTS_DIR}/${ZN_DTS_NAME}
if [ $? -eq 0 ]; then
    echo_info "The Device Tree - Build OK"
else
    error_exit "The Device Tree - Build Failed"
fi

# => 3. Compiling the Kernel Modules
echo_info "Building the Kernel Modules on the ${ZN_KERNEL_DIR}"

make ${MAKE_JOBS} modules
if [ $? -eq 0 ]; then
    echo_info "Installing the Kernel Modules"

    sudo rm -rf ${ZN_ROOTFS_MOUNT_POINT}/*
    sudo tar zxf ${ZN_TARGET_DIR}/rootfs.tar.gz -C ${ZN_ROOTFS_MOUNT_POINT}
    sudo rm -rf ${ZN_ROOTFS_MOUNT_POINT}/lib/modules/

    sudo make ${MAKE_JOBS} ARCH=arm INSTALL_MOD_PATH=${ZN_ROOTFS_MOUNT_POINT} modules_install
    if [ $? -eq 0 ]; then
        sudo rm ${ZN_TARGET_DIR}/rootfs.tar.gz
        sudo tar zcf ${ZN_TARGET_DIR}/rootfs.tar.gz -C ${ZN_ROOTFS_MOUNT_POINT} .
        sudo rm -rf ${ZN_ROOTFS_MOUNT_POINT}/*
        echo_info "The Kernel Modules - Install OK"
    else
        sudo rm -rf ${ZN_ROOTFS_MOUNT_POINT}/*
        error_exit "The Kernel Modules - Install Failed"
    fi

else
    error_exit "Kernel Modules - Build Failed"
fi

# => The end
echo_info "[ $(date "+%Y/%m/%d %H:%M:%S") ] Finished ${ZN_SCRIPT_NAME}"
###############################################################################
- 1
- 2
- 3
- 4
- 5
- 6
- 7
- 8
- 9
- 10
- 11
- 12
- 13
- 14
- 15
- 16
- 17
- 18
- 19
- 20
- 21
- 22
- 23
- 24
- 25
- 26
- 27
- 28
- 29
- 30
- 31
- 32
- 33
- 34
- 35
- 36
- 37
- 38
- 39
- 40
- 41
- 42
- 43
- 44
- 45
- 46
- 47
- 48
- 49
- 50
- 51
- 52
- 53
- 54
- 55
- 56
- 57
- 58
- 59
- 60
- 61
- 62
- 63
- 64
- 65
- 66
- 67
- 68
- 69
- 70
- 71
- 72
- 73
- 74
- 75
- 76
- 77
- 78
- 79
- 80
- 81
- 82
- 83
四.rootfs相关的sh文件
4.1save_rootfs_defconfig.sh
#!/bin/bash
###############################################################################
# 版    权:米联客
# 技术社区:www.osrc.cn
# 功能描述:保存配置文件到硬盘
# 版 本 号:V1.0
###############################################################################
# => Setting The Development Environment Variables
if [ ! "${ZN_CONFIG_DONE}" ];then
    echo "[ERROR] 请以“source settings64.sh”的方式执行 settings64.sh 脚本。" && exit 1
fi

# => Filename of the running script.
ZN_SCRIPT_NAME="$(basename ${BASH_SOURCE})"

###############################################################################
# => The beginning
echo_info "[ $(date "+%Y/%m/%d %H:%M:%S") ] Starting ${ZN_SCRIPT_NAME}"

# => TODO nothing now

# => The end
echo_info "[ $(date "+%Y/%m/%d %H:%M:%S") ] Finished ${ZN_SCRIPT_NAME}"
###############################################################################

什么也没有做。
- 1
- 2
- 3
- 4
- 5
- 6
- 7
- 8
- 9
- 10
- 11
- 12
- 13
- 14
- 15
- 16
- 17
- 18
- 19
- 20
- 21
- 22
- 23
- 24
- 25
- 26
4.2cfg_rootfs.sh
#!/bin/bash
###############################################################################
# 版    权:米联客
# 技术社区:www.osrc.cn
# 功能描述:
# 版 本 号:V1.0
###############################################################################
# => Setting The Development Environment Variables
if [ ! "${ZN_CONFIG_DONE}" ];then
    echo "[ERROR] 请以“source settings64.sh”的方式执行 settings64.sh 脚本。" && exit 1
fi

# => Filename of the running script.
ZN_SCRIPT_NAME="$(basename ${BASH_SOURCE})"

###############################################################################
# => The beginning
echo_info "[ $(date "+%Y/%m/%d %H:%M:%S") ] Starting ${ZN_SCRIPT_NAME}"

# => TODO nothing now

# => The end
echo_info "[ $(date "+%Y/%m/%d %H:%M:%S") ] Finished ${ZN_SCRIPT_NAME}"
###############################################################################
- 1
- 2
- 3
- 4
- 5
- 6
- 7
- 8
- 9
- 10
- 11
- 12
- 13
- 14
- 15
- 16
- 17
- 18
- 19
- 20
- 21
- 22
- 23
- 24
4.3make_rootfs.sh
#!/bin/bash
###############################################################################
# 版    权:米联客
# 技术社区:www.osrc.cn
# 功能描述:编译安装根文件系统
# 版 本 号:V1.0
###############################################################################
# => Setting The Development Environment Variables
if [ ! "${ZN_CONFIG_DONE}" ];then
    echo "[ERROR] 请以“source settings64.sh”的方式执行 settings64.sh 脚本。" && exit 1
fi

# => Filename of the running script.
ZN_SCRIPT_NAME="$(basename ${BASH_SOURCE})"

###############################################################################
# => The beginning
echo_info "[ $(date "+%Y/%m/%d %H:%M:%S") ] Starting ${ZN_SCRIPT_NAME}"

# => 1. Install required packages on your pc
host_packages="debootstrap qemu-user-static qemu-system"
for package in ${host_packages} ; do
    dpkg-query -W -f='${Package}\n' | grep ^$package$ > /dev/null
    if [ $? != 0 ] ; then
        echo_info "Installing ${package}"
        sudo apt-get --assume-yes install ${package}
    fi
done
	debootstrap 是一个可以快速获得基本 Debian 系统的一个工具, 你可以将 Debootstrap 看作是一种特殊的安装工具。
	qemu-user-static 是一个用于利用当前操作系统来运行其它架构的一个仿真器。
	qemu-system虚拟化相关。
	dpkg-query命令是Debian linux中软件包的查询工具,它从dpkg软件包数据库中查询并显示软件包的信息。
	上述主要功能就是首先查找当前系统是否已经安装上述三个包,否则就进行安装。

# => 2. Configuring an Debian/Ubuntu guest rootfs
# 2.1 Supported Architectures
# ARCH="armel"                                                 # ARM
  ARCH="armhf"                                                 # ARM with hardware FPU

# 2.2 Setup a distribution
# DISTRO="xenial"                                              # Ubuntu LTS 16.04
  DISTRO="bionic"                                              # Ubuntu LTS 18.04

# 2.3
  BASETGZ="rootfs.tar.gz"
  BUILDPLACE="${ZN_ROOTFS_DIR}/rootfs"

# 2.4
# MIRRORSITE="http://ports.ubuntu.com/ubuntu-ports"            # default
  MIRRORSITE="https://mirrors.ustc.edu.cn/ubuntu-ports"

# 2.5
#######################################################################################
# [NOTE] The repository components are:
# Main - Officially supported software.
# Restricted - Supported software that is not available under a completely free license.
# Universe - Community maintained software, i.e. not officially supported software.
# Multiverse - Software that is not free.
#######################################################################################
  COMPONENTS="main,restricted,multiverse,universe"
  REPOSITORIS="main restricted multiverse universe"

# 2.6 Add useful packages (https://pkgs.org/)
  EXTRA_PKGS="sudo,udev,apt-utils,dialog,locales,bash-completion,can-utils,i2c-tools,usbutils"
  EXTRA_PKGS="${EXTRA_PKGS},ethtool,net-tools,ifupdown,dhcpcd5,ssh,curl,wget,rsync,vim,parted"
  EXTRA_PKGS="${EXTRA_PKGS},dosfstools,build-essential"

  armel和armhf区别:https://www.jianshu.com/p/a7e5952b2e83
  xenial和bionic指的是ubuntu的发行版本号。

# => 3. Checking if a File Exists
if [ -f ${ZN_ROOTFS_DIR}/${BASETGZ} ]; then
    echo_info "The ${BASETGZ} Normal already exists."
    read -p "Do you want to use the existing file system and exit [y/N]? " REPLY
    case ${REPLY} in
        y|Y)
            echo_info "Copy Root File System Image on ${ZN_TARGET_DIR}"
            sudo rm -rf ${ZN_TARGET_DIR}/rootfs.tar.gz
            sudo cp ${ZN_ROOTFS_DIR}/${BASETGZ} ${ZN_TARGET_DIR}/rootfs.tar.gz
            echo_info "[ $(date "+%Y/%m/%d %H:%M:%S") ] Finished ${ZN_SCRIPT_NAME}" && exit 0
            ;;
        *)
            sudo rm -rf ${ZN_ROOTFS_DIR}/${BUILDPLACE}
            sudo rm -rf ${ZN_ROOTFS_DIR}/${BASETGZ}
            ;;
    esac
fi

使用qemu-debootstrap构建文件系统。
# => 4. Create an Debian/Ubuntu guest rootfs (First Stage / Second Stage)
sudo qemu-debootstrap --arch=${ARCH} --components=${COMPONENTS}   \
    --include=${EXTRA_PKGS} ${DISTRO} ${BUILDPLACE} ${MIRRORSITE} \
    || error_exit " Could not create the debian/ubuntu base system"

###############################################################################
# mount stuff, you will need more often
sudo mount --bind /dev     ${BUILDPLACE}/dev
sudo mount --bind /dev/pts ${BUILDPLACE}/dev/pts
sudo mount --bind /proc    ${BUILDPLACE}/proc

sudo mount:的解释如下https://blog.csdn.net/HayPinF/article/details/105849589
进行挂在是为了后续chroot服务的:
https://blog.csdn.net/weixin_31082779/article/details/116898580
###############################################################################
# => 6. Update and upgrade the system
这里主要是更新源镜像。
cat << END | sudo chroot ${BUILDPLACE}

cat << EOF > /etc/apt/sources.list
  deb     ${MIRRORSITE}/          ${DISTRO}           ${REPOSITORIS}
# deb-src ${MIRRORSITE}/          ${DISTRO}           ${REPOSITORIS}

  deb     ${MIRRORSITE}/          ${DISTRO}-updates   ${REPOSITORIS}
# deb-src ${MIRRORSITE}/          ${DISTRO}-updates   ${REPOSITORIS}

  deb     ${MIRRORSITE}/          ${DISTRO}-backports ${REPOSITORIS}
# deb-src ${MIRRORSITE}/          ${DISTRO}-backports ${REPOSITORIS}

# deb     ${MIRRORSITE}-security/ ${DISTRO}/updates   ${REPOSITORIS}
# deb-src ${MIRRORSITE}-security/ ${DISTRO}/updates   ${REPOSITORIS}
EOF

END

一,关于cat << EOF语句的意思

在linux shell脚本中cat << EOF的语句,起到什么作用?

首先必须要说明的是EOF在这里没有特殊的含义,你可以使用FOE或OOO等(当然也不限制在三个字符或大写字符)。

接下来,简单描述一下几种常见的使用方式及其作用:

1、cat<<EOF,以EOF输入字符为标准输入结束:

2、cat>filename,创建文件,并把标准输入输出到filename文件中,以ctrl+d作为输入结束:

3、cat>filename<<EOF,以EOF作为输入结束,和ctrl+d的作用一样:
————————————————
版权声明:本文为CSDN博主「沙门空海」的原创文章,遵循CC 4.0 BY-SA版权协议,转载请附上原文出处链接及本声明。
原文链接:https://blog.csdn.net/robin90814/article/details/86705155

chroot的用法
chroot命令用来在指定的根目录下运行指令。chroot,即 change root directory (更改 root 目录)。在 linux 系统中,系统默认的目录结构都是以/,即是以根 (root) 开始的。而在使用 chroot 之后,系统的目录结构将以指定的位置作为/位置。
https://www.cnblogs.com/charlieroro/p/9259675.html
# => 6. setup locales
sudo chroot ${BUILDPLACE} apt-get install -y locales dialog
sudo chroot ${BUILDPLACE} apt-get install -y language-pack-zh language-pack-zh-base
sudo chroot ${BUILDPLACE} /bin/sh -c "echo LANG="zh_CN.UTF-8" >> /etc/environment"
sudo chroot ${BUILDPLACE} /bin/sh -c "echo LANGUAGE="zh_CN:zh:en_US:en" >> /etc/environment"
sudo chroot ${BUILDPLACE} locale-gen zh_CN.UTF-8 en_US.UTF-8


# => 7. Customize rootfs

# ==> Changing password for root.
echo "root:root" | sudo chroot ${BUILDPLACE} chpasswd

# ==> Create a User Administrator (https://wiki.ubuntu.com/Security/Privileges)
USERNAME=osrc
PASSWORD=osrc
sudo chroot ${BUILDPLACE} adduser --disabled-password --gecos "" $USERNAME
sudo chroot ${BUILDPLACE} usermod -aG sudo    $USERNAME    # add to sudo group for root access
sudo chroot ${BUILDPLACE} usermod -aG tty     $USERNAME    # add to tty group for tty access
sudo chroot ${BUILDPLACE} usermod -aG dialout $USERNAME    # add to dialout group for UART access
echo "$USERNAME:$PASSWORD" | sudo chroot ${BUILDPLACE} chpasswd

# ==> Set the hostname
HOSTNAME="${DISTRO}-${ARCH}"
echo ${HOSTNAME} | sudo tee ${BUILDPLACE}/etc/hostname

# ==> Set minimal hosts {{{
cat << END | sudo chroot ${BUILDPLACE}

cat > /etc/hosts << EOF
127.0.0.1    localhost
127.0.1.1    $HOSTNAME
EOF

END
# }}}

# ==> Configure networking:
cat << END | sudo chroot ${BUILDPLACE}

cat << EOF > /etc/network/interfaces
######################################################################
# /etc/network/interfaces -- configuration file for ifup(8), ifdown(8)
# See the interfaces(5) manpage for information on what options are
# available.
######################################################################

# We always want the loopback interface.
#
auto lo
iface lo inet loopback

# A. For DHCP on eth0
# auto eth0
# iface eth0 inet dhcp

# B. For static on eth0
# auto eth0
# iface eth0 inet static
#     address 192.168.0.42
#     network 192.168.0.0
#     netmask 255.255.255.0
#     broadcast 192.168.0.255
#     gateway 192.168.0.1

EOF

END

# => System update and upgrade
sudo chroot ${BUILDPLACE} apt-get update
# sudo chroot ${BUILDPLACE} apt-get -q -y upgrade

# => System cleaning
sudo chroot ${BUILDPLACE} apt-get -q -y autoremove
sudo chroot ${BUILDPLACE} apt-get -q -y autoclean

###############################################################################
[ ! -z ${BUILDPLACE} ] && sudo umount ${BUILDPLACE}/proc
[ ! -z ${BUILDPLACE} ] && sudo umount ${BUILDPLACE}/dev/pts
[ ! -z ${BUILDPLACE} ] && sudo umount ${BUILDPLACE}/dev
###############################################################################
# => Binary Tarball
sudo tar zcf ${ZN_ROOTFS_DIR}/${BASETGZ} -C ${BUILDPLACE} .
sudo cp ${ZN_ROOTFS_DIR}/${BASETGZ} ${ZN_TARGET_DIR}/rootfs.tar.gz
sudo rm -rf ${BUILDPLACE}

# => The end
print_info "[ $(date "+%Y/%m/%d %H:%M:%S") ] Finished ${ZN_SCRIPT_NAME}\n"
###############################################################################
- 1
- 2
- 3
- 4
- 5
- 6
- 7
- 8
- 9
- 10
- 11
- 12
- 13
- 14
- 15
- 16
- 17
- 18
- 19
- 20
- 21
- 22
- 23
- 24
- 25
- 26
- 27
- 28
- 29
- 30
- 31
- 32
- 33
- 34
- 35
- 36
- 37
- 38
- 39
- 40
- 41
- 42
- 43
- 44
- 45
- 46
- 47
- 48
- 49
- 50
- 51
- 52
- 53
- 54
- 55
- 56
- 57
- 58
- 59
- 60
- 61
- 62
- 63
- 64
- 65
- 66
- 67
- 68
- 69
- 70
- 71
- 72
- 73
- 74
- 75
- 76
- 77
- 78
- 79
- 80
- 81
- 82
- 83
- 84
- 85
- 86
- 87
- 88
- 89
- 90
- 91
- 92
- 93
- 94
- 95
- 96
- 97
- 98
- 99
- 100
- 101
- 102
- 103
- 104
- 105
- 106
- 107
- 108
- 109
- 110
- 111
- 112
- 113
- 114
- 115
- 116
- 117
- 118
- 119
- 120
- 121
- 122
- 123
- 124
- 125
- 126
- 127
- 128
- 129
- 130
- 131
- 132
- 133
- 134
- 135
- 136
- 137
- 138
- 139
- 140
- 141
- 142
- 143
- 144
- 145
- 146
- 147
- 148
- 149
- 150
- 151
- 152
- 153
- 154
- 155
- 156
- 157
- 158
- 159
- 160
- 161
- 162
- 163
- 164
- 165
- 166
- 167
- 168
- 169
- 170
- 171
- 172
- 173
- 174
- 175
- 176
- 177
- 178
- 179
- 180
- 181
- 182
- 183
- 184
- 185
- 186
- 187
- 188
- 189
- 190
- 191
- 192
- 193
- 194
- 195
- 196
- 197
- 198
- 199
- 200
- 201
- 202
- 203
- 204
- 205
- 206
- 207
- 208
- 209
- 210
- 211
- 212
- 213
- 214
- 215
- 216
- 217
- 218
- 219
- 220
- 221
- 222
- 223
- 224
- 225
- 226
- 227
- 228
- 229
- 230
- 231
- 232
- 233
- 234
- 235
4.4make_parted.sh
该脚本用来制作分区
#!/bin/bash
###############################################################################
# 版    权:米联客
# 技术社区:www.osrc.cn
# 功能描述:1. 卸载已经挂了的分区
#           2. 删除已有的分区
#           3. 重新分区
#           4. 格式化分区
# 版 本 号:V1.0
###############################################################################
# => Setting The Development Environment Variables
if [ ! "${ZN_CONFIG_DONE}" ];then
    echo "[ERROR] 请以“source settings64.sh”的方式执行 settings64.sh 脚本。" && exit 1
fi

# => Filename of the running script.
ZN_SCRIPT_NAME="$(basename ${BASH_SOURCE})"
###############################################################################
# => The beginning
echo "[ $(date "+%Y/%m/%d %H:%M:%S") ] Starting ${ZN_SCRIPT_NAME}"

# => Check for dependencies
type parted >/dev/null 2>&1 || { sudo apt-get update; sudo apt-get install parted; }

parted是一个分区工具。一般情况下,type命令被用于判断另外一个命令是否是内置命令。
bash中 2>&1 & 的解释:https://blog.csdn.net/astonqa/article/details/8252791
# 0、 Plug in your SD Card to your Linux machine.
# 1、Determine what device to use
until [[ -b /dev/${DISK} && ${DISK} != "hda" && ${DISK} != "sda" && ${DISK} != "sr*" ]]; do
    lsblk -o NAME,RM,SIZE,TYPE,MODEL,SERIAL | grep -vE "hda|sda|sr|loop|part|boot|rpmb"
    read -p "[INFO] Type device filename, or press <Enter> to exit: " DISK
    [[ -z ${DISK} ]] && exit 0
done
- 1
- 2
- 3
- 4
- 5
- 6
- 7
- 8
- 9
- 10
- 11
- 12
- 13
- 14
- 15
- 16
- 17
- 18
- 19
- 20
- 21
- 22
- 23
- 24
- 25
- 26
- 27
- 28
- 29
- 30
- 31
- 32
- 33
until语句 :提供循环执行,它与while循环相反, until循环将反复执行直到条件为真就结束循环,而while循环条件为假就结束循环。
linux中hda和sda的区别
hda一般是指IDE接口的硬盘,hda一般指第一块硬盘,类似的有hdb,hdc等
sda一般是指SATA接口的硬盘,sda一般指第一块硬盘,类似的有sdb,sdc等
现在的内核都会把硬盘,移动硬盘,U盘之类的识别为sdX的形式
/dev/sr0 光驱的设备名,sr*代表虚拟化设备。

lsblk 默认是树形方式显示块设备:
NAME   MAJ:MIN RM   SIZE RO TYPE MOUNTPOINT
sda      8:0    0   2.7T  0 disk
├─sda1   8:1    0   1.3M  0 part
├─sda2   8:2    0   400M  0 part /boot
├─sda3   8:3    0 390.6G  0 part /
├─sda4   8:4    0  97.7G  0 part /home
├─sda5   8:5    0   7.8G  0 part [SWAP]
└─sda6   8:6    0   2.2T  0 part /data0
NAME : 这是块设备名。
MAJ:MIN : 本栏显示主要和次要设备号。
RM : 本栏显示设备是否可移动设备。注意,在本例中设备sdb和sr0的RM值等于1,这说明他们是可移动设备。
SIZE : 本栏列出设备的容量大小信息。例如298.1G表明该设备大小为298.1GB,而1K表明该设备大小为1KB。
RO : 该项表明设备是否为只读。在本案例中,所有设备的RO值为0,表明他们不是只读的。
TYPE :本栏显示块设备是否是磁盘或磁盘上的一个分区。在本例中,sda和sdb是磁盘,而sr0是只读存储(rom)。
MOUNTPOINT : 本栏指出设备挂载的挂载点。

grep not操作
使用 grep -v可以实现反向选择操作
如:筛选出test.txt文本中不包含匹配内容的行
grep or操作
1、使用 grep -E可以实现or操作(也可以写成egrep)

如:筛选出test.txt文本中包含“a”或“b”的行

exit(0):正常运行程序并退出程序;
exit(1):非正常运行导致退出程序;
exit 0 可以告知你的程序的使用者:你的程序是正常结束的。如果 exit 非 0 值,那么你的程序的使用者通常会认为你的程序产生了一个错误。
- 1
- 2
- 3
- 4
- 5
- 6
- 7
- 8
- 9
- 10
- 11
- 12
- 13
- 14
- 15
- 16
- 17
- 18
- 19
- 20
- 21
- 22
- 23
- 24
- 25
- 26
- 27
- 28
- 29
- 30
- 31
- 32
- 33
- 34
- 35
# 2. Remove All Existing Partitions
read -p "[WARNING] ALL DATA ON ${DISK} WILL BE ERASED!!! DO YOU WANT TO CONTINUE [y/N]? " REPLY
case ${REPLY} in
    y|Y)
        echo_info "Umount All Mounted Partitions"
        for part in $(lsblk /dev/${DISK} -o mountpoint --noheadings); do
            sudo umount ${part}
        done

        echo_info "Remove All Existing Partitions from ${DISK}"
        for PARTITION in $(sudo parted /dev/${DISK} print | awk '/^ /{print $1}'); do
            sudo parted -s /dev/${DISK} rm ${PARTITION}
        done
awk是一个强大的文本分析工具,相对于grep的查找,sed的编辑,awk在其对数据分析并生成报告时,显得尤为强大。简单来说awk就是把文件逐行的读入,以空格为默认分隔符将每行切片,切开的部分再进行各种分析处理。
awk -F':' '{print $1}'
表示以“:”分割字符串,打印第一个


        echo_info "Choose the MBR Partitioning Standard"
        sudo parted -s /dev/$DISK mklabel msdos
MBR分区的分区表保存在硬盘的第一个扇区,而且只有64字节,所以最多只能有四个表项。https://blog.csdn.net/zt_xcyk/article/details/53669383
        echo_info "Create the fat32 partition of 100MB and make it bootable"
        sudo parted -s /dev/$DISK mkpart primary fat32 0% 100MiB && sudo parted -s /dev/$DISK set 1 boot on

        echo_info "Create the ext4 partition until end of device"
        sudo parted -s /dev/$DISK mkpart primary ext4 100MiB 100%

        echo_info "Re-read The Partition Table Without Rebooting Linux System"
        sudo partprobe /dev/$DISK && sleep 1 && lsblk /dev/$DISK
partprobe命令用于重读分区表,将磁盘分区表变化信息通知内核,请求操作系统重新加载分区表。如果删除文件后,仍然提示占用空间,可以用partprobe在不重启的情况下重读分区 。
        # Create a Filesystem on the New Partition
        for PARTITION in $(lsblk -l /dev/$DISK | grep part | awk '{print $1}'); do
            PARTNUM=${PARTITION##*[[:alpha:]]}
            case ${PARTNUM} in
                1)
                    echo_info "To format a FAT32 filesystem on /dev/${PARTITION} with a 'boot' disk label,换句话就是生产新的分区,并命名为'boot'"
                    sudo mkfs.vfat -F 32 -n boot /dev/${PARTITION}
                    ;;
https://www.cnblogs.com/reddusty/p/4745309.html
                2)
                    echo_info "To format an ext4 filesystem on /dev/${PARTITION} with a 'rootfs' disk label"
                    echo y | sudo mkfs.ext4 -L rootfs /dev/${PARTITION}
                    ;;
                *)
                    echo_warn "Extra unintended partition"
                    ;;
            esac
        done

        ;;
    *)
        ;;
esac

# => The end
echo "[ $(date "+%Y/%m/%d %H:%M:%S") ] Finished ${ZN_SCRIPT_NAME}"
###############################################################################
- 1
- 2
- 3
- 4
- 5
- 6
- 7
- 8
- 9
- 10
- 11
- 12
- 13
- 14
- 15
- 16
- 17
- 18
- 19
- 20
- 21
- 22
- 23
- 24
- 25
- 26
- 27
- 28
- 29
- 30
- 31
- 32
- 33
- 34
- 35
- 36
- 37
- 38
- 39
- 40
- 41
- 42
- 43
- 44
- 45
- 46
- 47
- 48
- 49
- 50
- 51
- 52
- 53
- 54
- 55
- 56
- 57
- 58
4.5create_image.sh
#!/bin/bash
###############################################################################
# 版    权:米联客
# 技术社区:www.osrc.cn
# 功能描述:创建系统安装镜像
# 版 本 号:V1.0
###############################################################################
# => Setting The Development Environment Variables
if [ ! "${ZN_CONFIG_DONE}" ];then
    echo "[ERROR] 请以“source settings64.sh”的方式执行 settings64.sh 脚本。" && exit 1
fi

# => Filename of the running script.
ZN_SCRIPT_NAME="$(basename ${BASH_SOURCE})"
###############################################################################
# => The beginning
echo_info "[ $(date "+%Y/%m/%d %H:%M:%S") ] Starting ${ZN_SCRIPT_NAME}"

# => Make sure the following files are needed.
targets=(                          \
    "zynq_fsbl.elf"                \
    "system.bit"                   \
    "u-boot.elf"                   \
    "uImage"                       \
    "devicetree.dtb"               \
    "rootfs.tar.gz"                \
    )

for target in "${targets[@]}"; do
    [[ ! -f "${ZN_TARGET_DIR}/${target}" ]] && error_exit "Target cannot be found: ${target}."
done

# => Make sure the target dir is there
DIRECTORIES=(                      \
    "boot"                         \
    "rootfs"                       \
    )

for DIR in ${DIRECTORIES[@]}; do
    [[ ! -d "${ZN_IMGS_DIR}/${DIR}" ]] && mkdir -p ${ZN_IMGS_DIR}/${DIR}
done

# => Setting Zynq-7000 Development Environment Variables
if [ -f "${ZN_SCRIPTS_DIR}/xilinx/export_xilinx_env.sh" ]; then
    source ${ZN_SCRIPTS_DIR}/xilinx/export_xilinx_env.sh
else
    error_exit "Could not find file ${ZN_SCRIPTS_DIR}/xilinx/export_xilinx_env.sh"
fi

# =>
echo_info "1. Generate the boot image for sdcard mode"

BIF_FILE=${ZN_TARGET_DIR}/sd_image.bif

echo "//arch = zynq; split = false; format = BIN"          > ${BIF_FILE}
echo "the_ROM_image:"                                      >>${BIF_FILE}
echo "{"                                                   >>${BIF_FILE}
echo "  [bootloader]${ZN_TARGET_DIR}/zynq_fsbl.elf"        >>${BIF_FILE}
echo "  ${ZN_TARGET_DIR}/system.bit"                       >>${BIF_FILE}
echo "  ${ZN_TARGET_DIR}/u-boot.elf"                       >>${BIF_FILE}
echo "}"                                                   >>${BIF_FILE}
#[bootloader]只是写入‘[bootloader]’,因为bif格式需要这个:https://www.cnblogs.com/schips/p/xilinx-petalinux-package-boot_bin_and_image_ub.html
bootgen -image ${BIF_FILE} -o ${ZN_IMGS_DIR}/boot/BOOT.bin -w on

# =>
echo_info "2. Linux kernel with modified header for U-Boot"
cp ${ZN_TARGET_DIR}/uImage ${ZN_IMGS_DIR}/boot/uImage

# =>
echo_info "3. Device tree blob"
cp ${ZN_TARGET_DIR}/devicetree.dtb ${ZN_IMGS_DIR}/boot/devicetree.dtb

# =>
echo_info "4. Generate the ${ZN_ROOTFS_TYPE} Root filesystem"
cp ${ZN_TARGET_DIR}/rootfs.tar.gz ${ZN_IMGS_DIR}/rootfs/rootfs.tar.gz

# => The end
echo_info "[ $(date "+%Y/%m/%d %H:%M:%S") ] Finished ${ZN_SCRIPT_NAME}"
###############################################################################
- 1
- 2
- 3
- 4
- 5
- 6
- 7
- 8
- 9
- 10
- 11
- 12
- 13
- 14
- 15
- 16
- 17
- 18
- 19
- 20
- 21
- 22
- 23
- 24
- 25
- 26
- 27
- 28
- 29
- 30
- 31
- 32
- 33
- 34
- 35
- 36
- 37
- 38
- 39
- 40
- 41
- 42
- 43
- 44
- 45
- 46
- 47
- 48
- 49
- 50
- 51
- 52
- 53
- 54
- 55
- 56
- 57
- 58
- 59
- 60
- 61
- 62
- 63
- 64
- 65
- 66
- 67
- 68
- 69
- 70
- 71
- 72
- 73
- 74
- 75
- 76
- 77
- 78
- 79
- 80
4.6deploy_image.sh
#!/bin/bash
###############################################################################
# 版    权:米联客
# 技术社区:www.osrc.cn
# 功能描述:部署系统镜像到 SD 卡
# 版 本 号:V1.0
###############################################################################
- 1
- 2
- 3
- 4
- 5
- 6
- 7
# => Setting The Development Environment Variables
if [ ! "${ZN_CONFIG_DONE}" ];then
    echo "[ERROR] 请以“source settings64.sh”的方式执行 settings64.sh 脚本。" && exit 1
fi

# => Filename of the running script.
ZN_SCRIPT_NAME="$(basename ${BASH_SOURCE})"

###############################################################################
# => The beginning
echo_info "[ $(date "+%Y/%m/%d %H:%M:%S") ] Starting ${ZN_SCRIPT_NAME}"

# 0、 Plug in your SD Card to your Linux machine.

# 1、Determine what device to use
until [[ -b /dev/${DISK} && ${DISK} != "hda" && ${DISK} != "sda" && ${DISK} != "sr*" ]]; do
    lsblk -o NAME,RM,SIZE,TYPE,MODEL,SERIAL | grep -vE "hda|sda|sr|loop|part"
    read -p "[INFO] Type device filename, or press <Enter> to exit: " DISK
    [[ -z ${DISK} ]] && exit 0
done

# 2、
echo_info "Umount All Mounted Partitions"
for part in $(lsblk /dev/${DISK} -o mountpoint --noheadings); do
    sudo umount ${part}
done

# 3、
BOOT_MOUNT_POINT=${ZN_SDCARD_MOUNT_POINT}/boot
ROOT_MOUNT_POINT=${ZN_SDCARD_MOUNT_POINT}/rootfs
mkdir -p ${BOOT_MOUNT_POINT} ${ROOT_MOUNT_POINT}

for PARTITION in $(lsblk -l /dev/$DISK | grep part | awk '{print $1}'); do
    PARTNUM=$( echo "$PARTITION" | tr -d "$DISK" | tr -cd "[0-9]" )
    case ${PARTNUM} in
        1)
            [[ $(lsblk -no FSTYPE /dev/${PARTITION}) != 'vfat' ]] && error_exit "no bootable device found"

            echo_info "mount the boot partition to ${BOOT_MOUNT_POINT}"
            sudo mount -t vfat /dev/${PARTITION} ${BOOT_MOUNT_POINT}

            echo_info "Install boot images to ${BOOT_MOUNT_POINT}"
            sudo rsync -rv ${ZN_IMGS_DIR}/boot/ ${BOOT_MOUNT_POINT} && sync

            echo_info "umount the boot partition from ${BOOT_MOUNT_POINT}"
            sudo umount ${BOOT_MOUNT_POINT}
            ;;
        2)
            [[ $(lsblk -no FSTYPE /dev/${PARTITION}) != 'ext4' ]] && error_exit "no rootfs partition found"

            echo_info "mount the rootfs partition to ${ROOT_MOUNT_POINT}"
            sudo mount -t ext4 /dev/${PARTITION} ${ROOT_MOUNT_POINT}

            if [ "`ls -A ${ROOT_MOUNT_POINT}`" != "lost+found" ]; then
                sudo umount ${ROOT_MOUNT_POINT}
                error_exit "The ROOTFS partition is dirty ,please clean it!"
            fi

            echo_info "Install rootfs images to ${ROOT_MOUNT_POINT}"
            sudo tar zxf ${ZN_IMGS_DIR}/rootfs/rootfs.tar.gz -C ${ROOT_MOUNT_POINT} && sync

            echo_info "umount the rootfs partition from ${ROOT_MOUNT_POINT}"
            sudo umount ${ROOT_MOUNT_POINT}
            ;;
        *)
            echo_warn "[WARNING] Extra unintended partition"
            ;;
    esac
done

# recovery

# => The end
echo_info "[ $(date "+%Y/%m/%d %H:%M:%S") ] Finished ${ZN_SCRIPT_NAME}"
###############################################################################
- 1
- 2
- 3
- 4
- 5
- 6
- 7
- 8
- 9
- 10
- 11
- 12
- 13
- 14
- 15
- 16
- 17
- 18
- 19
- 20
- 21
- 22
- 23
- 24
- 25
- 26
- 27
- 28
- 29
- 30
- 31
- 32
- 33
- 34
- 35
- 36
- 37
- 38
- 39
- 40
- 41
- 42
- 43
- 44
- 45
- 46
- 47
- 48
- 49
- 50
- 51
- 52
- 53
- 54
- 55
- 56
- 57
- 58
- 59
- 60
- 61
- 62
- 63
- 64
- 65
- 66
- 67
- 68
- 69
- 70
- 71
- 72
- 73
- 74
- 75
- 76
五.Xilinx相关sh文件
5.1export_xilinx_env.sh
#!/bin/bash
###############################################################################
# 版    权:米联客
# 技术社区:www.osrc.cn
# 功能描述:配置开发所需要的环境变量
# 版 本 号:V1.0
###############################################################################
# => Setting The Development Environment Variables
if [ ! "${ZN_CONFIG_DONE}" ];then
    echo "[ERROR] 请以“source settings64.sh”的方式执行 settings64.sh 脚本。" && exit 1
fi

# => 确保使用 source export_xilinx_env.sh 的方式来执行本脚本。
if [ ${BASH_SOURCE[0]} == "$0" ]; then
    echo "[ERROR] 请以“source export_xilinx_env.sh”的方式执行本脚本。" && exit 1
fi

# => Current Vivado/LabTool/SDK Version (Example:2015.4).
export VIVADO_VERSION="${VIVADO_VERSION:-2015.4}"

# => Set Xilinx installation path (Default: /opt/Xilinx/).
export XILINX="${XILINX:-/mnt/workspace/Xilinx}"


:=句法
在这种替换中,使用和前例中相同的:=句法来设置默认值。
username=””
echo “${username:=$LOGNAME}”
在使用“:=”进行比较时,username变量已经被定义了,但是它的值为空。因此,这里对echo命令使用了变量LOGNAME的值,即设置变量username的值为LOGNAME的值。
有了这个特殊的句法,只有当变量username已被定义,而且有一个实际的非空值时,变量username才会被设置为变量LOGNAME的值。
和前例的主要不同是使用活动命令(echo)而不是被动的冒号来设置变量的默认值,当活动命令被调用时,默认赋值仍然会执行,并输出显示结果。

# => Vivado Design Suite
export XILINX_VIVADO=${XILINX}/Vivado/${VIVADO_VERSION}

# => Xilinx Software Development Kit (XSDK):
# (only needed to build the FSBL).
export XILINX_SDK=${XILINX}/SDK/${VIVADO_VERSION}

# => High-Level Synthesis (HLS)
# 注意: 2017.4及以后版本, HLS 与 Vivado 为同一目录
export XILINX_VIVADO_HLS=${XILINX}/Vivado_HLS/${VIVADO_VERSION}

# => the SDSoC Development Environment
export XILINX_SDX=${XILINX}/SDx/${VIVADO_VERSION}

# => Docnav
export XILINX_DOCNAV=${XILINX}/DocNav

# => The Vivado Environment needs to be setup beforehand
###
# Note: There are two settings files available in the Vivado toolset:
# settings64.sh for use on 64-bit machines with bash;
# settings64.csh for use on 64-bit machines with C Shell.
###
if [ -d "${XILINX_VIVADO}" ]; then
    source ${XILINX_VIVADO}/settings64.sh
else
    echo_error "找不到Vivado设计套件" && return 1
fi

###
# Fixed: librdi_common* not found executing vivado
# https://forums.xilinx.com/t5/Installation-and-Licensing/librdi-common-not-found-executing-vivado/td-p/536991
###
if [ -n "${LD_LIBRARY_PATH}" ]; then
    export LD_LIBRARY_PATH=${XILINX_VIVADO}/lib/lnx64.o:$LD_LIBRARY_PATH
else
    export LD_LIBRARY_PATH=${XILINX_VIVADO}/lib/lnx64.o
fi

###
# Fixed: SDK (SWT issues in Eclipse)
###
# Try lsb_release, fallback with /etc/issue then uname command
distributions="(Debian|Ubuntu|RedHat|CentOS|openSUSE|SUSE)"
首先区分当前系统,然后下面根据当前的distributions重新生成distribution变量
distribution=$(                                             \
    lsb_release -d 2>/dev/null | grep -Eo $distributions    \
    || grep -Eo $distributions /etc/issue 2>/dev/null       \
    || grep -Eo $distributions /etc/*-release 2>/dev/null   \
    || uname -s                                             \
    )

case ${distribution} in
    Ubuntu)
        export SWT_GTK3=0
        ;;
    *)
        ;;
esac

LSB是Linux Standard Base的缩写, lsb_release命令 用来显示LSB和特定版本的相关信息。如果使用该命令时不带参数,则默认加上-v参数。
-v 显示版本信息。
-i 显示发行版的id。
-d 显示该发行版的描述信息。
-r 显示当前系统是发行版的具体版本号。
-c 发行版代号。
-a 显示上面的所有信息。
-h 显示帮助信息。


###
# Fixed: Docnav
###
if [ -n "${LD_LIBRARY_PATH}" ]; then
    export LD_LIBRARY_PATH=${XILINX_DOCNAV}:$LD_LIBRARY_PATH
else
    export LD_LIBRARY_PATH=${XILINX_DOCNAV}
fi
- 1
- 2
- 3
- 4
- 5
- 6
- 7
- 8
- 9
- 10
- 11
- 12
- 13
- 14
- 15
- 16
- 17
- 18
- 19
- 20
- 21
- 22
- 23
- 24
- 25
- 26
- 27
- 28
- 29
- 30
- 31
- 32
- 33
- 34
- 35
- 36
- 37
- 38
- 39
- 40
- 41
- 42
- 43
- 44
- 45
- 46
- 47
- 48
- 49
- 50
- 51
- 52
- 53
- 54
- 55
- 56
- 57
- 58
- 59
- 60
- 61
- 62
- 63
- 64
- 65
- 66
- 67
- 68
- 69
- 70
- 71
- 72
- 73
- 74
- 75
- 76
- 77
- 78
- 79
- 80
- 81
- 82
- 83
- 84
- 85
- 86
- 87
- 88
- 89
- 90
- 91
- 92
- 93
- 94
- 95
- 96
- 97
- 98
- 99
- 100
- 101
- 102
- 103
- 104
- 105
- 106
- 107
- 108
- 109
- 110
- 111
比如下面有一条文本 tmp.txt ,其中内容为:
{"aid":45,"path":"attachment/Mon_1112/2_1_5728040df3ab346.jpg"}
我们想从中过略出 aid 的值即 45 ,那么可以先如下这么做:
grep -o -E 'aid":[1-9]*' tmp.txt
得到的结果为:
aid":45
这时就好办了,我们可以使用 awk 的 -F 选项指示出冒号分隔符,这样就容易过滤出 45 这个值来,整个命令综合如下:
grep -o -E 'aid":[1-9]*' tmp.txt |awk -F: '{print $2}'

uname命令的英文全称即“Unix name”。
用于显示系统相关信息,比如主机名、内核版本号、硬件架构等。
如果未指定任何选项,其效果相当于执行”uname -s”命令,即显示系统内核的名字。
- 1
- 2
- 3
- 4
- 5
- 6
- 7
- 8
- 9
- 10
- 11
- 12
5.2get_hw_description.sh
#!/bin/bash
###############################################################################
# 版    权:米联客
# 技术社区:www.osrc.cn
# 功能描述:1. 导入 system.bit
#           2. 导入 zynq_fsbl.elf
# 版 本 号:V1.0
###############################################################################
# => Setting The Development Environment Variables
if [ ! "${ZN_CONFIG_DONE}" ];then
    echo "[ERROR] 请以“source settings64.sh”的方式执行 settings64.sh 脚本。" && exit 1
fi

# => Filename of the running script.
ZN_SCRIPT_NAME="$(basename ${BASH_SOURCE})"

###############################################################################
# => The beginning
echo_info "[ $(date "+%Y/%m/%d %H:%M:%S") ] Starting ${ZN_SCRIPT_NAME}"
- 1
- 2
- 3
- 4
- 5
- 6
- 7
- 8
- 9
- 10
- 11
- 12
- 13
- 14
- 15
- 16
- 17
- 18
- 19
- 20
# => hw_platform
ZYNQ_HW_PLATFORM_DIR=${ZN_VIVADO_PROJECT_DIR}/${ZN_VIVADO_PROJECT_NAME}.sdk/${ZN_BD_NAME}_wrapper_hw_platform_0
# => bitstream
ZYNQ_BITSTREAM=${ZYNQ_HW_PLATFORM_DIR}/${ZN_BD_NAME}_wrapper.bit
if [ ! -f "${ZYNQ_BITSTREAM}" ]; then
    error_exit "could not find file 'system.bit'"
fi
cp ${ZYNQ_BITSTREAM} ${ZN_TARGET_DIR}/system.bit

# => zynq_fsbl
ZYNQ_FSBL_DIR=${ZN_VIVADO_PROJECT_DIR}/${ZN_VIVADO_PROJECT_NAME}.sdk/zynq_fsbl
# 确定fsbl.elf文件是否存在
if [ -f "${ZYNQ_FSBL_DIR}/Release/zynq_fsbl.elf" ]; then
    cp ${ZYNQ_FSBL_DIR}/Release/zynq_fsbl.elf ${ZN_TARGET_DIR}/zynq_fsbl.elf
elif [ -f "${ZYNQ_FSBL_DIR}/Debug/zynq_fsbl.elf" ]; then
    cp ${ZYNQ_FSBL_DIR}/Debug/zynq_fsbl.elf ${ZN_TARGET_DIR}/zynq_fsbl.elf
else
    error_exit "could not find file 'zynq_fsbl.elf'"
fi

# => The end
echo_info "[ $(date "+%Y/%m/%d %H:%M:%S") ] Finished ${ZN_SCRIPT_NAME}"
###############################################################################
- 1
- 2
- 3
- 4
- 5
- 6
- 7
- 8
- 9
- 10
- 11
- 12
- 13
- 14
- 15
- 16
- 17
- 18
- 19
- 20
- 21
- 22
- 23
- 24
5.3install_cable_drivers.sh
#!/bin/bash
###############################################################################
# 版    权:米联客
# 技术社区:www.osrc.cn
# 功能描述:安装 JTAG 驱动
#           2. 重新配置内核
#           3. 编译开发所需要的工具
# 版 本 号:V1.0
###############################################################################
# => Setting The Development Environment Variables
if [ ! "${ZN_CONFIG_DONE}" ];then
    echo "[ERROR] 请以“source settings64.sh”的方式执行 settings64.sh 脚本。" && exit 1
fi

# => Filename of the running script.
ZN_SCRIPT_NAME="$(basename ${BASH_SOURCE})"

###############################################################################
# => The beginning
echo_info "[ $(date "+%Y/%m/%d %H:%M:%S") ] Starting ${ZN_SCRIPT_NAME}"
- 1
- 2
- 3
- 4
- 5
- 6
- 7
- 8
- 9
- 10
- 11
- 12
- 13
- 14
- 15
- 16
- 17
- 18
- 19
- 20
- 21
# => Setting Zynq-7000 Development Environment Variables
if [ -f "${ZN_SCRIPTS_DIR}/xilinx/export_xilinx_env.sh" ]; then
    source ${ZN_SCRIPTS_DIR}/xilinx/export_xilinx_env.sh
else
    error_exit "Could not find file ${ZN_SCRIPTS_DIR}/xilinx/export_xilinx_env.sh"
fi

# You may have noticed that during installation (see step 5 above) the option
# to install cable drivers is grayed out, with a note to check guide UG973.
# If you own a Xilinx Platform USB cable you will need to manually install them:
if [ -d "${XILINX_VIVADO}" ]; then
    cd ${XILINX_VIVADO}/data/xicom/cable_drivers/lin64/install_script/install_drivers/
    sudo ./install_drivers
else
    error_exit "找不到Vivado设计套件"
fi

# => The end
echo_info "[ $(date "+%Y/%m/%d %H:%M:%S") ] Finished ${ZN_SCRIPT_NAME}"
###############################################################################
- 1
- 2
- 3
- 4
- 5
- 6
- 7
- 8
- 9
- 10
- 11
- 12
- 13
- 14
- 15
- 16
- 17
- 18
- 19
- 20
- 21
5.4run_vivado.sh
#!/bin/bash
###############################################################################
# 版    权:米联客
# 技术社区:www.osrc.cn
# 功能描述:打开 Vivado 开发套件
# 版 本 号:V1.0
###############################################################################
# => Setting The Development Environment Variables
if [ ! "${ZN_CONFIG_DONE}" ];then
    echo "[ERROR] 请以“source settings64.sh”的方式执行 settings64.sh 脚本。" && exit 1
fi

# => Filename of the running script.
ZN_SCRIPT_NAME="$(basename ${BASH_SOURCE})"

###############################################################################
# => The beginning
echo_info "[ $(date "+%Y/%m/%d %H:%M:%S") ] Starting ${ZN_SCRIPT_NAME}"
- 1
- 2
- 3
- 4
- 5
- 6
- 7
- 8
- 9
- 10
- 11
- 12
- 13
- 14
- 15
- 16
- 17
- 18
- 19
# The Vivado Environment needs to be setup beforehand
if [ -f "${ZN_SCRIPTS_DIR}/xilinx/export_xilinx_env.sh" ]; then
    source ${ZN_SCRIPTS_DIR}/xilinx/export_xilinx_env.sh
else
    error_exit "Could not find file ${ZN_SCRIPTS_DIR}/xilinx/export_xilinx_env.sh"
fi

# vivado.jou and vivado.log files
# 1. The vivado.jou file is a journal file which contains tcl commands.
# 2. The vivado.log file also contains the tcl commands captured from the GUI
# operations but also contains all the messages returned by Vivado.

# This will ensure that the .jou and .log files are placed in the project directory.
cd ${ZN_VIVADO_PROJECT_DIR}

# => Open the Vivado Development Environment
if [ -f "${ZN_VIVADO_PROJECT_DIR}/${ZN_VIVADO_PROJECT_NAME}.xpr" ]; then
    vivado ${ZN_VIVADO_PROJECT_DIR}/${ZN_VIVADO_PROJECT_NAME}.xpr > /dev/null 2>&1 &

elif [ -f "${ZN_VIVADO_PROJECT_DIR}/create_project.tcl" ]; then
    vivado -source ${ZN_VIVADO_PROJECT_DIR}/create_project.tcl > /dev/null 2>&1 &

else
    vivado > /dev/null 2>&1 &
fi

# => The end
echo_info "[ $(date "+%Y/%m/%d %H:%M:%S") ] Finished ${ZN_SCRIPT_NAME}"
###############################################################################
- 1
- 2
- 3
- 4
- 5
- 6
- 7
- 8
- 9
- 10
- 11
- 12
- 13
- 14
- 15
- 16
- 17
- 18
- 19
- 20
- 21
- 22
- 23
- 24
- 25
- 26
- 27
- 28
- 29
- 30
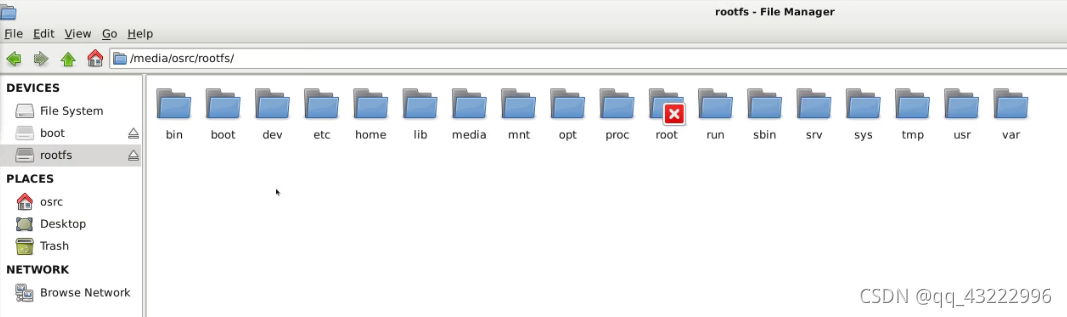
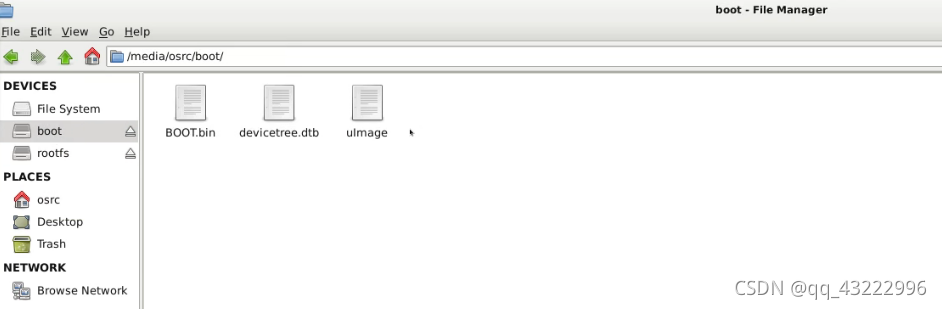
六.SD卡配置Ubuntu的例子
step1,修改osrc-labs/scripts/下的settings64.sh文件中的
	export ZN_PORJECT_NAME = “ubuntu”
Step2,使用source settings64.sh设置全系统变量
Step3,在osrc-labs/scripts/rootfs/ubuntu目录下运行cfg_rootfs.sh配置rootfs
Step4,在osrc-labs/scripts/rootfs/ubuntu目录下运行make_rootfs.sh编译得到rootfs.tar.gz文件系统
	执行该脚本后会将rootfs.tar.gz拷贝到osrc-labs/boards/MZ7X/ubuntu/output/target/目录下
Step5,进入osrc-labs/scripts/kernels目录下运行cfg_kernel.sh文件配置kernel
Step6,进入osrc-labs/scripts/kernels目录下运行nake_kernel.sh
	执行完该操作后会在osrc-labs/boards/MZ7X/ubuntu/output/target/目录下生成devicetree.dtb、uImage、uImage.bin、zImage文件
Step7,进入osrc-labs/scripts/Xilinxs目录下运行get_hw_description.sh
	执行完该操作后,会将vivado工程生成的zynq_fsbl.elf文件以及system.bit文件拷贝到osrc-labs/boards/MZ7X/ubuntu/output/target/目录下。
Step8,进入osrc-labs/scripts/uboots目录下运行cfg_uboot.sh
Step9,进入osrc-labs/scripts/uboots目录下运行make_uboot.sh
	执行完该操作后会在osrc-labs/boards/MZ7X/ubuntu/output/target/目录下生成boot.bin、u-boot.elf、u-boot.img文件
Step10,进入osrc-labs/scripts/rootfs/ubuntu目录下运行create_image.sh
	该操作的作用是生成sd卡中放置的相关文件,创建系统安装镜像,执行完该操作后会在osrc-labs/boards/MZ7X/ubuntu/output/target/目录下生成sd_image.bif文件,在osrc-labs/boards/MZ7X/ubuntu/images/boot目录下生成BOOT.bin文件、uImage文件、devicetree.dtb文件。在osrc-labs/boards/MZ7X/ubuntu/images/rootfs目录下生成rootfs.tar.gz文件
	我们真正用于配置SD卡的就是上述四个文件:BOOT.bin文件、uImage文件、devicetree.dtb文件、rootfs.tar.gz文件。
Step11,插入SD卡,执行osrc-labs/scripts/rootfs/ubuntu目录下的make_parted.sh对SDD卡进行分区。
	分区后sd卡会得到boot、rootfs两个子盘符
Step12,分区好后,执行osrc-labs/scripts/rootfs/ubuntu目录下的deploy_image.sh进行烧录
	在弹出的[INFO]Type device filenames,or press <Enter> to exit:输入sdb
	执行后系统运行:
- 1
- 2
- 3
- 4
- 5
- 6
- 7
- 8
- 9
- 10
- 11
- 12
- 13
- 14
- 15
- 16
- 17
- 18
- 19
- 20
- 21
- 22
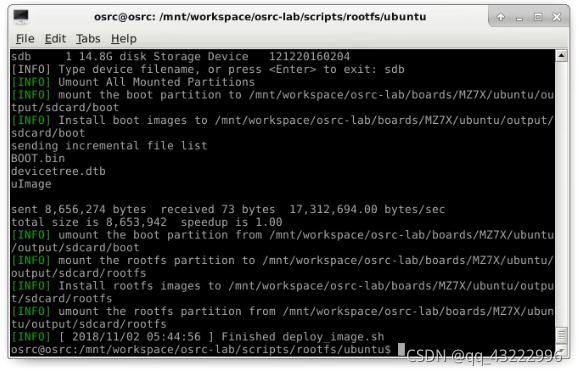
文件目录被解压到rootfs分区中,编译后的uboot、内核、设备树被拷贝到boot分区中。
- 1
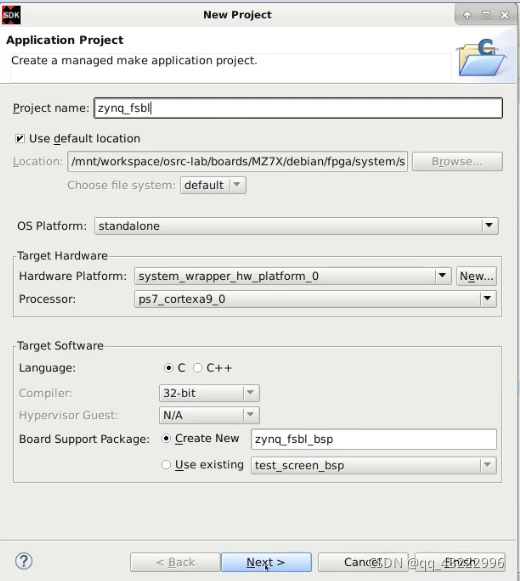
七.vivado生成设备树以及fsbl文件
7.1设置路径

7.2vivado自动生成设备树
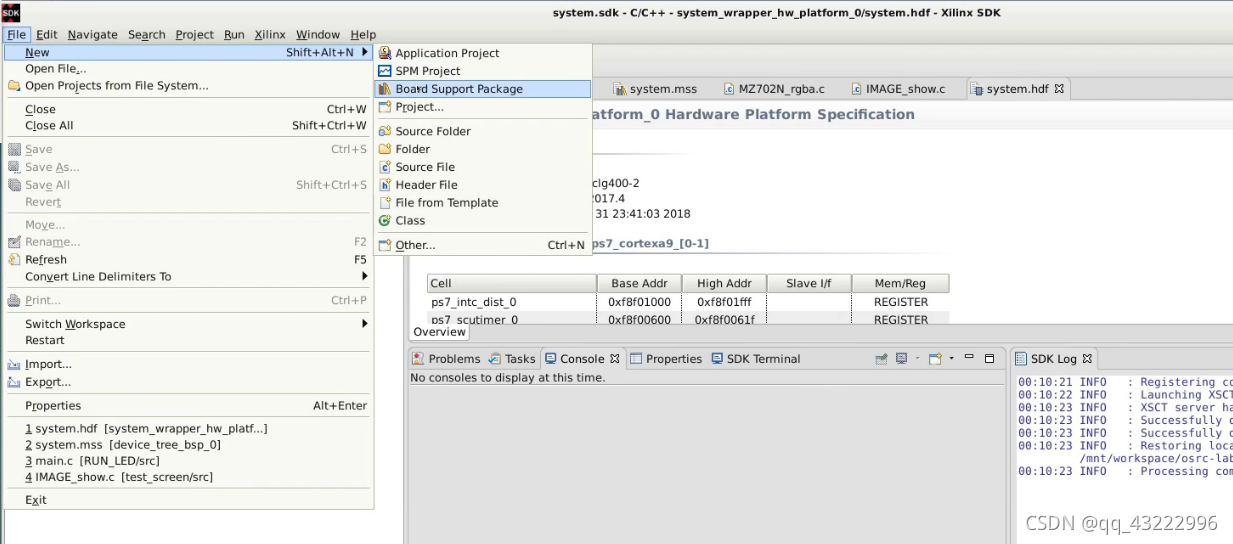
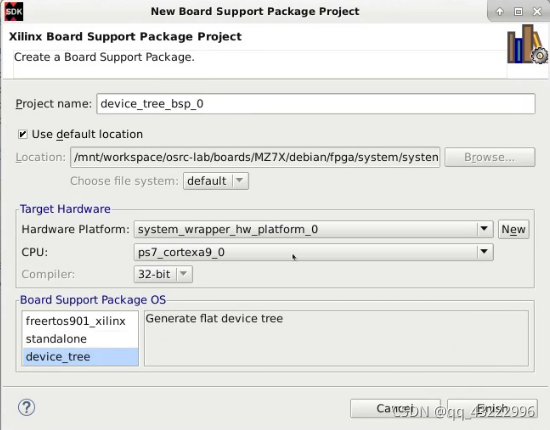
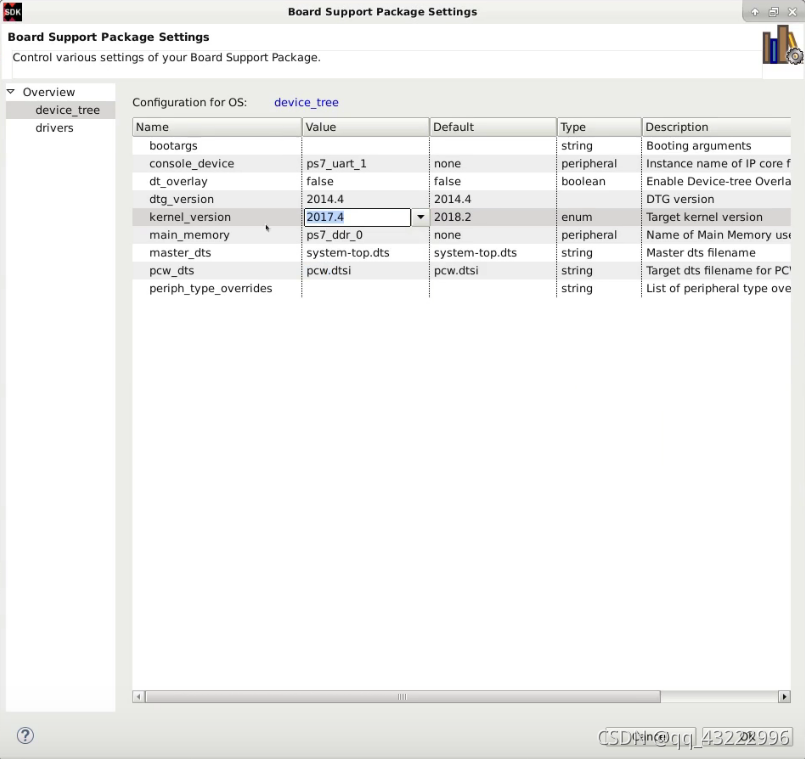
7.3生成FSBL

7.4更新vivado生成的文件

8.<完>
声明:本文内容由网友自发贡献,不代表【wpsshop博客】立场,版权归原作者所有,本站不承担相应法律责任。如您发现有侵权的内容,请联系我们。转载请注明出处:https://www.wpsshop.cn/blog/article/detail/51434
推荐阅读
- DataEase是开源的数据可视化分析工具,帮助用户快速分析数据并洞察业务趋势,从而实现业务的改进与优化。是开源的数据可视化分析工具,帮助用户快速分析数据并洞察业务趋势,从而实现业务的改进与优化。在本地搭建后,借助cpolar内网穿透实现远... [详细]
赞
踩
- 介绍socket编程,简单实现一个UDP服务器✨✨【Linux】套接字编程目录套接字IP+PORTTCP和UDP的介绍TCPUDP网络字节序转换接口UDP服务器的编写服务器的初始化 socketbindsockaddr结构服务器的... [详细]
赞
踩
- 本文是对Linux中文件和目录权限的总结。以上就是我对于Linux中文件和目录权限的总结。!!Linux:权限个人主页:个人主页个人专栏:《数据结构》《C语言》《C++》《Linux》文章目录前言一、Linux权限的管理文件访问者的分类(身... [详细]
赞
踩
- 看了这篇文章你将学到软硬链接的使用,以及制作自己的动静态库,并使用他们✨✨_动态库的软连接动态库的软连接系列文章收录于【Linux】文件系统 专栏关于文件描述符与文件重定向的相关内容可以移步 文件描述符与重定向操作。可以... [详细]
赞
踩
- 讲述Linux的基本指令:man、cp、mv、cat、more、less、head、tail等指令。【走进Linux的世界】Linux---基本指令(2)个人主页:平行线也会相交欢迎点赞... [详细]
赞
踩
- 上一篇文章中我们讲到了很多的网络名词以及相关知识,下面我们就直接进入udp服务器的实现。一、udp服务器的实现cc=g++.PHONY:allclean:我们通过all就可以创建多个可执行程序了,对于cc这个变量我们设置为g++,以后如果想... [详细]
赞
踩
- Linux防火墙服务和区的不同配置操作,放行端口或服务等_linux防火墙配置linux防火墙配置目录防火墙介绍zones预定义服务firewalld启动与停止查看firewalld当前状态和设置使⽤CLI查看firewalld设置fire... [详细]
赞
踩
 MeterSphere是一站式开源持续测试平台,涵盖测试跟踪、接口测试、UI测试和性能测试等功能,全面兼容JMeter、Selenium等主流开源标准,有效助力开发和测试团队充分利用云弹性进行高度可扩展的自动化测试,加速高质量的软件交付,推... [详细]
赞
踩
- KaliLinux是一款基于Debian的发行版,这意味着它拥有强大的社区支持和丰富的软件资源。它被设计为具有快速、轻量级的特性,特别适合在虚拟机和闪存驱动器上运行。KaliLinux的目标是成为网络和安全专业人士的首选工具,它提供了广泛的... [详细]
赞
踩
- 注意事项:下载openssh9.3p2的安装包:或者是使用我提供的离线包:openssh7.4p1升级到openssh9.3p2所需的离线包网盘下载:链接:https://pan.baidu.com/s/1W426VDGwchE9ndKGV... [详细]
赞
踩
- mkdir命令是Linux系统中的一个用于创建目录的命令。它的作用是在指定的路径下创建一个新的目录。使用mkdir命令可以方便地创建一个空的目录,该目录可以用于存储文件或其他目录。通过指定路径参数,可以在当前工作目录或其他指定目录下创建新的... [详细]
赞
踩
- 上篇文章我们说学习系统我们要翻越三座大山:进程周边、文件周边以及线程周边。那今天我们就对第一座大山:进程周边开启攀登之旅【Linux】进程周边001之进程概念... [详细]
赞
踩
- >对于企业网络安全建设工作的质量保障,业界普遍遵循PDCA(计划(Plan)、实施(Do)、检查(Check)、处理(Act))的方法论。近年来,网络安全攻防对抗演练发挥了越来越重要的作用。企业的安全管理者通过组织内部或外部攻击队,站在恶意... [详细]
赞
踩
 上篇文章我们最后提到了进程的并发:多个进程在一个CPU下采用进程切换的方式,在一段时间之内,让多个进程都得以推进,称之为并发。那么Linux是如何完成进程切换的呢?本篇文章博主会与大家共同领略Linux系统进程调度算法之美。【Linux】进... [详细]
赞
踩
- 【代码】【Linux】项目自动化构建工具-make/Makefile。【Linux】项目自动化构建工具-make/Makefile背景会不会写makefile,从侧面说明了一个人是否具备完成大型工程的能力。一个工程中的源文件不计数,其按类型... [详细]
赞
踩
- 1.申请锁和释放锁本身就被设计成了原子性操作2.当线程访问临界区的过程,对于其他线程是原子的(对于其他线程来讲,一个线程要么没有锁,要么释放锁)。3.在临界区中,线程可以被切换,(在线程被切出去的时候,是持有锁被切走的,我不在期间,你们没有... [详细]
赞
踩
- 本文是对Linux中vim使用的总结以上就是我对于Linux中vim使用的总结。!!Linux:vim的简单使用个人主页:个人主页个人专栏:《数据结构》《C语言》《C++》《Linux》文章目录前言一、vim的基本概念二、vim的基本操作三... [详细]
赞
踩
- umount命令用于卸载(取消挂载)已经挂载的文件系统,使其从文件系统树中移除。它用于断开文件系统与指定挂载点之间的连接,以便安全地卸载文件系统。_取消挂载取消挂载目录标题描述语法格式参数说明错误情况注意事项底层实现示例示例一示例二示例三示... [详细]
赞
踩
- 【Linux】探索Linux进程优先级|环境变量|本地变量|内建命令【Linux】探索Linux进程优先级|环境变量|本地变量|内建命令最近,我发现了一个超级强大的人工智能学习网站。它以通俗易懂的方式呈现复杂的概念,而且内容风趣幽默。我觉得... [详细]
赞
踩
- t:显示TCP连接-u:显示UDP连接-l:仅显示监听状态的连接-n:以数字形式显示端口号,而不是以服务名称显示通过管道符号|将netstat的输出结果传递给grep命令,用于过滤出包含指定端口号的行。执行命令后,终端将显示与该端口号相关的... [详细]
赞
踩
相关标签

