
- 1二进制部署K8S
- 2cdf表格_利用Matlab中的dfittool工具实现概率密度函数pdf和累积概率密度函数CDF绘图...
- 3Codeforces Round #700 (Div. 2) D1. Painting the Array I(暴力+后缀)
- 4利用yum安装docker-compose_could not find a version that satisfies the requir
- 5web开发人员必备的提高开发水平的20个参考手册
- 6第十二届蓝桥杯大赛软件赛省赛(Python大学A组)_蓝桥杯本科a组python真题
- 7Vue基础语法之@click、时间修饰符@click.stop与@click.prevent、按键修饰符(如@keyup.enter)_@click.enter
- 8「getWriter() has already been called for this response」问题处理全过程
- 940条软件测试面试常考题目总结(附答案解析)_软件测试面试题
- 10“探店”低代码_探店博客
pytest的常用插件和Allure测试报告
赞
踩
pytest常用插件
pytest-html插件
安装:
pip install pytest-html -U用途:
生成html的测试报告
用法:
在.ini配置文件里面添加
addopts = --html=report.html --self-contained-html效果:
执行结果中存在html测试报告路径
![]()
pytest-xdist插件
安装:
pip install pytest-xdist -U用途:
可以使用并发的方式执行用例
用法:
在.ini配置文件中添加
- addopte -n 并发数(建议不要超过系统CPU的核心数)
- 如果并发数为0,相当于没有使用插件
效果:
会减少用例的执行时间,但是由于调用进程也需要消耗资源,所以填写的并发数太多时间并不会得到有效的提升
无并发执行情况:

并发数为2的执行情况:

可以看到效率有所提高
pytest-rerunfailures插件
安装:
pip install pytest-rerunfailures -U用途:
在用例失败后进行重试,可以执行重试最大次数和每次重试之前的等待时间
用法:
在.ini配置文件中添加
- addopts --reruns 重新执行的数量 --reruns-delay 每次重新执行的等待时间
- 如: --reruns 5 --reruns-delay 1 表示如果失败最多重新执行5次,并且每次重新执行之间间隔一秒
效果:
用例内容:
生成一个随机数范围是[1, 3)
断言这个随机数是否等于1,相当于是50%的概率
- def test_1():
- a = random.randint(1, 3)
- assert a == 1
使用--reruns 5 --reruns-delay 1的配置执行后

pytest-order插件
安装:
pip install pytest-order -U用途:
给用例排序,让用例可以按照执行的顺序执行
用法:
在用例上面加上如下标识
@pytest.mark.order(1)执行时会按照数字从小到大的顺序执行,如果没有填数字或者没有添加标识的用例,会在排序的所有用例执行之后,按照原本的用例顺序执行。
效果:
用例内容:
test_1没有添加标识
test_2添加了标识但没有加入数字
test_3、test_4、test_5添加了标识并且加入了数字
- def test_1():
- print('执行用例test_1')
-
-
- @pytest.mark.order()
- def test_2():
- print('执行用例test_2')
-
-
- @pytest.mark.order(1)
- def test_3():
- print('执行用例test_3')
-
- @pytest.mark.order(3)
- def test_4():
- print('执行用例test_4')
-
- @pytest.mark.order(2)
- def test_5():
- print('执行用例test_5')

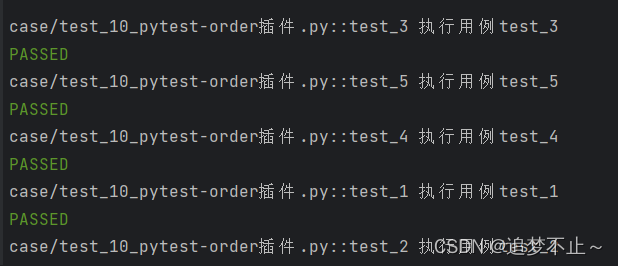
预期执行顺序:
test_3、test_5、test_4、test_1、test_2
执行结果:
符合预期
pytest-base-url插件
安装:
pip install pytest-base-url -U用途:
在用例中可以使用名为base-url的变量,可以在用例之间传递信息
用法:
在.ini配置文件中添加:
- addopts --base-url 内容
- 或者
- base_url = 内容
效果:
用例内容:
打印base-url的内容
- def test_abc(base_url):
- print('正在使用的环境是:', base_url)
base-url的内容为:
base_url = 测试环境效果:

pytest-result-log插件
安装:
pip install pytest-result-log -U用途:
打印的日志更详细,并且会对不同用例的日志进行区分
用法:
安装之后即可用
配置格式:
- log_file = ./pytest.log
- log_file_level = info
- log_file_format = %(levelname)-8s %(asctime)s [%(name)s:%(lineno)s] : %(message)s
- log_file_date_format = %Y-%m-%d %H:%M:%S
-
- # 设置打印日志的级别
- result_log_level_verbose = info
效果:
用例内容:
- import logging
-
- logger = logging.getLogger()
-
- def test_log1():
- logger.info("哈哈哈,我是日志内容")
-
- def test_log2():
- logger.info("哈哈哈,我也是日志内容")
- assert 1 == 2
执行结果:
会生成一个.log的文件,文件名为配置中设置的名称
log_file = ./pytest.log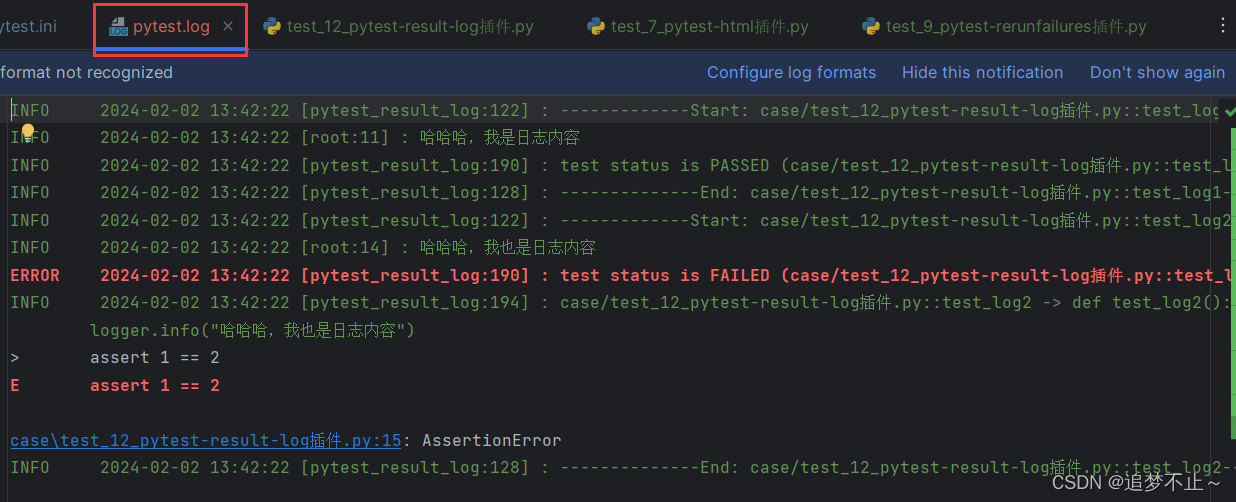
Allure测试报告框架
环境需要
需要安装Allure和jdk11及以上版本(建议17)
并且需要将其加入到系统的环境变量
最终结果就是:在cmd窗口或者终端中输入java和allure都可以出现对应的内容
allure-pytest插件
安装:
pip install allure-pytest -U用途:
将pytest生成的测试报告转化为Allure可以识别的数据
用法:
在.ini配置文件中添加:
addopts --alluredir=./temps --clean-alluredirAllure测试报告框架的用法
当生成了pytest的测试报告之后,在终端输入:
allure generate -c -o report temps其中generate表示生成报告
-c表示清空之前的报告
-o表示报告存放的目录名字(后面的report是我设置的目录名字)
temps表示allure-pytest插件生成的测试结果存放的位置(名字可以自己更换)
可以通过在main.py文件中添加如下代码,用来在用例执行完之后,自动执行该命令
os.system('allure generate -c -o report temps')效果:
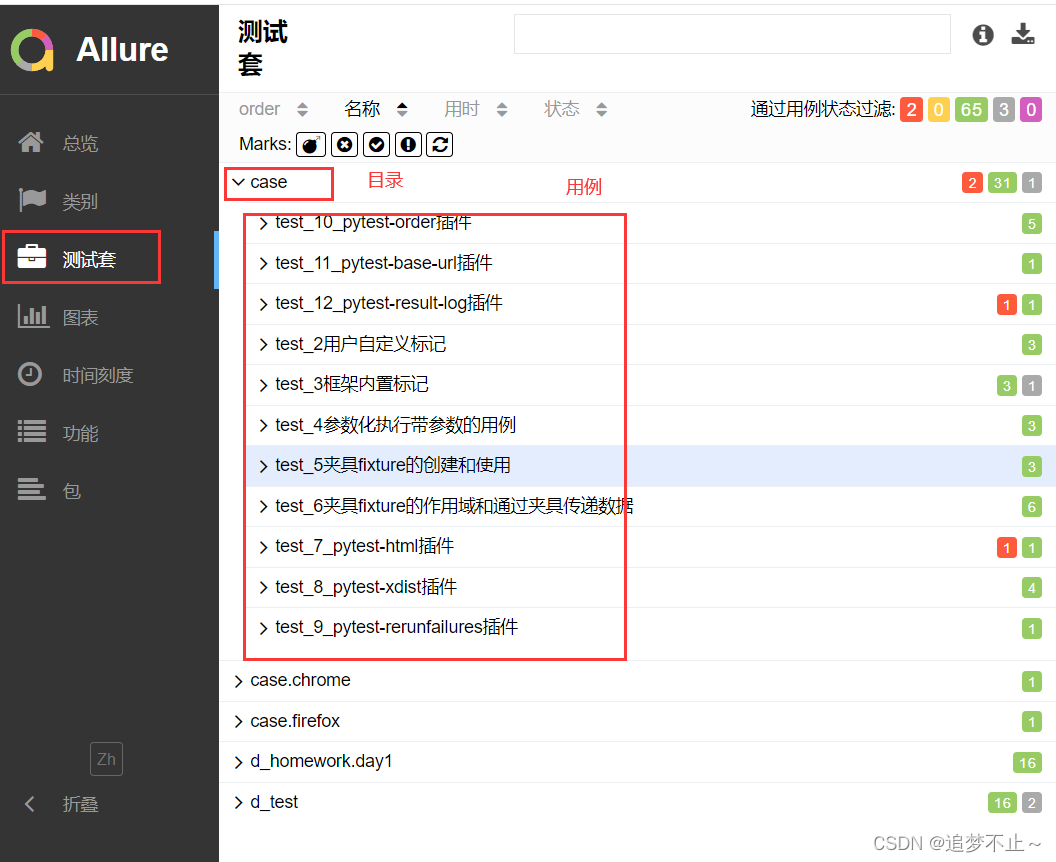
点击你存放allure报告的目录(我的是report),找到index.html用浏览器打开
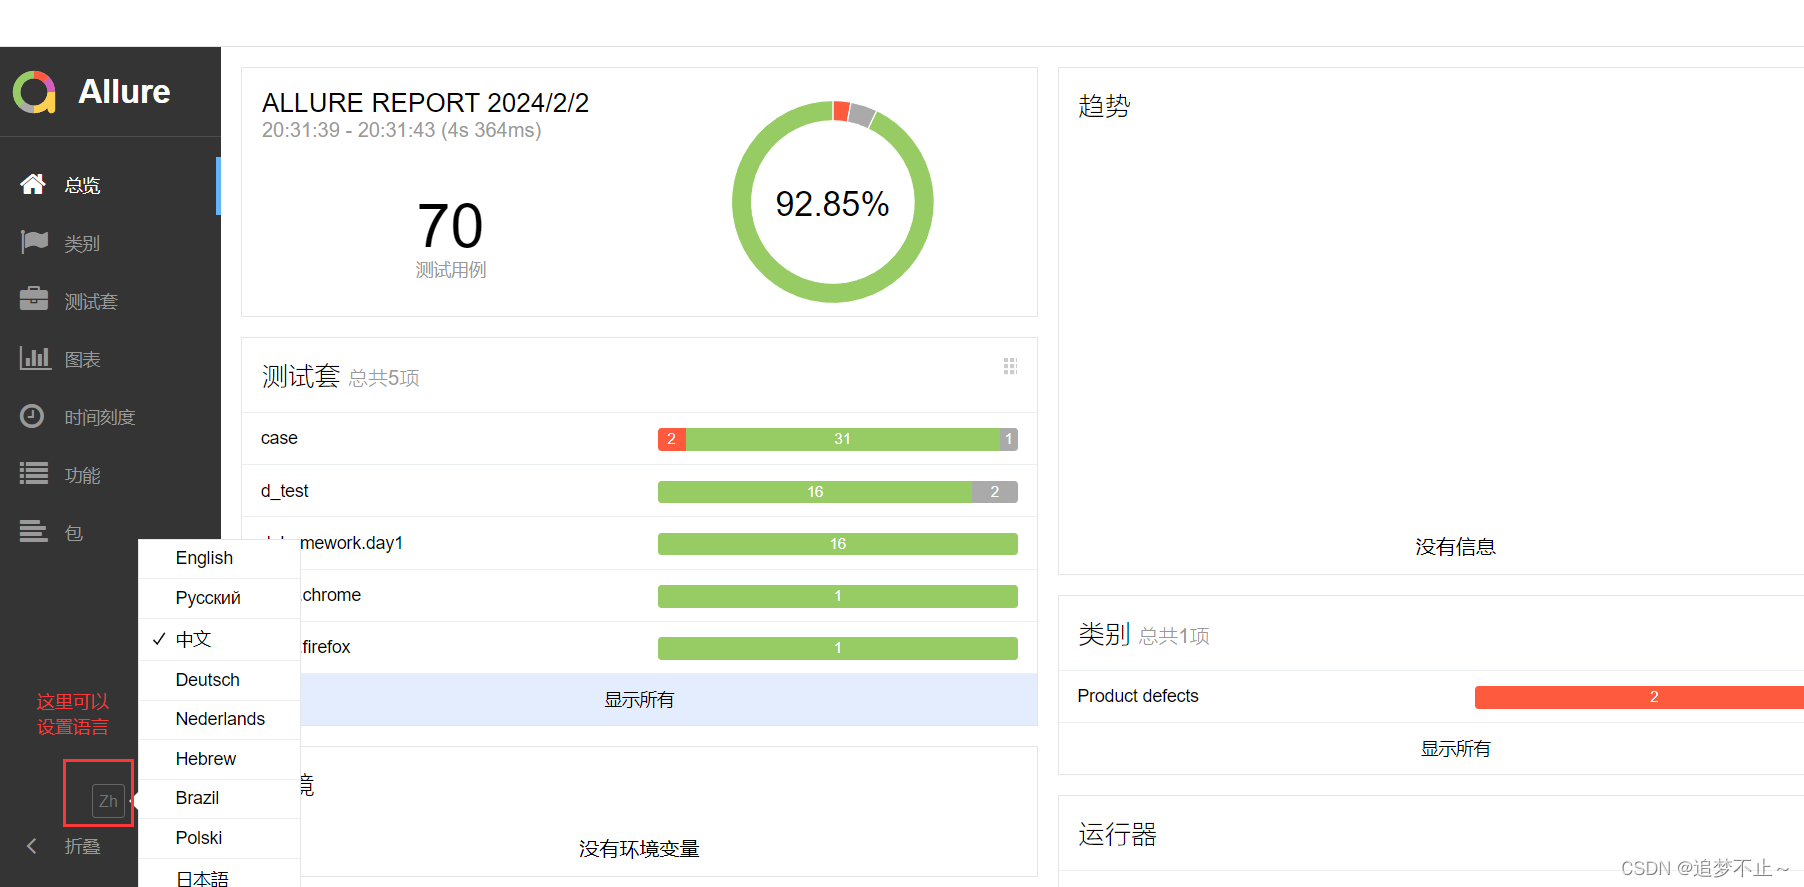
其中测试套会根据用来存在的目录进行区分
Allure测试报告定制
在Allure目录下找到config/allure.yml
修改成如下内容(就是把 - custom-logo-plugin 那一行加进去):
- plugins:
- - junit-xml-plugin
- - xunit-xml-plugin
- - trx-plugin
- - behaviors-plugin
- - packages-plugin
- - screen-diff-plugin
- - xctest-plugin
- - jira-plugin
- - xray-plugin
- - custom-logo-plugin
然后在来到Allure的plugins\custom-logo-plugin\static路径下
找到图片文件和css文件
设计好对应的logo图片和css样式,加进去Allure报告的logo就会修改了
Allure报告中对用例分类
我们可以在用例加上allure标记
同类型的标记中内容相同的标记会被归为一类
- # 对测试用例进行划分,级别从大到小
- @allure.epic()
- @allure.feature()
- @allure.story()
- @allure.title()
举例:
- @allure.epic('项目标记1')
- @allure.feature('模块标记1')
- class Test1:
- @allure.story('场景1')
- @allure.title('功能1')
- def test_1(self):
- print('执行了test_1')
-
- @allure.story('场景1')
- @allure.title('功能2')
- def test_2(self):
- print('执行了test_2')
-
- @allure.title('功能2')
- def test_3(self):
- print('执行了test_3')
-
- @allure.epic('项目标记1')
- @allure.feature('模块标记2')
- class Test2:
- @allure.title('功能1')
- def test_1(self):
- print('执行了test_1')
-
- @allure.title('功能1')
- def test_2(self):
- print('执行了test_2')
-
- @allure.story('场景1')
- @allure.title('功能2')
- def test_3(self):
- print('执行了test_3')
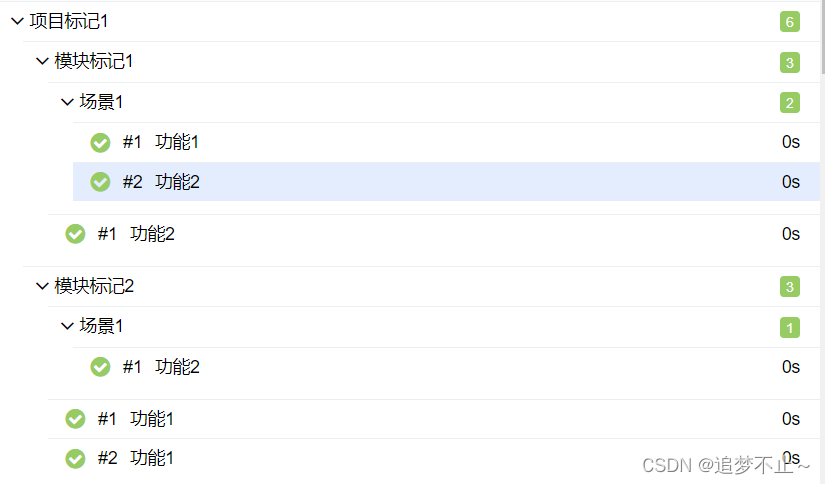
Test1类和Test2类都加上了epic('项目标记1')此时他们会在报告会打包到一个名为"项目标记1"的目录下
又因为他们各自有带有不同的feature()标记,所以在"项目标记1"目录下Test1类和Test2类中的用例会再被分为两个目录:"模块标记1"和"模块标记2"
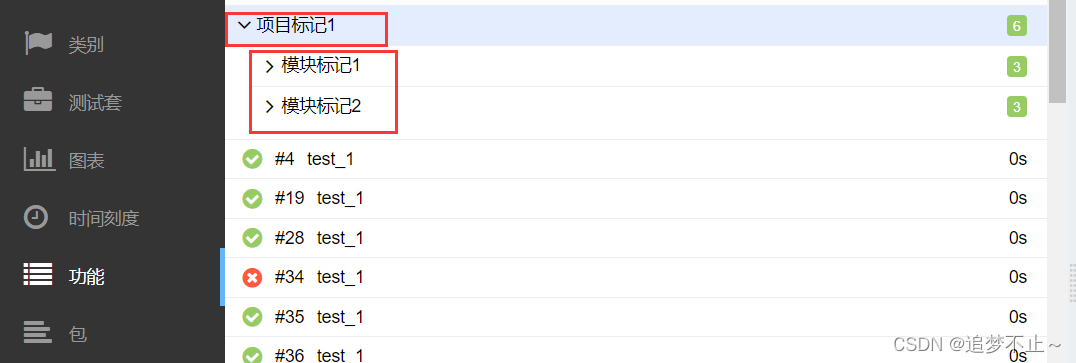
Test1类中用例又被分为"场景1"目录和直接展示的用例,以此类推
- 导语今天小编给大家带来一个来源于李飞飞大佬团队的3D仿真环境iGibson。iGibson通过Python就能调用,在ROS中可直接观察,阿chai推荐做机器人、3D以及模型构建的小伙伴可以尝试,iGibson中的物理引擎是真的很强。想领取... [详细]
赞
踩
- Django是一个流行的PythonWeb框架,它可以很方便地集成机器学习模型,进行预测和推理。我将介绍如何在Django项目中调用训练好的机器学习模型,并实现一个预测接口。Django如何调用机器学习模型进行预测Django是一个流行的P... [详细]
赞
踩
- Nacos详细解释配置与注册_L_Sueno的博客-CSDN博客_nacos配置文件详解_nacos配置nacos配置原作者:nacos实战(史上最全)-疯狂创客圈-博客园 一、若依的配置中心共享配置的shared-configs... [详细]
赞
踩
- CIM技术,构建数字孪生的智慧城市图一BIM图二BIM+GIS图三BIM+GIS+IoT=CIM图四数字孪生城市编者按:近年来,在智慧城市领域,“数字孪生”已成为网红词汇,那么数字孪生与传统的数字城市技术BIM、GIS又有何关联呢?本期介绍... [详细]
赞
踩
- 游戏隐私政策本人尊重并保护所有使用服务用户的个人隐私权。为了给您提供更准确、更有个性化的服务,本人会按照此隐私权政策的规定使用和披露您的个人信息。除本隐私权政策另有规定外,在未征得您事先许可的情况下,本人游戏不会将这些信息对外披露或向第三方... [详细]
赞
踩
- 点灯方法千千万,自加自减占一半。此博文分享了一种使用数学函数来平滑控制单个LED呈呼吸效果的方法,让点灯也变得高大上。_控制led的算法控制led的算法一种平滑控制LED呼吸灯的方法前言代码设计反推函数曲线设计前提设计简述函数及曲线图代码实... [详细]
赞
踩
- win10系统USB-Blaster驱动异常解决方法_试图将驱动程序添加到存储区时遇到问题试图将驱动程序添加到存储区时遇到问题Quartus版本:QuartusSetup-13.1.0.162.exeUSB-Blaster驱动异常现象:在设... [详细]
赞
踩
- 作者:皖渝源自:快学python客官,想看看邓紫棋微博粉丝分布嘛,跟俺一起逛一逛吧。本文主要有三个地方需要逛一逛:python爬虫,数据可视化,数据分析一、微博爬虫类型介绍微博有关的爬虫,由于根据网址的不同,可分为三种类型:1.移动端爬取:... [详细]
赞
踩
- 本文详细的分析gateway是如何使用和如何实现的,以及动态路由在gateway中的应用_springcloudgatewaynacosspringcloudgatewaynacos一、简介1、什么是gateway?SpringCloudG... [详细]
赞
踩
- 构建自定义镜像,如果一个个文件去拷贝打包,会非常麻烦;我们只需要告诉Docker,我们镜像的组成结构,需要哪些BaseImage、拷贝哪些依赖,需要哪些启动脚本,那么Docker将会帮助构建镜像;而DockerFile:是一个文本文件,里面... [详细]
赞
踩
- 第二,对于要求5中landuse92(GRID格式)中栅格属性值与土地的对应关系可以在土地利用类型元数据:tdlymetadata.dbf找到,这里倒还好,landuse92的value值类别不是很多你倒是可以一个一个去元数据表中对应找,但... [详细]
赞
踩
- ((?=[\x21-\x7e]+)[^A-Za-z0-9])x21-\x7e]+)[^A-Za-z0-9])这个匹配所有键盘上可见的非字母和数字的符号varpatrn=/[`~!@#$%^&*()_\-+=<>?:"{}|,.\/;'\\[... [详细]
赞
踩
- (2)将country.shp和point.shp进行空间连接,目标要素为point,连接要素为country(注意:保留country.shp属性表中的唯一标识)数据管理工具——要素——要素转点记转换后的数据为point.shp。(4)将... [详细]
赞
踩
- Dockerbuild命令dockerbuild命令用于使用Dockerfile文件来创建镜像dockerbuild[OPTIONS]PATH|URL|-OPTIONS说明:–build-arg=[]:设置镜像创建时的变量;–cpu-sha... [详细]
赞
踩
- Dokcer确实是个好东西,自从使用了它之后,不论是nginxmysqlredis,还是...,通通放里边儿,管理起来非常好管理,部署也很方便。这里介绍SpringBoot项目生成docker镜像并完成容器部署_docker部署spring... [详细]
赞
踩
- 基于SpringBoot的图书馆管理系统根据实际情况分为前后台两部分,前台部分主要是让用户使用的,包括用户的注册登录,首页,图书信息,公告信息,后台管理等功能;后台部分主要给管理员使用的,主要功能包括系统首页,个人中心,用户管理,图书分类管... [详细]
赞
踩
- springBoot整合myBatis完整后端项目实例,springBoot三层架构(controller+service/serviceImpl+Dao)+myBatis+thymeleaf模式完整的项目整合_springboot+sql... [详细]
赞
踩
- 如何依次从左向右,每次取两个相邻数组,进行合并,即两个有序数组的合并,合并完以后,再找下一组两个相邻的数组进行合并(并不包括上次合并好的数组),直到最后只有一个组或者没有组了,就重新从头开始合并,继续上述步骤。归并排序的总体思路就是将一个大... [详细]
赞
踩
- 10.C++中有成员函数和成员变量,成员变量(静态,非静态)成员函数(静态,非静态,虚函数)C++程序内存布局四大区域:全局数据区,代码区,栈区,堆区(程序可自由分配内存)。全局数据区:静态数据,全局数据,常量,代码区:类的成员函数和非成员... [详细]
赞
踩
- stm32f407探索者开发板(三)——GPIO工作原理(内部结构说明、八种输入输出分析、GPIO寄存器说明)_stm32f407电路stm32f407电路文章目录一、GPIO基本结构和工作方式二、内部结构介绍(1)、保护二极管(2)、上下... [详细]
赞
踩

