
- 1批处理不支持中文的问题_start执行中文不行吗
- 2Ubuntu20.04+RealSense D455_error: could not find git for clone of libcurl
- 3JavaWeb:Servlet概述_java简历servlet项目概述
- 4spring-mvc底层实现-1_spring mvc基于servlet接口实现
- 5前端数据格式解析 json,form(application/json、application/x-www-form-urlencoded、multipart/form-data)
- 6Windows部署Jar包的三种方式
- 7JAVA开发(记一次504 gateway timeout错误排查过程)_java 504 gateway time-out
- 8springboot服务接入nacos注册中心_spring boot 开启nacos服务
- 9SpringSecurity基本原理_springsecurity原理
- 10JAVA开发环境配置指南_java环境配置
ros realsense ur5手眼标定_realsense 坐标系
赞
踩
ros realsense ur5手眼标定
前言介绍:
ros中 realsense的坐标系,根据官网介绍:
https://github.com/IntelRealSense/realsense-ros
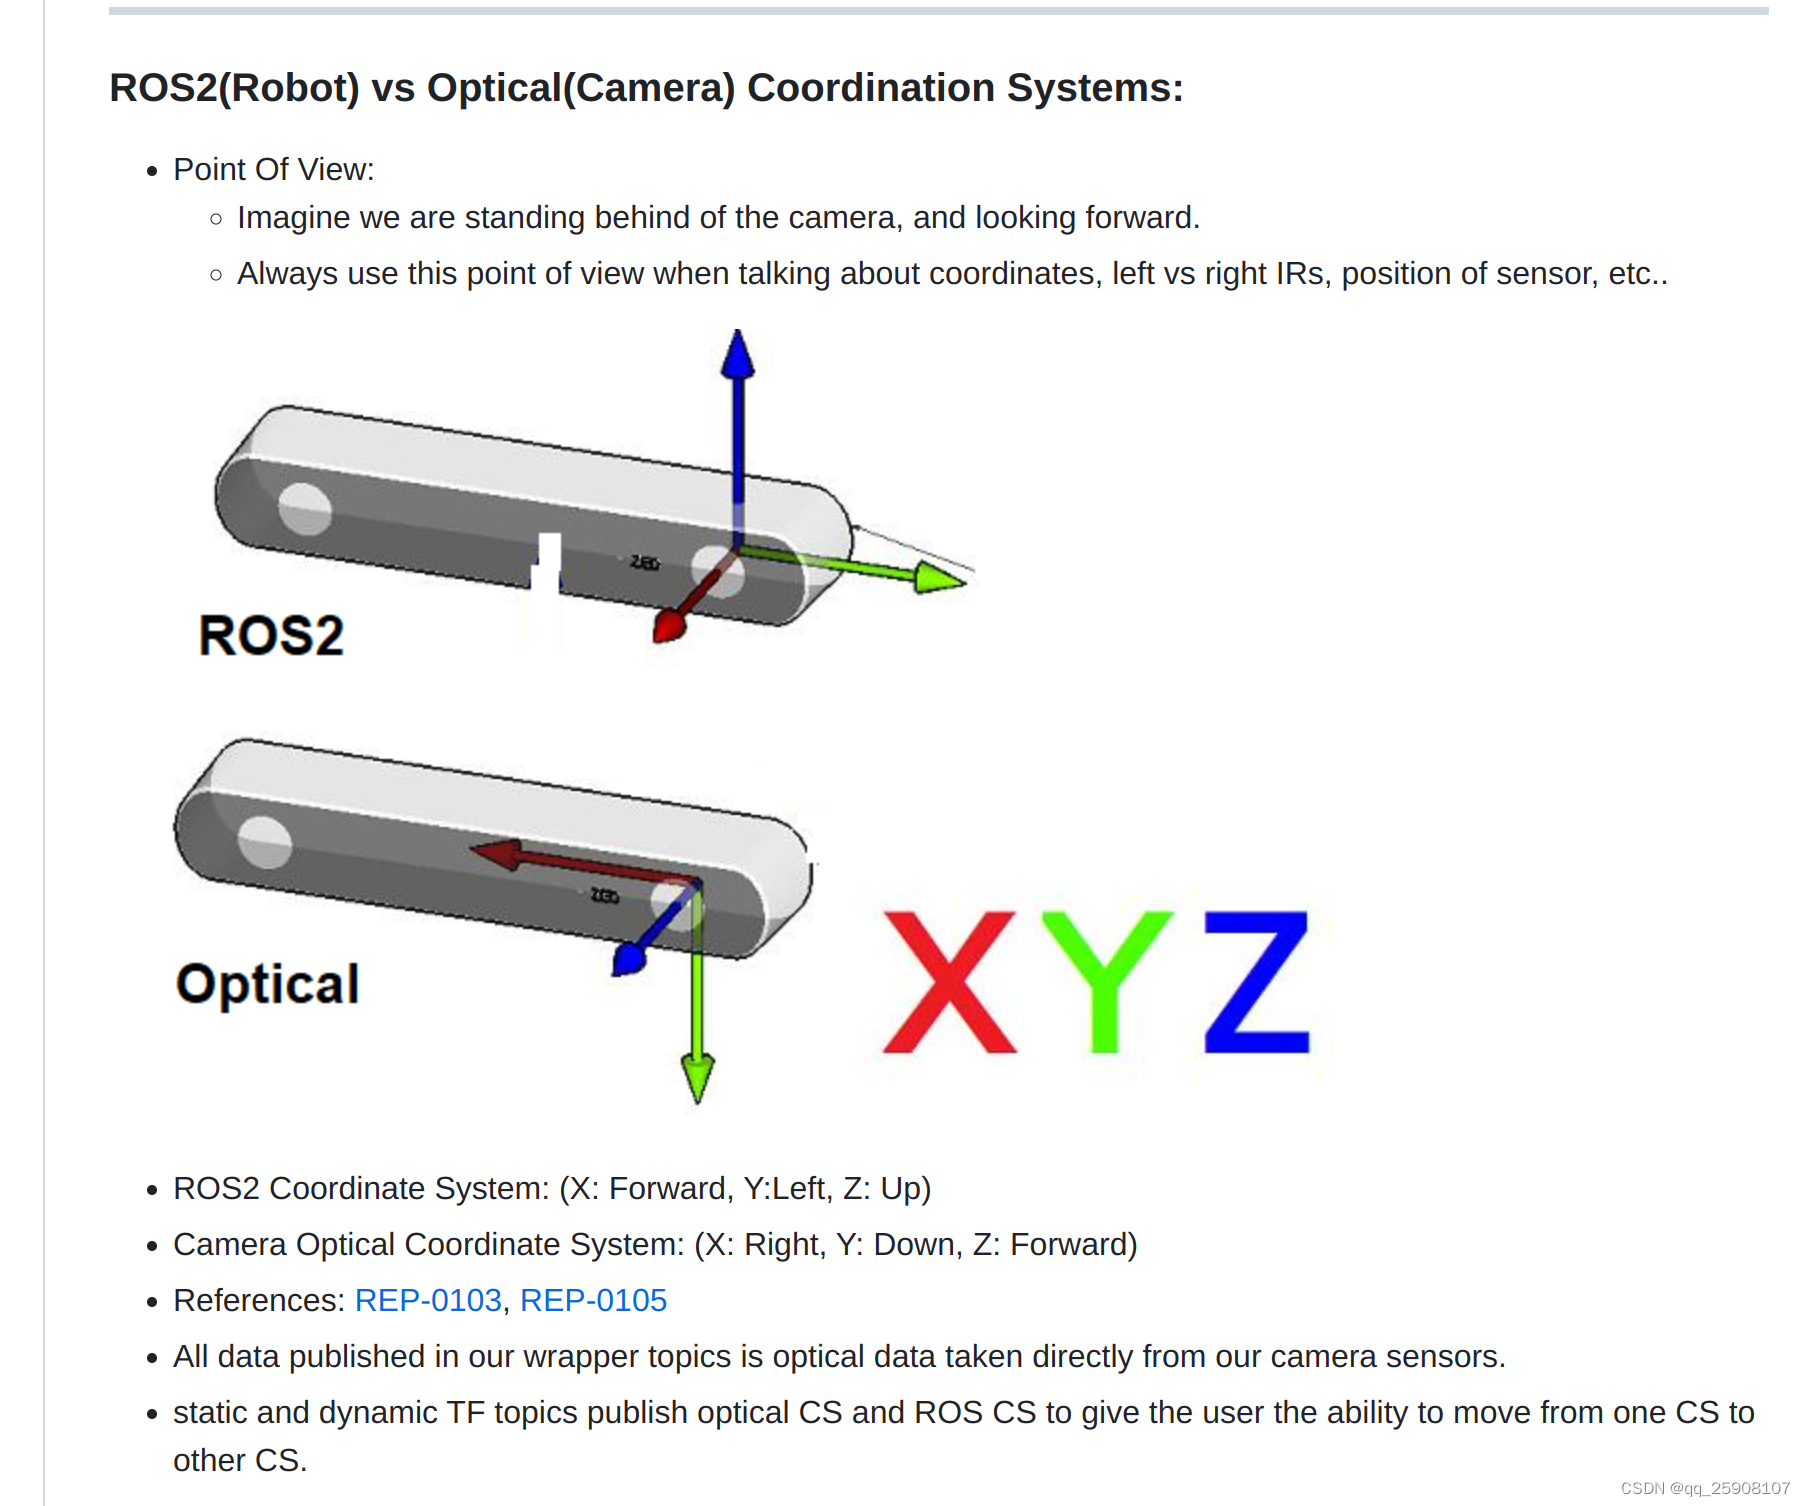 在ros中相机的坐标系和相机光学成像坐标系是不一样的,在标定时要先考虑清楚自己要的哪个。
标定前需要安装realsense-ros
需要安装两个文件:
librealsense(官方sdk)
librealsense-ros(基于sdk打包成ros的包)
(官方sdk)
# 下载安装包
git clone https://github.com/IntelRealSense/librealsense.git
cd librealsense

# 更新依赖库
sudo apt-get update && sudo apt-get upgrade && sudo apt-get dist-upgrade

# 安装依赖库
sudo apt-get install libudev-dev pkg-config libgtk-3-dev
sudo apt-get install libusb-1.0-0-dev pkg-config
sudo apt-get install libglfw3-dev
sudo apt-get install libssl-dev

# 运行Intel Realsense许可脚本
./scripts/setup_udev_rules.sh

# 下载并编译内核模块
./scripts/patch-realsense-ubuntu-lts.sh

# 编译SDK2.0
cd librealsense
mkdir build
cd build
cmake ../ -DBUILD_EXAMPLES=true
make
sudo make install

# 测试
cd examples/capture
./rs-capture

# 打开realsense-viewer
realsense-viewer

- 1
- 2
- 3
- 4
- 5
- 6
- 7
- 8
- 9
- 10
- 11
- 12
- 13
- 14
- 15
- 16
- 17
- 18
- 19
- 20
- 21
- 22
- 23
- 24
- 25
- 26
- 27
- 28
- 29
- 30
- 31
- 32
- 33
安装Realsense ROS
# 建立workspace
mkdir -p ~/catkin_ws/src
cd ~/catkin_ws/src/
catkin_init_workspace
cd ..
catkin_make
echo "source ~/catkin_ws/devel/setup.bash" >> ~/.bashrc
source ~/.bashrc

# 在catkin_ws/src/下载源程序
cd src
git clone https://github.com/IntelRealSense/realsense-ros.git
git clone https://github.com/pal-robotics/ddynamic_reconfigure.git

# catkin_make编译
cd ~/catkin_ws && catkin_make

# 测试
roslaunch realsense2_camera demo_pointcloud.launch

# 其他测试
## 查看发布的topic
rostopic list

## 查看相机内参
# 方法一
rostopic echo /camera/color/camera_info
rostopic echo /camera/aligned_depth_to_color/camera_info
注:aligned_depth_to_color是指已经将深度信息通过相机到RGBD的外参映射到彩色图像上
# 方法二
rs-sensor-control
- 1
- 2
- 3
- 4
- 5
- 6
- 7
- 8
- 9
- 10
- 11
- 12
- 13
- 14
- 15
- 16
- 17
- 18
- 19
- 20
- 21
- 22
- 23
- 24
- 25
- 26
- 27
- 28
- 29
- 30
- 31
原文链接:https://blog.csdn.net/qq_36722887/article/details/126643886
1、easy_handeye安装
# 创建catkin_workspace
mkdir calibration_catkin_workspace
cd calibration_catkin_workspace
mkdir src
cd src

# 下载机械臂驱动
git clone https://github.com/UniversalRobots/Universal_Robots_ROS_Driver.git Universal_Robots_ROS_Driver
git clone -b calibration_devel https://github.com/fmauch/universal_robot.git fmauch_universal_robot
# aruco
git clone -b noetic-devel https://github.com/pal-robotics/aruco_ros.git
# vision_visp
git clone -b noetic-devel https://github.com/lagadic/vision_visp.git
# easy_hand_eye
git clone https://github.com/IFL-CAMP/easy_handeye

# 下载依赖
cd ..
sudo apt update
rosdep update
rosdep install --from-paths src --ignore-src -y
# empy
pip install empy
# pyqt
pip install PyQt5

# 编译
catkin_make
# 切换环境
source ./devel/setup.bash
- 1
- 2
- 3
- 4
- 5
- 6
- 7
- 8
- 9
- 10
- 11
- 12
- 13
- 14
- 15
- 16
- 17
- 18
- 19
- 20
- 21
- 22
- 23
- 24
- 25
- 26
- 27
- 28
- 29
- 30
2. launch 文件配置
标定过程需启动 ur5 机械臂的相关节点,realsense 节点,aruco 节点,easy_handeye 节点,可以写一个 launch 文件同时启动上述节点,也可以分别启动。easy_handeye 包中给出了用一个 launch 文件实现的示例,在如下的目录中:xxx/catkin_ws/src/easy_handeye/easy_handeye/launch/eye_to_hand_calibration1.launch
由于我用的是眼在手外的标定,并且是ur5,因此选择eye_to_hand_calibration1.launch
官网的launch文件在这里,也可以基于这个修改
下面是我修改的launch文件,期间参考里许多网上的教程,但是都不合适,最后终于找到里适合自己的launch
<launch>
    <arg name="namespace_prefix" default="ur5_realsense_handeyecalibration" />

    <arg name="robot_ip" doc="The IP address of the UR5 robot" />

    <arg name="marker_size" doc="Size of the ArUco marker used, in meters" default="0.1" />
    <arg name="marker_id" doc="The ID of the ArUco marker used" default="123"/>

   <!-- start the realsen435 -->
    <include file="$(find realsense2_camera)/launch/rs_camera.launch" >
       <!-- <arg name="depth_registration" value="true" /> -->
    </include>

    <!-- 2. start ArUco -->
    <node name="aruco_tracker" pkg="aruco_ros" type="single">
        <remap from="/camera_info" to="/camera/color/camera_info" />
        <remap from="/image" to="/camera/color/image_raw" />
        <param name="image_is_rectified" value="true"/>
        <param name="marker_size"        value="$(arg marker_size)"/>
        <param name="marker_id"          value="$(arg marker_id)"/>
        <param name="reference_frame"    value="camera_color_optical_frame"/>
        <param name="camera_frame"       value="camera_color_optical_frame"/>
##这里需要强调,虽然这个参数的具体功能我没弄清楚,但是许多教程都把这里修改里,例如修改为camera_color_frame,默认为camera_color_optical_frame,经过实际测试不需要修改,至于原因可以参考前言关于坐标系的描述。
        <param name="marker_frame"       value="camera_marker" />
    </node>


<!-- start the robot -->
    <include file="$(find ur_robot_driver)/launch/ur5_bringup.launch">

        <arg name="robot_ip" value="192.168.1.117" />
    </include>
    <include file="$(find ur5_moveit_config)/launch/ur5_moveit_planning_execution.launch">

    </include>


    <!-- 4. start easy_handeye -->
    <include file="$(find easy_handeye)/launch/calibrate.launch" >
        <arg name="namespace_prefix" value="$(arg namespace_prefix)" />
        <arg name="eye_on_hand" value="false" />

        <arg name="tracking_base_frame" value="camera_color_frame" />
        <arg name="tracking_marker_frame" value="camera_marker" />
        <arg name="robot_base_frame" value="base" />
        #在这里, <arg name="tracking_base_frame" value="camera_color_optical_frame" />
        #<arg name="tracking_marker_frame" value="board" />
       # <arg name="robot_base_frame" value="base_link" />
        #<arg name="robot_effector_frame" value="tool0" />
        可以看到源文件设置为这个,根据自己的实际需要进行修改,目前我标定的是base与camera_color_frame之间的。经过实际测试,base坐标系符合物理机器人实际的base,至于base_link我也不清楚为什么这么设置,
        有明白小伙伴可以给解释一下。至于camera_color_frame也是ros坐标系下彩色相机的坐标系,
        我个人感觉应该在实际应用的时候应该考虑的是相机光学坐标系camera_color_optical_frame与base之间的坐标转换矩阵,但是还没有进行到这一步,所以还有待考虑。
        <arg name="robot_effector_frame" value="wrist_3_link" />

        <arg name="freehand_robot_movement" value="false" />
        <arg name="robot_velocity_scaling" value="0.5" />
        <arg name="robot_acceleration_scaling" value="0.2" />
    </include>

</launch>
- 1
- 2
- 3
- 4
- 5
- 6
- 7
- 8
- 9
- 10
- 11
- 12
- 13
- 14
- 15
- 16
- 17
- 18
- 19
- 20
- 21
- 22
- 23
- 24
- 25
- 26
- 27
- 28
- 29
- 30
- 31
- 32
- 33
- 34
- 35
- 36
- 37
- 38
- 39
- 40
- 41
- 42
- 43
- 44
- 45
- 46
- 47
- 48
- 49
- 50
- 51
- 52
- 53
- 54
- 55
- 56
- 57
- 58
- 59
- 60
- 61
注意:
眼在手外:value 为 false
tracking_base_frame 为相机坐标系 camera_color_frame
robot_base_frame 为机器人基座坐标系,示例里写的是 base_link,我在 rviz 中查看 base 才是真实的基座坐标系。
3. 标定眼在手上 eye-in-hand
3.1. 启动 launch 文件
roslaunch easy_handeye ur5_realsense_handeyecalibration1.launch
roslaunch easy_handeye eye_to_hand_calibration1.launch#应该被我改成这个名字了
- 1
- 2
2.在rviz中添加image,topic选择result方便观察标定板位置
3.手动调节机械臂,使 aruco 二维码移动至相机视野中心处附近,作为 home config。
在界面 3 中,点击 check starting pose,若检查成功,界面会出现: 0/17,ready to start
4.界面 3 中依次点击 Next Pose,Plan,Execute,机械臂会移动至新的位置,若二维码在相机视野范围内,且能检测成功,则进行下一步
5.界面 2 中点击 Take Sample,若 Samples 对话框中出现有效信息,说明第一个点标定成功
6.重复执行步骤 2 和步骤 3,直至 17 个点全部标定完毕
7.界面 2 中点击 Compute,则 Result 对话框中会出现结果
8.界面 2 中 Save,会将结果保存为一个 YAML 文件,路径为 ~/.ros/easy_handeye
https://blog.csdn.net/weixin_43735353/article/details/106128655
2.3 发布tf验证
easy_handeye 功能包提供了 publish.launch 文件,可以将标定好的 TF 发布出
注:要修改 “namespace_prefix” 参数,与眼在手外标定 launch 文件中的 “namespace_prefix” 一致,这样才能找到标定好的 YAML 文件,并且同样修改eye_on_hand为True
原文链接:https://blog.csdn.net/a17381562089/article/details/119546155
我没有使用这个方法。而是在/realsense_ws/src/realsense-ros/realsense2_camera/launch、demo_pointcloud.launch
的基础上添加了:
<node pkg="tf" type="static_transform_publisher" name="ur5_broadcaster" args="-0.8583407000885981 -0.7772945386894723 0.5265763229921994 -0.165891645862763 0.2564254303246922 0.4581886677250204 0.8347389443916647 base camera_link 100" />
- 1
完整的launch文件:
<launch>
<!-- start the robot -->
  <include file="$(find ur_robot_driver)/launch/ur5_bringup.launch">

      <arg name="robot_ip" value="192.168.1.117" />
  </include>
  <include file="$(find ur5_moveit_config)/launch/ur5_moveit_planning_execution.launch">

  </include>

  <include file="$(find ur5_moveit_config)/launch/moveit_rviz.launch">

  </include>
  <arg name="serial_no"             default=""/>
  <arg name="json_file_path"        default=""/>
  <arg name="camera"                default="camera"/>

  <group ns="$(arg camera)">
    <include file="$(find realsense2_camera)/launch/includes/nodelet.launch.xml">
      <arg name="serial_no"         value="$(arg serial_no)"/>
      <arg name="json_file_path"    value="$(arg json_file_path)"/>
      <arg name="depth_width"       value="640"/>
      <arg name="depth_height"      value="480"/>
      <arg name="depth_fps"         value="30"/>
      <arg name="color_width"       value="640"/>
      <arg name="color_height"      value="480"/>
      <arg name="color_fps"         value="30"/>
      <arg name="enable_depth"      value="true"/>
      <arg name="enable_color"      value="true"/>
      <arg name="enable_infra1"     value="false"/>
      <arg name="enable_infra2"     value="false"/>
      <arg name="enable_fisheye"    value="false"/>
      <arg name="enable_gyro"       value="false"/>
      <arg name="enable_accel"      value="false"/>
      <arg name="enable_pointcloud" value="true"/>
      <arg name="enable_sync"       value="true"/>
      <arg name="tf_prefix"         value="$(arg camera)"/>
    </include>


    <node pkg="tf" type="static_transform_publisher" name="ur5_broadcaster" args="-0.8583407000885981 -0.7772945386894723 0.5265763229921994  -0.165891645862763 0.2564254303246922 0.4581886677250204 0.8347389443916647 base camera_link 100" />
  </group>
</launch>
- 1
- 2
- 3
- 4
- 5
- 6
- 7
- 8
- 9
- 10
- 11
- 12
- 13
- 14
- 15
- 16
- 17
- 18
- 19
- 20
- 21
- 22
- 23
- 24
- 25
- 26
- 27
- 28
- 29
- 30
- 31
- 32
- 33
- 34
- 35
- 36
- 37
- 38
- 39
- 40
- 41
- 42
- 43
camera_link我没有标定,前文提到的我标定的camera_color_frame,但是我想测试点云的话用这个不行,所以改为了camera_link,实际上camera_link应该和depth_frame重合,在这里仅做测试。
将矩阵输入到 tf static_transform_publisher中发布。xyz,xyzw
实际效果:
 可以看到,只有optical_frame指向成像面才是正确的。
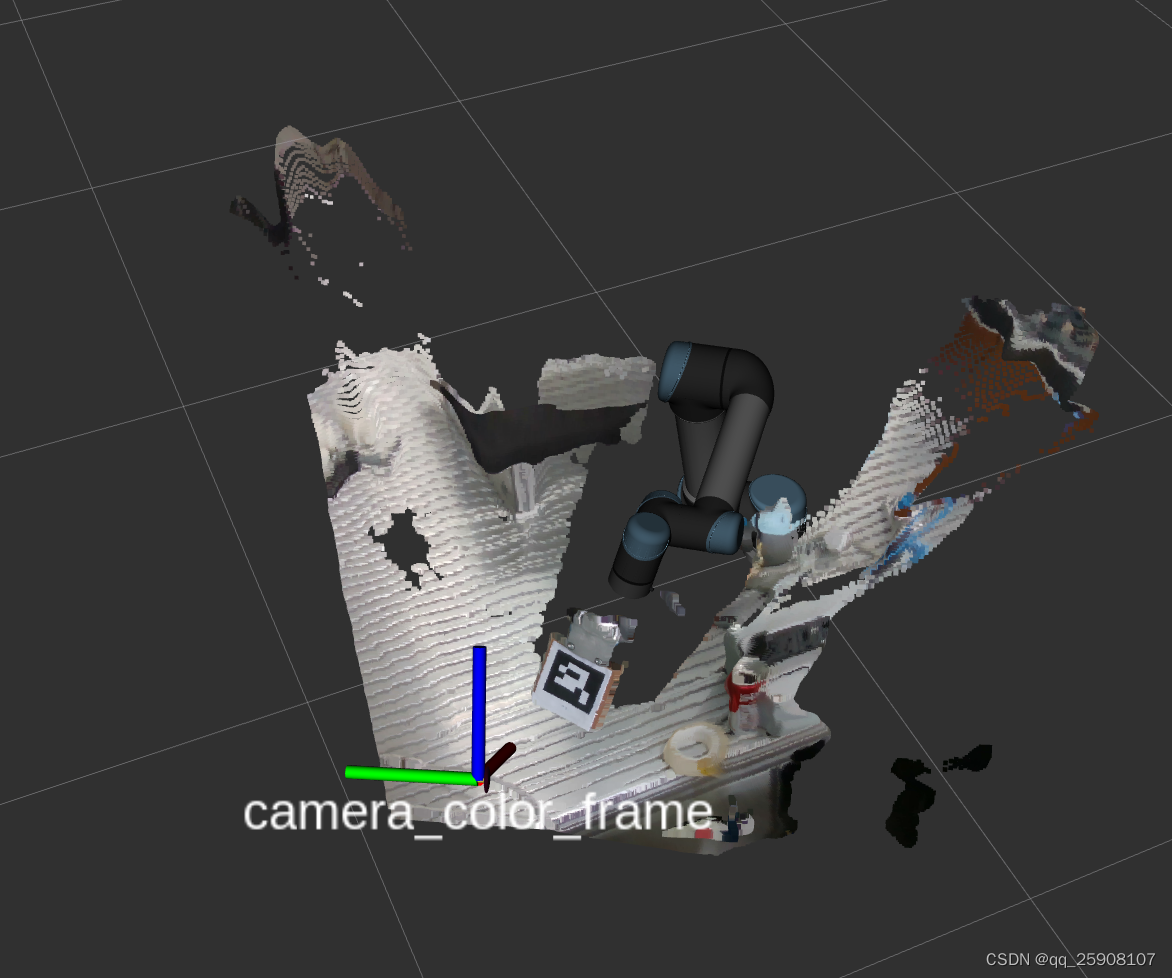 可以看到camera_color_frame的坐标系,x轴(红色轴)指向成像方向。
如果在这里的时候把camera_color_optical_frame改为了camera_color_frame,那么标定出来的坐标系就会出现camera_color_frame的z轴指向成像平面。
  <!-- 2. start ArUco -->
  <param name="reference_frame"    value="camera_color_optical_frame"/>
        <param name="camera_frame"       value="camera_color_optical_frame"/>
- 1
- 2
- 3
2.启动标定程序
1.realsense相机启动
roslaunch realsense2_camera rs_camera.launch
1
2.启动机器人
roslaunch ur_robot_driver ur5_bringup.launch limited:=true robot_ip:=192.168.1.117
- 1
1
再打开一个终端
roslaunch ur5_moveit_config ur5_moveit_planning_execution.launch limited:=true
- 1
1
3.启动标定程序
roslaunch easy_handeye hand_eye.launch
roslaunch easy_handeye ur5e_realsense_calibration.launch
- 1
- 2
- 3
1
4.再打开一个rviz终端,输入rqt
点击菜单栏的 Plugins -> Visulization -> Image View,选择 /aruco_tracker/result 话题。如果没有出现 aruco码,注意检查上文 中相机节点是否改变。
————————————————
版权声明:本文为CSDN博主「浪子陪都」的原创文章,遵循CC 4.0 BY-SA版权协议,转载请附上原文出处链接及本声明。
原文链接:https://blog.csdn.net/lqsdddd/article/details/126544007
- 基本思想:手中有一块微软的深度相机,结合手册和逻辑写个代码测试一下_realsense相机使用教程realsense相机使用教程基本思想:手中有一块微软的深度相机,结合手册和逻辑写个代码测试一下注意:深度相机实际与实例分隔模型相结合是效果最... [详细]
赞
踩
- 硬件机载端:树莓派4B4/8G、T265、RPLIDAR-A2配套开发环境:树莓派系统Ubuntu20.04.3LTSRealSenseSDK2.0ROS系统版本:noetic+realsense-ros多平台远程登陆软件:nomachin... [详细]
赞
踩
- SLAM算法与工程实践——相机篇:RealSenseT265相机使用(2)_t265rost265rosSLAM算法与工程实践系列文章下面是SLAM算法与工程实践系列文章的总链接,本人发表这个系列的文章链接均收录于此SLAM算法与工程实践系... [详细]
赞
踩
- realsenset265和D435iROS版的驱动安装教程_ros2t265ros2t265安装librealsencehttps://blog.csdn.net/qq_43412584/article/details/108357706... [详细]
赞
踩
- article
Ubuntu 20.04+intel realense t265 (安装Realsense SDK和Realsense-ros)_ubuntu20.04 anzhuang realsense
这个安装的的是最新版本的librealsense。v2.54.1之后已经不能读取t265了所以安装第一个安装包。打开话题发布关掉realsense-viewer。传入ubuntu并改名为librealsense。安装realsensesdk... [详细]赞
踩
- 硬件:树莓派4B8G内存系统:Ubuntu20最初我是参照这篇博客树莓派上部署英特尔深度相机IntelRealsenseT265(他人8月7日刚写的)我树莓派上librealsenserealsense-ros最后是实际按照这个来装的,也装... [详细]
赞
踩
- T265安装全教程_t265t265参考文章:1、D435i-----Ubuntu18.04下D435i使用(SDK安装与测试)_d435i使用手册_杰尼君的博客-CSDN博客VIO视觉无人机室内定点自主飞行(T265+PX4+Mavros... [详细]
赞
踩
- 树莓派+Ubuntu22.04.2+T265环境配置_ubuntu22.04安装t265ubuntu22.04安装t265准备: 树莓派4b&nb... [详细]
赞
踩
- 树莓派4B(4G/8G)安装Ubuntu18.04桌面版+ROS(Melodic)+RealsenseSDK(T265+D400系列)文章目录树莓派4B(4G/8G)安装Ubuntu18.04桌面版+ROS(Melodic)+Realsen... [详细]
赞
踩
- 由于T265停产,Intel®RealSense™SDK2.0(v2.54.1)在该版本中移除了对T265相机的支持,以后的版本也不会支持了。本文给出安装Intel®RealSense™SDK2.0(v2.53.1)版本的方法,以正常使用T... [详细]
赞
踩
- 树莓派4BUbuntuserver20.04LTS。可以gitclone也可以直接下zip。跳出来的窗口左边打开开关就能看到效果。1.下载RealSenseSDK。会提示我们先拔掉再插上,让他识别。4.调用RGB-D415。3.设置udev... [详细]
赞
踩
- IntelRealSenseT265Windows10环境下运行最近从某宝上买了个T265体验了下intel的硬件开发卖家怕我不会用还专门问了我会不会用intel的包装里面不带那个很酷炫的三脚架!!!!!打开来傻眼了开发工具在https:/... [详细]
赞
踩
- 这里面很重要一点说了获取T265相机参数的方式转载自:https://blog.csdn.net/crp997576280/article/details/109544456IntelRealsenseT265使用教程熊猫飞天2021-02... [详细]
赞
踩
- T265追踪相机,可以直接读取里程计信息,直接输出位置、速度等参数,为了了解如何使用,利用网上的信息进行了环境的配置,先测试的是Windows平台的使用,后来在Ubuntu下面配置环境,最后根据历程代码生成动态库,直接在一个未安装相应环境的... [详细]
赞
踩
- 1.添加RsDevice:2.设置开启鱼眼相机:3.新建RsStreamTextureRendererFisheye.cs和Fisheye.shader:usingIntel.RealSense;usingSystem;usingSyste... [详细]
赞
踩
- IntelRealsenseT265在ubuntu下的环境配置一、T265介绍二、realsenseSDK安装配置1.注册服务器的公钥2.将服务器添加到存储库列表3.安装所需的库,开发者和调试包5.插上T265打开realsenseSDK运... [详细]
赞
踩
- RealsenseT265简单上手实验室新买了一个相机,属于intelrealsense系列,两个单色鱼眼相机,自带IMU并配有VPU,性能强大,可以直接输出位置。就是拿来当IMU用也是不错的。废话不多说,直接上手系统:ubuntu16.0... [详细]
赞
踩
- realsenseT265是一款很不错的双目+IMU传感器。体积非常小巧,而且IMU精度表现还挺不错的。阅读本篇内容你将学会使用realsenseT265传感器,而且还能学会使用它进行简单的程序开发。1.realsenseT265传感器输出... [详细]
赞
踩
- IntelRealsenseT265使用教程1T265参数2T265数据读取2.1环境安装3、使用ROS包读取T265数据4、使用Opencv库读取T265数据参考资料1T265参数T265采用了MovidiusMyriad2视觉处理单元(... [详细]
赞
踩
- 分为两种,这里只是Intel的翻译和个人安装记录总结。详细可以参看IntelrealsenseSDK2的github仓库具体分为编译安装和源码安装。_ros2realsenseros2realsense余既为此文,经年拟安装ROS2和T26... [详细]
赞
踩

