
- 1JMeter定时器
- 2three顶点颜色数据差值计算_three 差值图
- 3html5页面分屏 还有上下拖动_html创建一个可移动和缩放的分屏页面
- 4QT中主窗口setWindowState(Qt::FramelessWindowHint);设置引起子控件背景色无法设置的bug_qt setwindowstate
- 5云计算 1月16号_arpspoof时间间隔
- 6Eigen矩阵库中非方阵的广义逆矩阵的求法,利用SVD矩阵分解_eigen svd分解求逆
- 7合合信息——用智能文字识别技术赋能古彝文原籍数字化_项目也将推出结合ocr、句读、实体识别和知识图谱等技术构建的一站式自动古籍智能
- 8香橙派(orangePiZero2):交叉编译、内核编译及驱动开发_香橙派toolchains交叉编译用哪个
- 9【小沐学Python】Python实现语音识别(SpeechRecognition)_识别语音的python库
- 10threejs(3)-详解材质与纹理_three.js 材质球
Spring Security使用JSON格式登录_spring security json
赞
踩
本文内容来自王松老师的《深入浅出Spring Security》,自己在学习的时候为了加深理解顺手抄录的,有时候还会写一些自己的想法。
Spring Security中默认的登录参数传递的格式是key/value形式,也是表单登录格式。在实际项目中我们可能会通过Json格式来登录来传递参数,这就需要我们自定义登录过滤器来实现。
其实登录参数的提取是在UsernamePasswordAuthenticationFilter中完成的。如果我们要使用Json格式登录,我们只需要模仿UsernamePasswordAuthenticationFilter过滤器定义自己的过滤器,在将自定义的过滤器放到UsernamePasswordAuthenticationFilter所在的文职即可。
我们自定义一个LoginFilter:
- /**
- * @author tlh
- * @date 2022/11/23 21:27
- */
- public class LoginFilter extends UsernamePasswordAuthenticationFilter {
-
- @Override
- public Authentication attemptAuthentication(HttpServletRequest request, HttpServletResponse response) throws AuthenticationException {
-
- //仅支持POST方法
- if (!"POST".equals(request.getMethod())) {
- throw new AuthenticationServiceException("当前认证不支持:" + request.getMethod());
- }
- if (request.getContentType().equalsIgnoreCase(MediaType.APPLICATION_JSON_VALUE) || request.getContentType().equalsIgnoreCase(MediaType.APPLICATION_PROBLEM_JSON_UTF8_VALUE)) {
- try {
- Map<String, String> userInfo = new ObjectMapper().readValue(request.getInputStream(), Map.class);
- String userename = userInfo.get(getUsernameParameter());
- String password = userInfo.get(getPasswordParameter());
- UsernamePasswordAuthenticationToken token = new UsernamePasswordAuthenticationToken(userename, password);
- setDetails(request, token);
- return this.getAuthenticationManager().authenticate(token);
- } catch (IOException e) {
- e.printStackTrace();
- }
- }
- return super.attemptAuthentication(request, response);
- }
- }

- 首先确保进入该过滤器的请求为POST
- 根据content-type来判断参数是Json的还是key/value格式的,如果是Json格式的就自己处理,如果不是就调用父类的attemptAuthentication方法来处理即可
- 如果还是Json格式的数据,则利用jackson提供的ObjectMapper工具将输入流转为Map对象,然后在Map对象里面提取出用户名和密码,接着构造UsernamePasswordAuthenticationToken对象,然后调用AuthenticationManager的authenticate方法来执行认证操作
其实LoginFilter中,从请求中提取出Json参数之后的逻辑和父类UsernamePasswordAuthenticationFilter中的认证逻辑是一样的,如下是UsernamePasswordAuthenticationFilter获取用户名和密码然后认证的逻辑:
- @Override
- public Authentication attemptAuthentication(HttpServletRequest request, HttpServletResponse response)
- throws AuthenticationException {
- if (this.postOnly && !request.getMethod().equals("POST")) {
- throw new AuthenticationServiceException("Authentication method not supported: " + request.getMethod());
- }
- String username = obtainUsername(request);
- username = (username != null) ? username.trim() : "";
- String password = obtainPassword(request);
- password = (password != null) ? password : "";
- UsernamePasswordAuthenticationToken authRequest = UsernamePasswordAuthenticationToken.unauthenticated(username,
- password);
- // Allow subclasses to set the "details" property
- setDetails(request, authRequest);
- return this.getAuthenticationManager().authenticate(authRequest);
- }
LoginFilter定义完之后,接下来我们将其添加到Spring Security过滤器链中去:
- /**
- * @author tlh
- * @date 2022/11/21 21:50
- */
- @Configuration
- public class SecurityConfig extends WebSecurityConfigurerAdapter {
-
- @Override
- protected void configure(AuthenticationManagerBuilder auth)
- throws Exception {
- auth.inMemoryAuthentication().withUser("javagirl")
- .password("{noop}123")
- .roles("admin");
- }
-
- @Bean
- @Override
- public AuthenticationManager authenticationManagerBean() throws Exception {
- return super.authenticationManagerBean();
- }
-
- @Bean
- LoginFilter loginFilter() throws Exception {
- LoginFilter loginFilter = new LoginFilter();
- loginFilter.setAuthenticationManager(authenticationManagerBean());
- loginFilter.setAuthenticationSuccessHandler((request, response, authentication) -> {
- response.setContentType("application/json;charset=utf-8");
- response.getWriter().write(new ObjectMapper().writeValueAsString(authentication));
- });
- return loginFilter;
- }
-
- @Override
- protected void configure(HttpSecurity http) throws Exception {
- http.authorizeRequests()
- .anyRequest().authenticated()
- .and()
- .formLogin()
- .and()
- .csrf().disable();
- //表示提起掉原来的UsernamePasswordAuthenticationFilter的位置
- http.addFilterAt(loginFilter(), UsernamePasswordAuthenticationFilter.class);
- }
-
- @Override
- public void configure(WebSecurity web) throws Exception {
- web.ignoring()
- .antMatchers("/login.html", "/css/**", "/js/**", "/images/**");
- }
- }
- 首先重写configure(AuthenticationManagerBuilder auth)方法来定义一个用户
- 重写父类的authenticationManagerBean()方法来提供一个AuthenticationManager实例,一会将会配置给LoginFilter
- 配置LoginFilter实例,同时将AuthenticationManager的实例设置给LoginFilter,然后配置登录成功回调。当然这里也可以设置失败回调
- 最后在HttpSecurity中,调用addFilterAt方法将LoginFilter过滤器添加到UsernamePasswordAuthenticationFilter过滤器所在的位置
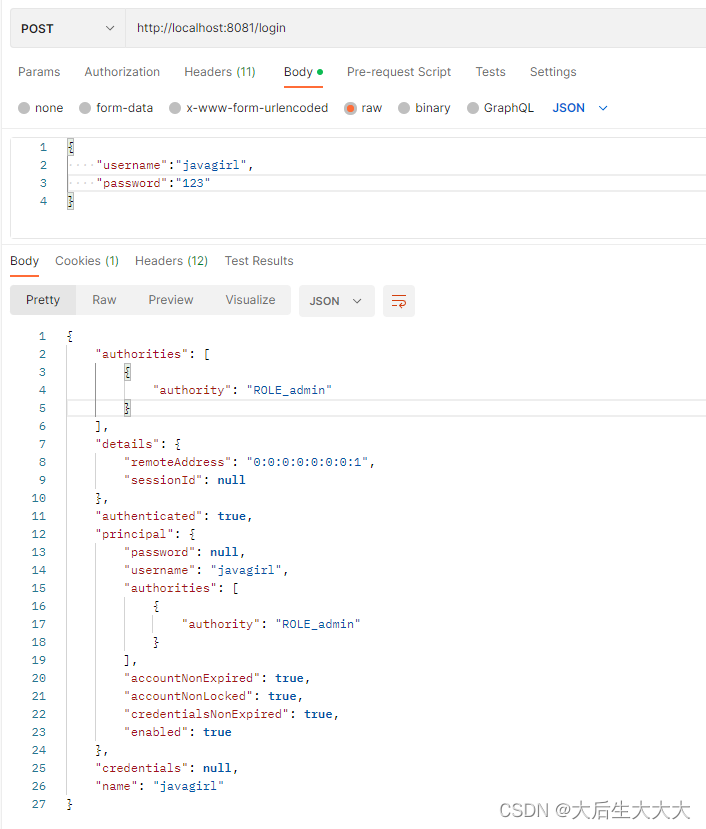
配置完成后,重启项目,此时我们就可以用Json格式的数据来登录系统了:
有小伙伴应该会注意到,当我们想要获得一个AuthenticationManager的实例时有两种方法:
- 重写父类的authenticationManager方法,如下:
@Override protected AuthenticationManager authenticationManager() throws Exception { return super.authenticationManager(); } - 从写父类的authenticationManagerBean方法,如下:
@Override
public AuthenticationManager authenticationManagerBean() throws Exception {
    return super.authenticationManagerBean();
}
表面上两种方法获取的实例都可以在这里运行,但是实际上是有区别的。第一种方法authenticationManager获取到时全局的AuthenticationManager实例,第二种方法获取到的是局部的AuthenticationManager实例。而LoginFilter作为Spring Security过滤器中的一环,显然该配置局部的AuthenticationManager的实例。应为,如果将全局的AuthenticationManager的实例配置给LoginFilter,则局部的AuthenticationManager实例所对应的用户就会失效。
实际上,如果我们想要配置一个AuthenticationManager实例,大部分情况下都是通过重写authenticationManagerBean方法来获取。
 把"miniprogramRoot":"wechat/smallcourse/"改为"miniprogramRoot":"",即可!smallcourse里面就是app,json等项目文件,导入项目需要选择smallcourse文件夹,而不... [详细]
赞
踩
- /***导出数据到文件**@paramfileName导出文件名*@parampageSize每页数据条数*/publicvoidexportToFile(StringfileName,intpageSize)throwsIOExcepti... [详细]
赞
踩
- config:用来配置安全相关的权限等core:一些安全的业务逻辑META-INF:配置spring的自动import类学习流程org.springframework.boot.autoconfigure.AutoConfiguration... [详细]
赞
踩
- ConfigurationProperties注解。SpringBoot@ConfigurationProperties注解的作用 解决的问题(解耦) 怎样解决@ConfigurationProperties注解前提:k... [详细]
赞
踩
- easyexcel重写了poi对07版Excel的解析,一个3M的excel用POIsax解析依然需要100M左右内存,改用easyexcel可以降低到几M,并且再大的excel也不会出现内存溢出;03版依赖POI的sax模式,在上层做了模... [详细]
赞
踩
- SpringBoot集成RocketMQ以及RocketMQ的基本使用、发送不同类型的消息、RocketMQ分布式事务消息。_springboot集成rocketmqspringboot集成rocketmqSpringBoot集成Rocke... [详细]
赞
踩
- 简单消息的发送顺序消息的发送RocketMQTemplate的API介绍环境搭建:RocketMQ的安装教程:在官网上下载bin文件,解压到本地,并配置环境变量,如下图所示:在Springboot项目中引入RocketMQ依赖:_sprin... [详细]
赞
踩
- SpringMessage是一种消息传输规范,RocketMQ可以支持,在SpringCloudStream中采用的就是SpringMessage作为消息传输规范,这是一个用于构建基于消息的微服务应用框架。ACL是AccessControl... [详细]
赞
踩
- 首先判断rocketMQ是否启动成功pom.xml文件
赞
踩
- springbootrocketmq_springboot集成rocketmqspringboot集成rocketmq集成SpringBoot和RocketMQ在现代的微服务架构中,消息队列已经成为一种常见的异步处理模式,它能解决服务间的同... [详细]
赞
踩
- 技术:springbootspringmybaticsjspmysql。功能有管理员模块:图书管理,读者管理,借阅管理,登录,修改密码。java图书管理系统ssm框架springboot项目。读者端:可查看图书信息,借阅记录,登录,修改密码... [详细]
赞
踩
- javaspringboot导入bean的四种方式javaspringboot导入bean的四种方式1 Import导入bean的四种方式2代码2.1要导入的beanpackagecom.example.demo;publiccl... [详细]
赞
踩
- 本博客详细讲解了在SpringBoot中如何使用SpringMVC中的文件上传功能SpringBoot中文件上传SpringBoot中文件上传一、MultipartFile二、单文件上传案例三、多文件上传案例四、Servlet规范五、Ser... [详细]
赞
踩
- springboot嵌入chatGPT步骤springboot嵌入chatGPT步骤一、需要良好的网络二、需要在OpenAI官网https://openai.com/注册用户,并获取一个api-key,sk开头的验证是否可用网站:http:... [详细]
赞
踩
- AOP(Aspect-OrientedProgramming)是一种编程范式,它允许我们将横切关注点(如日志记录、性能监控、事务管理等)从核心业务逻辑中分离出来,并将它们独立地进行管理。在SpringBoot中,AOP是一个强大的功能,可以... [详细]
赞
踩
- 然后重点排查这些阶段的代码。先看下。_springboot启动耗时排查springboot启动耗时排查0背景公司SpringBoot项目在日常开发过程中发现服务启动过程异常缓慢,常常需要6-7分钟才能暴露端口,严重降低开发效率。通过Spri... [详细]
赞
踩
- SpringBoot特别适合团队构建各种可快速迭代的微服务,同时为了减少程序本身监控系统的开发量,SpringBoot提供了actuator模块,可以很方便的对你的SpringBoot程序做监控。1.actuator接口说明SpringBo... [详细]
赞
踩
- 哲学最近看到了一句话:定乎内外之分辩乎荣辱之境。一个外国作家也说过:我生命里的的最大突破之一,就是我不再为别人的看法而担忧。此后,我真的能自由的去做我认为对自己最好的事,只有在我们不需要外来的赞许时,才变得自由。说的都很好。人就是要突破自己... [详细]
赞
踩
- 可用于追踪线上Java服务运行时信息的神器BTrace,你们经常用吗?概述生产环境中的服务可能会出现各种问题,但总不能让服务下线来专门排查错误,这时候最好有一些手段来获取程序运行时信息,比如接口方法参数/返回值、外部调用情况以及函数执行时间... [详细]
赞
踩
- 背景SpringBoot项目随着项目开发过程中引入中间件数量的增加,启动耗时逐渐增加。笔者在《SpringBoot2.4.0正式GA,全面拥抱云原生》文章评论下发现了Spring生态复杂,非官方插件并未严格按官方标准实现。例如@Config... [详细]
赞
踩

