
JavaEE高阶---SpringBoot 统一功能处理_javaee统一输出统一验证统一异常处理
赞
踩
一:什么是SpringBoot 统⼀功能处理
SpringBoot统一功能处理是AOP的实战环节。我们主要学习三方面内容:
- 统一用户登录权限验证;
- 统一数据格式返回;
- 统一异常处理。
二:统一用户登录权限验证
Spring 中提供了具体的实现拦截器:HandlerInterceptor,拦截器的实现分为以下两个步骤:
- 创建自定义拦截器,实现 HandlerInterceptor 接口的 preHandle(执行具体方法之前的预处理)方法。
- 将自定义拦截器加入 WebMvcConfigurer 的 addInterceptors 方法中。
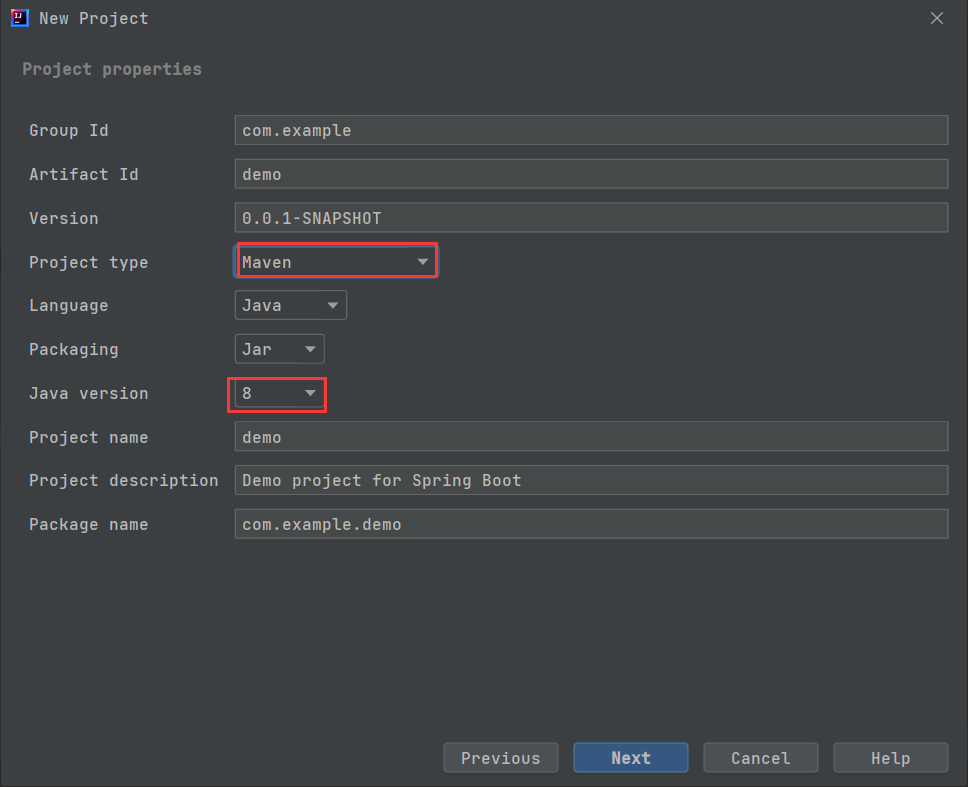
此处我创建一个新的项目:

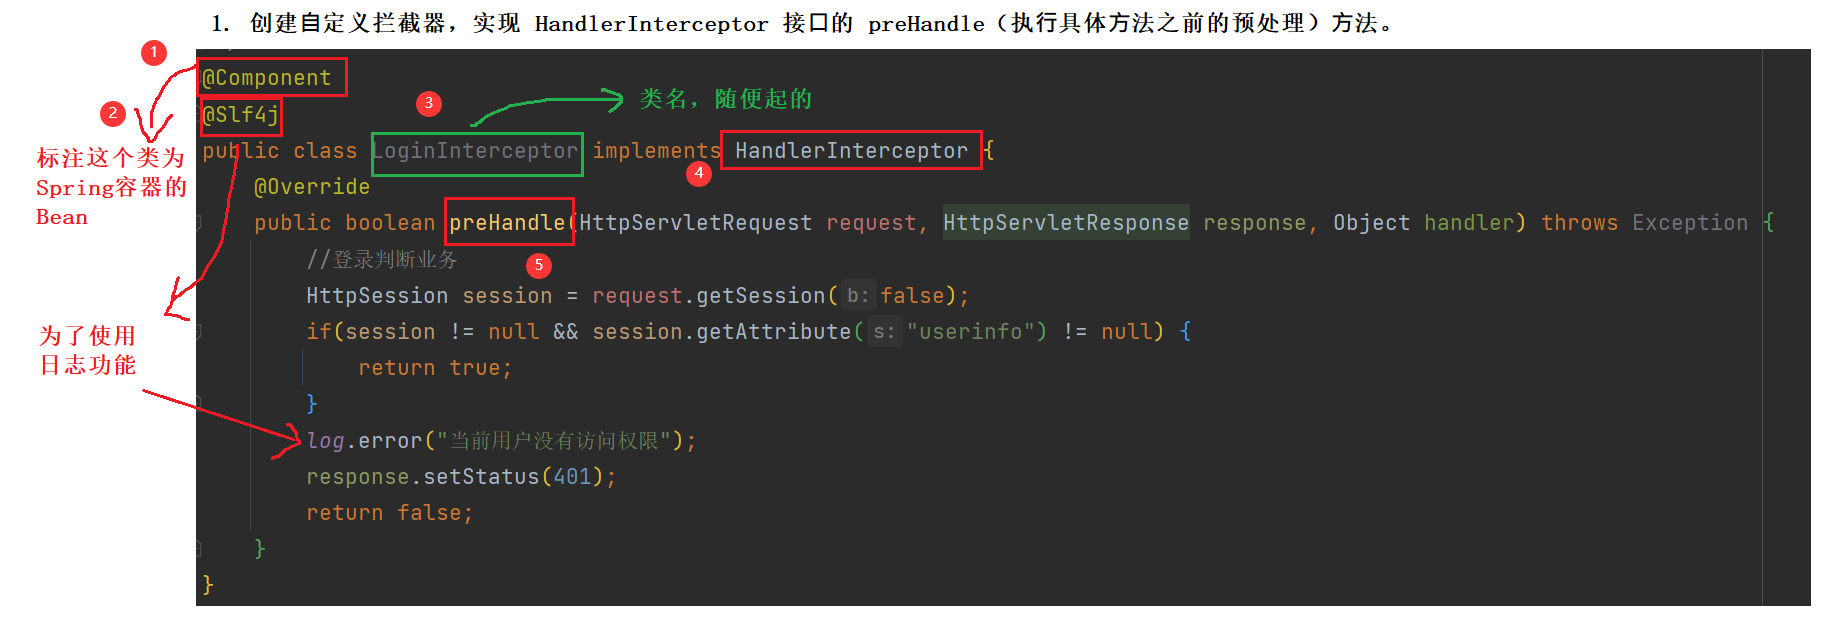
1. 创建自定义拦截器,实现 HandlerInterceptor 接口的 preHandle(执行具体方法之前的预处理)方法。
package com.example.demo.config;

import lombok.extern.slf4j.Slf4j;
import org.springframework.boot.autoconfigure.condition.ConditionalOnBean;
import org.springframework.stereotype.Component;
import org.springframework.web.servlet.HandlerInterceptor;

import javax.servlet.http.HttpServletRequest;
import javax.servlet.http.HttpServletResponse;
import javax.servlet.http.HttpSession;

/**
 * 登录拦截器
 */
@Component
@Slf4j
public class LoginInterceptor implements HandlerInterceptor {
    @Override
    public boolean preHandle(HttpServletRequest request, HttpServletResponse response, Object handler) throws Exception {
        //登录判断业务
        HttpSession session = request.getSession(false);
        if(session != null && session.getAttribute("userinfo") != null) {
            return true;
        }
        log.error("当前用户没有访问权限");
        response.setStatus(401);
        return false;
    }
}

- 1
- 2
- 3
- 4
- 5
- 6
- 7
- 8
- 9
- 10
- 11
- 12
- 13
- 14
- 15
- 16
- 17
- 18
- 19
- 20
- 21
- 22
- 23
- 24
- 25
- 26
- 27
- 28
- 29
- 30
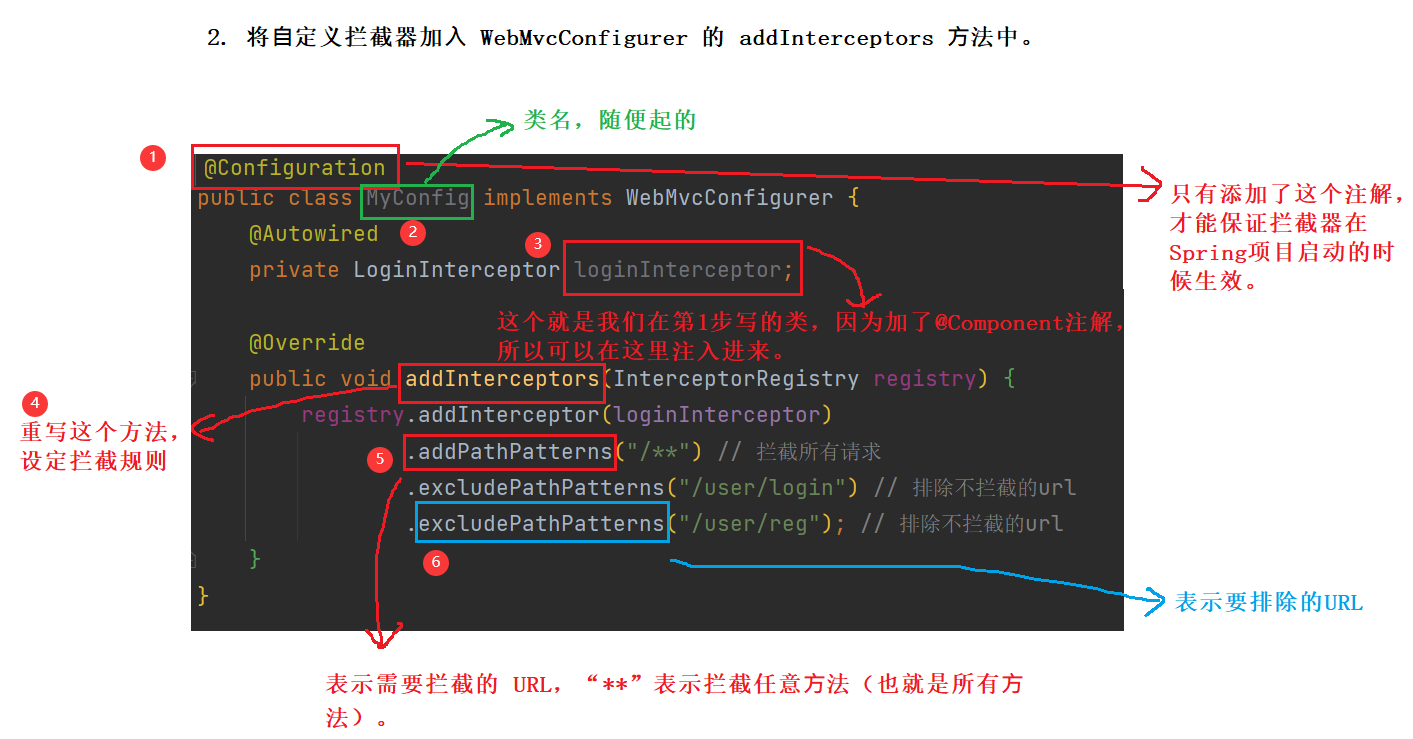
2. 将自定义拦截器加入 WebMvcConfigurer 的 addInterceptors 方法中。
package com.example.demo.config;

import org.springframework.beans.factory.annotation.Autowired;
import org.springframework.web.servlet.config.annotation.InterceptorRegistry;
import org.springframework.web.servlet.config.annotation.WebMvcConfigurer;

@Configuration
public class MyConfig implements WebMvcConfigurer {
    @Autowired
    private LoginInterceptor loginInterceptor;

    @Override
    public void addInterceptors(InterceptorRegistry registry) {
        registry.addInterceptor(loginInterceptor)
                .addPathPatterns("/**") // 拦截所有请求
                .excludePathPatterns("/user/login") // 排除不拦截的url
                .excludePathPatterns("/user/reg"); // 排除不拦截的url
    }
}
- 1
- 2
- 3
- 4
- 5
- 6
- 7
- 8
- 9
- 10
- 11
- 12
- 13
- 14
- 15
- 16
- 17
- 18
- 19
- 20
统一用户登录权限的验证步骤如下:
查看UserController中的具体方法 [ 这里写了三个方法 ] :
package com.example.demo.controller;

import lombok.extern.slf4j.Slf4j;
import org.springframework.util.StringUtils;
import org.springframework.web.bind.annotation.RequestMapping;
import org.springframework.web.bind.annotation.RestController;

import javax.servlet.http.HttpServletRequest;
import javax.servlet.http.HttpSession;
import java.net.PasswordAuthentication;

@RestController
@RequestMapping("/user")
@Slf4j
public class UserController {
    @RequestMapping("/login")
    public boolean login(HttpServletRequest request,
                         String username,String password) {
//        //1.非空判断
//        if(username != null && username != "" &&
//           password != null && password != "") {
//            //2.验证用户名和密码是否正确
//        }

        //1.非空判断[高端写法]
        if(StringUtils.hasLength(username) && StringUtils.hasLength(password)) {
            //2.验证用户名和密码是否正确
            if(username.equals("admin") && password.equals("admin")) {
                //登录成功
                HttpSession session = request.getSession();
                session.setAttribute("userinfo","admin");
                return true;
            } else {
                //用户名或密码输入错误
                return false;
            }
        }
        return false;
    }

    @RequestMapping("/getinfo")
    public String getInfo() {
        log.debug("执行了 getinfo 方法");
        return " 执行了 getinfo 方法";
    }

    @RequestMapping("/reg")
    public String reg() {
        log.debug("执行了 reg 方法");
        return " 执行了 reg 方法";
    }
}
- 1
- 2
- 3
- 4
- 5
- 6
- 7
- 8
- 9
- 10
- 11
- 12
- 13
- 14
- 15
- 16
- 17
- 18
- 19
- 20
- 21
- 22
- 23
- 24
- 25
- 26
- 27
- 28
- 29
- 30
- 31
- 32
- 33
- 34
- 35
- 36
- 37
- 38
- 39
- 40
- 41
- 42
- 43
- 44
- 45
- 46
- 47
- 48
- 49
- 50
- 51
- 52
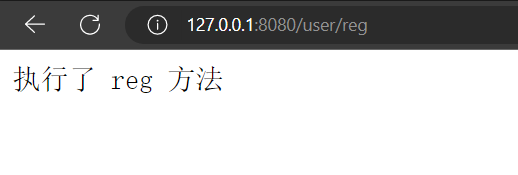
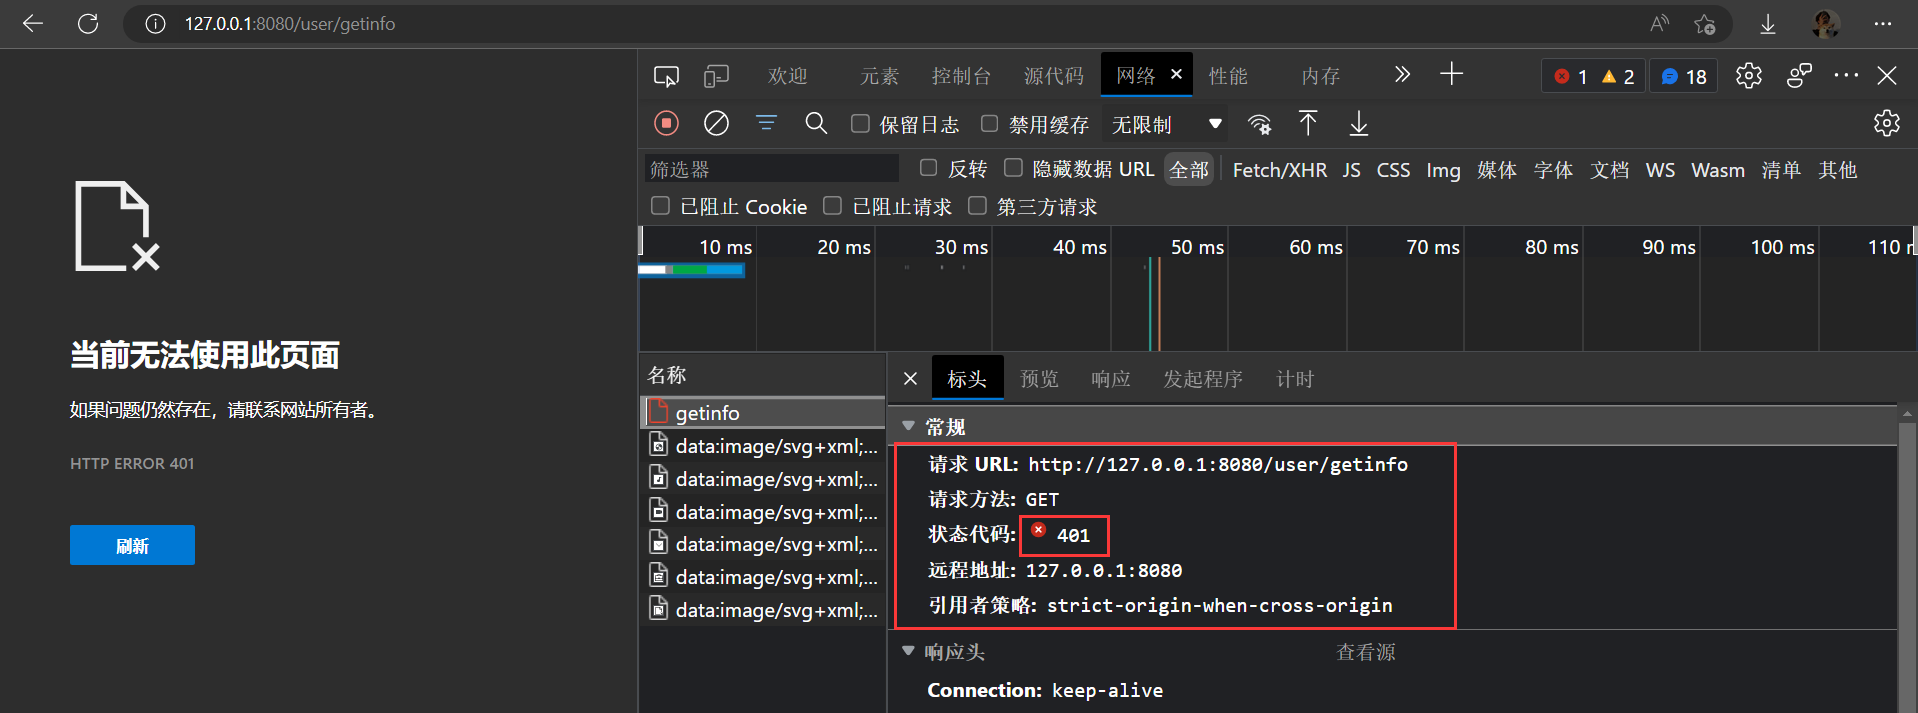
根据我们设定的拦截规则,只有执行getinfo()时才会被拦截。
执行reg方法,成功执行;
执行getinfo方法,拦截器生效:

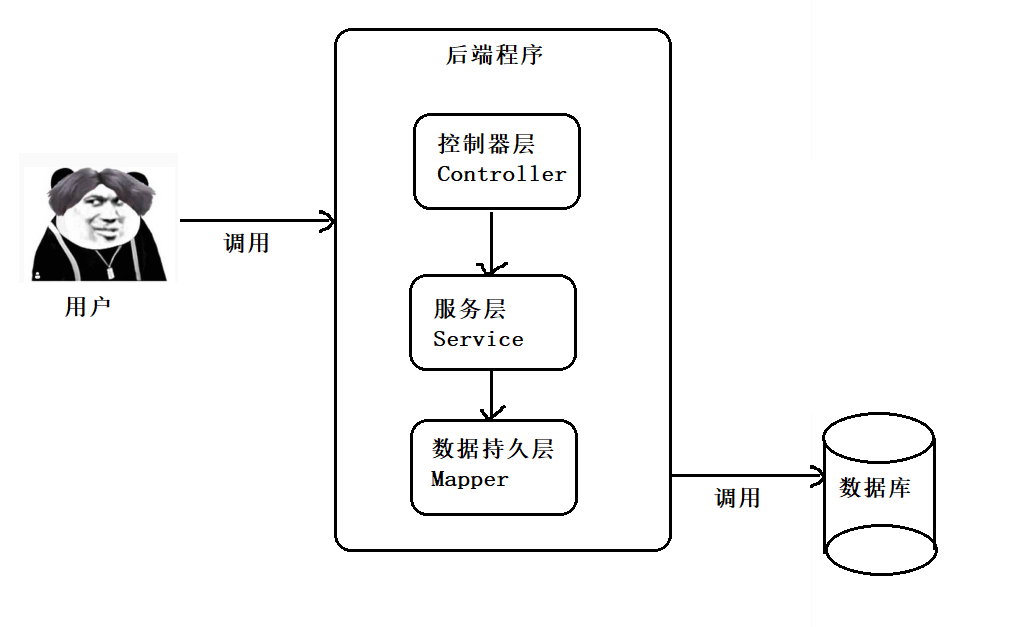
这就是拦截器的基本实现。正常情况下的调用顺序是:
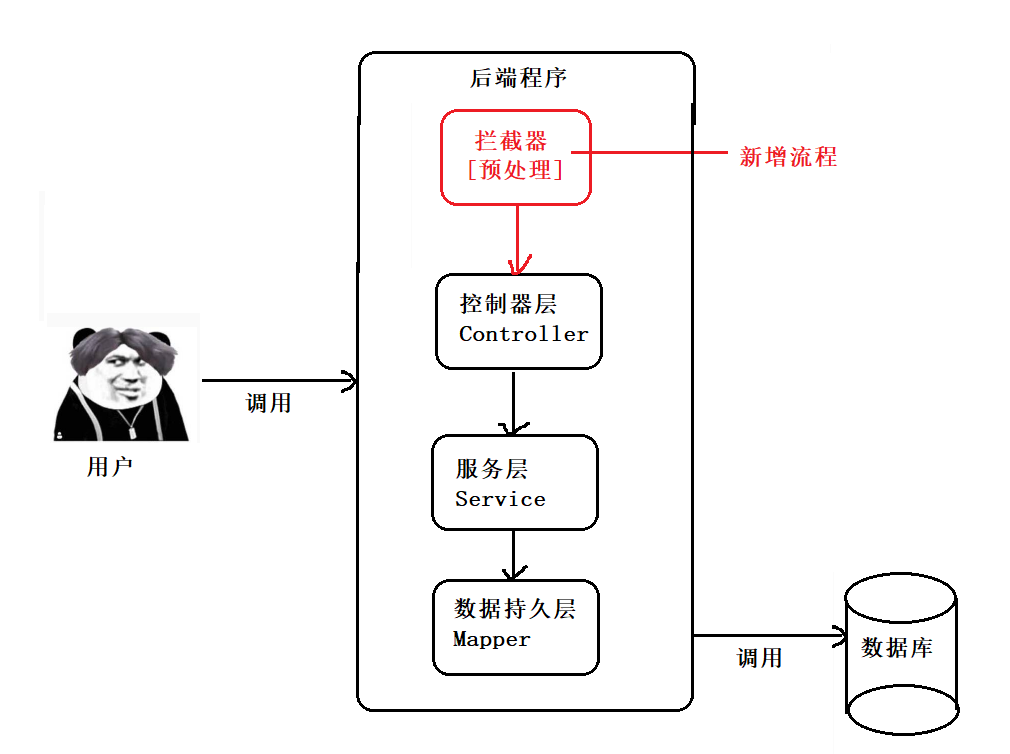
有拦截器之后,会在调用Controller之前进行相应的业务处理:
实现原理源码分析:
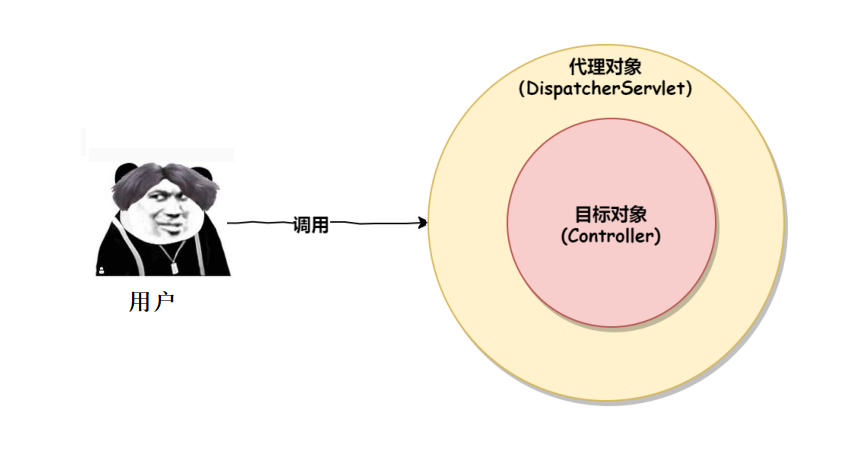
所有的 Controller 执行都会通过⼀个调度器 DispatcherServlet 来实现,这⼀点可以从 Spring Boot 控制台的打印信息看出,如下图所示:
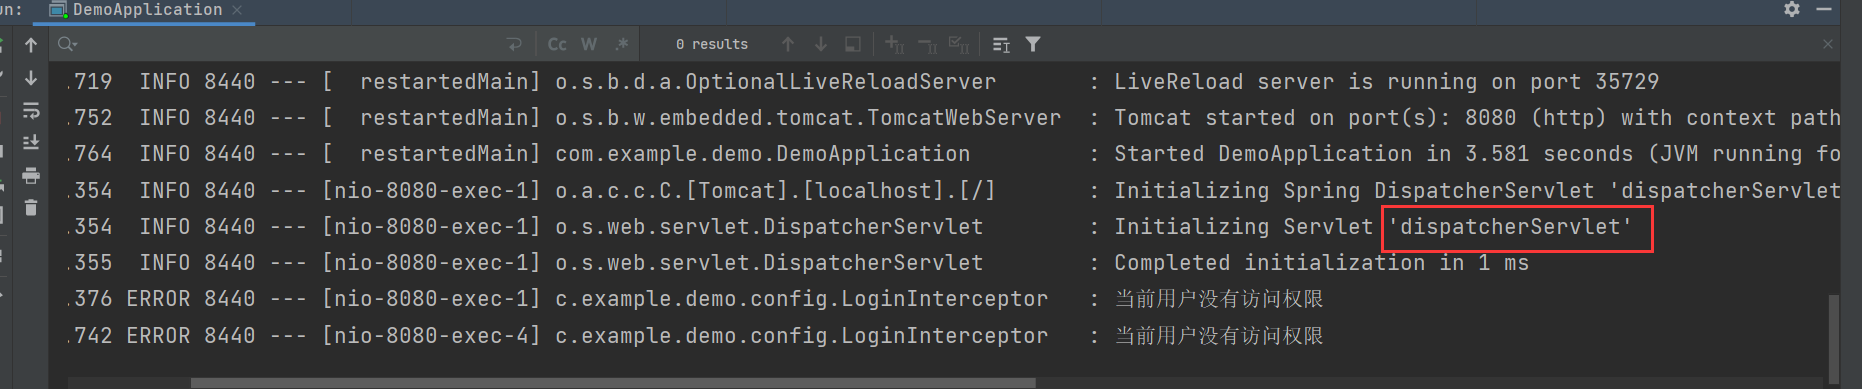
而所有方法都会执行 DispatcherServlet 中的 doDispatch 调度方法,而在doDispatch调度方法中开始执行 Controller 之前,会先调用预处理方法 applyPreHandle,在 applyPreHandle 中会获取所有的拦截器 HandlerInterceptor 并执行拦截器中的 preHandle 方法,这样就和我们前⾯定义的拦截器对应上了。
拦截器小结:
Spring 中的拦截器也是通过动态代理和环绕通知的思想实现的,调用流程如下
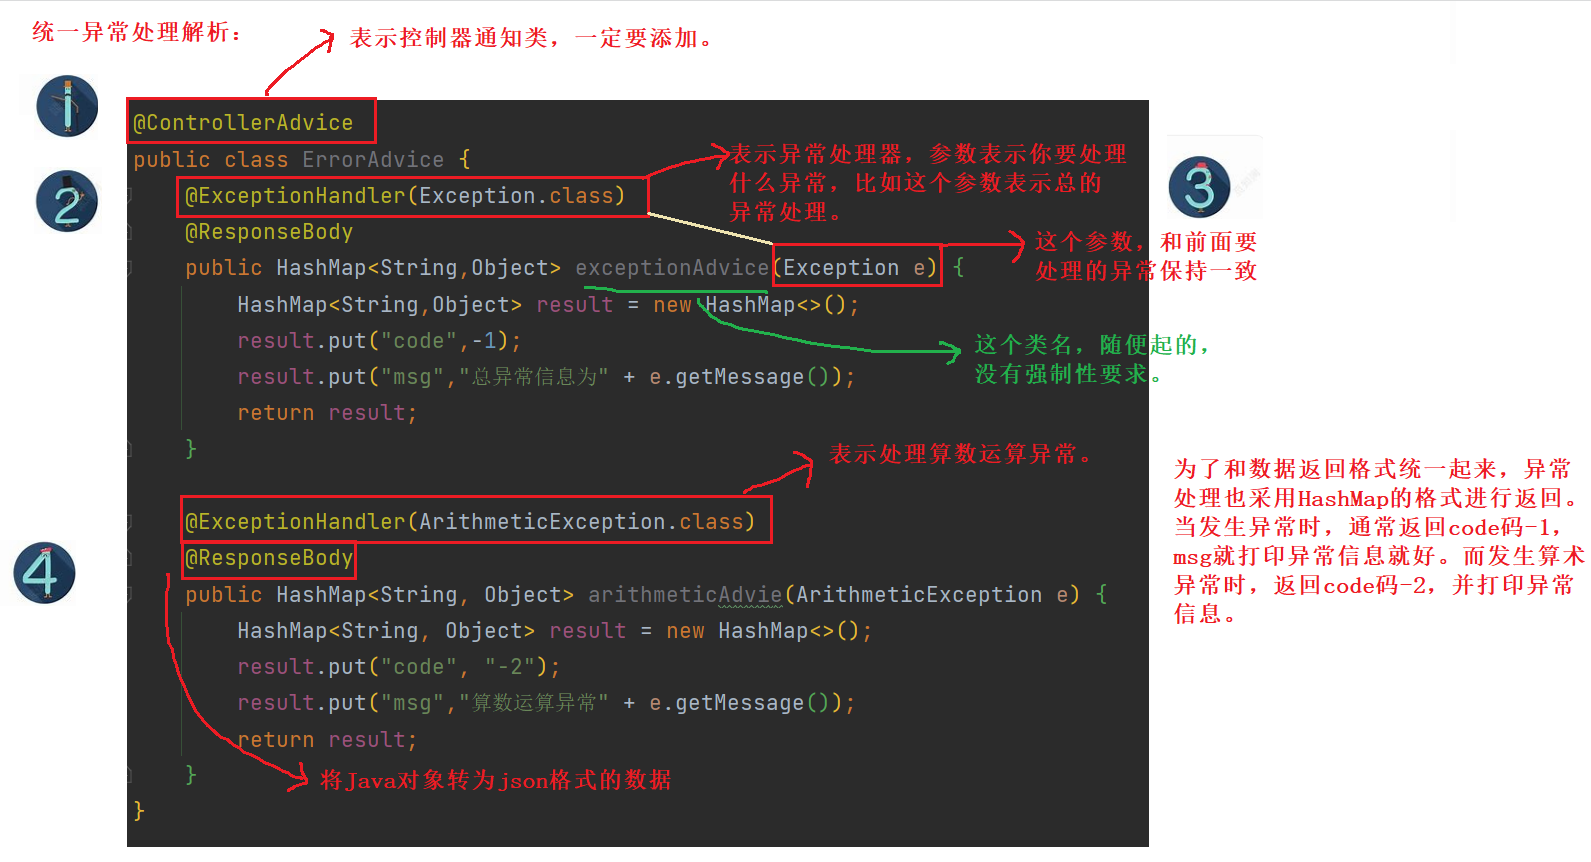
三:统一异常处理
统⼀异常处理使用的是 @ControllerAdvice + @ExceptionHandler 来实现的,@ControllerAdvice 表示控制器通知类,@ExceptionHandler 是异常处理器,两个结合表示当出现异常的时候执行某个通知,也就是执行某个方法事件,具体实现代码如下:
package com.example.demo.config;

import lombok.extern.slf4j.Slf4j;
import org.springframework.web.bind.annotation.ControllerAdvice;
import org.springframework.web.bind.annotation.ExceptionHandler;
import org.springframework.web.bind.annotation.ResponseBody;

import java.util.HashMap;

/**
 * 统一异常处理
 */
@ControllerAdvice// 控制器通知类
public class ErrorAdvice {
    @ExceptionHandler(Exception.class)
    @ResponseBody //将Java对象转为json格式的数据
    public HashMap<String,Object> exceptionAdvice(Exception e) {
        HashMap<String,Object> result = new HashMap<>();
        result.put("code",-1);
        result.put("msg","总异常信息为" + e.getMessage());
        return result;
    }

    @ExceptionHandler(ArithmeticException.class)
    @ResponseBody
    public HashMap<String, Object> arithmeticAdvie(ArithmeticException e) {
        HashMap<String, Object> result = new HashMap<>();
        result.put("code", "-2");
        result.put("msg","算数运算异常" + e.getMessage());
        return result;
    }
}
- 1
- 2
- 3
- 4
- 5
- 6
- 7
- 8
- 9
- 10
- 11
- 12
- 13
- 14
- 15
- 16
- 17
- 18
- 19
- 20
- 21
- 22
- 23
- 24
- 25
- 26
- 27
- 28
- 29
- 30
- 31
- 32
- 33
- 34
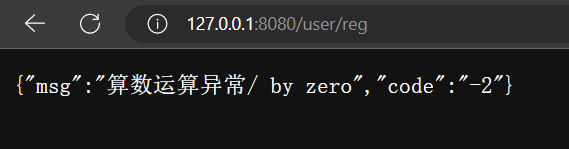
此处设计一个算术运算异常用于检验:
    @RequestMapping("reg")
    public String reg() {
        int num = 10/0;
        log.debug("执行了 reg 方法");
        return " 执行了 reg 方法";
    }
- 1
- 2
- 3
- 4
- 5
- 6
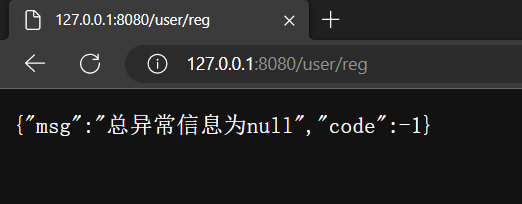
此时我做这样一件事:

将算术异常处理的代码注释掉,再次访问reg方法:
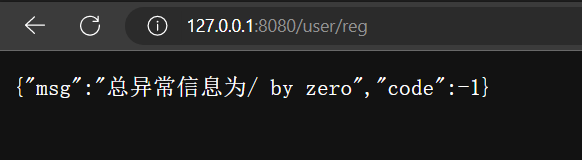
此时显示为总的异常信息。这说明,如果当前代码中添加了更加具体的异常处理,就会走这个具体的异常处理逻辑;如果没有添加,就会走总的异常处理逻辑。
再设计一个空指针异常:
    @RequestMapping("/reg")
    public String reg() {
        Object obj = null;
        System.out.println(obj.hashCode());
        log.debug("执行了 reg 方法");
        return " 执行了 reg 方法";
    }
- 1
- 2
- 3
- 4
- 5
- 6
- 7
- 8
四:统一数据返回格式
首先,为什么需要统一数据的返回格式呢?
统⼀数据返回格式的优点有很多,例如:
- 方便前端程序员更好的接收和解析后端返回的数据。
- 降低前端程序员和后端程序员的沟通成本,按照某个格式实现就行了,因为所有接口都是这样返回的。
- 有利于项⽬统⼀数据的维护和修改。
- 有利于后端技术部门的统⼀规范的标准制定,不会出现稀奇古怪的返回内容。
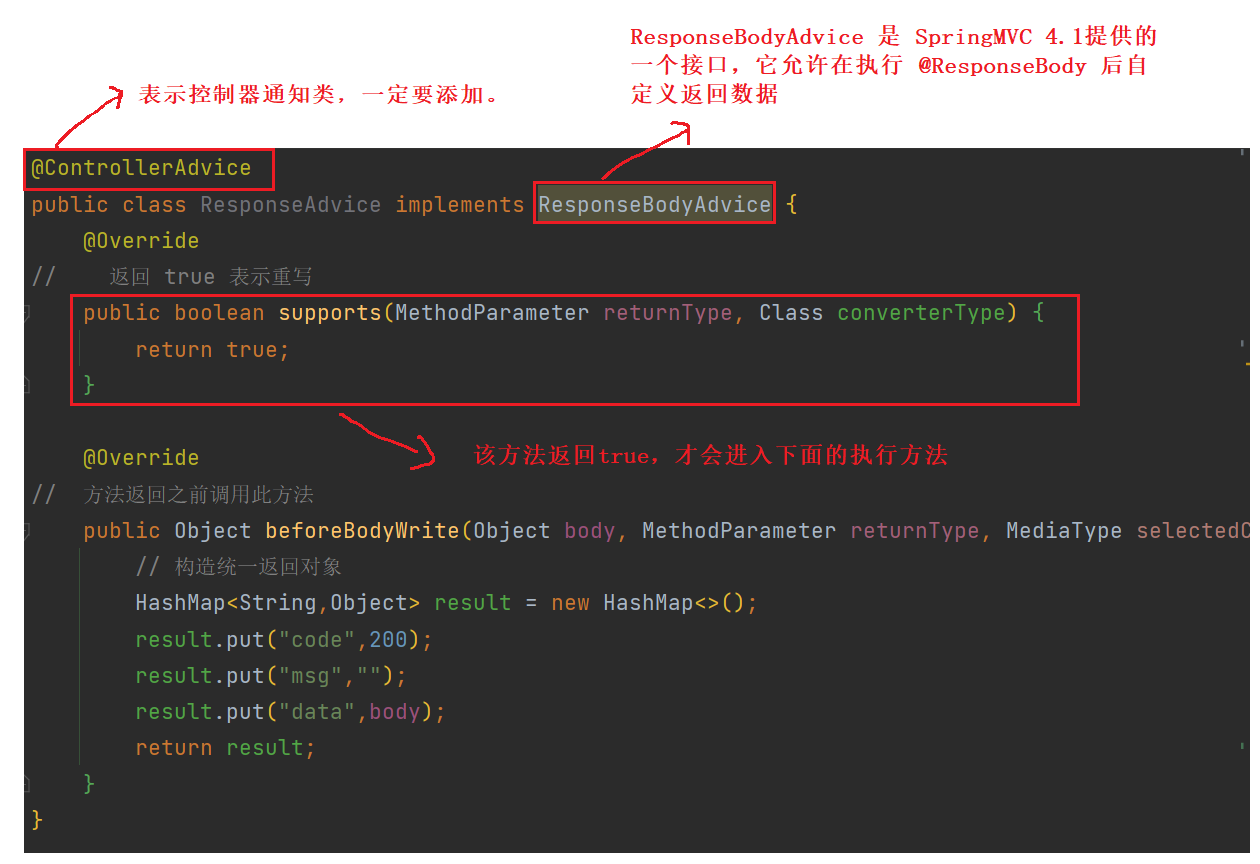
统⼀的数据返回格式可以使用 @ControllerAdvice【控制器通知器】 + ResponseBodyAdvice 的方式实现,具体实现代码如下:
package com.example.demo.config;

import org.springframework.beans.factory.parsing.ReaderEventListener;
import org.springframework.core.MethodParameter;
import org.springframework.http.MediaType;
import org.springframework.http.server.ServerHttpRequest;
import org.springframework.http.server.ServerHttpResponse;
import org.springframework.web.bind.annotation.ControllerAdvice;
import org.springframework.web.servlet.mvc.method.annotation.ResponseBodyAdvice;

import java.util.HashMap;

/**
 * 统一数据返回格式
 */
@ControllerAdvice
public class ResponseAdvice implements ResponseBodyAdvice {
    @Override
//    返回 true 表示重写
    public boolean supports(MethodParameter returnType, Class converterType) {
        return true;
    }

    @Override
//  方法返回之前调用此方法
    public Object beforeBodyWrite(Object body, MethodParameter returnType, MediaType selectedContentType, Class selectedConverterType, ServerHttpRequest request, ServerHttpResponse response) {
        // 构造统一返回对象
        HashMap<String,Object> result = new HashMap<>();
        result.put("code",200);
        result.put("msg","");
        result.put("data",body);
        return result;
    }
}
- 1
- 2
- 3
- 4
- 5
- 6
- 7
- 8
- 9
- 10
- 11
- 12
- 13
- 14
- 15
- 16
- 17
- 18
- 19
- 20
- 21
- 22
- 23
- 24
- 25
- 26
- 27
- 28
- 29
- 30
- 31
- 32
- 33
- 34
- 35
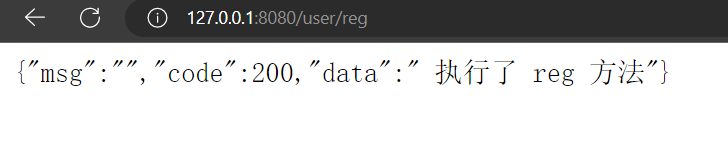
访问具体的方法:
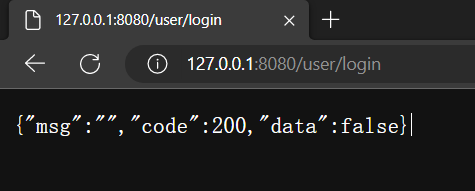
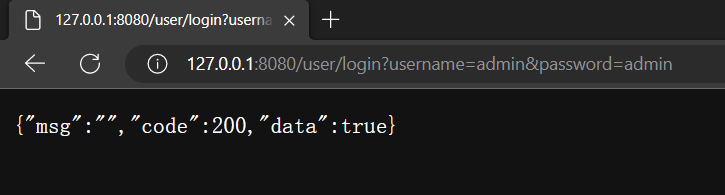
此时数据返回的格式就统一了!
但是当返回数据的格式为String时,此时出现异常了:


说明String类型的数据无法正确加载,这与转换器的加载时机有关。
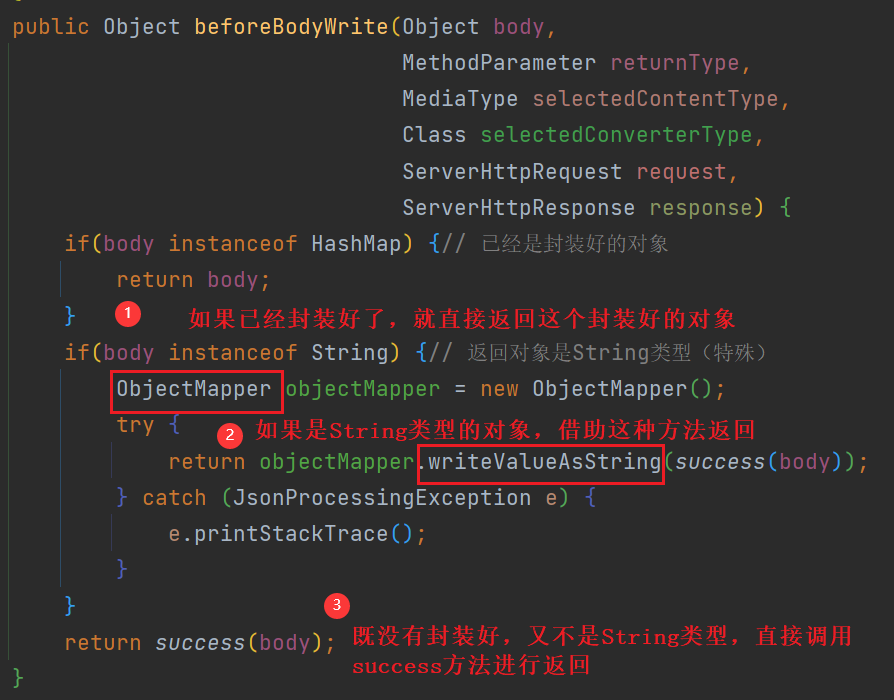
正确做法是,对String类型的对象做单独的处理:
ResponseAdvice
package com.example.demo.common;

import com.fasterxml.jackson.core.JsonProcessingException;
import com.fasterxml.jackson.databind.ObjectMapper;
import org.springframework.core.MethodParameter;
import org.springframework.http.MediaType;
import org.springframework.http.server.ServerHttpRequest;
import org.springframework.http.server.ServerHttpResponse;
import org.springframework.web.bind.annotation.ControllerAdvice;
import org.springframework.web.servlet.mvc.method.annotation.ResponseBodyAdvice;

import java.util.HashMap;

/**
 * 统一数据返回封装
 */
@ControllerAdvice
public class ResponseAdvice implements ResponseBodyAdvice {
    @Override
    public boolean supports(MethodParameter returnType, Class converterType) {
        return true;
    }

    public static HashMap<String,Object> success(Object data) {
        HashMap<String,Object> result = new HashMap<>();
        result.put("code",200);
        result.put("msg","");
        result.put("data",data);
        return result;
    }

    @Override
    public Object beforeBodyWrite(Object body,
                                  MethodParameter returnType,
                                  MediaType selectedContentType,
                                  Class selectedConverterType,
                                  ServerHttpRequest request,
                                  ServerHttpResponse response) {
        if(body instanceof HashMap) {// 已经是封装好的对象
            return body;
        }
        if(body instanceof String) {// 返回对象是String类型(特殊)
            ObjectMapper objectMapper = new ObjectMapper();
            try {
                return objectMapper.writeValueAsString(success(body));
            } catch (JsonProcessingException e) {
                e.printStackTrace();
            }
        }
        return success(body);
    }
}
- 1
- 2
- 3
- 4
- 5
- 6
- 7
- 8
- 9
- 10
- 11
- 12
- 13
- 14
- 15
- 16
- 17
- 18
- 19
- 20
- 21
- 22
- 23
- 24
- 25
- 26
- 27
- 28
- 29
- 30
- 31
- 32
- 33
- 34
- 35
- 36
- 37
- 38
- 39
- 40
- 41
- 42
- 43
- 44
- 45
- 46
- 47
- 48
- 49
- 50
- 51
- 52
- 53
- 54
注意,在自定义拦截器时,我们添加了@Configuration注解;在进行统一异常处理和统一数据格式返回时,我们添加了@ControllerAdvice注解。只有添加了这些注解,Spring项目才能在执行到相应的逻辑时感知到统一格式处理逻辑的存在,进而触发下面的代码。说白了,要想实现SpringBoot统一功能的处理,就要遵循官方的书写规范。
本节内容到此结束!

- 一.单条:通过主键id,直接对修改字段进行操作即可,不用再附带已有值和修改字段一起修改。publicvoidupdateInfo(){Stringid="344364895434851641";OrderDetailEntityod=ord... [详细]
赞
踩
- SpringBoot2.x集成Elasticsearch多字段高亮显示1.主要依赖
org.springframework.boot spring-boot-sta... [详细] 赞
踩
- ElasticSearchConfig配置。根据es内部id批量查询数据。EsConfig配置。_springbootes7.10.2根据id更新指定字段springbootes7.10.2根据id更新指定字段pom.xml配置<de... [详细]
赞
踩
- 注:文章皆为个人纪录,可用性请以最终结果为准,若有错还请大佬们指出,谢谢!此文章重在springboot中对6.3.2版本Es的各种操作,简单易学,暂不做基础概念梳理。每个操作都已测试,请放心食用~~步骤一:引入相关依赖注:此处引入elas... [详细]
赞
踩
- 使用高级客户端pom.xmlspringboot读取elasticsearch:host:Springboot操作elasticsearch一、es6.8版本使用高级客户端pom.xml <!--ES客户端--><dep... [详细]
赞
踩
- 升级到Junit5之后,除了增加Java8的很多特性,做了很多功能增强,在结构上做了优化调整,拆分了很多不同的模块,可以按需引入,比如:JUnitPlatform-在JVM上启动测试框架 JUnitJupiter-在JUnit5中编写测试和... [详细]
赞
踩
- springboot注解@Scopespringboot使用工厂+反射创建bean示例,创建的bean实例默认为单例,可通过注解@Scope("prototype")使得每次调用对象的时候生成一个新的对象******************... [详细]
赞
踩
- springboot操作es之elasticsearch-rest-high-level-client_elasticsearch-rest-high-level-clientelasticsearch-rest-high-level-cl... [详细]
赞
踩
- GraalVM本机镜像提供了一种部署和运行Java应用程序的新方法。与Java虚拟机相比,本机镜像可以使用更小的内存占用和更快的启动时间来运行。它们非常适合使用容器镜像部署的应用程序。与为JVM编写的传统应用程序不同,GraalVMNati... [详细]
赞
踩
- GraalVMNativeImage是GraalVM提供的一种能够将SpringBoot程序打包成云原生可执行文件的技术,并且比JVM占用更少的内存和更快的启动速度,非常适合使用容器部署和在Faas平台使用。与在JVM运行的应用程序不同,G... [详细]
赞
踩
- 最近项目用到elasticsearch,结合官方提供的RestHighLevelClient使用,这里记录下项目整合实践的过程,包括创建索引、增删改、搜索以及批量操作等。首先,简单的介绍下:elasticsearch是一个实时的分布式搜索引... [详细]
赞
踩
- Spring团队一直致力于Spring应用程序的原生映像支持已有一段时间了。经过3+年的孵化春季原生SpringBoot2的实验性项目,原生支持将在SpringFramework6和SpringBoot3中正式发布!_graalvmspri... [详细]
赞
踩
- 点击上方[全栈开发者社区]→右上角[...]→[设为星标⭐]一、ElasticSearch简介1、简介ElasticSearch是一个基于Lucene的搜索服务器。它提供了一个分..._springboot集成es8实现增删改查spring... [详细]
赞
踩
- 在这个Spring(SpringBoot3.0)教程中,我们通过示例学习了如何创建和使用声明式HTTP客户端接口。SpringBoot3.0王炸版本带来了很多新特性,值得我们深入学习,推荐给大家哔站上讲解细致且全面的springboot3教... [详细]
赞
踩
- 由于SpringBoot3.0,SpringBoot2.7~2.4和2.4以下版本之间变化较大,目前企业级客户老项目相关SpringBoot版本仍停留在SpringBoot2.4以下,为了同时满足存量用户和新用户不同需求,社区以Spring... [详细]
赞
踩
- java操作elasticsearch是作为一个无数据节点与其他节点之间通信,端口是9300.elasticsearch和jdk版本一定要适配,因为elasticsearch是用java编写的,随着版本的升级,用的也是最新版的jdk,所以低... [详细]
赞
踩
- 1、springboot核心依赖最新版本:SpringBoot2.3.3SpringCloudHoxton.SR8SpringCloudAlibaba2.2.2MybatisPlus3.4.0Element2.3.122、更新auth认证时... [详细]
赞
踩
- Spring官方于2022年1月20日发布SpringBoot3.0.0-M1版本,预示开启了SpringBoot3.0的里程碑,相信这是通往下一代Spring框架的激动人心的旅程。接下来一起来看看SpringBoot3.0.0-M1版本都... [详细]
赞
踩
- 我们做一个类似于updatestusetsign='abc',age=33,money=99.8wheredocId='1004'的操作@TestpublicvoidupdateStuDoc(){Map
赞
踩
- pojoimportorg.springframework.data.elasticsearch.annotations.Document;importorg.springframework.data.elasticsearch.annot... [详细]
赞
踩

