- 1《伸手系列》之基于springboot的动态数据源启动器_com.baomidou:dynamic-datasource-spring-boot-starte
- 2Java实现License许可证控制(详细过程)_java license
- 3python安装pyqt5豆瓣_python3安装PyQt5
- 4三个著名加密算法(MD5、RSA、DES)的解析二_vⅰ0des
- 5ai降重有没有用 快码论文_ai降重工作
- 6v-for中key属性的作用_vue循环的key作用
- 7启动hadoop集群时报错ERROR: Attempting to operate on hdfs namenode as root_error: attempting to operate on hdfs secondaryname
- 8nginx accept() failed (24: Too many open files)
- 9three中界面交互gui.js库的使用_threejs gui
- 10在IDEA中使用Git_idea没有vcs只有git
SpringBoot——动态数据源(多数据源自动切换)
赞
踩
前言
日常的业务开发项目中只会配置一套数据源,如果需要获取其他系统的数据往往是通过调用接口, 或者是通过第三方工具比如kettle将数据同步到自己的数据库中进行访问。
但是也会有需要在项目中引用多数据源的场景。比如如下场景:
- 自研数据迁移系统,至少需要新、老两套数据源,从老库读取数据写入新库
- 自研读写分离中间件,系统流量增加,单库响应效率降低,引入读写分离方案,写入数据是一个数据源,读取数据是另一个数据源
某系统除了需要从自己的主要数据库上读取和管理数据外,还有一部分业务涉及到其他多个数据库,要求可以在任何方法上可以灵活指定具体要操作的数据库。
为了在开发中以最简单的方法使用,本文基于注解和AOP的方法实现,在spring boot框架的项目中,添加本文实现的代码类后,只需要配置好数据源就可以直接通过注解使用,简单方便。
一、原理
关键类说明
忽略掉controller/service/entity/mapper/xml介绍。
- jdbc.properties: 数据源配置文件。虽然可以配置到Spring boot的默认配置文件application.properties/application.yml文件当中,但是如果数据源比较多的话,根据实际使用,最佳的配置方式还是独立配置比较好。
- DynamicDataSourceConfig:数据源配置类
- DynamicDataSource:动态数据源配置类
- DataSourceRouting:动态数据源注解
- DynamicDataSourceAspect:动态数据源设置切面
- DynamicDataSourceContextHolder:当前线程持有的数据源key
- DataSourceConstants:数据源key常量类
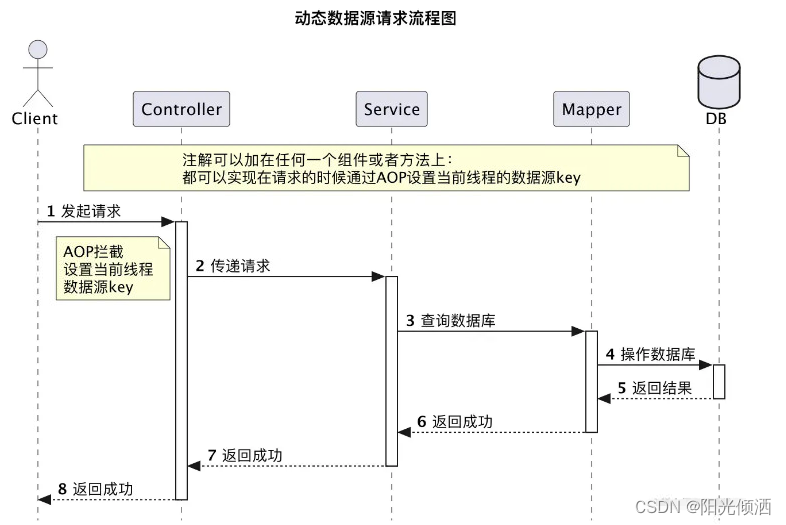
开发流程

动态数据源流程
Spring Boot 的动态数据源,本质上是把多个数据源存储在一个 Map 中,当需要使用某个数据源时,从 Map 中获取此数据源进行处理。

在 Spring 中已提供了抽象类 AbstractRoutingDataSource 来实现此功能,继承AbstractRoutingDataSource类并覆写其determineCurrentLookupKey()方法即可,该方法只需要返回数据源key即可,也就是存放数据源的Map的key。
因此,我们在实现动态数据源的,只需要继承它,实现自己的获取数据源逻辑即可。AbstractRoutingDataSource顶级继承了DataSource,所以它也是可以做为数据源对象,因此项目中使用它作为主数据源。

AbstractRoutingDataSource原理
AbstractRoutingDataSource中有一个重要的属性:

- argetDataSources:目标数据源,即项目启动的时候设置的需要通过AbstractRoutingDataSource管理的数据源。
- defaultTargetDataSource:默认数据源,项目启动的时候设置的默认数据源,如果没有指定数据源,默认返回改数据源。
- resolvedDataSources:也是存放的数据源,是对targetDataSources进行处理后进行存储的。可以看一下源码。

- resolvedDefaultDataSource: 对默认数据源进行了二次处理,源码如上图最后的两行代码。
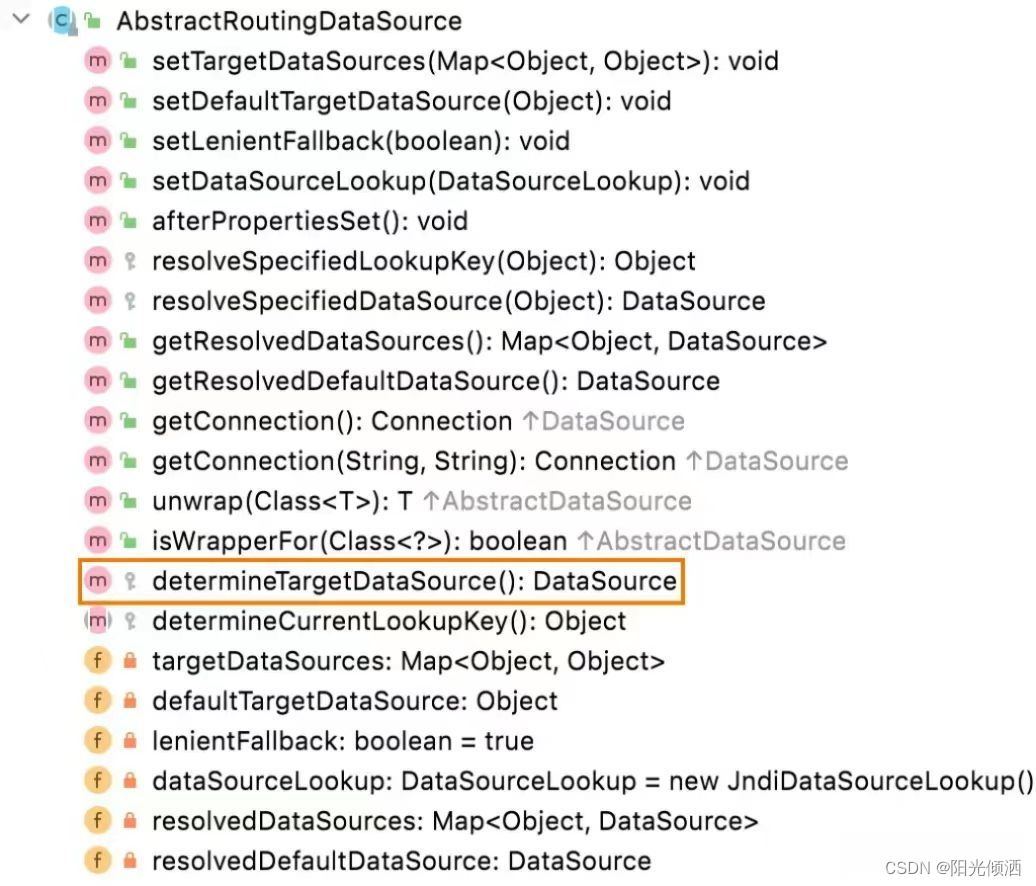
AbstractRoutingDataSource中所有的方法和属性:

比较重要的是determineTargetDataSource方法。
- protected DataSource determineTargetDataSource() {
- Assert.notNull(this.resolvedDataSources, "DataSource router not initialized");
- Object lookupKey = determineCurrentLookupKey();
- DataSource dataSource = this.resolvedDataSources.get(lookupKey);
- if (dataSource == null && (this.lenientFallback || lookupKey == null)) {
- dataSource = this.resolvedDefaultDataSource;
- }
- if (dataSource == null) {
- throw new IllegalStateException("Cannot determine target DataSource for lookup key [" + lookupKey + "]");
- }
- return dataSource;
- }
-
- /**
- * Determine the current lookup key. This will typically be
- * implemented to check a thread-bound transaction context.
- * <p>Allows for arbitrary keys. The returned key needs
- * to match the stored lookup key type, as resolved by the
- * {@link #resolveSpecifiedLookupKey} method.
- */
- @Nullable
- protected abstract Object determineCurrentLookupKey();

这个方法主要就是返回一个DataSource对象,主要逻辑就是先通过方法determineCurrentLookupKey获取一个Object对象的lookupKey,然后通过这个lookupKey到resolvedDataSources中获取数据源(resolvedDataSources就是一个Map,上面已经提到过了);如果没有找到数据源,就返回默认的数据源。determineCurrentLookupKey就是程序员配置动态数据源需要自己实现的方法。
二、实现
引入Maven依赖
- <parent>
- <groupId>org.springframework.boot</groupId>
- <artifactId>spring-boot-starter-parent</artifactId>
- <version>2.1.10.RELEASE</version>
- <relativePath/> <!-- lookup parent from repository -->
- </parent>
-
- <properties>
- <project.build.sourceEncoding>UTF-8</project.build.sourceEncoding>
- <project.reporting.outputEncoding>UTF-8</project.reporting.outputEncoding>
- <java.version>1.8</java.version>
- </properties>
-
- <dependencies>
- <dependency>
- <groupId>org.springframework.boot</groupId>
- <artifactId>spring-boot-starter-web</artifactId>
- </dependency>
-
- <!--如果要用传统的xml或properties配置,则需要添加此依赖-->
- <dependency>
- <groupId>org.springframework.boot</groupId>
- <artifactId>spring-boot-configuration-processor</artifactId>
- </dependency>
-
- <dependency>
- <groupId>tk.mybatis</groupId>
- <artifactId>mapper-spring-boot-starter</artifactId>
- <version>2.1.5</version>
- </dependency>
-
- <dependency>
- <groupId>mysql</groupId>
- <artifactId>mysql-connector-java</artifactId>
- <scope>runtime</scope>
- </dependency>
-
- <dependency>
- <groupId>org.springframework.boot</groupId>
- <artifactId>spring-boot-starter-jdbc</artifactId>
- </dependency>
-
- <dependency>
- <groupId>org.springframework.boot</groupId>
- <artifactId>spring-boot-starter-aop</artifactId>
- </dependency>
-
- <!-- swagger -->
- <dependency>
- <groupId>io.springfox</groupId>
- <artifactId>springfox-swagger-ui</artifactId>
- <version>2.9.2</version>
- </dependency>
-
- <dependency>
- <groupId>io.springfox</groupId>
- <artifactId>springfox-swagger2</artifactId>
- <version>2.9.2</version>
- </dependency>
-
- <!-- spring security -->
- <dependency>
- <groupId>org.springframework.boot</groupId>
- <artifactId>spring-boot-starter-security</artifactId>
- </dependency>
- <!-- jwt -->
- <dependency>
- <groupId>io.jsonwebtoken</groupId>
- <artifactId>jjwt</artifactId>
- <version>0.9.1</version>
- </dependency>
- <!-- fastjson -->
- <dependency>
- <groupId>com.alibaba</groupId>
- <artifactId>fastjson</artifactId>
- <version>1.2.70</version>
- </dependency>
-
-
- <dependency>
- <groupId>org.projectlombok</groupId>
- <artifactId>lombok</artifactId>
- <optional>true</optional>
- </dependency>
- </dependencies>
-
- <build>
- <plugins>
- <plugin>
- <groupId>org.springframework.boot</groupId>
- <artifactId>spring-boot-maven-plugin</artifactId>
- </plugin>
-
- <plugin>
- <groupId>org.mybatis.generator</groupId>
- <artifactId>mybatis-generator-maven-plugin</artifactId>
- <version>1.3.6</version>
- <configuration>
- <configurationFile>
- ${basedir}/src/main/resources/generator/generatorConfig.xml
- </configurationFile>
- <overwrite>true</overwrite>
- <verbose>true</verbose>
- </configuration>
- <dependencies>
- <dependency>
- <groupId>mysql</groupId>
- <artifactId>mysql-connector-java</artifactId>
- <version>5.1.41</version>
- </dependency>
- <dependency>
- <groupId>tk.mybatis</groupId>
- <artifactId>mapper</artifactId>
- <version>4.1.5</version>
- </dependency>
- </dependencies>
- </plugin>
- </plugins>
- </build>

主要实现步骤:一配置二使用
- 启动类注册动态数据源
- 配置文件中配置多个数据源
- 在需要的方法上使用注解指定数据源
-
1、在启动类添加 @Import({DynamicDataSourceRegister.class, MProxyTransactionManagementConfiguration.class})
- // 注册动态多数据源
- @Import({DynamicDataSourceRegister.class})
- @MapperScan("com.yibo.mapper")//扫描Mapper接口
- @SpringBootApplication
- public class Application {
-
- public static void main(String[] args) {
- SpringApplication.run(Application.class,args);
- }
- }
- 2、配置文件配置内容为:
- # 默认数据源
- spring.datasource.url=jdbc:mysql://localhost:3306/user_center?useUnicode=true&useJDBCCompliantTimezoneShift=true&useLegacyDatetimeCode=false&serverTimezone=UTC
- spring.datasource.hikari.driver-class-name=com.mysql.cj.jdbc.Driver
- spring.datasource.hikari.username=root
- spring.datasource.hikari.password=yibo
-
- # 更多数据源
- custom.datasource.names=ds1,ds2
- custom.datasource.ds1.driver-class-name=com.mysql.cj.jdbc.Driver
- custom.datasource.ds1.url=jdbc:mysql://localhost:3306/content_center?useUnicode=true&useJDBCCompliantTimezoneShift=true&useLegacyDatetimeCode=false&serverTimezone=UTC
- custom.datasource.ds1.username=root
- custom.datasource.ds1.password=yibo
- custom.datasource.ds2.driver-class-name=com.mysql.cj.jdbc.Driver
- custom.datasource.ds2.url=jdbc:mysql://localhost:3306/trade?useUnicode=true&useJDBCCompliantTimezoneShift=true&useLegacyDatetimeCode=false&serverTimezone=UTC
- custom.datasource.ds2.username=root
- custom.datasource.ds2.password=yibo
-
- mybatis.type-aliases-package: com.yibo.center.domain.entity
- mybatis.mapper-locations: classpath:mapper/*.xml
- mapper.identity: MYSQL
- mapper.not-empty: false
-
- #是否激活 swagger true or false
- swagger.enable=true

- 3、使用方法
- import com.yibo.center.domain.entity.Share;
- import com.yibo.datasource.anno.TargetDataSource;
- import com.yibo.mapper.ShareMapper;
- import org.springframework.beans.factory.annotation.Autowired;
- import org.springframework.stereotype.Service;
- import org.springframework.transaction.annotation.Transactional;
-
- import java.util.List;
-
-
-
- @Service
- public class ShareService {
-
- @Autowired
- private ShareMapper shareMapper;
-
- @TargetDataSource(name = "ds1")
- @Transactional
- public List<Share> findAll(){
- return shareMapper.selectAll();
- }
- }

- import com.yibo.center.domain.entity.TradeGoods;
- import com.yibo.center.domain.vo.TradeGoodsAO;
- import com.yibo.datasource.anno.TargetDataSource;
- import com.yibo.mapper.TradeGoodsMapper;
- import org.springframework.beans.BeanUtils;
- import org.springframework.beans.factory.annotation.Autowired;
- import org.springframework.stereotype.Service;
- import org.springframework.transaction.annotation.Transactional;
-
- import java.util.Date;
- import java.util.List;
-
- /**
- * @Description:
- */
-
- @Service
- public class TradeGoodsService {
-
- @Autowired
- private TradeGoodsMapper tradeGoodsMapper;
-
- @TargetDataSource(name = "ds2")
- @Transactional
- public List<TradeGoods> findAll(){
- return tradeGoodsMapper.selectAll();
- }
-
- @TargetDataSource(name = "ds2")
- @Transactional
- public String addTradeGoods(TradeGoodsAO tradeGoodsAO){
- TradeGoods tradeGoods = new TradeGoods();
- BeanUtils.copyProperties(tradeGoodsAO,tradeGoods);
- tradeGoods.setAddTime(new Date());
- tradeGoodsMapper.insert(tradeGoods);
- return "SUCCESS";
- }
- }

- import com.yibo.center.domain.entity.User;
- import com.yibo.center.domain.vo.UserAo;
- import com.yibo.mapper.UserMapper;
- import org.springframework.beans.BeanUtils;
- import org.springframework.beans.factory.annotation.Autowired;
- import org.springframework.stereotype.Service;
- import org.springframework.transaction.annotation.Transactional;
-
- import java.util.Date;
- import java.util.List;
-
- /**
- * @Description:
- */
-
- @Service
- public class UserService {
-
- @Autowired
- private UserMapper userMapper;
-
- public List<User> findAll(){
- return userMapper.selectAll();
- }
-
- @Transactional
- public User findById(Integer id){
- User user = new User();
- user.setId(id);
- return userMapper.selectOne(user);
- }
-
- @Transactional
- public String addUser(UserAo userAo){
- User user = new User();
- BeanUtils.copyProperties(userAo,user);
- user.setCreateTime(new Date());
- user.setUpdateTime(new Date());
- userMapper.insert(user);
- return "SUCCESS";
- }
- }

要注意的是,在使用MyBatis时,注解@TargetDataSource 不能直接在接口类Mapper上使用。
请将下面几个类放到Spring Boot项目中。
- DynamicDataSource.java
- DynamicDataSourceAspect.java
- DynamicDataSourceContextHolder.java
- DynamicDataSourceRegister.java
- TargetDataSource.java
- import org.springframework.jdbc.datasource.lookup.AbstractRoutingDataSource;
-
- /**
- * @Description: 继承Spring AbstractRoutingDataSource实现路由切换
- */
- public class DynamicDataSource extends AbstractRoutingDataSource {
-
- @Override
- protected Object determineCurrentLookupKey() {
- return DynamicDataSourceContextHolder.getDataSourceType();
- }
- }
- import com.yibo.datasource.DynamicDataSourceContextHolder;
- import com.yibo.datasource.anno.TargetDataSource;
- import lombok.extern.slf4j.Slf4j;
- import org.aspectj.lang.JoinPoint;
- import org.aspectj.lang.annotation.After;
- import org.aspectj.lang.annotation.Aspect;
- import org.aspectj.lang.annotation.Before;
- import org.springframework.core.annotation.Order;
- import org.springframework.stereotype.Component;
-
- /**
- * @Description: 动态数据源通知
- */
- @Aspect
- //保证该AOP在@Transactional之前执行
- @Order(-1)
- @Component
- @Slf4j
- public class DynamicDataSourceAspect {
-
- /**
- * @Description 在方法执行之前执行 @annotation(ds) 会拦截有ds这个注解的方法即有 TargetDataSource这个注解的
- * @param @param point
- * @param @param ds
- * @param @throws Throwable 参数
- * @return void 返回类型
- * @throws
- */
- @Before("@annotation(ds)")
- public void changeDataSource(JoinPoint point, TargetDataSource ds)
- throws Throwable {
- String dsId = ds.name();
- if (!DynamicDataSourceContextHolder.containsDataSource(dsId)) {
- log.error("数据源[{}]不存在,使用默认数据源 > {}", ds.name(), point.getSignature());
- }
- else {
- log.debug("Use DataSource : {} > {}", ds.name(),point.getSignature());
- DynamicDataSourceContextHolder.setDataSourceType(ds.name());
- }
- }
-
- /**
- * @Description 在方法执行之后执行 @annotation(ds) 会拦截有ds这个注解的方法即有 TargetDataSource这个注解的
- * @param @param point
- * @param @param ds 参数
- * @return void 返回类型
- * @throws
- */
- @After("@annotation(ds)")
- public void restoreDataSource(JoinPoint point, TargetDataSource ds) {
- log.debug("Revert DataSource : {} > {}", ds.name(), point.getSignature());
- DynamicDataSourceContextHolder.clearDataSourceType();
- }
- }

- import java.util.ArrayList;
- import java.util.List;
-
- /**
- * @Description: 动态数据源上下文管理
- */
-
- public class DynamicDataSourceContextHolder {
-
- //存放当前线程使用的数据源类型信息
- private static final ThreadLocal<String> contextHolder = new ThreadLocal<String>();
-
- //存放数据源id
- public static List<String> dataSourceIds = new ArrayList<String>();
-
- //设置数据源
- public static void setDataSourceType(String dataSourceType) {
- contextHolder.set(dataSourceType);
- }
-
- //获取数据源
- public static String getDataSourceType() {
- return contextHolder.get();
- }
-
- //清除数据源
- public static void clearDataSourceType() {
- contextHolder.remove();
- }
-
- /**
- * 判断指定DataSrouce当前是否存在
- *
- * @param dataSourceId
- * @return
- */
- public static boolean containsDataSource(String dataSourceId){
- return dataSourceIds.contains(dataSourceId);
- }
- }

- import lombok.extern.slf4j.Slf4j;
- import org.springframework.beans.MutablePropertyValues;
- import org.springframework.beans.factory.support.BeanDefinitionRegistry;
- import org.springframework.beans.factory.support.GenericBeanDefinition;
- import org.springframework.boot.jdbc.DataSourceBuilder;
- import org.springframework.context.EnvironmentAware;
- import org.springframework.context.annotation.ImportBeanDefinitionRegistrar;
- import org.springframework.core.env.Environment;
- import org.springframework.core.type.AnnotationMetadata;
-
- import javax.sql.DataSource;
- import java.util.HashMap;
- import java.util.Map;
-
- /**
- * @Description: 注册动态数据源
- * 初始化数据源和提供了执行动态切换数据源的工具类
- * EnvironmentAware(获取配置文件配置的属性值)
- */
- @Slf4j
- public class DynamicDataSourceRegister implements ImportBeanDefinitionRegistrar, EnvironmentAware {
-
- //指定默认数据源(springboot2.0默认数据源是hikari如何想使用其他数据源可以自己配置)
- private static final String DATASOURCE_TYPE_DEFAULT = "com.zaxxer.hikari.HikariDataSource";
-
- //默认数据源
- private DataSource defaultDataSource;
-
- //用户自定义数据源
- private Map<String, DataSource> customDataSources = new HashMap<>();
-
- /**
- * 加载多数据源配置
- * @param env
- */
- @Override
- public void setEnvironment(Environment env) {
- initDefaultDataSource(env);
- initCustomDataSources(env);
- }
-
-
-
- /**
- * 初始化主数据源
- * @param env
- */
- private void initDefaultDataSource(Environment env) {
- // 读取主数据源
- Map<String, Object> dsMap = new HashMap<>();
- dsMap.put("driver", env.getProperty("spring.datasource.hikari.driver-class-name"));
- dsMap.put("url", env.getProperty("spring.datasource.url"));
- dsMap.put("username", env.getProperty("spring.datasource.hikari.username"));
- dsMap.put("password", env.getProperty("spring.datasource.hikari.password"));
- defaultDataSource = buildDataSource(dsMap);
- }
-
-
- /**
- * 初始化更多数据源
- * @param env
- */
- private void initCustomDataSources(Environment env) {
- // 读取配置文件获取更多数据源
- String dsPrefixs = env.getProperty("custom.datasource.names");
- for (String dsPrefix : dsPrefixs.split(",")) {
- // 多个数据源
- Map<String, Object> dsMap = new HashMap<>();
- dsMap.put("driver", env.getProperty("custom.datasource." + dsPrefix + ".driver-class-name"));
- dsMap.put("url", env.getProperty("custom.datasource." + dsPrefix + ".url"));
- dsMap.put("username", env.getProperty("custom.datasource." + dsPrefix + ".username"));
- dsMap.put("password", env.getProperty("custom.datasource." + dsPrefix + ".password"));
- DataSource ds = buildDataSource(dsMap);
- customDataSources.put(dsPrefix, ds);
- }
- }
-
- @Override
- public void registerBeanDefinitions(AnnotationMetadata importingClassMetadata, BeanDefinitionRegistry registry) {
- Map<Object, Object> targetDataSources = new HashMap<Object, Object>();
- // 将主数据源添加到更多数据源中
- targetDataSources.put("dataSource", defaultDataSource);
- DynamicDataSourceContextHolder.dataSourceIds.add("dataSource");
- // 添加更多数据源
- targetDataSources.putAll(customDataSources);
- for (String key : customDataSources.keySet()) {
- DynamicDataSourceContextHolder.dataSourceIds.add(key);
- }
-
- // 创建DynamicDataSource
- GenericBeanDefinition beanDefinition = new GenericBeanDefinition();
- beanDefinition.setBeanClass(DynamicDataSource.class);
- beanDefinition.setSynthetic(true);
- MutablePropertyValues mpv = beanDefinition.getPropertyValues();
- mpv.addPropertyValue("defaultTargetDataSource", defaultDataSource);
- mpv.addPropertyValue("targetDataSources", targetDataSources);
- registry.registerBeanDefinition("dataSource", beanDefinition); // 注册到Spring容器中
-
- log.info("Dynamic DataSource Registry");
- }
-
- /**
- * 创建DataSource
- * @param dsMap
- * @return
- */
- @SuppressWarnings("unchecked")
- public DataSource buildDataSource(Map<String, Object> dsMap) {
- try {
- Object type = dsMap.get("type");
- if (type == null)
- type = DATASOURCE_TYPE_DEFAULT;// 默认DataSource
-
- Class<? extends DataSource> dataSourceType;
- dataSourceType = (Class<? extends DataSource>)Class.forName((String)type);
- log.info("dsMap:{}",dsMap);
- System.out.println(dsMap);
- String driverClassName = dsMap.get("driver").toString();
- String url = dsMap.get("url").toString();
- String username = dsMap.get("username").toString();
- String password = dsMap.get("password").toString();
- // 自定义DataSource配置
- DataSourceBuilder factory = DataSourceBuilder.create()
- .driverClassName(driverClassName)
- .url(url)
- .username(username)
- .password(password)
- .type(dataSourceType);
- return factory.build();
- }catch (ClassNotFoundException e) {
- e.printStackTrace();
- }
- return null;
- }
- }

- import java.lang.annotation.*;
-
- /**
- * @Description: 作用于类、接口或者方法上
- */
- @Target({ElementType.METHOD, ElementType.TYPE})
- @Retention(RetentionPolicy.RUNTIME)
- @Documented
- public @interface TargetDataSource {
- String name();
- }
本文代码博主是经过测试后没有问题才发出来共享给大家的。对于连接池参数配置会应用到所有数据源上。
比如配置一个:
spring.datasource.maximum-pool-size=80
那么我们所有的数据源都会自动应用上。
补充:
如果你使用的是SpringMVC,并集成了Shiro,一般按网上的配置你可能是:
- <bean class="org.springframework.aop.framework.autoproxy.DefaultAdvisorAutoProxyCreator" depends-on="lifecycleBeanPostProcessor">
- <property name="proxyTargetClass" value="true" />
- </bean>
-
- <bean class="org.apache.shiro.spring.security.interceptor.AuthorizationAttributeSourceAdvisor">
- <property name="securityManager" ref="securityManager"/>
- </bean>
那么你请不要这样做,请按下面方法配置:
- <!-- AOP式方法级权限检查 -->
- <!-- 不要使用 DefaultAdvisorAutoProxyCreator 会出现二次代理的问题,这里不详述。 mark by shanhy 2016-05-15 -->
- <aop:config proxy-target-class="true"/>
- <!-- 或者你使用了 <aop:aspectj-autoproxy proxy-target-class="true" /> 也可以。 -->
-
- <bean class="org.apache.shiro.spring.security.interceptor.AuthorizationAttributeSourceAdvisor">
- <property name="securityManager" ref="securityManager"/>
- </bean>


