- 1git pull冲突怎么解决_Git学习笔记
- 2pm2配置开机自启动 linux和windows系统_pm2 startup windows
- 3JS数组操作大全_js 数组操作
- 412G高速SDI信号简介及PCB设计_sdi-12芯片
- 5大数据时代--Hive技术原理解析_hive 底层实现原理
- 6论文浅尝 | Continual Learning for Named Entity Recognition
- 7miui删除内置不卡米教程_小米MIUI免root一键删除系统内置软件!!
- 8mysql outer join的用法_MySQL中join的用法
- 9浅谈Kafka架构与核心组件_kafka架构分为几层
- 10随机森林及其超参数调整(1)_随机森林超参数选取
【springboot源码】深度解析@Value赋值时机及底层原理_@value原理
赞
踩
1.@Value使用
@Value主要是让我们程序动态的将外部值注入到bean中的,使用方式主要如下两种:
1.1@Value("${}"):可以获取对应属性文件中定义的属性值。
1.2@Value("#{}"):表示 SpEl 表达式通常用来获取 bean 的属性,或者调用 bean 的某个方法。
下面不做代码演示,只是看看它底层实现的时机
2.获取时机
2.1简单说下spring bean的生命周期
为啥要说下bean的生命周期,主要是@Value注入到我们的bean属性上,那么必然牵扯spring bean的生命周期,看到网上好多帖子直接讲解对应的实现方法,我觉得看完之后,大家会云里来雾里去
点击springboot的启动类,一直往下找到这个方法,点进去找到refresh方法
spring bean的生命周期主要就在refresh方法中

红线的方法其实就是初始化了所有的singleton beans
点击红线的方法,继续往下看:
先找到getBean=>doGetBean=>createBean=>doCreateBean
类名称为:AbstractAutowireCapableBeanFactory
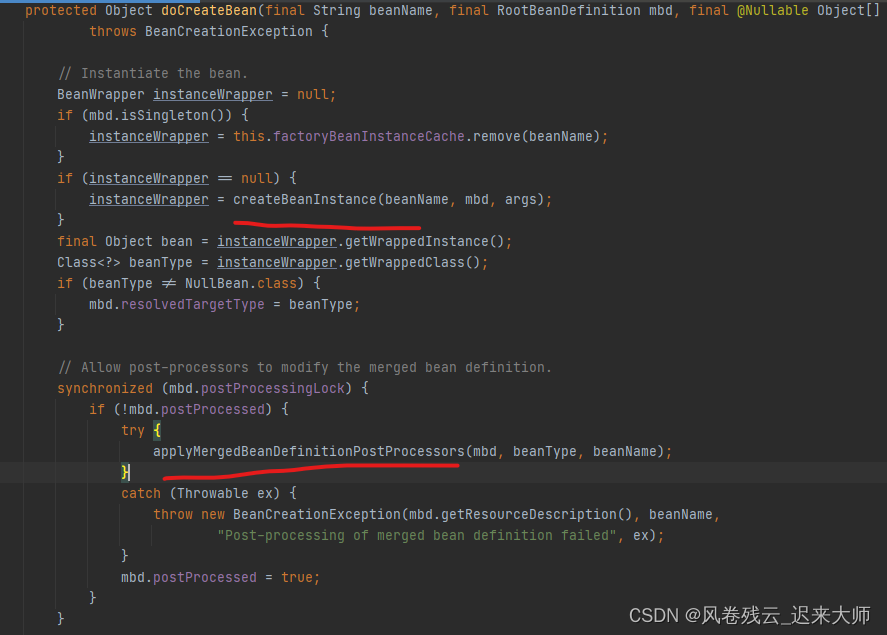
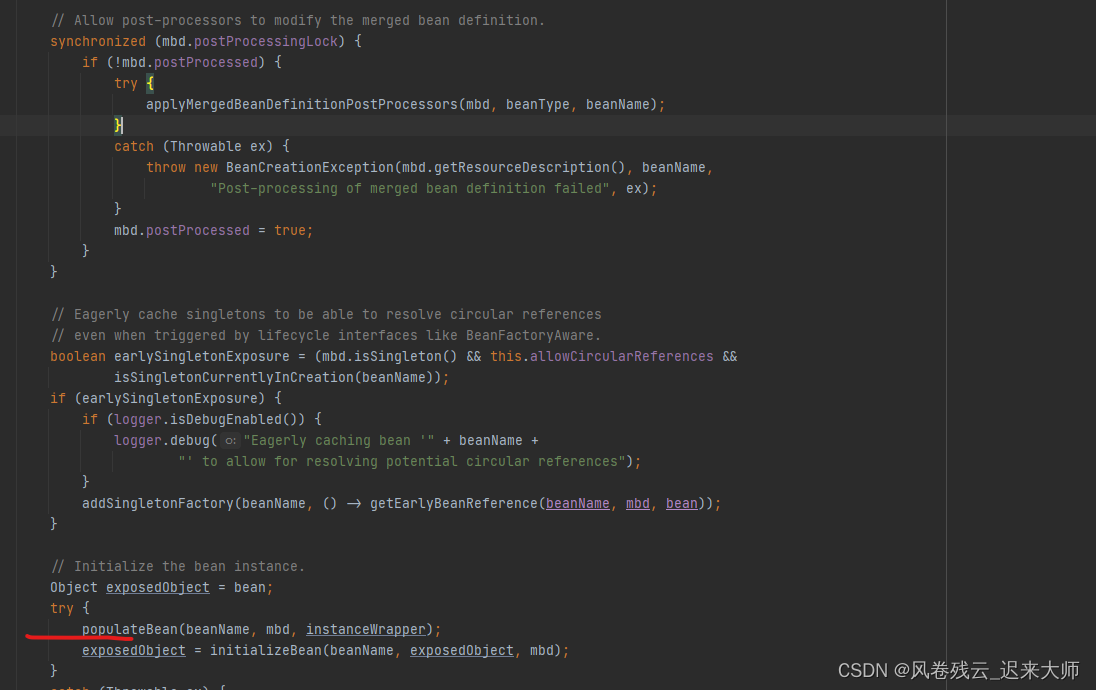 这里面主要看红线标注的三个方法
createBeanInstance方法,创建对象的
点击看instantiateBean=>instantiate=>BeanUtils.instantiateClass
- public static <T> T instantiateClass(Constructor<T> ctor, Object... args) throws BeanInstantiationException {
- Assert.notNull(ctor, "Constructor must not be null");
- try {
- ReflectionUtils.makeAccessible(ctor);
- return (KotlinDetector.isKotlinType(ctor.getDeclaringClass()) ?
- KotlinDelegate.instantiateClass(ctor, args) : ctor.newInstance(args));
- }
- catch (InstantiationException ex) {
- throw new BeanInstantiationException(ctor, "Is it an abstract class?", ex);
- }
- catch (IllegalAccessException ex) {
- throw new BeanInstantiationException(ctor, "Is the constructor accessible?", ex);
- }
- catch (IllegalArgumentException ex) {
- throw new BeanInstantiationException(ctor, "Illegal arguments for constructor", ex);
- }
- catch (InvocationTargetException ex) {
- throw new BeanInstantiationException(ctor, "Constructor threw exception", ex.getTargetException());
- }
- }

可以看到创建对象的方法是通过构造器反射创建的
如果对于创建对象的方式比较迷惑,可以看另一篇文章【java基础】Java常见的创建对象方式_风卷残云_迟来大师的博客-CSDN博客
另外两个方法,下面讲
2.1@Value创建时机
2.1.1 看这个applyMergedBeanDefinitionPostProcessors方法
这个是后置处理器,去收集/预解析属性元数据
这个方法会调用AutowiredAnnotationBeanPostProcessor类的这个postProcessMergedBeanDefinition方法,然后调用这个findAutowiringMetadata方法
findAutowiringMetadata 找到注入的元素
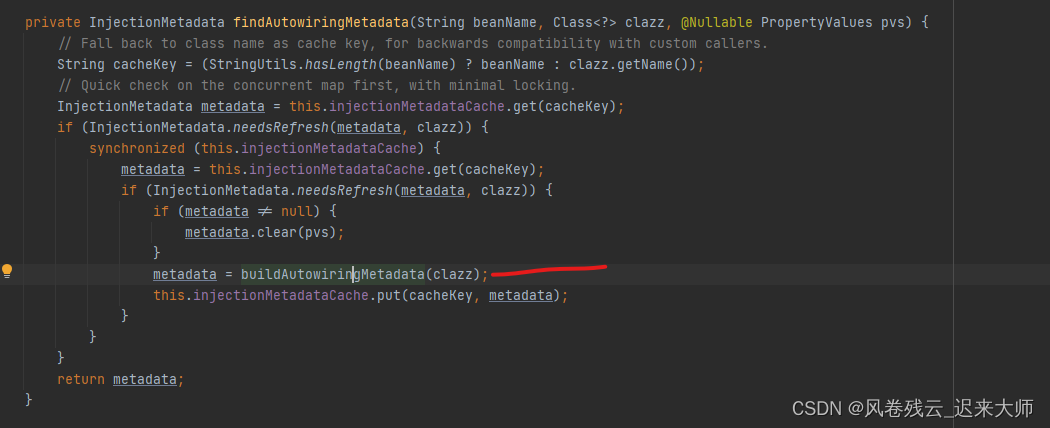
下面看红线的方法,这个是核心方法
- private InjectionMetadata buildAutowiringMetadata(Class<?> clazz) {
- /**
- * 如果没有 Autowired Value 注解信息就返回 EMPTY
- * this.autowiredAnnotationTypes.add(Autowired.class);
- * this.autowiredAnnotationTypes.add(Value.class);
- */
- if (!AnnotationUtils.isCandidateClass(clazz, this.autowiredAnnotationTypes)) {
- return InjectionMetadata.EMPTY;
- }
- List<InjectionMetadata.InjectedElement> elements = new ArrayList<>();
- Class<?> targetClass = clazz;
- do {
- final List<InjectionMetadata.InjectedElement> currElements = new ArrayList<>();
- // 遍历Class中的所有field,根据注解判断每个field是否需要被注入
- ReflectionUtils.doWithLocalFields(targetClass, field -> {
- // 看看field是不是有注解@Autowired 或 @Value
- MergedAnnotation<?> ann = findAutowiredAnnotation(field);
- if (ann != null) {
- // 不支持静态类
- if (Modifier.isStatic(field.getModifiers())) {
- if (logger.isInfoEnabled()) {
- logger.info("Autowired annotation is not supported on static fields: " + field);
- }
- return;
- }
- // 确定带注解的字段是否存在required并且是true 默认是true
- boolean required = determineRequiredStatus(ann);
- // AutowiredFieldElement 对象包装一下
- currElements.add(new AutowiredFieldElement(field, required));
- }
- });
- // 遍历Class中的所有method,根据注解判断每个method是否需要注入
- ReflectionUtils.doWithLocalMethods(targetClass, method -> {
- // 桥接方法 什么是桥接方法 大概查了查跟泛型方法有关系
- // 我猜的哈 比如某一个泛型方法 没有具体的实现的话 不知道注入何种类型 就会略过吧 知道的还请告知哈
- Method bridgedMethod = BridgeMethodResolver.findBridgedMethod(method);
- if (!BridgeMethodResolver.isVisibilityBridgeMethodPair(method, bridgedMethod)) {
- return;
- }
- // 看看方法是不是有注解@Autowired 或 @Value
- MergedAnnotation<?> ann = findAutowiredAnnotation(bridgedMethod);
- if (ann != null && method.equals(ClassUtils.getMostSpecificMethod(method, clazz))) {
- // 静态方法略过
- if (Modifier.isStatic(method.getModifiers())) {
- if (logger.isInfoEnabled()) {
- logger.info("Autowired annotation is not supported on static methods: " + method);
- }
- return;
- }
- // 参数为空的方法略过
- if (method.getParameterCount() == 0) {
- if (logger.isInfoEnabled()) {
- logger.info("Autowired annotation should only be used on methods with parameters: " +
- method);
- }
- }
- // 判断是不是有 required
- boolean required = determineRequiredStatus(ann);
- // 获取目标class中某成员拥有读或写方法与桥接方法一致的PropertyDescriptor
- PropertyDescriptor pd = BeanUtils.findPropertyForMethod(bridgedMethod, clazz);
- // AutowiredMethodElement 对象包装一下
- currElements.add(new AutowiredMethodElement(method, required, pd));
- }
- });
- elements.addAll(0, currElements);
- // 递归调用
- targetClass = targetClass.getSuperclass();
- }
- while (targetClass != null && targetClass != Object.class);
- // 包装成 InjectionMetadata 对象 targetClass属性就是当前的类 injectedElements属性就是分析的字段或者方法
- return InjectionMetadata.forElements(elements, clazz);
- }

看着这个代码
AnnotationAttributes ann = findAutowiredAnnotation(bridgedMethod);
找到自动注入的注解,进去看下:
- @Nullable
- private AnnotationAttributes findAutowiredAnnotation(AccessibleObject ao) {
- if (ao.getAnnotations().length > 0) { // autowiring annotations have to be local
- for (Class<? extends Annotation> type : this.autowiredAnnotationTypes) {
- AnnotationAttributes attributes = AnnotatedElementUtils.getMergedAnnotationAttributes(ao, type);
- if (attributes != null) {
- return attributes;
- }
- }
- }
- return null;
- }
这个里面有一个全局变量
this.autowiredAnnotationTypes
看下这个值是咋来的,查看AutowiredAnnotationBeanPostProcessor这个类的构造函数

很清晰的告诉你了,我们要看的注解
从上面可以看到这个buildAutowiringMetadata方法会对类的属性进行遍历以及父亲的递归,对于字段会忽略掉static修饰的,对于方法会也会忽略掉static以及参数为空的。最后解析到的属性会包装成 AutowiredFieldElement ,方法会包装成 AutowiredMethodElement ,最后统一放进集合中,包装成 InjectionMetadata 对象返回,并放进缓存
2.1.2看populateBean这个方法
点击去看调用这个postProcessPropertyValues方法
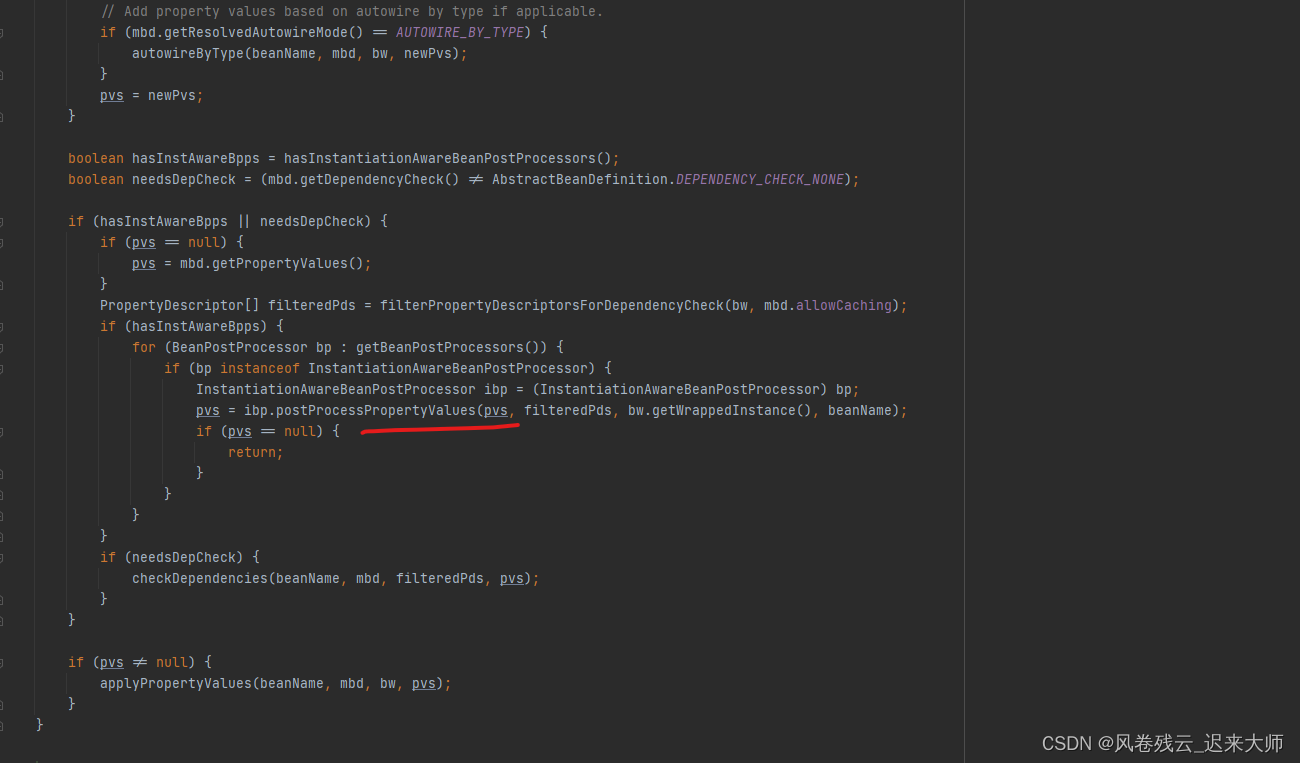
继续往下看

element.inject(target, beanName, pvs)方法
调用对象对应的方法进行注入 属性就是 AutowiredFieldElement  方法就是 AutowiredMethodElement
点下去主要看属性

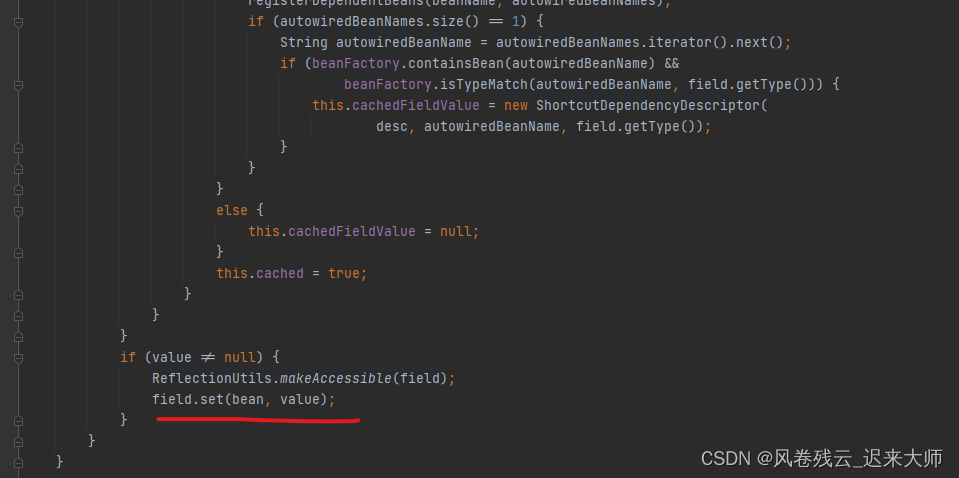
第一个红线获取属性值
第二个红线注入属性值
2.1.3看下beanFactory.resolveDependency这个获取属性值方法
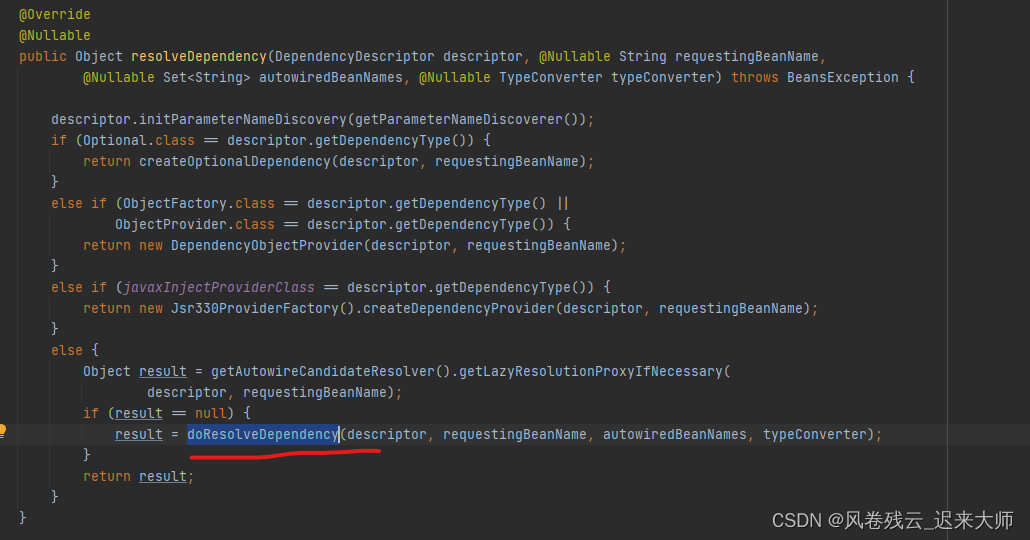
doResolveDependency这个是核心
- @Nullable
- public Object doResolveDependency(DependencyDescriptor descriptor, @Nullable String beanName,
- @Nullable Set<String> autowiredBeanNames, @Nullable TypeConverter typeConverter) throws BeansException {
-
- InjectionPoint previousInjectionPoint = ConstructorResolver.setCurrentInjectionPoint(descriptor);
- try {
- Object shortcut = descriptor.resolveShortcut(this);
- if (shortcut != null) {
- return shortcut;
- }
-
- Class<?> type = descriptor.getDependencyType();
- // 如果是 @Value 注解元素,则获取 value 值
- Object value = getAutowireCandidateResolver().getSuggestedValue(descriptor);
- if (value != null) {
- if (value instanceof String) {
- // 占位符解析
- String strVal = resolveEmbeddedValue((String) value);
- BeanDefinition bd = (beanName != null && containsBean(beanName) ? getMergedBeanDefinition(beanName) : null);
- // SpEL 解析
- value = evaluateBeanDefinitionString(strVal, bd);
- }
- TypeConverter converter = (typeConverter != null ? typeConverter : getTypeConverter());
- return (descriptor.getField() != null ?
- converter.convertIfNecessary(value, type, descriptor.getField()) :
- converter.convertIfNecessary(value, type, descriptor.getMethodParameter()));
- }
-
- Object multipleBeans = resolveMultipleBeans(descriptor, beanName, autowiredBeanNames, typeConverter);
- if (multipleBeans != null) {
- return multipleBeans;
- }
-
- Map<String, Object> matchingBeans = findAutowireCandidates(beanName, type, descriptor);
- if (matchingBeans.isEmpty()) {
- if (isRequired(descriptor)) {
- raiseNoMatchingBeanFound(type, descriptor.getResolvableType(), descriptor);
- }
- return null;
- }
-
- String autowiredBeanName;
- Object instanceCandidate;
-
- if (matchingBeans.size() > 1) {
- autowiredBeanName = determineAutowireCandidate(matchingBeans, descriptor);
- if (autowiredBeanName == null) {
- if (isRequired(descriptor) || !indicatesMultipleBeans(type)) {
- return descriptor.resolveNotUnique(type, matchingBeans);
- }
- else {
- // In case of an optional Collection/Map, silently ignore a non-unique case:
- // possibly it was meant to be an empty collection of multiple regular beans
- // (before 4.3 in particular when we didn't even look for collection beans).
- return null;
- }
- }
- instanceCandidate = matchingBeans.get(autowiredBeanName);
- }
- else {
- // We have exactly one match.
- Map.Entry<String, Object> entry = matchingBeans.entrySet().iterator().next();
- autowiredBeanName = entry.getKey();
- instanceCandidate = entry.getValue();
- }
-
- if (autowiredBeanNames != null) {
- autowiredBeanNames.add(autowiredBeanName);
- }
- if (instanceCandidate instanceof Class) {
- instanceCandidate = descriptor.resolveCandidate(autowiredBeanName, type, this);
- }
- Object result = instanceCandidate;
- if (result instanceof NullBean) {
- if (isRequired(descriptor)) {
- raiseNoMatchingBeanFound(type, descriptor.getResolvableType(), descriptor);
- }
- result = null;
- }
- if (!ClassUtils.isAssignableValue(type, result)) {
- throw new BeanNotOfRequiredTypeException(autowiredBeanName, type, instanceCandidate.getClass());
- }
- return result;
- }
- finally {
- ConstructorResolver.setCurrentInjectionPoint(previousInjectionPoint);
- }
- }

看下resolveEmbeddedValue方法
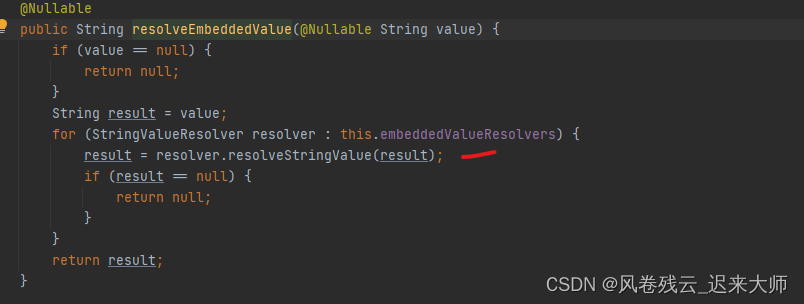
红线就取到值了
3.结论:
经过源码的层层解析,大家已经看到了,@Value取值实在对象创建完成后,在后置处理器中进行赋值的
org.apache.poi[详细] 赞
踩


