- 1基于学习空间融合的单发目标检测(Learning Spatial Fusion for Single-Shot Object Detection)_liu s , huang d , wang y . learning spatial fusion
- 2xcode15,个推推送SDK闪退问题处理办法
- 3我的第一个鸿蒙harmoneyOS应用程序尝试_运行我的第一个鸿蒙应用程序
- 4PDFSDK(支持多种平台)_pdf sdk
- 5华为在发布会带来了harmonyos,华为HarmonyOS 2.0正式发布,共赢移动终端产业的下一个十年...
- 6使用Python开发游戏可以吗?_python能做游戏吗
- 7Linux -- 线程互斥
- 8How To Install Kali Linux Tools Without Rooting Android Using Termux_how to install tool in kail linux
- 9Kernel Panic on VFS: Unable to mount root fs on unknown-block(x,y) (转)_kernel panic - not syncing: vfs: unable to mount r
- 10基于JavaSSH框架的网上商城设计与实现_[6]李明山. 基于ssh框架的网上购物系统设计与实现[j]. 学周刊, 2021(7):158-1
【XR806开发板试用】通过http请求从心知天气网获取天气预报信息_ubuntu http获取天气预报
赞
踩
1. 开发环境搭建
本次评测开发环境搭建在windows11的WSL2的Ubuntu20.04中,关于windows安装WSL2可以参考文章: Windows下安装Linux(Ubuntu20.04)子系统(WSL)
(1) 在WSL的Ubuntu20.04下安装必要的工具的.
- 安装git:
sudo apt-get install git
- 安装gcc编译器套件:
sudo apt-get install build-essential
- 安装bear,该工具用来生成编译数据库文件:compile_commands.json,可以实现编辑代码时智能提示和代码跳转.
sudo apt-get install bear
- 安装ncurses库,使用make menuconfig配置工程时依赖该库.
sudo apt-get install libncurses5-dev
(2)安装windows下必要的工具
我们编译的固件要通过串口烧录到XR806,由于WSL2下不能直接使用windows的串口,所以需要在windows下使用工具 usbipd共享串口给WSL2使用,可以参考文章:WSL2下的usb串口设备使用
此外,我们编辑和阅读代码使用vscode,关于vscode的C/C++环境配置可参考文章:vscode配置C/C++环境
(3)搭建XR806编译开发环境
可以参考:搭建基于FreeRTOS的XR806开发环境, 需要注意的是文章中提供的编译工具链gcc-arm-none-eabi-8-2019-q3-update下载链接无效,在终端中使用如下命令下载编译工具链:
wget https://armkeil.blob.core.windows.net/developer/Files/downloads/gnu-rm/8-2019q3/RC1.1/gcc-arm-none-eabi-8-2019-q3-update-linux.tar.bz2
2. 创建工程
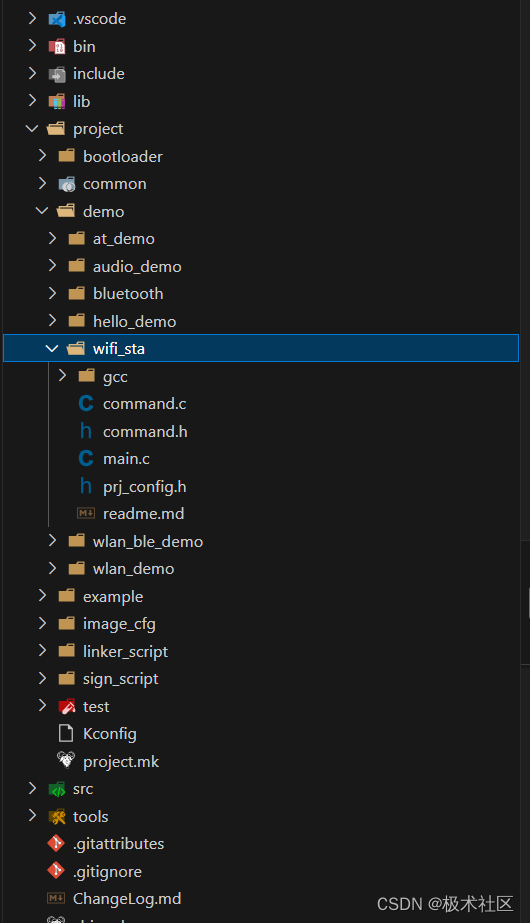
创建工程可以参考: 新工程创建, 我们工程命名为wifi_sta,我们工程所在目录如下图:

我们在终端中进入工程跟目录,按如下步骤来配置工程和编译代码生成镜像:
# 复制默认配置文件到顶层目录(不切换工程可不要此步骤)
$ make PRJ=demo/wifi_sta defconfig
# 检查SDK 基础配置,如工程名、芯片型号、高频晶振、板级配置是否正确
$ make menuconfig
# 清理,切换工程时需要
$ make build_clean
# 编译代码并生成镜像文件,生成的镜像文件为“out/xr_system.img”
$ bear make build -j 12
- 1
- 2
- 3
- 4
- 5
- 6
- 7
- 8
依次执行上述命令后,在工程根目录执行如下命令,使用vscode打开工程
code .
在vscode中打开工程目录后,敲击F1键,弹出如下选择项,我们选择C/C++:编辑配置(UI)

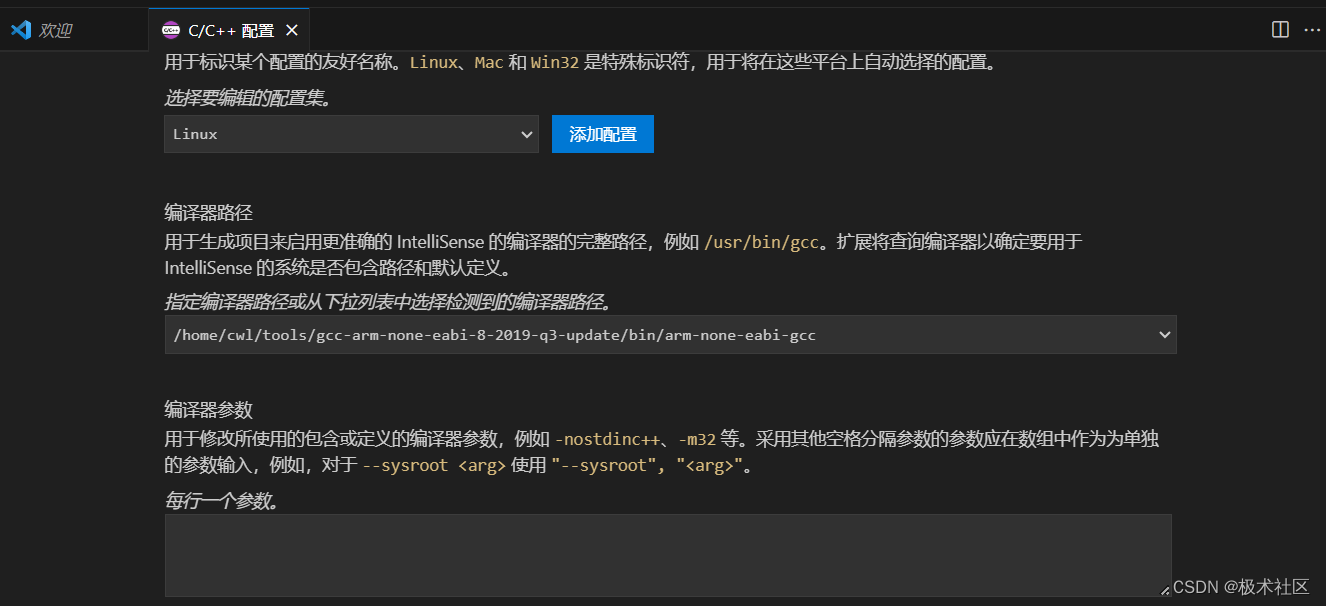
在编译器路径输入框中输入XR806交叉编译器完整路径,如下图所示:

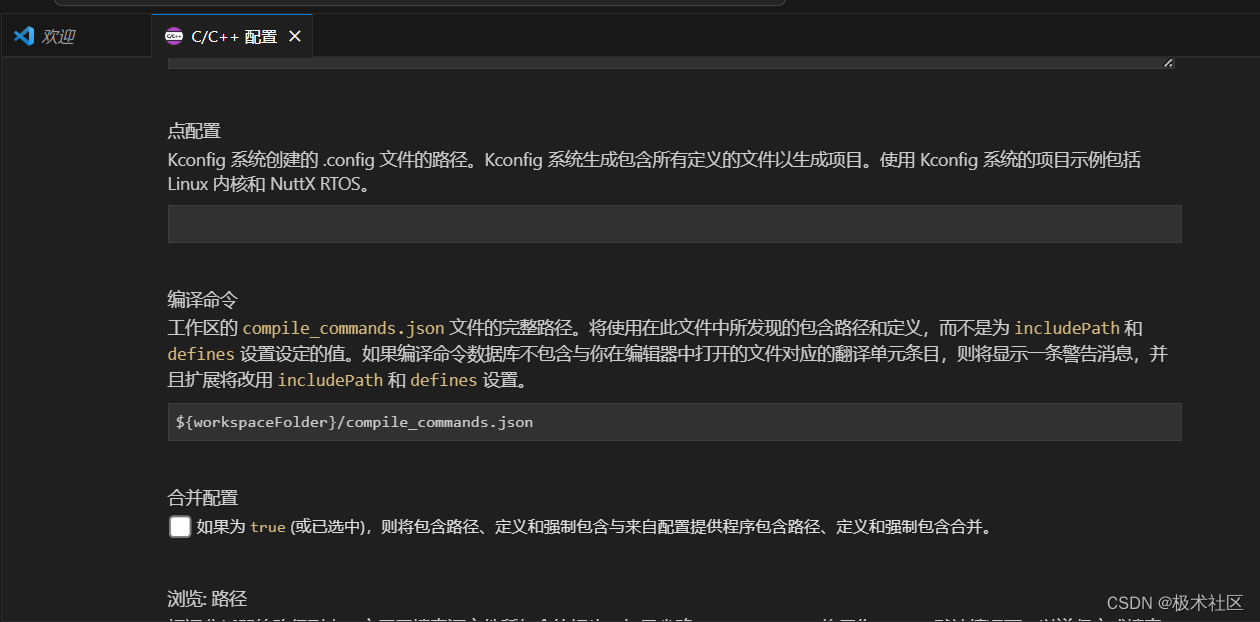
在高级设置下的编译命令输入框中输入编译数据库文件compile_commands.json的路径,如下图所示:

3. 编辑工程代码
想要从心知天气网获取天气预报,首先需要注册该网站账号. 注册账号并登陆,打开获取天气预报相关的API文档页: 未来15天逐日天气预报和昨日天气 阅读该文档了解到获取未来3天天气预报的接口地址为:
https://api.seniverse.com/v3/weather/daily.json?key=your_api_key&location=beijing&language=zh-Hans&unit=c&start=-1&days=5
其中参数"your_api_key"是你获取天气预报信息的API密钥,该API密钥可以从心知天气网主页进入控制台页面,然后点击左侧的"免费版",即可看到自己的私钥,该私钥即为API 密钥,如下图所示:

接下来我们编写代码实现通过http请求从心知天气网获取未来3天的天气信息.
- 首先在main.c中添加必要的头文件:
#include <stdio.h>
#include <string.h>
#include "kernel/os/os.h"
#include "net/wlan/wlan.h"
#include "net/wlan/wlan_defs.h"
#include "common/framework/net_ctrl.h"
#include "common/framework/platform_init.h"

#include <errno.h>
#include "lwip/err.h"
#include "lwip/sockets.h"
#include "lwip/sys.h"
#include "lwip/inet.h"
#include "lwip/netdb.h"
#include "sys/select.h"

#include "cjson/cJSON.h"
- 1
- 2
- 3
- 4
- 5
- 6
- 7
- 8
- 9
- 10
- 11
- 12
- 13
- 14
- 15
- 16
- 17
- 然后定义关于天气信息的结构体类型:
/* 天气数据结构体 */
typedef struct tagWeather
{
	/* 实况天气数据 */
	char id[32];				//id
	char name[32];				//地名
	char country[32];			//国家
	char path[32];				//完整地名路径
	char timezone[32];			//时区
	char timezone_offset[32];   //时差
	char text[32];				//天气预报文字
	char code[32];				//天气预报代码
	char temperature[32];   	//气温
	char last_update[32];		//最后一次更新的时间


	/* 今天、明天、后天天气数据 */
	char date[3][32];			//日期
	char text_day[3][64];	    //白天天气现象文字
	char code_day[3][32];		//白天天气现象代码
	char code_night[3][64]; 	//晚间天气现象代码
	char high[3][32];			//最高温
	char low[3][32];			//最低温
	char wind_direction[3][64]; //风向
	char wind_speed[3][32];  	//风速,单位km/h(当unit=c时)
	char wind_scale[3][32];  	//风力等级
} Weather_T;
- 1
- 2
- 3
- 4
- 5
- 6
- 7
- 8
- 9
- 10
- 11
- 12
- 13
- 14
- 15
- 16
- 17
- 18
- 19
- 20
- 21
- 22
- 23
- 24
- 25
- 26
- 27
- 再定义通过http的GET请求方式获取天气预报的请求头部:
#define WEB_SERVER     "api.seniverse.com" // 天气预报网服务器地址
#define WEB_PORT       "80"                // 天气预报网服务器端口号
#define CONFIG_API_KEY "xxxxxxxxxxxxxx" // 你的API密钥,从心知天气网控制台页面获取
/* 获取天气预报信息的http请求头部 */
#define  GET_REQUEST_PACKAGE     \
         "GET https://api.seniverse.com/v3/weather/daily.json?key=" CONFIG_API_KEY "&location=%s&language=zh-Hans&unit=c\r\n\r\n"

#define HTTPC_DEMO_THREAD_STACK_SIZE (8 * 1024) /* 任务栈大小 */
- 1
- 2
- 3
- 4
- 5
- 6
- 7
- 8
- 定义WiFi的ssid和password:
char *sta_ssid = "xxxxxx";  // 你要连接的WiFi名
char *sta_psk = "xxxxxxxx"; // 你要连接的WiFi密码
char httpc_response_buf[2048]; //用于保存获取到的天气信息的原始数据
int write_idx = 0;  // 写数据到httpc_response_buf的数组下标
static OS_Thread_t httpc_demo_thread; // 获取天气的线程ID
- 1
- 2
- 3
- 4
- 5
- 编写WiFi联网初始化函数:
void sta_start(void)
{
	/* switch to sta mode */
	net_switch_mode(WLAN_MODE_STA);

#if STA_MODE_USE_WPA2_ONLY
	/* set ssid and password to wlan, only use WPA2 mode to connect AP. */
	wlan_sta_config((uint8_t *)sta_ssid, strlen(sta_ssid), (uint8_t *)sta_psk, 0);
#else
	/* set ssid and password to wlan, use WPA2|WPA3 compatible mode to connect AP. */
	wlan_sta_set((uint8_t *)sta_ssid, strlen(sta_ssid), (uint8_t *)sta_psk);
#endif

	/* start scan and connect to ap automatically */
	wlan_sta_enable();
}
- 1
- 2
- 3
- 4
- 5
- 6
- 7
- 8
- 9
- 10
- 11
- 12
- 13
- 14
- 15
- 16
- 在mian函数中添加如下代码
int main(void)
{
	observer_base *net_ob;

	platform_init();

	/* create an observer to monitor the net work state */
	net_ob = sys_callback_observer_create(CTRL_MSG_TYPE_NETWORK,
	                                     NET_CTRL_MSG_ALL,
	                                     net_cb,
	                                     NULL);
	if (net_ob == NULL) {
		return -1;
	}

	if (sys_ctrl_attach(net_ob) != 0) {
		return -1;
	}

	sta_start();

	return 0;
}
- 1
- 2
- 3
- 4
- 5
- 6
- 7
- 8
- 9
- 10
- 11
- 12
- 13
- 14
- 15
- 16
- 17
- 18
- 19
- 20
- 21
- 22
- 23
其中,函数sys_callback_observer_create创建一个事件监听器,当函数第1个参数CTRL_MSG_TYPE_NETWORK和第2个参数NET_CTRL_MSG_ALL所指定的事件发生时自动调用回调函数net_cb,此处表示所有的网络事件发生时均会调用回调函数net_cb,net_cb定义如下:
static void net_cb(uint32_t event, uint32_t data, void *arg)
{
	uint16_t type = EVENT_SUBTYPE(event);

	switch (type) {
	case NET_CTRL_MSG_NETWORK_UP: // WiFi sta连接AP成功并自动分配了ip地址
		{
        /* 打印本机的IP地址,网关,子网掩码 */
			struct netif *nif = wlan_netif_get(WLAN_MODE_STA);
			while (!NET_IS_IP4_VALID(nif)) {
				OS_MSleep(100);
			}

			printf("local ip: %s\n", ipaddr_ntoa(&nif->ip_addr));
			printf("gw: %s\n", ipaddr_ntoa(&nif->gw));
			printf("netmask: %s\n", ipaddr_ntoa(&nif->netmask));
		}
        /*创建线程,通过http请求获取天气预报信息*/
		if (!OS_ThreadIsValid(&httpc_demo_thread)) {
			OS_ThreadCreate(&httpc_demo_thread,
			                    "httpc_demo_thread",
			                    httpc_demo_fun,
			                    (void *)NULL,
			                    OS_THREAD_PRIO_APP,
			                    HTTPC_DEMO_THREAD_STACK_SIZE);
		}
		break;

	case NET_CTRL_MSG_NETWORK_DOWN: //WiFi连接断开事件
		break;

	default:
		break;
	}
}
- 1
- 2
- 3
- 4
- 5
- 6
- 7
- 8
- 9
- 10
- 11
- 12
- 13
- 14
- 15
- 16
- 17
- 18
- 19
- 20
- 21
- 22
- 23
- 24
- 25
- 26
- 27
- 28
- 29
- 30
- 31
- 32
- 33
- 34
- 35
httpc_demo_fun函数的定义如下:
static void httpc_demo_fun(void *arg)
{
	http_get_weather("beijing");
    // 获取天气预报信息结束后,删除本线程
	OS_ThreadDelete(&httpc_demo_thread);
}
- 1
- 2
- 3
- 4
- 5
- 6
其中http_get_weather函数的参数即为想要获取天气预报的城市的汉语拼音名,定义如下:
static void http_get_weather(char *city)
{
	int32_t ret;
	char request_head[sizeof(REQUEST) + 64];
	const struct addrinfo hints = {
        .ai_family = AF_INET,
        .ai_socktype = SOCK_STREAM,
    };
    struct addrinfo *res;
    struct in_addr *addr;
	int s, r;
	Weather_T weather_data = {0};

	bzero(httpc_response_buf, sizeof(httpc_response_buf));
    /* 通过服务器域名和端口获取服务器的IP地址相关信息 */
	ret = getaddrinfo(WEB_SERVER, WEB_PORT, &hints, &res);
	if (ret != 0 || res == NULL) {
		printf("DNS lookup failed ret=%d res=%p\n", ret, res);
		return;
	}
	// Note: inet_ntoa is non-reentrant, look at ipaddr_ntoa_r for "real" code */
    addr = &((struct sockaddr_in *)res->ai_addr)->sin_addr;
    printf("DNS lookup succeeded. IP=%s\n", inet_ntoa(*addr));

    /* 创建soocket */
	s = socket(res->ai_family, res->ai_socktype, 0);
    if(s < 0) {
		printf("... Failed to allocate socket.\n");
		freeaddrinfo(res);
		return;
	}
	printf("... allocated socket\n");

    /* 使用第1步获取的服务器IP地址连接服务器 */
	if(connect(s, res->ai_addr, res->ai_addrlen) != 0) {
        printf("... socket connect failed errno=%d\n", errno);
        close(s);
        freeaddrinfo(res);
		return;
    }

    printf("... connected\n");
    freeaddrinfo(res);

    /* 使用城市名生成完整的http的GET请求头部并发送到服务器*/
	snprintf(request_head, sizeof(request_head), GET_REQUEST_PACKAGE, city);
    if (write(s, request_head, strlen(request_head)) < 0) {
		printf("... socket send failed\n");
		close(s);
		return;
	}
    printf("... socket send success\n");

    /* 读取服务器返回的应答数据 */
	/* Read HTTP response */
	do {
		r = read(s, &httpc_response_buf[write_idx], sizeof(httpc_response_buf) - write_idx -1);
		if (r > 0) {
			write_idx += r;
		}
	} while(r > 0 && write_idx < (sizeof(httpc_response_buf) - 1));

	printf("... done reading from socket. Last read return=%d write_idx=%u errno=%d.\n", r, write_idx, errno);
    /* 打印服务器返回的数据 */
	for	(int i = 0; i < write_idx; ++i) {
		putchar(httpc_response_buf[i]);
	}
	puts("");
    /* 解析天气预报数据 */
	ret = cJSON_DailyWeatherParse(httpc_response_buf, &weather_data);
	if (ret == 0) {
    /* 格式化打印天气预报信息 */
		DisplayWeather(&weather_data);
	}
	close(s);
}
- 1
- 2
- 3
- 4
- 5
- 6
- 7
- 8
- 9
- 10
- 11
- 12
- 13
- 14
- 15
- 16
- 17
- 18
- 19
- 20
- 21
- 22
- 23
- 24
- 25
- 26
- 27
- 28
- 29
- 30
- 31
- 32
- 33
- 34
- 35
- 36
- 37
- 38
- 39
- 40
- 41
- 42
- 43
- 44
- 45
- 46
- 47
- 48
- 49
- 50
- 51
- 52
- 53
- 54
- 55
- 56
- 57
- 58
- 59
- 60
- 61
- 62
- 63
- 64
- 65
- 66
- 67
- 68
- 69
- 70
- 71
- 72
- 73
- 74
- 75
- 76
由于服务器返回的天气预报数据为json字符串, 我们编写函数cJSON_DailyWeatherParse解析天气预报json数据并保存到结构体变量weather_data中,cJSON_DailyWeatherParse函数和DisplayWeather函数的定义如下:
static int cJSON_DailyWeatherParse(char *JSON, Weather_T *result)
{
	cJSON *json,*arrayItem,*object,*subobject,*item,*sub_child_object,*child_Item;

	json = cJSON_Parse(JSON); //解析JSON数据包
	if(json == NULL)		  //检测JSON数据包是否存在语法上的错误,返回NULL表示数据包无效
	{
		printf("Error before: [%s]\n",cJSON_GetErrorPtr()); //打印数据包语法错误的位置
		return 1;
	}
	else
	{
		if ((arrayItem = cJSON_GetObjectItem(json,"results")) != NULL) //匹配字符串"results",获取数组内容
		{
			// int size = cJSON_GetArraySize(arrayItem);     //获取数组中对象个数
#if DEBUG
			printf("Get Array Size: size=%d\n",size);
#endif
			if((object = cJSON_GetArrayItem(arrayItem,0)) != NULL)//获取父对象内容
			{
				/* 匹配子对象1------结构体location */
				if((subobject = cJSON_GetObjectItem(object,"location")) != NULL)
				{
					if((item = cJSON_GetObjectItem(subobject,"name")) != NULL) //匹配子对象1成员"name"
					{
						memcpy(result->name, item->valuestring,strlen(item->valuestring)); 		// 保存数据供外部调用
					}
				}
				/* 匹配子对象2------数组daily */
				if((subobject = cJSON_GetObjectItem(object,"daily")) != NULL)
				{
					int sub_array_size = cJSON_GetArraySize(subobject);
#if DEBUG
					printf("Get Sub Array Size: sub_array_size=%d\n",sub_array_size);
#endif
					for(int i = 0; i < sub_array_size; i++)
					{
						if((sub_child_object = cJSON_GetArrayItem(subobject,i))!=NULL)
						{
							// 匹配日期
							if((child_Item = cJSON_GetObjectItem(sub_child_object,"date")) != NULL)
							{
								memcpy(result->date[i], child_Item->valuestring,strlen(child_Item->valuestring)); 		// 保存数据
							}
							// 匹配白天天气现象文字
							if((child_Item = cJSON_GetObjectItem(sub_child_object,"text_day")) != NULL)
							{
								memcpy(result->text_day[i], child_Item->valuestring,strlen(child_Item->valuestring)); 	// 保存数据
							}
							// 匹配白天天气现象代码
							if((child_Item = cJSON_GetObjectItem(sub_child_object,"code_day")) != NULL)
							{
								memcpy(result->code_day[i], child_Item->valuestring,strlen(child_Item->valuestring)); 	// 保存数据
							}
							// 匹配夜间天气现象代码
							if((child_Item = cJSON_GetObjectItem(sub_child_object,"code_night")) != NULL)
							{
								memcpy(result->code_night[i], child_Item->valuestring,strlen(child_Item->valuestring)); // 保存数据
							}
							// 匹配最高温度
							if((child_Item = cJSON_GetObjectItem(sub_child_object,"high")) != NULL)
							{
								memcpy(result->high[i], child_Item->valuestring,strlen(child_Item->valuestring)); 		//保存数据
							}
							// 匹配最低温度
							if((child_Item = cJSON_GetObjectItem(sub_child_object,"low")) != NULL)
							{
								memcpy(result->low[i], child_Item->valuestring,strlen(child_Item->valuestring)); 		// 保存数据
							}
							// 匹配风向
							if((child_Item = cJSON_GetObjectItem(sub_child_object,"wind_direction")) != NULL)
							{
								memcpy(result->wind_direction[i],child_Item->valuestring,strlen(child_Item->valuestring)); //保存数据
							}
							// 匹配风速,单位km/h(当unit=c时)
							if((child_Item = cJSON_GetObjectItem(sub_child_object,"wind_speed")) != NULL)
							{
								memcpy(result->wind_speed[i], child_Item->valuestring,strlen(child_Item->valuestring)); // 保存数据
							}
							// 匹配风力等级
							if((child_Item = cJSON_GetObjectItem(sub_child_object,"wind_scale")) != NULL)
							{
								memcpy(result->wind_scale[i], child_Item->valuestring,strlen(child_Item->valuestring)); // 保存数据
							}
						}
					}
				}
				/* 匹配子对象3------最后一次更新的时间 */
				if((subobject = cJSON_GetObjectItem(object,"last_update")) != NULL)
				{
					//printf("%s:%s\n",subobject->string,subobject->valuestring);
				}
			}
		}
	}
	cJSON_Delete(json); //释放cJSON_Parse()分配出来的内存空间

	return 0;
}

/*******************************************************************************************************
** 函数: DisplayWeather,显示天气数据
**------------------------------------------------------------------------------------------------------
** 参数: weather_data:天气数据
** 返回: void
********************************************************************************************************/
static void DisplayWeather(Weather_T *weather_data)
{
	printf("===========%s近三天的天气情况如下===========\n",weather_data->name);
	printf("【%s】\n",weather_data->date[0]);
	printf("天气:%s\n",weather_data->text_day[0]);
	printf("最高温:%s℃\n",weather_data->high[0]);
	printf("最低温:%s℃\n",weather_data->low[0]);
	printf("风向:%s\n",weather_data->wind_direction[0]);
	printf("风速:%skm/h\n",weather_data->wind_speed[0]);
	printf("风力等级:%s\n",weather_data->wind_scale[0]);
	printf("\n");
	printf("【%s】\n",weather_data->date[1]);
	printf("天气:%s\n",weather_data->text_day[1]);
	printf("最高温:%s℃\n",weather_data->high[1]);
	printf("最低温:%s℃\n",weather_data->low[1]);
	printf("风向:%s\n",weather_data->wind_direction[1]);
	printf("风速:%skm/h\n",weather_data->wind_speed[1]);
	printf("风力等级:%s\n",weather_data->wind_scale[1]);
	printf("\n");
	printf("【%s】\n",weather_data->date[2]);
	printf("天气:%s\n",weather_data->text_day[2]);
	printf("最高温:%s℃\n",weather_data->high[2]);
	printf("最低温:%s℃\n",weather_data->low[2]);
	printf("风向:%s\n",weather_data->wind_direction[2]);
	printf("风速:%skm/h\n",weather_data->wind_speed[2]);
	printf("风力等级:%s\n",weather_data->wind_scale[2]);
}
- 1
- 2
- 3
- 4
- 5
- 6
- 7
- 8
- 9
- 10
- 11
- 12
- 13
- 14
- 15
- 16
- 17
- 18
- 19
- 20
- 21
- 22
- 23
- 24
- 25
- 26
- 27
- 28
- 29
- 30
- 31
- 32
- 33
- 34
- 35
- 36
- 37
- 38
- 39
- 40
- 41
- 42
- 43
- 44
- 45
- 46
- 47
- 48
- 49
- 50
- 51
- 52
- 53
- 54
- 55
- 56
- 57
- 58
- 59
- 60
- 61
- 62
- 63
- 64
- 65
- 66
- 67
- 68
- 69
- 70
- 71
- 72
- 73
- 74
- 75
- 76
- 77
- 78
- 79
- 80
- 81
- 82
- 83
- 84
- 85
- 86
- 87
- 88
- 89
- 90
- 91
- 92
- 93
- 94
- 95
- 96
- 97
- 98
- 99
- 100
- 101
- 102
- 103
- 104
- 105
- 106
- 107
- 108
- 109
- 110
- 111
- 112
- 113
- 114
- 115
- 116
- 117
- 118
- 119
- 120
- 121
- 122
- 123
- 124
- 125
- 126
- 127
- 128
- 129
- 130
- 131
- 132
- 133
- 134
- 编译工程
bear make build -j 8 - 烧录镜像到xr806
首先使用USB线将开发板连上电脑,可能需要重新安装CP2102驱动,下载地址为CP2102驱动,在Windows中打开powershell,输入如下命令:
PS C:\Users\30751\Desktop> usbipd wsl list
BUSID  VID:PID    DEVICE                                                        STATE
2-1    10c4:ea60  Silicon Labs CP210x USB to UART Bridge (COM3)                 Not attached
2-3    248a:8367  USB 输入设备                                                  Not attached
2-6    0c45:6a1b  Integrated Webcam                                             Not attached
2-10   8087:0026  英特尔(R) 无线 Bluetooth(R)                                   Not attached
- 1
- 2
- 3
- 4
- 5
- 6
我们可以看到开发板连接的USB端口的的BUSID为2-1,接着使用如下命令将该USB串口共享给WSL:
PS C:\Users\30751\Desktop> usbipd wsl attach --busid 2-1
usbipd: info: Using default WSL distribution 'Ubuntu-20.04'; specify the '--distribution' option to select a different one.
- 1
- 2
接下来我们在Ubuntu终端中进入工程源码目录下的tools目录下,开启固件烧录USB串口的读写权限:
sudo chmod 666 /dev/ttyUSB0
使用如下命令烧录镜像到xr806
./phoenixMC
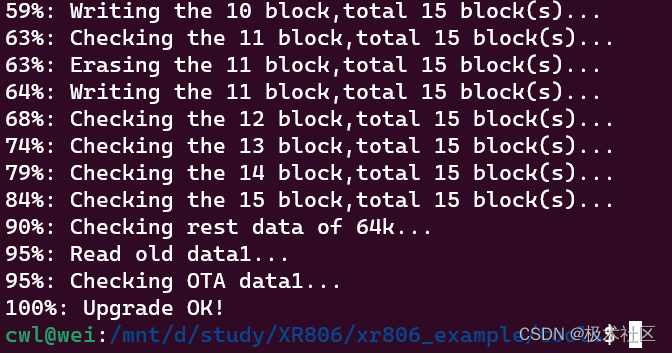
烧录成功信息如下:

我们再次在Windows中打开powershell,输入如下命令将开发板连接到windows:
usbipd wsl detach --busid 2-1
我们在windows中打开终端软件Tera Term,连上开发板串口,复位开发板将会看到如下信息:
use default flash chip mJedec 0x0
[FD I]: mode: 0x10, freq: 96000000Hz, drv: 0
[FD I]: jedec: 0x0, suspend_support: 1
mode select:e

wlan information ===================================================
firmware:
    version : R0-XR_C07.08.52.67_ULP_R_02.132 Jan 10 2023 19:14:11-Y02.132
    buffer  : 8
driver:
    version : XR_V02.06.10
mac address:
    in use        : 8c:6d:08:3d:14:01
    in use        : 8c:6d:08:3d:14:02
====================================================================

wlan mode:a

platform information ===============================================
XR806 SDK v1.2.2  Oct 21 2023 23:46:57 62800400

heap space [0x217098, 0x24bc00), size 215912

cpu  clock 160000000 Hz
HF   clock  40000000 Hz

sdk option:
    XIP           : enable
    INT LF OSC    : enable
    INT LDO       : select
    INT LDO / EXT PWR: enable
    SIP flash     : enable

mac address:
    efuse         : 80:74:84:05:b9:ca
    in use        : 8c:6d:08:3d:14:01
====================================================================

[net INF] no need to switch wlan mode 0
[net INF] msg <wlan scan success>
en1: Trying to associate with 8c:ab:8e:fd:c3:58 (SSID='302' freq=2412 MHz)
en1: Associated with 8c:ab:8e:fd:c3:58
en1: WPA: Key negotiation completed with 8c:ab:8e:fd:c3:58 [PTK=CCMP GTK=TKIP]
en1: CTRL-EVENT-CONNECTED - Connection to 8c:ab:8e:fd:c3:58 completed [id=0 id_str=]
[net INF] msg <wlan connected>
[net INF] netif is link up
[net INF] start DHCP...
WAR drop=1135, fctl=0x00d0.
[net INF] netif (IPv4) is up
[net INF] address: 192.168.2.107
[net INF] gateway: 192.168.2.1
[net INF] netmask: 255.255.255.0
[net INF] msg <network up>
local ip: 192.168.2.107
gw: 192.168.2.1
netmask: 255.255.255.0
DNS lookup succeeded. IP=116.62.81.138
... allocated socket
... connected
... socket send success
... done reading from socket. Last read return=0 write_idx=995 errno=107.
{"results":[{"location":{"id":"WX4FBXXFKE4F","name":"北京","country":"CN","path":"北京,北京,中国","timezone":"Asia/Shanghai","timezone_offset":"+08:00"},"daily":[{"date":"2023-10-22","text_day":"晴","code_day":"0","text_night":"晴","code_night":"1","high":"21","low":"6","rainfall":"0.00","precip":"0.00","wind_direction":"无持续风向","wind_direction_degree":"","wind_speed":"8.4","wind_scale":"2","humidity":"61"},{"date":"2023-10-23","text_day":"晴","code_day":"0","text_night":"晴","code_night":"1","high":"21","low":"7","rainfall":"0.00","precip":"0.00","wind_direction":"无持续风向","wind_direction_degree":"","wind_speed":"3.0","wind_scale":"1","humidity":"75"},{"date":"2023-10-24","text_day":"晴","code_day":"0","text_night":"晴","code_night":"1","high":"23","low":"9","rainfall":"0.00","precip":"0.00","wind_direction":"无持续风向","wind_direction_degree":"","wind_speed":"3.0","wind_scale":"1","humidity":"75"}],"last_update":"2023-10-20T08:00:00+08:00"}]}
===========北京近三天的天气情况如下===========
【2023-10-22】
天气:晴
最高温:21℃
最低温:6℃
风向:无持续风向
风速:8.4km/h
风力等级:2

【2023-10-23】
天气:晴
最高温:21℃
最低温:7℃
风向:无持续风向
风速:3.0km/h
风力等级:1

【2023-10-24】
天气:晴
最高温:23℃
最低温:9℃
风向:无持续风向
风速:3.0km/h
风力等级:1
- 1
- 2
- 3
- 4
- 5
- 6
- 7
- 8
- 9
- 10
- 11
- 12
- 13
- 14
- 15
- 16
- 17
- 18
- 19
- 20
- 21
- 22
- 23
- 24
- 25
- 26
- 27
- 28
- 29
- 30
- 31
- 32
- 33
- 34
- 35
- 36
- 37
- 38
- 39
- 40
- 41
- 42
- 43
- 44
- 45
- 46
- 47
- 48
- 49
- 50
- 51
- 52
- 53
- 54
- 55
- 56
- 57
- 58
- 59
- 60
- 61
- 62
- 63
- 64
- 65
- 66
- 67
- 68
- 69
- 70
- 71
- 72
- 73
- 74
- 75
- 76
- 77
- 78
- 79
- 80
- 81
- 82
- 83
- 84
- 85
- 86
可以看到我们已经成功获取了北京的未来三天的天气情况.
4. 总结
通过本次开发板评测,掌握了XR806的WiFi相关API的使用,系统事件监听API的使用掌,握了sokect网络编程相关知识,掌握了cJSON的使用. XR806是一款性价比很高的WiFi/BLE MCU,官方提供的SDK完善,文档丰富,是物联网相关的项目的理想选择.
附件:工程源码仓库


