- 1能不能介绍一下USB传输协议的原理
- 2SpringDataJpa使用详解_spring data jpa使用
- 3jQuery ui effects详细用法_$effect详解
- 4NameError: name xx is not defined_input nameerror: name 'qwe' is not defined
- 5盘点人工智能十大经典应用领域、图解技术原理
- 6JavaScript、Kotlin、Flutter可以开发鸿蒙APP吗?
- 7APP测试Adb操作命令与Monkey使用、查错流程(入门+精通级)_monkey命令忽略崩溃
- 8AWS S3跨账号复制迁移数据_两个不同账户的aws 跨库复制
- 9Ineffective mark-compacts near heap limit Allocation failed-JavaScript heap out of memory vue项目内存溢出_v8 ineffective mark-compacts near heap limit alloc
- 10发掘非结构化数据价值:AI 在文档理解领域的现状与未来_非结构化数据 ai
前端Vue小兔鲜儿电商项目实战Day05_vue小兔鲜儿项目
赞
踩
一、登录 - 整体认识和路由配置
1. 整体认识
登录页面的主要功能就是表单校验和登录退出业务
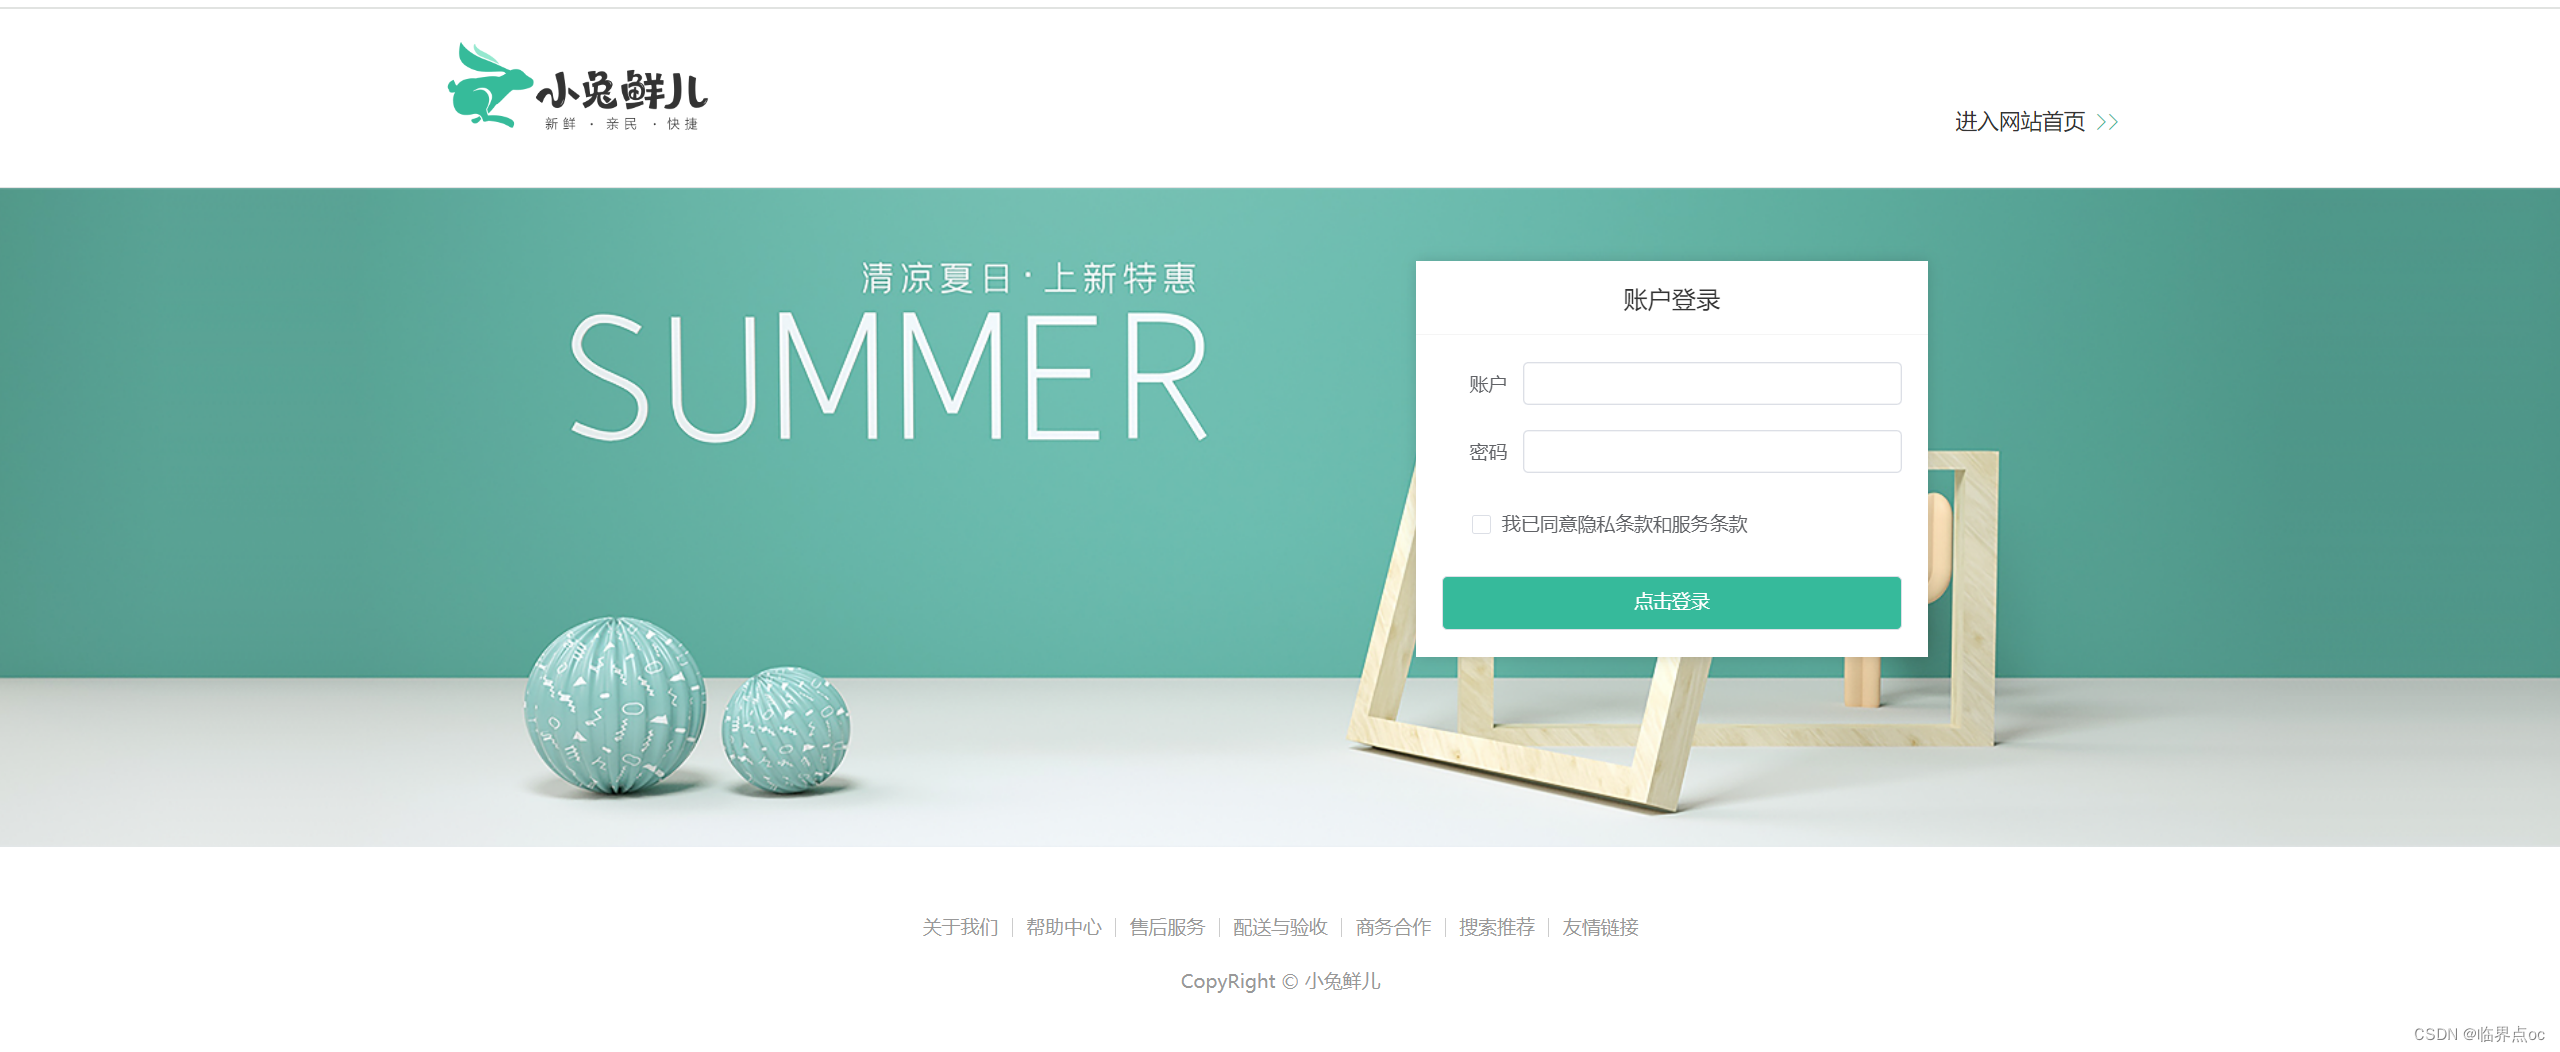
①src/views/Login/index.vue
- <script setup></script>
-
- <template>
- <div>
- <header class="login-header">
- <div class="container m-top-20">
- <h1 class="logo">
- <RouterLink to="/">小兔鲜</RouterLink>
- </h1>
- <RouterLink class="entry" to="/">
- 进入网站首页
- <i class="iconfont icon-angle-right"></i>
- <i class="iconfont icon-angle-right"></i>
- </RouterLink>
- </div>
- </header>
- <section class="login-section">
- <div class="wrapper">
- <nav>
- <a href="javascript:;">账户登录</a>
- </nav>
- <div class="account-box">
- <div class="form">
- <el-form label-position="right" label-width="60px" status-icon>
- <el-form-item label="账户">
- <el-input />
- </el-form-item>
- <el-form-item label="密码">
- <el-input />
- </el-form-item>
- <el-form-item label-width="22px">
- <el-checkbox size="large">
- 我已同意隐私条款和服务条款
- </el-checkbox>
- </el-form-item>
- <el-button size="large" class="subBtn">点击登录</el-button>
- </el-form>
- </div>
- </div>
- </div>
- </section>
-
- <footer class="login-footer">
- <div class="container">
- <p>
- <a href="javascript:;">关于我们</a>
- <a href="javascript:;">帮助中心</a>
- <a href="javascript:;">售后服务</a>
- <a href="javascript:;">配送与验收</a>
- <a href="javascript:;">商务合作</a>
- <a href="javascript:;">搜索推荐</a>
- <a href="javascript:;">友情链接</a>
- </p>
- <p>CopyRight © 小兔鲜儿</p>
- </div>
- </footer>
- </div>
- </template>
-
- <style scoped lang="scss">
- .login-header {
- background: #fff;
- border-bottom: 1px solid #e4e4e4;
-
- .container {
- display: flex;
- align-items: flex-end;
- justify-content: space-between;
- }
-
- .logo {
- width: 200px;
-
- a {
- display: block;
- height: 132px;
- width: 100%;
- text-indent: -9999px;
- background: url('@/assets/images/logo.png') no-repeat center 18px /
- contain;
- }
- }
-
- .sub {
- flex: 1;
- font-size: 24px;
- font-weight: normal;
- margin-bottom: 38px;
- margin-left: 20px;
- color: #666;
- }
-
- .entry {
- width: 120px;
- margin-bottom: 38px;
- font-size: 16px;
-
- i {
- font-size: 14px;
- color: $xtxColor;
- letter-spacing: -5px;
- }
- }
- }
-
- .login-section {
- background: url('@/assets/images/login-bg.png') no-repeat center / cover;
- height: 488px;
- position: relative;
-
- .wrapper {
- width: 380px;
- background: #fff;
- position: absolute;
- left: 50%;
- top: 54px;
- transform: translate3d(100px, 0, 0);
- box-shadow: 0 0 10px rgba(0, 0, 0, 0.15);
-
- nav {
- font-size: 14px;
- height: 55px;
- margin-bottom: 20px;
- border-bottom: 1px solid #f5f5f5;
- display: flex;
- padding: 0 40px;
- text-align: right;
- align-items: center;
-
- a {
- flex: 1;
- line-height: 1;
- display: inline-block;
- font-size: 18px;
- position: relative;
- text-align: center;
- }
- }
- }
- }
-
- .login-footer {
- padding: 30px 0 50px;
- background: #fff;
-
- p {
- text-align: center;
- color: #999;
- padding-top: 20px;
-
- a {
- line-height: 1;
- padding: 0 10px;
- color: #999;
- display: inline-block;
-
- ~ a {
- border-left: 1px solid #ccc;
- }
- }
- }
- }
-
- .account-box {
- .toggle {
- padding: 15px 40px;
- text-align: right;
-
- a {
- color: $xtxColor;
-
- i {
- font-size: 14px;
- }
- }
- }
-
- .form {
- padding: 0 20px 20px 20px;
-
- &-item {
- margin-bottom: 28px;
-
- .input {
- position: relative;
- height: 36px;
-
- > i {
- width: 34px;
- height: 34px;
- background: #cfcdcd;
- color: #fff;
- position: absolute;
- left: 1px;
- top: 1px;
- text-align: center;
- line-height: 34px;
- font-size: 18px;
- }
-
- input {
- padding-left: 44px;
- border: 1px solid #cfcdcd;
- height: 36px;
- line-height: 36px;
- width: 100%;
-
- &.error {
- border-color: $priceColor;
- }
-
- &.active,
- &:focus {
- border-color: $xtxColor;
- }
- }
-
- .code {
- position: absolute;
- right: 1px;
- top: 1px;
- text-align: center;
- line-height: 34px;
- font-size: 14px;
- background: #f5f5f5;
- color: #666;
- width: 90px;
- height: 34px;
- cursor: pointer;
- }
- }
-
- > .error {
- position: absolute;
- font-size: 12px;
- line-height: 28px;
- color: $priceColor;
-
- i {
- font-size: 14px;
- margin-right: 2px;
- }
- }
- }
-
- .agree {
- a {
- color: #069;
- }
- }
-
- .btn {
- display: block;
- width: 100%;
- height: 40px;
- color: #fff;
- text-align: center;
- line-height: 40px;
- background: $xtxColor;
-
- &.disabled {
- background: #cfcdcd;
- }
- }
- }
-
- .action {
- padding: 20px 40px;
- display: flex;
- justify-content: space-between;
- align-items: center;
-
- .url {
- a {
- color: #999;
- margin-left: 10px;
- }
- }
- }
- }
-
- .subBtn {
- background: $xtxColor;
- width: 100%;
- color: #fff;
- }
- </style>

②src/views/Layout/components/LayoutNav.vue
- <script setup></script>
-
- <template>
- <nav class="app-topnav">
- <div class="container">
- <ul>
- <!-- 多模板渲染 区分登录状态和非登录状态 -->
- <template v-if="false">
- <li>
- <a href="javascript:;"><i class="iconfont icon-user"></i>周杰伦</a>
- </li>
- <li>
- <el-popconfirm
- title="确认退出吗?"
- confirm-button-text="确认"
- cancel-button-text="取消"
- >
- <template #reference>
- <a href="javascript:;">退出登录</a>
- </template>
- </el-popconfirm>
- </li>
- <li><a href="javascript:;">我的订单</a></li>
- <li><a href="javascript:;">会员中心</a></li>
- </template>
- <template v-else>
- <li>
- <a href="javascript:;" @click="$router.push('/login')">请先登录</a>
- </li>
- <li><a href="javascript:;">帮助中心</a></li>
- <li><a href="javascript:;">关于我们</a></li>
- </template>
- </ul>
- </div>
- </nav>
- </template>
-
- <style scoped lang="scss">
- <!-- ... ... -->
- </style>
二、登录 - 表单校验实现
1. 为什么需要校验
作用:前端提前校验可以省去一些错误的请求提交,为后端节省接口压力
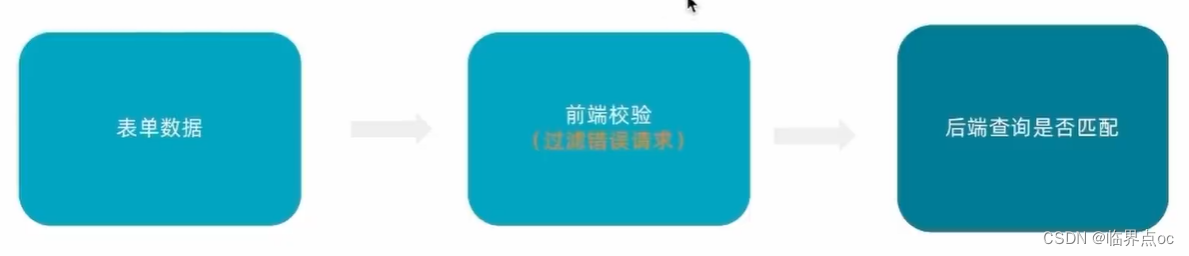
2. 表单如何进行校验
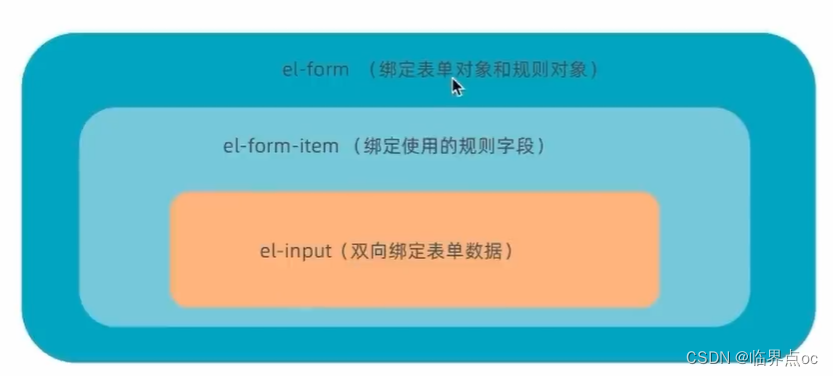
ElementPlus表单组件内置了表单校验功能,只需要按照组件要求配置必要参数即可。
思想:当功能很复杂时,通过多个组件各自负责某个功能,再组合成一个大功能是组件设计中的常用方法。
表单校验步骤
- 1. 按照接口字段准备表单对象并绑定
- 2. 按照产品要求准备规则对象并绑定
- 3. 指定表单域的校验字段名
- 4. 把表单对象进行双向绑定
自定义校验规则
ElementPlus表单组件内置了初始的校验配置,应付简单的校验只需要通过配置即可,如果想要定制一些特殊的校验需求,可以使用自定义校验规则,格式如下:
校验逻辑:如果勾选了协议框,通过校验,如果没有勾选,不通过校验
src/views/Login/index.vue
- <script setup>
- // 表单校验
- // 整个表单的校验规则
- // 1. 非空校验 required: true message消息提示,trigger触发校验的时机:blur change
- // 2. 长度校验 min:xxx, max:xxx
- // 3. 正则校验 pattern: 正则规则 \S:非空字符
- // 4. 自定义校验 => 自己写逻辑校验(校验函数)
- // validator: (rule, value, callback)
- // (1)rule: 当前校验规则的相关信息
- // (2)value: 所校验的表单元素目前的表单值
- // (3)callback 无论成功还是失败,都需要callback回调
- // - callback()校验成功
-
- import { ref } from 'vue'
- const form = ref()
- // 1. 准备表单对象
- const formModel = ref({
- account: '',
- password: '',
- agree: false
- })
-
- // 2. 准备校验规则对象
- const rules = {
- account: [
- { required: true, message: '用户名不能为空', trigger: 'blur' },
- {
- pattern: /^\S{5,15}$/,
- message: '账户名必须是5-15位的非空字符',
- trigger: 'blur'
- }
- ],
- password: [
- { required: true, message: '密码不能为空', trigger: 'blur' },
- {
- pattern: /^\S{6,15}$/,
- message: '密码必须是5-16位的非空字符',
- trigger: 'blur'
- }
- ],
- agree: [
- {
- // 自定义校验规则
- validator: (rule, value, callback) => {
- console.log(value)
- // 判断是否勾选协议
- if (!value) {
- callback(new Error('请先勾选同意协议'))
- } else {
- callback()
- }
- }
- }
- ]
- }
- </script>
-
- <template>
- <div>
- <header class="login-header">
- <div class="container m-top-20">
- <h1 class="logo">
- <RouterLink to="/">小兔鲜</RouterLink>
- </h1>
- <RouterLink class="entry" to="/">
- 进入网站首页
- <i class="iconfont icon-angle-right"></i>
- <i class="iconfont icon-angle-right"></i>
- </RouterLink>
- </div>
- </header>
- <section class="login-section">
- <div class="wrapper">
- <nav>
- <a href="javascript:;">账户登录</a>
- </nav>
- <div class="account-box">
- <div class="form">
- <el-form
- :model="formModel"
- :rules="rules"
- ref="form"
- label-position="right"
- label-width="60px"
- status-icon
- >
- <el-form-item label="账户" prop="account">
- <el-input
- v-model="formModel.account"
- placeholder="请输入账户名"
- />
- </el-form-item>
- <el-form-item label="密码" prop="password">
- <el-input
- v-model="formModel.password"
- placeholder="请输入密码"
- />
- </el-form-item>
- <el-form-item label-width="22px" prop="agree">
- <el-checkbox size="large" v-model="formModel.agree">
- 我已同意隐私条款和服务条款
- </el-checkbox>
- </el-form-item>
- <el-button size="large" class="subBtn">点击登录</el-button>
- </el-form>
- </div>
- </div>
- </div>
- </section>
-
- <footer class="login-footer">
- <div class="container">
- <p>
- <a href="javascript:;">关于我们</a>
- <a href="javascript:;">帮助中心</a>
- <a href="javascript:;">售后服务</a>
- <a href="javascript:;">配送与验收</a>
- <a href="javascript:;">商务合作</a>
- <a href="javascript:;">搜索推荐</a>
- <a href="javascript:;">友情链接</a>
- </p>
- <p>CopyRight © 小兔鲜儿</p>
- </div>
- </footer>
- </div>
- </template>
-
- <style scoped lang="scss">
- .login-header {
- background: #fff;
- border-bottom: 1px solid #e4e4e4;
-
- .container {
- display: flex;
- align-items: flex-end;
- justify-content: space-between;
- }
-
- .logo {
- width: 200px;
-
- a {
- display: block;
- height: 132px;
- width: 100%;
- text-indent: -9999px;
- background: url('@/assets/images/logo.png') no-repeat center 18px /
- contain;
- }
- }
-
- .sub {
- flex: 1;
- font-size: 24px;
- font-weight: normal;
- margin-bottom: 38px;
- margin-left: 20px;
- color: #666;
- }
-
- .entry {
- width: 120px;
- margin-bottom: 38px;
- font-size: 16px;
-
- i {
- font-size: 14px;
- color: $xtxColor;
- letter-spacing: -5px;
- }
- }
- }
-
- .login-section {
- background: url('@/assets/images/login-bg.png') no-repeat center / cover;
- height: 488px;
- position: relative;
-
- .wrapper {
- width: 380px;
- background: #fff;
- position: absolute;
- left: 50%;
- top: 54px;
- transform: translate3d(100px, 0, 0);
- box-shadow: 0 0 10px rgba(0, 0, 0, 0.15);
-
- nav {
- font-size: 14px;
- height: 55px;
- margin-bottom: 20px;
- border-bottom: 1px solid #f5f5f5;
- display: flex;
- padding: 0 40px;
- text-align: right;
- align-items: center;
-
- a {
- flex: 1;
- line-height: 1;
- display: inline-block;
- font-size: 18px;
- position: relative;
- text-align: center;
- }
- }
- }
- }
-
- .login-footer {
- padding: 30px 0 50px;
- background: #fff;
-
- p {
- text-align: center;
- color: #999;
- padding-top: 20px;
-
- a {
- line-height: 1;
- padding: 0 10px;
- color: #999;
- display: inline-block;
-
- ~ a {
- border-left: 1px solid #ccc;
- }
- }
- }
- }
-
- .account-box {
- .toggle {
- padding: 15px 40px;
- text-align: right;
-
- a {
- color: $xtxColor;
-
- i {
- font-size: 14px;
- }
- }
- }
-
- .form {
- padding: 0 20px 20px 20px;
-
- &-item {
- margin-bottom: 28px;
-
- .input {
- position: relative;
- height: 36px;
-
- > i {
- width: 34px;
- height: 34px;
- background: #cfcdcd;
- color: #fff;
- position: absolute;
- left: 1px;
- top: 1px;
- text-align: center;
- line-height: 34px;
- font-size: 18px;
- }
-
- input {
- padding-left: 44px;
- border: 1px solid #cfcdcd;
- height: 36px;
- line-height: 36px;
- width: 100%;
-
- &.error {
- border-color: $priceColor;
- }
-
- &.active,
- &:focus {
- border-color: $xtxColor;
- }
- }
-
- .code {
- position: absolute;
- right: 1px;
- top: 1px;
- text-align: center;
- line-height: 34px;
- font-size: 14px;
- background: #f5f5f5;
- color: #666;
- width: 90px;
- height: 34px;
- cursor: pointer;
- }
- }
-
- > .error {
- position: absolute;
- font-size: 12px;
- line-height: 28px;
- color: $priceColor;
-
- i {
- font-size: 14px;
- margin-right: 2px;
- }
- }
- }
-
- .agree {
- a {
- color: #069;
- }
- }
-
- .btn {
- display: block;
- width: 100%;
- height: 40px;
- color: #fff;
- text-align: center;
- line-height: 40px;
- background: $xtxColor;
-
- &.disabled {
- background: #cfcdcd;
- }
- }
- }
-
- .action {
- padding: 20px 40px;
- display: flex;
- justify-content: space-between;
- align-items: center;
-
- .url {
- a {
- color: #999;
- margin-left: 10px;
- }
- }
- }
- }
-
- .subBtn {
- background: $xtxColor;
- width: 100%;
- color: #fff;
- }
- </style>
3. 整个表单的内容验证
思考:每个表单域都有自己的校验触发事件,如果用户一上来就点击登录怎么办呢?
答:在点击登录时需要对所有需要校验的表单进行统一校验
三、登录 - 基础登录业务实现
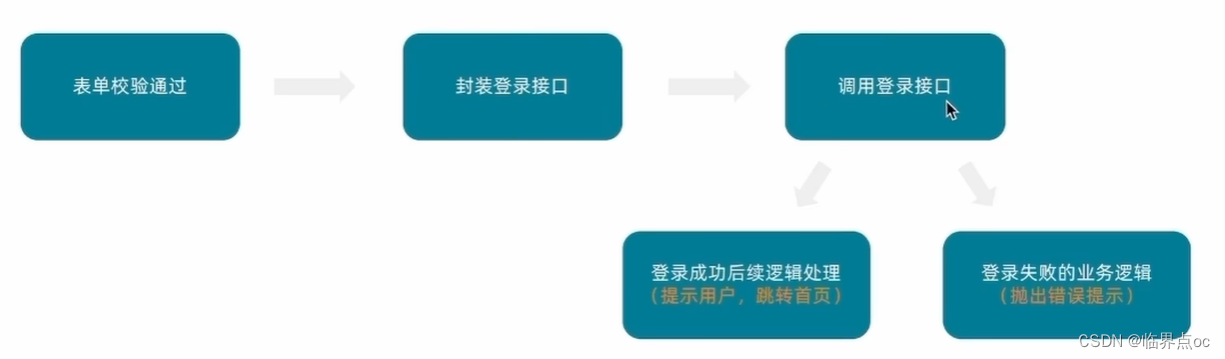
1. 封装登录接口 - src/apis/user.js
- import instance from '@/utils/http.js'
-
- // 登录接口
- // export const loginAPI = ({ account, password }) => {
- // instance.post('/login', { account, password })
- // }
- export const loginAPI = ({ account, password }) => {
- return instance({
- url: '/login',
- method: 'POST',
- data: {
- account,
- password
- }
- })
- }
2. 登录成功后续逻辑处理 - src/views/Login/index.vue
- <script setup>
- // 表单校验
- // 整个表单的校验规则
- // 1. 非空校验 required: true message消息提示,trigger触发校验的时机:blur change
- // 2. 长度校验 min:xxx, max:xxx
- // 3. 正则校验 pattern: 正则规则 \S:非空字符
- // 4. 自定义校验 => 自己写逻辑校验(校验函数)
- // validator: (rule, value, callback)
- // (1)rule: 当前校验规则的相关信息
- // (2)value: 所校验的表单元素目前的表单值
- // (3)callback 无论成功还是失败,都需要callback回调
- // - callback()校验成功
-
- import { loginAPI } from '@/apis/user.js'
- import { ref } from 'vue'
- import { useRouter } from 'vue-router'
-
- const form = ref(null)
- // 1. 准备表单对象
- const formModel = ref({
- account: '',
- password: '',
- agree: false
- })
-
- // 2. 准备校验规则对象
- const rules = {
- account: [
- { required: true, message: '用户名不能为空', trigger: 'blur' },
- {
- pattern: /^\S{5,15}$/,
- message: '账户名必须是5-15位的非空字符',
- trigger: 'blur'
- }
- ],
- password: [
- { required: true, message: '密码不能为空', trigger: 'blur' },
- {
- pattern: /^\S{6,15}$/,
- message: '密码必须是5-16位的非空字符',
- trigger: 'blur'
- }
- ],
- agree: [
- {
- // 自定义校验规则
- validator: (rule, value, callback) => {
- console.log(value)
- // 判断是否勾选协议
- if (!value) {
- callback(new Error('请先勾选同意协议'))
- } else {
- callback()
- }
- }
- }
- ]
- }
-
- // 带r,调用方法;不带r,获取参数
- const router = useRouter()
- const doLogin = async () => {
- // 登录之前,先进行校验。校验成功,发请求;校验失败,自动提示
- await form.value.validate()
- const { account, password } = formModel.value
- await loginAPI({ account, password })
- ElMessage.success('登录成功')
- // 跳转首页
- router.replace({ path: '/' })
- }
- </script>
-
- <template>
- <div>
- <header class="login-header">
- <div class="container m-top-20">
- <h1 class="logo">
- <RouterLink to="/">小兔鲜</RouterLink>
- </h1>
- <RouterLink class="entry" to="/">
- 进入网站首页
- <i class="iconfont icon-angle-right"></i>
- <i class="iconfont icon-angle-right"></i>
- </RouterLink>
- </div>
- </header>
- <section class="login-section">
- <div class="wrapper">
- <nav>
- <a href="javascript:;">账户登录</a>
- </nav>
- <div class="account-box">
- <!--
- (1) el-form => :model="ruleForm" 绑定的整个form的数据对象 { xxx, xxx, xxx }
- (2) el-form => :rules="rules" 绑定的整个rules规则对象 { xxx, xxx, xxx }
- (3) 表单元素 => v-model="ruleForm.xxx" 给表单元素,绑定form的子属性
- (4) el-form-item => prop配置生效的是哪个校验规则 (和rules中的字段要对应)
- -->
- <div class="form">
- <el-form
- :model="formModel"
- :rules="rules"
- ref="form"
- label-position="right"
- label-width="60px"
- status-icon
- >
- <el-form-item label="账户" prop="account">
- <el-input
- v-model="formModel.account"
- placeholder="请输入账户名"
- />
- </el-form-item>
- <el-form-item label="密码" prop="password">
- <el-input
- v-model="formModel.password"
- placeholder="请输入密码"
- />
- </el-form-item>
- <el-form-item label-width="22px" prop="agree">
- <el-checkbox size="large" v-model="formModel.agree">
- 我已同意隐私条款和服务条款
- </el-checkbox>
- </el-form-item>
- <el-button @click="doLogin" size="large" class="subBtn"
- >点击登录</el-button
- >
- </el-form>
- </div>
- </div>
- </div>
- </section>
-
- <footer class="login-footer">
- <div class="container">
- <p>
- <a href="javascript:;">关于我们</a>
- <a href="javascript:;">帮助中心</a>
- <a href="javascript:;">售后服务</a>
- <a href="javascript:;">配送与验收</a>
- <a href="javascript:;">商务合作</a>
- <a href="javascript:;">搜索推荐</a>
- <a href="javascript:;">友情链接</a>
- </p>
- <p>CopyRight © 小兔鲜儿</p>
- </div>
- </footer>
- </div>
- </template>
3. .eslintrc.cjs - 配置全局变量
- /* eslint-env node */
- require('@rushstack/eslint-patch/modern-module-resolution')
-
- module.exports = {
- root: true,
- extends: [
- 'plugin:vue/vue3-essential',
- 'eslint:recommended',
- '@vue/eslint-config-prettier/skip-formatting'
- ],
- parserOptions: {
- ecmaVersion: 'latest'
- },
- rules: {
- // prettier专注于代码的美观度 (格式化工具)
- // 前置:
- // 1. 禁用格式化插件 prettier format on save 关闭
- // 2. 安装Eslint插件, 并配置保存时自动修复
- 'prettier/prettier': [
- 'warn',
- {
- singleQuote: true, // 单引号
- semi: false, // 无分号
- printWidth: 80, // 每行宽度至多80字符
- trailingComma: 'none', // 不加对象|数组最后逗号
- endOfLine: 'auto' // 换行符号不限制(win mac 不一致)
- }
- ],
- // ESLint关注于规范, 如果不符合规范,报错
- 'vue/multi-word-component-names': [
- 'warn',
- {
- ignores: ['index'] // vue组件名称多单词组成(忽略index.vue)
- }
- ],
- 'vue/no-setup-props-destructure': ['off'], // 关闭 props 解构的校验 (props解构丢失响应式)
- // 添加未定义变量错误提示,create-vue@3.6.3 关闭,这里加上是为了支持下一个章节演示。
- 'no-undef': 'error'
- },
- // 全局变量
- globals: {
- ElMessage: 'readonly',
- ElMessageBox: 'readonly',
- ElLoading: 'readonly'
- }
- }
4. 登录失败的逻辑处理 - src/utils/http.js
- import axios from 'axios'
-
- // 创建axios实例
- const instance = axios.create({
- baseURL: 'http://pcapi-xiaotuxian-front-devtest.itheima.net',
- timeout: 5000
- })
-
- // axios请求拦截器
- instance.interceptors.request.use(
- (config) => {
- return config
- },
- (e) => Promise.reject(e)
- )
-
- // axios响应式拦截器
- instance.interceptors.response.use(
- (res) => res.data,
- (e) => {
- console.log(e)
- // 统一错误提示
- ElMessage({
- type: 'warning',
- message: e.response.data.message
- })
- return Promise.reject(e)
- }
- )
-
- export default instance
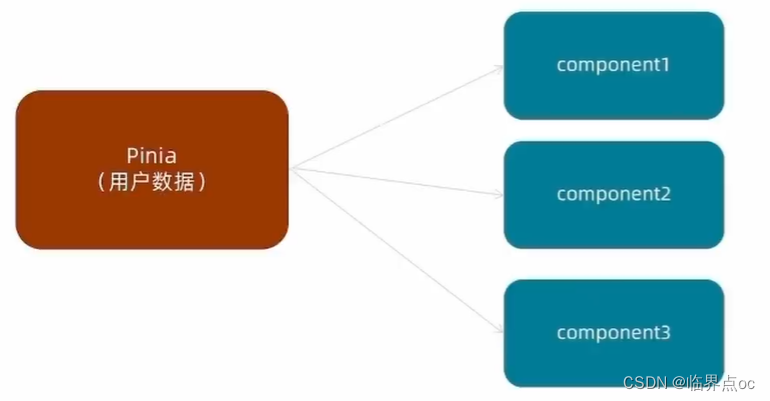
四、登录 - Pinia管理用户数据
1. 为什么要用Pinia管理数据
由于用户数据的特殊性,在很多组件中都有可能进行共享,共享的数据使用Pinia管理会更加方便
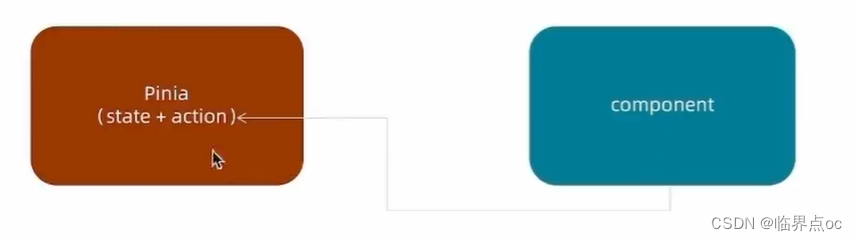
2. 如何使用Pinia管理数据
遵循理念:和数据相关的所有操作(state + action)都放到Pinia中,组件只负责触发action函数

①src/stores/user.js
- import { defineStore } from 'pinia'
- import { loginAPI } from '@/apis/user'
- import { ref } from 'vue'
-
- export const useUserStore = defineStore(
- 'user',
- () => {
- // 1. 定义管理用户数据的state
- const userInfo = ref({})
-
- // 2. 定义获取数据的action函数
- const getUserInfo = async ({ account, password }) => {
- const res = await loginAPI({ account, password })
- userInfo.value = res.result
- }
- // 3. 以对象的形式把state和action return
- return {
- userInfo,
- getUserInfo
- }
- },
- {
- persist: true
- }
- )
②src/views/Login/index.vue
- <script setup>
- import { useUserStore } from '@/stores/user.js'
-
- const userStore = useUserStore()
-
- // ... ...
-
- // 带r,调用方法;不带r,获取参数
- const router = useRouter()
- const doLogin = async () => {
- // 登录之前,先进行校验。校验成功,发请求;校验失败,自动提示
- await form.value.validate()
- const { account, password } = formModel.value
- await userStore.getUserInfo({ account, password })
- ElMessage.success('登录成功')
- // 跳转首页
- router.replace({ path: '/' })
- }
- </script>
-
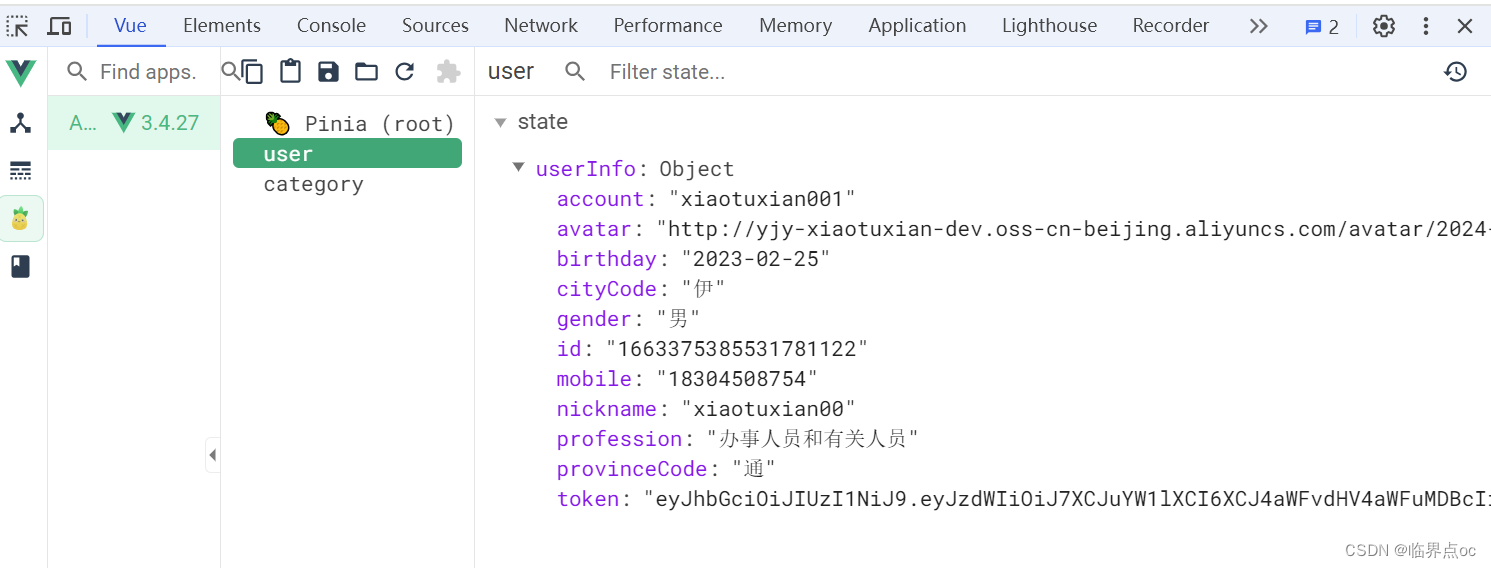
3. Pinia用户数据持久化
持久化用户数据说明
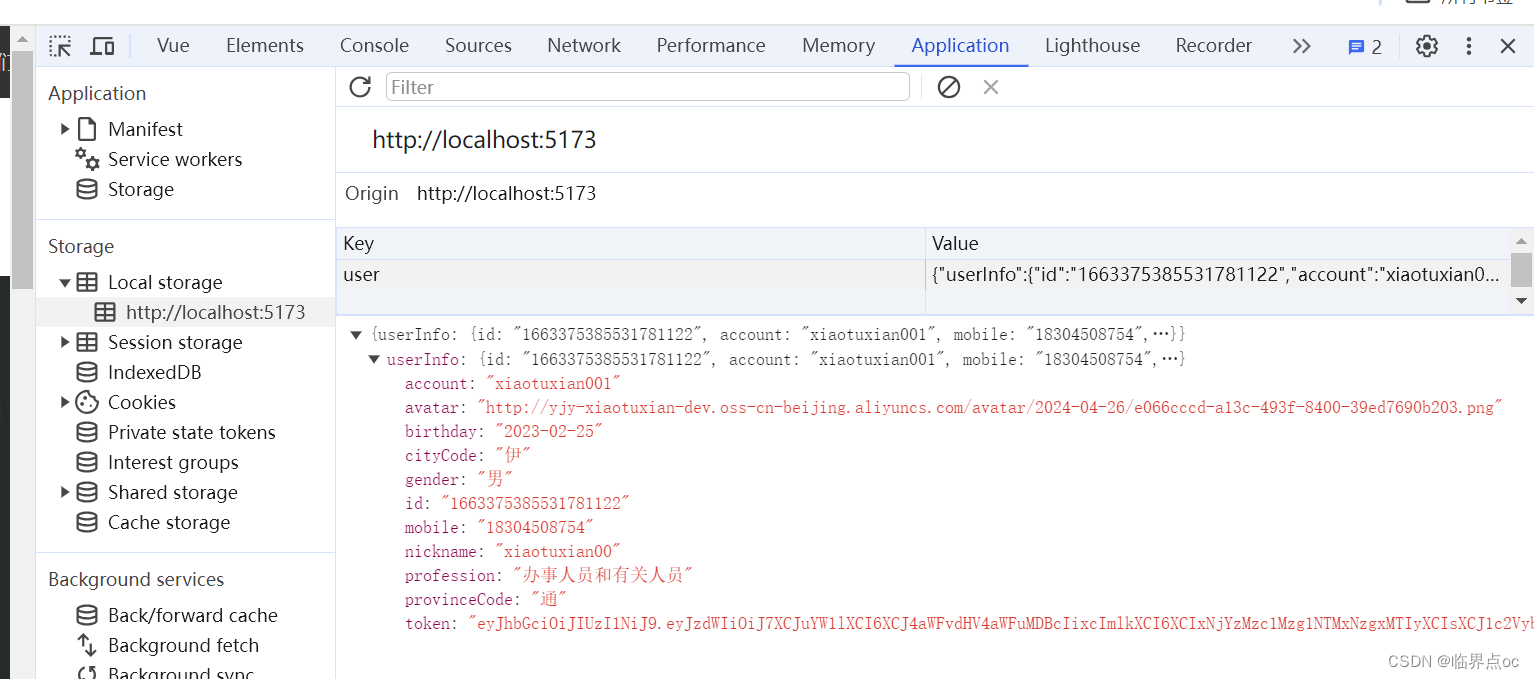
1. 用户数据中有一个关键的数据叫做Token(用来标识当前用户是否登录),而Token持续一段时间才会过期
2. Pinia的存储是基于内存的,刷新就丢失,为了保持登录状态就要做到刷新不丢失,需要配合持久化进行存储。
目的:保持token不丢失,保持登录状态
最终效果:操作state时会自动把用户数据在本地的localStorage也存一份,刷新的时候会从localStorage中先取
快速开始 | pinia-plugin-persistedstate

运行机制:在设置state的时候会自动把数据同步给localstorage,在获取state数据的时候会优先从localstorage中获取。
①安装插件
pnpm i pinia-plugin-persistedstate②将插件添加到pinia实例上 - main.js
- import { createApp } from 'vue'
- import { createPinia } from 'pinia'
- import piniaPluginPersistedstate from 'pinia-plugin-persistedstate'
-
- import App from './App.vue'
- import router from './router'
- // 引入初始化样式文件
- import '@/styles/common.scss'
- // 引入懒加载指令插件并注册
- import { lazyPlugin } from '@/direactives'
- // 引入全局组件插件
- import { componentPlugin } from '@/components/index.js'
-
- const app = createApp(App)
- const pinia = createPinia()
-
- pinia.use(piniaPluginPersistedstate)
- app.use(pinia)
- app.use(router)
- app.use(lazyPlugin)
- app.use(componentPlugin)
-
- app.mount('#app')
③创建Store时,将persist选项设置为true
- import { defineStore } from 'pinia'
- import { loginAPI } from '@/apis/user'
- import { ref } from 'vue'
-
- export const useUserStore = defineStore(
- 'user',
- () => {
- // 1. 定义管理用户数据的state
- const userInfo = ref({})
-
- // 2. 定义获取数据的action函数
- const getUserInfo = async ({ account, password }) => {
- const res = await loginAPI({ account, password })
- userInfo.value = res.result
- }
- // 3. 以对象的形式把state和action return
- return {
- userInfo,
- getUserInfo
- }
- },
- {
- persist: true
- }
- )
五、登录 - 登录和非登录状态的模板适配
1. 需求理解

src/views/Layout/components/LayoutNav.vue
- <script setup>
- import { useUserStore } from '@/stores/user.js'
- const userStore = useUserStore()
- </script>
-
- <template>
- <nav class="app-topnav">
- <div class="container">
- <ul>
- <!-- 多模板渲染 区分登录状态和非登录状态 -->
- <!-- 判断是否有token -->
- <template v-if="userStore.userInfo.token">
- <li>
- <a href="javascript:;">
- <i class="iconfont icon-user"></i>
- {{ userStore.userInfo.nickname || userStore.userInfo.account }}
- </a>
- </li>
- <li>
- <el-popconfirm
- title="确认退出吗?"
- confirm-button-text="确认"
- cancel-button-text="取消"
- >
- <template #reference>
- <a href="javascript:;">退出登录</a>
- </template>
- </el-popconfirm>
- </li>
- <li><a href="javascript:;">我的订单</a></li>
- <li><a href="javascript:;">会员中心</a></li>
- </template>
- <template v-else>
- <li>
- <a href="javascript:;" @click="$router.push('/login')">请先登录</a>
- </li>
- <li><a href="javascript:;">帮助中心</a></li>
- <li><a href="javascript:;">关于我们</a></li>
- </template>
- </ul>
- </div>
- </nav>
- </template>

六、登录 - 请求拦截器携带Token
1. 为什么要在请求拦截器携带Token
Token作为用户标识,在很多个接口中都需要携带Token才可以正确获取数据,所以需要在接口调用时携带Token。另外,为了统一控制采取请求拦截器携带的方案。
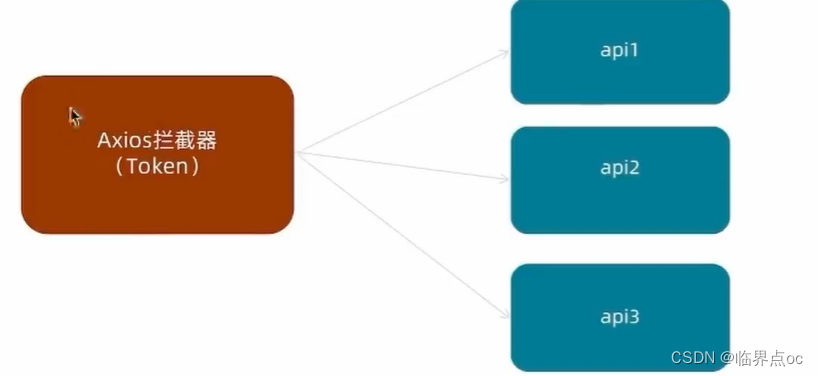
2. 如何配置
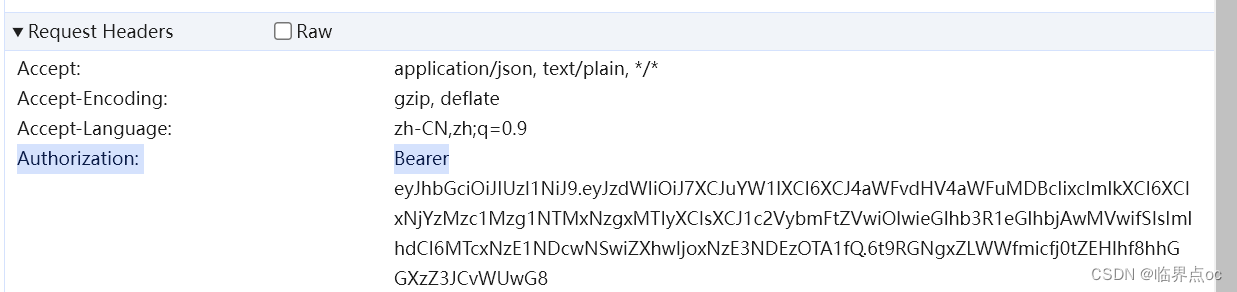
Axios请求拦截器可以在接口正式发起之前对请求参数做一些事情,通常Token数据会被注入到请求header中,格式按照后端要求的格式进行拼接处理
- instance.interceptors.request.use(config => {
- const userStore = useUserStore()
- const token = userStore.userInfo.token
- if( token ) {
- config.headers.Authorization = `Bearer ${token}`
- }
- return config
- }, e=> Promise.reject(e))
七、登录 - 退出登录功能实现
1. 退出登录业务实现
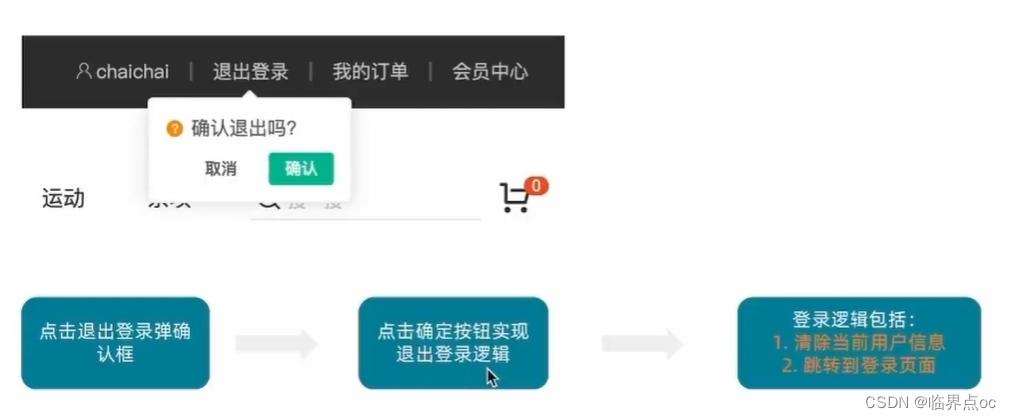
Popconfirm 气泡确认框 | Element Plus
①新增清除用户信息action - src/stores/user.js
- import { defineStore } from 'pinia'
- import { loginAPI } from '@/apis/user'
- import { ref } from 'vue'
-
- export const useUserStore = defineStore(
- 'user',
- () => {
- // 1. 定义管理用户数据的state
- const userInfo = ref({})
-
- // 2. 定义获取数据的action函数
- const getUserInfo = async ({ account, password }) => {
- const res = await loginAPI({ account, password })
- userInfo.value = res.result
- }
- // 退出登录时清除用户信息
- const clearUserInfo = () => {
- userInfo.value = {}
- }
-
- // 3. 以对象的形式把state和action return
- return {
- userInfo,
- getUserInfo,
- clearUserInfo
- }
- },
- {
- persist: true
- }
- )
②组件中执行业务逻辑 - src/views/Layout/components/LayoutNav.vue
- <script setup>
- import { useUserStore } from '@/stores/user.js'
- import { useRouter } from 'vue-router'
- const userStore = useUserStore()
- const router = useRouter()
-
- const confirm = () => {
- // 清除登录信息
- userStore.clearUserInfo()
- // 跳转到登录页
- router.push('/login')
- }
- </script>
-
- <template>
- <nav class="app-topnav">
- <div class="container">
- <ul>
- <!-- 多模板渲染 区分登录状态和非登录状态 -->
- <!-- 判断是否有token -->
- <template v-if="userStore.userInfo.token">
- <li>
- <a href="javascript:;">
- <i class="iconfont icon-user"></i>
- {{ userStore.userInfo.nickname || userStore.userInfo.account }}
- </a>
- </li>
- <li>
- <el-popconfirm
- title="确认退出吗?"
- confirm-button-text="确认"
- cancel-button-text="取消"
- @confirm="confirm"
- >
- <template #reference>
- <a href="javascript:;">退出登录</a>
- </template>
- </el-popconfirm>
- </li>
- <li><a href="javascript:;">我的订单</a></li>
- <li><a href="javascript:;">会员中心</a></li>
- </template>
- <template v-else>
- <li>
- <a href="javascript:;" @click="$router.push('/login')">请先登录</a>
- </li>
- <li><a href="javascript:;">帮助中心</a></li>
- <li><a href="javascript:;">关于我们</a></li>
- </template>
- </ul>
- </div>
- </nav>
- </template>
-
-
八、登录 - Token失效401拦截
1. 业务背景
Token的有效性可以保持一定时间,如果用户一段时间不做任何操作,Token就会失效,使用失效的Token再去请求一些接口,接口就会报401状态码错误,需要我们做额外处理
两个需要思考的问题:
1. 我们能确定用户到底是在访问哪个接口时出现的401错误吗?在什么位置去拦截这个401?
答:响应拦截器
2. 检测到401之后又该干什么呢?
答:清除掉过期的用户信息,跳转到登录页
解决方案:在axios响应拦截器做统一处理

src/utils/http.js
- import axios from 'axios'
- import { useUserStore } from '@/stores/user.js'
- import router from '@/router'
-
- // 创建axios实例
- const instance = axios.create({
- baseURL: 'http://pcapi-xiaotuxian-front-devtest.itheima.net',
- timeout: 5000
- })
-
- // axios请求拦截器
- instance.interceptors.request.use(
- (config) => {
- // 1. 从pinia获取token数据
- const userStore = useUserStore()
- // 2. 按照后端的要求拼接token数据
- const token = userStore.userInfo.token
- if (token) {
- config.headers.Authorization = `Bearer ${token}`
- }
- return config
- },
- (e) => Promise.reject(e)
- )
-
- // axios响应式拦截器
- instance.interceptors.response.use(
- (res) => res.data,
- (e) => {
- const userStore = useUserStore()
- // 统一错误提示
- ElMessage({
- type: 'warning',
- message: e.response.data.message
- })
-
- // 401 token失效处理
- if (e.response.status === 401) {
- // 1. 清除本地用户信息
- userStore.clearUserInfo()
- // 2. 跳转到登录页(进入到详情页才会)
- router.push('/login')
- }
- return Promise.reject(e)
- }
- )
-
- export default instance
九、购物车功能实现
1. 购物车业务逻辑梳理拆解
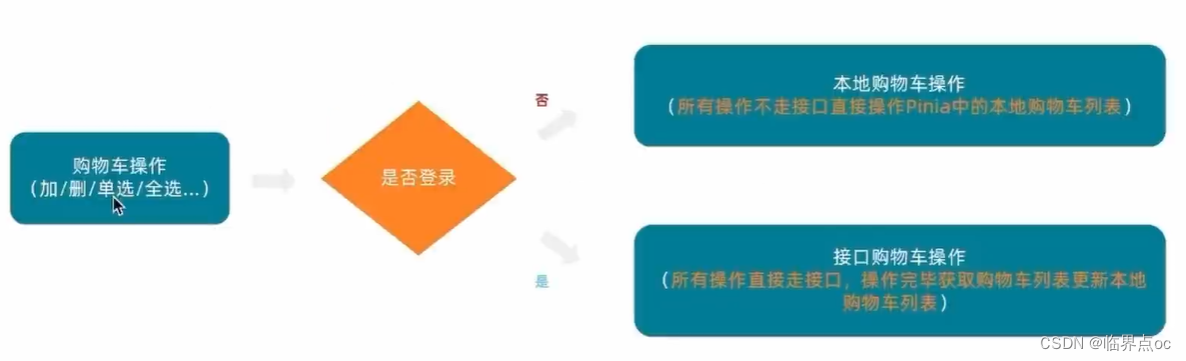
1. 整个购物车的实现分为两个大分支,本地购物车操作和接口购物车操作
2. 由于购物车数据的特殊性,采取pinia管理购物车列表数据并添加持久化缓存
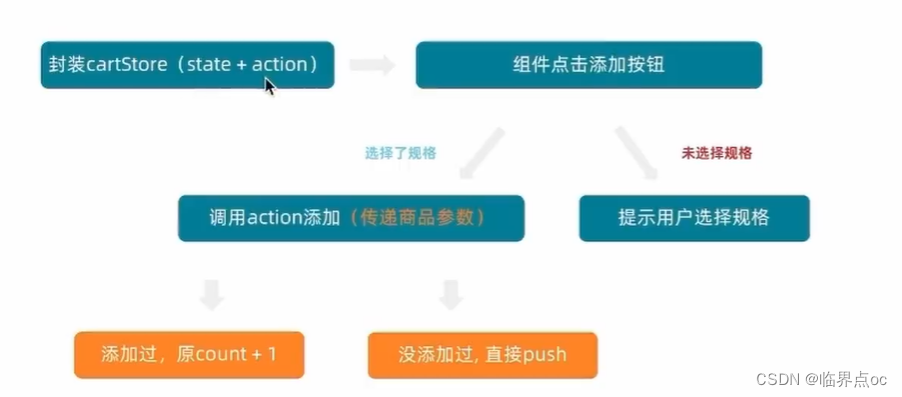
2. 本地购物车 - 加入购物车实现
Input Number 数字输入框 | Element Plus
①封装购物车模块 - src/stores/cart.js
- // 封装购物车模块
- import { ref } from 'vue'
- import { defineStore } from 'pinia'
-
- export const useCartStore = defineStore(
- 'cart',
- () => {
- // 1. 定义state - cartList
- const cartList = ref([])
- // 2. 定义action - addCart
- const addCart = (goods) => {
- // 添加购物车操作
- // 思路:通过匹配传递过来的商品对象中是skuId能不能在cartList中找到,找到了就是添加过
- const item = cartList.value.find((item) => goods.skuId === item.skuId)
- if (item) {
- // 已添加过,count + 1
- item.count++
- } else {
- // 没有添加过,直接push
- cartList.value.push(goods)
- }
- }
-
- return {
- cartList,
- addCart
- }
- },
- {
- persist: true
- }
- )
②src/views/Detail/index.vue
- <script setup>
- // ... ...
- import { useCartStore } from '@/stores/cart.js'
-
- const cartStore = useCartStore()
-
- // sku规格被操作时
- let skuObj = {}
- const skuChange = (sku) => {
- console.log(sku)
- skuObj = sku
- }
-
- const count = ref(1)
- const handleChange = (count) => {
- console.log(count)
- }
-
- // 添加购物车
- const addCart = () => {
- if (skuObj.skuId) {
- // 规格已选择
- cartStore.addCart({
- id: goods.value.id,
- name: goods.value.name,
- picture: goods.value.mainPictures[0],
- price: goods.value.price,
- count: count.value,
- skuId: skuObj.skuId,
- attrsText: skuObj.specsText,
- selected: true
- })
- ElMessage.success('加入购物车成功')
- } else {
- // 规格没有选择,提示用户
- ElMessage.warning('请选择规格')
- }
- }
- </script>
-
- <template>
- <!-- ... ... -->
- <!-- sku组件 -->
- <XtxSku :goods="goods" @change="skuChange"></XtxSku>
- <!-- 数据组件 -->
- <el-input-number
- v-model="count"
- @change="handleChange"
- :min="1"
- />
- <!-- 按钮组件 -->
- <div>
- <el-button @click="addCart" size="large" class="btn">
- 加入购物车
- </el-button>
- </div>
- <!-- ... ... -->
- </template>
-

3. 本地购物车 - 头部购物车列表渲染
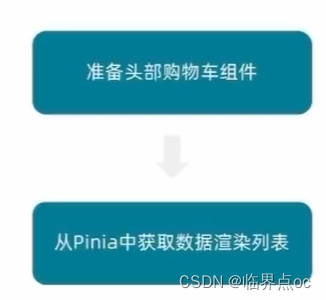
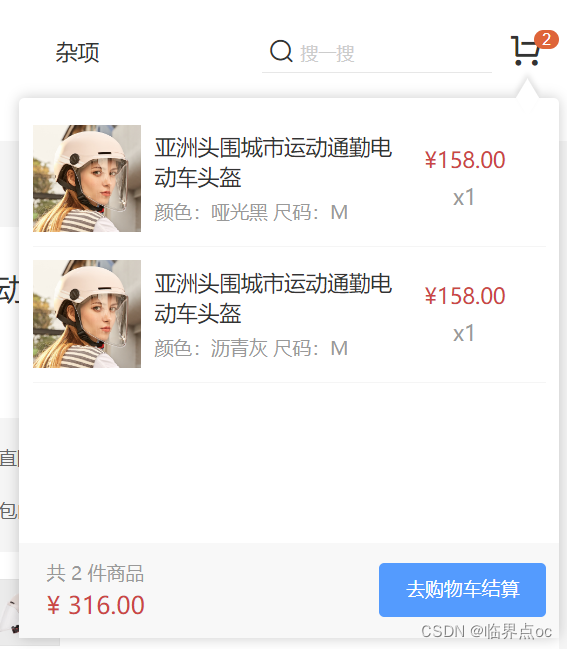
①头部购物车组件 - src/views/Layout/components/HeaderCart.vue
- <script setup>
- import { useCartStore } from '@/stores/cart.js'
- const cartStore = useCartStore()
- </script>
-
- <template>
- <div class="cart">
- <a class="curr" href="javascript:;">
- <i class="iconfont icon-cart"></i><em>{{ cartStore.cartList.length }}</em>
- </a>
- <div class="layer">
- <div class="list">
- <div class="item" v-for="i in cartStore.cartList" :key="i">
- <RouterLink to="">
- <img :src="i.picture" alt="" />
- <div class="center">
- <p class="name ellipsis-2">
- {{ i.name }}
- </p>
- <p class="attr ellipsis">{{ i.attrsText }}</p>
- </div>
- <div class="right">
- <p class="price">¥{{ i.price }}</p>
- <p class="count">x{{ i.count }}</p>
- </div>
- </RouterLink>
- <i
- class="iconfont icon-close-new"
- @click="store.delCart(i.skuId)"
- ></i>
- </div>
- </div>
- <div class="foot">
- <div class="total">
- <p>共 10 件商品</p>
- <p>¥ 100.00</p>
- </div>
- <el-button size="large" type="primary">去购物车结算</el-button>
- </div>
- </div>
- </div>
- </template>
-
- <style scoped lang="scss">
- .cart {
- width: 50px;
- position: relative;
- z-index: 600;
-
- .curr {
- height: 32px;
- line-height: 32px;
- text-align: center;
- position: relative;
- display: block;
-
- .icon-cart {
- font-size: 22px;
- }
-
- em {
- font-style: normal;
- position: absolute;
- right: 0;
- top: 0;
- padding: 1px 6px;
- line-height: 1;
- background: $helpColor;
- color: #fff;
- font-size: 12px;
- border-radius: 10px;
- font-family: Arial;
- }
- }
-
- &:hover {
- .layer {
- opacity: 1;
- transform: none;
- }
- }
-
- .layer {
- opacity: 0;
- transition: all 0.4s 0.2s;
- transform: translateY(-200px) scale(1, 0);
- width: 400px;
- height: 400px;
- position: absolute;
- top: 50px;
- right: 0;
- box-shadow: 0 0 10px rgba(0, 0, 0, 0.2);
- background: #fff;
- border-radius: 4px;
- padding-top: 10px;
-
- &::before {
- content: '';
- position: absolute;
- right: 14px;
- top: -10px;
- width: 20px;
- height: 20px;
- background: #fff;
- transform: scale(0.6, 1) rotate(45deg);
- box-shadow: -3px -3px 5px rgba(0, 0, 0, 0.1);
- }
-
- .foot {
- position: absolute;
- left: 0;
- bottom: 0;
- height: 70px;
- width: 100%;
- padding: 10px;
- display: flex;
- justify-content: space-between;
- background: #f8f8f8;
- align-items: center;
-
- .total {
- padding-left: 10px;
- color: #999;
-
- p {
- &:last-child {
- font-size: 18px;
- color: $priceColor;
- }
- }
- }
- }
- }
-
- .list {
- height: 310px;
- overflow: auto;
- padding: 0 10px;
-
- &::-webkit-scrollbar {
- width: 10px;
- height: 10px;
- }
-
- &::-webkit-scrollbar-track {
- background: #f8f8f8;
- border-radius: 2px;
- }
-
- &::-webkit-scrollbar-thumb {
- background: #eee;
- border-radius: 10px;
- }
-
- &::-webkit-scrollbar-thumb:hover {
- background: #ccc;
- }
-
- .item {
- border-bottom: 1px solid #f5f5f5;
- padding: 10px 0;
- position: relative;
-
- i {
- position: absolute;
- bottom: 38px;
- right: 0;
- opacity: 0;
- color: #666;
- transition: all 0.5s;
- }
-
- &:hover {
- i {
- opacity: 1;
- cursor: pointer;
- }
- }
-
- a {
- display: flex;
- align-items: center;
-
- img {
- height: 80px;
- width: 80px;
- }
-
- .center {
- padding: 0 10px;
- width: 200px;
-
- .name {
- font-size: 16px;
- }
-
- .attr {
- color: #999;
- padding-top: 5px;
- }
- }
-
- .right {
- width: 100px;
- padding-right: 20px;
- text-align: center;
-
- .price {
- font-size: 16px;
- color: $priceColor;
- }
-
- .count {
- color: #999;
- margin-top: 5px;
- font-size: 16px;
- }
- }
- }
- }
- }
- }
- </style>
②导入渲染 - src/views/Layout/components/LayoutHeader.vue
- <script setup>
- import { useCategoryStore } from '@/stores/category.js'
- import HeaderCart from './HeaderCart.vue'
-
- // 使用pinia中的数据
- const categoryStore = useCategoryStore()
- </script>
-
- <template>
- <header class="app-header">
- <div class="container">
- <h1 class="logo">
- <RouterLink to="/">小兔鲜</RouterLink>
- </h1>
- <ul class="app-header-nav">
- <li
- class="home"
- v-for="item in categoryStore.categoryList"
- :key="item.id"
- >
- <RouterLink active-class="active" :to="`/category/${item.id}`">{{
- item.name
- }}</RouterLink>
- </li>
- </ul>
- <div class="search">
- <i class="iconfont icon-search"></i>
- <input type="text" placeholder="搜一搜" />
- </div>
- <!-- 头部购物车 -->
- <HeaderCart></HeaderCart>
- </div>
- </header>
- </template>
4. 本地购物车 - 头部购物车删除实现
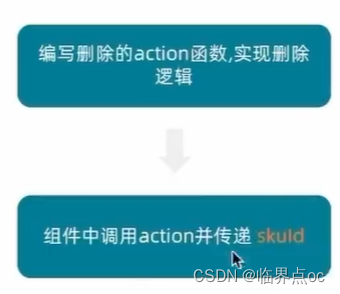
①src/stores/cart.js
- // 封装购物车模块
- import { ref } from 'vue'
- import { defineStore } from 'pinia'
-
- export const useCartStore = defineStore(
- 'cart',
- () => {
- // 1. 定义state - cartList
- const cartList = ref([])
- // 2. 定义action - addCart
- // 添加购物车
- const addCart = (goods) => {
- // 添加购物车操作
- // 思路:通过匹配传递过来的商品对象中是skuId能不能在cartList中找到,找到了就是添加过
- const item = cartList.value.find((item) => goods.skuId === item.skuId)
- if (item) {
- // 已添加过,count + 1
- item.count++
- } else {
- // 没有添加过,直接push
- cartList.value.push(goods)
- }
- }
-
- // 删除购物车
- const delCart = (skuId) => {
- // 思路:1. 找到要删除的下标值 - splice
- // 2. 使用组件的过滤方法 - filter
- const idx = cartList.value.findIndex((item) => skuId === item.skuId)
- cartList.value.splice(idx, 1)
- }
-
- return {
- cartList,
- addCart,
- delCart
- }
- },
- {
- persist: true
- }
- )
②src/views/Layout/components/HeaderCart.vue
- <script setup>
- import { useCartStore } from '@/stores/cart.js'
- const cartStore = useCartStore()
- </script>
-
- <template>
- <div class="cart">
- <a class="curr" href="javascript:;">
- <i class="iconfont icon-cart"></i>
- <em v-if="cartStore.cartList.length">{{ cartStore.cartList.length }}</em>
- </a>
- <div class="layer">
- <div class="list">
- <div class="item" v-for="i in cartStore.cartList" :key="i">
- <RouterLink to="">
- <img :src="i.picture" alt="" />
- <div class="center">
- <p class="name ellipsis-2">
- {{ i.name }}
- </p>
- <p class="attr ellipsis">{{ i.attrsText }}</p>
- </div>
- <div class="right">
- <p class="price">¥{{ i.price }}</p>
- <p class="count">x{{ i.count }}</p>
- </div>
- </RouterLink>
- <i
- class="iconfont icon-close-new"
- @click="cartStore.delCart(i.skuId)"
- ></i>
- </div>
- </div>
- <div class="foot">
- <div class="total">
- <p>共 10 件商品</p>
- <p>¥ 100.00</p>
- </div>
- <el-button
- @click="$router.push('/cartlist')"
- size="large"
- type="primary"
- >去购物车结算</el-button
- >
- </div>
- </div>
- </div>
- </template>
5. 本地购物车 - 头部购物车统计计算
实现思路:计算属性
计算逻辑是什么:
- 1. 商品总数计算逻辑:商品列表中的所有商品count累加之和
- 2. 商品总价钱计算逻辑:商品列表中的所有商品的count * price累加之和
①src/stores/cart.js
- // 封装购物车模块
- import { ref, computed } from 'vue'
- import { defineStore } from 'pinia'
-
- export const useCartStore = defineStore(
- 'cart',
- () => {
- // ... ...
-
- // 计算属性
- // 1. 总的数量 所有项的count之和
- const allCount = computed(() =>
- cartList.value.reduce((sum, item) => sum + item.count, 0)
- )
- // 2. 总价 所有项的count * price之和
- const allPrice = computed(() =>
- cartList.value.reduce((sum, item) => sum + item.count * item.price, 0)
- )
- return {
- cartList,
- addCart,
- delCart,
- allCount,
- allPrice
- }
- },
- {
- persist: true
- }
- )
②src/views/Layout/components/HeaderCart.vue
- <div class="foot">
- <div class="total">
- <p>共 {{ cartStore.allCount }} 件商品</p>
- <p>¥ {{ cartStore.allPrice.toFixed(2) }}</p>
- </div>
- <el-button
- @click="$router.push('/cartlist')"
- size="large"
- type="primary"
- >去购物车结算</el-button
- >
- </div>