在vue+elememt-ui 的项目开发过程中,由于element-ui 的图标样式局限,可能和我们项目中需要的图标不一致;此时我们想要自已的图标样式,如何解决这一问题呢?
解决方案是:添加一个自定义全局指令,同时在element-ui源码中,加入对应的组件。开发人员在开发时只要在type中添加不同的类的值,就能添加上颜色和图标 ;
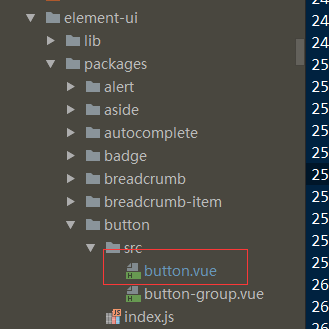
1. 在node-modules 找到element-ui 文件:

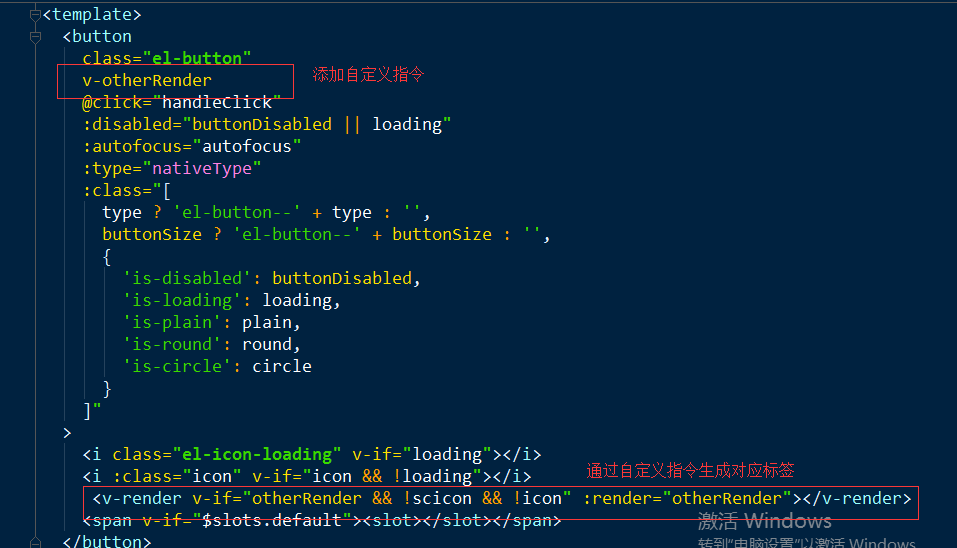
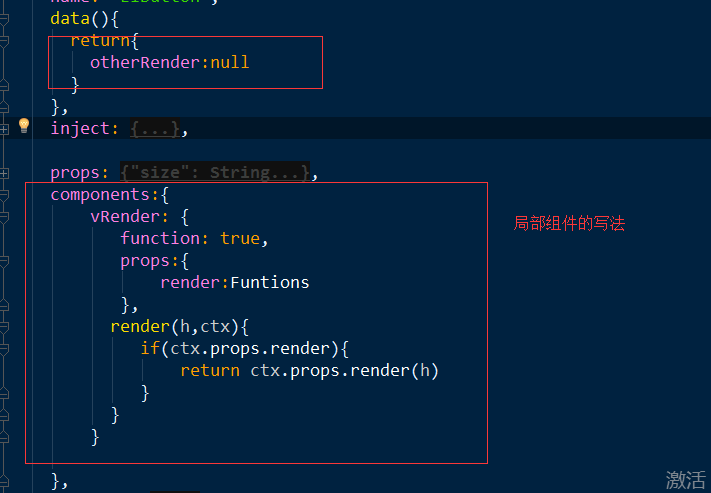
2. button 组件更改的地方:


代码如下:
<template>
  <button
    class="el-button"
    v-otherRender
    @click="handleClick"
    :disabled="buttonDisabled || loading"
    :autofocus="autofocus"
    :type="nativeType"
    :class="[
      type ? 'el-button--' + type : '',
      buttonSize ? 'el-button--' + buttonSize : '',
      {
        'is-disabled': buttonDisabled,
        'is-loading': loading,
        'is-plain': plain,
        'is-round': round,
        'is-circle': circle
      }
    ]"
  >
    <i class="el-icon-loading" v-if="loading"></i>
    <i :class="icon" v-if="icon && !loading"></i>
     <v-render v-if="otherRender && !scicon && !icon" :render="otherRender"></v-render>
    <span v-if="$slots.default"><slot></slot></span>
  </button>
</template>
<script>
  export default {
    name: 'ElButton',
    data(){
      return{
        otherRender:null
      }
    },
    inject: {
      elForm: {
        default: ''
      },
      elFormItem: {
        default: ''
      }
    },

    props: {
      type: {
        type: String,
        default: 'default'
      },
      size: String,
      icon: {
        type: String,
        default: ''
      },
      nativeType: {
        type: String,
        default: 'button'
      },
      loading: Boolean,
      disabled: Boolean,
      plain: Boolean,
      autofocus: Boolean,
      round: Boolean,
      circle: Boolean
    },
    components:{
        vRender: {
           function: true,
           props:{
               render:Funtions
           },
          render(h,ctx){
             if(ctx.props.render){
                 return ctx.props.render(h)
             }
          }
        }

    },
    computed: {
      _elFormItemSize() {
        return (this.elFormItem || {}).elFormItemSize;
      },
      buttonSize() {
        return this.size || this._elFormItemSize || (this.$ELEMENT || {}).size;
      },
      buttonDisabled() {
        return this.disabled || (this.elForm || {}).disabled;
      }
    },

    methods: {
      handleClick(evt) {
        this.$emit('click', evt);
      }
    }
  };
</script>
3.将所有的类对应的颜色类和图标定义好,写在自项目公共的js中: oterRender.js
var AllBrnName=[
  {
    text:"新增类",
    class:'sc_blue_btn',
    icon:"icon  iconfont  saveIcon",
    type:"add",
  },
  {
    text:"修改类",
    class:'sc_blue_btn',
    icon:"icon  iconfont  editIcon",
    type:"edit",
  },
  {
    text:"删除类",
    class:'sc_blue_btn',
    icon:"icon  iconfont  delIcon",
    type:"delete",
  },
  {
    text:"保存类",
    class:'sc_blue_btn',
    icon:"icon  iconfont saveIcon",
    type:"save",
  },

  {
    text:"查询类",
    class:'sc_blue_btn',
    icon:"icon  iconfont  searchIcon",
    type:"save",
  },

  {
    text:"重置类",
    class:'sc_blue_btn',
    icon:"icon  iconfont resetIcon",
    type:"save",
  },

]
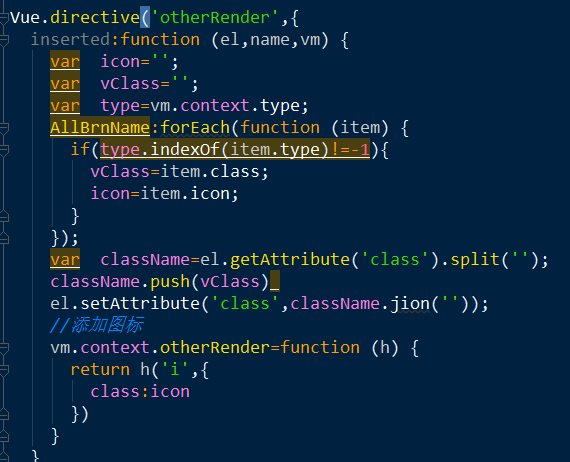
4.在main.js 里面引入定义样式的 oterRender.js文件 ,然后自定义指令中循环添加:

代码如下:
import '@/components/common/js/otherRender.js'
Vue.directive('otherRender',{
  inserted:function (el,name,vm) {
    var  icon='';
    var  vClass='';
    var  type=vm.context.type;
    AllBrnName:forEach(function (item) {
      if(type.indexOf(item.type)!=-1){
        vClass=item.class;
        icon=item.icon;
      }
    });
    var  className=el.getAttribute('class').split('');
    className.push(vClass)
    el.setAttribute('class',className.jion(''));
    //添加图标
    vm.context.otherRender=function (h) {
      return h('i',{
        class:icon
      })
    }
  }
})
/* eslint-disable no-new */
new Vue({
  el: '#app',
  router,
  store,
  components: { App },
  template: '<App/>'
})
上面步骤完成后:在自已组件中的应用:
<el-button size="mini" icon="addIcon" > 新增</el-button>
//使用图片来替换
//before属性中的content文本是用来占位的,必须有
//可以设置字体大小来确定大小
//使用visibility: hidden;来隐藏文字
.addIcon{
  background: url("../img/iconImg/add.png") center no-repeat;
  background-size: cover;
}
.addIcon:before{
  content: "替";
  font-size: 14px;
  visibility: hidden;
}
//如果直接使用字体图片
//直接在before属性设置对应的content就行
.el-icon-my-export{
  font-size: 16px;
}
.el-icon-my-export:before{
  content: "\e611";
}

content里面使用汉字大小会比较正常,但是汉字有时候会出现乱码,可以使用Unicode编码

//编码后的的替为 \u66ff
//书写到css里面的时候需要去掉u
.el-icon-my-export:before{
  content: "\66ff";
  font-size: 16px;
  visibility: hidden;
}
原文链接:https://www.jb51.net/article/149551.htm


