热门标签
热门文章
- 1请查收!“全国大学生智能汽车竞赛”线上赛备赛指南
- 2AI编程助手探索之旅:Amazon CodeWhisperer 提高编程效率的利器
- 3(一)特征提取
- 4卷积神经网络之VGG
- 5GoogLeNet网络详解并使用pytorch搭建模型_搭建googlenet网络模型
- 6GPT4-AIl本地部署-chat AI本地使用_gpt4本地部署
- 7层次多尺度注意力用于语义分割
- 8人工智能深度神经网络的研究_人工智能和神经网络那个范围更广
- 9【AI视野·今日CV 计算机视觉论文速览 第300期】Fri, 1 Mar 2024
- 1034、StoHisNet:CNN+Transformer结合首次用于胃病理图像4分类[奔狼怎配质疑雄狮!]_深度可分离卷积能捕获全局特征吗
当前位置: article > 正文
java基于opencv图片灰度处理小工具_在java中使用opencv处理网络图片
作者:AllinToyou | 2024-03-27 10:16:16
赞
踩
在java中使用opencv处理网络图片
前言:基于opencv对文件夹内的所有图片进行灰度处理,直接在小工具程序上选择待处理的文件夹,对文件夹内的所有图片进行灰度处理。此方法区别于调样式风格灰色处理,而是直接把图片更换为灰度处理后的图片。选用的技术是opencv、awt,其中opencv为图片处理核心,需要引入opencv对于java支持的相关依赖,awt作为java图形界面库,用于绘制简单的客户端。
优点:效率高、替换彻底,无论多层嵌套都会处理
缺点:灰度后无法恢复,需要提前做好备份
一、小工具效果演示
工具说明
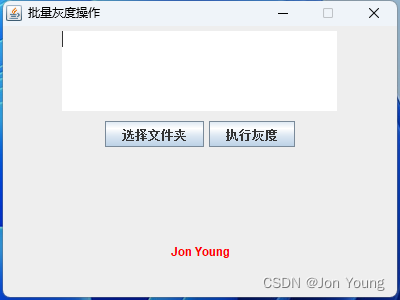
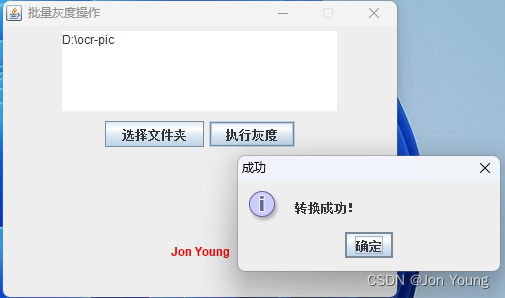
项目运行起来之后如图所示,点击“选择文件夹”选择待处理的文件夹路径,选择完成之后点击“灰度处理”按钮,会执行操作
处理前图示
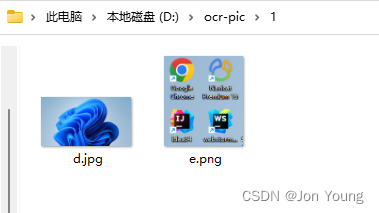
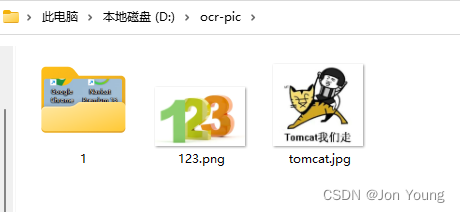
处理后图示
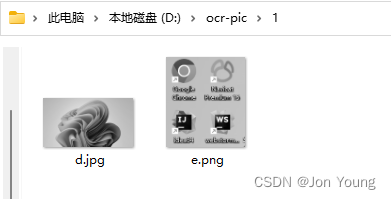
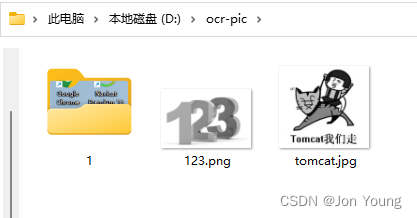
二、代码实现
新建项目
新建一个maven项目或springboot项目
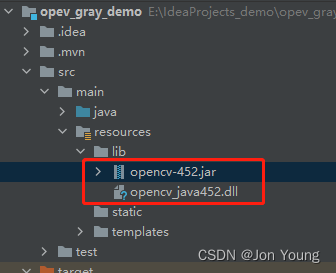
导入opencv的依赖
javacv-platform可以直接从maven仓库获取到,opencv-452.jar和opencv_java452.dll需要手动引一下包
		<dependency>
            <groupId>org.bytedeco</groupId>
            <artifactId>javacv-platform</artifactId>
            <version>1.5.6</version>
        </dependency>

        <dependency>
            <groupId>org</groupId>
            <artifactId>opencv</artifactId>
            <version>452</version>
            <scope>system</scope>
            <systemPath>${project.basedir}/src/main/resources/lib/opencv-452.jar</systemPath>
        </dependency>
- 1
- 2
- 3
- 4
- 5
- 6
- 7
- 8
- 9
- 10
- 11
- 12
- 13
绘制awt客户端效果
页面的简单绘制(包含一个画板、textarea、button、文件选择等),启动main方法
public class FrameDemo extends JFrame implements ActionListener {

    public static void main(String[] args) {
        new FrameDemo();
    }

    JPanel jp1, jp2;
    JButton jb1, jb2;
    JTextArea ta;
    JFileChooser fc = new JFileChooser();
    JLabel jl;

    public FrameDemo(){
        super("批量灰度操作");
        this.setBounds(500,200,100,100);
        this.setPreferredSize(new Dimension(400, 300));
        jl = new JLabel("Jon Young",JLabel.CENTER);
        jl.setForeground(Color.red);

        ta = new JTextArea(5,25);
        jp1 = new JPanel();
        jp1.setLayout(new FlowLayout());
        jp1.add(ta);

        jp2 = new JPanel();
        jp2.setLayout(new FlowLayout());
        jb1 = new JButton("选择文件夹");
        jb2 = new JButton("执行灰度");
        jp2.add(jb1);
        jp2.add(jb2);
        this.setResizable(false);
        this.setLayout(new GridLayout(3,1));
        jb1.addActionListener( this);
        jb2.addActionListener( this);

        this.add(jp1);
        this.add(jp2);
        this.add(jl);

        this.pack();
        this.setVisible(true);
        this.setDefaultCloseOperation(EXIT_ON_CLOSE);
    }

    @Override
    public void actionPerformed(ActionEvent e) {
        if(e.getSource()==jb1){
            fc.setFileSelectionMode(JFileChooser.DIRECTORIES_ONLY);
            int intRetVal = fc.showOpenDialog( this);
            if(intRetVal == JFileChooser.APPROVE_OPTION){
                ta.setText(fc.getSelectedFile().getPath());
            }
        }
        if(e.getSource()==jb2){
            if (StringUtils.isEmpty(ta.getText())) {
                JOptionPane.showMessageDialog(null, "请先选择文件夹!", "失败", JOptionPane.ERROR_MESSAGE);
            } else {
                try {
                    GrayHandleUtils.findImgToGray(ta.getText());
                    JOptionPane.showMessageDialog(null, "转换成功!", "成功", JOptionPane.INFORMATION_MESSAGE);
                } catch (Exception ex) {
                    ex.printStackTrace();
                    JOptionPane.showMessageDialog(null, "转换异常!"+ex.getMessage(), "失败", JOptionPane.ERROR_MESSAGE);
                }
            }
        }
    }
}
- 1
- 2
- 3
- 4
- 5
- 6
- 7
- 8
- 9
- 10
- 11
- 12
- 13
- 14
- 15
- 16
- 17
- 18
- 19
- 20
- 21
- 22
- 23
- 24
- 25
- 26
- 27
- 28
- 29
- 30
- 31
- 32
- 33
- 34
- 35
- 36
- 37
- 38
- 39
- 40
- 41
- 42
- 43
- 44
- 45
- 46
- 47
- 48
- 49
- 50
- 51
- 52
- 53
- 54
- 55
- 56
- 57
- 58
- 59
- 60
- 61
- 62
- 63
- 64
- 65
- 66
- 67
- 68
读取图片并处理
递归读取到文件夹中的所有图片格式文件,全部替换处理
public class GrayHandleUtils {

    /**
     * 某文件夹下的所有图片转灰度操作
     * @param path 某文件夹基础路径
     */
    public static void findImgToGray(String path){
        File file = new File(path);
        File[] files = file.listFiles();
        if(files!=null){
            for (File f : files) {
                if (!f.isDirectory()){
                    //如果是文件,筛选出图片格式的文件
                    if (f.getAbsolutePath().endsWith(".png") || f.getAbsolutePath().endsWith(".jpg")
                            || f.getAbsolutePath().endsWith(".jpeg") || f.getAbsolutePath().endsWith(".bmp")) {
                        handleGray(f.getAbsolutePath());
                    }
                }else{
                    //如果是目录,递归调用,查找子目录
                    findImgToGray(f.getAbsolutePath());
                }
            }
        }
    }

    /**
     * 单个图片转灰度操作
     * @param filePath 图片路径
     */
    private static void handleGray(String filePath) {
        // 解决awt报错问题
        System.setProperty("java.awt.headless", "false");
        // 加载动态库
        URL url = ClassLoader.getSystemResource("lib/opencv_java452.dll");
        System.load(url.getPath());
        // 读取图像
        Mat image = imread(filePath);
        if (image.empty()) {
            return;
        }
        // 创建输出单通道图像
        Mat grayImage = new Mat(image.rows(), image.cols(), CvType.CV_8SC1);
        // 进行图像色彩空间转换
        cvtColor(image, grayImage, COLOR_RGB2GRAY);
        imwrite(filePath, grayImage);
    }
}
- 1
- 2
- 3
- 4
- 5
- 6
- 7
- 8
- 9
- 10
- 11
- 12
- 13
- 14
- 15
- 16
- 17
- 18
- 19
- 20
- 21
- 22
- 23
- 24
- 25
- 26
- 27
- 28
- 29
- 30
- 31
- 32
- 33
- 34
- 35
- 36
- 37
- 38
- 39
- 40
- 41
- 42
- 43
- 44
- 45
- 46
- 47
三、说明
1. 资源一定要做好备份,灰度后无法直接还原
2. 文件路径中不要包含中文,不然会执行不成功
推荐阅读
相关标签


