热门标签
热门文章
- 1leecode-1379-找出克隆二叉树中的相同节点_code1379
- 2web课程设计——仿小米商城(10个页面)HTML+CSS+JavaScript web前端课程设计 web前端课程设计代码 web课程设计 HTML网页制作代码
- 3java比较两个实体类及属性差异工具类(简版)_java实体类属性差集
- 4SpringbootV2.6整合Knife4j 3.0.3 问题记录_springboot2.6对应的knife版本
- 5Python自然语言处理学习笔记(2):Preface 前言
- 6MATLAB中的曲线拟合_matlab的linefit
- 7《.Net 基础系列》- IO操作
- 8分析Java8中的stream.map()函数_java 8 stream map
- 9多目标跟踪:视觉联合检测和跟踪
- 10概率论与数理统计B 重点/笔记梳理 第二章_概率论与数理统计考点归纳两点分布
当前位置: article > 正文
HCIP【GRE VPN、MGRE VPN与PPP验证综合实验】
作者:AllinToyou | 2024-04-05 11:09:47
赞
踩
HCIP【GRE VPN、MGRE VPN与PPP验证综合实验】
目录
(2)R2与R5之间使用ppp的CHAP认证,R5为主认证方。
(1)R1、R2、R3构建一个MGRE环境,R1为中心站点。
四、配置NAT协议(easy IP)使得所有的PC可以访问R5环回
实验要求:
1、R5为ISP,只能进行IP地址配置,其所有地址均配为公有IP地址。
2、(1)R1和R5间使用PPP的PAP认证,R5为主认证方。
(2)R2与R5之间使用ppp的CHAP认证,R5为主认证方。
(3)R3与R5之间使用HDLC封装。
3、R1、R2、R3构建一个MGRE环境,R1为中心站点,R1、R4间为点到点的GRE。
4、整个私有网络基于RIP全网可达。
5、所有PC设置私有IP为源IP,可以访问R5环回,实现全网通。
实验拓扑图:

实验思路:
- 根据拓扑图配置所有设备的IP地址
- 将私网与公网分别搞通
- 在公网搞通的基础上进行PPP的pap和chap认证,以及DHLC验证
- 再创建GRE VPN和MGRE VPN
- 配置NAT协议使得所有的PC可以访问R5环回,实现全网通
实验步骤:
一、配IP地址
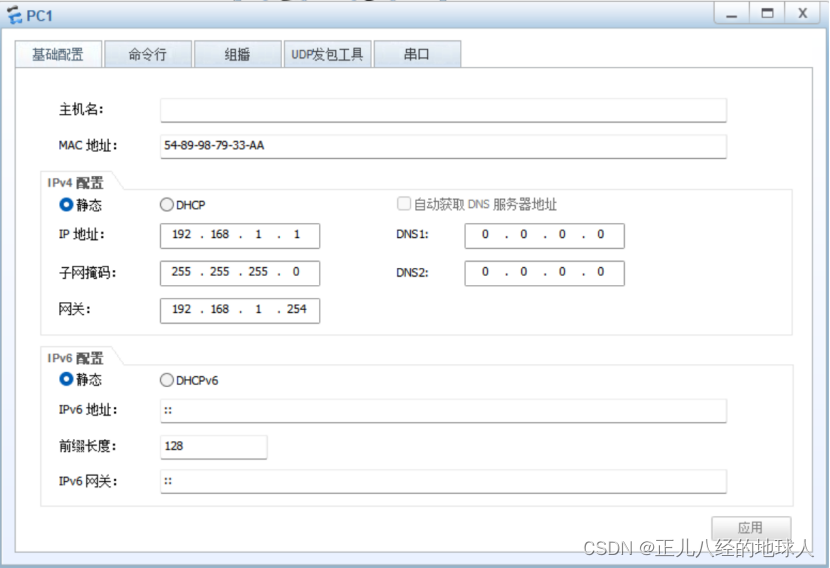
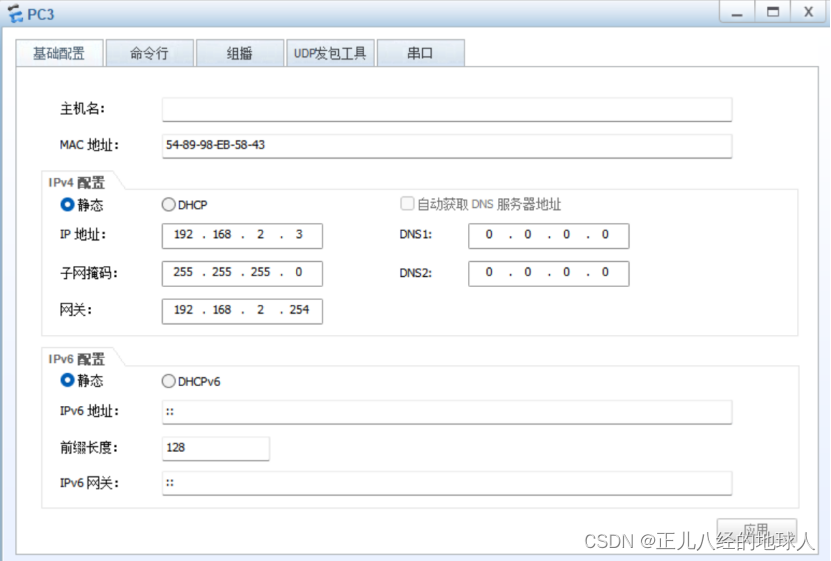
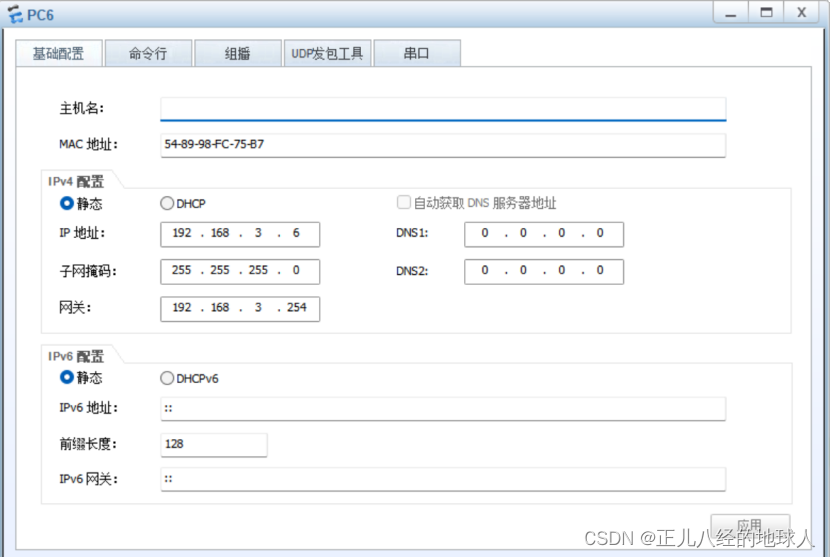
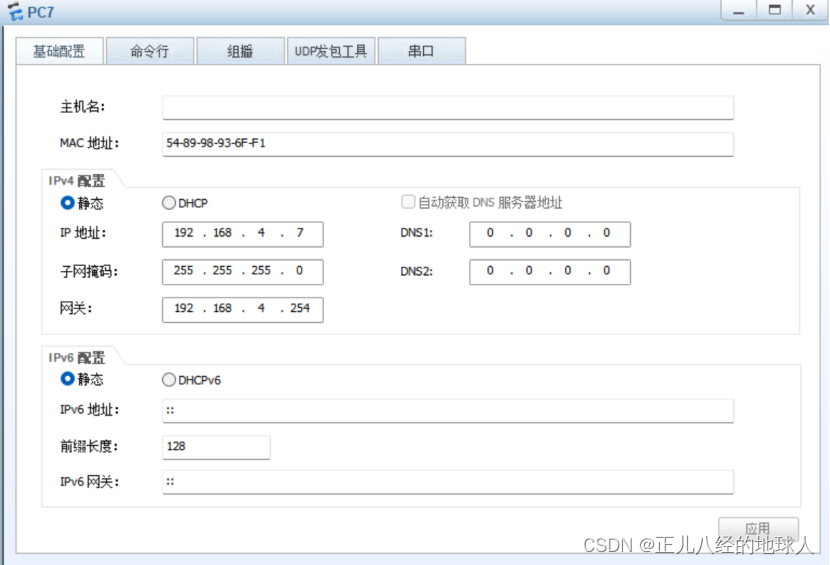
(1)配置所有设备接口的IP地址:
PC1:

PC3:

PC6:

PC7:

- R1:
-
- <Huawei>sys
-
- [Huawei]sysn R1
-
- [R1]int g 0/0/0
-
- [R1-GigabitEthernet0/0/0]ip add 192.168.1.254 24
-
- [R1-GigabitEthernet0/0/0]q
-
- [R1]int Serial 4/0/0
-
- [R1-Serial4/0/0]ip add 15.1.1.1 24
-
- [R1-Serial4/0/0]q
-
- [R1]dis ip int bri
-
-
-
- R2:
-
- <Huawei>sys
-
- [Huawei]sysn R2
-
- [R2]int g0/0/0
-
- [R2-GigabitEthernet0/0/0]ip add 192.168.2.254 24
-
- [R2-GigabitEthernet0/0/0]q
-
- [R2]int Serial 4/0/0
-
- [R2-Serial4/0/0]ip add 25.1.1.2 24
-
- [R2-Serial4/0/0]q
-
- [R2]dis ip int bri
-
-
-
- R3:
-
- <Huawei>sys
-
- [Huawei]sysn R3
-
- [R3]int g0/0/0
-
- [R3-GigabitEthernet0/0/0]ip add 192.168.3.254 24
-
- [R3-GigabitEthernet0/0/0]q
-
- [R3]int Serial 4/0/0
-
- [R3-Serial4/0/0]ip add 35.1.1.3 24
-
- [R3-Serial4/0/0]q
-
- [R3]dis ip int bri
-
-
-
- R4:
-
- <Huawei>sys
-
- [Huawei]sysn R4
-
- [R4]int g 0/0/0
-
- [R4-GigabitEthernet0/0/0]ip add 45.1.1.4 24
-
- [R4-GigabitEthernet0/0/0]int g 0/0/1
-
- [R4-GigabitEthernet0/0/1]ip add 192.168.4.254 24
-
- [R4-GigabitEthernet0/0/1]q
-
- [R4]dis ip int bri
-
-
-
- R5:
-
- <Huawei>sys
-
- [Huawei]sysn R5
-
- [R5]int g0/0/0
-
- [R5-GigabitEthernet0/0/0]ip add 45.1.1.5 24
-
- [R5-GigabitEthernet0/0/0]q
-
- [R5]int Serial 4/0/1
-
- [R5-Serial4/0/1]ip add 15.1.1.5 24
-
- [R5-Serial4/0/1]q
-
- [R5]int Serial 3/0/1
-
- [R5-Serial3/0/1]ip add 25.1.1.5 24
-
- [R5-Serial3/0/1]q
-
- [R5]int Serial 4/0/0
-
- [R5-Serial4/0/0]ip add 35.1.1.5 24
-
- [R5-Serial4/0/0]q
-
- [R5]int l0
-
- [R5-LoopBack0]ip add 5.5.5.5 24
-
- [R5]dis ip int bri

(2)配置私网与公网接口的缺省路由使得公网可通:
- R1:
-
- [R1]ip route-static 0.0.0.0 0 15.1.1.5
-
- R2:
-
- [R2]ip route-static 0.0.0.0 0 25.1.1.5
-
- R3:
-
- [R3]ip route-static 0.0.0.0 0 35.1.1.5
-
- R4:
-
- [R4]ip route-static 0.0.0.0 0 45.1.1.5
测试一下:
- 示例:
-
- R1的serial 4/0/0接口 ping R2 的serial 4/0/0接口
-
- <R1>ping -a 15.1.1.1 25.1.1.2
-
- PING 25.1.1.2: 56 data bytes, press CTRL_C to break
-
- 0.00% packet loss
-
-
-
- R3的serial 4/0/0接口 ping R4 的g 0/0/0接口
-
-
-
- <R3>ping -a 35.1.1.3 45.1.1.4
-
- PING 45.1.1.4: 56 data bytes, press CTRL_C to break
-
- 0.00% packet loss

测试通过!!!
二、PPP验证的PAP和CHAP认证 与 DHLC 认证
(1)R1和R5间使用PPP的PAP认证,R5为主认证方。
- R5(主验证方):
-
- [R5]aaa
-
- [R5-aaa]local-user gxc password cipher gxc12345
-
- [R5-aaa]local-user gxc service-type ppp
-
- [R5-aaa]q
-
- [R5]int Serial 4/0/1
-
- [R5-Serial4/0/1]ppp authentication-mode pap
-
- [R5-Serial4/0/1]q
-
- [R5]
-
- R1(被验证方):
-
- [R1-Serial4/0/0]ppp pap local-user gxc password cipher gxc12345
-
- [R1-Serial4/0/0]shutdown
-
- [R1-Serial4/0/0]undo shutdown

(2)R2与R5之间使用ppp的CHAP认证,R5为主认证方。
- R5(主验证方):
-
- [R5-aaa]aaa
-
- [R5-aaa]local-user gxc password cipher gxc12345
-
- [R5-aaa]local-user gxc service-type ppp
-
- [R5-aaa]q
-
- [R5]int Serial 3/0/1
-
- [R5-Serial3/0/1]ppp authentication-mode chap
-
- [R5-Serial3/0/1]q
-
- [R5]
-
-
-
- R2(被验证方):
-
- [R2-Serial4/0/0]ppp chap user gxc
-
- [R2-Serial4/0/0]ppp chap password cipher gxc12345
-
- [R2-Serial4/0/0]undo shutdown
-
- [R2-Serial4/0/0]shutdown

(3)R3与R5之间使用HDLC封装。
- R5:
-
- [R5-Serial4/0/0]link-protocol hdlc
-
-
-
- R3:
-
- [R3-Serial4/0/0]link-protocol hdlc
三、再创建GRE VPN和MGRE VPN
MGRE VPN:10.1.2.0/24
GRE VPN:10.1.1.0/24
(1)R1、R2、R3构建一个MGRE环境,R1为中心站点。
- 隧道接口配置:
- R1:
-
- [R1]int Tunnel 0/0/0
-
- [R1-Tunnel0/0/0]ip add 10.1.2.1 24
-
- [R1-Tunnel0/0/0]tunnel-protocol gre p2mp
-
- [R1-Tunnel0/0/0]source 15.1.1.1
- # 配置NHRP(下一跳解析协议)
-
- [R1-Tunnel0/0/0]nhrp network-id 100
-
- [R1-Tunnel0/0/0]q
-
- [R1]dis nhrp peer all
-
-
-
- R2:
-
- [R2]int Tunnel 0/0/0
-
- [R2-Tunnel0/0/0]ip add 10.1.2.2 24
-
- [R2-Tunnel0/0/0]tunnel-protocol gre p2mp
-
- [R2-Tunnel0/0/0]source Serial 4/0/0
-
- # 设置与NHRP服务器(Next Hop Resolution Protocol)的条目
- [R2-Tunnel0/0/0]nhrp network-id 100
-
- [R2-Tunnel0/0/0]nhrp entry 10.1.2.1 15.1.1.1 register
-
- [R2-Tunnel0/0/0]q
-
- [R2]dis nhrp peer all
-
-
-
- R3:
-
- [R3]int Tunnel 0/0/0
-
- [R3-Tunnel0/0/0]ip add 10.1.2.3 24
-
- [R3-Tunnel0/0/0]tunnel-protocol gre p2mp
-
- [R3-Tunnel0/0/0]source Serial 4/0/0.
-
- [R3-Tunnel0/0/0]nhrp network-id 100
-
- [R3-Tunnel0/0/0]nhrp entry 10.1.2.1 15.1.1.1 register
-
- [R3-Tunnel0/0/0]q
-
- [R3]dis nhrp peer all

(2)R1、R4间为点到点的GRE。
- R1:
-
- [R1]int Tunnel 0/0/1
-
- [R1-Tunnel0/0/1]ip add 10.1.1.1 24
-
- [R1-Tunnel0/0/1]tunnel-protocol gre
-
- [R1-Tunnel0/0/1]source 15.1.1.1
-
- [R1-Tunnel0/0/1]destination 45.1.1.4
-
-
-
- R4:
-
- [R4]int Tunnel 0/0/1
-
- [R4-Tunnel0/0/1]ip add 10.1.1.4 24
-
- [R4-Tunnel0/0/1]tunnel-protocol gre
-
- [R4-Tunnel0/0/1]source 45.1.1.4
-
- [R4-Tunnel0/0/1]destination 15.1.1.1

(3)在R1到R5上配置路由协议(RIP)传递两端私网路由
- R1:
-
- [R1]rip 1
-
- [R1-rip-1]version 2
-
- [R1-rip-1]network 192.168.1.0
-
- [R1-rip-1]network 10.0.0.0
-
- [R1-rip-1]undo summary
-
- [R1-rip-1]q
-
- 查看路由表中的rip信息
-
- [R1]dis ip routing-table protocol rip
-
- [R1]int Serial 4/0/0
-
- 关闭RIP水平分割:
-
- [R1-Serial4/0/0]undo rip split-horizon
-
- [R1]int tunnel 0/0/0
-
- 开启伪广播 :
-
- [R1-Tunnel0/0/0]nhrp entry multicast dynamic
-
-
-
- R2:
-
- [R2]rip 1
-
- [R2-rip-1]v 2
-
- [R2-rip-1]undo summary
-
- [R2-rip-1]network 192.168.2.0
-
- [R2-rip-1]network 10.0.0.0
-
- [R2-rip-1]q
-
- [R2]dis ip routing-table protocol rip
-
- [R2]int t0/0/0
-
- [R2-Tunnel0/0/0]undo rip split-horizon
-
- [R2-Tunnel0/0/0]q
-
- [R2]
-
-
-
- R3:
-
- [R3]rip 1
-
- [R3-rip-1]v 2
-
- [R3-rip-1]undo summary
-
- [R3-rip-1]network 192.168.3.0
-
- [R3-rip-1]network 10.0.0.0
-
- [R3-rip-1]q
-
- [R3]dis ip routing-table protocol rip
-
- [R3]int t0/0/0
-
- [R3-Tunnel0/0/0]undo rip sp
-
- [R3-Tunnel0/0/0]undo rip split-horizon
-
- [R3-Tunnel0/0/0]q
-
- [R3]
-
-
-
- R4:
-
- [R4]rip 1
-
- [R4-rip-1]v 2
-
- [R4-rip-1]undo summary
-
- [R4-rip-1]network 192.168.4.0
-
- [R4-rip-1]network 10.0.0.0
-
- [R4-rip-1]q
-
- [R4]

测试一下私网与公网是否已经是可通:
- 示例:
-
- PC1 ping PC3:
-
- PC>ping 192.168.2.3
-
- Ping 192.168.2.3: 32 data bytes, Press Ctrl_C to break
-
- 20.00% packet loss
-
-
-
- PC1 ping PC6:
-
- PC>ping 192.168.3.6
-
- Ping 192.168.3.6: 32 data bytes, Press Ctrl_C to break
-
- 0.00% packet loss

测试通过!!!
四、配置NAT协议(easy IP)使得所有的PC可以访问R5环回
- R1:
-
- <R1>sys
-
- [R1]acl 2000
-
- [R1-acl-basic-2000]rule permit source 192.168.1.0 0.0.0.255
-
- [R1-acl-basic-2000]q
-
- [R1]int Serial 4/0/0
-
- [R1-Serial4/0/0]nat outbound 2000
-
- [R1-Serial4/0/0]q
-
- [R1]
-
-
-
- R2:
-
- [R2]acl 2000
-
- [R2-acl-basic-2000]rule permit source 192.168.2.0 0.0.0.255
-
- [R2-acl-basic-2000]q
-
- [R2]int Serial 4/0/0
-
- [R2-Serial4/0/0]nat outbound 2000
-
- [R2-Serial4/0/0]q
-
- [R2]
-
-
-
- R3:
-
- <R3>sys
-
- [R3]acl 2000
-
- [R3-acl-basic-2000]rule permit source 192.168.3.0 0.0.0.255
-
- [R3-acl-basic-2000]q
-
- [R3]int Serial 4/0/0
-
- [R3-Serial4/0/0]nat outbound 2000
-
- [R3-Serial4/0/0]q
-
- [R3]
-
-
-
- R4:
-
- <R4>sys
-
- [R4]acl 2000
-
- [R4-acl-basic-2000]rule permit source 192.168.4.0 0.0.0.255
-
- [R4-acl-basic-2000]q
-
- [R4]int g0/0/0
-
- [R4-GigabitEthernet0/0/0]nat outbound 2000
-
- [R4-GigabitEthernet0/0/0]q
-
- [R4]

测试一下:
- 示例:
-
- PC1 ping R5的环回路由:
-
- PC>ping 5.5.5.5
-
- 0.00% packet loss
-
-
-
- PC7 ping R5 的环回路由:
-
- PC>ping 5.5.5.5
-
- Ping 5.5.5.5: 32 data bytes, Press Ctrl_C to break
-
- 20.00% packet loss

测试通过!!!
声明:本文内容由网友自发贡献,不代表【wpsshop博客】立场,版权归原作者所有,本站不承担相应法律责任。如您发现有侵权的内容,请联系我们。转载请注明出处:https://www.wpsshop.cn/w/AllinToyou/article/detail/365185
推荐阅读
相关标签


