
- 1CTF学习路线指南(附刷题练习网址)_ctf wargame
- 2计算机发展史_1957年电子管计算机
- 3html接入百度地图
- 4Bugku CTF---where is flag 5_bugkuwhere is flag 5
- 5Swin Transformer——披着CNN外皮的transformer,解决多尺度序列长问题
- 6MQTT入门指南(一)ubuntu16.04上安装MQTT服务端_ppa:mosquitto-dev 不存在
- 7分布式限流——Redis + Lua实现滑动窗口算法
- 8oracle 去掉末尾四位_oracle去掉后四位
- 9微信支付指纹上传服务器,指纹安全吗,支付宝、微信支付会上传用户的指纹吗...
- 10中国互联网20年简史(1998-2018),告诉你本质是什么、规律是什么
前端三剑客 —— JavaScript (第八节)
赞
踩
目录
内容回顾:
事件对象
1.1 什么是事件驱动
1.2 事件绑定
事件源:发生事件的源对象
事件对象:它包含了事件所有的信息,它是以回调函数的第一个参数形式出现的(event)
事件处理函数:也叫回调函数,它是对事件源产生的事件进行处理
对于事件绑定而言有两种种方式:
1.2.1 DOM0:它是以“事件源对象.事件类型=事件处理函数”的方式进行绑定的
1.2.2 DOM2:它是以"事件源对象.addEventListener(‘事件类型’,事件处理函数,捕获/冒泡)“的方式进行绑定。第三个参数是一个布尔值,如果是true表示捕获,如果是false表示冒泡,默认值为false。
捕获:是从window > document >body > 目标对象 的一个过程
冒泡:是从 目标对象 > body >document >window 的一个过程
1.3 事件类型
1.3.1 窗口事件 > window 相关 ,如 window.onload
1.3.2 键盘事件 > 事件源对象,如:xx.onkeyup,xxx.onkeydowm,xx.onkeypress
1.3.3 鼠标事件 > 事件源对象,如:xx.onmouseover,xx.onmouseout,xx.onmousemove,xxx.ondrag,..
1.3.4 表单事件 > 表单元素对象,如:onfocus,onblur,onchange,…
1.3.5 多媒体事件
事件对象
事件对象包含了事件的各种信息,使我们处理事件时经常需要使用的,使用标签绑定方式获取不到事件对象,DOM0和DOM2模型中事件对象的获取都默认是处理函数的第一个参数。
事件对象中有些重要的方法和属性,需要熟悉。
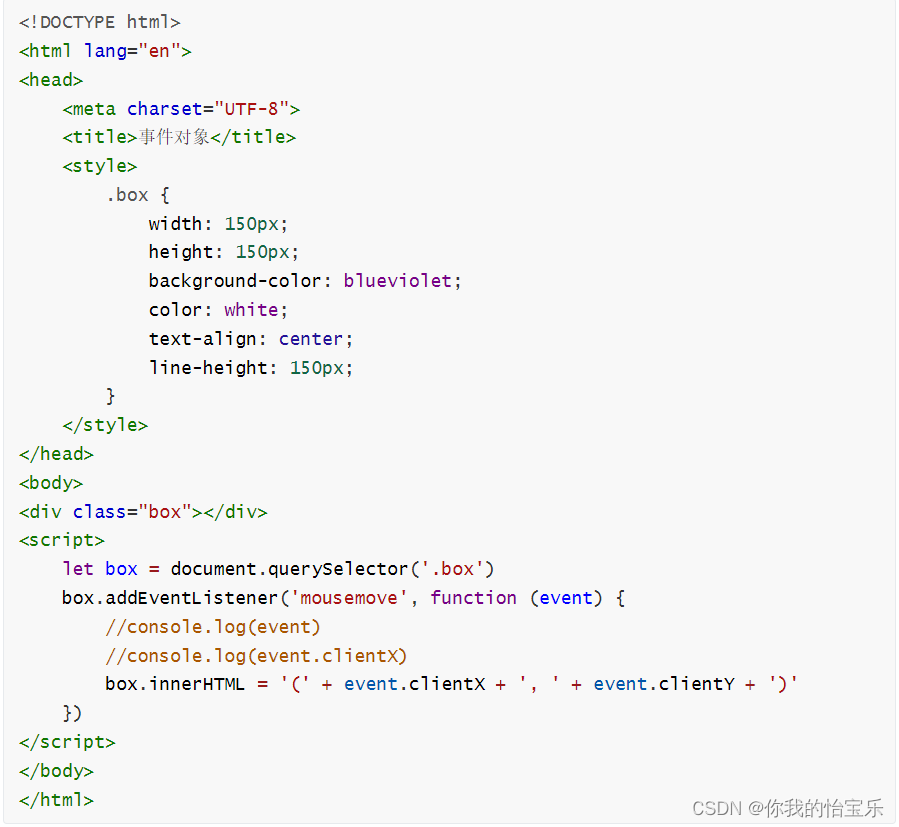
如鼠标事件中:事件对象提供了两组来获取浏览器坐标的属性,一组是页面可视区左边,另一组是屏幕坐标。

判断是否存在组合键。
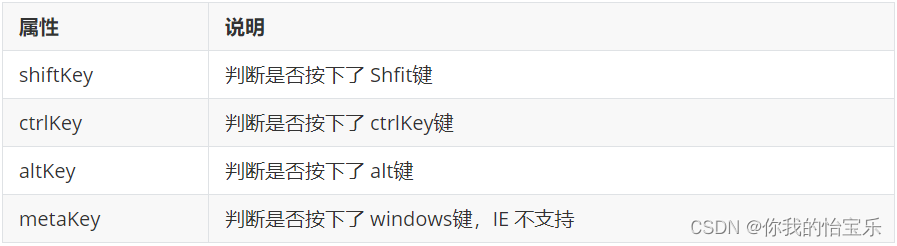
键盘事件中:判断键码是什么?字符编码的什么?

事件对象的方法和属性
在标准的 DOM事件中,event对象包含与创建它的特定事件有关的属性和方法。触发的事件类型不一样,可用的属性和方法也不一样。

案例-移动DIV
<!DOCTYPE html>
<html lang="en">
<head>
<meta charset="UTF-8">
<title>案例-移动div</title>
<style>
.box {
width: 150px;
height: 150px;
background-color: blueviolet;
position: absolute;
}
.box:hover {
cursor: move;
}
</style>
</head>
<body>
<div class="box"></div>
<script>
// 1. 获取事件源对象
const boxObj = document.querySelector('.box')
// 2. 给事件源绑定事件(DOM0、DOM2)
boxObj.addEventListener('mousedown', function (e) {
// 获取对象的初始位置
let w = e.clientX - boxObj.offsetLeft
let h = e.clientY - boxObj.offsetTop
// 2.2 添加移动事件,开始移动
//document.addEventListener('mousemove', function (ev) {
// boxObj.style.top = (ev.clientY - h) + 'px'
// boxObj.style.left = (ev.clientX - w) + 'px'
//})
document.onmousemove = function (ev) {
boxObj.style.top = (ev.clientY - h) + 'px'
boxObj.style.left = (ev.clientX - w) + 'px'
}
})
// 3. 添加放开鼠标事件
boxObj.addEventListener('mouseup', function (e) {
document.onmousemove = null
})
</script>
</body>
</html>
案例-图片轮换
功能实现:
<!DOCTYPE html>
<html lang="en">
<head>
<meta charset="UTF-8">
<title>案例 - 图片轮换</title>
<style>
* {
padding: 0;
margin: 0;
}
.banner {
width: 400px;
height: 267px;
overflow: hidden;
position: relative;
margin: 50px auto 0;
}
ul {
width: 2000px;
height: 100%;
background-color: #C44F00;
list-style: none;
display: flex;
}
ul li {
width: 400px;
height: 100%;
display: none;
}
ol {
width: 130px;
height: 20px;
position: absolute;
left: 35%;
bottom: 20px;
background: rgba(0, 0, 0, .6);
border-radius: 10px;
display: flex;
justify-content: space-between;
/*align-items: center;*/
list-style: none;
}
ol li {
margin: 3px 6px 0;
width: 13px;
height: 13px;
border-radius: 50%;
background: rgba(255, 255, 255, .5);
cursor: pointer;
}
img {
width: 400px;
height: 267px;
}
.page_left {
position: absolute;
top: 0;
right: 0;
width: 50px;
height: 267px;
line-height: 267px;
color: white;
text-align: center;
background: rgba(0, 0, 0, .5);
cursor: pointer;
display: none;
}
.page_right {
position: absolute;
top: 0;
left: 0;
width: 50px;
height: 267px;
line-height: 267px;
color: white;
text-align: center;
background: rgba(0, 0, 0, .5);
cursor: pointer;
display: none;
}
.current {
background: rgba(255, 0, 0, .8);
}
</style>
</head>
<body>
<div class="banner">
<ul>
<li class="photo_change" style="display: block;"><img src="./images/1.jpg"></li>
<li class="photo_change"><img src="./images/2.jpg"></li>
<li class="photo_change"><img src="./images/3.jpg"></li>
<li class="photo_change"><img src="./images/4.jpg"></li>
<li class="photo_change"><img src="./images/5.jpg"></li>
</ul>
<ol>
<li class="pointers current"></li>
<li class="pointers"></li>
<li class="pointers"></li>
<li class="pointers"></li>
<li class="pointers"></li>
</ol>
<i class="page_left">></i>
<i class="page_right"><</i>
</div>
<script>
window.onload = function () {
// 判断定时器的变量
let timer = null
// 定义一个索引变量,代表是第几张图,默认是从第一张开始显示
let index = 0
// 获取所有图的数组
let photos = document.querySelectorAll('.photo_change')
// 获取中间显示的小圆点
let pointers = document.querySelectorAll('.pointers')
// 获取左箭头
let leftArrow = document.querySelector('.page_right')
// 获取右箭头
let rightArrow = document.querySelector('.page_left')
// 定义一个函数,用于定时切换图片,假设 3 秒切换一次
let init = function () {
return setInterval(function () {
photos[index].style.display = 'none'
pointers[index].style.background = 'rgba(255, 255, 255, .5)'
if (index >= photos.length - 1) {
index = 0
} else {
index++
}
photos[index].style.display = 'block'
pointers[index].style.background = 'rgba(255, 0, 0, .8)'
}, 3000)
}
// 执行函数
timer = init()
// 小圆点的点击事件
for (let i = 0; i < pointers.length; i++) {
// 为每一个小圆点添加一个 index 的属性,并赋值
pointers[i].index = i
// 给小圆点添加点击事件
pointers[i].onclick = function (event) {
// 清除定时器
clearInterval(timer)
for (let j = 0; j < photos.length; j++) {
if (j === this.index) {
photos[j].style.display = 'block'
this.style.background = 'rgba(255, 0, 0, .8)'
} else {
photos[j].style.display = 'none'
pointers[j].style.background = 'rgba(240, 240, 240, .5)'
}
}
// 重新开启定时器来切换图片
timer = init()
// 将要轮换的图片指定为点击后的那张图片
index = this.index
}
}
// 左面的箭头点击事件
leftArrow.onclick = function () {
// 清除定时器
clearInterval(timer)
photos[index].style.display = 'none'
if (index <= 0) {
index = photos.length - 1
} else {
index--
}
photos[index].style.display = 'block'
setColor()
// 重新开启定时器
timer = init()
}
// 自定义的 setColor 函数,作用是点击后图片变化
let setColor = function () {
for (let i = 0; i < photos.length; i++) {
if (i === index) {
pointers[i].style.background = 'rgba(255, 0, 0, .8)'
} else {
photos[i].style.display = 'none'
pointers[i].style.background = 'rgba(240, 240, 240, .5)'
}
}
}
// 右面的箭头点击事件
rightArrow.onclick = function (event) {
// 清除定时器
clearInterval(timer)
photos[index].style.display = 'none'
if (index >= photos.length - 1) {
index = 0
} else {
index++
}
photos[index].style.display = 'block'
setColor()
// 重新开启定时器
timer = init()
}
// 当鼠标悬停在图片上时不切换
let banner = document.querySelector('.banner')
banner.onmousemove = function (e) {
// 显示左右箭头
leftArrow.style.display = 'block'
rightArrow.style.display = 'block'
// 让图片不再切换,其实就是清除定时器
clearInterval(timer)
}
banner.onmouseout = function (e) {
// 隐藏左右箭头
leftArrow.style.display = 'none'
rightArrow.style.display = 'none'
// 重新开启定时器来切换图片
timer = init()
}
}
</script>
</body>
</html>
Ajax
Ajax 需要使用到 XMLHttpRequest()
<!DOCTYPE html>
<html lang="en">
<head>
<meta charset="UTF-8">
<title>原生Ajax的使用</title>
<style>
.box {
width: 700px;
height: 300px;
border: 1px solid #317FE5;
margin-top: 10px;
}
</style>
</head>
<body>
<button class="btn">点击获取笑话</button>
<div class="box">
</div>
<script>
// 获取到 div 对象
let div = document.querySelector('.box')
// 1. 获取按钮
let btn = document.querySelector('.btn')
btn.addEventListener('click', function () {
getData()
})
// 获取数据
let getData = function (method, url) {
// 1. 创建 XMLHttpRequest 对象
let xhr = new XMLHttpRequest()
// 2. 打开连接
/*
打开连接是通过调用 XMLHttpRequest 对象的 open() 方法来完成的,这个方法有三个参数:
1. 第一个参数是请求方式:如果请求方式为 GET 时,参数可以直接写在 URL 上,例如:xxx?id=1&name=lisi;如果是POST的话,一般我们需要封装到对象
2. 第二个参数是访问的服务器 URL
3. 第三个参数是一个布尔值,true 表示异步,false 表示同步。默认为 true
*/
xhr.open('GET', 'https://autumnfish.cn/api/joke/list?num=5', true)
// 3. 发送请求
/**
* 调用 XMLHttpRequest 对象的 send() 方法来发送请求。如果没有数据,则可以不传参数, send(null)
* 如果是 post 请求,则需要写 xhr.send(id=1&name=lisi)
*/
xhr.send()
// 4. 处理数据
xhr.onreadystatechange = function () {
/* 注意:为了避免反复执行,我们通常是当 readState的值为 4 时表示要处理数据,这个属性的值有以下几个:
* 0 表示请求未初始,即调用 open() 方法之前
* 1 表示请求已经提交,即调用 send() 方法之前
* 2 表示请求已经发送
* 3 表示请求处理中,但是服务器还没有响应
* 4 表示请求已经完成,即服务器已经响应
* console.log(xhr.readyState)
*
* 除了 XMLHttpRequest 对象中有 readyState 属性外,还有一个 status 属性,它表示服务器响应的状态:
* 200 表示成功的正常响应
* 404 表示请求的资源没有找到(1.资源确实没有;2.资源名称不对;3.资源路径不对)
* 500 表示服务器端错误
*/
if (xhr.readyState < 3) {
console.log('---------------------')
div.innerHTML = '数据加载中。。。。。。'
}
if (xhr.readyState === 4 && xhr.status === 200) {
// 获取到服务器响应回来的数据
//console.log(xhr.responseText, typeof xhr.responseText)
let content = xhr.responseText
//alert(content)
// 将服务器接收的数据转换为 JSON 格式的数据,使用 JSON.parse(),如果希望将 JSON 对象转换为字符串
// 则使用 JSON.stringify() 方法来实现。
let result = JSON.parse(content)
let data = result.data
//console.log(data.length);
let s = ''
let index = 1
for (let text of data) {
// 将每一条笑话前加上一个序号
s += index++ + '. ' + text + '<br>'
}
// 把处理好的数据放到容器中显示
div.innerHTML = s
}
}
}
</script>
</body>
</html>

