- 1pandas中的滚动窗口rolling函数和扩展窗口expanding函数_pandas rolling()的参数
- 2Python3对一个class类型的list按class中某一属性排序_python如何按照class的某个值排序
- 3TransReID: Transformer-based Object Re-Identification 介绍
- 4php如何实现在线直播系统,设计方案以及简单实现(此方案 app与pc端一致)---》第一篇
- 5PyTorch 最新安装教程_pytorch最新版本安装
- 6【软件安装】CUDA的卸载_cuda卸载
- 7新东方人工智能中台建设和AI部门管理经验分享_新东方数据中台
- 8迭代器详解
- 9假如C++是一只箭,你会用它来射哪只雕?| 就业岗位分享
- 10SqlSugar ORM 入门(简介和增删查改)
支付宝支付--沙箱支付教程+案例 | PC端网站支付(超级详细版本)_沙箱支付技术
赞
踩
一、什么是沙箱环境
蚂蚁沙箱环境 (Beta) 是协助开发者进行接口功能开发及主要功能联调的辅助环境。
沙箱环境模拟了开放平台部分产品的主要功能和主要逻辑。在开发者应用上线审核前,开发者可以根据自身需求,先在沙箱环境中了解、组合和调试各种开放接口,进行开发调试工作,从而帮助开发者在应用上线审核完成后,能更快速、更顺利的完成线上调试和验收。
注意:
- 由于沙箱为模拟环境,在沙箱完成接口开发及主要功能调试后,请务必在蚂蚁正式环境进行完整的功能验收测试。所有返回码及业务逻辑以正式环境为准。
- 为保证沙箱稳定,沙箱环境测试数据会进行定期数据清理。Beta 测试阶段每周日中午 12 点至每周一中午 12点为维护时间,在此时间内沙箱环境部分功能可能不可用,敬请谅解。
- 请勿在沙箱进行压力测试,以免触发相应的限流措施,导致无法正常使用沙箱环境。
- 沙箱支持的各个开放产品,沙箱使用的特别说明请参见各产品的快速接入文档章节。
以上内容来自沙箱支付官网介绍
二、如何快速使用沙箱环境
1、百度搜索支付宝沙箱环境

你也可以直接点击此链接:沙箱环境地址
2、点击沙箱环境

如果你未登录的话首先会跳转到登录界面,使用支付宝扫码完成登录即可。未进行认证的账号还需要完成身份认证。
完成以上步骤后进入下图所示的页面,选择服务对象。如果是个人的话选择自研开发服务即可。

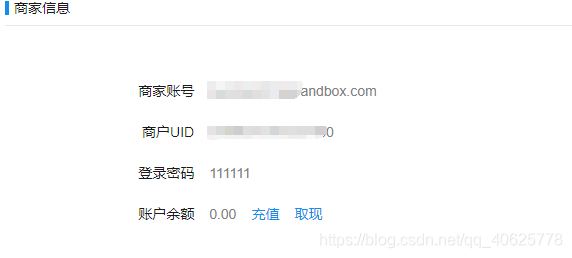
最后,检查沙箱账号中卖家和买家账号是否已经生成。


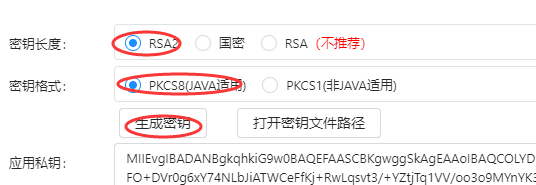
3、生成RSA秘钥
点击沙箱应用 - 》信息配置 - 》必看部分 - 》设置

这里选择公钥,生成方式使用支付宝秘钥生成器,工具下载和具体操作请看:https://opendocs.alipay.com/open/291/106097/

使用支付宝秘钥生成器生成公钥时注意以下几点:

4、设置应用网关、生成AES密钥
开发环境:https://openapi.alipay.com/gateway.do
沙箱环境:https://openapi.alipaydev.com/gateway.do (现在用的)

5、下载手机网站支付 DEMO
手机网站支付 DEMO下载地址:https://opendocs.alipay.com/open/54/106682,这里选择JAVA版。
6、创建Web项目,集成支付
本次demo使用SSM框架,具体搭建步骤请看博主另一篇文章:《手把手教你搭建SSM框架(Eclipse版)》,公众号【C you again】回复“SSM”下载框架源码。
完成项目基本框架搭建以后,就可以集成支付模块了,具体操作如下:
- 在src目录下新建 com.alipay.config 包并把步骤5中下载项目src.com.alipay.config包中的 AlipayConfig.java 复制到此包路径下。
- 在src目录下新建 com.alipay.util 包并把步骤5中下载项目的 src.com.alipay.util 包中的logFile.java 复制到此包路径下。
- 将步骤5下载的项目中WebContent\WEB-INF\lib文件夹下的所有jar包放到此项目的WebContent\WEB-INF\lib下。
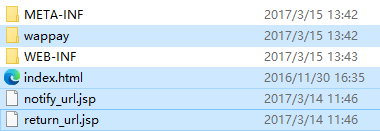
- 将下图中选中的文件复制到 WebContent 目录下。

完成以上四步后就可以启动项目进行测试了,访问地址:http://localhost:8080//ssmDemo/index.html,如果发现访问jsp页面正常,而html页面出现404时,在web.xml中添加以下代码即可:
<servlet-mapping>
   <servlet-name>default</servlet-name>
   <url-pattern>*.html</url-pattern>
   <url-pattern>*.css</url-pattern>
   <url-pattern>*.js</url-pattern>
</servlet-mapping>
- 1
- 2
- 3
- 4
- 5
- 6
看到此图就说明集成成功了哦!

7、修改配置文件,编写测试案例(重要)
接下来是实现支付的重要步骤,修改com.alipay.config下的 AlipayConfig.java
商户ID在步骤3中可以看到,需要填写自己的
// 商户appid
public static String APPID = "此处填写商户ID";
- 1
- 2
此处的值在完成步骤3时已经获得,点击 打开秘钥文件路径 可看到

// 私钥 pkcs8格式的
public static String RSA_PRIVATE_KEY = "此处填写应用秘钥";
- 1
- 2
服务器异步通知页面配成我们自己的项目路径即可
// 服务器异步通知页面路径 需http://或者https://格式的完整路径,不能加?id=123这类自定义参数,必须外网可以正常访问
public static String notify_url = "http://localhost:8080/ssmDemo/notify_url.jsp";
- 1
- 2
页面跳转同步通知页面路径也配成我们自己的项目路径即可,表示支付完成之后要做的事(例如:将订单信息写入数据库)
// 页面跳转同步通知页面路径 需http://或者https://格式的完整路径,不能加?id=123这类自定义参数,必须外网可以正常访问 商户可以自定义同步跳转地址
public static String return_url = "http://localhost:8080/ssmDemo/complete";
- 1
- 2
请求网关地址修改为沙箱环境网关
// 请求网关地址
public static String URL = "https://openapi.alipaydev.com/gateway.do";
- 1
- 2
支付宝公钥在完成步骤3时已经获得,注意不是应用公钥

如上图,点击查看即可获得支付宝公钥:

// 支付宝公钥
public static String ALIPAY_PUBLIC_KEY = "需要换成自己的支付宝公钥";
- 1
- 2
到这里配置就完成了,接下来开始编写测试案例。
在WebContent下新建 payDemo.html
<!DOCTYPE html>
<html>
	<head>
		<meta charset="UTF-8">
		<title>支付宝支付案例</title>
	</head>

	<style>
		.main{
			width: 600px;
			height: 350px;
			border: solid 2px black;
			position: absolute;
         top: 50%;
    left: 50%;
    margin-top: -175px;
    margin-left: -300px;
    padding: 20px;
    float: left;
		}
		.title{
			width: 100%;
			font-size: 20px;
			font-weight: bold;
			text-align: center;
			margin-bottom: 20px;
		}
		.row{
			width: 51%;
			margin-top: 20px;
			float: left;
			margin-left: 20%;
		}
		.row input{
			width: 70%;
			height: 30px;
			float: left;
			display: block;
			box-sizing: border-box;
		}
		.row label{
			width: 30%;
			display: block;
			float: left;
		}
		.row button{
			float: left;
			height: 30px;
		}
		.row .left{
			width: 20%;
			margin: 0 4% 0 30%;

		}
		.row .right{
			width: 46%;
		}

	</style>
	<script>

		window.onload=function(){
			randomShopId(); //随机产生商品Id
		}

		function randomShopId(){
			var shopId="cya_"+new Date().getTime();
			var shop=document.getElementById('shop-id');
			shop.value=shopId
		}
		function reload(){
			location.reload()
		}
	</script>
	<body>
		<div class="main">
			<div class="title">支付宝 网站支付案例,公众号【C you again】作品</div>
			<form method="post" action="/ssmDemo/pay">
				<div class="row">
					<label>订单ID:</label>
					<input readonly="readonly" name="orderId" id="shop-id"/>
				</div>
				<div class="row">
					<label>商品名称:</label>
					<input name="shopName" placeholder="请输入商品名称" />
				</div>
				<div class="row">
					<label>商品价格:</label>
					<input name="shopPrice" placeholder="请输入商品价格" />
				</div>
				<div class="row">
					<label>商品描述:</label>
					<input name="orderDesc" placeholder="请输入商品描述" />
				</div>
				<div class="row">
					<button onclick="reload()" class="left" type="button">重置</button>
				    <button class="right" type="submit">去购买</button>
				</div>

			</form>
			<div style="width:100%;margin-left: 20%;padding:20px 0;float:left;"><a style="display:block;float:left;" href="getOrders">查看所有订单信息</a></div>
		</div>
	</body>
</html>
- 1
- 2
- 3
- 4
- 5
- 6
- 7
- 8
- 9
- 10
- 11
- 12
- 13
- 14
- 15
- 16
- 17
- 18
- 19
- 20
- 21
- 22
- 23
- 24
- 25
- 26
- 27
- 28
- 29
- 30
- 31
- 32
- 33
- 34
- 35
- 36
- 37
- 38
- 39
- 40
- 41
- 42
- 43
- 44
- 45
- 46
- 47
- 48
- 49
- 50
- 51
- 52
- 53
- 54
- 55
- 56
- 57
- 58
- 59
- 60
- 61
- 62
- 63
- 64
- 65
- 66
- 67
- 68
- 69
- 70
- 71
- 72
- 73
- 74
- 75
- 76
- 77
- 78
- 79
- 80
- 81
- 82
- 83
- 84
- 85
- 86
- 87
- 88
- 89
- 90
- 91
- 92
- 93
- 94
- 95
- 96
- 97
- 98
- 99
- 100
- 101
- 102
- 103
- 104
- 105
在 com.cya.entity 包下新建 Order.java 类
package com.cya.entity;

public class Order {

	private String orderId;  //订单Id
	private String shopName; //商品名称
	private Double shopPrice; //商品价格
	private String orderTime;  //下单时间
	private String orderDesc;  //商品描述
	public String getOrderId() {
		return orderId;
	}
	public void setOrderId(String orderId) {
		this.orderId = orderId;
	}
	public String getShopName() {
		return shopName;
	}
	public void setShopName(String shopName) {
		this.shopName = shopName;
	}
	public Double getShopPrice() {
		return shopPrice;
	}
	public void setShopPrice(Double shopPrice) {
		this.shopPrice = shopPrice;
	}
	public String getOrderTime() {
		return orderTime;
	}
	public void setOrderTime(String orderTime) {
		this.orderTime = orderTime;
	}
	public String getOrderDesc() {
		return orderDesc;
	}
	public void setOrderDesc(String orderDesc) {
		this.orderDesc = orderDesc;
	}
	@Override
	public String toString() {
		return "Order [orderId=" + orderId + ", shopName=" + shopName + ", shopPrice=" + shopPrice + ", orderTime="
				+ orderTime + ", orderDesc=" + orderDesc + "]";
	}

}
- 1
- 2
- 3
- 4
- 5
- 6
- 7
- 8
- 9
- 10
- 11
- 12
- 13
- 14
- 15
- 16
- 17
- 18
- 19
- 20
- 21
- 22
- 23
- 24
- 25
- 26
- 27
- 28
- 29
- 30
- 31
- 32
- 33
- 34
- 35
- 36
- 37
- 38
- 39
- 40
- 41
- 42
- 43
- 44
- 45
- 46
- 47
在test数据库中新建order表

在 com.cya.mapper包下新建 IPayMapper.java 接口
package com.cya.mapper;

import java.util.List;

import com.cya.entity.Order;
import com.cya.entity.Person;

public interface IPayMapper {

	public void insertOrder(Order order);

    public List<Order> getOrder();
}
- 1
- 2
- 3
- 4
- 5
- 6
- 7
- 8
- 9
- 10
- 11
- 12
- 13
在 com.cya.mapper包下新建 IPayMapper.xml文件
<?xml version="1.0" encoding="UTF-8"?>
<!DOCTYPE mapper PUBLIC "-//mybatis.org//DTD Mapper 3.0//EN" "http://mybatis.org/dtd/mybatis-3-mapper.dtd" >
<mapper namespace="com.cya.mapper.IPayMapper">
   <sql id="orderColumns">
   o.order_id AS "orderId",
   o.shop_name AS "shopName",
   o.shop_price AS "shopPrice",
   o.order_time AS "orderTime",
   o.order_desc AS "orderDesc"
   </sql>
  <select id="getOrder" resultType="com.cya.entity.Order">
     select <include refid="orderColumns"></include>
      from `order` as o
  </select>

  <insert id="insertOrder" parameterType="com.cya.entity.Order">

     insert into `order`(order_id,shop_name,shop_price,order_time,order_desc)
     values(#{orderId},#{shopName},#{shopPrice},#{orderTime},#{orderDesc})
  </insert>
</mapper>
- 1
- 2
- 3
- 4
- 5
- 6
- 7
- 8
- 9
- 10
- 11
- 12
- 13
- 14
- 15
- 16
- 17
- 18
- 19
- 20
- 21
在 com.cya.service包下新建 IPayService.java接口
package com.cya.service;

import java.util.List;

import com.cya.entity.Order;
import com.cya.entity.Person;

public interface IPayService {

    public void insertOrder(Order order);

    public List<Order> getOrder();
}
- 1
- 2
- 3
- 4
- 5
- 6
- 7
- 8
- 9
- 10
- 11
- 12
- 13
在 com.cya.service.impl包下新建 IPayService.java接口的实现类 PayServiceImpl.java
package com.cya.service.impl;

import java.util.List;

import org.springframework.beans.factory.annotation.Autowired;
import org.springframework.stereotype.Service;

import com.cya.entity.Order;
import com.cya.entity.Person;
import com.cya.mapper.IPayMapper;
import com.cya.mapper.IPersonMapper;
import com.cya.service.IPayService;
import com.cya.service.IPersonService;

@Service()
public class PayServiceImpl implements IPayService{

	@Autowired
	private IPayMapper payMapper;

	@Override
	public void insertOrder(Order order) {
		// TODO Auto-generated method stub
		System.out.println(order);
		payMapper.insertOrder(order);
	}

	@Override
	public List<Order> getOrder() {
		// TODO Auto-generated method stub
		return payMapper.getOrder();
	}

}
- 1
- 2
- 3
- 4
- 5
- 6
- 7
- 8
- 9
- 10
- 11
- 12
- 13
- 14
- 15
- 16
- 17
- 18
- 19
- 20
- 21
- 22
- 23
- 24
- 25
- 26
- 27
- 28
- 29
- 30
- 31
- 32
- 33
- 34
在 com.cya.controller 包下新建 PayController.java 类
package com.cya.controller;

import java.io.IOException;
import java.text.SimpleDateFormat;
import java.util.Date;
import java.util.List;

import javax.annotation.Resource;
import javax.servlet.http.HttpServlet;
import javax.servlet.http.HttpServletRequest;
import javax.servlet.http.HttpServletResponse;
import javax.servlet.http.HttpSession;

import org.springframework.http.HttpRequest;
import org.springframework.stereotype.Controller;
import org.springframework.web.bind.annotation.RequestMapping;
import org.springframework.web.bind.annotation.ResponseBody;

import com.cya.entity.Order;
import com.cya.entity.Person;
import com.cya.service.IPayService;
import com.sun.org.apache.bcel.internal.generic.NEW;

@Controller
@ResponseBody
public class PayController {

	@Resource
	private IPayService payService;

	@RequestMapping("pay")
    public void pay( HttpServletRequest request, HttpServletResponse response) {
		String orderId=""; //订单ID
		String shopName="无名商品";  //商品名称
		Double shopPrice=0.0; //商品价格
		String orderDesc="暂无描述";  //商品描述

		if(request.getParameter("orderId") != null && !request.getParameter("orderId").equals("")) {
			orderId=request.getParameter("orderId");
		}
		if(request.getParameter("shopName") != null && !request.getParameter("shopName").equals("")) {
			shopName=request.getParameter("shopName");
		}
		if(request.getParameter("shopPrice") != null && !request.getParameter("shopPrice").equals("")) {
			shopPrice=Double.valueOf(request.getParameter("shopPrice"));
		}
		if(request.getParameter("orderDesc") != null && !request.getParameter("orderDesc").equals("")) {
			orderDesc=request.getParameter("orderDesc");
		}

		//创建订单对象,设置相关数据
		Order order=new Order();
		order.setOrderId(orderId);
		order.setShopName(shopName);
		order.setShopPrice(shopPrice);
		order.setOrderTime(getNowTime());
		order.setOrderDesc(orderDesc);

		//把订单信息保存到httpSession中
		HttpSession httpSession=request.getSession();
		httpSession.setAttribute("order", order);
		//跳转到支付页面
		try {
			System.out.println("re:"+request.getSession().getAttribute("order"));
			response.sendRedirect(request.getContextPath()+"/wappay/pay.jsp");
		} catch (IOException e) {
			// TODO Auto-generated catch block
			e.printStackTrace();
		}
    }


	//完成支付,写入数据库
	@RequestMapping("complete")
	public void complete(HttpServletRequest request, HttpServletResponse response) {

		//从session中获取定点信息
		Order order=(Order)request.getSession().getAttribute("order");
		try {
			//将数据插入到订单表中
			payService.insertOrder(order);
			response.sendRedirect(request.getContextPath()+"/payDemo.html");
		} catch (Exception e) {
			// TODO: handle exception
			e.printStackTrace();
		}

	}

	//获取所有订单
	@RequestMapping("getOrders")
	public List<Order> getOrders(){
		List<Order>orders=payService.getOrder();
		System.out.println("orders"+orders);
		return orders;
	}

	public String getNowTime() {
        //格式化日期 pattern
        SimpleDateFormat formatter = new SimpleDateFormat("yyyy-MM-dd HH:mm:ss");//HH24小时制、hh12小时制
        String eventDate;
        eventDate =  formatter.format(new Date());
        return eventDate;
	}

}
- 1
- 2
- 3
- 4
- 5
- 6
- 7
- 8
- 9
- 10
- 11
- 12
- 13
- 14
- 15
- 16
- 17
- 18
- 19
- 20
- 21
- 22
- 23
- 24
- 25
- 26
- 27
- 28
- 29
- 30
- 31
- 32
- 33
- 34
- 35
- 36
- 37
- 38
- 39
- 40
- 41
- 42
- 43
- 44
- 45
- 46
- 47
- 48
- 49
- 50
- 51
- 52
- 53
- 54
- 55
- 56
- 57
- 58
- 59
- 60
- 61
- 62
- 63
- 64
- 65
- 66
- 67
- 68
- 69
- 70
- 71
- 72
- 73
- 74
- 75
- 76
- 77
- 78
- 79
- 80
- 81
- 82
- 83
- 84
- 85
- 86
- 87
- 88
- 89
- 90
- 91
- 92
- 93
- 94
- 95
- 96
- 97
- 98
- 99
- 100
- 101
- 102
- 103
- 104
- 105
- 106
- 107
修改WebContent/wappay/pay.jsp页面
<%@ page language="java" contentType="text/html; charset=UTF-8"
    pageEncoding="UTF-8"%>
<%@page import="com.alipay.config.AlipayConfig" %>
<%@page import="com.alipay.api.AlipayClient"%>
<%@page import="com.alipay.api.DefaultAlipayClient"%>
<%@page import="com.alipay.api.AlipayApiException"%>
<%@page import="com.alipay.api.response.AlipayTradeWapPayResponse"%>
<%@page import="com.alipay.api.request.AlipayTradeWapPayRequest"%>
<%@page import="com.alipay.api.domain.AlipayTradeWapPayModel" %>
<%@page import="com.alipay.api.domain.AlipayTradeCreateModel"%>

<%
  /*
     新增以下代码
  */
%>
<%@ taglib uri="http://java.sun.com/jsp/jstl/core" prefix="c" %>
<%@page import="com.cya.entity.Order"%>

<%
/* *
 * 功能:支付宝手机网站支付接口(alipay.trade.wap.pay)接口调试入口页面
 * 版本:2.0
 * 修改日期:2016-11-01
 * 说明:
 * 以下代码只是为了方便商户测试而提供的样例代码,商户可以根据自己网站的需要,按照技术文档编写,并非一定要使用该代码。
 请确保项目文件有可写权限,不然打印不了日志。
 */
%>
<%
if(request.getParameter("WIDout_trade_no")!=null){
	// 商户订单号,商户网站订单系统中唯一订单号,必填
    String out_trade_no = new String(request.getParameter("WIDout_trade_no").getBytes("ISO-8859-1"),"UTF-8");
	// 订单名称,必填
    String subject = new String(request.getParameter("WIDsubject").getBytes("ISO-8859-1"),"UTF-8");
	System.out.println(subject);
    // 付款金额,必填
    String total_amount=new String(request.getParameter("WIDtotal_amount").getBytes("ISO-8859-1"),"UTF-8");
    // 商品描述,可空
    String body = new String(request.getParameter("WIDbody").getBytes("ISO-8859-1"),"UTF-8");
    // 超时时间 可空
   String timeout_express="2m";
    // 销售产品码 必填
    String product_code="QUICK_WAP_WAY";
    /**********************/
    // SDK 公共请求类,包含公共请求参数,以及封装了签名与验签,开发者无需关注签名与验签
    //调用RSA签名方式
    AlipayClient client = new DefaultAlipayClient(AlipayConfig.URL, AlipayConfig.APPID, AlipayConfig.RSA_PRIVATE_KEY, AlipayConfig.FORMAT, AlipayConfig.CHARSET, AlipayConfig.ALIPAY_PUBLIC_KEY,AlipayConfig.SIGNTYPE);
    AlipayTradeWapPayRequest alipay_request=new AlipayTradeWapPayRequest();

    // 封装请求支付信息
    AlipayTradeWapPayModel model=new AlipayTradeWapPayModel();
    model.setOutTradeNo(out_trade_no);
    model.setSubject(subject);
    model.setTotalAmount(total_amount);
    model.setBody(body);
    model.setTimeoutExpress(timeout_express);
    model.setProductCode(product_code);
    alipay_request.setBizModel(model);
    // 设置异步通知地址
    alipay_request.setNotifyUrl(AlipayConfig.notify_url);
    // 设置同步地址
    alipay_request.setReturnUrl(AlipayConfig.return_url);

    // form表单生产
    String form = "";
	try {
		// 调用SDK生成表单
		form = client.pageExecute(alipay_request).getBody();
		response.setContentType("text/html;charset=" + AlipayConfig.CHARSET);
	    response.getWriter().write(form);//直接将完整的表单html输出到页面
	    response.getWriter().flush();
	    response.getWriter().close();
	} catch (AlipayApiException e) {
		// TODO Auto-generated catch block
		e.printStackTrace();
	}
}
%>
<!DOCTYPE html>
<html>
	<head>
	<title>支付宝手机网站支付接口</title>
	<meta http-equiv="Content-Type" content="text/html; charset=utf-8">
<style>
    *{
        margin:0;
        padding:0;
    }
    ul,ol{
        list-style:none;
    }
    body{
        font-family: "Helvetica Neue",Helvetica,Arial,"Lucida Grande",sans-serif;
    }
    .hidden{
        display:none;
    }
    .new-btn-login-sp{
        padding: 1px;
        display: inline-block;
        width: 75%;
    }
    .new-btn-login {
        background-color: #02aaf1;
        color: #FFFFFF;
        font-weight: bold;
        border: none;
        width: 100%;
        height: 30px;
        border-radius: 5px;
        font-size: 16px;
    }
    #main{
        width:100%;
        margin:0 auto;
        font-size:14px;
    }
    .red-star{
        color:#f00;
        width:10px;
        display:inline-block;
    }
    .null-star{
        color:#fff;
    }
    .content{
        margin-top:5px;
    }
    .content dt{
        width:100px;
        display:inline-block;
        float: left;
        margin-left: 20px;
        color: #666;
        font-size: 13px;
        margin-top: 8px;
    }
    .content dd{
        margin-left:120px;
        margin-bottom:5px;
    }
    .content dd input {
        width: 85%;
        height: 28px;
        border: 0;
        -webkit-border-radius: 0;
        -webkit-appearance: none;
    }
    #foot{
        margin-top:10px;
        position: absolute;
        bottom: 15px;
        width: 100%;
    }
    .foot-ul{
        width: 100%;
    }
    .foot-ul li {
        width: 100%;
        text-align:center;
        color: #666;
    }
    .note-help {
        color: #999999;
        font-size: 12px;
        line-height: 130%;
        margin-top: 5px;
        width: 100%;
        display: block;
    }
    #btn-dd{
        margin: 20px;
        text-align: center;
    }
    .foot-ul{
        width: 100%;
    }
    .one_line{
        display: block;
        height: 1px;
        border: 0;
        border-top: 1px solid #eeeeee;
        width: 100%;
        margin-left: 20px;
    }
    .am-header {
        display: -webkit-box;
        display: -ms-flexbox;
        display: box;
        width: 100%;
        position: relative;
        padding: 7px 0;
        -webkit-box-sizing: border-box;
        -ms-box-sizing: border-box;
        box-sizing: border-box;
        background: #1D222D;
        height: 50px;
        text-align: center;
        -webkit-box-pack: center;
        -ms-flex-pack: center;
        box-pack: center;
        -webkit-box-align: center;
        -ms-flex-align: center;
        box-align: center;
    }
    .am-header h1 {
        -webkit-box-flex: 1;
        -ms-flex: 1;
        box-flex: 1;
        line-height: 18px;
        text-align: center;
        font-size: 18px;
        font-weight: 300;
        color: #fff;
    }
</style>
</head>
<body text=#000000 bgColor="#ffffff" leftMargin=0 topMargin=4>
<header class="am-header">
        <h1>支付宝手机网站支付接口快速通道(接口名:alipay.trade.wap.pay)</h1>
</header>
<div id="main">
        <form name=alipayment action='' method=post target="_blank">
            <div id="body" style="clear:left">
                <dl class="content">
                    <dt>商户订单号:</dt>
                    <dd>
                        <input id="WIDout_trade_no" name="WIDout_trade_no" value="${sessionScope.order.orderId}"/>
                    </dd>
                    <hr class="one_line">
                    <dt>订单名称:</dt>
                    <dd>
                        <input id="WIDsubject" name="WIDsubject" value="${sessionScope.order.shopName}" />
                    </dd>
                    <hr class="one_line">
                    <dt>付款金额:</dt>
                    <dd>
                        <input id="WIDtotal_amount" name="WIDtotal_amount" value="${sessionScope.order.shopPrice}" />
                    </dd>
                    <hr class="one_line"/>
                    <dt>商品描述:</dt>
                    <dd>
                        <input id="WIDbody" name="WIDbody" value="${sessionScope.order.orderDesc}" />
                    </dd>
                    <hr class="one_line">
                    <dt></dt>
                    <dd id="btn-dd">
                        <span class="new-btn-login-sp">
                            <button class="new-btn-login" type="submit" style="text-align:center;">确 认</button>
                        </span>
                        <span class="note-help">如果您点击“确认”按钮,即表示您同意该次的执行操作。</span>
                    </dd>
                </dl>
            </div>
		</form>
        <div id="foot">
			<ul class="foot-ul">
				<li>
					支付宝版权所有 2015-2018 ALIPAY.COM
				</li>
			</ul>
		</div>
	</div>
</body>
<script language="javascript">
	function GetDateNow() {
		var vNow = new Date();
		var sNow = "";
		sNow += String(vNow.getFullYear());
		sNow += String(vNow.getMonth() + 1);
		sNow += String(vNow.getDate());
		sNow += String(vNow.getHours());
		sNow += String(vNow.getMinutes());
		sNow += String(vNow.getSeconds());
		sNow += String(vNow.getMilliseconds());
		//document.getElementById("WIDout_trade_no").value =  sNow;
		//document.getElementById("WIDsubject").value = "手机网站支付测试商品";
		//document.getElementById("WIDtotal_amount").value = "0.01";
       // document.getElementById("WIDbody").value = "购买测试商品0.01元";
	}
	GetDateNow();
</script>
</html>
- 1
- 2
- 3
- 4
- 5
- 6
- 7
- 8
- 9
- 10
- 11
- 12
- 13
- 14
- 15
- 16
- 17
- 18
- 19
- 20
- 21
- 22
- 23
- 24
- 25
- 26
- 27
- 28
- 29
- 30
- 31
- 32
- 33
- 34
- 35
- 36
- 37
- 38
- 39
- 40
- 41
- 42
- 43
- 44
- 45
- 46
- 47
- 48
- 49
- 50
- 51
- 52
- 53
- 54
- 55
- 56
- 57
- 58
- 59
- 60
- 61
- 62
- 63
- 64
- 65
- 66
- 67
- 68
- 69
- 70
- 71
- 72
- 73
- 74
- 75
- 76
- 77
- 78
- 79
- 80
- 81
- 82
- 83
- 84
- 85
- 86
- 87
- 88
- 89
- 90
- 91
- 92
- 93
- 94
- 95
- 96
- 97
- 98
- 99
- 100
- 101
- 102
- 103
- 104
- 105
- 106
- 107
- 108
- 109
- 110
- 111
- 112
- 113
- 114
- 115
- 116
- 117
- 118
- 119
- 120
- 121
- 122
- 123
- 124
- 125
- 126
- 127
- 128
- 129
- 130
- 131
- 132
- 133
- 134
- 135
- 136
- 137
- 138
- 139
- 140
- 141
- 142
- 143
- 144
- 145
- 146
- 147
- 148
- 149
- 150
- 151
- 152
- 153
- 154
- 155
- 156
- 157
- 158
- 159
- 160
- 161
- 162
- 163
- 164
- 165
- 166
- 167
- 168
- 169
- 170
- 171
- 172
- 173
- 174
- 175
- 176
- 177
- 178
- 179
- 180
- 181
- 182
- 183
- 184
- 185
- 186
- 187
- 188
- 189
- 190
- 191
- 192
- 193
- 194
- 195
- 196
- 197
- 198
- 199
- 200
- 201
- 202
- 203
- 204
- 205
- 206
- 207
- 208
- 209
- 210
- 211
- 212
- 213
- 214
- 215
- 216
- 217
- 218
- 219
- 220
- 221
- 222
- 223
- 224
- 225
- 226
- 227
- 228
- 229
- 230
- 231
- 232
- 233
- 234
- 235
- 236
- 237
- 238
- 239
- 240
- 241
- 242
- 243
- 244
- 245
- 246
- 247
- 248
- 249
- 250
- 251
- 252
- 253
- 254
- 255
- 256
- 257
- 258
- 259
- 260
- 261
- 262
- 263
- 264
- 265
- 266
- 267
- 268
- 269
- 270
- 271
- 272
- 273
- 274
- 275
- 276
- 277
- 278
- 279
- 280
- 281
- 282
- 283
- 284
配置修改和测试案例完成后,就来看看最终效果吧!
8、查看效果
启动项目,浏览器地址栏访问:http://localhost:8080/ssmDemo/payDemo.html,如果以上步骤无误,会显示如下界面:

输入:
商品名称:vivo x9
商品价格:2599.0
商品描述:新品上市,测试用例
点击去购买效果图如下:

继续点击确定,跳转到如下页面:

选择支付方式,这里以浏览器支付为例,输入账号和登录密码(查看步骤2),跳转到订单详情页面:

继续点击确认付款,输入支付密码等待支付完成

出现上图界面,说明支付成功,等待几秒后跳转到首页面,点击查看所有订单信息可以查询到所有订单。这里只做简单展示。

三、 结束语
以上就是支付宝PC端完成支付功能的所有教程了,如果你有疑问请在后台私信,下载本教程源码请在公众号【C you again】回复“Alipay”。另外,因博主技术有限,文章中可能有不妥之处,欢迎交流。欢迎各位大佬转载本文章,转载时注明出处!制作不易,如果文章对你有帮助,记得一键三连!


