- 1十、训练自己的TTS模型_tts 训练
- 2Spring的优点_spring的优势
- 3【无监控,不运维】监控之Prometheus_prometheus 监控pod流量
- 4UE的AI基础(3)行为树执行流程_ue5 ai行为树在哪里运行
- 52024 年 10大 AI 趋势
- 6【OpenCV】 基础入门(一)初识 Mat 类 | 通过 Mat 类显示图像
- 7智谱AI发布国产最强大模型GLM4,理解评测与数学能力仅次于Gemini Ultra和GPT-4,编程能力超过Gemini-pro,还有对标GPTs商店的GLMs_智谱glm4
- 8MySQL查询为什么没走索引?这篇文章带你全面解析_tidb group by主键id,为啥没有走索引呢
- 9自媒体矩阵大比拼:创作者VS机构,原创VS转载,你更看好谁?
- 10【腾讯云云上实验室】向量数据库与数据挖掘分析的黄金组合指南_向量数据库实现数据分析的步骤
BEVFusion环境配置
赞
踩
BEVFusion环境配置
论文地址:BEVFusion: Multi-Task Multi-Sensor Fusion with Unified Bird’s-Eye View Representation
项目地址:https://github.com/mit-han-lab/bevfusion
第一步:Pytorch环境搭建
1.1 安装pytorch环境
conda create -n pytorch-bev python=3.8
conda activate pytorch-bev
conda install pytorch==1.10.1 torchvision==0.11.2 torchaudio==0.10.1 cudatoolkit=11.3 -c pytorch
- 1
- 2
- 3
1.2 验证pytorch环境
python                     # 3.8.16
import torch
torch.__version__          # 1.10.1
torch.version.cuda         # 11.3
torch.cuda.is_available()  # True
exit()
- 1
- 2
- 3
- 4
- 5
- 6
第二步:安装其它包
2.1 安装其它包
pip install Pillow==8.4.0
pip install tqdm
pip install torchpack
pip install mmcv==1.4.0 mmcv-full==1.4.0 mmdet==2.20.0
pip install nuscenes-devkit
conda install mpi4py==3.0.3
pip install numba==0.48.0
pip install numpy==1.23.0
pip uninstall setuptools
conda install setuptools==58.0.4
- 1
- 2
- 3
- 4
- 5
- 6
- 7
- 8
- 9
- 10
2.2 安装OpenMPI
注意:OpenMPI是不能用pip和conda下载的,我这里主要需要参考这篇文章下载OpenMPI。
2.2.1 下载openmpi-4.0.4.tar.bz2
首先去OpenMPI官网下载所需要的版本。例如,将最新版本 openmpi-4.0.4.tar.bz2 文件放到你个人用户目录下的任一个文件夹。
2.2.2 解压安装包
tar -xjf openmpi-4.0.4.tar.bz2
- 1
2.2.3 安装openmpi-4.0.4
mkdir software    # 新建openmpi-4.0.4的安装目录
cd openmpi-4.0.4  # 进入解压后的目录
./configure --prefix=/home/user/software/openmpi-4.0.4  #./configure --prefix="安装目录所在的绝对路径"
make all install  # 安装全部
- 1
- 2
- 3
- 4
2.2.4 环境配置
vim ~/.bashrc # 使用vim打开文件.bashrc,按i进入编辑状态
- 1
然后把下面的环境配置复制到.bashrc最后面,注意环境配置中的绝对路径需要与你的环境中的保持一致。
export PATH=/home/user/software/openmpi-4.0.4/bin:$PATH

export LD_LIBRARY_PATH=$LD_LIBRARY_PATH:/home/user/software/openmpi-4.0.4/lib:$LD_LIBRARY_PATH

export LIBRARY_PATH=/home/user/software/openmpi-4.0.4/lib:$LIBRARY_PATH

export INCLUDE=/home/user/software/openmpi-4.0.4/include:$INCLUDE

export MANPATH=/home/user/software/openmpi-4.0.4/share/man:$MANPATH
- 1
- 2
- 3
- 4
- 5
- 6
- 7
- 8
- 9
2.2.5 保存环境
保存关闭.bashrc文件之后,使用以下命令保存环境变量。
source ~/.bashrc # 使环境变量设置起作用
- 1
2.2.6 验证是否openmpi安装成功
重新新进入shell之后直接用以下命令来查看openmpi版本。
mpiexec -V # 查看openmpi版本
- 1
注意:openmpi安装成功后可以直接删除安装文件夹/openmpi-4.0.4和安装包openmpi-4.0.4.tar.bz2。
第三步:安装BEVFusion
3.1 克隆项目地址
git clone https://github.com/mit-han-lab/bevfusion.git
- 1
3.2 修改 mmdet3d/ops/spconv/src/indice_cuda.cu 文件
把 mmdet3d/ops/spconv/src/indice_cuda.cu 文件里面所有的4096改为256


3.3 编译
cd bevfusion
python setup.py develop
- 1
- 2
第四步:下载Nuscenes数据集
4.1 官网下载Nuscenes数据集
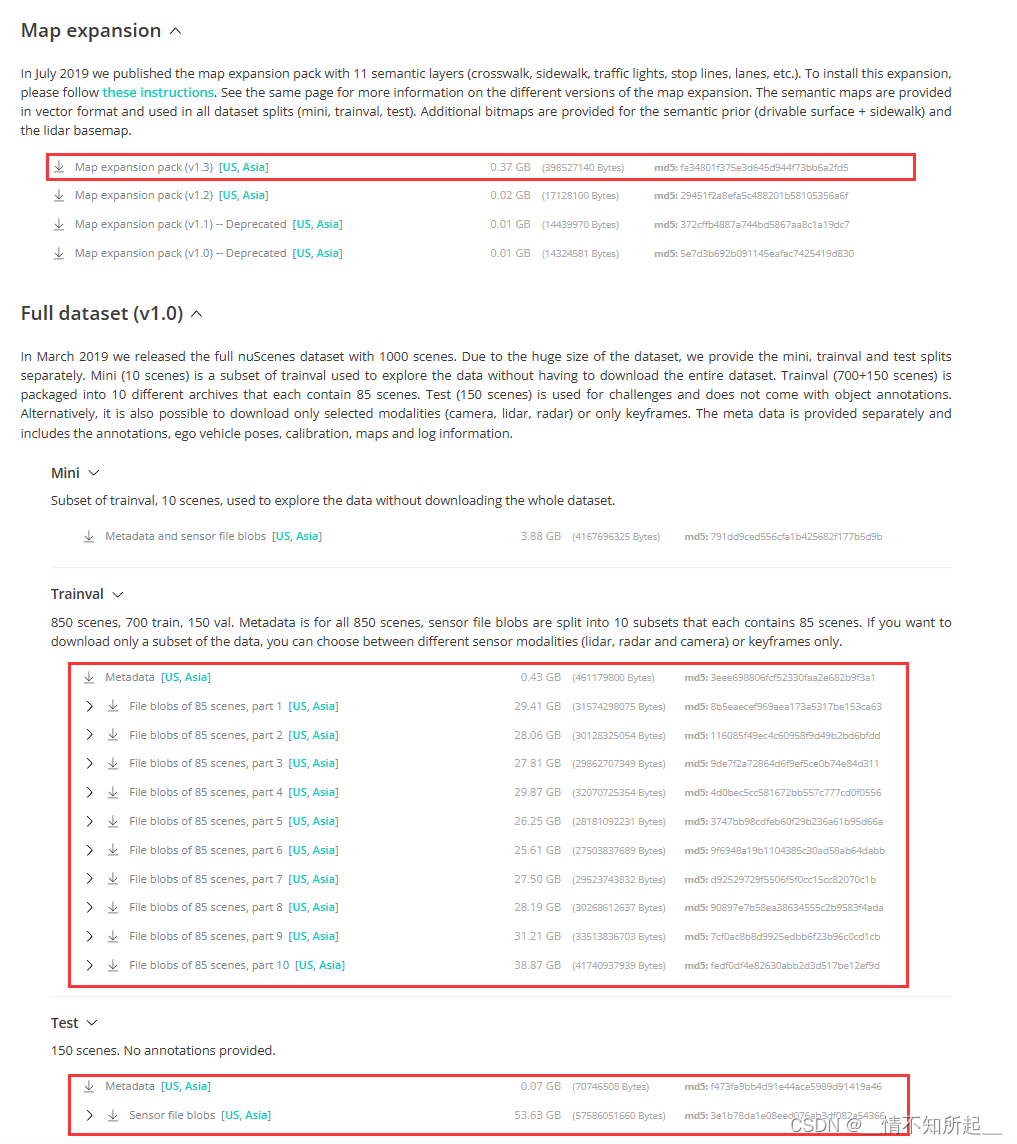
在NuScenes 3D object detection dataset下载nuscenes数据集安装包,请记住下载检测数据集和地图扩展(用于BEV地图分割)。
当然,如果在官网下载麻烦的话,可以参考这篇博客使用百度网盘或者迅雷网盘进行下载。

4.2 官网下载Nuscenes数据集后的组织结构
在官网下载nuscenes数据集后,并在bevfusion文件夹下组织成以下所示的结构。
bevfusion
├── assets
├── configs
├── mmdet3d
├── tools
├── data
│   ├── nuscenes
│   │   ├── maps
│   │   │   ├── basemap
│   │   │   ├── expansion
│   │   │   ├── prediction
│   │   ├── samples
│   │   ├── sweeps
│   │   ├── v1.0-test
│   │   ├── v1.0-trainval
- 1
- 2
- 3
- 4
- 5
- 6
- 7
- 8
- 9
- 10
- 11
- 12
- 13
- 14
- 15
4.3 数据预处理
项目的数据预处理需要使用tools/create_data.py重新处理一次。
cd bevfusion
python tools/create_data.py nuscenes --root-path ./data/nuscenes --out-dir ./data/nuscenes --extra-tag nuscenes
./tools/download_pretrained.sh  # 使用该脚本下载检查点,方便后续训练和测试
- 1
- 2
- 3
4.4 数据预处理后的组织结构
项目的数据预处理后,在bevfusion文件夹下将会组织成以下所示的结构。
mmdetection3d
├── assets
├── configs
├── mmdet3d
├── tools
├── data
│   ├── nuscenes
│   │   ├── maps
│   │   │   ├── basemap
│   │   │   ├── expansion
│   │   │   ├── prediction
│   │   ├── samples
│   │   ├── sweeps
│   │   ├── v1.0-test
│   │   ├── v1.0-trainval
│   │   ├── nuscenes_database
│   │   ├── nuscenes_infos_train.pkl
│   │   ├── nuscenes_infos_val.pkl
│   │   ├── nuscenes_infos_test.pkl
│   │   ├── nuscenes_dbinfos_train.pkl
- 1
- 2
- 3
- 4
- 5
- 6
- 7
- 8
- 9
- 10
- 11
- 12
- 13
- 14
- 15
- 16
- 17
- 18
- 19
- 20
第五步:训练
BEVFusion的单卡训练和测试需要修改一下tool/train文件、mmdet3d/apis/train.py文件和tools/test.py文件,参考这篇文章进行修改。
5.1 单卡训练
## 单卡训练
# 多模态(常用)
CUDA_VISIBLE_DEVICES=5 python tools/train_single_gpu.py \
	configs/nuscenes/det/transfusion/secfpn/camera+lidar/swint_v0p075/convfuser.yaml \
	--model.encoders.camera.backbone.init_cfg.checkpoint pretrained/swint-nuimages-pretrained.pth \
	--load_from pretrained/lidar-only-det.pth \
	--run-dir output/bev_result/
# 图像
CUDA_VISIBLE_DEVICES=5 python tools/train_single_gpu.py \
	configs/nuscenes/det/centerhead/lssfpn/camera/256x704/swint/default.yaml \
	--model.encoders.camera.backbone.init_cfg.checkpoint pretrained/swint-nuimages-pretrained.pth \
	--run-dir output/image_result/
# 点云
CUDA_VISIBLE_DEVICES=5 python tools/train_single_gpu.py \
	configs/nuscenes/det/transfusion/secfpn/lidar/voxelnet_0p075.yaml \
	--run-dir output/lidar_result/
- 1
- 2
- 3
- 4
- 5
- 6
- 7
- 8
- 9
- 10
- 11
- 12
- 13
- 14
- 15
- 16
5.2 单卡测试
# 单卡测试(常用)
CUDA_VISIBLE_DEVICES=5 python tools/test_single_gpu.py \
	configs/nuscenes/det/transfusion/secfpn/camera+lidar/swint_v0p075/convfuser.yaml \
	pretrained/bevfusion-det.pth --eval bbox
- 1
- 2
- 3
- 4
5.3 多卡训练
## 多卡训练
# 多模态
torchpack dist-run -np 8 python tools/train.py \
	configs/nuscenes/det/transfusion/secfpn/camera+lidar/swint_v0p075/convfuser.yaml \
	--model.encoders.camera.backbone.init_cfg.checkpoint pretrained/swint-nuimages-pretrained.pth \
	--load_from pretrained/lidar-only-det.pth \
	--run-dir output/bev_result/
# 图像
torchpack dist-run -np 8 python tools/train.py \
	configs/nuscenes/det/centerhead/lssfpn/camera/256x704/swint/default.yaml \
	--model.encoders.camera.backbone.init_cfg.checkpoint pretrained/swint-nuimages-pretrained.pth \
	--run-dir output/image_result/
# 点云
torchpack dist-run -np 8 python tools/train.py \
	configs/nuscenes/det/transfusion/secfpn/lidar/voxelnet_0p075.yaml \
	--run-dir output/lidar_result/
- 1
- 2
- 3
- 4
- 5
- 6
- 7
- 8
- 9
- 10
- 11
- 12
- 13
- 14
- 15
- 16
5.4 多卡测试
## 多卡测试
# 多模态
torchpack dist-run -np 8 python tools/test.py \
	configs/nuscenes/det/transfusion/secfpn/camera+lidar/swint_v0p075/convfuser.yaml \
	pretrained/bevfusion-det.pth --eval bbox
- 1
- 2
- 3
- 4
- 5
5.5 可视化
## 可视化
torchpack dist-run -np 1 python tools/visualize.py \
	configs/nuscenes/det/transfusion/secfpn/camera+lidar/swint_v0p075/convfuser.yaml \
	--mode pred --checkpoint pretrained/bevfusion-det.pth --bbox-score 0.1 --out-dir output/bev_result/visualize
- 1
- 2
- 3
- 4
至此,BEVFusion的环境配置到此结束!感谢大家的观看!


