热门标签
热门文章
- 1lopatkin俄大神最新精简中文系统Windows 7 Professional VL SP1 7601.24496 x86-x64 ZH-CN DREY
- 2Windows10 + docker for desktop + WSL2 实现Windows运行docker进行GPU加速,pycharm远程连接容器内的解释器,本地使用(连接)容器内jupyter_windows版docker是否可以使用gpu加速
- 3Ubuntu Linux 下安装和卸载cmake 3.28.2版本_cmake linux 卸载
- 4手动下载/安装Xcode的simulator_xcode下载
- 5【ChatGPT 和文心一言哪个更好用?】
- 6python对列表进行去重_Python编程常用技巧–持续更新
- 7drf序列化器字段类型及参数_drf manytomany
- 8React和Vue的区别
- 9Linux中该如何查看当前CPU、内存、硬盘占用情况,如何判断当前服务器负载情况_linux查看服务器资源占用情况
- 10React 和 Vue 框架的区别_vue和react的虚拟dom对比
当前位置: article > 正文
RT-Thread: 移植RT-Thread,基于 STM32CubeMX 生成的 KEIL 工程_cubemx 移植rtthread
作者:Cpp五条 | 2024-02-07 21:25:50
赞
踩
cubemx 移植rtthread
关键词:RT-Thread 移植,基于 STM32CubeMX 生成的 KEIL 工程,JLINK-RTT 移植
目录
关键词:RT-Thread 移植,基于 STM32CubeMX 生成的 KEIL 工程,JLINK-RTT 移植
2).KEIL 打开工程,配置工程,打开 Use MicroLIB库
1).使用 STM32CubeMX 生成芯片对应的裸机工程
使用 STM32CubeMX 根据所需芯片创建工程

注意:选择 Debug 为 Serial Wire 不然可能下载一次程序后就不能再下载了。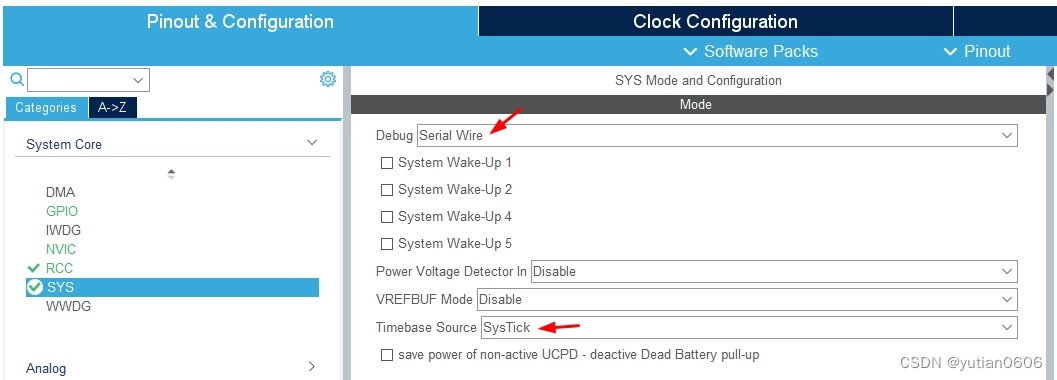
时钟设置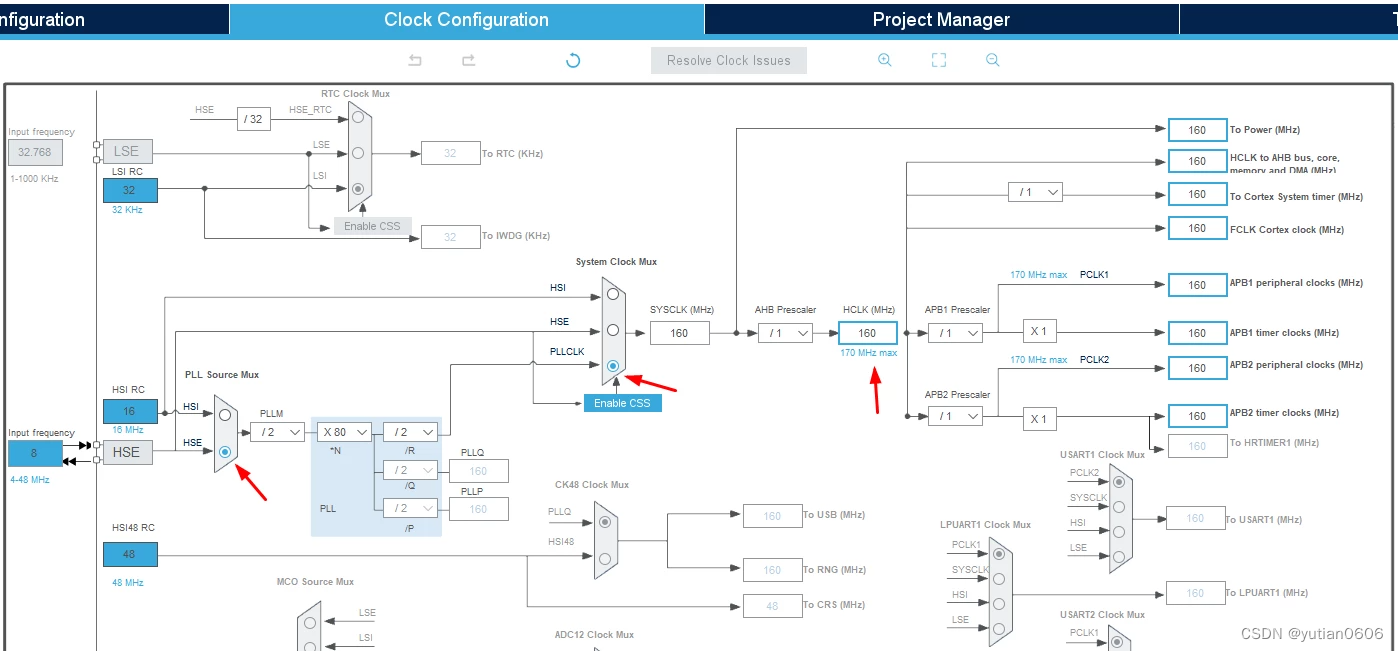
工程输出设置

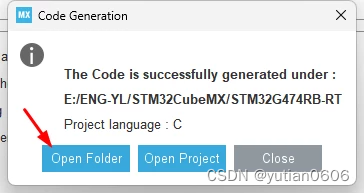
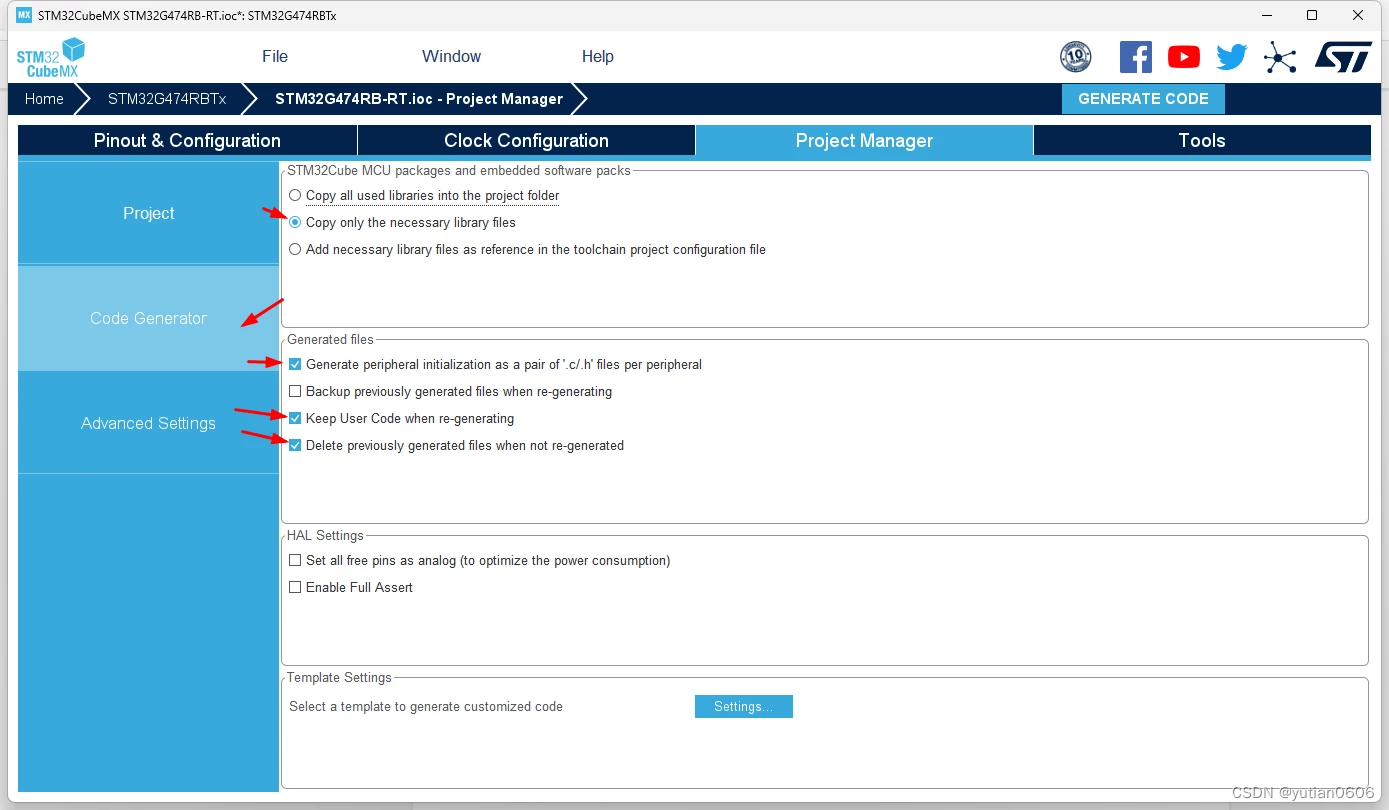 生成工程 打开工程对应文件夹

打开工程对应文件夹
2).KEIL 打开工程,配置工程,打开 Use MicroLIB库
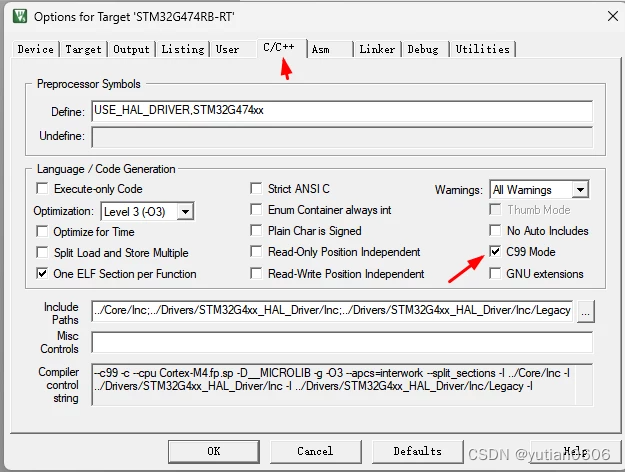
配置调试接口
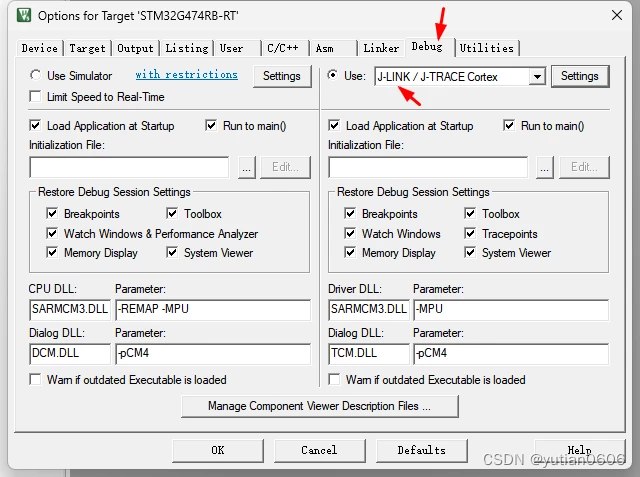

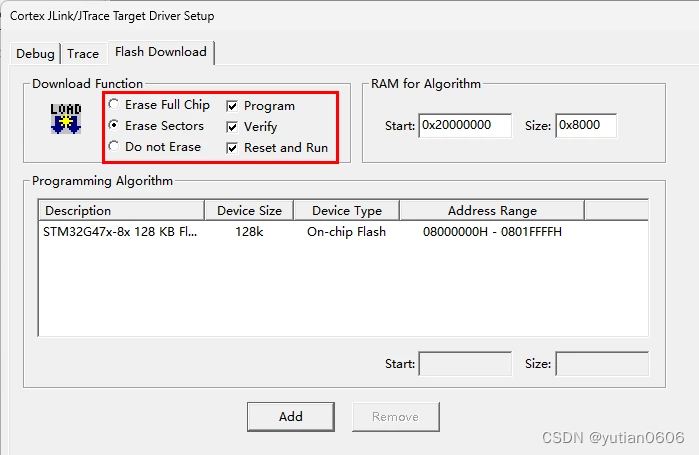
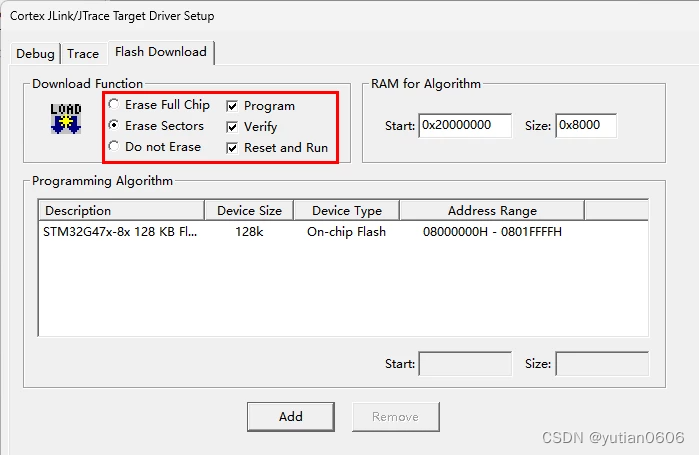
配置完成,编译一下检查是否有错,为下一步添加系统提前排除错误。
3).添加 RT-Thread

添加 RTOS

添加好后,RTOS出现在项目目录里面
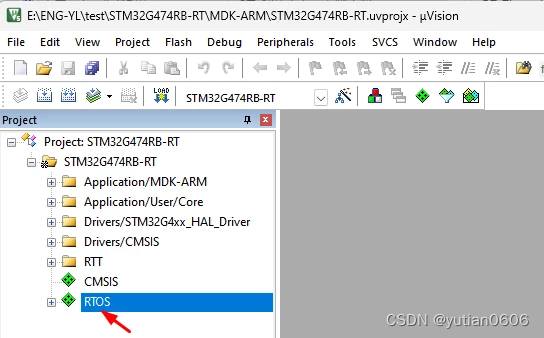
4).修改 RTOS 的配置文件 rtconfig.h
rtconfig.h 文件参考
- /* RT-Thread config file */
-
-
- #ifndef __RTTHREAD_CFG_H__
- #define __RTTHREAD_CFG_H__
-
-
- // <<< Use Configuration Wizard in Context Menu >>>
-
-
- // <h>Basic Configuration
- // <o>Maximal level of thread priority <8-256>
- // <i>Default: 32
- #define RT_THREAD_PRIORITY_MAX 32
- // <o>OS tick per second
- // <i>Default: 1000 (1ms)
- #define RT_TICK_PER_SECOND 1000
- // <o>Alignment size for CPU architecture data access
- // <i>Default: 4
- #define RT_ALIGN_SIZE 4
- // <o>the max length of object name<2-16>
- // <i>Default: 8
- #define RT_NAME_MAX 16 /* YL 从8改16 */
- // <c1>Using RT-Thread components initialization
- // <i>Using RT-Thread components initialization
- #define RT_USING_COMPONENTS_INIT
- // </c>
-
-
- #define RT_USING_USER_MAIN
-
-
- // <o>the stack size of main thread<1-4086>
- // <i>Default: 512
- #define RT_MAIN_THREAD_STACK_SIZE 256 /* YL 从 256 改 2048 */
-
-
- // </h>
-
-
- // <h>Debug Configuration
- // <c1>enable kernel debug configuration
- // <i>Default: enable kernel debug configuration
- //#define RT_DEBUG
- // </c>
- // <o>enable components initialization debug configuration<0-1>
- // <i>Default: 0
- #define RT_DEBUG_INIT 0
- // <c1>thread stack over flow detect
- // <i> Diable Thread stack over flow detect
- //#define RT_USING_OVERFLOW_CHECK
- // </c>
- // </h>
-
-
- // <h>Hook Configuration
- // <c1>using hook
- // <i>using hook
- //#define RT_USING_HOOK
- // </c>
- // <c1>using idle hook
- // <i>using idle hook
- //#define RT_USING_IDLE_HOOK
- // </c>
- // </h>
-
-
- // <e>Software timers Configuration
- // <i> Enables user timers
- #define RT_USING_TIMER_SOFT 0
- #if RT_USING_TIMER_SOFT == 0
- #undef RT_USING_TIMER_SOFT
- #endif
- // <o>The priority level of timer thread <0-31>
- // <i>Default: 4
- #define RT_TIMER_THREAD_PRIO 4
- // <o>The stack size of timer thread <0-8192>
- // <i>Default: 512
- #define RT_TIMER_THREAD_STACK_SIZE 512
- // </e>
-
-
- // <h>IPC(Inter-process communication) Configuration
- // <c1>Using Semaphore
- // <i>Using Semaphore
- #define RT_USING_SEMAPHORE
- // </c>
- // <c1>Using Mutex
- // <i>Using Mutex
- //#define RT_USING_MUTEX /* YL 互斥量 */
- // </c>
- // <c1>Using Event
- // <i>Using Event
- //#define RT_USING_EVENT /* YL 信号量 */
- // </c>
- // <c1>Using MailBox
- // <i>Using MailBox
- #define RT_USING_MAILBOX /* YL 邮箱 */
- // </c>
- // <c1>Using Message Queue
- // <i>Using Message Queue
- //#define RT_USING_MESSAGEQUEUE /* YL 消息队列 */
- // </c>
- // </h>
-
-
- // <h>Memory Management Configuration
- // <c1>Memory Pool Management
- // <i>Memory Pool Management
- //#define RT_USING_MEMPOOL
- // </c>
- // <c1>Dynamic Heap Management(Algorithm: small memory )
- // <i>Dynamic Heap Management
- #define RT_USING_HEAP
- #define RT_USING_SMALL_MEM
- // </c>
- // <c1>using tiny size of memory
- // <i>using tiny size of memory
- //#define RT_USING_TINY_SIZE
- // </c>
- // </h>
-
-
- // <h>Console Configuration
- // <c1>Using console
- // <i>Using console
- #define RT_USING_CONSOLE /* YL 控制台 */
- // </c>
- // <o>the buffer size of console <1-1024>
- // <i>the buffer size of console
- // <i>Default: 128 (128Byte)
- #define RT_CONSOLEBUF_SIZE 256
- // </h>
-
-
- // <h>FinSH Configuration
- // <c1>include finsh config
- // <i>Select this choice if you using FinSH
- #include "finsh_config.h" /* YL 开启宏定义,再到finsh_port.c 中关闭对应提示 */
- // </c>
- // </h>
-
-
- // <h>Device Configuration
- // <c1>using device framework
- // <i>using device framework
- //#define RT_USING_DEVICE /* YL 设备框架: 开启宏定义, */
- // </c>
- // </h>
-
-
- // <<< end of configuration section >>>
-
-
- #endif

5).修改 RTOS 的 board.c 文件
- //添加MCU的滴答定时器中断函数,并调用 RTOS 的滴答定时器回调函数
- /* cortex-m SysTick_Handler() */
- void SysTick_Handler()
- {
- rt_os_tick_callback();
- }
-
-
-
-
- //在 rt_hw_board_init 添加系统初始化调用的 MCU 函数
-
-
- void rt_hw_board_init(void)
- {
- //#error "TODO 1: OS Tick Configuration."
- /*
- * TODO 1: OS Tick Configuration
- * Enable the hardware timer and call the rt_os_tick_callback function
- * periodically with the frequency RT_TICK_PER_SECOND.
- */
-
-
- HAL_Init();
- SystemClock_Config();
- // SystemCoreClockUpdate();
- // HAL_SYSTICK_Config( HAL_RCC_GetSysClockFreq() / RT_TICK_PER_SECOND );
-
-
- /* Call components board initial (use INIT_BOARD_EXPORT()) */
- #ifdef RT_USING_COMPONENTS_INIT
- rt_components_board_init();
- #endif
-
-
- #if defined(RT_USING_USER_MAIN) && defined(RT_USING_HEAP)
- rt_system_heap_init(rt_heap_begin_get(), rt_heap_end_get());
- #endif
- }
-
-
- //添加RTOS控制台的收发代码
- void rt_hw_console_output(const char *str)
- {
- //#error "TODO 3: Output the string 'str' through the uart."
-
- #if PRINTF_PORT_JLINK /* j-link rtt 模式*/
- SEGGER_RTT_printf(0,str);
- #else /* 硬件串口 模式*/
- while (*str != '\0')
- {
- // HAL_UART_Transmit(&Uart1Handle, (uint8_t *) (str++), 1, 1000);
- }
- #endif
- rt_exit_critical();
-
-
- }
-
-
-
-
- char rt_hw_console_getchar(void)
- {
- /* Note: the initial value of ch must < 0 */
- int ch = -1;
- #if PRINTF_PORT_JLINK /* j-link rtt 模式*/
- ch = SEGGER_RTT_GetKey();
- #else /* 硬件串口 模式*/
- //read_uart1_ch(&ch);
- #endif
-
-
- return ch;
- }
-
-
- //添加 printf 函数重定向代码
- /* printf 重定向 */
- int fputc(int ch, FILE *f)
- {
- #if PRINTF_PORT_JLINK /* j-link rtt 模式*/
- SEGGER_RTT_PutChar(0, ch);
- #else
- HAL_UART_Transmit(&Uart1Handle, (uint8_t *)&ch, 1, 1000); /* 硬件串口 模式*/
- #endif
- return (ch);
- }

6).添加JLINK 的RTT 打印功能
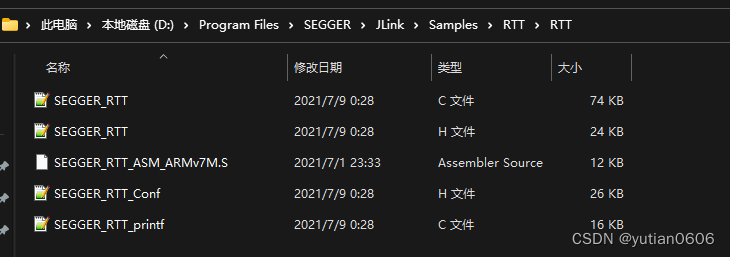
安装JLINK 后,在如下目录中可以找到一个 RTT 文件夹,把这文件夹添加到工程中
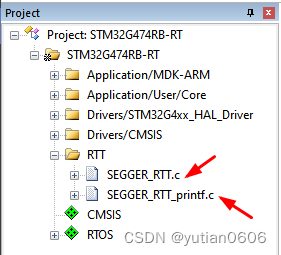
添加 RTT 功能使用到的2个 .C 文件
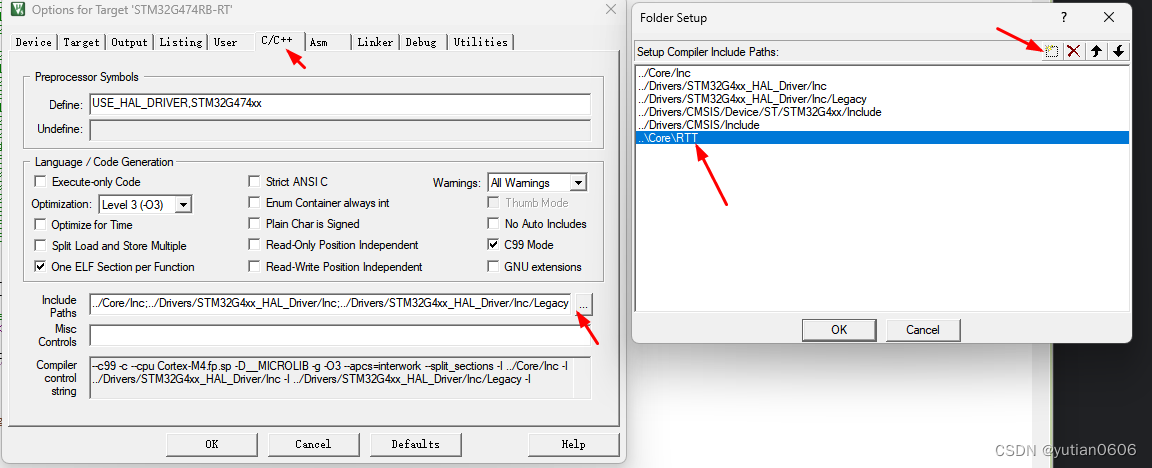
添加 RTT 的头文件
添加 RTT 的收发代码、printf的重定向函数 到 board.c
- void rt_hw_console_output(const char *str)
- {
- //#error "TODO 3: Output the string 'str' through the uart."
-
- #if PRINTF_PORT_JLINK /* j-link rtt 模式*/
- SEGGER_RTT_printf(0,str);
- #else /* 硬件串口 模式*/
- while (*str != '\0')
- {
- // HAL_UART_Transmit(&Uart1Handle, (uint8_t *) (str++), 1, 1000);
- }
- #endif
- rt_exit_critical();
- }
-
-
- char rt_hw_console_getchar(void)
- {
- /* Note: the initial value of ch must < 0 */
- int ch = -1;
- #if PRINTF_PORT_JLINK /* j-link rtt 模式*/
- ch = SEGGER_RTT_GetKey();
- #else /* 硬件串口 模式*/
- //read_uart1_ch(&ch);
- #endif
-
- return ch;
- }
-
- /* printf 重定向 */
- int fputc(int ch, FILE *f)
- {
- #if PRINTF_PORT_JLINK /* j-link rtt 模式*/
- SEGGER_RTT_PutChar(0, ch);
- #else
- HAL_UART_Transmit(&Uart1Handle, (uint8_t *)&ch, 1, 1000); /* 硬件串口 模式*/
- #endif
- return (ch);
- }

7).编译、排错错误、测试
编译过程中可能会出现如下错误,错误原因因为重复定义。在 Core\Src\stm32g4xx_it.c 文件中找到对应函数,屏蔽掉即可。

- SysTick_Handler() //屏蔽掉
- PendSV_Handler() //屏蔽掉
- HardFault_Handler()//屏蔽掉
测试:在main.c 函数中增加系统测试代码
- uint32_t count = 0;
- while (1)
- {
- /* USER CODE END WHILE */
- count++;
- rt_thread_mdelay(1000);
- printf("count = %d ,tick_time = %d \r\n",count,rt_tick_get());
- /* USER CODE BEGIN 3 */
- }
下载程序,打开 JLINK 的 RTT

系统成功运行后打印如下信息
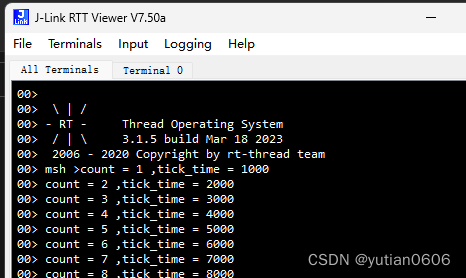
8)JLINK RTT 软件设置及应用

打开软件后按 F2 可以弹出如下窗口;
设置后 OK可以打开 RTT 功能按F3可以断开链接;
窗口数据停止刷新ALT + R 清除窗口显示;
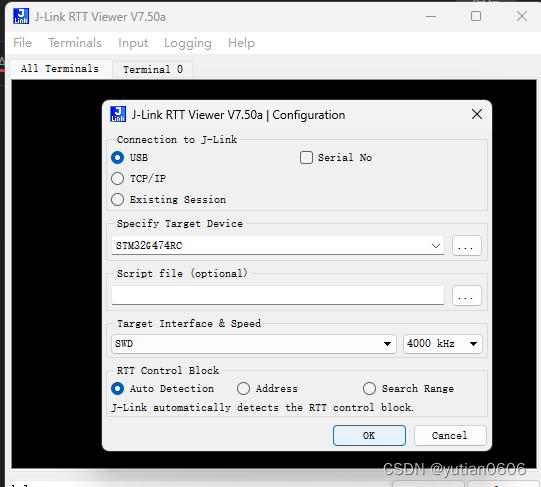
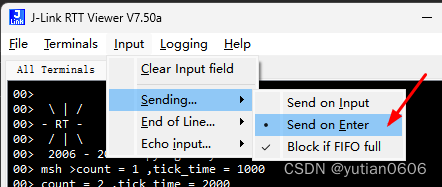
按如下设置后,输入信息按 回车键才会发出,这样配置后才能使用 RT thread 的控制台
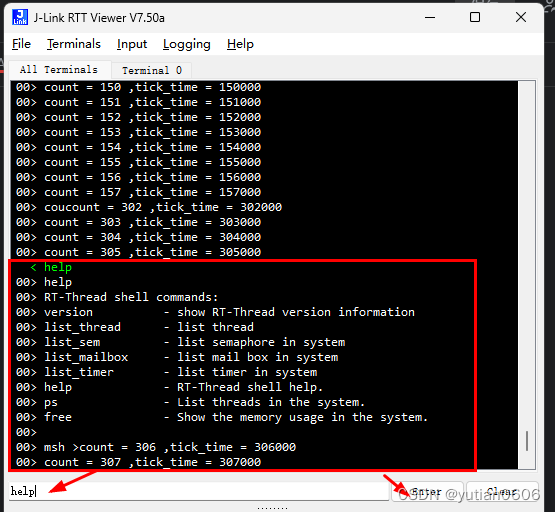
在输入窗口输入 help 回车可以看到系统控制台的打印信息
声明:本文内容由网友自发贡献,不代表【wpsshop博客】立场,版权归原作者所有,本站不承担相应法律责任。如您发现有侵权的内容,请联系我们。转载请注明出处:https://www.wpsshop.cn/w/Cpp五条/article/detail/67445
推荐阅读
相关标签


