NuSences 数据集解析以及 nuScenes devkit 的使用_nuscenes-devkit
赞
踩
一、官网介绍
1.1 总览(Overview)
nuScenes数据集(发音为/nuːsiːnz/)是由Motional(前身为nuTonomy)团队开发的用于自动驾驶的公共大规模数据集。motion公司正在让无人驾驶汽车成为一个安全、可靠、方便的现实。通过向公众发布我们的一部分数据,motion旨在支持公众对计算机视觉和自动驾驶的研究。
为此,我们收集了波士顿和新加坡的1000个驾驶场景,这两个城市以交通密集和极具挑战性的驾驶情况而闻名。时长20秒的场景是手动选择的,展示了一组多样而有趣的驾驶动作、交通状况和意外行为。nuScenes的丰富复杂性将鼓励开发方法,使每个场景中有数十个物体的城市地区能够安全驾驶。收集不同大洲的数据进一步使我们能够研究计算机视觉算法在不同地区的泛化
为了方便常见的计算机视觉任务,例如对象检测和跟踪,我们在整个数据集上以2Hz的速度用精确的3D包围框注释了23个对象类。此外,我们还注释了对象级属性,如可见性、活动和姿势。
2019年3月,我们发布了包含所有1000个场景的完整nuScenes数据集。完整的数据集包括大约1.4M相机图像(camera images),390k激光雷达扫描(LIDAR sweeps),1.4M雷达扫描(RADAR sweeps)和1.4M物体边界框(object bounding boxes)在40k关键帧。其他功能(地图层,原始传感器数据等)将很快跟进。我们还组织了nuScenes 3D检测挑战,作为CVPR 2019自动驾驶研讨会的一部分。
nuScenes数据集的灵感来自开创性的KITTI数据集。**nuScenes是首个提供自动驾驶汽车整个传感器套件(6个摄像头、1个LIDAR、5个RADAR、GPS、IMU)数据的大规模数据集。**与KITTI相比,nuScenes包含了7倍多的对象注释。
2020年7月,我们发布了nuScenes-lidarseg。在nuScenes-lidarseg中,我们用32种可能的语义标签之一注释nuScenes中的关键帧中的每个激光雷达点(即激光雷达语义分割)。因此,nuScenes-lidarseg包含了14亿个注释点,横跨40000个点云和1000个场景(850个场景用于训练和验证,150个场景用于测试)。
1.1.1 数据搜集(Data collection)
- 场景选择(Scene planning)
对于nuScenes数据集,我们在波士顿和新加坡收集了大约15小时的驾驶数据。对于完整的nuScenes数据集,我们发布了来自波士顿海港和新加坡One North、皇后镇和荷兰村地区的数据。驾驶路线经过精心选择,以捕捉具有挑战性的场景。我们的目标是不同的地点、时间和天气条件。为了平衡职业频率分布,我们加入了更多带有稀有职业的场景(比如自行车)。使用这些标准,我们手动选择1000个持续时间为20秒的场景。这些场景都是用人工仔细标注的
- 汽车配置(Car setup)
我们使用两辆传感器布局相同的雷诺Zoe汽车在波士顿和新加坡驾驶。传感器的放置位置请参考上图。我们发布的数据来自以下传感器:
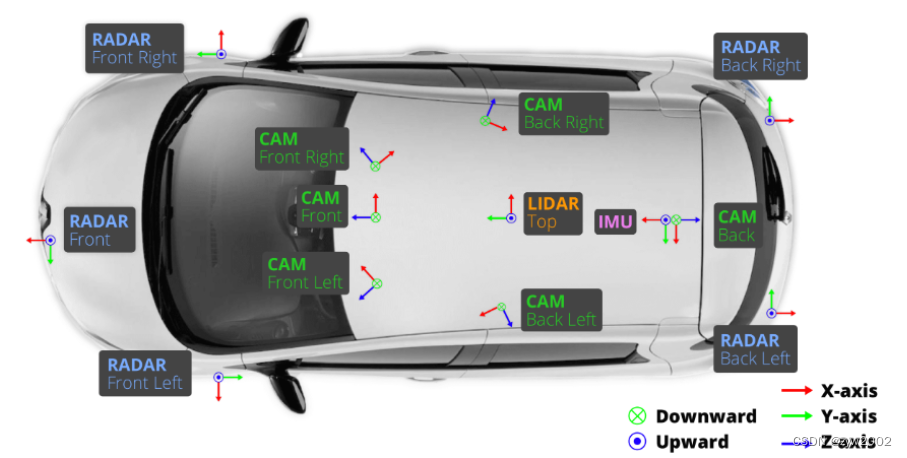
相机(CAM)有六个,分别分布在前方(Front)、右前方(Front Right)、左前方(Front Left)、后方(Back)、右后方(Back Right)、左后方(Back Left);
激光雷达(LIDAR)有1个,放置在车顶(TOP);
毫米波雷达有五个,分别放置在前方(Front)、右前方(Front Right)、左前方(Front Left)、右后方(Back Right)、左后方(Back Left)。
具体配置参数如下:
# 1x spinning LIDAR (Velodyne HDL32E):
20Hz capture frequency
32 beams, 1080 (+-10) points per ring
32 channels
360° Horizontal FOV, +10° to -30° Vertical FOV, uniform azimuth angles
80m-100m Range, Usable returns up to 70 meters, ± 2 cm accuracy
Up to ~1.39 Million Points per Second

# 5x long range RADAR sensor (Continental ARS 408-21):
13Hz capture frequency
77GHz
Independently measures distance and velocity in one cycle using Frequency Modulated Continuous Wave
Up to 250m distance
Velocity accuracy of ±0.1 km/h

# 6x camera (Basler acA1600-60gc):
12Hz capture frequency
Evetar Lens N118B05518W F1.8 f5.5mm 1/1.8"
1/1.8'' CMOS sensor of 1600x1200 resolution
Bayer8 format for 1 byte per pixel encoding
1600x900 ROI is cropped from the original resolution to reduce processing and transmission bandwidth
Auto exposure with exposure time limited to the maximum of 20 ms
Images are unpacked to BGR format and compressed to JPEG
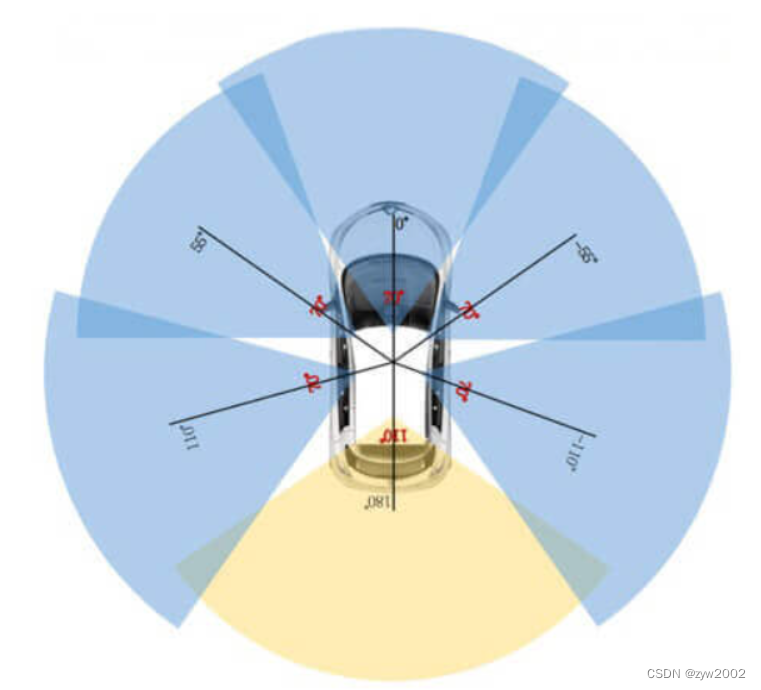
See camera orientation and overlap in the figure below.

# 1x IMU & GPS (Advanced Navigation Spatial):
Position accuracy of 20mm
Heading accuracy of 0.2° with GNSS
Roll & pitch accuracy of 0.1°
Localization takes into account IMU, GPS and HD lidar maps (see our paper for more details)
- 1
- 2
- 3
- 4
- 5
- 6
- 7
- 8
- 9
- 10
- 11
- 12
- 13
- 14
- 15
- 16
- 17
- 18
- 19
- 20
- 21
- 22
- 23
- 24
- 25
- 26
- 27
- 28
- 29
- 30
- 传感器矫正(Sensor calibration)
为了获得高质量的多传感器数据集,校准每个传感器的外参(extrinsics) 和内参(intrinsics) 是必不可少的。我们表示相对于自我框架(ego frame)的外部坐标,即后车轴的中点。最相关的步骤如下:
- LIDAR extrinsics
我们使用laser liner来精确测量激光雷达与自我框架的相对位置。
- Camera extrinsics
我们在摄像机和激光雷达传感器前放置一个立方体形状的校准目标。标定目标由三个已知模式的正交平面组成。在检测到模式后,通过对准校准目标的平面来计算从相机到激光雷达的变换矩阵。给出上面计算的激光雷达到自我帧的转换,然后我们可以计算相机到自我帧的转换和由此产生的外部参数。
- RADAR extrinsics
我们把雷达安装在水平位置。然后我们通过在城市环境中驾驶来收集雷达测量数据。在对移动物体的雷达回波进行滤波后,我们使用暴力方法校准偏航角,以使静态物体的补偿距离率最小化。
4 . Camera intrinsic calibration
我们使用一组已知模式的校准目标板来推断相机的固有参数和畸变参数。
1.1.2 传感器同步(Sensor synchronization)
为了在激光雷达和相机之间实现良好的跨模态数据对齐,当顶部激光雷达扫过相机的FOV中心时,相机的曝光被触发。图像的时间戳为曝光触发时间;所述LIDAR扫描的时间戳为当前LIDAR帧实现完全旋转的时间。考虑到相机的曝光时间几乎是瞬时的,这种方法通常会产生良好的数据对齐。请注意,相机运行在12Hz,而激光雷达运行在20Hz。12个相机曝光尽可能均匀地分布。
1.2 数据格式(Data format)
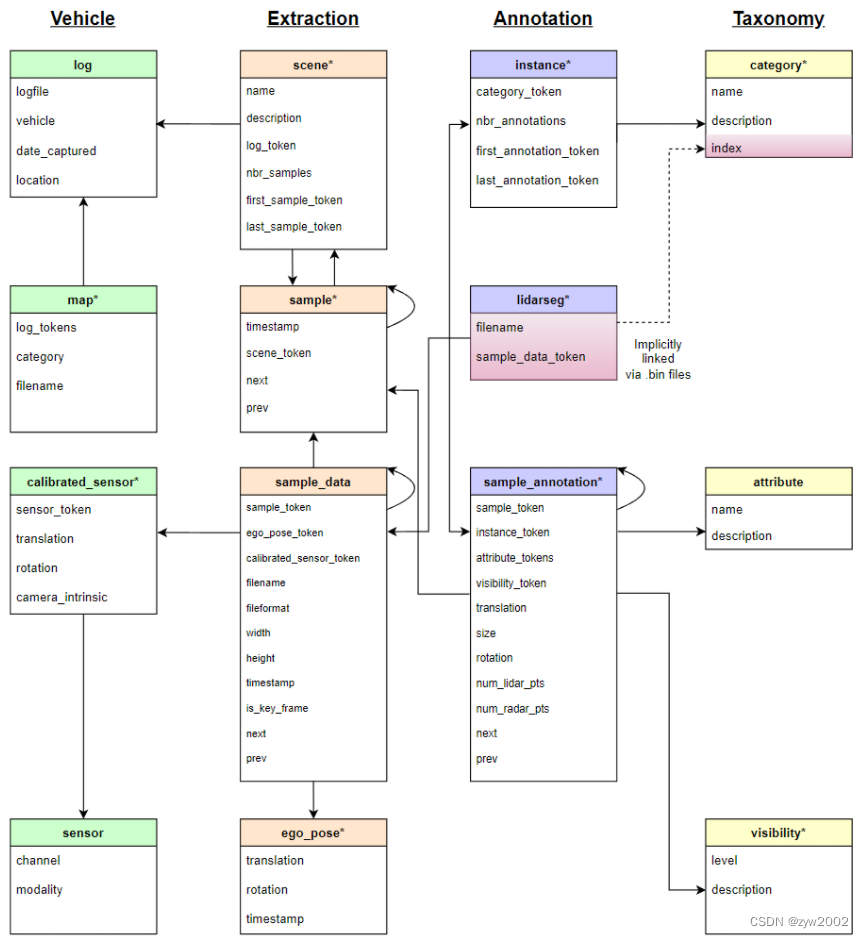
本文档描述了nuScenes中使用的数据库模式。所有注释和元数据(包括校准、地图、车辆坐标等)都包含在关系数据库中。下面列出了数据库表。每一行都可以由其唯一的主键token标识。可以使用sample_token等外键链接到表sample的token。有关最重要的数据库表的介绍,请参阅本教程。
attribute
属性是可以在类别保持不变的情况下更改的实例的属性。例如:一辆正在停放/停止/移动的车辆,以及一辆自行车是否有人骑。
attribute {
   "token":                   <str> -- 唯一的标识符
   "name":                    <str> -- 属性名
   "description":             <str> -- 属性描述
}
- 1
- 2
- 3
- 4
- 5
calibrated_sensor
定义在特定车辆上校准的特定传感器(激光雷达/雷达/摄像机)。所有外部参数都是关于自我车体框架给出的。所有相机图像都没有失真和校正。
calibrated_sensor {
   "token":                   <str> -- 唯一的标识符
   "sensor_token":            <str> -- 指向传感器类型的外键。
   "translation":             <float> [3] -- 以米为单位的坐标系原点: x, y, z.
   "rotation":                <float> [4] -- 坐标系方向为四元数: w, x, y, z.
   "camera_intrinsic":        <float> [3, 3] -- 内置相机校准。对于非相机的传感器为空。
}
- 1
- 2
- 3
- 4
- 5
- 6
- 7
category
对象类别的分类(例如车辆、人)。子类别由一个点划分(如:human.pedestrian.adult)。
category {
   "token":                   <str> -- 唯一的标识符.
   "name":                    <str> -- 类别名称,子类别由句点划分
   "description":             <str> -- 类别描述
   "index":                   <int> -- 在nuScenes-lidarseg中 .bin 文件中用于提高效率的标签索引。
}
- 1
- 2
- 3
- 4
- 5
- 6
ego_pose
自车具在特定时间戳的姿势。给出了对数图的全局坐标系。ego_pose是我们论文中描述的基于激光雷达地图的定位算法的输出。定位在x-y平面上是二维的。
ego_pose {
   "token":                   <str> -- 唯一的标识符.
   "translation":             <float> [3] -- 坐标系原点以米为单位:x, y, z。注意z总是0
   "rotation":                <float> [4] -- 坐标系方向为四元数:w x y z。
   "timestamp":               <int> -- 唯一的表示符.
}
- 1
- 2
- 3
- 4
- 5
- 6
instance
对象实例,例如特定的车辆。这个表是我们观察到的所有对象实例的枚举。注意,实例不是跨场景跟踪的
instance {
   "token":                   <str> -- 唯一的标识符.
   "category_token":          <str> -- 指向物体类别的外键
   "nbr_annotations":         <int> -- 此实例的注释数量.
   "first_annotation_token":  <str> -- 外键。指向此实例的第一个注释
   "last_annotation_token":   <str> -- 外键。指向此实例的最后一个注释
}
- 1
- 2
- 3
- 4
- 5
- 6
- 7
lidarseg
nuScenes-lidarseg注释和sample_data之间的映射,对应于与关键帧相关的lidar点云。
lidarseg {
   "token":                   <str> -- 唯一的标识符.
   "filename":                <str> -- 包含nuScenes-lidarseg标签的.bin文件的名称。这些是使用numpy以二进制格式存储的uint8的numpy数组
   "sample_data_token":       <str> -- 外键。Sample_data对应于带注释的激光雷达pointcloud,带有is_key_frame=True。
}
- 1
- 2
- 3
- 4
- 5
log
提取数据的日志的信息。
log {
   "token":                   <str> -- 唯一的标识符.
   "logfile":                 <str> -- 日志文件名.
   "vehicle":                 <str> -- 车辆名称.
   "date_captured":           <str> -- 日期 (YYYY-MM-DD).
   "location":                <str> -- 定位, e.g. singapore-onenorth.
}
- 1
- 2
- 3
- 4
- 5
- 6
- 7
map
从自顶向下视图存储为二进制语义掩码的地图数据。
map {
   "token":                   <str> -- 唯一的标识符.
   "log_tokens":              <str> [n] -- 外键.
   "category":                <str> -- 地图类别,目前只有semantic_prior用于可驾驶的表面和人行道
   "filename":                <str> -- 具有映射掩码的文件的相对路径。
}
- 1
- 2
- 3
- 4
- 5
- 6
sample
一个sample是一个带注释的2hz关键帧。数据收集在(大约)相同的时间戳作为单个LIDAR扫描的一部分。
sample {
   "token":                   <str> -- 唯一的标识符.
   "timestamp":               <int> -- Unix时间戳
   "scene_token":             <str> -- 指向scene的外键
   "next":                    <str> -- 外键。在时间上跟随这个样本。空如果场景结束。
   "prev":                    <str> -- 外键。在时间上早于此的样本。如果场景开始为空。
- 1
- 2
- 3
- 4
- 5
- 6
sample_annotation
定义样本中物体位置的边界框。所有位置数据都是在全局坐标系下给出的。
sample_annotation {
   "token":                   <str> -- 唯一的标识符
   "sample_token":            <str> -- 外键。注意:这指向一个样本而不是一个sample_data,因为注释是在样本级别上完成的,考虑了所有相关的sample_data。
   "instance_token":          <str> -- 外键。这个注释是哪个对象实例。随着时间的推移,一个实例可以有多个注释。
   "attribute_tokens":        <str> [n] -- 外键。此注释的属性列表。属性会随着时间而改变,所以它们属于这里,而不是实例表中。
   "visibility_token":        <str> -- 外键。能见度也可能随着时间的推移而改变。如果没有标注可见性,则token为空字符串。
   "translation":             <float> [3] -- 边界框的位置,以米为单位,如center_x, center_y, center_z
   "size":                    <float> [3] -- 边框大小以米为单位,如宽、长、高。
   "rotation":                <float> [4] -- 边框方向为四元数:w, x, y, z
   "num_lidar_pts":           <int> -- 这个检测框里的激光雷达点的数量。在此样本识别的激光雷达扫描过程中计算点。
   "num_radar_pts":           <int> -- 这个盒子里雷达点的数目。在此样本识别的雷达扫描过程中计算点。这个数字是所有雷达传感器的总和,没有任何无效的点滤波
   "next":                    <str> -- 外键。来自后面同一对象实例的示例注释。如果这是该对象的最后一个注释,则为空。
   "prev":                    <str> -- 外键。来自时间上位于此之前的同一对象实例的示例注释。如果这是该对象的第一个注释,则为空。
}
- 1
- 2
- 3
- 4
- 5
- 6
- 7
- 8
- 9
- 10
- 11
- 12
- 13
- 14
sample_data
传感器数据,如图像、点云或雷达返回。对于带有is_key_frame=True的sample_data,时间戳应该非常接近它所指向的样本。对于非关键帧,sample_data指向时间最接近的样本。
sample_data {
   "token":                   <str> -- 唯一的标识符.
   "sample_token":            <str> -- 外键。与此sample_data相关联的示例。
   "ego_pose_token":          <str> -- 外键.
   "calibrated_sensor_token": <str> -- 外键
   "filename":                <str> -- 磁盘上data-blob的相对路径.
   "fileformat":              <str> -- 数据文件格式.
   "width":                   <int> -- 如果样本数据是一张图像,则这是图像宽度(以像素为单位)
   "height":                  <int> -- 如果样本数据是一张图像,则这是图像高度(以像素为单位)。
   "timestamp":               <int> -- Unix时间戳。
   "is_key_frame":            <bool> -- 如果sample_data是key_frame的一部分,则为True,否则为False。
   "next":                    <str> -- 外键。来自同一传感器的样本数据在时间上跟随这个。空如果场景结束。
   "prev":                    <str> -- 外键。从同一传感器采样数据,在此时间之前。如果场景开始为空。
}
- 1
- 2
- 3
- 4
- 5
- 6
- 7
- 8
- 9
- 10
- 11
- 12
- 13
- 14
scene
场景是从日志中提取的20秒长的连续帧序列。同一个日志可以产生多个场景。注意,对象标识(实例token)不会跨场景保存。
scene {
   "token":                   <str> -- 唯一的标识符.
   "name":                    <str> -- 短字符串标识符。
   "description":             <str> -- 更长的场景描述。
   "log_token":               <str> -- 外键。提取数据的位置记录日志的点。
   "nbr_samples":             <int> -- 这个场景中的样本数量
   "first_sample_token":      <str> -- 外键。指向场景中的第一个样本。
   "last_sample_token":       <str> -- 外键。指向场景中的最后一个样本。
}
- 1
- 2
- 3
- 4
- 5
- 6
- 7
- 8
- 9
sensor
特定的传感器类型。
sensor {
   "token":                   <str> -- 唯一的标识符.
   "channel":                 <str> -- 传感器通道名称
   "modality":                <str> {camera, lidar, radar} -- 传感器形态。支持括号内的类别
}
- 1
- 2
- 3
- 4
- 5
visibility
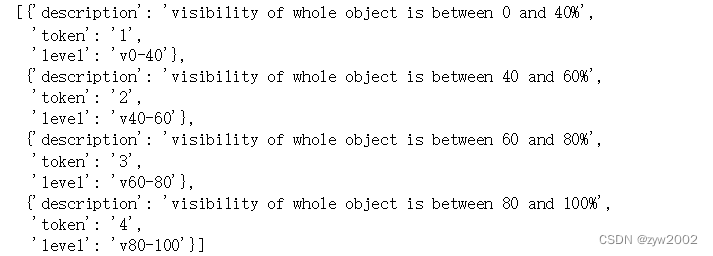
实例的可见性是在所有6个图像中可见的注释的百分比。分为4个bin : 0-40%,40-60%,60-80%和80-100%。
visibility {
   "token":                   <str> -- 唯一的标识符.
   "level":                   <str> -- 能见度水平
   "description":             <str> -- 能见度描述
}
- 1
- 2
- 3
- 4
- 5
二、使用教程
2.1 数据集的下载
- 在官网上下载mini版本的数据集(Nuscenes的官网下载链接 )

-
解压后有四个文件夹:
maps、samples、sweeps、v1.0-mini-
maps文件夹4张地图照片
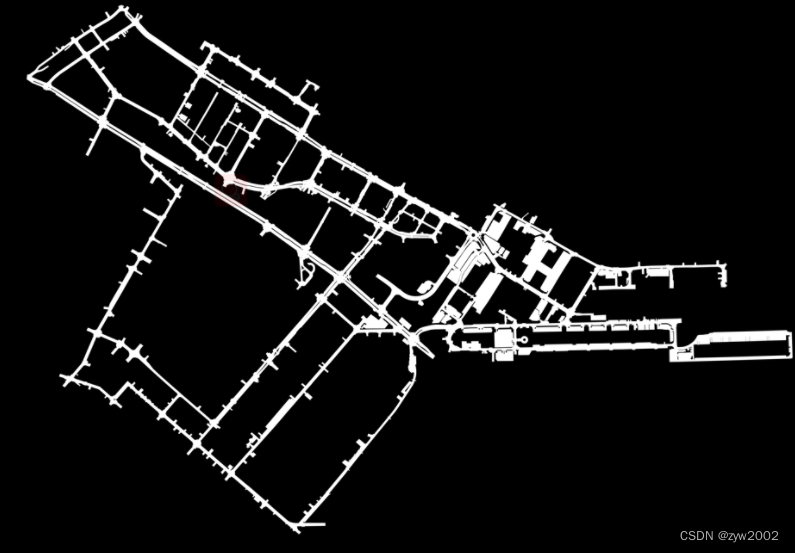
-
samples文件夹针对于关键帧(keyframes), 传感器(6个相机、1个激光雷达、5个毫米波雷达)所采集到的信息。
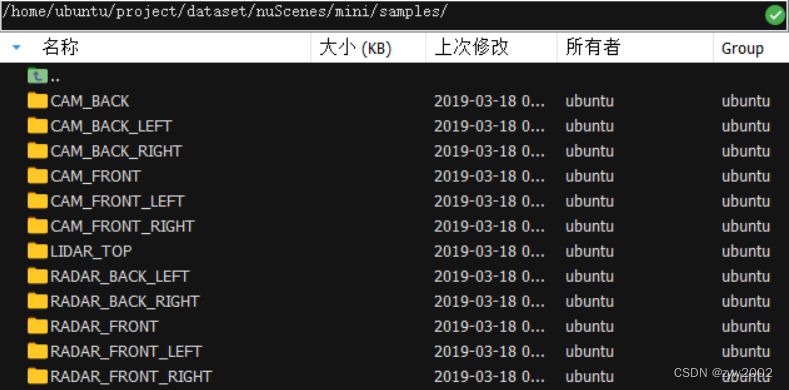
-
sweeps文件夹其结构和samples文件夹是完全一样的。是intermediate frames(过渡帧或中间帧)的sensor data。
-
v1.0-mini文件夹存放着所有meta data和annotations的JSON table。
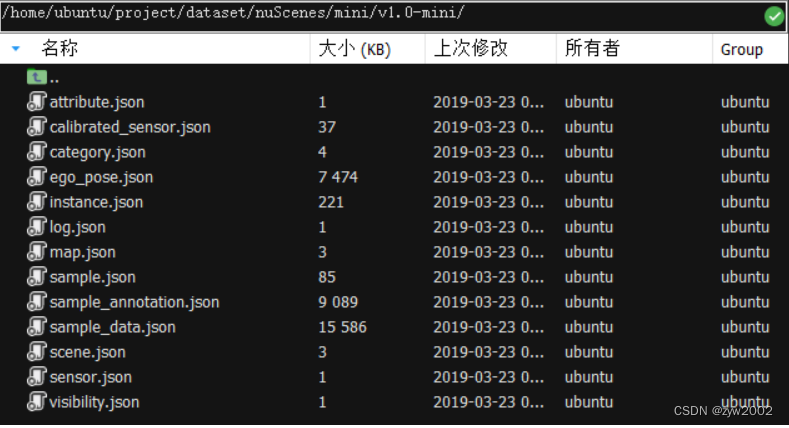
例如打开 attibute.json 文件
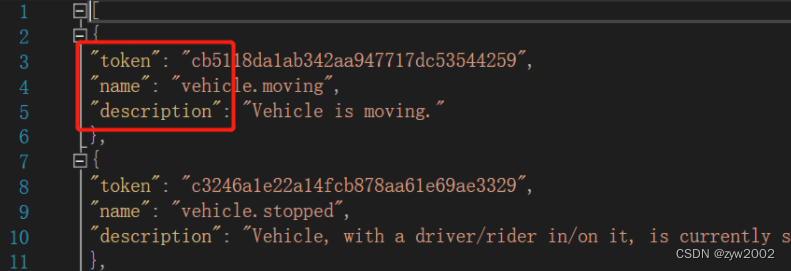
其关键字对应本文【2.1 数据格式】中介绍的:
attribute { "token": <str> -- 唯一的标识符 "name": <str> -- 属性名 "description": <str> -- 属性描述 }- 1
- 2
- 3
- 4
- 5
-
2.2 nuScenes devkit 的使用
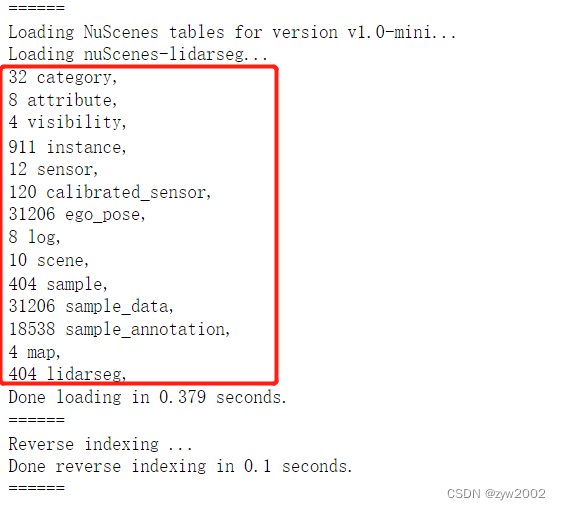
2.2.1 Initialization
- 安装nuscenes-devkit
pip install nuscenes-devkit
- 1
- 初始化
%matplotlib inline
from nuscenes.nuscenes import NuScenes

nusc = NuScenes(version='v1.0-mini', dataroot='/data/sets/nuscenes', verbose=True)
- 1
- 2
- 3
- 4
2.2.2 scene
nuScenes是一个大型数据库,其特点是注释了1000个场景的样本,每个场景大约20秒。让我们来看看我们在加载的数据库中的场景。
nusc.list_scenes()
- 1

让我们来看一个场景元数据
my_scene = nusc.scene[0]
my_scene
- 1
- 2

2.2.3 sample
在场景中,我们每半秒(2hz)注释一次数据。
我们将sample定义为在给定时间戳的场景的注释关键帧。关键帧是一个帧,其中来自所有传感器的数据的时间戳应该非常接近它所指向的样本的时间戳。
现在,让我们看看这个场景中的第一个带注释的示例。
first_sample_token = my_scene['first_sample_token']

# The rendering command below is commented out because it tends to crash in notebooks
# nusc.render_sample(first_sample_token)
- 1
- 2
- 3
- 4
让我们研究一下它的元数据
my_sample = nusc.get('sample', first_sample_token)
my_sample
- 1
- 2
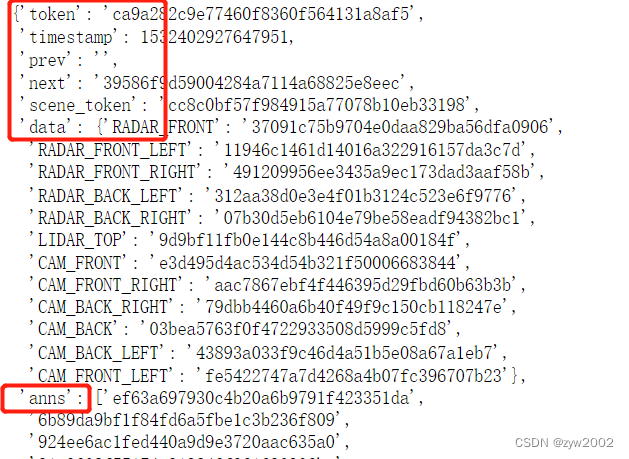
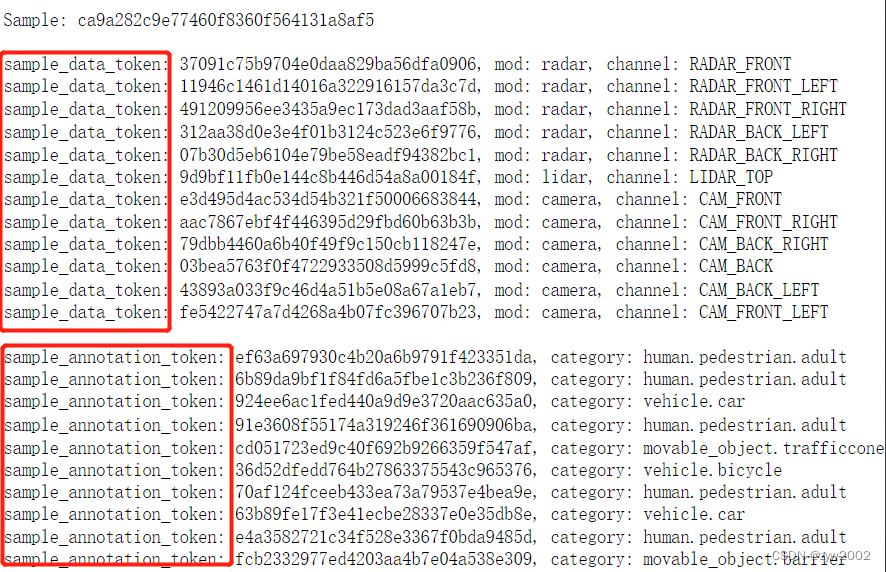
一个有用的方法是list_sample(),它列出了与示例相关的所有sample_data关键帧和sample_annotation,我们将在后续部分详细讨论。
nusc.list_sample(my_sample['token'])
- 1
2.2.4 sample_data
nuScenes数据集包含从完整的传感器套件收集的数据。因此,对于场景的每个快照,我们提供了对从这些传感器收集的一系列数据的引用。
我们提供了一个data键来访问这些:
my_sample['data']
- 1
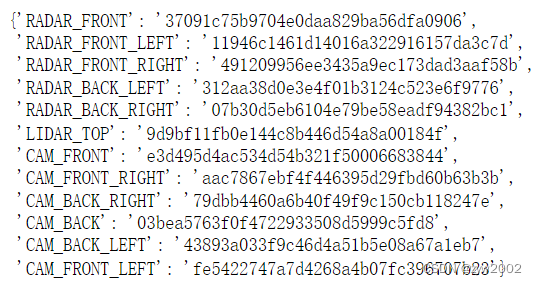 注意,这些键指向组成传感器套件的不同传感器。让我们看一下从CAM_FRONT获取的sample_data的元数据。
sensor = 'CAM_FRONT'
cam_front_data = nusc.get('sample_data', my_sample['data'][sensor])
cam_front_data
- 1
- 2
- 3
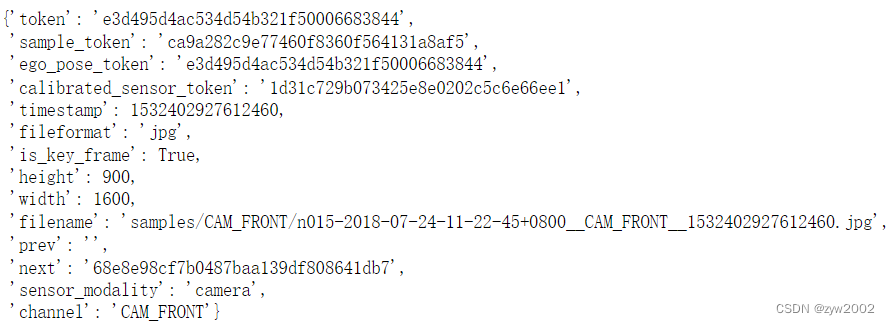
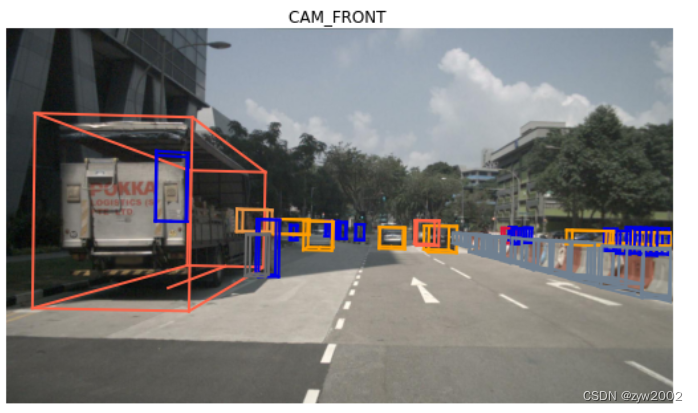
我们还可以在特定的传感器上呈现sample_data。
nusc.render_sample_data(cam_front_data['token'])
- 1
2.2.5 sample_annotation
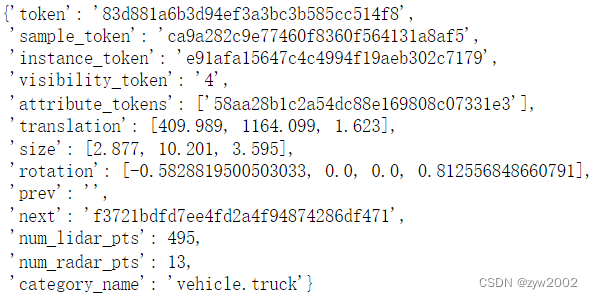
Sample_annotation引用定义示例中所见对象位置的任何边界框。所有位置数据都是在全局坐标系下给出的。让我们从上面的示例中查看一个示例。
my_annotation_token = my_sample['anns'][18]
my_annotation_metadata =  nusc.get('sample_annotation', my_annotation_token)
my_annotation_metadata
- 1
- 2
- 3
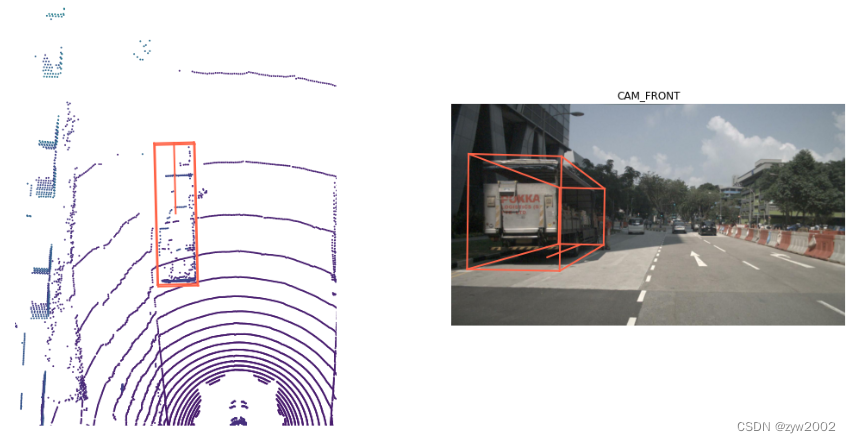
我们还可以呈现一个注释,以便更仔细地查看。
nusc.render_annotation(my_annotation_token)
- 1
2.2.6 instance
对象实例是需要被AV检测或跟踪的实例(例如特定的车辆、行人)。让我们研究一个实例元数据
my_instance = nusc.instance[599]
my_instance
- 1
- 2

我们通常在特定场景的不同帧间跟踪实例。然而,我们并没有在不同的场景中跟踪它们。在本例中,我们在特定场景中有16个带注释的示例。
instance_token = my_instance['token']
nusc.render_instance(instance_token)
- 1
- 2
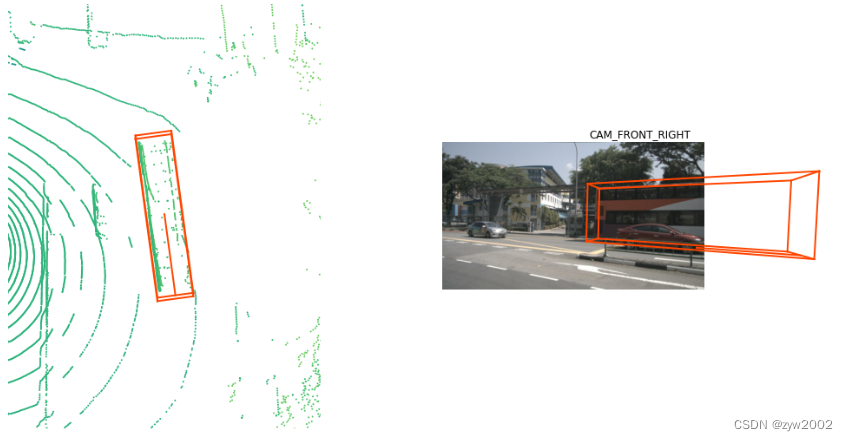
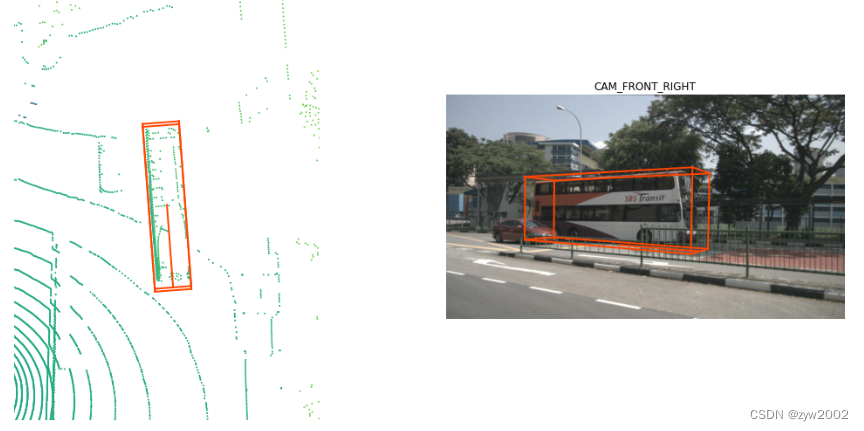
实例记录记录它的第一个和最后一个annotation token。我们来渲染一下
print("First annotated sample of this instance:")
nusc.render_annotation(my_instance['first_annotation_token'])
- 1
- 2
该实例的第一个注释示例:
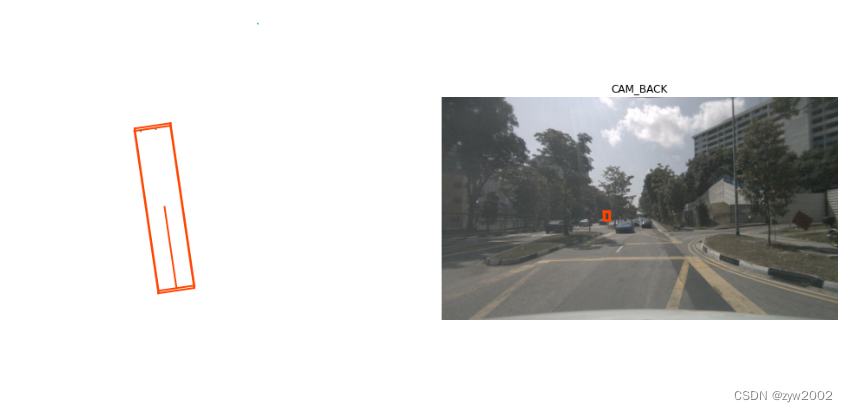
print("Last annotated sample of this instance")
nusc.render_annotation(my_instance['last_annotation_token'])
- 1
- 2
此实例的最后一个注释示例:
2.2.7 category
类别是注释的对象赋值。让我们看看数据库中的类别表。该表包含不同对象类别的分类法,还列出了子类别(以周期划分)。
nusc.list_categories()
- 1
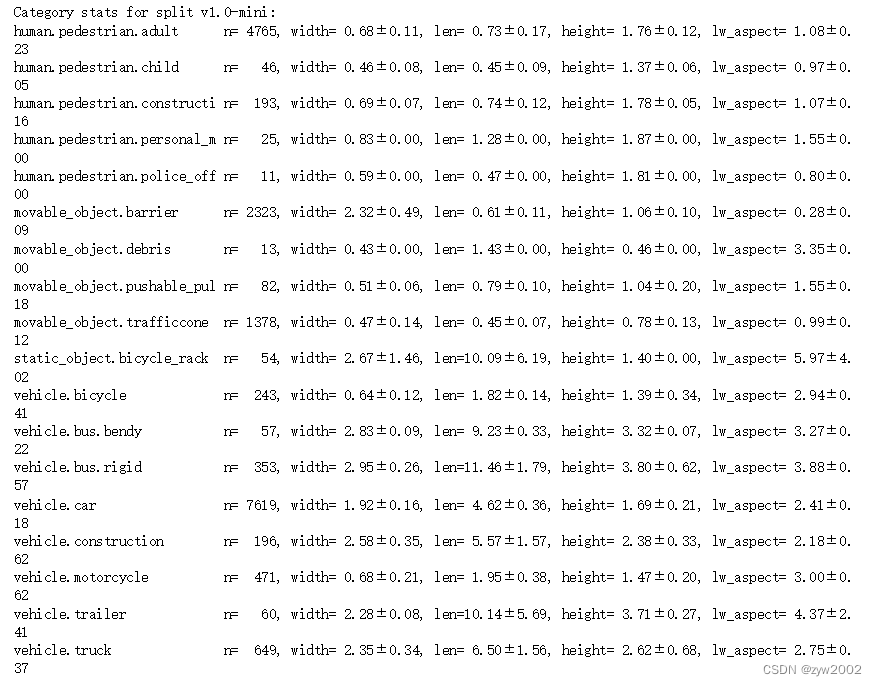
类别记录包含特定类别的名称和描述
nusc.category[9]
- 1

2.2.8 attribute
属性是一个实例的属性,它可能在场景的不同部分发生变化,而类别保持不变。在这里,我们列出了所提供的属性以及与特定属性关联的注释的数量。
nusc.list_attributes()
- 1

让我们看一个例子,一个属性如何在一个场景中改变
my_instance = nusc.instance[27]
first_token = my_instance['first_annotation_token']
last_token = my_instance['last_annotation_token']
nbr_samples = my_instance['nbr_annotations']
current_token = first_token

i = 0
found_change = False
while current_token != last_token:
    current_ann = nusc.get('sample_annotation', current_token)
    current_attr = nusc.get('attribute', current_ann['attribute_tokens'][0])['name']

    if i == 0:
        pass
    elif current_attr != last_attr:
        print("Changed from `{}` to `{}` at timestamp {} out of {} annotated timestamps".format(last_attr, current_attr, i, nbr_samples))
        found_change = True

    next_token = current_ann['next']
    current_token = next_token
    last_attr = current_attr
    i += 1
- 1
- 2
- 3
- 4
- 5
- 6
- 7
- 8
- 9
- 10
- 11
- 12
- 13
- 14
- 15
- 16
- 17
- 18
- 19
- 20
- 21
- 22

2.2.9 visibility
visibility定义为特定注释在6个摄像机上可见的像素的百分比,分为4个bins。
nusc.visibility
- 1
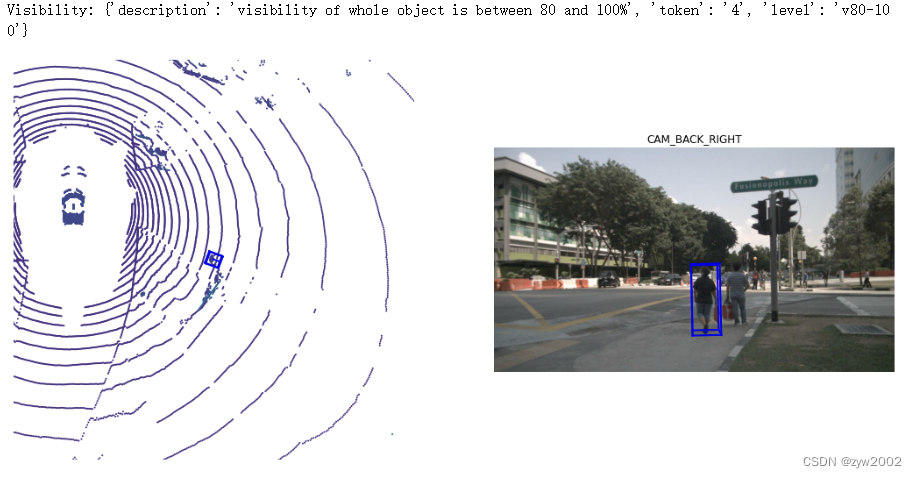
 让我们看一个示例sample_annotation,它具有80-100%的可见性
anntoken = 'a7d0722bce164f88adf03ada491ea0ba'
visibility_token = nusc.get('sample_annotation', anntoken)['visibility_token']

print("Visibility: {}".format(nusc.get('visibility', visibility_token)))
nusc.render_annotation(anntoken)
- 1
- 2
- 3
- 4
- 5
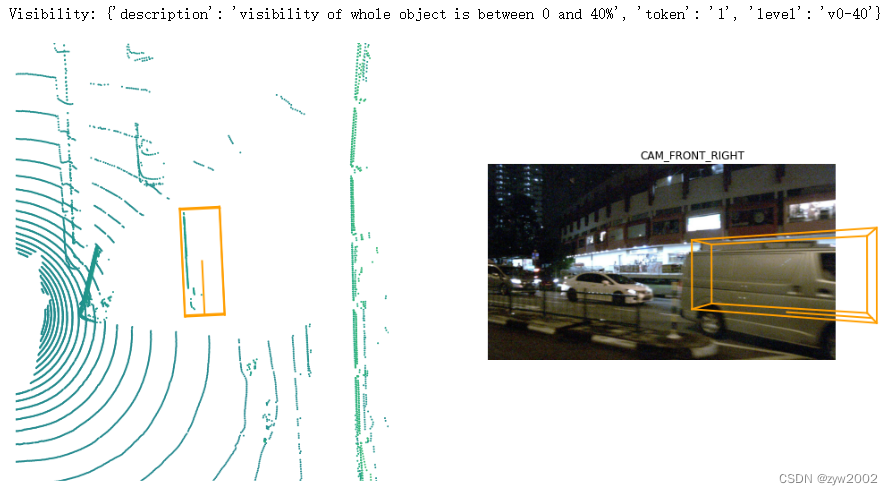
让我们看一个示例sample_annotation,它具有0-40%的可见性
anntoken = '9f450bf6b7454551bbbc9a4c6e74ef2e'
visibility_token = nusc.get('sample_annotation', anntoken)['visibility_token']

print("Visibility: {}".format(nusc.get('visibility', visibility_token)))
nusc.render_annotation(anntoken)
- 1
- 2
- 3
- 4
- 5
2.2.10 sensor
nuScenes数据集由从我们的完整传感器套件收集的数据组成,其中包括:
1 x LIDAR, 5 x RADAR, 6 x cameras,
nusc.sensor
- 1
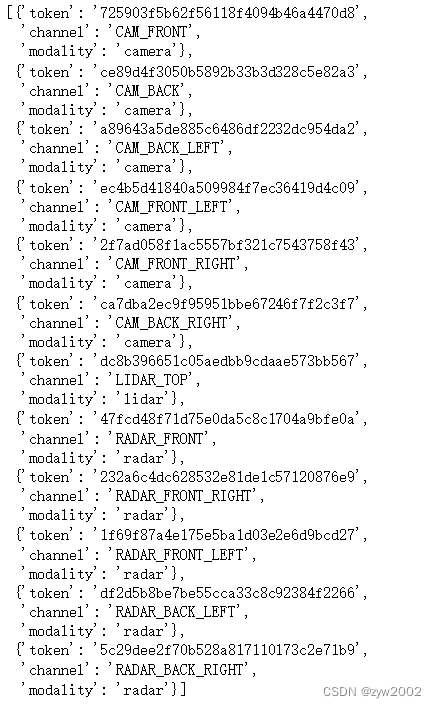
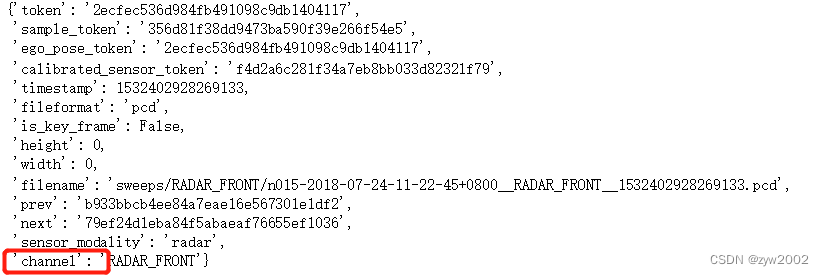
每个sample_data都有从哪个传感器收集数据的记录(注意“channel”键)
nusc.sample_data[10]
- 1
2.2.11 calibrated_sensor
calibrated_sensor由在特定车辆上校准的特定传感器(激光雷达/雷达/摄像机)的定义组成。让我们看一个例子。
nusc.calibrated_sensor[0]
- 1

请注意,平移和旋转参数是相对于自我车身框架给出的。
2.2.12 ego_pose
ego_pose包含关于自车相对于全局坐标系的位置(translation编码)和方向(rotation编码)的信息。
nusc.ego_pose[0]
- 1

注意,在加载的数据库中,ego_pose记录的数量与sample_data记录的数量相同。这两份记录显示出一一对应的关系。
2.2.13 log
log表包含从中提取数据的日志信息。日志记录对应于我们的自我车辆沿着预定义路线的一次旅行。让我们检查日志的数量和日志的元数据。
print("Number of `logs` in our loaded database: {}".format(len(nusc.log)))
- 1

nusc.log[0]
- 1

请注意,它包含各种信息,例如收集的日志的日期和位置。它还提供了关于收集数据的地图的信息。注意,一个日志可以包含多个不重叠的场景。
2.2.14 map
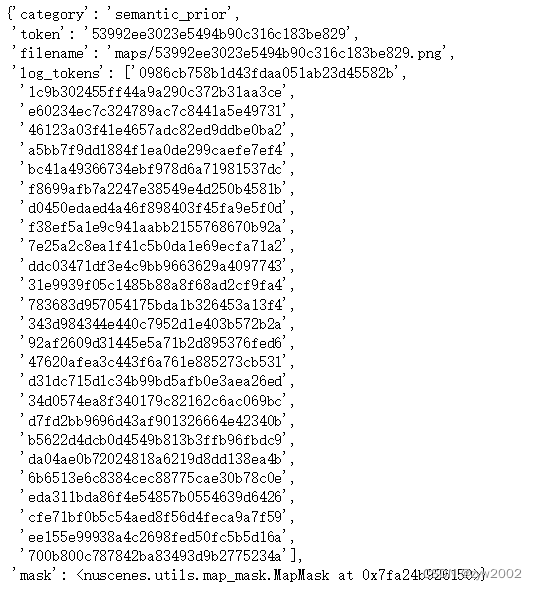
地图信息存储为自顶向下视图的二进制语义掩码。让我们检查地图的数量和地图的元数据。
print("There are {} maps masks in the loaded dataset".format(len(nusc.map)))
- 1

nusc.map[0]
- 1
2.3 nuScenes Basics
NuScenes类包含几个表。每个表是一个记录列表,每个记录是一个字典。例如,类别表的第一条记录存储在 :
nusc.category[0]
- 1

类别表很简单 : 它包含字段名称name和描述description。它还有一个标记字段token,这是一个唯一的记录标识符。由于记录是一个字典,token可以像这样访问 :
cat_token = nusc.category[0]['token']
cat_token
- 1
- 2

如果您知道DB中任何记录的token,您可以通过执行以下操作来检索该记录
nusc.get('category', cat_token)
- 1

让我们试试更难的。让我们看一下sample_annotation表。
nusc.sample_annotation[0]
- 1
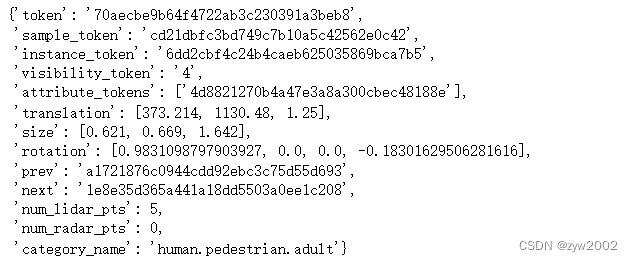
它也有一个token字段(它们都有)。此外,它还有几个格式为[a-z]*_token的字段,例如instance_token。这些是数据库术语中的外键,这意味着它们指向另一个表。使用nusc.get(),我们可以在常数时间内获取其中任何一个。例如,让我们看看能见度记录。
nusc.get('visibility', nusc.sample_annotation[0]['visibility_token'])
- 1

visibility记录表明对象在注释时可见的程度。
让我们再获取instance_token
one_instance = nusc.get('instance', nusc.sample_annotation[0]['instance_token'])
one_instance
- 1
- 2

它指向实例表。这个表列举了我们在每个场景中遇到的对象实例。通过这种方式,我们可以连接特定对象的所有注释。
如果仔细查看上表,就会发现sample_annotation表指向实例表,但是实例表并没有列出指向它的所有注释(只有第一个和最后一个)。
那么,如何恢复特定对象实例的所有sample_annotations呢?有两种方法:
- 使用
nusc.field2token()
ann_tokens = nusc.field2token('sample_annotation', 'instance_token', one_instance['token'])
- 1
这将返回带有'instance_token' == one_instance['token']的所有sample_annotation记录的列表。现在让我们把这些存储在一个集合中
ann_tokens_field2token = set(ann_tokens)
ann_tokens_field2token
- 1
- 2
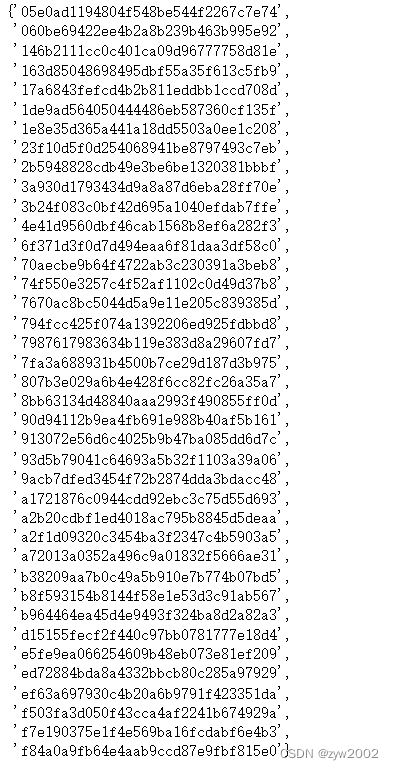
nusc.field2token()方法是通用的,可以在任何类似的情况下使用
2 . 在某些情况下,我们在表中提供了一些反向索引。这就是一个这样的例子。
instance记录有一个字段first_annotation_token,它指向该实例的第一个注释。恢复这一记录很容易。
ann_record = nusc.get('sample_annotation', one_instance['first_annotation_token'])
ann_record
- 1
- 2
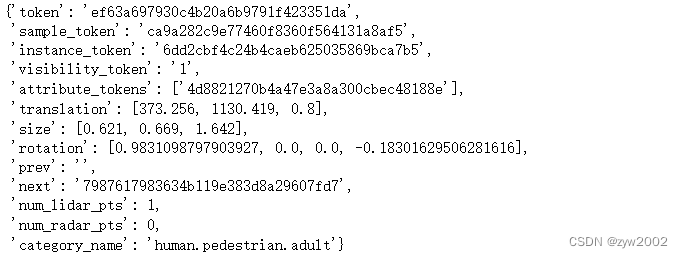
现在我们可以使用“next”字段遍历这个实例的所有注释。我们试试吧。
ann_tokens_traverse = set()
ann_tokens_traverse.add(ann_record['token'])
while not ann_record['next'] == "":
    ann_record = nusc.get('sample_annotation', ann_record['next'])
    ann_tokens_traverse.add(ann_record['token'])
- 1
- 2
- 3
- 4
- 5
最后,让我们断言我们恢复了与使用nusc.field2token相同的ann_records:
print(ann_tokens_traverse == ann_tokens_field2token)
# True
- 1
- 2
2.3.1 反向索引和快捷方式(Reverse indexing and short-cuts)
nuScenes表是规范化的,这意味着每条信息只给出一次。例如,每个日志记录对应一个映射记录。查看模式,您将注意到映射表有一个log_token字段,但日志表没有相应的map_token字段。但在很多情况下,您有一个日志,并希望找到相应的地图!那么该怎么办呢?您总是可以使用nusc.field2token()方法,但这很慢且不方便。因此,我们为一些常见情况添加了反向映射,包括这种情况。
此外,在某些情况下,需要遍历几个表才能获得特定的信息。例如,考虑sample_annotation的类别名称(例如human.pedestrian)。sample_annotation表不包含此信息,因为类别是实例级常量。相反,sample_annotation表指向实例表中的一条记录。这反过来又指向类别表中的一个记录,最后名称字段存储所需的信息。
由于想要知道注释的类别名称是很常见的,所以在初始化NuScenes类时,我们向sample_annotation表添加了一个category_name字段。
在本节中,我们列出了在初始化过程中添加到NuScenes类的快捷方式和反向索引。这些都是在NuScenes.__make_reverse_index__()方法中创建的。
Reverse indices
默认情况下,我们添加两个反向索引。
- log记录中增加
map_token字段。 sample记录具有指向该记录的所有sample_annotation以及sample_data关键帧的快捷方式。在前一节中使用nusc.list_sample()方法获得更多关于此的详细信息。
Shortcuts
sample_annotation表有一个category_name快捷方式。
使用shortcut
catname = nusc.sample_annotation[0]['category_name']
- 1
不使用shortcut
ann_rec = nusc.sample_annotation[0]
inst_rec = nusc.get('instance', ann_rec['instance_token'])
cat_rec = nusc.get('category', inst_rec['category_token'])

print(catname == cat_rec['name'])
# True
- 1
- 2
- 3
- 4
- 5
- 6
sample_data表有“channel”和“sensor_modality”快捷方式:
# Shortcut
channel = nusc.sample_data[0]['channel']

# No shortcut
sd_rec = nusc.sample_data[0]
cs_record = nusc.get('calibrated_sensor', sd_rec['calibrated_sensor_token'])
sensor_record = nusc.get('sensor', cs_record['sensor_token'])

print(channel == sensor_record['channel'])
# True
- 1
- 2
- 3
- 4
- 5
- 6
- 7
- 8
- 9
- 10
2.3.2 数据可视化 (Data Visualizations)
我们提供了列表和呈现方法。这些方法既可以作为开发过程中的方便方法,也可以作为构建您自己的可视化方法的教程。它们是在NuScenesExplorer类中实现的,带有通过NuScenes类本身的快捷方式
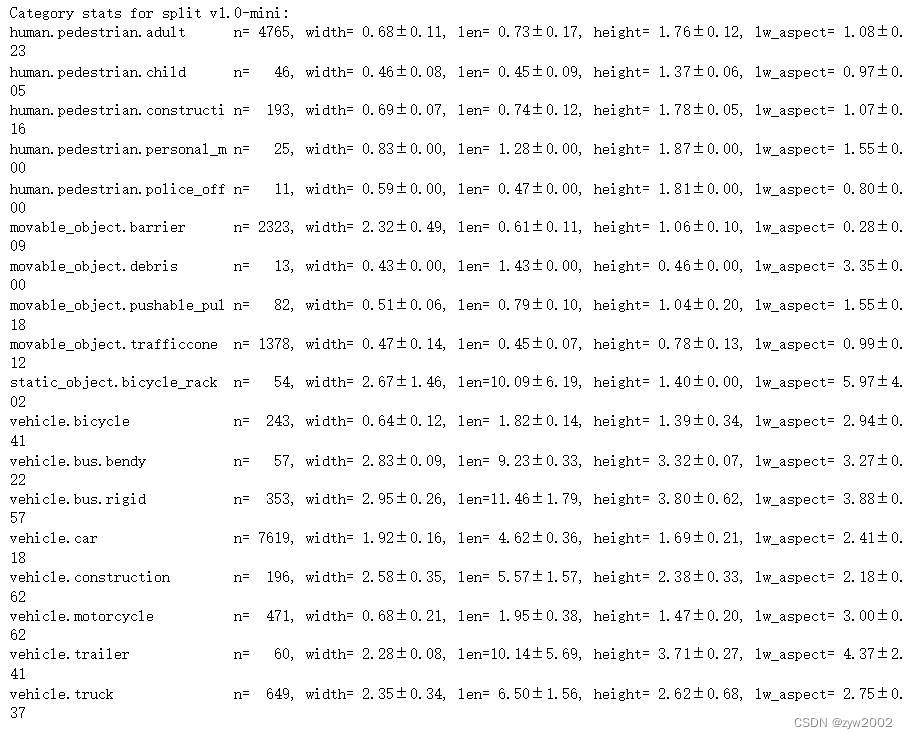
List methods
list_categories()列出所有类别,以米为单位计算和统计宽/长/高。
nusc.list_categories()
- 1
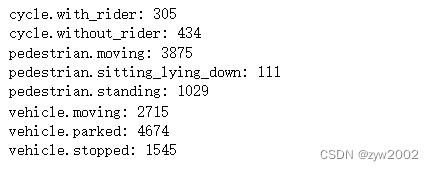
list_attributes()列出所有属性并进行计数。
nusc.list_attributes()
- 1
list_scenes()列出加载的DB中的所有场景。
nusc.list_scenes()
- 1

Render
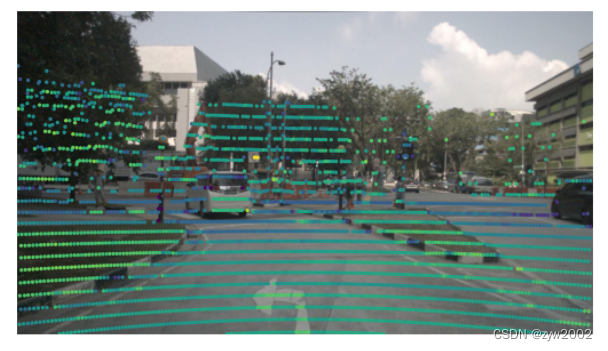
首先,让我们在图像中绘制一个激光雷达点云。激光雷达使我们能够精确地绘制周围环境的三维地图。
my_sample = nusc.sample[10]
nusc.render_pointcloud_in_image(my_sample['token'], pointsensor_channel='LIDAR_TOP')
- 1
- 2
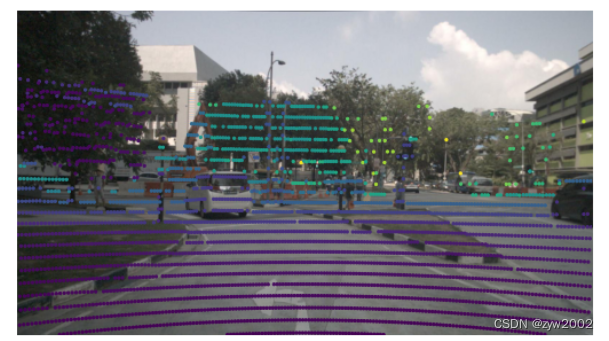
在前面的图像中,颜色表示从自我车辆到每个激光雷达点的距离。我们也可以渲染激光雷达的强度。在下面的图像中,我们前面的交通标志具有很强的反射率(黄色),而右边的黑色车辆具有较低的反射率(紫色)。
nusc.render_pointcloud_in_image(my_sample['token'], pointsensor_channel='LIDAR_TOP', render_intensity=True)
- 1
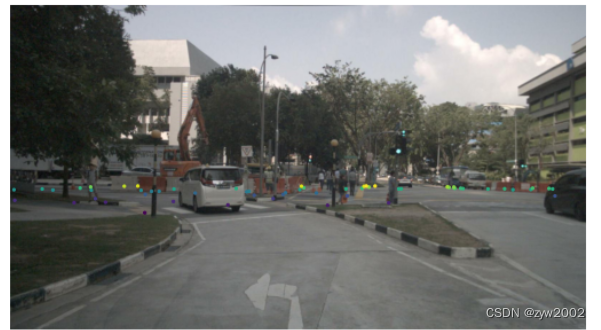
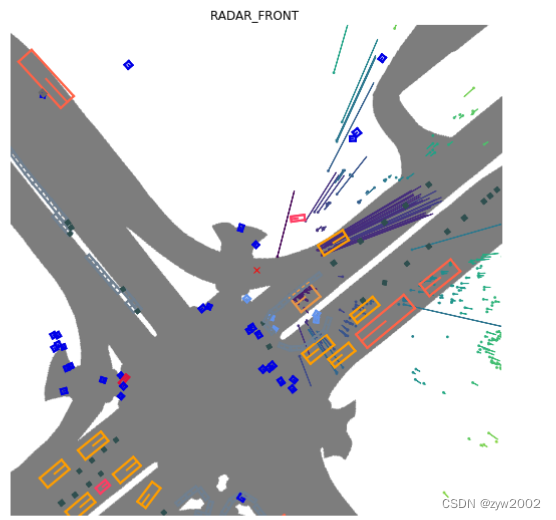
其次,让我们为同一图像绘制雷达点云。雷达的密度比激光雷达小,但范围大得多。
nusc.render_pointcloud_in_image(my_sample['token'], pointsensor_channel='RADAR_FRONT')
- 1
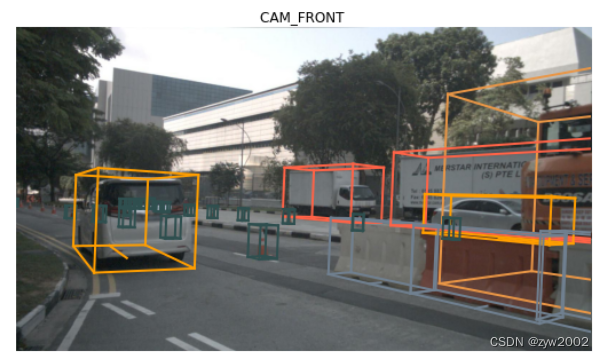
我们还可以在该样本的所有样本数据上绘制所有注释。注意,对于雷达,我们也绘制运动物体的速度矢量。一些速度向量是异常值,可以使用RadarPointCloud.from_file()中的设置进行过滤
my_sample = nusc.sample[20]

# The rendering command below is commented out because it may crash in notebooks
# nusc.render_sample(my_sample['token'])
- 1
- 2
- 3
- 4
或者如果我们只想渲染一个特定的传感器,我们可以指定。
nusc.render_sample_data(my_sample['data']['CAM_FRONT'])
- 1
此外,我们还可以从多次扫描中聚合点云以获得更密集的点云。
nusc.render_sample_data(my_sample['data']['LIDAR_TOP'], nsweeps=5, underlay_map=True)
nusc.render_sample_data(my_sample['data']['RADAR_FRONT'], nsweeps=5, underlay_map=True)
- 1
- 2
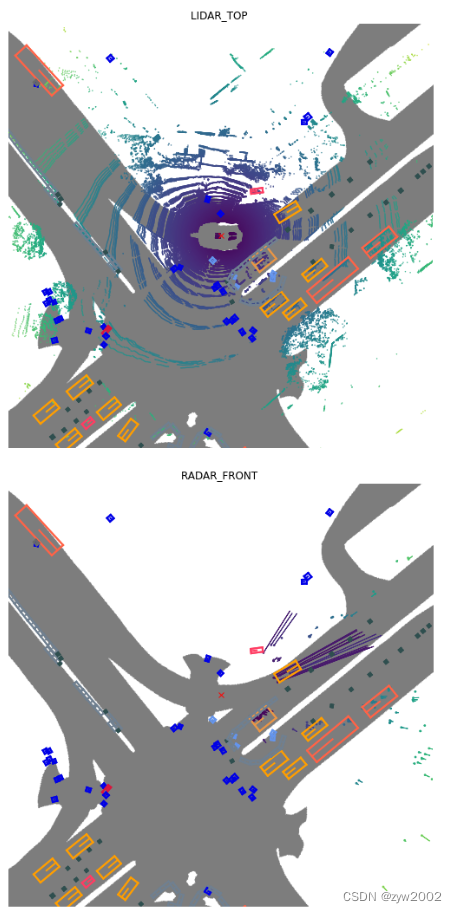
在上面的雷达图中,我们只看到了两辆车的雷达回波。这是由于nuscenes/utils/data_classes.py文件中定义的过滤器设置。如果我们希望禁用所有过滤器并呈现所有返回值,则可以使用disable_filters()函数。这将返回一个密度更大的点云,但有许多来自背景对象的返回值。要返回默认设置,只需调用default_filters()。
from nuscenes.utils.data_classes import RadarPointCloud
RadarPointCloud.disable_filters()
nusc.render_sample_data(my_sample['data']['RADAR_FRONT'], nsweeps=5, underlay_map=True)
RadarPointCloud.default_filters()
- 1
- 2
- 3
- 4
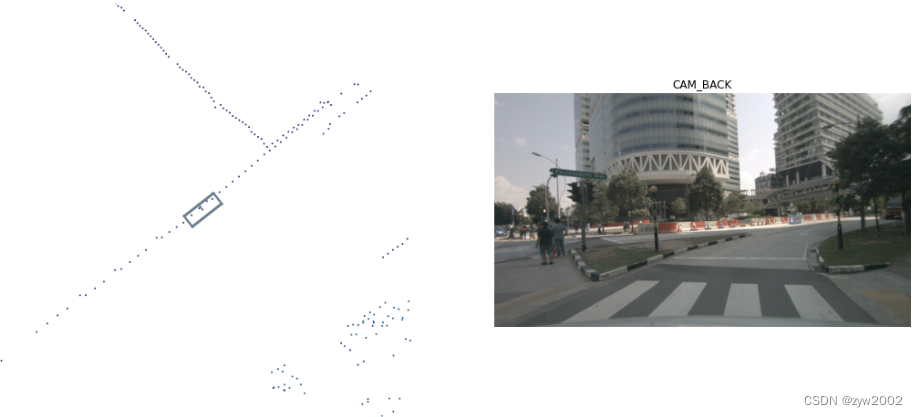
我们甚至可以呈现特定的注释。
nusc.render_annotation(my_sample['anns'][22])
- 1
最后,我们可以渲染一个完整的场景作为视频。这里有两个选项:
render_scene_channel()渲染特定频道的视频。(按ESC退出)nusc.render_scene()渲染所有摄像机通道的视频。
注意:这些方法使用OpenCV进行渲染,这在IPython notebook上并不总是很好。如果遇到任何问题,请从命令行运行这些行。
让我们提取场景0061,它很密集。
my_scene_token = nusc.field2token('scene', 'name', 'scene-0061')[0]
# The rendering command below is commented out because it may crash in notebooks
# nusc.render_scene_channel(my_scene_token, 'CAM_FRONT')
- 1
- 2
- 3
还有一个方法nusc.render_scene(),它为所有摄像机通道呈现视频。这需要一个高分辨率的显示器,而且最好在笔记本电脑之外运行。
# The rendering command below is commented out because it may crash in notebooks
# nusc.render_scene(my_scene_token)
- 1
- 2
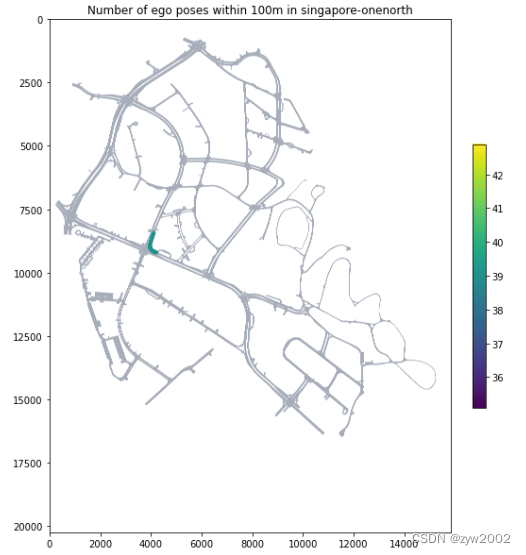
最后,让我们在地图上可视化一个特定位置的所有场景。
nusc.render_egoposes_on_map(log_location='singapore-onenorth')
- 1
