- 1Python 医学知识图谱问答系统(二),建立医学知识图谱,基于neo4j知识图谱的医学问答体系_基于知识图谱的医药问答系统答案检索方法
- 2Android:ADB各类错误_need apk file on command line
- 3Android Studio中如何调整代码字体大小_android studio设置字体大小
- 4使用vpn/代理后无法正常上网的解决方法_电脑翻完墙后浏览器上不了网
- 5Caused by: io.lettuce.core.RedisConnectionException: Unable to connect to 127.0.0.1:6379:6379
- 6机器学习在金融风控的经验总结!
- 7Java微服务分布式分库分表ShardingSphere - ShardingSphere-JDBC_java shardingsphere
- 8每日一题 2698. 求一个整数的惩罚数(中等,暴力)
- 9mysql多表查询30个经典案例_mysql经典实例
- 10基于Dlib训练自已的人脸数据集提高人脸识别的准确率_怎么使用dlib库来训练自己的模型
基于SpringBoot的合家云社区物业管理平台 - 项目介绍
赞
踩
合家云社区物业管理平台
2.合家云需求&设计
2.1 项目概述
2.1.1 项目介绍
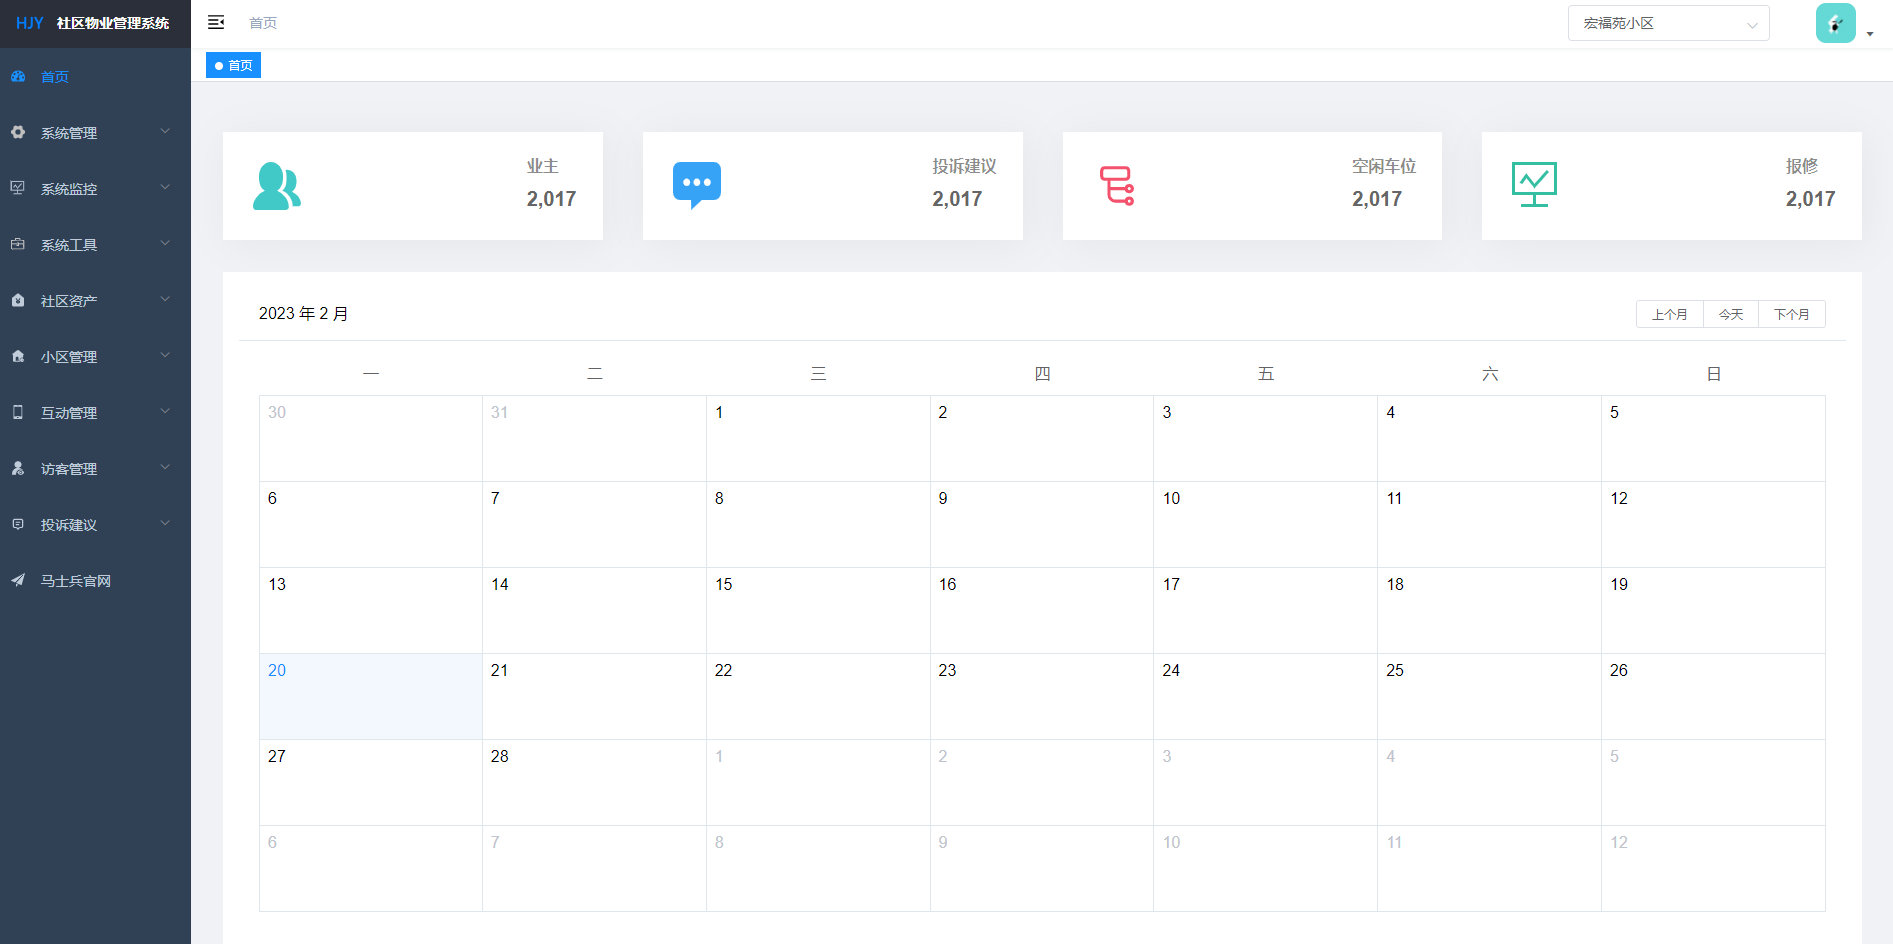
合家云社区物业管理平台是一个全新的 ”智慧物业解决方案“,是一款互联网+的专业社区物业管理系统。平台通过社区资产管理、小区管理、访客管理、在线报修、意见投诉等多种功能模块,来全面提升社区工作人员的工作效率和客户服务质量,主要致力于构建一个为社区居民更好服务的优质互联网平台。
2.1.2 主要模块介绍
1)系统管理模块
- 该模块包括了用户权限的管理、部门以及岗位的管理、还有字典数据和日志数据的管理。
2)系统监控模块
- 该模块可以获取当前系统用户信息、服务器状态、JVM相关参数等等。
3)社区资产模块
- 该模块主要管理社区内的相关资产信息,包括小区信息、楼栋信息、单元信息以及具体的房屋信息。
4)小区管理
- 该模块主要负责管理业主相关信息和业主的审核信息。
5)互动信息模块
- 管理社区论坛内居民发送的互动信息。
2.2 需求分析
- 详见具体功能开发
2.3 系统设计
2.3.1 前后端分离
2.3.1.1 前后端分离架构介绍
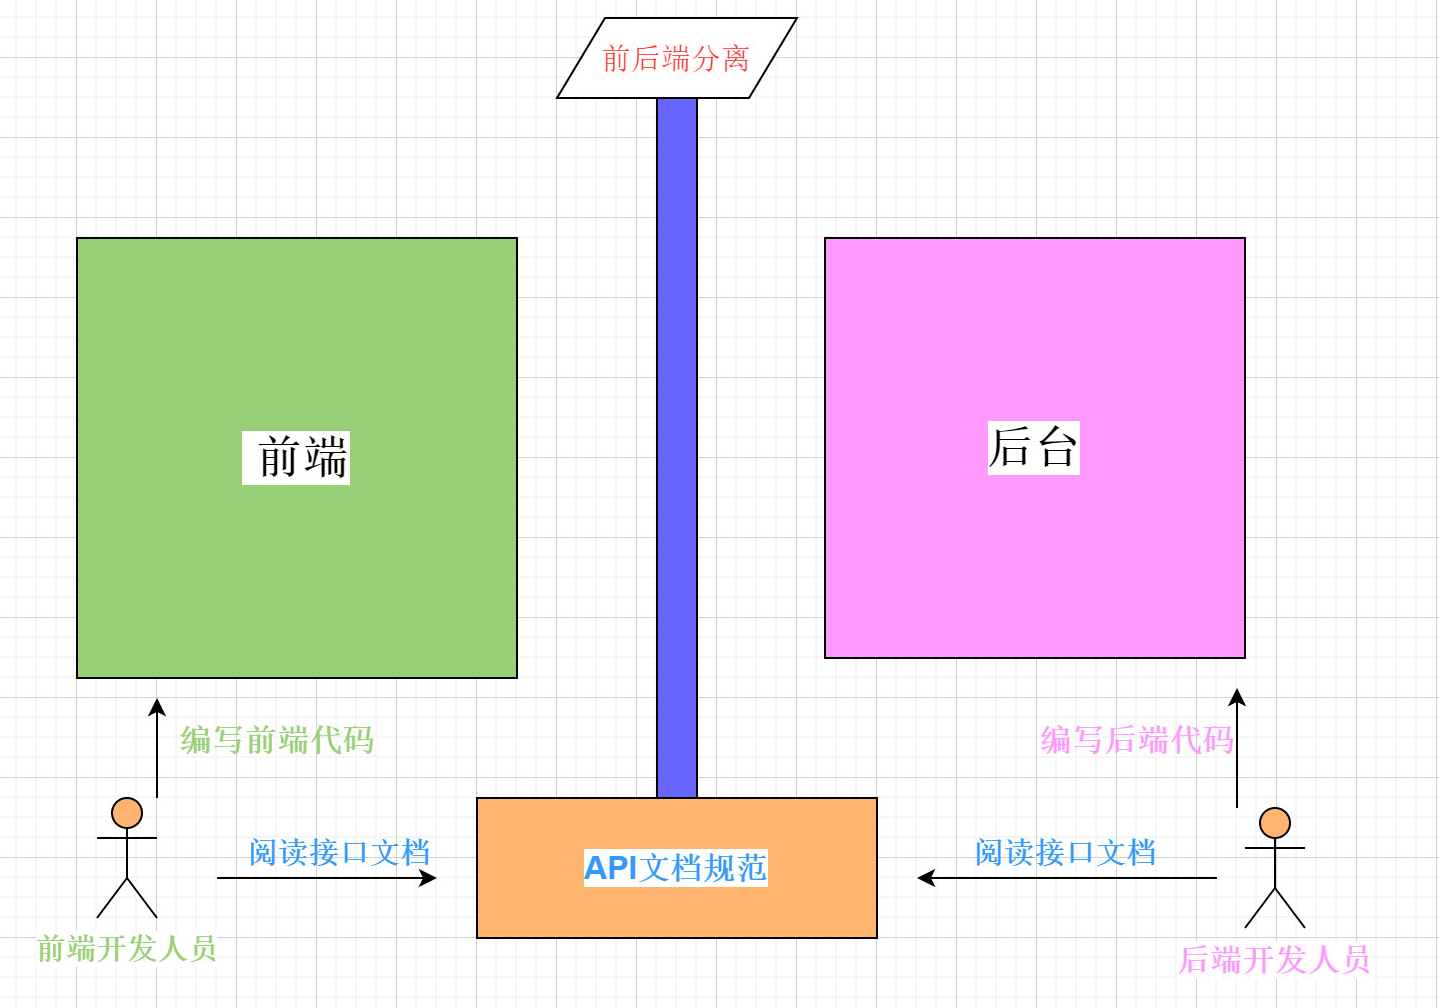
前后端分离已成为互联网项目开发的业界标准使用方式,将前端和后端的开发进行解耦。并且前后端分离会为以后的大型分布式架构、微服务架构、多端化服务(各种客户端,比如浏览器、车载终端、安卓、IOS等)打下坚实的基础。
前后端分离的核心思想就是前端HTML页面通过AJAX调用后端的API接口,并通过JSON数据进行交互。
2.3.1.2 前后端分离的优势
1)前后端耦合的开发方式
- 这种方式中 Java程序员又当爹又当妈,又搞前端,又搞后端。 正所谓术业有专攻,一个人如果什么都会,那么他肯定也什么都不精.
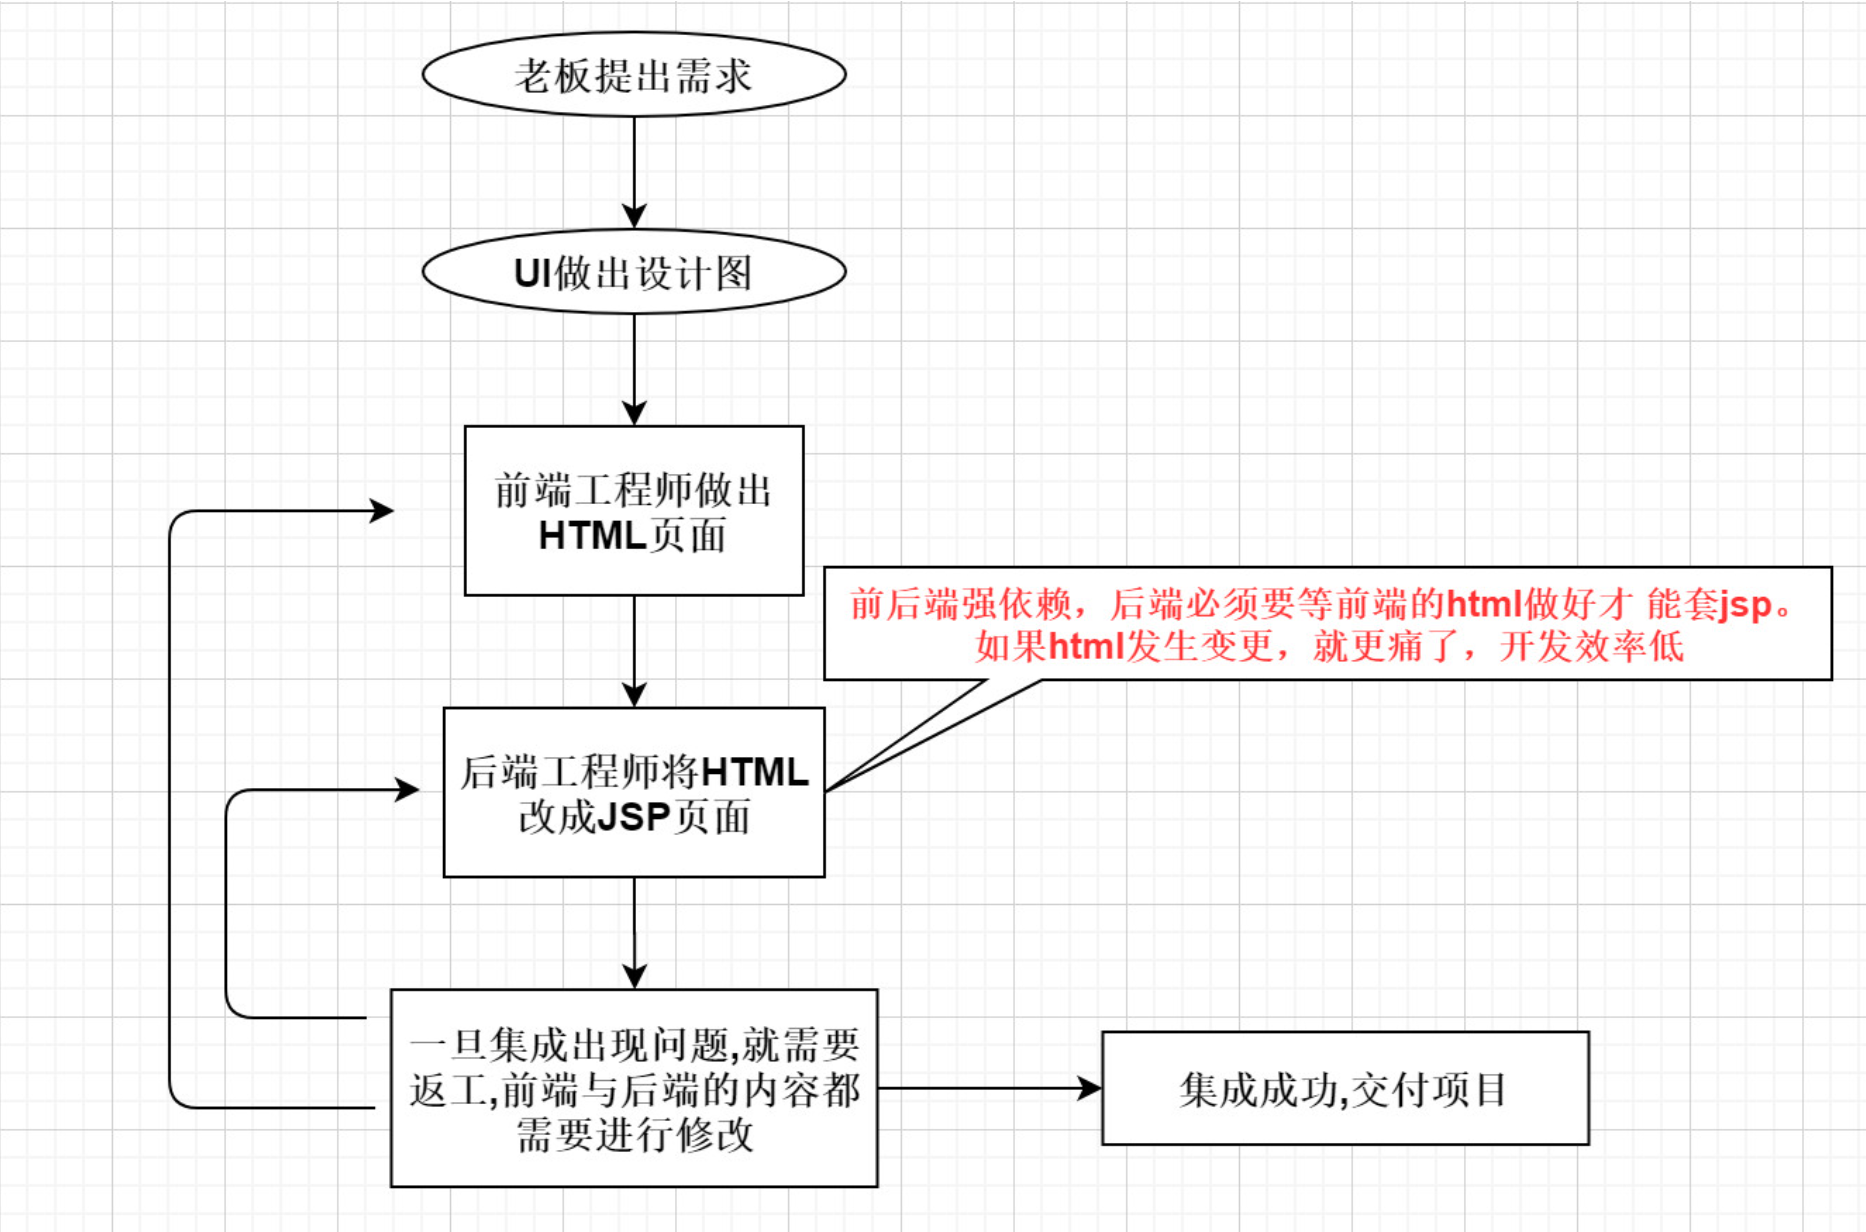
2)前后端耦合的缺陷 (以JSP为例)
- UI出好设计图之后,前端开发工程师只负责将设计图切成HTML,需要由Java开发工程师来将HTML套成JSP页面,修改问题的时候需要双方协同开发,效率低下。
- JSP页面必须要在支持Java的WEB服务器上运行(如Tomcat、Jetty等),无法使用Nginx等(官方宣称单实例HTTP并发高达5W),性能提升不上来。
- 第一次请求JSP,必须要在WEB服务器中编译成Servlet,第一次运行会较慢。 之后的每次请求JSP都是访问Servlet再用输出流输出的HTML页面,效率没有直接使用HTML高
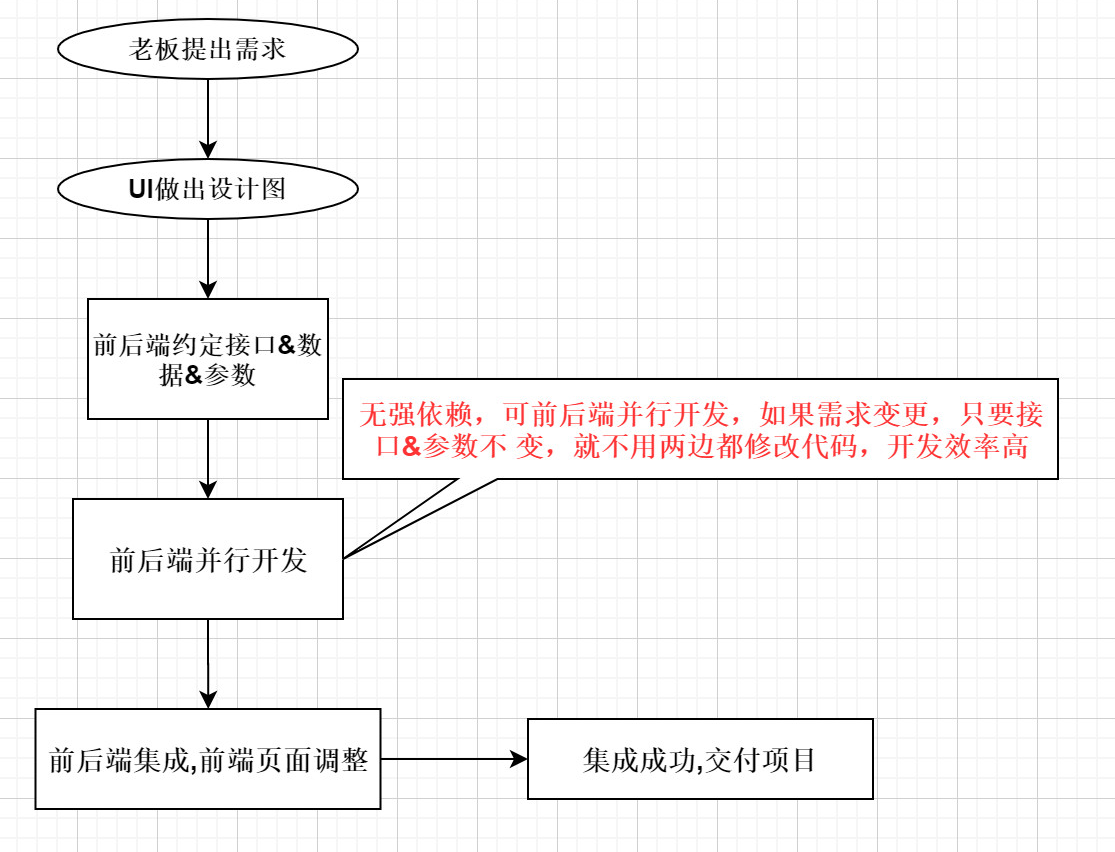
3)前后端分离的开发方式
4)前后端分离的优势
- 前后端分离的模式下,如果发现Bug,可以快速定位是谁的问题,不会出现互相踢皮球的现象
- 前后端分离可以减少后端服务器的并发/负载压力。除了接口以外的其他所有HTTP请求全部转移到前端Nginx上,接口的请求则转发调用Tomcat.
- 前后端分离的模式下,即使后端服务器暂时超时或宕机了,前端页面也会正常访问,只不过数据刷不出来而已。
- 前后端分离会更加合理的分配团队的工作量,减轻后端团队的工作量,提高了性能和可扩展性。
2.3.1.3 接口文档介绍
1)什么是接口文档?
在我们的项目中使用的是前后端分离开发方式,需要由前后端工程师共同定义接口,编写接口文档,之后大家都根据这个接口文档进行开发,到项目结束前都要一直进行接口文档的维护。
2)为什么要写接口文档?
- 项目开发过程中前后端工程师有一个统一的文件进行沟通交流,并行开发
- 项目维护中或者项目人员更迭,方便后期人员查看、维护
3)接口规范是什么?
- 接口地址:
http://localhost/hejiayun/community/list?pageNum=1&pageSize=10&communityName=&communityCode=COMMUNITY_1675945745985 - 请求方式: GET
- 接口描述: 获取小区信息
- 请求参数说明
| 参数名称 | 参数说明 | 是否必须 |
|---|---|---|
| pageNum | 当前页 | 是 |
| pageSize | 每页显示条数 | 是 |
| communityCode | 小区编码 | 否 |
| communityName | 小区名称 | 否 |
- 响应结果说明
| 字段名称 | 字段说明 | 是否必须 |
|---|---|---|
| code | 状态码 | 是 |
| msg | 查询成功/查询失败 | 是 |
| total | 总条数 | 是 |
| rows | 小区数据信息集合 | 是 |
- 响应结果示例:
{
	"total": 1,
	"rows": [{
		"searchValue": null,
		"createBy": "admin",
		"createTime": "2023-02-09 20:29:06",
		"updateBy": "admin",
		"updateTime": "2023-02-09 20:29:06",
		"remark": null,
		"params": {

		},
		"communityId": "1623660256618201090",
		"communityName": "宏福苑小区",
		"communityCode": "COMMUNITY_1675945745985",
		"communityProvenceCode": "1",
		"communityProvenceName": "北京市",
		"communityCityCode": "10",
		"communityCityName": "北京市",
		"communityTownCode": "1010",
		"communityTownName": "昌平区",
		"communityDetailedAddress": "北京市昌平区宏福苑",
		"communityLongitude": null,
		"communityLatitude": null,
		"deptId": 103,
		"communitySort": null
	}],
	"code": 200,
	"msg": "查询成功"
}
- 1
- 2
- 3
- 4
- 5
- 6
- 7
- 8
- 9
- 10
- 11
- 12
- 13
- 14
- 15
- 16
- 17
- 18
- 19
- 20
- 21
- 22
- 23
- 24
- 25
- 26
- 27
- 28
- 29
- 30
2.3.2 技术选型&数据库设计
2.3.2.1 前端技术选型
| 前端技术 | 说明 |
|---|---|
| vue-cli | Vue 的脚手架工具,用于自动生成 Vue 项目的目录及文件。 |
| Element UI库 | element-ui 是饿了么前端出品的基于 Vue.js的 后台组件库, 方便程序员进行页面快速布局和构建 |
| node.js | 简单的说 Node.js 就是运行在服务端的 JavaScript 运行环境 . |
| axios | 对ajax的封装, 简单来说就是ajax技术实现了局部数据的刷新,axios实现了对ajax的封装, |
2.3.2.2 后端技术选型
| 后端技术 | 说明 |
|---|---|
| SpringBoot | Spring Boot 是一款开箱即用框架,提供各种默认配置来简化项目配置。让我们 的 |
| Spring 应用变的更轻量化、更快的入门。 | |
| Spring Security | Spring Security 是一个能够为基于 Spring 的企业应用系统提供声明式的安全访问 |
| 控制解决方案的安全框架。 | |
| MyBatis-plus | mybatis-plus是一款Mybatis增强工具,用于简化开发,提高效率。 |
| Redis | 使用Redis进行数据缓存 |
2.3.3 数据库设计
- 详见数据库设计文档。
- 执行数据库创建脚本,SQL脚本见项目资料。
3.5 后台系统搭建
在创建项目之前首先创建数据库、表。直接导入提供的数据库脚本即可。

3.5.1 创建SpringBoot项目
1)创建一个空的项目

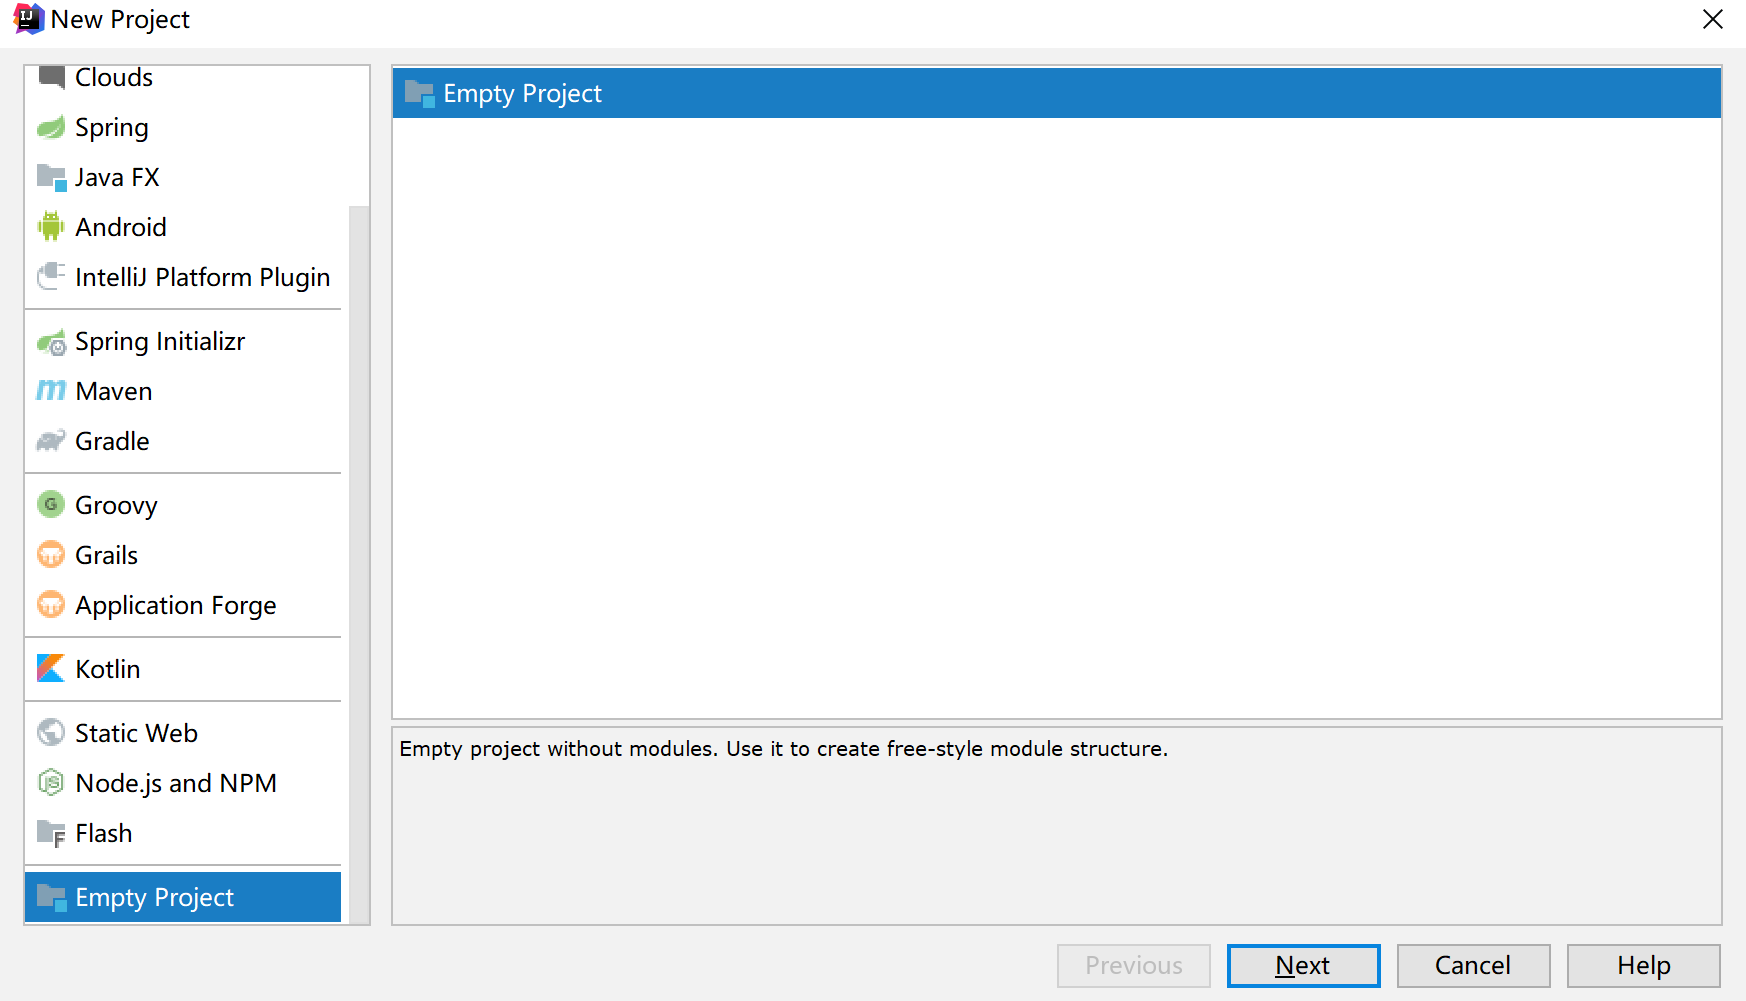
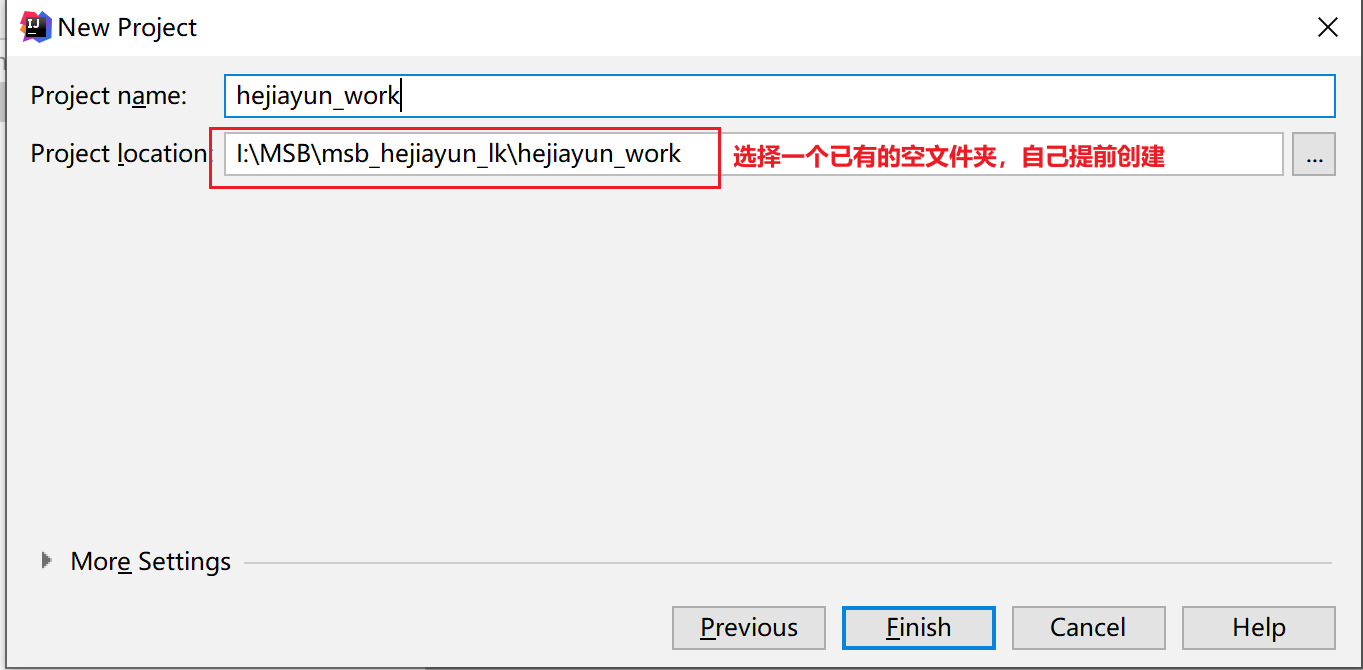
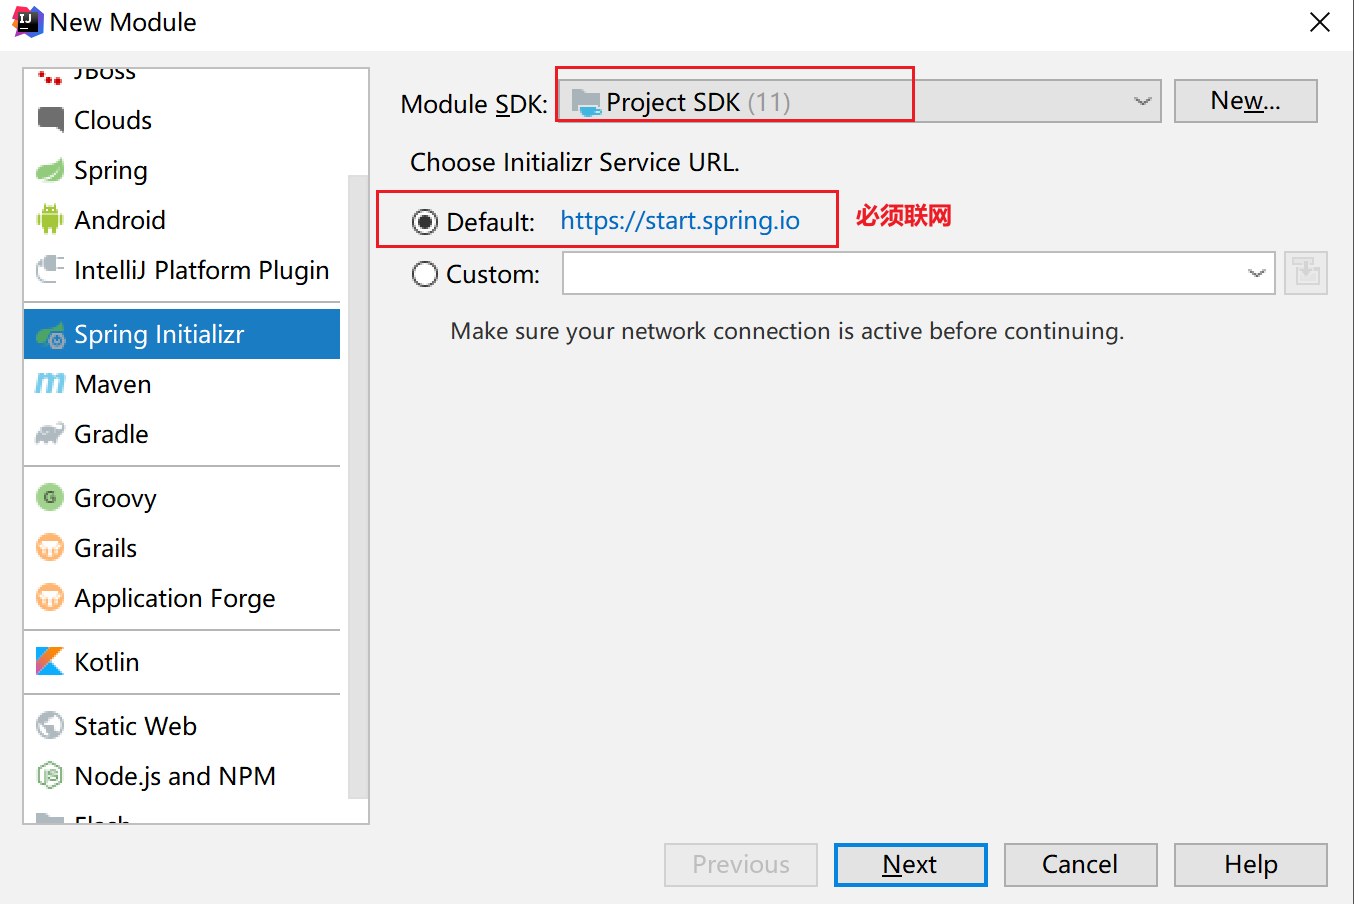
2)在当前空项目下,创建一个module,选择Spring Initializr

Spring Initializr是一个Web应用,它提供了一个基本的项目结构,能够帮助我们快速构建一个基础的Spring Boot项目 .
- Project SDK”用于设置创建项目使用的JDK版本,这里,使用之前初始化设置好的JDK版本即可;
- 在“Choose Initializr Service URL(选择初始化服务地址)”下使用默认的初始化服务地址“https://start.spring.io”进行Spring Boot项目创建.
3)指定坐标、打包方式、版本等信息
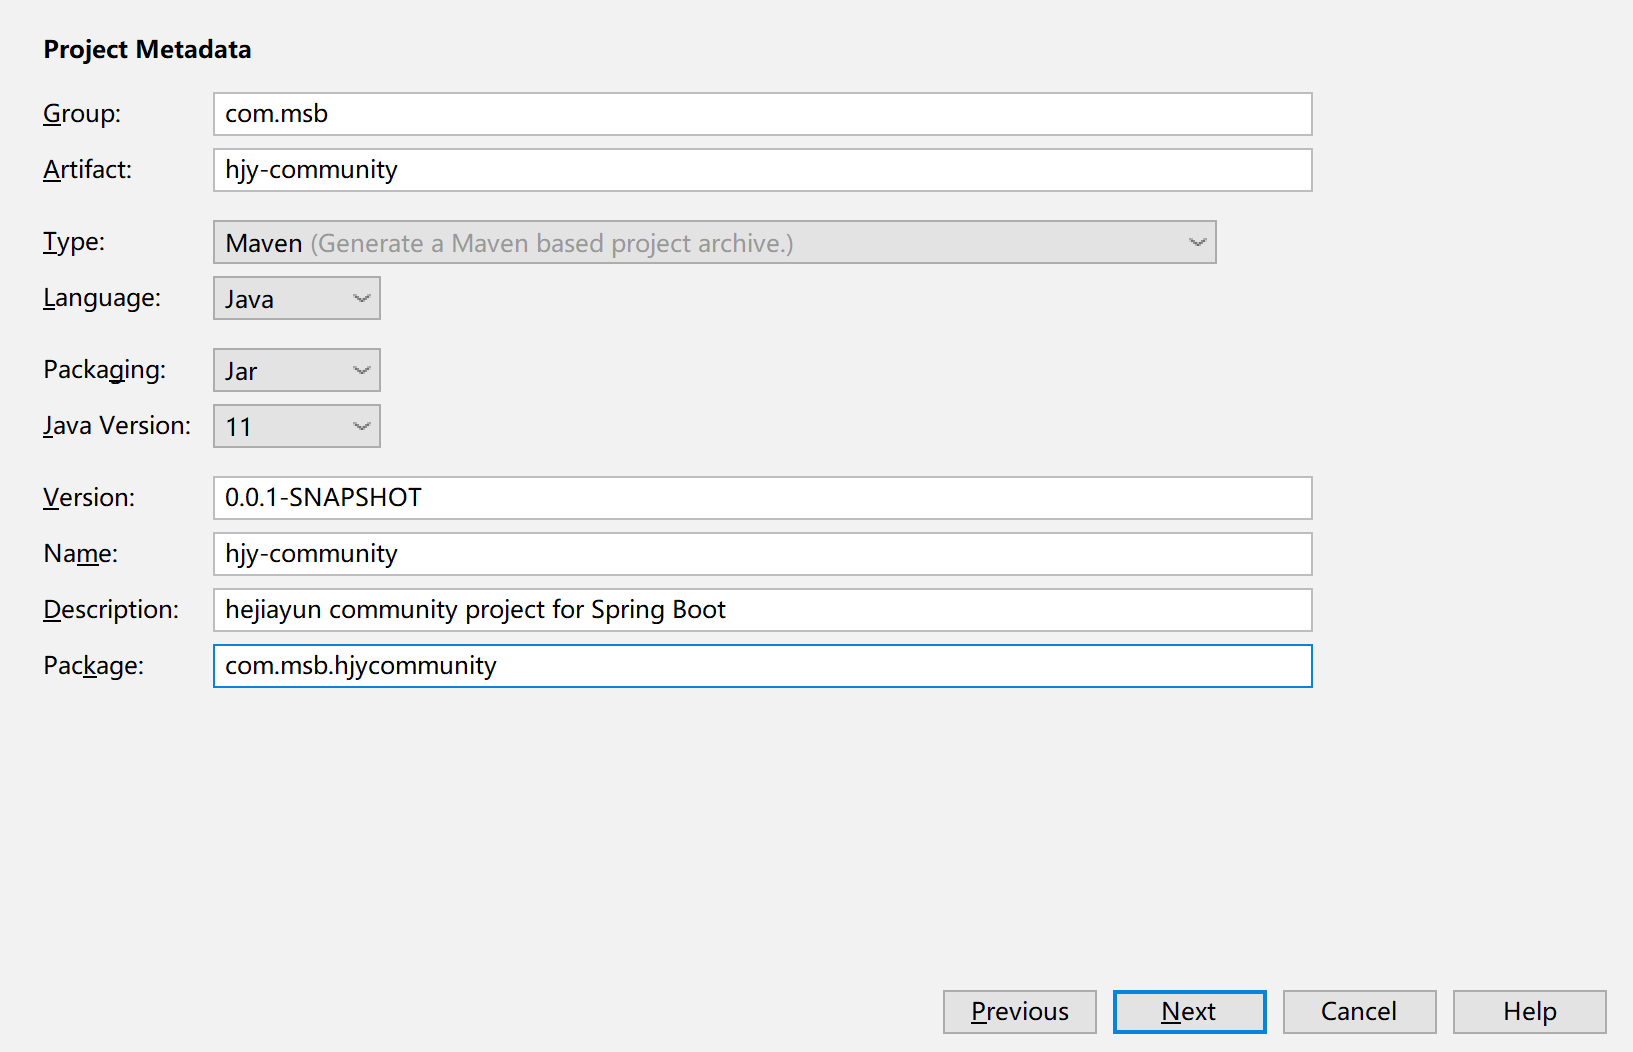
4)选择springboot版本,以及要添加的依赖.
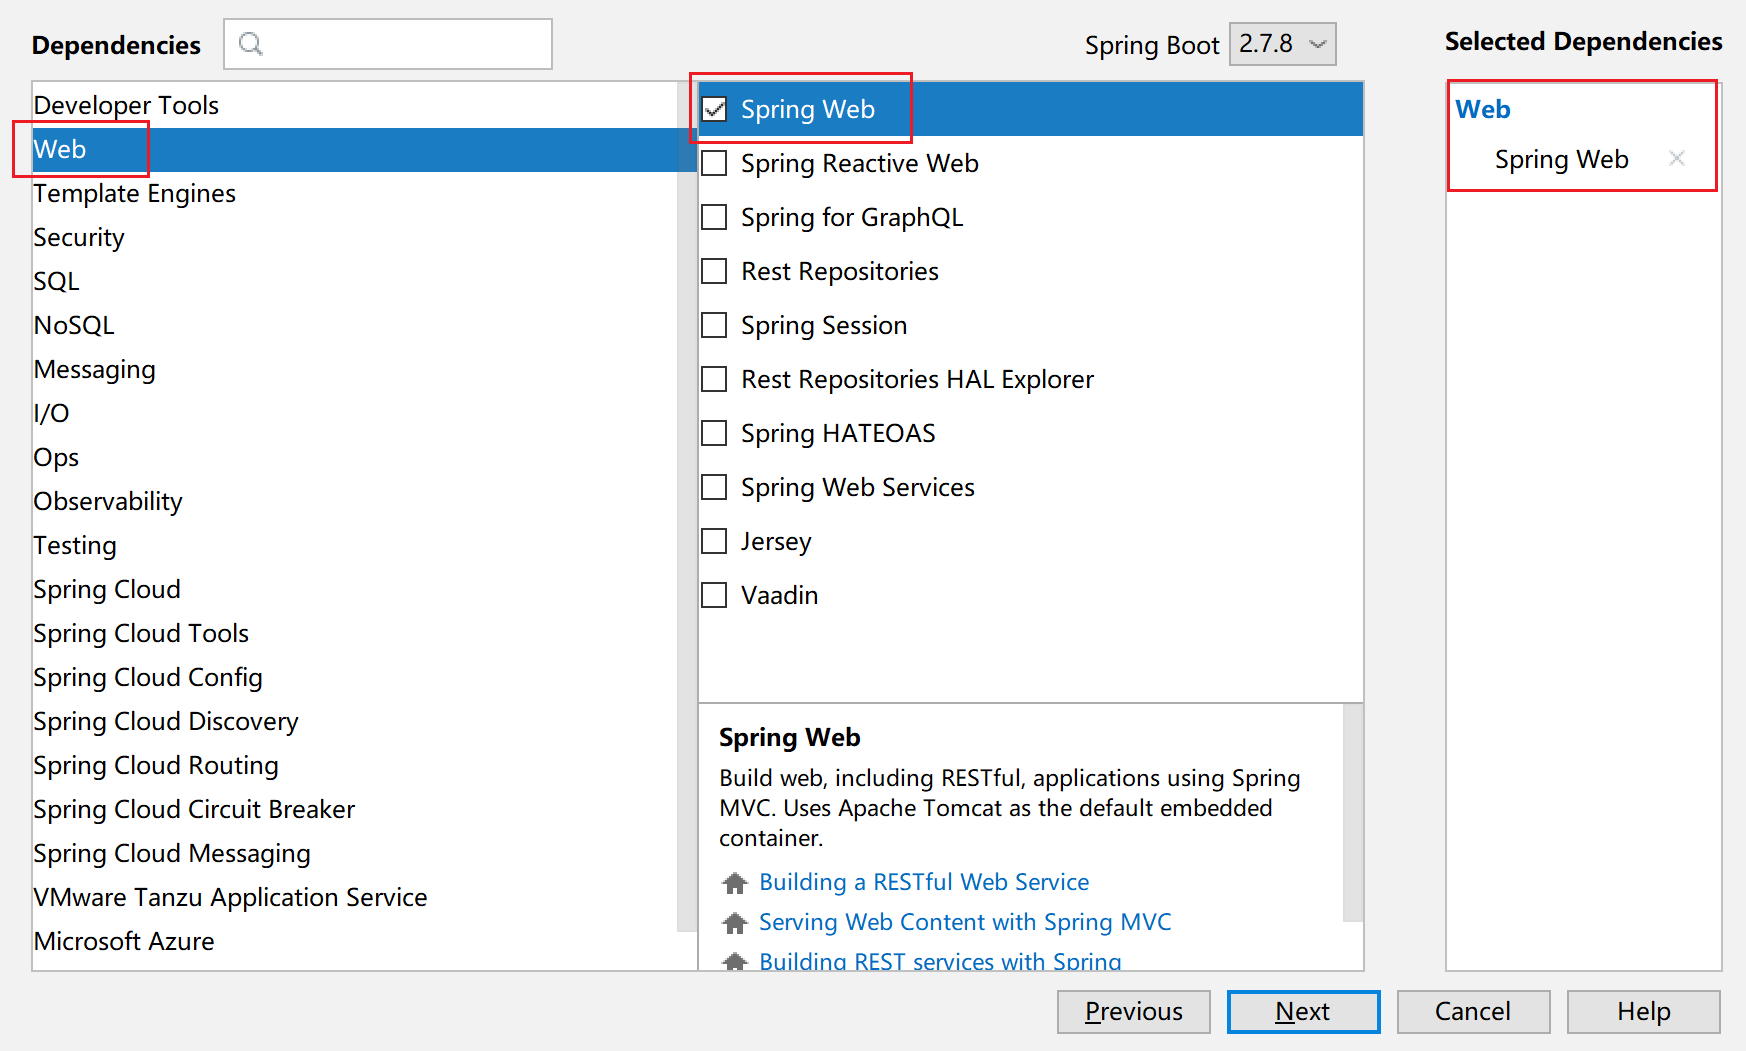
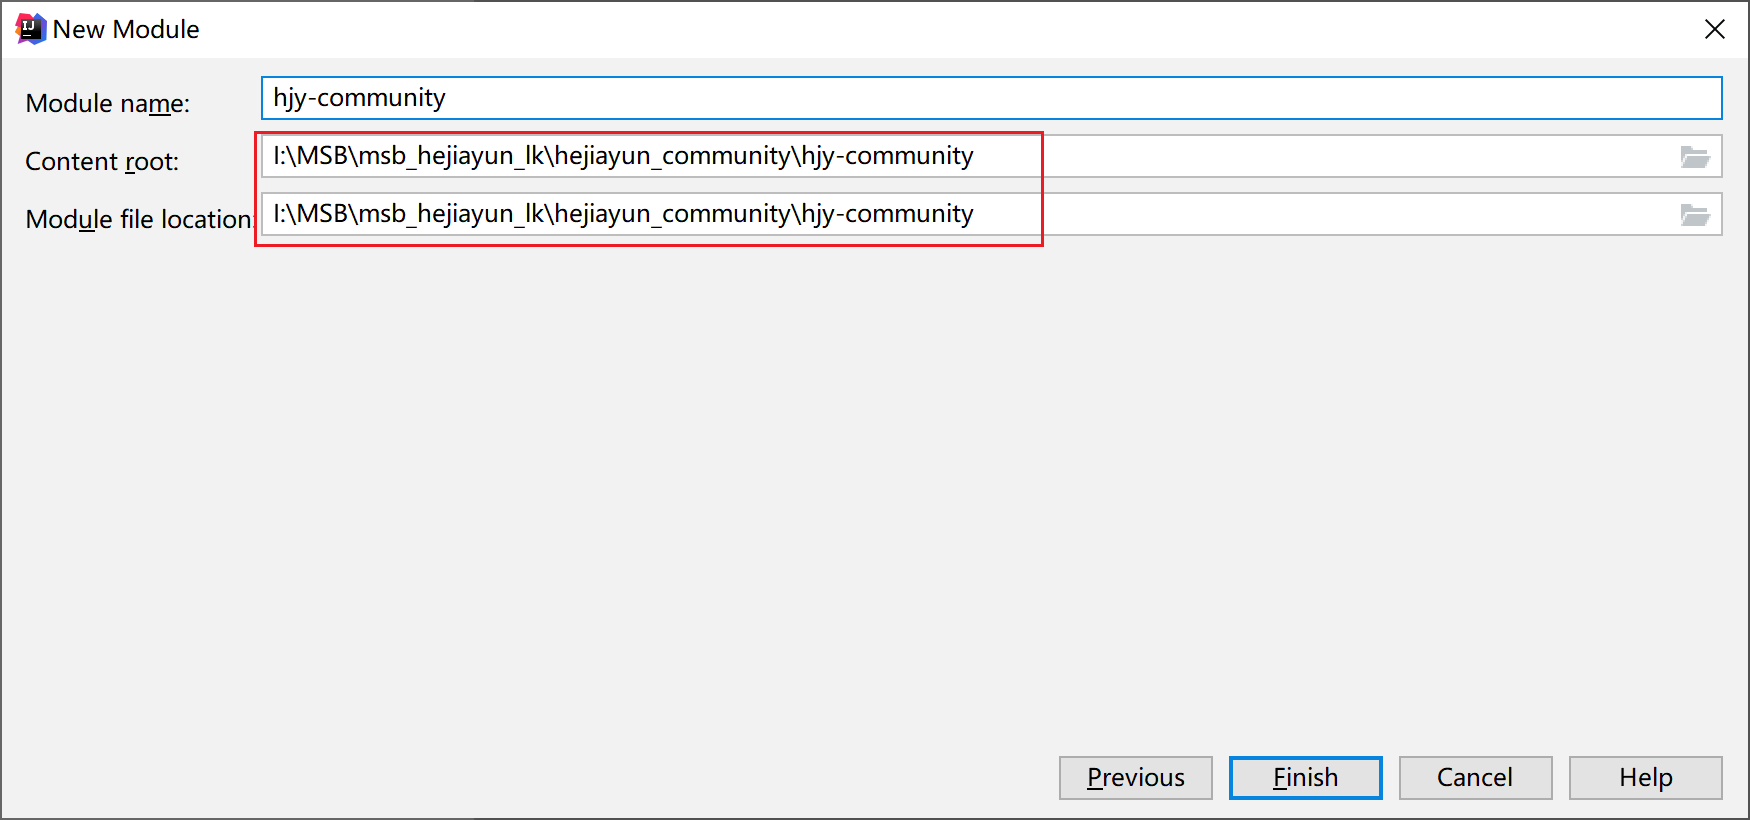
注意: 创建时不要选错路径!
提示: 如果使用IDEA快速构建SpringBoot项目,就必须要联网. 所谓的快速构建指的是在开发工具执行各项参数后,有Spring提供的URL所对应的服务器生成.
IDEA会将服务器生成的SpringBoot项目下载到本地工作空间中.
3.5.2 编写相关配置文件
1)pom.xml
<?xml version="1.0" encoding="UTF-8"?>
<project xmlns="http://maven.apache.org/POM/4.0.0" xmlns:xsi="http://www.w3.org/2001/XMLSchema-instance"
         xsi:schemaLocation="http://maven.apache.org/POM/4.0.0 https://maven.apache.org/xsd/maven-4.0.0.xsd">
    <modelVersion>4.0.0</modelVersion>
    <parent>
        <groupId>org.springframework.boot</groupId>
        <artifactId>spring-boot-starter-parent</artifactId>
        <version>2.7.8</version>
        <relativePath/> <!-- lookup parent from repository -->
    </parent>

    <groupId>com.msb</groupId>
    <artifactId>hjy-community</artifactId>
    <version>0.0.1-SNAPSHOT</version>

    <name>hjy-community</name>
    <packaging>jar</packaging>
    <description>合家云社区物业管理平台</description>

    <properties>
        <java.version>11</java.version>
        <project.build.sourceEncoding>UTF-8</project.build.sourceEncoding>
        <project.reporting.outputEncoding>UTF-8</project.reporting.outputEncoding>
        <maven-jar-plugin.version>3.1.1</maven-jar-plugin.version>
        <druid.version>1.2.2</druid.version>
        <bitwalker.version>1.21</bitwalker.version>
        <swagger.version>2.9.2</swagger.version>
        <kaptcha.version>2.3.2</kaptcha.version>
        <pagehelper.boot.version>1.4.1</pagehelper.boot.version>
        <fastjson.version>1.2.74</fastjson.version>
        <oshi.version>5.3.6</oshi.version>
        <jna.version>5.6.0</jna.version>
        <commons.io.version>2.5</commons.io.version>
        <commons.fileupload.version>1.3.3</commons.fileupload.version>
        <poi.version>4.1.2</poi.version>
        <velocity.version>1.7</velocity.version>
        <jwt.version>0.9.1</jwt.version>
    </properties>
    <dependencies>
        <!--阿里数据库连接池 -->
        <dependency>
            <groupId>com.alibaba</groupId>
            <artifactId>druid-spring-boot-starter</artifactId>
            <version>${druid.version}</version>
        </dependency>

        <!-- 解析客户端操作系统、浏览器等 -->
        <dependency>
            <groupId>eu.bitwalker</groupId>
            <artifactId>UserAgentUtils</artifactId>
            <version>${bitwalker.version}</version>
        </dependency>
        <!-- servlet包 -->
        <dependency>
            <groupId>javax.servlet</groupId>
            <artifactId>javax.servlet-api</artifactId>
        </dependency>
        <!-- SpringBoot Web容器 -->
        <dependency>
            <groupId>org.springframework.boot</groupId>
            <artifactId>spring-boot-starter-web</artifactId>
        </dependency>

        <!-- pagehelper 分页插件 -->
        <dependency>
            <groupId>com.github.pagehelper</groupId>
            <artifactId>pagehelper-spring-boot-starter</artifactId>
            <version>${pagehelper.boot.version}</version>
        </dependency>
        <!-- SpringBoot 拦截器 -->
        <dependency>
            <groupId>org.springframework.boot</groupId>
            <artifactId>spring-boot-starter-aop</artifactId>
        </dependency>

        <!-- 获取系统信息 -->
        <dependency>
            <groupId>com.github.oshi</groupId>
            <artifactId>oshi-core</artifactId>
            <version>${oshi.version}</version>
        </dependency>

        <dependency>
            <groupId>net.java.dev.jna</groupId>
            <artifactId>jna</artifactId>
            <version>${jna.version}</version>
        </dependency>
        <dependency>
            <groupId>com.baomidou</groupId>
            <artifactId>mybatis-plus-boot-starter</artifactId>
            <version>3.4.1</version>
        </dependency>
        <dependency>
            <groupId>net.java.dev.jna</groupId>
            <artifactId>jna-platform</artifactId>
            <version>${jna.version}</version>
        </dependency>
        <!-- pool 对象池 -->
        <dependency>
            <groupId>org.apache.commons</groupId>
            <artifactId>commons-pool2</artifactId>
        </dependency>
        <!-- redis 缓存操作 -->
        <dependency>
            <groupId>org.springframework.boot</groupId>
            <artifactId>spring-boot-starter-data-redis</artifactId>
            <!--暂时使用jedis来进行操作redis,lettuce目前缺失心跳处理-->
            <exclusions>
                <exclusion>
                    <groupId>io.lettuce</groupId>
                    <artifactId>lettuce-core</artifactId>
                </exclusion>
            </exclusions>
        </dependency>
        <dependency>
            <groupId>redis.clients</groupId>
            <artifactId>jedis</artifactId>
        </dependency>

        <!--io常用工具类 -->
        <dependency>
            <groupId>commons-io</groupId>
            <artifactId>commons-io</artifactId>
            <version>${commons.io.version}</version>
        </dependency>

        <!--文件上传工具类 -->
        <dependency>
            <groupId>commons-fileupload</groupId>
            <artifactId>commons-fileupload</artifactId>
            <version>${commons.fileupload.version}</version>
        </dependency>

        <!-- excel工具 -->
        <dependency>
            <groupId>org.apache.poi</groupId>
            <artifactId>poi-ooxml</artifactId>
            <version>${poi.version}</version>
        </dependency>

        <!--velocity代码生成使用模板 -->
        <dependency>
            <groupId>org.apache.velocity</groupId>
            <artifactId>velocity</artifactId>
            <version>${velocity.version}</version>
        </dependency>

        <!-- 阿里JSON解析器 -->
        <dependency>
            <groupId>com.alibaba</groupId>
            <artifactId>fastjson</artifactId>
            <version>${fastjson.version}</version>
        </dependency>

        <!--Token生成与解析-->
        <dependency>
            <groupId>io.jsonwebtoken</groupId>
            <artifactId>jjwt</artifactId>
            <version>${jwt.version}</version>
        </dependency>

        <!--验证码 -->
        <dependency>
            <groupId>com.github.penggle</groupId>
            <artifactId>kaptcha</artifactId>
            <version>${kaptcha.version}</version>
            <exclusions>
                <exclusion>
                    <artifactId>javax.servlet-api</artifactId>
                    <groupId>javax.servlet</groupId>
                </exclusion>
            </exclusions>
        </dependency>

        <!-- 自定义验证码 -->
        <dependency>
            <groupId>com.github.whvcse</groupId>
            <artifactId>easy-captcha</artifactId>
            <version>1.6.2</version>
        </dependency>
        <!-- spring-boot-devtools -->
        <dependency>
            <groupId>org.springframework.boot</groupId>
            <artifactId>spring-boot-devtools</artifactId>
            <optional>true</optional> <!-- 表示依赖不会传递 -->
        </dependency>
        <!-- Mysql驱动包 -->
        <dependency>
            <groupId>mysql</groupId>
            <artifactId>mysql-connector-java</artifactId>
            <version>8.0.32</version>
        </dependency>
        <!-- Spring框架基本的核心工具 -->
        <dependency>
            <groupId>org.springframework</groupId>
            <artifactId>spring-context-support</artifactId>
        </dependency>
        <!-- SpringWeb模块 -->
        <dependency>
            <groupId>org.springframework</groupId>
            <artifactId>spring-web</artifactId>
        </dependency>
        <!-- spring security 安全认证 -->
<!--        <dependency>-->
<!--            <groupId>org.springframework.boot</groupId>-->
<!--            <artifactId>spring-boot-starter-security</artifactId>-->
<!--        </dependency>-->

        <!-- 自定义验证注解 -->
        <dependency>
            <groupId>javax.validation</groupId>
            <artifactId>validation-api</artifactId>
        </dependency>
        <!--常用工具类 -->
        <dependency>
            <groupId>org.apache.commons</groupId>
            <artifactId>commons-lang3</artifactId>
        </dependency>

        <!-- JSON工具类 -->
        <dependency>
            <groupId>com.fasterxml.jackson.core</groupId>
            <artifactId>jackson-databind</artifactId>
        </dependency>
        <!-- yml解析器 -->
        <dependency>
            <groupId>org.yaml</groupId>
            <artifactId>snakeyaml</artifactId>
        </dependency>


        <dependency>
            <groupId>junit</groupId>
            <artifactId>junit</artifactId>
            <version>4.11</version>
            <scope>test</scope>
        </dependency>
        <dependency>
            <groupId>org.springframework.boot</groupId>
            <artifactId>spring-boot-starter-test</artifactId>
        </dependency>

    </dependencies>

    <build>
        <plugins>
            <plugin>
                <groupId>org.springframework.boot</groupId>
                <artifactId>spring-boot-maven-plugin</artifactId>
            </plugin>
        </plugins>
    </build>

</project>
- 1
- 2
- 3
- 4
- 5
- 6
- 7
- 8
- 9
- 10
- 11
- 12
- 13
- 14
- 15
- 16
- 17
- 18
- 19
- 20
- 21
- 22
- 23
- 24
- 25
- 26
- 27
- 28
- 29
- 30
- 31
- 32
- 33
- 34
- 35
- 36
- 37
- 38
- 39
- 40
- 41
- 42
- 43
- 44
- 45
- 46
- 47
- 48
- 49
- 50
- 51
- 52
- 53
- 54
- 55
- 56
- 57
- 58
- 59
- 60
- 61
- 62
- 63
- 64
- 65
- 66
- 67
- 68
- 69
- 70
- 71
- 72
- 73
- 74
- 75
- 76
- 77
- 78
- 79
- 80
- 81
- 82
- 83
- 84
- 85
- 86
- 87
- 88
- 89
- 90
- 91
- 92
- 93
- 94
- 95
- 96
- 97
- 98
- 99
- 100
- 101
- 102
- 103
- 104
- 105
- 106
- 107
- 108
- 109
- 110
- 111
- 112
- 113
- 114
- 115
- 116
- 117
- 118
- 119
- 120
- 121
- 122
- 123
- 124
- 125
- 126
- 127
- 128
- 129
- 130
- 131
- 132
- 133
- 134
- 135
- 136
- 137
- 138
- 139
- 140
- 141
- 142
- 143
- 144
- 145
- 146
- 147
- 148
- 149
- 150
- 151
- 152
- 153
- 154
- 155
- 156
- 157
- 158
- 159
- 160
- 161
- 162
- 163
- 164
- 165
- 166
- 167
- 168
- 169
- 170
- 171
- 172
- 173
- 174
- 175
- 176
- 177
- 178
- 179
- 180
- 181
- 182
- 183
- 184
- 185
- 186
- 187
- 188
- 189
- 190
- 191
- 192
- 193
- 194
- 195
- 196
- 197
- 198
- 199
- 200
- 201
- 202
- 203
- 204
- 205
- 206
- 207
- 208
- 209
- 210
- 211
- 212
- 213
- 214
- 215
- 216
- 217
- 218
- 219
- 220
- 221
- 222
- 223
- 224
- 225
- 226
- 227
- 228
- 229
- 230
- 231
- 232
- 233
- 234
- 235
- 236
- 237
- 238
- 239
- 240
- 241
- 242
- 243
- 244
- 245
- 246
- 247
- 248
- 249
- 250
- 251
- 252
- 253
- 254
2)application.yml
# 项目相关配置
hjy-community:
  # 名称
  name: hjy-community
  # 版本
  version: 1.0.0

# 开发环境配置
server:
  #服务器的HTTP端口
  port: 8888
  servlet:
    # 应用的访问路径
    context-path: /
  tomcat:
    # tomcat的URI编码
    uri-encoding: UTF-8
    # tomcat最大线程数,默认为200
    max-threads: 800
    # Tomcat启动初始化的线程数,默认值25
    min-spare-threads: 30

# 日志配置
logging:
  level:
    com.msb: debug
    org.springframework: warn

# Spring配置
spring:
  # 资源信息
  messages:
    # 国际化资源文件路径
    basename: i18n/messages
  profiles:
    active: druid

# MyBatis配置

# PageHelper分页插件
pagehelper:
  #数据库类型
  helperDialect: mysql
   #查询合理化 当该参数设置为 true 时,pageNum<=0 时会查询第一页, pageNum>pages(超过总数时),会查询最后一页
  reasonable: true
  # 自动分页的配置,依据的是入参,如果参数中有pageNum,pageSize分页参数,则会自动分页
  supportMethodsArguments: true
  # params:为了支持startPage(Object params)方法,增加了该参数来配置参数映射,用于从对象中根据属性名取值
  params: count=countSql

## mybatis-plus配置
mybatis-plus:
  ## plus的实体别名包,不需要写出实体类的完整路径,只需要写出类名即可
  type-aliases-package: com.msb.hjycommunity.**.domain
  ## mybatis  mapper.xml的位置
  mapper-locations: classpath:mapper/**/*Mapper.xml
  ## mybatis  config的配置文件位置

  config-location: classpath:mybatis/mybatis-config.xml
  ## 全局配置
  global-config:
    db-config:
      ## id生成策略为雪花id
      id-type: assign_id
    ## 不启用mybatis-plus的banner
    banner: false
- 1
- 2
- 3
- 4
- 5
- 6
- 7
- 8
- 9
- 10
- 11
- 12
- 13
- 14
- 15
- 16
- 17
- 18
- 19
- 20
- 21
- 22
- 23
- 24
- 25
- 26
- 27
- 28
- 29
- 30
- 31
- 32
- 33
- 34
- 35
- 36
- 37
- 38
- 39
- 40
- 41
- 42
- 43
- 44
- 45
- 46
- 47
- 48
- 49
- 50
- 51
- 52
- 53
- 54
- 55
- 56
- 57
- 58
- 59
- 60
- 61
- 62
- 63
- 64
- 65
- 66
1)helperDialect:分页插件会自动检测当前的数据库链接,自动选择合适的分页方式。 你可以配置helperDialect属性来指定分页插件使用哪种方言。
2)reasonable:分页合理化参数,默认值为false。当该参数设置为 true 时,pageNum<=0 时会查询第一页,pageNum>pages(超过总数时),会查询最后一页。默认false 时,直接根据参数进行查询。
3)supportMethodsArguments:支持通过 Mapper 接口参数来传递分页参数,默认值false,分页插件会从查询方法的参数值中,自动根据上面 params 配置的字段中取值,查找到合适的值时就会自动分页。
4)params:为了支持startPage(Object params)方法,增加了该参数来配置参数映射,用于从对象中根据属性名取值, 可以配置 pageNum,pageSize,count,pageSizeZero,reasonable,不配置映射的用默认值, 默认值为pageNum=pageNum;pageSize=pageSize;count=countSql;reasonable=reasonable;pageSizeZero=pageSizeZero。
3)application-druid.yml
# 数据源配置
spring:
  datasource:
    type: com.alibaba.druid.pool.DruidDataSource
    driverClassName: com.mysql.cj.jdbc.Driver
    url: jdbc:mysql://127.0.0.1:3306/hejiayun_community?useUnicode=true&characterEncoding=utf8&zeroDateTimeBehavior=convertToNull&useSSL=true&serverTimezone=GMT%2B8
    username: root
    password: 123456


    #druid 数据源专有配置
    druid:
      # 初始连接数
      initialSize: 5
      # 最小连接池数量
      minIdle: 10
      # 最大连接池数量
      maxActive: 20
      # 配置获取连接等待超时的时间
      maxWait: 50000
      # 配置间隔多久才进行一次检测,检测需要关闭的空闲连接,单位是毫秒
      timeBetweenEvictionRunsMillis: 60000
      # 配置一个连接在池中最小生存的时间,单位是毫秒
      minEvictableIdleTimeMillis: 300000
      # 配置一个连接在池中最大生存的时间,单位是毫秒
      maxEvictableIdleTimeMillis: 900000
      # 配置检测连接是否有效
      validationQuery: SELECT 1 FROM DUAL
      #申请连接的时候检测,如果空闲时间大于timeBetweenEvictionRunsMillis,执行validationQuery检测连接是否有效。
      testWhileIdle: true
      #配置从连接池获取连接时,是否检查连接有效性,true每次都检查;false不检查。做了这个配置会降低性能。
      testOnBorrow: false
      #配置向连接池归还连接时,是否检查连接有效性,true每次都检查;false不检查。做了这个配置会降低性能。
      testOnReturn: false
      #采集web-jdbc关联监控的数据。
      webStatFilter:
        enabled: true
      # Druid内置提供了一个StatViewServlet用于展示Druid的统计信息。
      statViewServlet:
        enabled: true
        # 设置白名单,不填则允许所有访问
        allow:
        url-pattern: /druid/*
        # 控制台管理用户名和密码
        login-username:
        login-password:

      #配置监控统计拦截的filters,stat:监控统计、log4j:日志记录、wall:防御sql注入
      filter:
        stat:
          enabled: true
          # 慢SQL记录
          log-slow-sql: true
          slow-sql-millis: 1000
          merge-sql: true
        wall:
          config:
            multi-statement-allow: true
- 1
- 2
- 3
- 4
- 5
- 6
- 7
- 8
- 9
- 10
- 11
- 12
- 13
- 14
- 15
- 16
- 17
- 18
- 19
- 20
- 21
- 22
- 23
- 24
- 25
- 26
- 27
- 28
- 29
- 30
- 31
- 32
- 33
- 34
- 35
- 36
- 37
- 38
- 39
- 40
- 41
- 42
- 43
- 44
- 45
- 46
- 47
- 48
- 49
- 50
- 51
- 52
- 53
- 54
- 55
- 56
- 57
- 58
3)mybatis-config.xml
mybatis核心配置文件,在resources目录下创建mybatis目录,在mybatis目录下创建该文件。
<?xml version="1.0" encoding="UTF-8" ?>
<!DOCTYPE configuration
PUBLIC "-//mybatis.org//DTD Config 3.0//EN"
"http://mybatis.org/dtd/mybatis-3-config.dtd">
<configuration>

	<settings>
		<setting name="useGeneratedKeys"         value="true" />  <!-- 允许 JDBC 支持自动生成主键 -->
		<setting name="logImpl"                  value="STDOUT_LOGGING" /> <!-- 指定 MyBatis 所用日志的具体实现 -->
	</settings>

</configuration>
- 1
- 2
- 3
- 4
- 5
- 6
- 7
- 8
- 9
- 10
- 11
- 12
4)logback.xml
<?xml version="1.0" encoding="UTF-8"?>
<configuration>
    <!-- 日志存放路径 -->
    <property name="log.path" value="/home/hejiayun/logs" />
    <!-- 日志输出格式 -->
    <property name="log.pattern" value="%d{HH:mm:ss.SSS} [%thread] %-5level %logger{20} - [%method,%line] - %msg%n" />

    <!-- 控制台输出 -->
    <appender name="console" class="ch.qos.logback.core.ConsoleAppender">
        <encoder>
            <pattern>${log.pattern}</pattern>
        </encoder>
    </appender>

    <!-- 系统日志输出 -->
    <appender name="file_info" class="ch.qos.logback.core.rolling.RollingFileAppender">
        <file>${log.path}/sys-info.log</file>
        <!-- 循环政策:基于时间创建日志文件 -->
        <rollingPolicy class="ch.qos.logback.core.rolling.TimeBasedRollingPolicy">
            <!-- 日志文件名格式 -->
            <fileNamePattern>${log.path}/sys-info.%d{yyyy-MM-dd}.log</fileNamePattern>
            <!-- 日志最大的历史 60天 -->
            <maxHistory>60</maxHistory>
        </rollingPolicy>
        <encoder>
            <pattern>${log.pattern}</pattern>
        </encoder>
        <filter class="ch.qos.logback.classic.filter.LevelFilter">
            <!-- 过滤的级别 -->
            <level>INFO</level>
            <!-- 匹配时的操作:接收(记录) -->
            <onMatch>ACCEPT</onMatch>
            <!-- 不匹配时的操作:拒绝(不记录) -->
            <onMismatch>DENY</onMismatch>
        </filter>
    </appender>

    <appender name="file_error" class="ch.qos.logback.core.rolling.RollingFileAppender">
        <file>${log.path}/sys-error.log</file>
        <!-- 循环政策:基于时间创建日志文件 -->
        <rollingPolicy class="ch.qos.logback.core.rolling.TimeBasedRollingPolicy">
            <!-- 日志文件名格式 -->
            <fileNamePattern>${log.path}/sys-error.%d{yyyy-MM-dd}.log</fileNamePattern>
            <!-- 日志最大的历史 60天 -->
            <maxHistory>60</maxHistory>
        </rollingPolicy>
        <encoder>
            <pattern>${log.pattern}</pattern>
        </encoder>
        <filter class="ch.qos.logback.classic.filter.LevelFilter">
            <!-- 过滤的级别 -->
            <level>ERROR</level>
            <!-- 匹配时的操作:接收(记录) -->
            <onMatch>ACCEPT</onMatch>
            <!-- 不匹配时的操作:拒绝(不记录) -->
            <onMismatch>DENY</onMismatch>
        </filter>
    </appender>

    <!-- 用户访问日志输出  -->
    <appender name="sys-user" class="ch.qos.logback.core.rolling.RollingFileAppender">
        <file>${log.path}/sys-user.log</file>
        <rollingPolicy class="ch.qos.logback.core.rolling.TimeBasedRollingPolicy">
            <!-- 按天回滚 daily -->
            <fileNamePattern>${log.path}/sys-user.%d{yyyy-MM-dd}.log</fileNamePattern>
            <!-- 日志最大的历史 60天 -->
            <maxHistory>60</maxHistory>
        </rollingPolicy>
        <encoder>
            <pattern>${log.pattern}</pattern>
        </encoder>
    </appender>

    <!-- 系统模块日志级别控制  -->
    <logger name="com.msb" level="info" />
    <!-- Spring日志级别控制  -->
    <logger name="org.springframework" level="warn" />

    <root level="info">
        <appender-ref ref="console" />
    </root>

    <!--系统操作日志-->
    <root level="info">
        <appender-ref ref="file_info" />
        <appender-ref ref="file_error" />
    </root>

    <!--系统用户操作日志-->
    <logger name="sys-user" level="info">
        <appender-ref ref="sys-user"/>
    </logger>
</configuration>
- 1
- 2
- 3
- 4
- 5
- 6
- 7
- 8
- 9
- 10
- 11
- 12
- 13
- 14
- 15
- 16
- 17
- 18
- 19
- 20
- 21
- 22
- 23
- 24
- 25
- 26
- 27
- 28
- 29
- 30
- 31
- 32
- 33
- 34
- 35
- 36
- 37
- 38
- 39
- 40
- 41
- 42
- 43
- 44
- 45
- 46
- 47
- 48
- 49
- 50
- 51
- 52
- 53
- 54
- 55
- 56
- 57
- 58
- 59
- 60
- 61
- 62
- 63
- 64
- 65
- 66
- 67
- 68
- 69
- 70
- 71
- 72
- 73
- 74
- 75
- 76
- 77
- 78
- 79
- 80
- 81
- 82
- 83
- 84
- 85
- 86
- 87
- 88
- 89
- 90
- 91
- 92
- 93
3.5.3 创建包结构&Entity基类
3.5.3.1 项目包结构
com.msb.hjycommunity
|———— common		//通用工具
|———— framework		//核心框架
|———— community 	//后台服务
|———— system		//系统管理
|———— web		//后台接口
- 1
- 2
- 3
- 4
- 5
- 6
3.5.3.2 创建Entity基类
在搭建的后端应用中,我们使用了 mybatis-plus 框架作为扩展,减少 sql 的书写,提升开发效率,其中有个功能很好用,就是自动填充。在项目中,我们的后台表一般会具有一些标准字段,作为强制建表规范,比如:
- create_by 创建者
- creation_date 创建时间
- last_updated_by 最后更新者
- last_update_date 最后更新时间
这些字段我们会放到 Entity类中,作为其他 Entity的超类,这样就不用重复定义了,但是有个问题,在每次修改数据时,都需要给这几个字段赋值,这显然就有点繁琐了,如果能系统自动读取相关值并填充就能省略很多代码,mybatis plus 的自动填充正是一个这样的功能。
我们在 com.msb.hjycommunity.common.core.domain 包下,创建这个Entity基类
package com.msb.hjycommunity.common.core.domain;

import com.baomidou.mybatisplus.annotation.FieldFill;
import com.baomidou.mybatisplus.annotation.TableField;
import com.fasterxml.jackson.annotation.JsonFormat;

import java.io.Serializable;
import java.util.Date;
import java.util.Map;

/**
 * Entity 基类
 * @author spikeCong
 * @date 2023/2/23
 **/
public class BaseEntity implements Serializable {

    private static final long serialVersionUID = 1L;

    /**
     * 搜索值
     * @TableField(exist = false)注解加载bean属性上,表示当前属性不是数据库的字段,
     * 但在项目中必须使用,这样在新增等使用bean的时候,mybatis-plus就会忽略这个,不会报错
     */
    @TableField(exist = false)
    private String searchValue;

    /**
     * 创建者
     * fill 在需要被填充的字段上使用注解,声明什么时候要被填充
     * FieldFill.INSERT 只在插入时填充
     * FieldFill.INSERT_UPDATE 插入和更新时都填充
     */
    @TableField(fill = FieldFill.INSERT)
    private String createBy;

    /** 创建时间 */
    @JsonFormat(pattern = "yyyy-MM-dd HH:mm:ss")
    @TableField(fill = FieldFill.INSERT)
    private Date createTime;

    /** 更新者 */
    @TableField(fill = FieldFill.INSERT)
    private String updateBy;

    /** 更新时间 */
    @JsonFormat(pattern = "yyyy-MM-dd HH:mm:ss")
    @TableField(fill = FieldFill.INSERT)
    private Date updateTime;

    /** 备注 */
    private String remark;

    /** 请求参数 */
    @TableField(exist = false)
    private Map<String, Object> params;

	//get/set ......
}
- 1
- 2
- 3
- 4
- 5
- 6
- 7
- 8
- 9
- 10
- 11
- 12
- 13
- 14
- 15
- 16
- 17
- 18
- 19
- 20
- 21
- 22
- 23
- 24
- 25
- 26
- 27
- 28
- 29
- 30
- 31
- 32
- 33
- 34
- 35
- 36
- 37
- 38
- 39
- 40
- 41
- 42
- 43
- 44
- 45
- 46
- 47
- 48
- 49
- 50
- 51
- 52
- 53
- 54
- 55
- 56
- 57
- 58
- 59
3.5.4 启动类添加@MapperScan注解
@SpringBootApplication
@MapperScan("com.msb.hjycommunity.**.mapper")
public class HjyCommunityApplication {

    public static void main(String[] args) {
        SpringApplication.run(HjyCommunityApplication.class, args);
        System.out.println("合家云后台系统启动成功!");
    }

}
- 1
- 2
- 3
- 4
- 5
- 6
- 7
- 8
- 9
- 10
3.5.5 IDEA连接mysql数据库
3.6.1 连接步骤
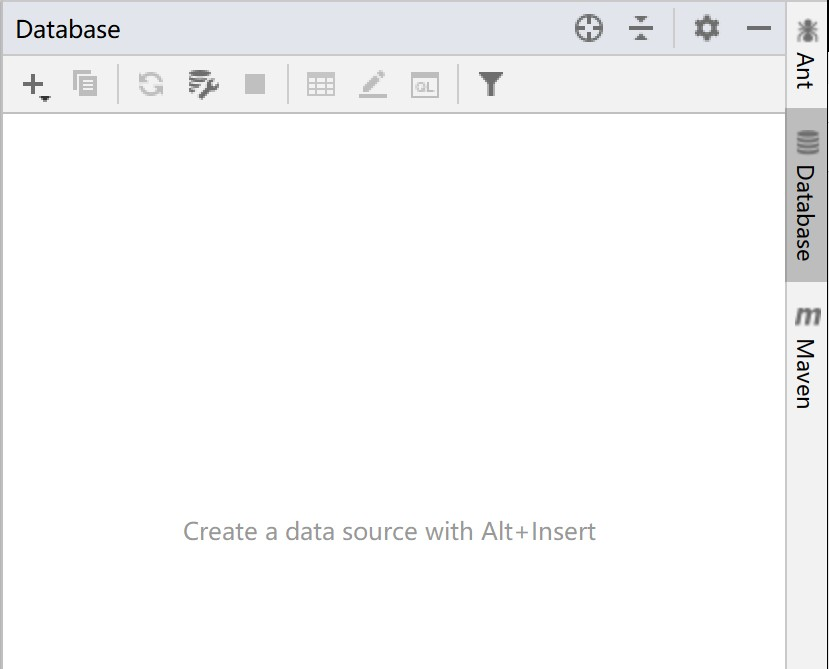
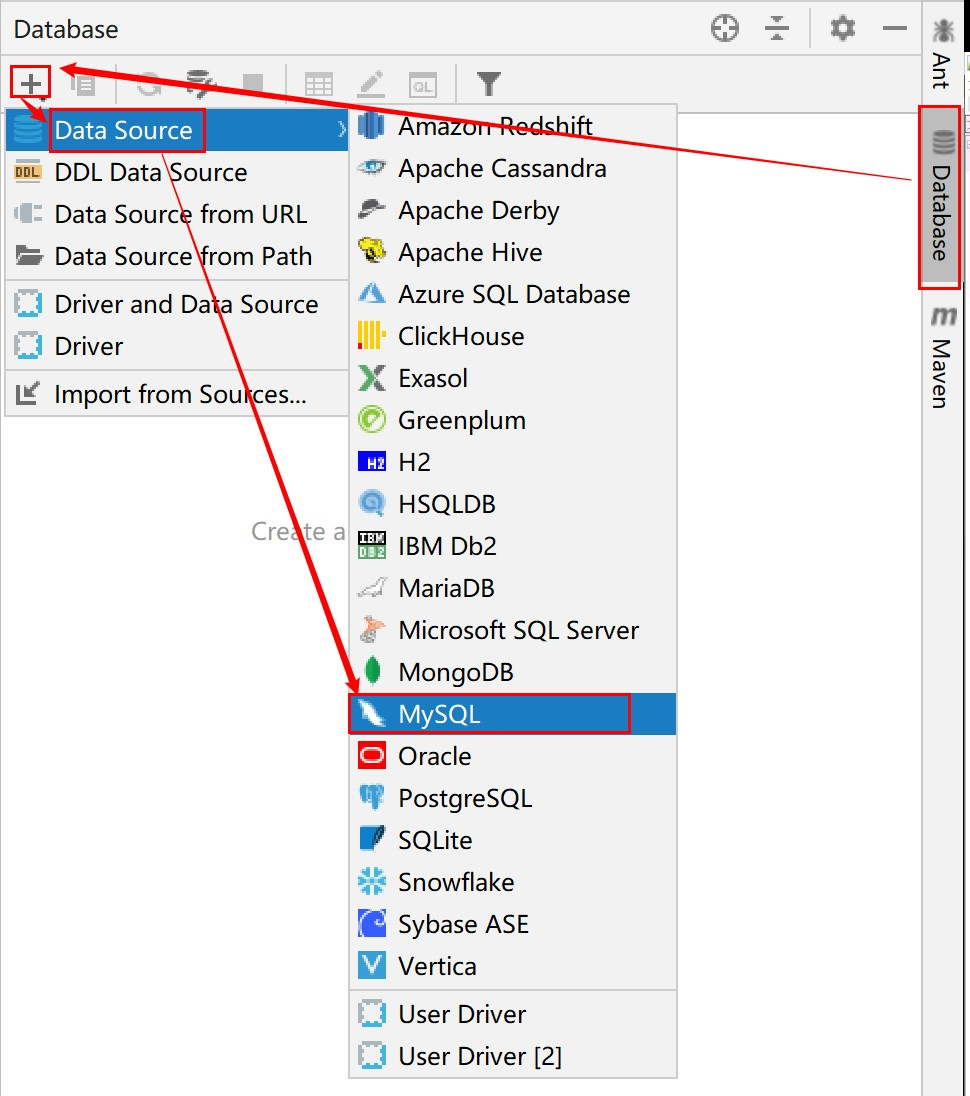
1、在idea 中选项栏中找到view
2、在选项栏下拉框中选择 Tool Windows
3、在Tool Windows 右侧小三角出现的列表中找到 Database

上述步骤完成之后,会出现如下界面
4、选择Database 下面的 + 号
5、选择Data Source
6、选择 MySQL
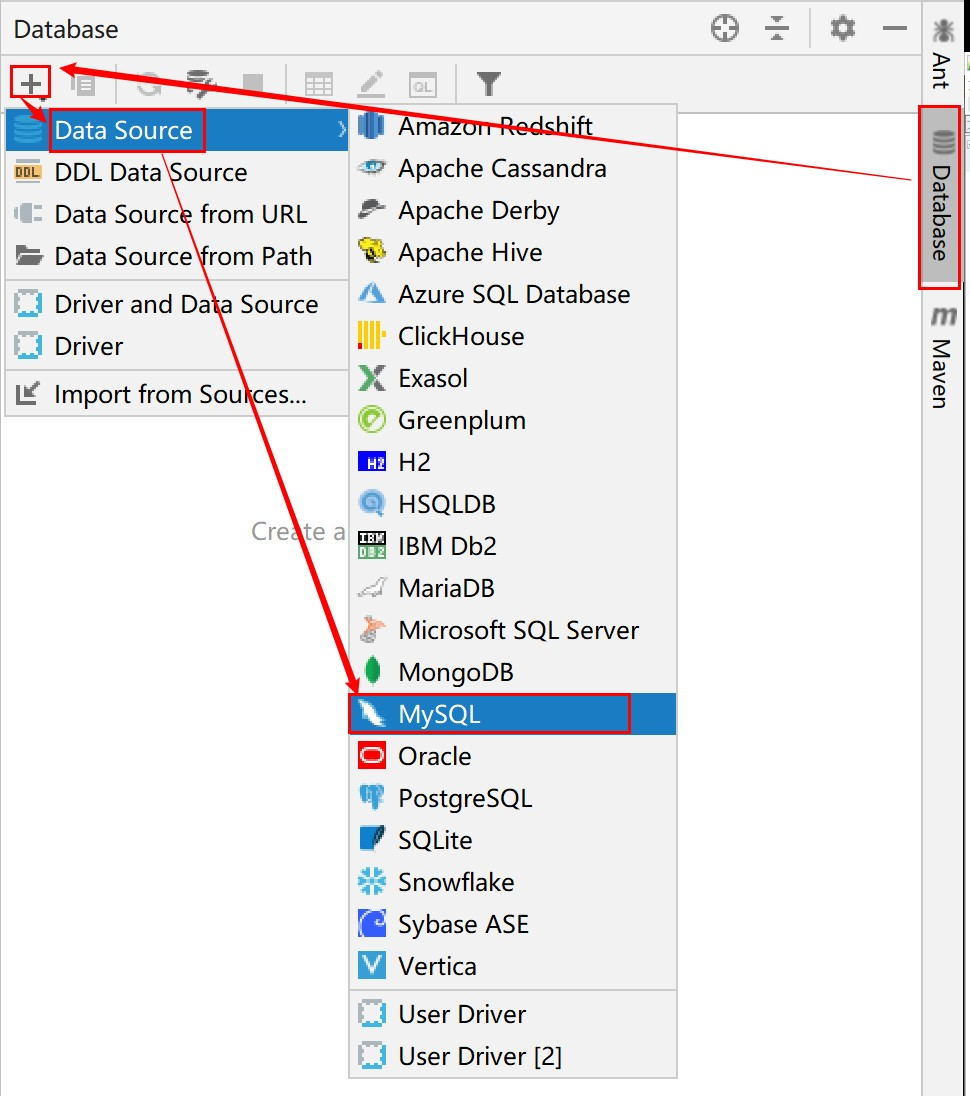
上述步骤完成之后,会出现如下界面
3.6.2 连接测试
1.点击Test Connection
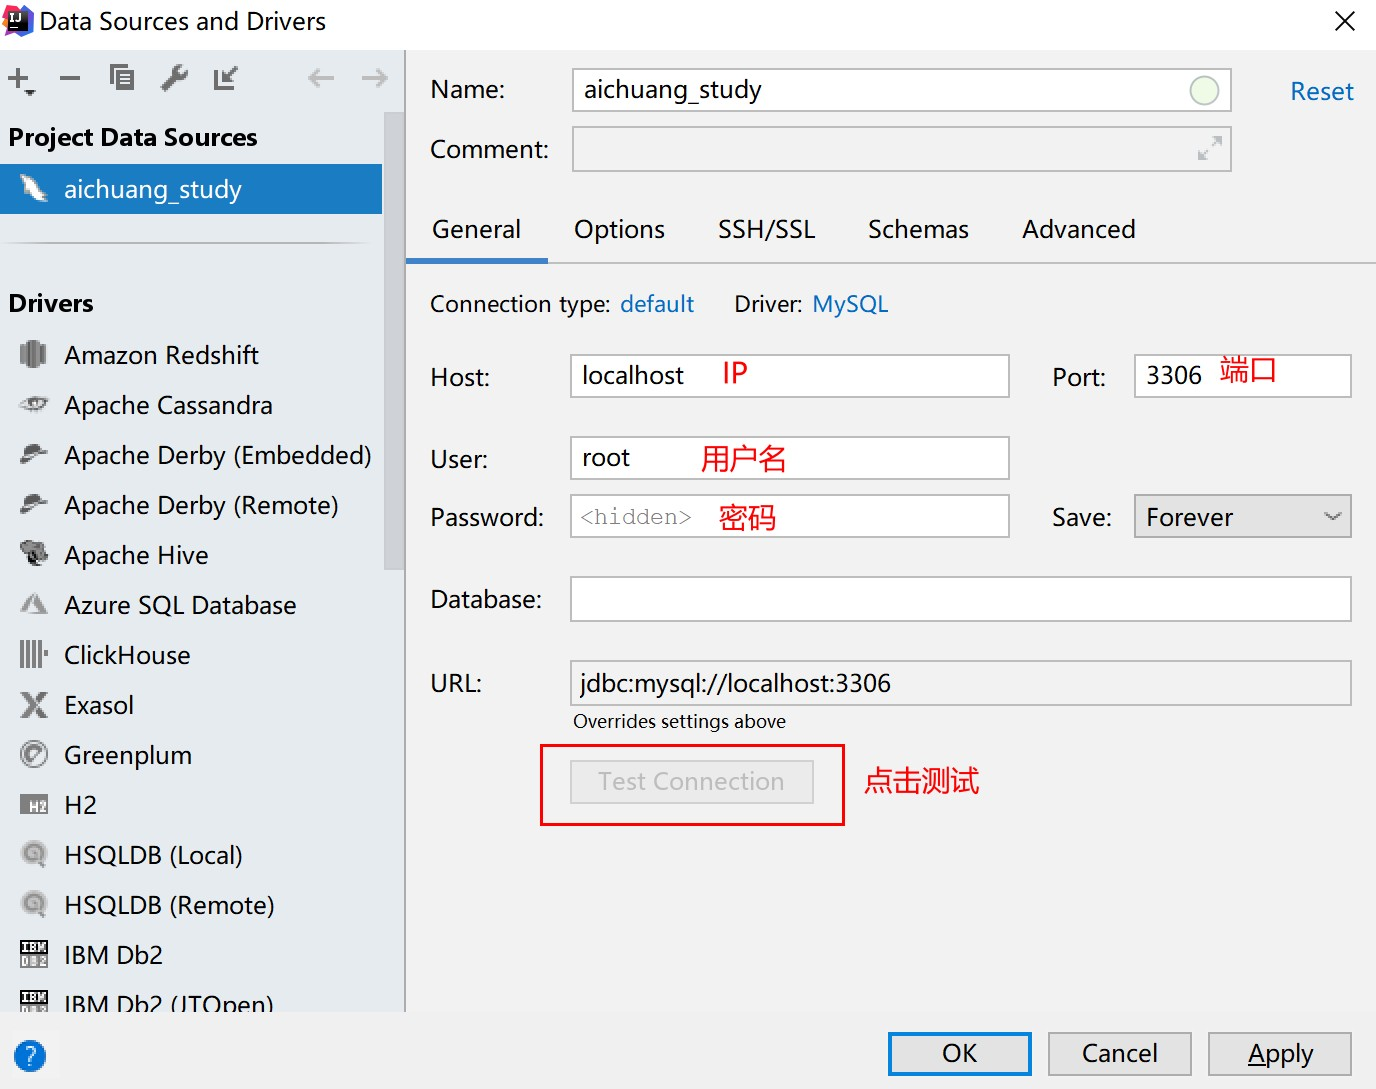
2.当然第一次进入这页面的时候,Test Connection 这个按钮是灰色的,因为没有响应的驱动文件,这时就需要下载驱动文件,具体如图所示
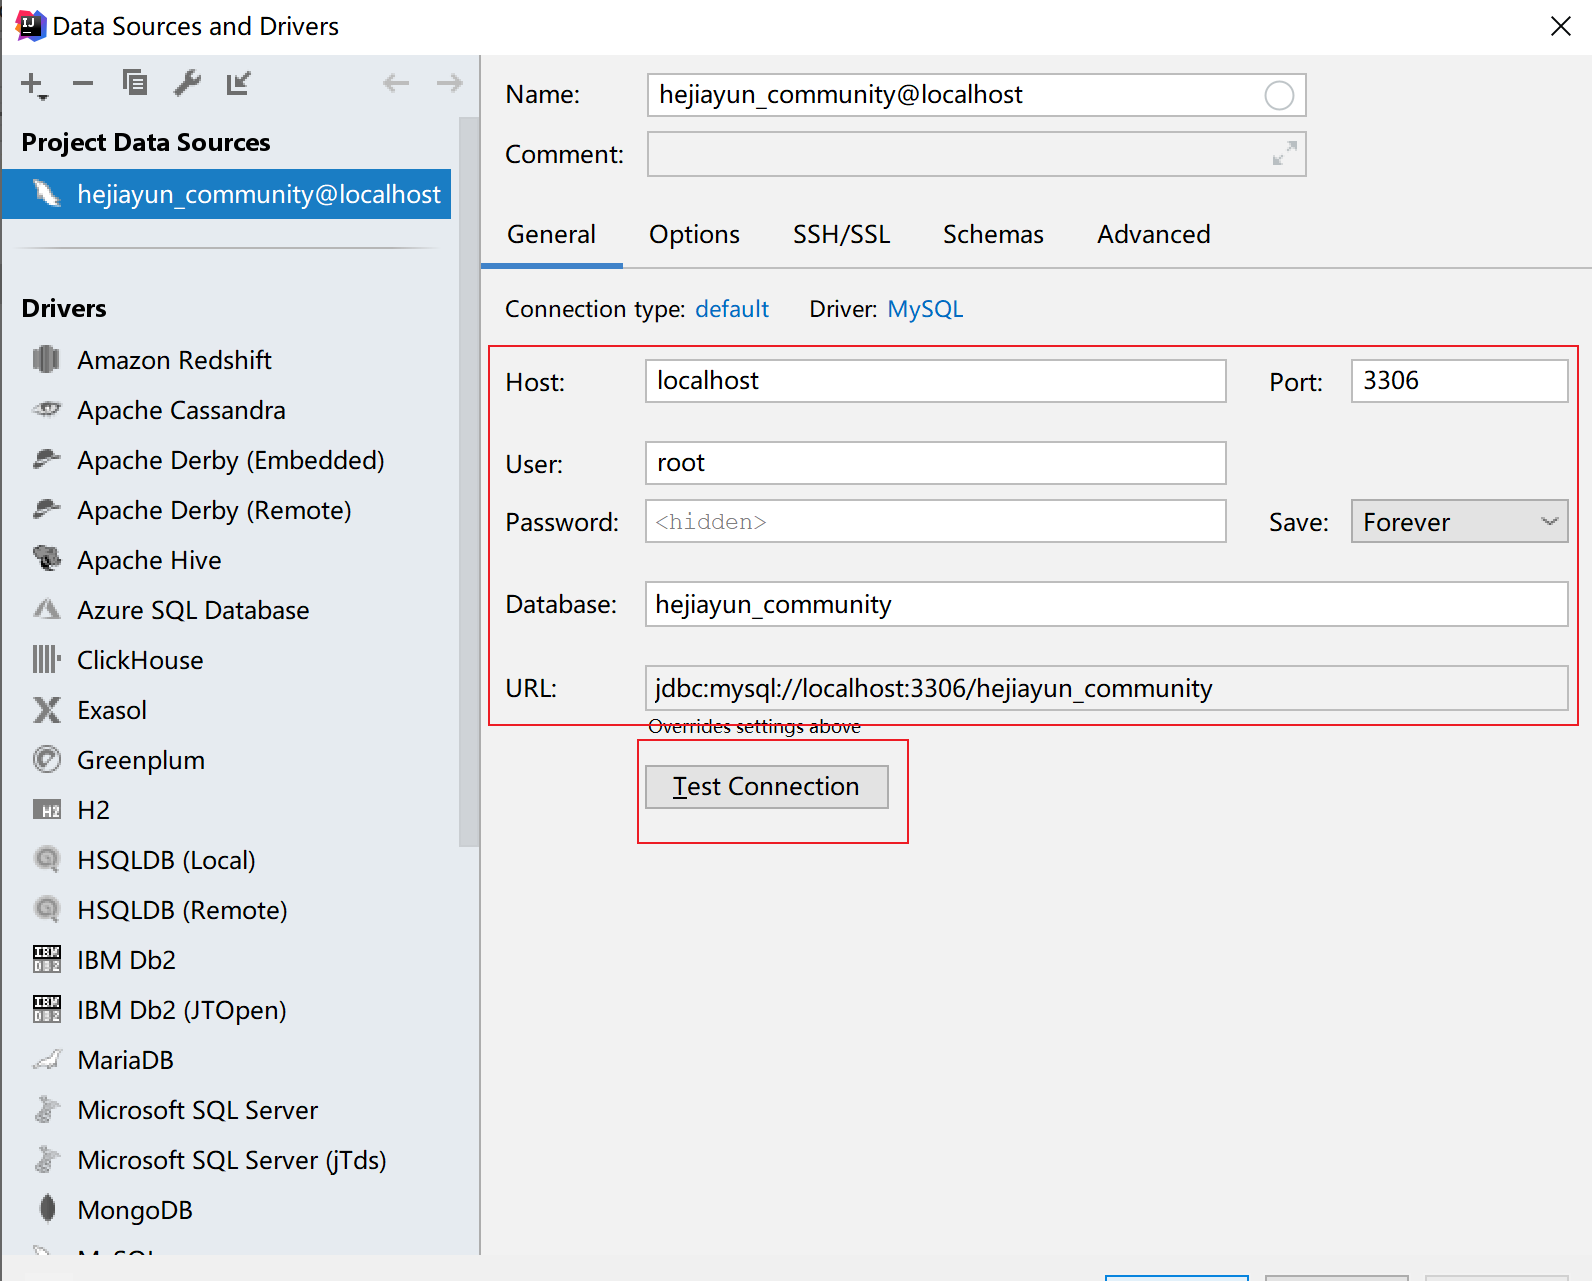
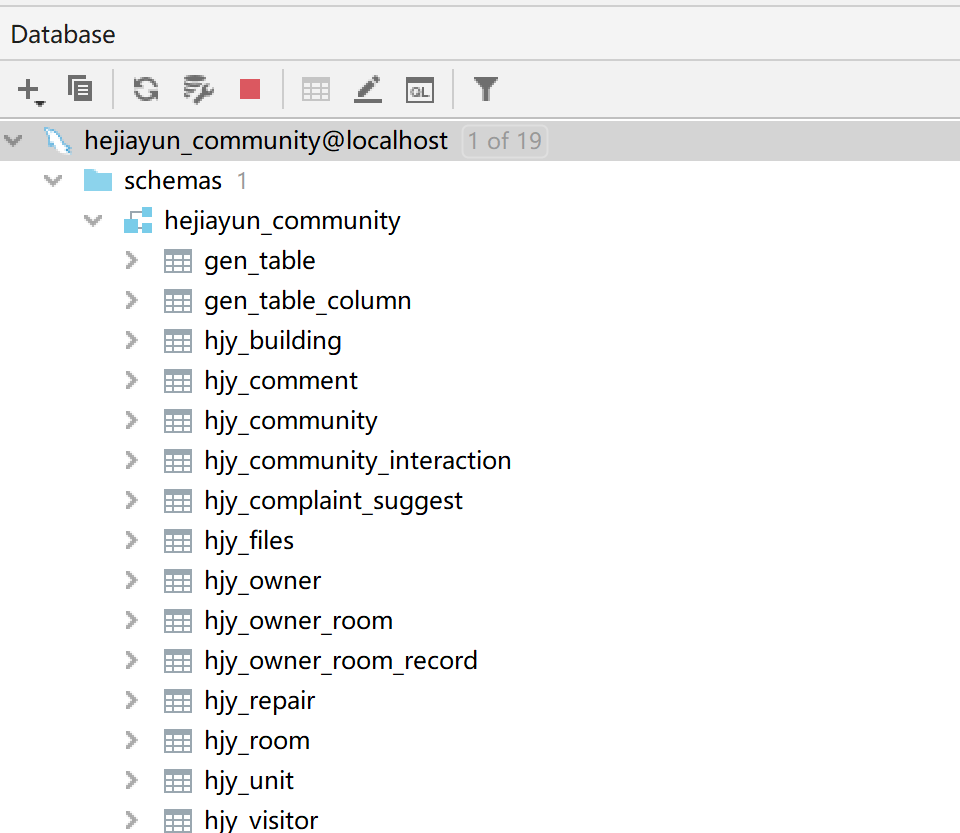
3.连接成功, 显示要使用的数据库,可以自主选择
3.6.3 时区问题解决
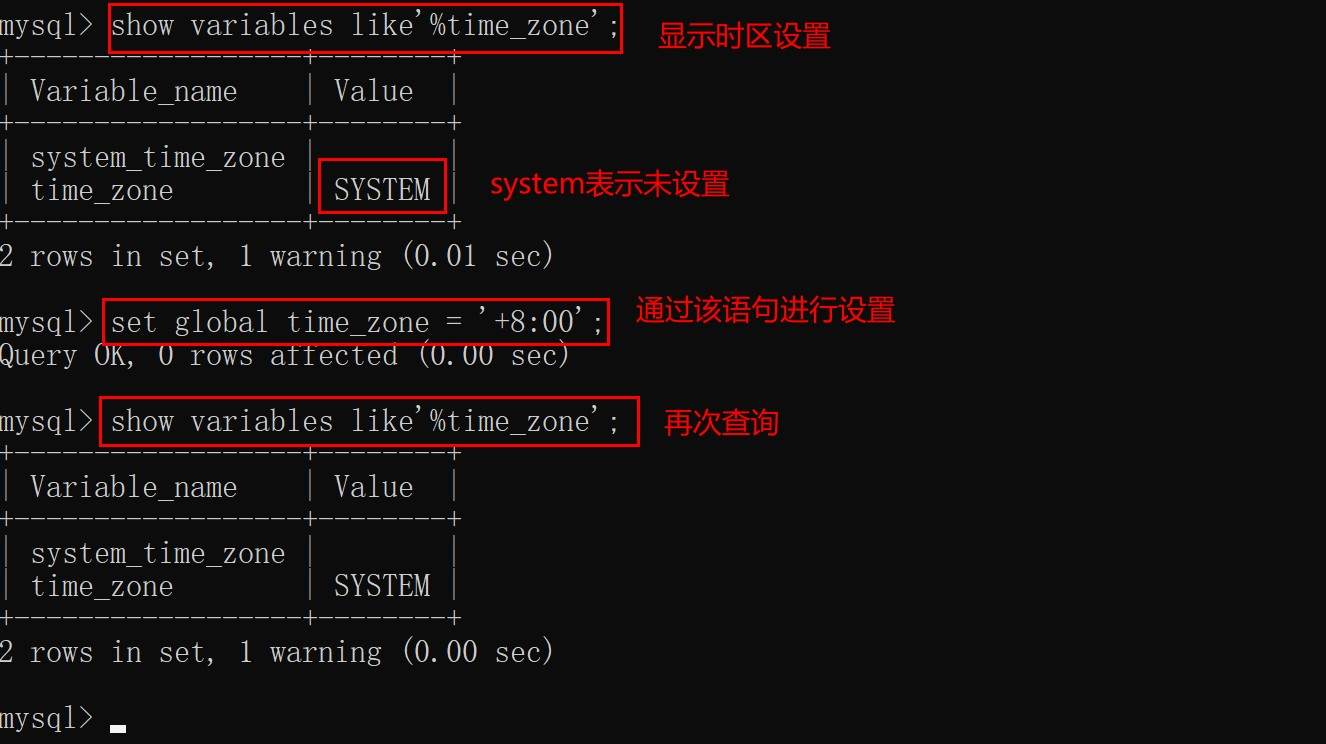
如果出现MySQL时区问题: Server returns invalid timezone. Go to ‘Advanced‘ tab and set ‘serverTimezon
1.输入 show variables like'%time_zone'; 回车,显示时区配置
	如果显示 SYSTEM 就是没有设置时区

2.输入 set global time_zone = '+8:00'; 回车
	显示Query OK, 0 rows affected (0.00 sec)就是设置成功了。

3.然后关闭cmd重新打开cmd重新连接数据库,连接成功后输入show variables like'%time_zone'; 回车
- 1
- 2
- 3
- 4
- 5
- 6
- 7
3.5.6 idea自动生成代码插件EasyCode
3.6.1 安装插件
- 在idea的plugins搜索
Easy Code

安装之后重启idea。
2.5.2 插件配置
-
打开
Setting -
选择
Other Setting–Easy Code,初始页可以设置代码作者,也可以导入导出模板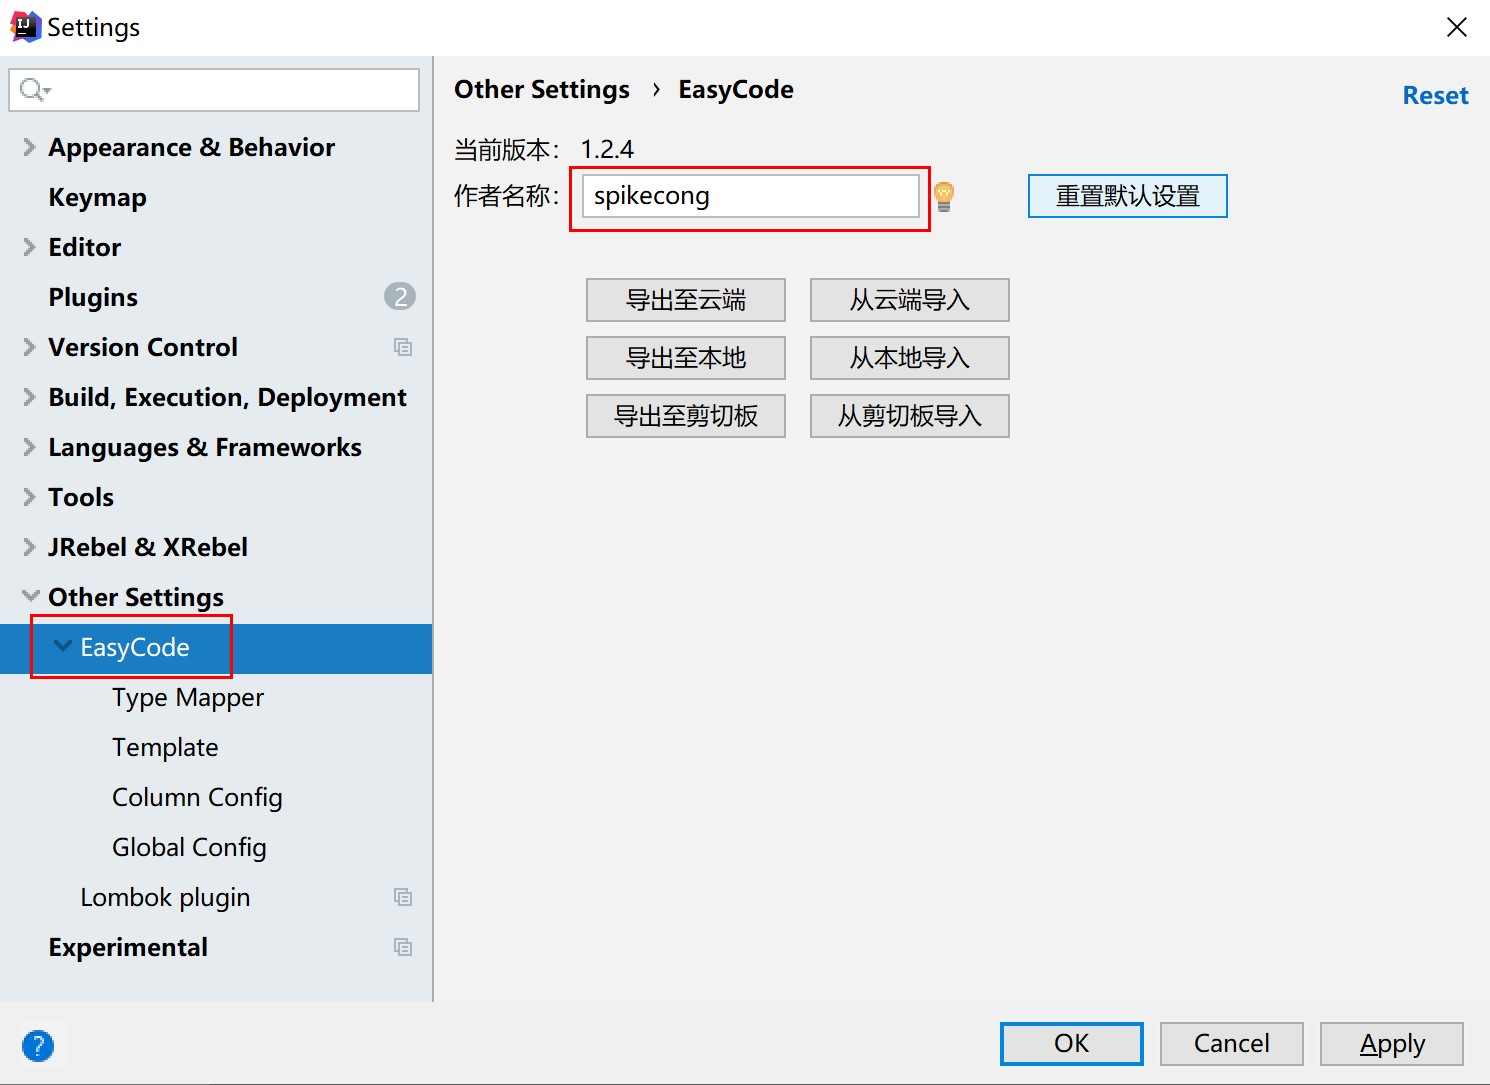
-
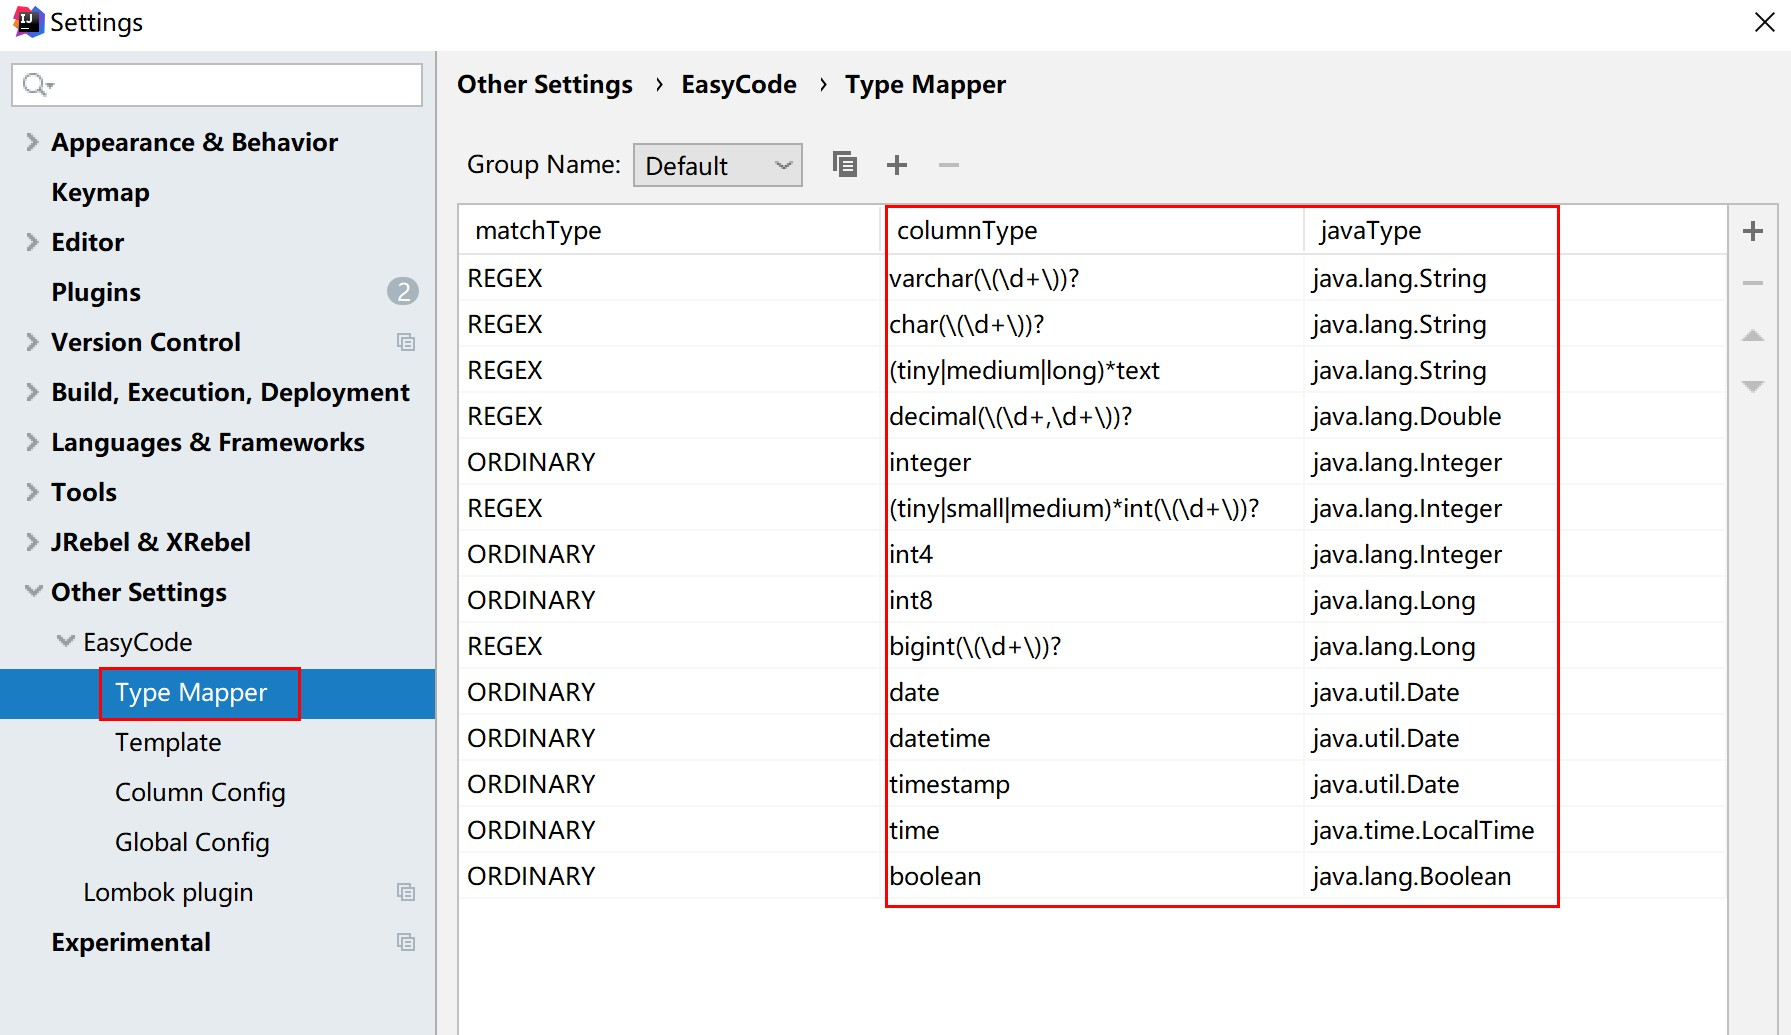
设置数据库数据类型对应java类型
-
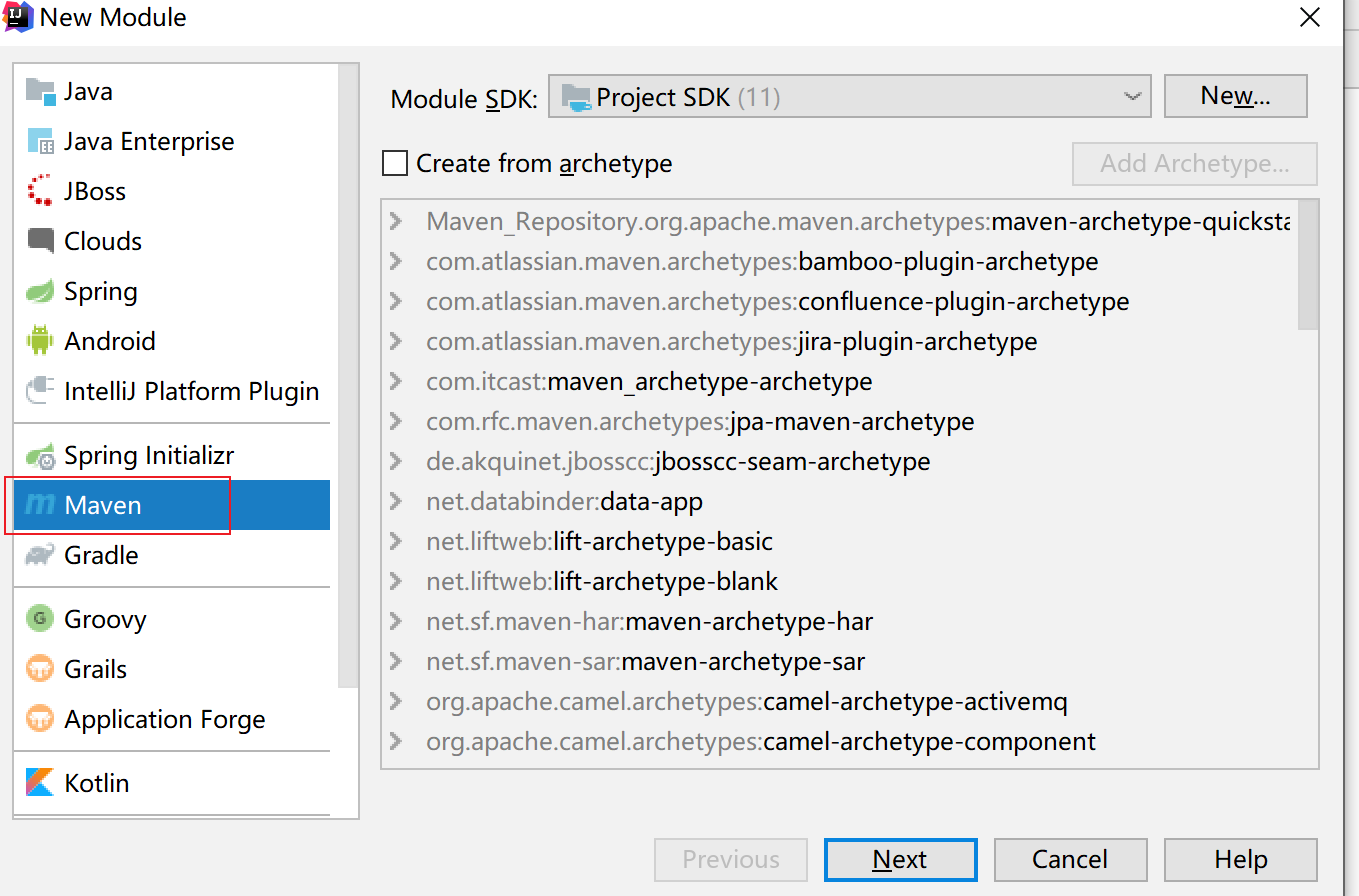
创建一个maven项目
-
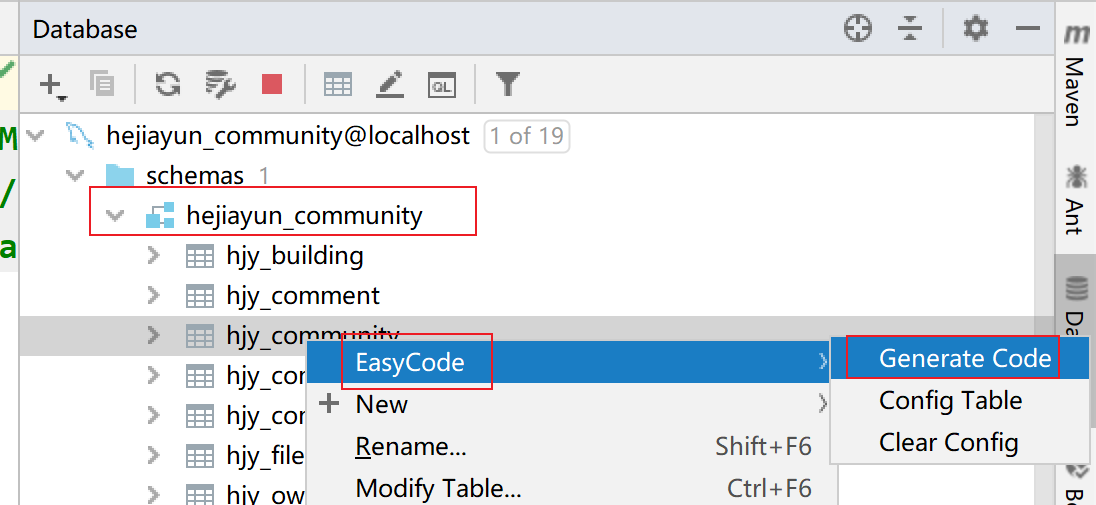
选中一张表,右键 选择EasyCode,生成代码
-
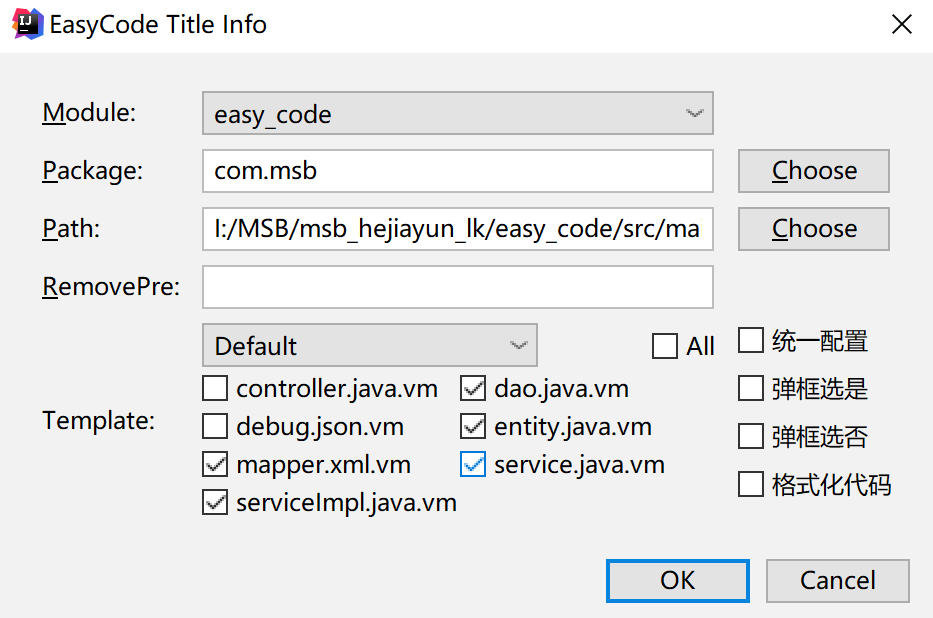
选择需要生成的代码类型,填写包名,点击确定
-
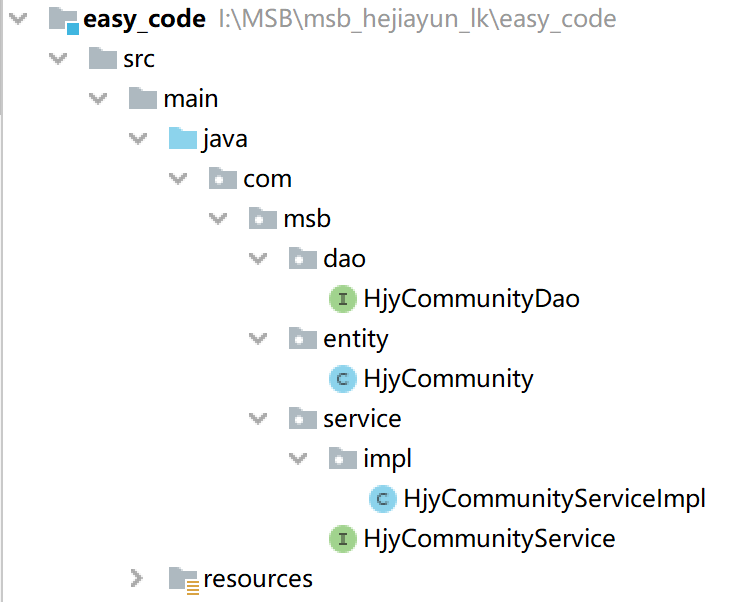
生成的代码
3.6 后端接口开发的统一规范
日常工作中,我们开发接口时,一般都会涉及到参数校验、异常处理、封装结果返回等处理。
如果每个后端开发在参数校验、异常处理等都是各写各的,没有统一处理的话,代码就不优雅,也不容易维护。所以,作为一名合格的后端开发工程师,我们需要统一校验参数,统一异常处理、统一结果返回,让代码更加规范、可读性更强、更容易维护。
3.6.1 接口统一响应对象返回
作为后端开发,我们项目的响应结果,需要统一标准的返回格式。一般一个标准的响应报文对象,有一下几个属性
- code :响应状态码
- message :响应结果描述
- data:返回的数据
1)响应状态码一般用枚举表示:
包结构: com.msb.hjycommunity.common.core.domain.ResultCode
/**
 * 响应状态码
 * @author spikeCong
 * @date 2023/2/28
 **/
public enum ResultCode {

    /**操作成功**/
    SUCCESS("200","操作成功"),

    /**操作失败**/
    ERROR("500","操作失败"),;

    /**
     * 自定义状态码
     **/
    private String code;


    /**自定义描述**/
    private String message;

    ResultCode(String code, String message) {
        this.code = code;
        this.message = message;
    }

    public String getCode() {
        return code;
    }

    public String getMessage() {
        return message;
    }
}
- 1
- 2
- 3
- 4
- 5
- 6
- 7
- 8
- 9
- 10
- 11
- 12
- 13
- 14
- 15
- 16
- 17
- 18
- 19
- 20
- 21
- 22
- 23
- 24
- 25
- 26
- 27
- 28
- 29
- 30
- 31
- 32
- 33
- 34
- 35
2)因为返回的数据类型不是确定的,我们可以使用泛型,如下:
包结构:com.msb.hjycommunity.common.core.domain.BaseResponse
/**
 * 响应结果封装对象
 * @author spikeCong
 * @date 2023/3/1
 **/
public class BaseResponse<T> implements Serializable {

    private static final long serialVersionUID = 1901152752394073986L;

    /**
     * 响应状态码
     */
    private String code;


    /**
     * 响应结果描述
     */
    private String message;

    /**
     * 返回的数据
     */
    private T data;


    /**
     * 成功返回
     * @param data
     * @return: com.msb.hjycommunity.common.core.domain.BaseResponse<T>
     */
    public static <T> BaseResponse<T> success(T data){

        BaseResponse<T> response = new BaseResponse<>();
        response.setCode(ResultCode.SUCCESS.getCode());
        response.setMessage(ResultCode.SUCCESS.getMessage());
        response.setData(data);

        return response;
    }


    /**
     * 失败返回
     * @param message
     * @return: com.msb.hjycommunity.common.core.domain.BaseResponse<T>
     */
    public static <T> BaseResponse<T> fail(String message){

        BaseResponse<T> response = new BaseResponse<>();
        response.setCode(ResultCode.ERROR.getCode());
        response.setMessage(message);

        return response;
    }

    /**
     * 失败返回
     * @param message
     * @return: com.msb.hjycommunity.common.core.domain.BaseResponse<T>
     */
    public static <T> BaseResponse<T> fail(String code, String message){

        BaseResponse<T> response = new BaseResponse<>();
        response.setCode(code);
        response.setMessage(message);

        return response;
    }


    public String getCode() {
        return code;
    }

    public void setCode(String code) {
        this.code = code;
    }

    public String getMessage() {
        return message;
    }

    public void setMessage(String message) {
        this.message = message;
    }

    public T getData() {
        return data;
    }

    public void setData(T data) {
        this.data = data;
    }
}
- 1
- 2
- 3
- 4
- 5
- 6
- 7
- 8
- 9
- 10
- 11
- 12
- 13
- 14
- 15
- 16
- 17
- 18
- 19
- 20
- 21
- 22
- 23
- 24
- 25
- 26
- 27
- 28
- 29
- 30
- 31
- 32
- 33
- 34
- 35
- 36
- 37
- 38
- 39
- 40
- 41
- 42
- 43
- 44
- 45
- 46
- 47
- 48
- 49
- 50
- 51
- 52
- 53
- 54
- 55
- 56
- 57
- 58
- 59
- 60
- 61
- 62
- 63
- 64
- 65
- 66
- 67
- 68
- 69
- 70
- 71
- 72
- 73
- 74
- 75
- 76
- 77
- 78
- 79
- 80
- 81
- 82
- 83
- 84
- 85
- 86
- 87
- 88
- 89
- 90
- 91
- 92
- 93
- 94
- 95
3)测试
- 创建user实体类
public class User {

    private String userId;

    private String username;

    public User() {

    }

    public User(String userId, String username) {
        this.userId = userId;
        this.username = username;
    }

    public String getUserId() {
        return userId;
    }

    public void setUserId(String userId) {
        this.userId = userId;
    }

    public String getUsername() {
        return username;
    }

    public void setUsername(String username) {
        this.username = username;
    }
}
- 1
- 2
- 3
- 4
- 5
- 6
- 7
- 8
- 9
- 10
- 11
- 12
- 13
- 14
- 15
- 16
- 17
- 18
- 19
- 20
- 21
- 22
- 23
- 24
- 25
- 26
- 27
- 28
- 29
- 30
- 31
- 创建UserController
@RestController
@RequestMapping("/user")
public class UserController {

    @RequestMapping("/queryUserById")
    public BaseResponse<User> queryUserById(String userId){

        if(userId != null){
           return BaseResponse.success(new User(userId,"spike"));
        }else{
            return BaseResponse.fail("查询用户信息失败!");
        }
    }
}
- 1
- 2
- 3
- 4
- 5
- 6
- 7
- 8
- 9
- 10
- 11
- 12
- 13
- 14
- 测试
http://localhost:8888/user/queryUserById?userId=1

//output
{
  "code": "200",
  "message": "操作成功",
  "data": {
    "userId": "1",
    "username": "tom"
  }
}

http://localhost:8888/user/queryUserById

//output
{
  "code": "500",
  "message": "查询用户信息失败!",
  "data": null
}
- 1
- 2
- 3
- 4
- 5
- 6
- 7
- 8
- 9
- 10
- 11
- 12
- 13
- 14
- 15
- 16
- 17
- 18
- 19
- 20
3.6.2 使用注解,统一参数校验
我们在实际的开发过程中经常会遇到需要对参数进行校验的情况,比如在需要用户输入手机号的时候他是不是真的输入了一个合法的手机号,在需要用户输入一个邮箱的时候他是不是真的输入了一个合法的邮箱,用户输入的内容是不是超出了长度限制等等。
当一个表单的数据较多的时候,单纯的数据校验代码就会占到很大的幅度,所以简化基础数据的校验可以省去我们很多的工作,让我们能更专注于功能的实现。
接下来我们一起看一下 springboot中参数校验(validation)的使用,首先导入依赖
<dependency>
    <groupId>org.springframework.boot</groupId>
    <artifactId>spring-boot-starter-validation</artifactId>
</dependency>
- 1
- 2
- 3
- 4
Validator可以非常方便的制定校验规则,并自动帮你完成校验。首先在入参里需要校验的字段加上注解,每个注解对应不同的校验规则,并可制定校验失败后的信息:
public class User {

    private String userId;

    @NotNull(message = "username 不能为空")
    private String username;
}
- 1
- 2
- 3
- 4
- 5
- 6
- 7
校验规则和错误提示信息配置完毕后,接下来只需要在接口需要校验的参数上加上@Validated注解,并添加BindResult参数即可方便完成验证:
@RestController
@RequestMapping("/user")
public class UserController {

    @RequestMapping("/addUser")
    public BaseResponse addUser(@Validated User user, BindingResult bindingResult){

        List<FieldError> fieldErrors = bindingResult.getFieldErrors();

        //如果参数校验失败,会将错误信息封装成对象组装在 BindingResult
        if(!fieldErrors.isEmpty()){
            return BaseResponse.fail(fieldErrors.get(0).getDefaultMessage());
        }

        return BaseResponse.success("OK");
    }
}
- 1
- 2
- 3
- 4
- 5
- 6
- 7
- 8
- 9
- 10
- 11
- 12
- 13
- 14
- 15
- 16
- 17
测试
http://localhost:8888/user/addUser?username="tom"

{
  "code": "500",
  "message": "userId 不能为空",
  "data": null
}

http://localhost:8888/user/addUser?username="tom"&userId=1

{
  "code": "200",
  "message": "操作成功",
  "data": "OK"
}
- 1
- 2
- 3
- 4
- 5
- 6
- 7
- 8
- 9
- 10
- 11
- 12
- 13
- 14
- 15
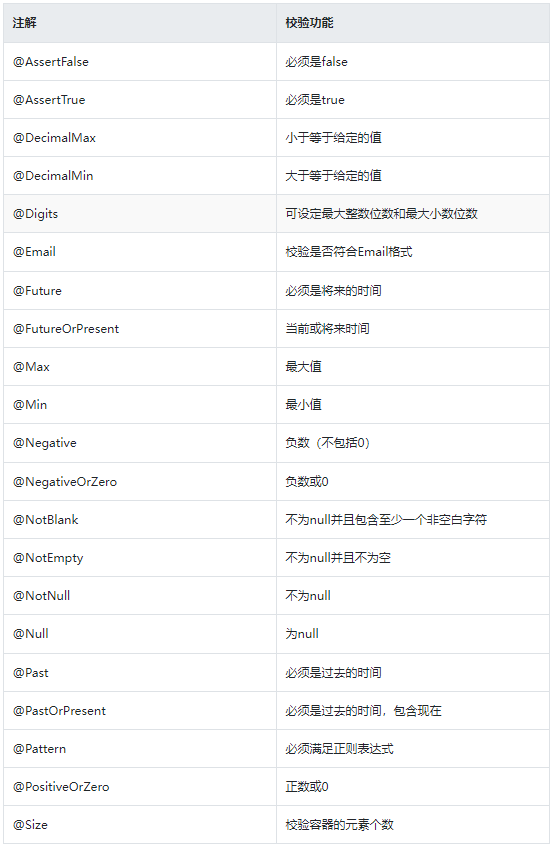
内置的校验注解有很多,罗列如下:
3.6.3 统一异常处理
日常开发中,我们一般都是自定义统一的异常类
- 自定义异常可以携带更多的信息。
- 项目开发中经常是很多人负责不同的模块,使用自定义异常可以统一了对外异常展示的方式。
- 自定义异常语义更加清晰明了,一看就知道是项目中手动抛出的异常。
自定义异常类, 所在包结构: com.msb.hjycommunity.common.core.exception.BaseException
/**
 * 基础异常
 * @author spikeCong
 * @date 2023/2/28
 **/
public class BaseException extends RuntimeException{


    /**
     * 错误码
     */
    private String code;


    /**
     * 错误消息
     */
    private String defaultMessage;

    public BaseException() {
    }

    public BaseException(String code, String defaultMessage) {
        this.code = code;
        this.defaultMessage = defaultMessage;
    }

    public String getCode() {
        return code;
    }

    public String getDefaultMessage() {
        return defaultMessage;
    }
}
- 1
- 2
- 3
- 4
- 5
- 6
- 7
- 8
- 9
- 10
- 11
- 12
- 13
- 14
- 15
- 16
- 17
- 18
- 19
- 20
- 21
- 22
- 23
- 24
- 25
- 26
- 27
- 28
- 29
- 30
- 31
- 32
- 33
- 34
- 35
在controller 层,我们来使用这个自定义异常:
@RequestMapping("/queryUser")
public BaseResponse queryUser(User user){

    //模拟查询失败抛出异常
    throw new BaseException("500","测试异常类!");
}
- 1
- 2
- 3
- 4
- 5
- 6
这块代码,没什么问题,但是如果在很多地方都抛出这个异常,我们处理起来就会比较麻烦。
这时我们可以借助注解@RestControllerAdvice,让代码更优雅。@RestControllerAdvice是一个应用于Controller层的切面注解,它一般配合@ExceptionHandler注解一起使用,作为项目的全局异常处理。示例代码如下:
/**
 * 全局异常处理器
 * @author spikeCong
 * @date 2023/2/28
 **/
@RestControllerAdvice
public class GlobalExceptionHandler {


}
- 1
- 2
- 3
- 4
- 5
- 6
- 7
- 8
- 9
- 10
我们有想要拦截的异常类型,比如想拦截BaseException类型,就新增一个方法,使用@ExceptionHandler注解修饰,并指定你想处理的异常类型,接着在方法内编写对该异常的操作逻辑,就完成了对该异常的全局处理!
@RestControllerAdvice
public class GlobalExceptionHandler {

    /**
     * 基础异常
     * @param e
     * @return: com.msb.hjycommunity.common.core.domain.BaseResponse
     */
    @ExceptionHandler(BaseException.class)
    @ResponseBody
    public BaseResponse baseExceptionHandler(BaseException e){

        return BaseResponse.fail(e.getDefaultMessage());
    }

}
- 1
- 2
- 3
- 4
- 5
- 6
- 7
- 8
- 9
- 10
- 11
- 12
- 13
- 14
- 15
- 16
测试
http://localhost:8888/hejiayun/user/queryUser

{
  "code": "500",
  "message": "测试异常类!",
  "data": null
}
- 1
- 2
- 3
- 4
- 5
- 6
- 7
3.6.4 总结
自此整个后端接口基本体系就构建完毕了
- 通过Validation 完成了方便的参数校验
- 通过全局异常处理 + 自定义异常完成了异常操作的规范
- 通过数据统一响应完成了响应数据的规范
- 多个方面组装非常优雅的完成了后端接口的协调,让开发人员有更多的经历注重业务逻辑代码,轻松构建后端接口。


