- 1QT day3
- 2python ‘float‘object is not iterable_typeerror: 'float' object is not iterable
- 3精心整理了30个Python数据分析项目,拿走就用!
- 4LuatOS-SOC接口文档(air780E)--crypto - 加解密和hash函数_lua sha256
- 5Linux如何查看系统时间_linux查看系统时间
- 6k8s中pod目录访问权限不足_k8s挂载目录权限设置为777
- 7《Java黑皮书基础篇第10版》 第7章【习题】_java语言程序设计基础篇第十版第七章答案
- 8使用阿里云服务器安装宝塔面板搭建网站教程(图文全流程)_宝塔搭建网站详细教程
- 92022力扣官方首发了这套1568页LeetCode算法刷题笔记(彩页版),真的无可挑剔,太强了_leetcode算法刷题笔记(彩页版)
- 10【独家源码】ssm健康定位打卡系统4i9mj计算机毕业设计问题的解决方案与方法
2023 年最新企业微信官方会话机器人开发详细教程(更新中)_企微机器人开发文档
赞
踩
目标是开发一个简易机器人,能接收消息并作出回复。
企业微信应用类型机器人
创建应用类型机器人支持接收消息和发送消息综合功能。
获取企业 ID 信息
企业信息页面链接地址:https://work.weixin.qq.com/wework_admin/frame#profile

创建企业微信机器人
后台应用管理页面链接地址:https://work.weixin.qq.com/wework_admin/frame#apps
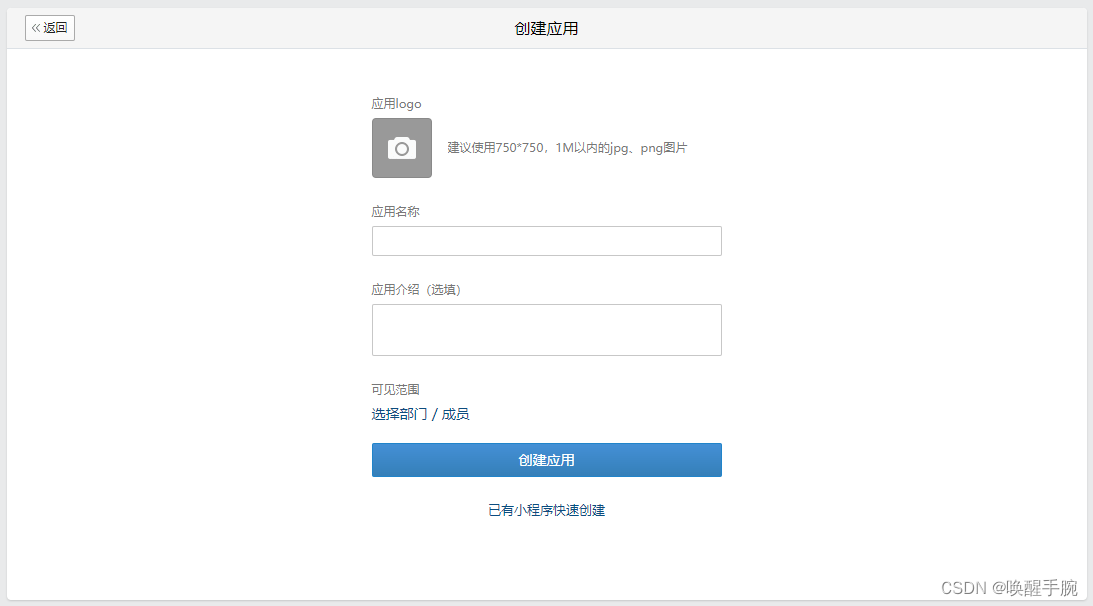
点击创建应用

填写配置机器人应用信息
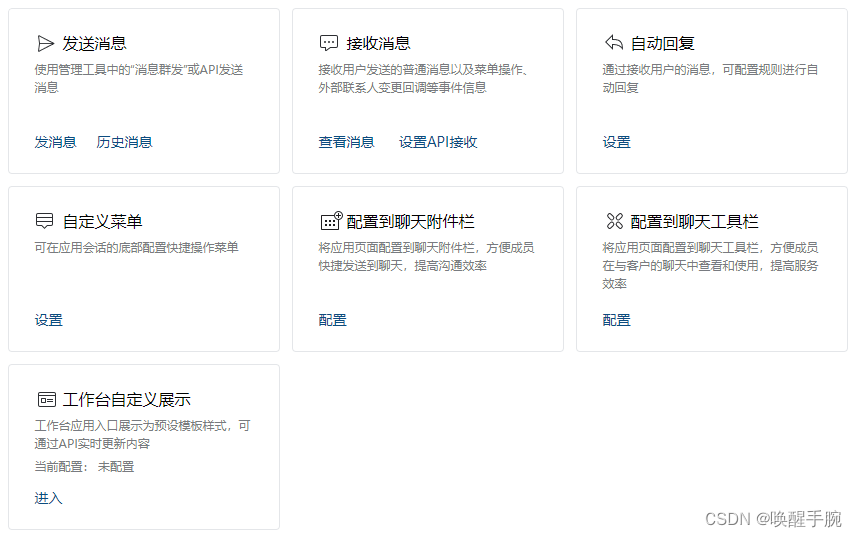
机器人功能配置
配置 .env 环境变量
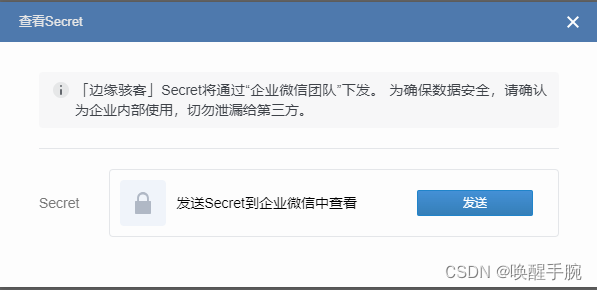
获取机器人应用 agentId 和 Secret 信息

发送 Secret 到企业微信查看详细 Secret
创建 .env 配置文件配置企业微信机器人应用的配置信息
corpId=【企业 ID】
corpSecret=【应用密钥】
- 1
- 2
获取 access_token
API 开发文档:https://developer.work.weixin.qq.com/resource/devtool
获取access_token是调用企业微信API接口的第一步,相当于创建了一个登录凭证,其它的业务API接口,都需要依赖于access_token来鉴权调用者身份。
因此开发者,在使用业务接口前,要明确access_token的颁发来源,使用正确的access_token。
请求方式: GET(HTTPS)
请求地址: https://qyapi.weixin.qq.com/cgi-bin/gettoken?corpid=ID&corpsecret=SECRET
- 1
- 2
权限说明
每个应用有独立的 secret,获取到的 access_token 只能本应用使用,所以每个应用的 access_token 应该分开来获取。

注意事项
开发者需要缓存access_token,用于后续接口的调用(注意:不能频繁调用gettoken接口,否则会受到频率拦截)。当access_token失效或过期时,需要重新获取。
access_token的有效期通过返回的expires_in来传达,正常情况下为7200秒(2小时),有效期内重复获取返回相同结果,过期后获取会返回新的access_token。
由于企业微信每个应用的access_token是彼此独立的,所以进行缓存时需要区分应用来进行存储。
access_token至少保留512字节的存储空间。
企业微信可能会出于运营需要,提前使access_token失效,开发者应实现access_token失效时重新获取的逻辑。
返回结果

实现代码展示
const axios = require("axios")
const fs = require('fs')
const { config } = require("dotenv")
config()

let corpid = process.env.corpid
let corpsecret = process.env.corpsecret

axios.get(`https://qyapi.weixin.qq.com/cgi-bin/gettoken?corpid=${corpid}&corpsecret=${corpsecret}`).then(async res => {
    if (res.data.errcode == 0) {
        fs.writeFileSync("access_token.txt", res.data.access_token)
    } else {
        console.log(res.data)
    }
})
- 1
- 2
- 3
- 4
- 5
- 6
- 7
- 8
- 9
- 10
- 11
- 12
- 13
- 14
- 15
发送应用消息
配置应用消息:https://developer.work.weixin.qq.com/document/path/90236
| 请求方式 | POST(HTTPS) |
| 请求地址 | https://qyapi.weixin.qq.com/cgi-bin/message/send?access_token=ACCESS_TOKEN |
机器人应用支持推送文本、图片、视频、文件、图文等类型。
配置 POST 请求参数

发送消息 sendmsg.js 配置
const request = require('request')
const fs = require('fs')
const axios = require('axios')
const { config } = require('dotenv')
config()

const corpId = process.env.corpId
const corpSecret = process.env.corpSecret
const agentId = parseInt(process.env.agentId)
const toUser = '@all'

const access_token = fs.readFileSync("access_token.txt").toString()
const sendMsgUrl = `https://qyapi.weixin.qq.com/cgi-bin/message/send?access_token=${access_token}`;


let axiosconfig = {
    headers: {
        "content-type": "application/json",
    }
}
let sendmsg = async (token, content) => {
    const requestData = {
        touser: toUser,
        msgtype: "text",
        agentid: agentId,
        safe: 0,
        text: {
            content: content
        }
    }
    await axios.post(sendMsgUrl, requestData, axiosconfig)
}

module.exports = {
    sendmsg,
}
- 1
- 2
- 3
- 4
- 5
- 6
- 7
- 8
- 9
- 10
- 11
- 12
- 13
- 14
- 15
- 16
- 17
- 18
- 19
- 20
- 21
- 22
- 23
- 24
- 25
- 26
- 27
- 28
- 29
- 30
- 31
- 32
- 33
- 34
- 35
- 36
接收消息服务器配置
为了能够让自建应用和企业微信进行双向通信,企业可以在应用的管理后台开启接收消息模式。开启接收消息模式的企业,需要提供可用的接收消息服务器URL(建议使用https)。
开启接收消息模式后,用户在应用里发送的消息会推送给企业后台。还可配置地理位置上报等事件消息,当事件触发时企业微信会把相应的数据推送到企业的后台。企业后台接收到消息后,可在回复该消息请求的响应包里带上新消息,企业微信会将该被动回复消息推送给用户。
配置消息服务器配置
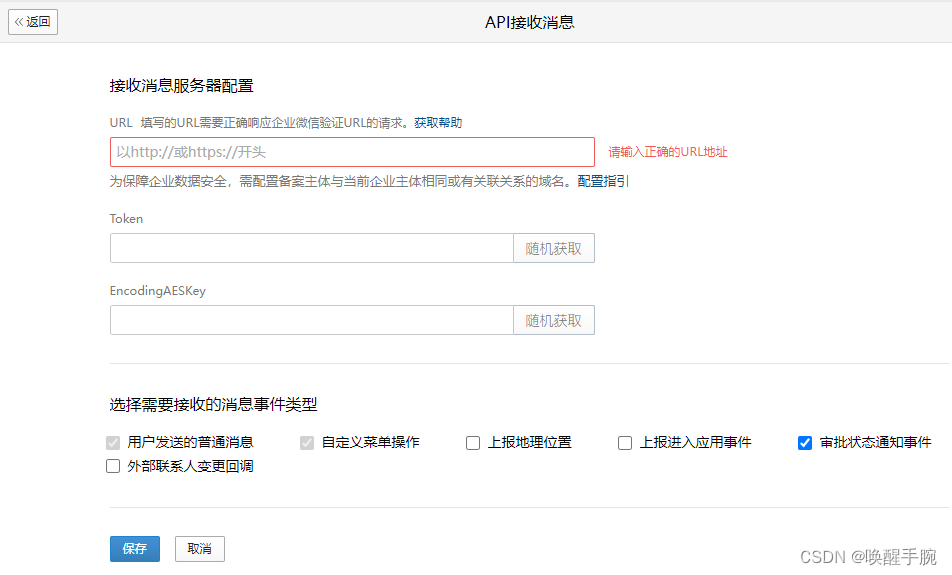
参数说明展示
| 参数 | 说明 |
|---|---|
| URL | 企业后台接收企业微信推送请求的访问协议和地址 支持 http 或 https 协议(为了提高安全性,建议使用https) |
| Token | 企业任意填写(用于生成签名) |
| EncodingAESKey | 用于消息体的加密 |
验证 URL 有效性
当点击“保存”提交以上信息时,企业微信会发送一条验证消息到填写的 URL,发送方法为 GET。企业的接收消息服务器接收到验证请求后,需要作出正确的响应才能通过 URL 验证。
注意:企业在获取请求时需要做Urldecode处理,否则可能会验证不成功。
假设接收消息地址设置为:http://api.3dept.com/,企业微信将向该地址发送如下验证请求:
请求方式:GET
请求地址:http://api.3dept.com/?msg_signature=ASDFQWEXZCVAQFASDFASDFSS×tamp=13500001234&nonce=123412323&echostr=ENCRYPT_STR
- 1
- 2
加密解决方案说明
企业微信在推送消息给企业时,会对消息内容做AES加密,以XML格式POST到企业应用的URL上。
企业在被动响应时,也需要对数据加密,以XML格式返回给企业微信。
加密库下载地址:https://developer.work.weixin.qq.com/document/path/90307
Node.Js @wecom/crypto 下载
npm install @wecom/crypto
- 1
验证 URL 函数 参数说明
int VerifyURL(const string &sMsgSignature, const string &sTimeStamp, const string &sNonce, const string &sEchoStr, string &sReplyEchoStr);
- 1

解密函数:签名校验 解密数据包;得到明文消息结构体。
int DecryptMsg(const string &sMsgSignature, const string &sTimeStamp, const string &sNonce, const string &sPostData, string &sMsg);
- 1

加密函数:加密明文消息结构体;生成签名;构造被动响应包。
int EncryptMsg(const string &sReplyMsg, const string &sTimeStamp, const string &sNonce, string &sEncryptMsg);
- 1

官方 WebHooK 机器人
一种基于 Webhook 协议自动推消息到群聊的方法。机器人推送的消息可以@群成员作为专门提醒,实现群聊消息的自动推送与提醒。
配置 webhook 机器人

定时发送任务
npm 下载 node-schedule 定时任务模块
npm install node-schedule
- 1
配置定时发送任务
const alarmWechat = require('./config.js')
const schedule = require('node-schedule')

const scheduleTask = ()=> {
    schedule.scheduleJob('30 * * * * *',() =>{
        console.log('scheduleCronstyle:' + new Date());
        alarmWechat.sendText('testmessage')
    });
}

scheduleTask();
- 1
- 2
- 3
- 4
- 5
- 6
- 7
- 8
- 9
- 10
- 11
WebHook 发送群消息
下载安装 axios 库
npm install axios
- 1
创建 .env 环境变量配置文件
HOOKURL=https://qyapi.weixin.qq.com/cgi-bin/webhook/send?key=【密钥】
- 1
具体实现
const axios = require("axios")
const { config } = require("dotenv")
config()

let data = {
    msgtype: "text",
    text: {
        content: "helloworld"
    }
}

axios.post(hookurl, data, {
    headers: {
        "Content-Type": "application/json"
    }
}).then(res => {
    console.log(res)
}).catch(err => {
    console.log(err)
})
- 1
- 2
- 3
- 4
- 5
- 6
- 7
- 8
- 9
- 10
- 11
- 12
- 13
- 14
- 15
- 16
- 17
- 18
- 19
- 20
企业微信应用调试工具
Nginx 反向代理服务器
ERROR: None
nginx: [emerg] host not found in upstream "wxbot.mslmxp.com" in /www/server/panel/vhost/nginx/proxy/wxbot.mslmsxp.com/4c6e119cbd5d2ec44c18f7f0f7068f1d_wxbot.mslmsxp.com.conf:6
nginx: configuration file /www/server/nginx/conf/nginx.conf test failed
- 1
- 2
- 3
原因分析:nginx配置语法上没有错误,只是 nginx 无法解析这个域名。
解决办法:把 DNS 添加到 根目录 /etc/hosts 文件。
/etc/hosts 文件是一个在 Linux 系统中用于映射 IP 地址和主机名的文本文件。它可以被用于在本地系统中实现简单的域名解析,而无需依赖于 DNS ( Domain Name System ) 服务器。
127.0.0.1 VM-4-16-centos VM-4-16-centos
127.0.0.1 localhost.localdomain localhost
127.0.0.1 localhost4.localdomain4 localhost4

::1 VM-4-16-centos VM-4-16-centos
::1 localhost.localdomain localhost
::1 localhost6.localdomain6 localhost6
- 1
- 2
- 3
- 4
- 5
- 6
- 7
域名免备案解决方案
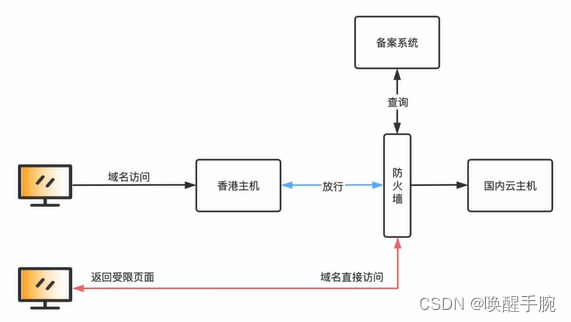
natapp 内网穿透
内网穿透工具 natapp 官方地址:https://natapp.cn/

购买隧道配置信息
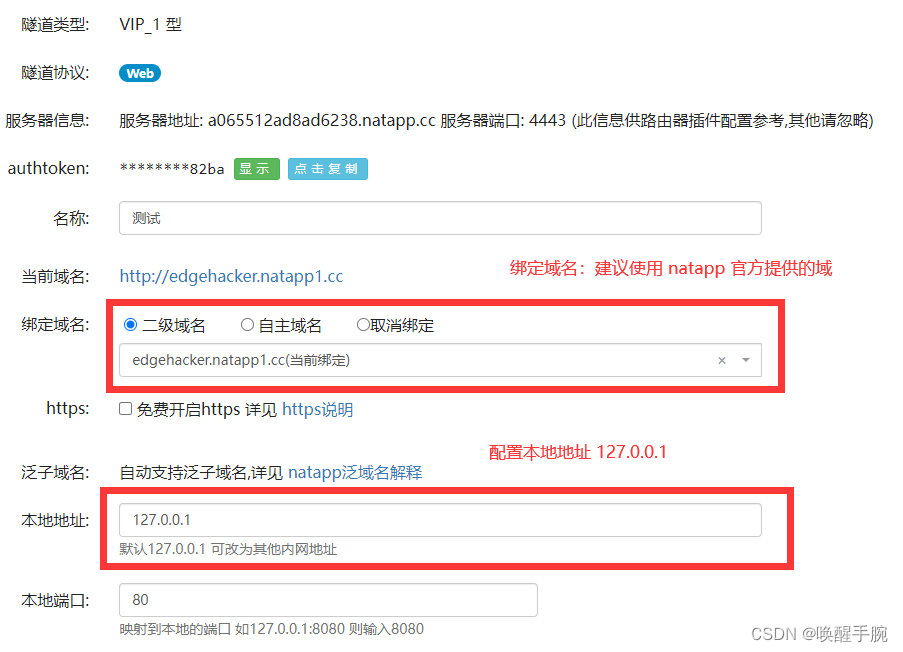
本地创建 config.ini 配置文件
[default]
authtoken=			# 对应一条隧道的authtoken
clienttoken=                    # 对应客户端的clienttoken,将会忽略authtoken,若无请留空,
log=none                        # log 日志文件,可指定本地文件, none=不做记录,stdout=直接屏幕输出 ,默认为none
loglevel=ERROR                  # 日志等级 DEBUG, INFO, WARNING, ERROR 默认为 DEBUG
http_proxy=                     # 代理设置 如 http://10.123.10.10:3128 非代理上网用户请务必留空
- 1
- 2
- 3
- 4
- 5
- 6
本地 natapp.exe 和 config.ini 放在同目录

启动内网穿透
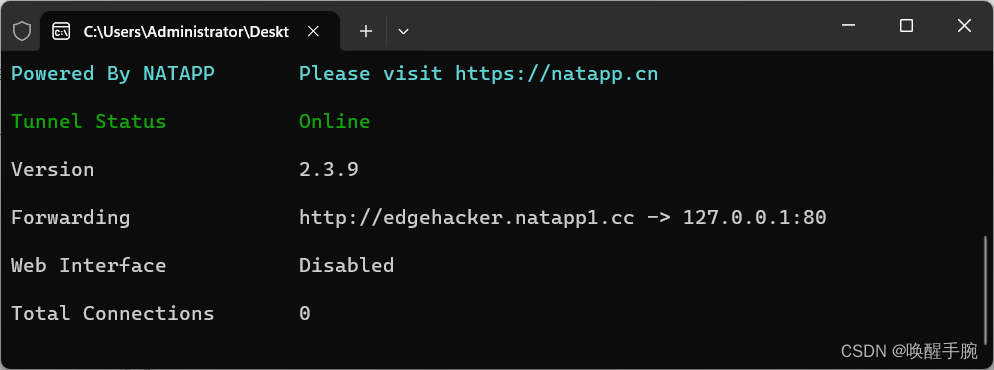
企业微信内网穿透工具
内网穿透工具文档链接地址:https://developer.work.weixin.qq.com/devtool/introduce?id=40600
开发者在应用的开发测试阶段,应用服务通常是部署在开发环境,在有数据回调的开发场景下,企业微信的回调数据无法直接请求到开发环境的服务。内网穿透工具可以帮助开发者将应用开发调试过程中的回调请求,穿透到本地的开发环境。
内网调试关闭
企业微信针对该应用的指令回调和数据回调,将正常回调到填写的【指令回调URL】和 【数据回调URL】上。
内网调试开启
将忽略在应用【回调配置】填写的 【数据回调URL】和【指令回调URL】,该应用的指令回调和数据回调,将通过安全通道请求到内网穿透工具上,然后工具把这些回调的数据转发到本地服务指定的端口与路由。
下载工具
内网穿透工具是一个可以直接运行的二进制工具,开发者可以根据系统的类型,选择下载对应的二进制压缩包。工具地址:https://dldir1.qq.com/wework/wwopen/developer/wecom-tunnel/win64/tunnel.exe.gz


