
- 1数字化智慧农场管理系统软件开发
- 2一起看 I/O | Android 性能相关最新动态
- 3sklearn-机器学习笔记_warnings.warn(("the least populated class in y has
- 4C#中HttpWebRequest的用法_c# httpwebrequest
- 5[Kaldi]中CMVN处理过程
- 6Android-Nexus 搭建自己的 Maven 仓库 & Gradle 上传依赖包_android 导入库版本号-snapshot
- 7win10taskkill无法终止进程_Win10专业版系统关闭全部无响应进程的方法
- 8linux下USB驱动_hub_port_status
- 9WPF内嵌CEFSharp控件与JS交互_wpf cefsharp 网页 交互
- 10解析Spark Executor内幕,详解CoarseGrainedExecutorBackend
apisix 初体验_apisix dashboard
赞
踩
前言
APISIX 是一个微服务API网关,具有高性能、可扩展性等优点。它基于 nginx(openresty)和 Lua 实现功能,借鉴了Kong的思路,将Kong底层的关系型数据库(Postgres)替换成了NoSQL型的 etcd,这使得 APISIX 相较于 Kong 在性能上有了很大提升,在启用各类插件的情况下,Apache APISIX 的性能据说是 Kong 的 10 倍,极具吸引力。
且相较于 Kong 来说,源码更为简洁,二次开发难度更低,但是相对的,开源时间较短,在插件功能完备性上不如Kong,比如缺少关于灰度相关的插件,但是其已纳入Apache 基金会孵化,社区也较为活跃,后期的发展空间较为可观。
和传统的API网关相比,APISIX 和 Kong 一样也是通过插件的形式来提供负载均衡、日记记录、身份鉴权、流量控制等功能。
一、参考资料
https://apisix.apache.org/zh/docs/apisix/installation-guide/#%E5%AE%89%E8%A3%85-etcd
https://apisix.apache.org/zh/docs/apisix/installation-guide/
https://www.bookstack.cn/read/apisix-3.0-zh/3a3ad75e1267bfce.md
http://www.lxiaoyu.com/p/77104
二、安装
本文安装环境为centos7 rpm安装方式 apisix2.5
1.安装依赖
- etcdepel
http://dl.fedoraproject.org/pub/epel/epel-release-latest-7.noarch.rpmrpm -ivh epel-release-latest-7.noarch.rpm - OpenResty源
yum install yum-utils
yum-config-manager --add-repo https://openresty.org/package/centos/openresty.repo
yum install -y openresty
- 1
- 2
- 3
- etcd 3.4.15
etcd 版本取决于apisix版本
https://github.com/etcd-io/etcd/releases/download/v3.4.15/etcd-v3.4.15-linux-arm64.tar.gz
tar -xvf etcd-v3.4.15-linux-amd64.tar.gz &&
    cd etcd-v3.4.15-linux-amd64 &&
    sudo cp -a etcd etcdctl /usr/bin/
- 1
- 2
- 3
启动etcd etcd & 端口2379
2.安装apisix 2.5
yum install -y https://github.com/apache/apisix/releases/download/2.5/apisix-2.5-0.x86_64.rpm
apisix version
apisix start
- 1
- 2
- 3
apisix 是基于nginx,所以此处启动后会启动nginx进程,当执行apisix stop时,nginx进程不会被杀死,此时重启后会出现一些问题,最好停止后直接杀死nginx进程后重启 kill -9 $(ps aux | grep 'nginx' | grep -v grep | tr -s ' '| cut -d ' ' -f 2)
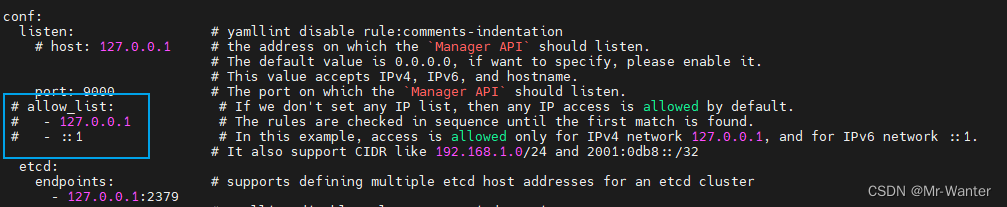
配置:设置允许访问ip
cd /usr/local/apisix/conf
vi config-default.yaml
- 1
- 2

- 安装地址 /usr/local/apisix
- 端口 8090
3.apisix dashboard
3.1. 安装
yum install -y https://github.com/apache/apisix-dashboard/releases/download/v2.6/apisix-dashboard-2.6-0.x86_64.rpm
- 1
3.2 配置conf
cd /usr/local/apisix/dashboard/conf
vi conf.yaml
- 1
- 2
释掉allow_list
3.3 启动验证
启动nohup manager-api -p /usr/local/apisix/dashboard/ &
在浏览器输入http://hostip:9000,默认登录用户密码均为admin
3.4 启动脚本(未测试)
if [[ $1  == "start" ]];then
        nohup manager-api -p /usr/local/apisix/dashboard/ >> /tmp/apisix-dashboard.log 2>&1 &
        systemctl start etcd
elif [[ $1 == "kill" ]];then
        systemctl stop etcd
        ps -ef | grep "/usr/local/apisix/dashboard/" | grep manager-api | awk '{print $2}' | xargs kill -9
        ps -ef | egrep "dashboard|etcd"
fi
ps -eo etime,pid,command | egrep "dashboard|etcd" | grep -v grep
- 1
- 2
- 3
- 4
- 5
- 6
- 7
- 8
- 9
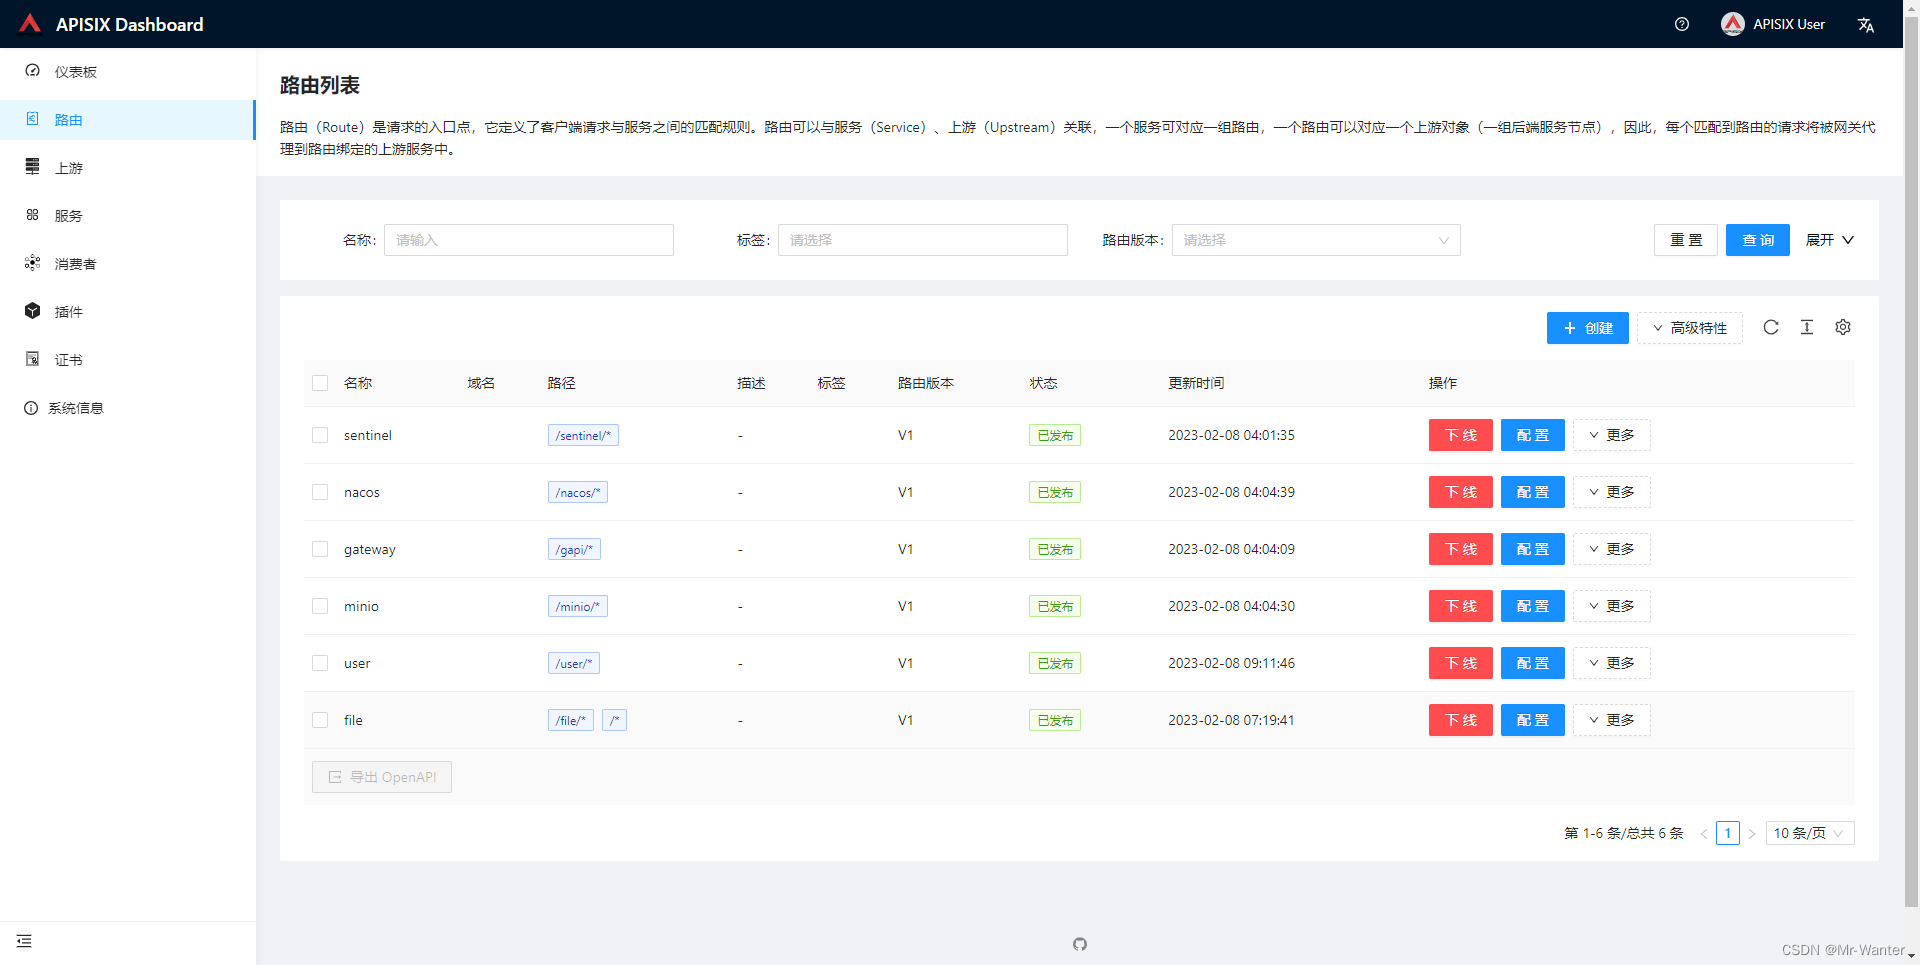
三、小试牛刀
以nacos和minio配置为例,直接用dashboard配置
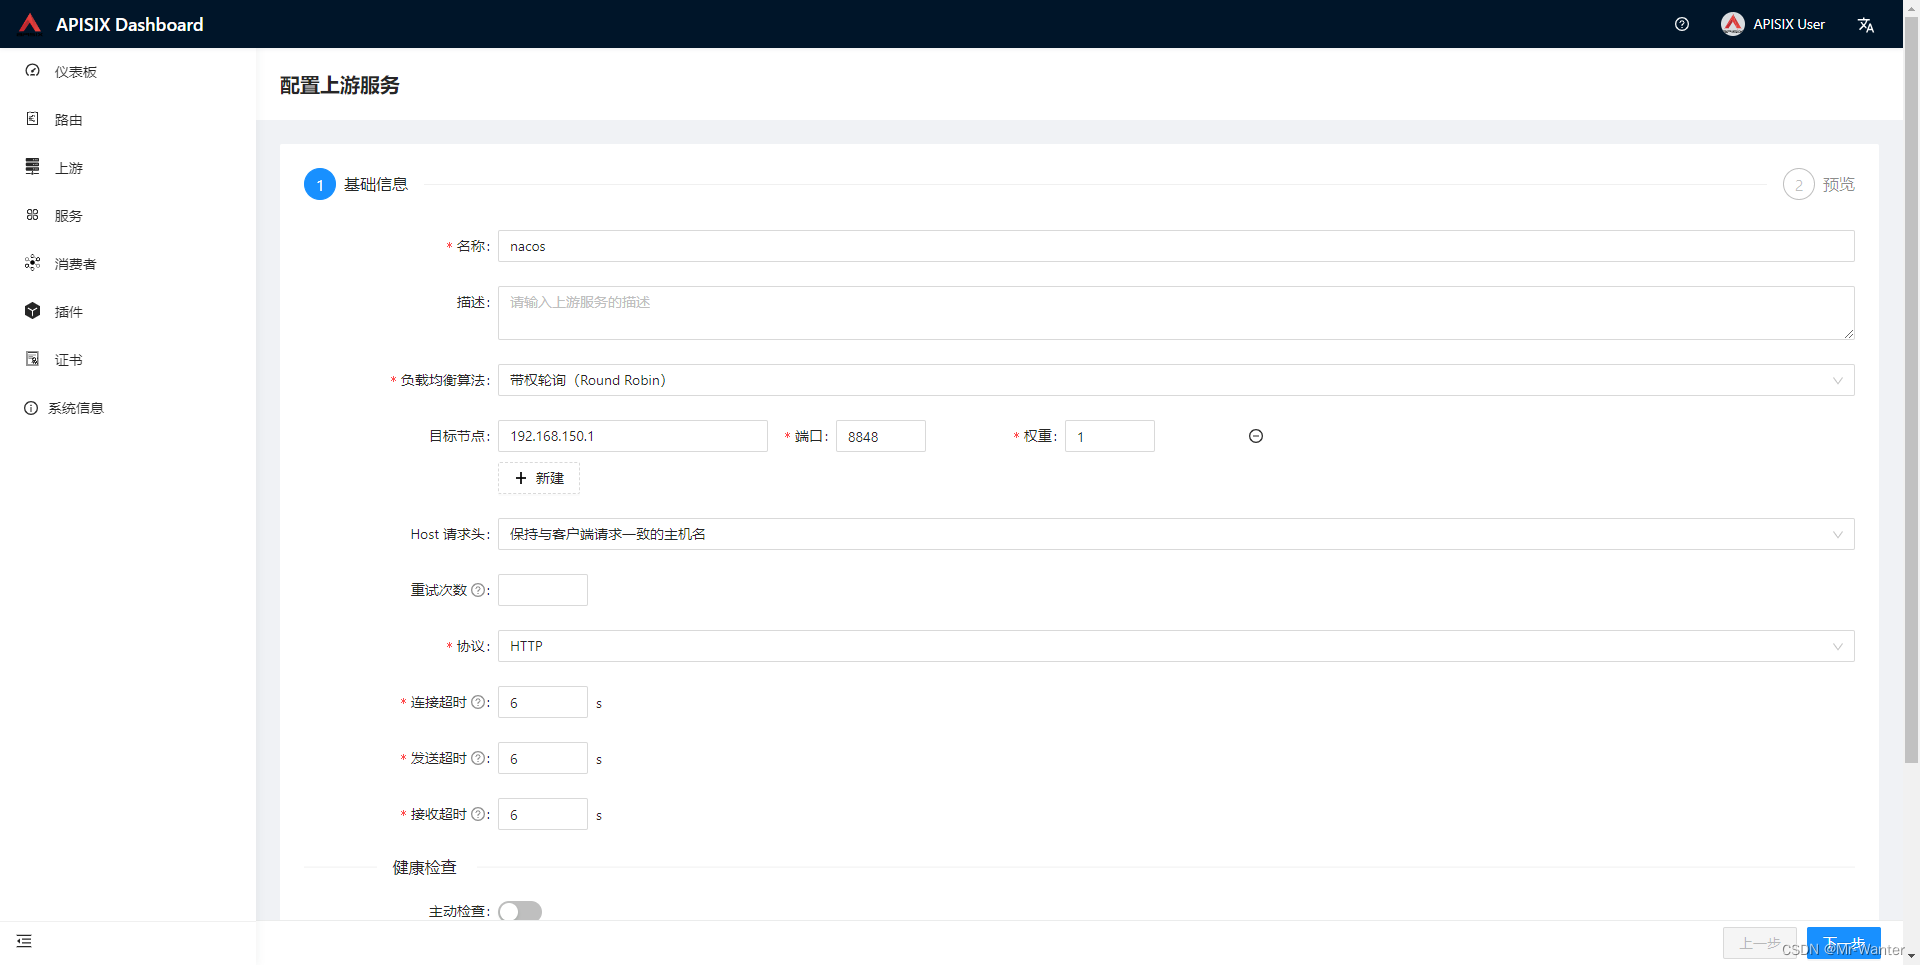
3.1 上游(upstream)
可以理解为nginx的upstream
这里配置一下nacos和user服务(省略),核心就是ip 端口
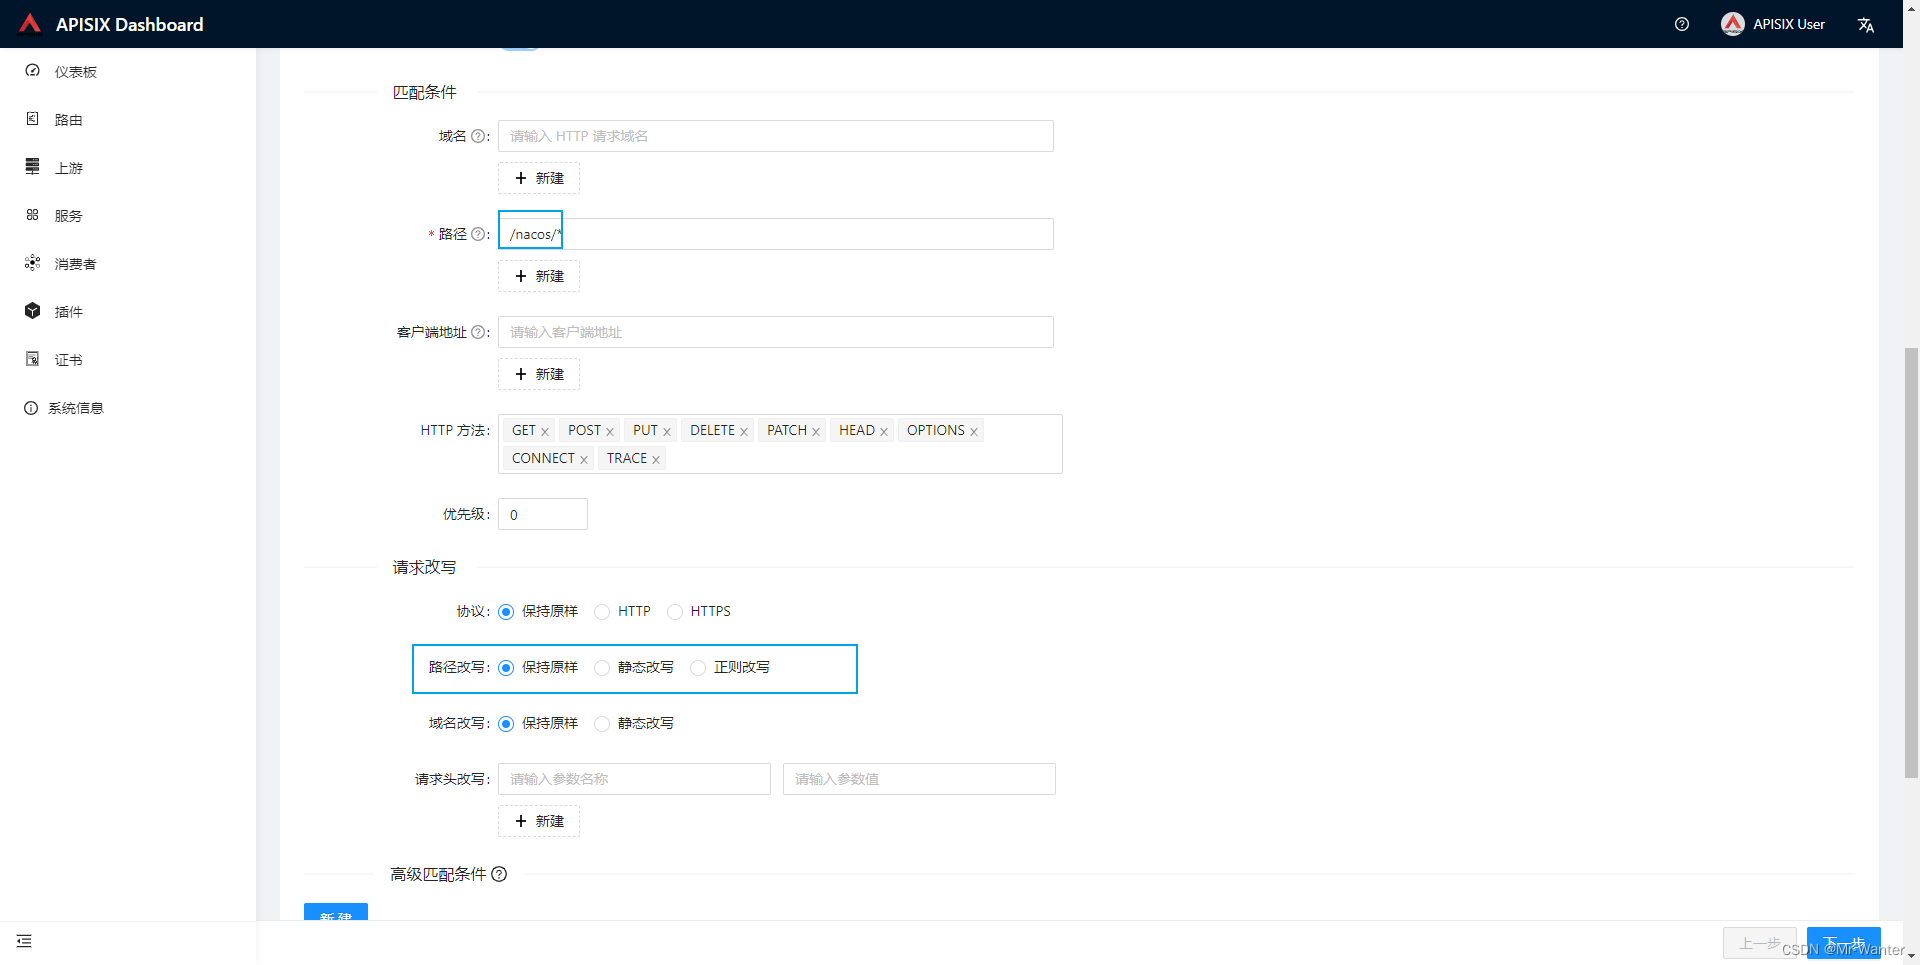
3.2 路由(route)
核心在路径和请求改写
- 路径配置:/nacos/*
- 路径改写:保持原样
效果:访问http://ip:9080/nacos/ 即可访问客户端,最后的/不要省略
分析:http://ip:9080/nacos/* 等于 upstream中配置的 http://192.168.150.1:8848/nacos
和nginx对比,这里的代理前缀因为路径改写保持原样,所以代理后会自动将路径保持原样进行访问,那么如果代理的地址和路径配置不一致怎么办?我们来配置一个user服务,代理user服务的swagger,原访问地址 http://localhost:8092/doc.html
- 路径配置:/user/*
- 路径改写:正则改写
- 匹配正则表达式:^/user(/|$)(.*)
- 转发路径模板:/$2
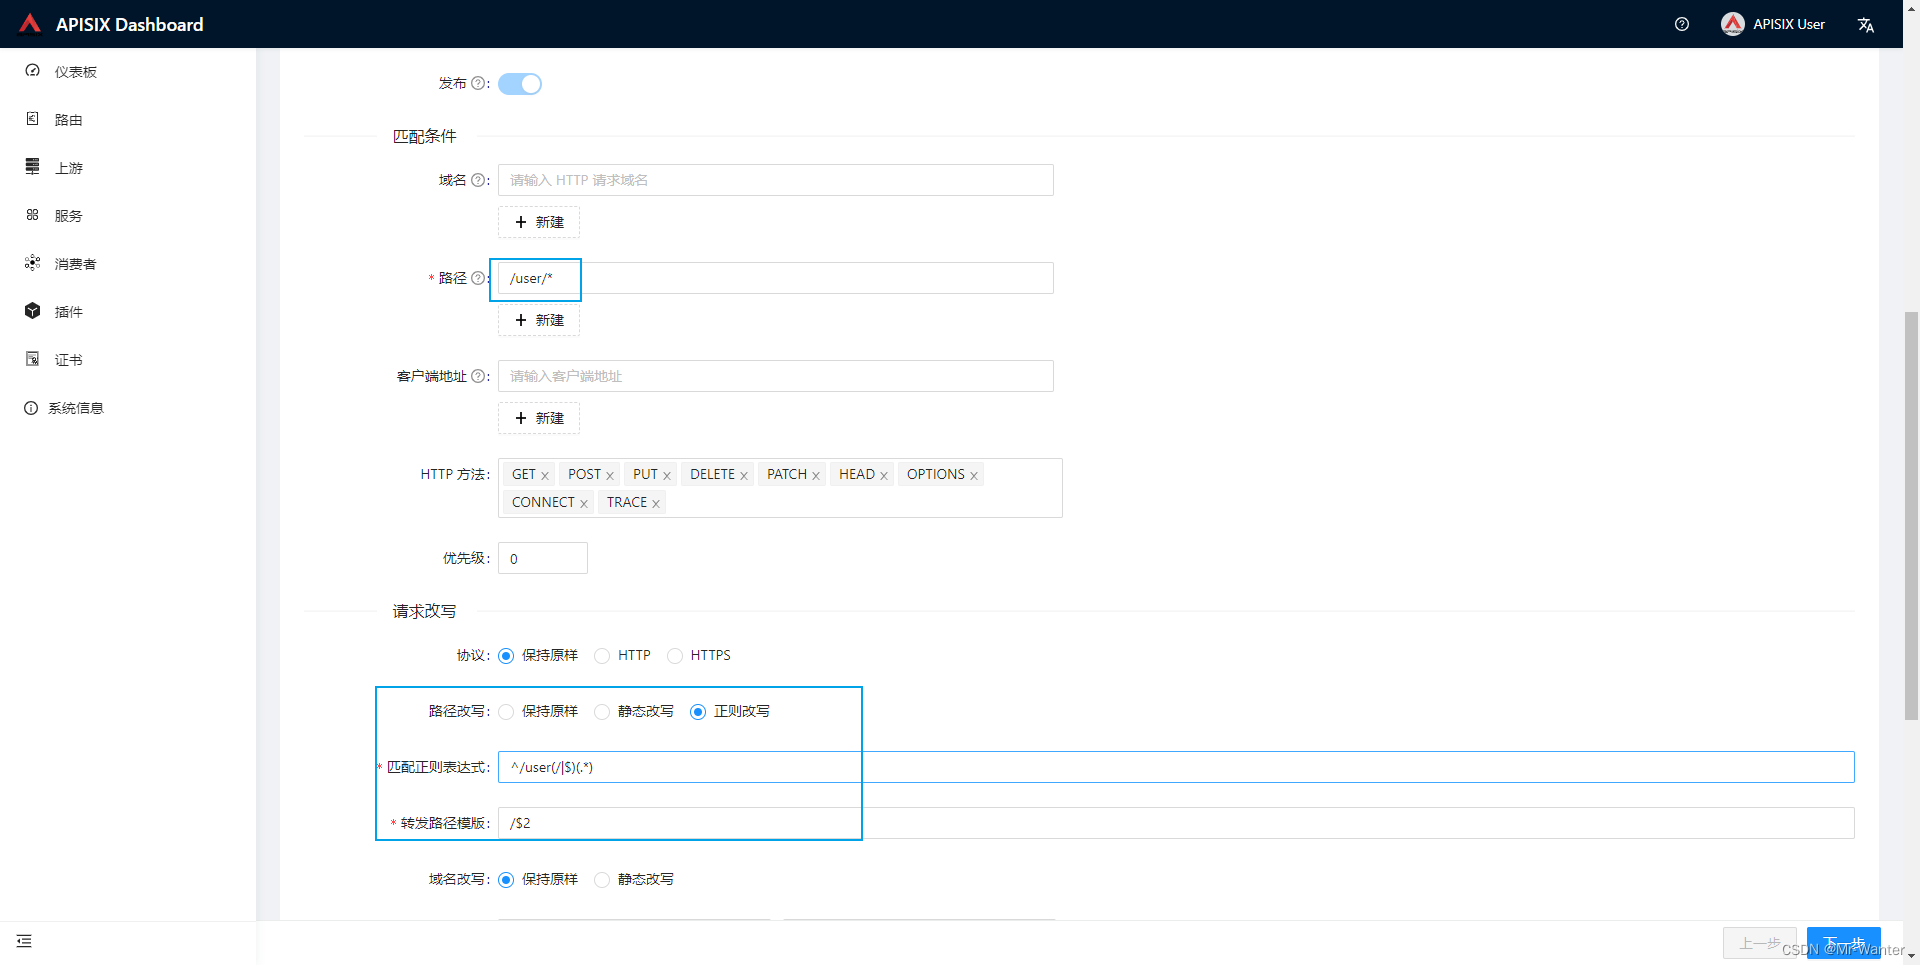
效果:访问http://ip:9080/user/doc.html
分析:正则改写覆盖了/user前缀 http://ip:9080/user/doc.html 等于 http://127.0.0.1:8092/doc.html
四、遇到的问题
- 配置user服务访问F12发现 webjars 无法访问
配置了lim-count 为1 那么此时访问的所有请求都算作一次,而加载doc.html时会请求多个/user路径下的请求,此时除了第一个请求,其他请求都会被拦截。关闭lim-count插件即可。 - 代理kkfileview 预览pdf插件,所有图片都加载失败
F12 图片加载的都是根路径,此时代理的路径配置是file,所以无法代理到file,在路径配置上再添加一个路径/*


