- 1新手蓝桥杯如何训练?(附带题库)
- 2大数据深度学习:基于Tensorflow深度学习卷积神经网络CNN算法垃圾分类识别系统_tensorflow与卷积神经网络
- 3Java接口自动化框架系列07:Web接口自动化测试框架设计思路_javaweb接口设计说明怎么写
- 4c语言题目:将一个正整数m表示成n个的正整数之和,关于编程大赛的一道题目,一个正整数有可能可以被表示为n(n>=2)个连续正整数之和,找出这样的数并输出!...
- 5计算机中SQL中文,SQL是什么意思 sql的中文含义
- 6AI小程序添加深度合成类目解决办法
- 7TLS握手协议详解_tls握手过程会被窃听吗
- 8大数据管理平台DataSophon1.2离线安装
- 9Nginx运维笔记3 - 正向代理和反向代理_nginx正向代理和反向代理配置区别
- 10Meta的Llama 3惊艳亮相,8B量化版本仅有4.7G,你也能像我一样马上部署到本地
Windows系统安装Anaconda、conda源换源、PyPI源换源、jupyter的kernel内核配置、文件路径配置、jupyter自动补全配置、PyCharm的Python解释器配置_conda换源
赞
踩
在Python的学习,以及机器学习、深度学习的过程当中,大概率会用到Anaconda平台,为了使后来的学习工具更加高效,这里讲解Anaconda的安装以及进行换源

前言:
分为四大部分
1、anaconda安装
2、anaconda换源conda源
3、anaconda换源pypi源
4、jupyter的kernel配置
5、PyCharm的Python解释器选择
文章目录
- 1、Anaconda安装
- 2、conda源换源
- 3、Anaconda换源——PyPI源换源
- 4、jupyter-notebook的文件路径配置
- 5、jupyter-notebook的kernel配置
- 6、Jupyter自动补全配置
- 7、PyCharm 切换conda环境的python解释器
- 8、附录
1、Anaconda安装
从官网下载最新版本的Anaconda安装包,默认安装即可,
2、conda源换源
2.1、conda源换源——文件方式
2.1.1、生成 .condarc 文件
2.1.1.1、打开Anaconda Prompt

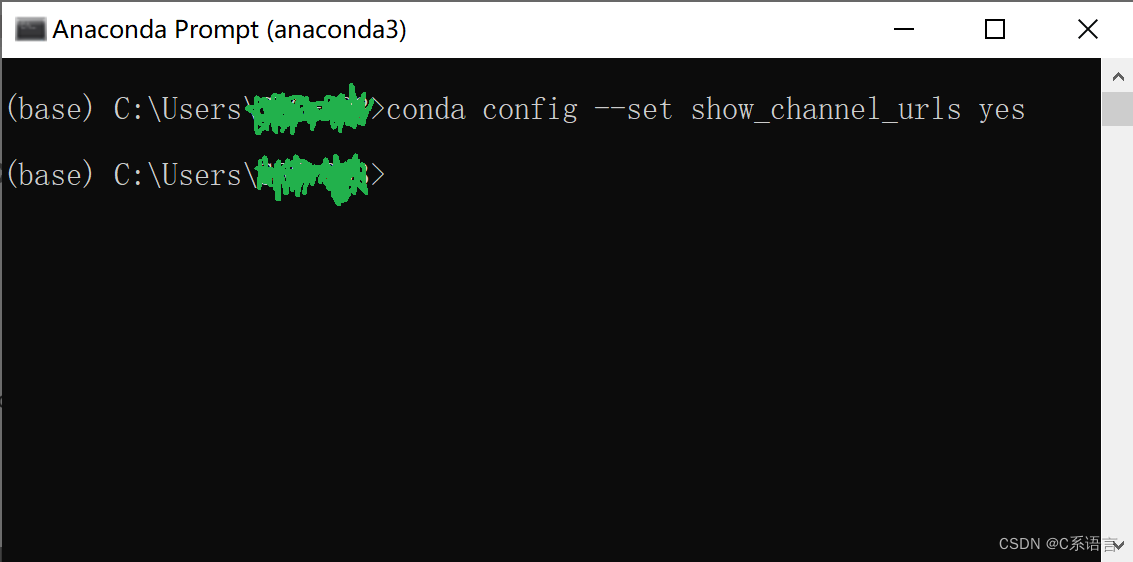
2.1.1.2、命令生成 .condarc文件
执行如下命令:
conda config --set show_channel_urls yes
- 1
如图所示:
2.1.1.3、备份 .condarc 文件
新建一个Anaconda文件备份文件夹,将 .condarc文件复制到里面,作为备份
2.1.2、进行换源
首先需要明确的是:Anaconda 的源分为conda源和pip源,
选中用户文件夹根目录里的.condarc文件,右键打开方式,使用记事本打开,将.condarc 挑选一个国内源修改即可
2.1.2.1、conda源——阿里云
现在可用的 conda 镜像站点
channels:
  - defaults
show_channel_urls: true
default_channels:
  - http://mirrors.aliyun.com/anaconda/pkgs/main
  - http://mirrors.aliyun.com/anaconda/pkgs/r
  - http://mirrors.aliyun.com/anaconda/pkgs/msys2
  - https://repo.anaconda.com/pkgs/main
  - https://repo.anaconda.com/pkgs/r
  - https://repo.anaconda.com/pkgs/msys2
custom_channels:
  conda-forge: http://mirrors.aliyun.com/anaconda/cloud
  msys2: http://mirrors.aliyun.com/anaconda/cloud
  bioconda: http://mirrors.aliyun.com/anaconda/cloud
  menpo: http://mirrors.aliyun.com/anaconda/cloud
  pytorch: http://mirrors.aliyun.com/anaconda/cloud
  simpleitk: http://mirrors.aliyun.com/anaconda/cloud
auto_activate_base: false
- 1
- 2
- 3
- 4
- 5
- 6
- 7
- 8
- 9
- 10
- 11
- 12
- 13
- 14
- 15
- 16
- 17
- 18
2.1.2.2、conda源——北京外国语大学
北京外国语大学
https://mirrors.bfsu.edu.cn/help/anaconda/
channels:
  - defaults
show_channel_urls: true
default_channels:
  - https://mirrors.bfsu.edu.cn/anaconda/pkgs/main
  - https://mirrors.bfsu.edu.cn/anaconda/pkgs/r
  - https://mirrors.bfsu.edu.cn/anaconda/pkgs/msys2
custom_channels:
  conda-forge: https://mirrors.bfsu.edu.cn/anaconda/cloud
  msys2: https://mirrors.bfsu.edu.cn/anaconda/cloud
  bioconda: https://mirrors.bfsu.edu.cn/anaconda/cloud
  menpo: https://mirrors.bfsu.edu.cn/anaconda/cloud
  pytorch: https://mirrors.bfsu.edu.cn/anaconda/cloud
  pytorch-lts: https://mirrors.bfsu.edu.cn/anaconda/cloud
  simpleitk: https://mirrors.bfsu.edu.cn/anaconda/cloud
auto_activate_base: false
- 1
- 2
- 3
- 4
- 5
- 6
- 7
- 8
- 9
- 10
- 11
- 12
- 13
- 14
- 15
- 16
2.1.2.3、conda源——清华大学
https://mirrors.tuna.tsinghua.edu.cn/help/anaconda/
channels:
  - defaults
show_channel_urls: true
default_channels:
  - https://mirrors.tuna.tsinghua.edu.cn/anaconda/pkgs/main
  - https://mirrors.tuna.tsinghua.edu.cn/anaconda/pkgs/r
  - https://mirrors.tuna.tsinghua.edu.cn/anaconda/pkgs/msys2
custom_channels:
  conda-forge: https://mirrors.tuna.tsinghua.edu.cn/anaconda/cloud
  msys2: https://mirrors.tuna.tsinghua.edu.cn/anaconda/cloud
  bioconda: https://mirrors.tuna.tsinghua.edu.cn/anaconda/cloud
  menpo: https://mirrors.tuna.tsinghua.edu.cn/anaconda/cloud
  pytorch: https://mirrors.tuna.tsinghua.edu.cn/anaconda/cloud
  pytorch-lts: https://mirrors.tuna.tsinghua.edu.cn/anaconda/cloud
  simpleitk: https://mirrors.tuna.tsinghua.edu.cn/anaconda/cloud
  deepmodeling: https://mirrors.tuna.tsinghua.edu.cn/anaconda/cloud/
auto_activate_base: false
- 1
- 2
- 3
- 4
- 5
- 6
- 7
- 8
- 9
- 10
- 11
- 12
- 13
- 14
- 15
- 16
- 17
2.1.2.4、conda源——北京大学
https://mirrors.pku.edu.cn/Help/Anaconda
channels:
    - defaults
show_channel_urls: true
default_channels:
    - https://mirrors.pku.edu.cn/anaconda/pkgs/main
    - https://mirrors.pku.edu.cn/anaconda/pkgs/r
custom_channels:
    conda-forge: https://mirrors.pku.edu.cn/anaconda/cloud
    pytorch: https://mirrors.pku.edu.cn/anaconda/cloud
    bioconda: https://mirrors.pku.edu.cn/anaconda/cloud
auto_activate_base: false
- 1
- 2
- 3
- 4
- 5
- 6
- 7
- 8
- 9
- 10
- 11
2.1.2.5、conda源——哈尔滨工业大学
https://mirrors.hit.edu.cn/anaconda/
https://mirrors.hit.edu.cn/anaconda/pkgs/main/
https://mirrors.hit.edu.cn/anaconda/cloud/conda-forge/
https://mirrors.hit.edu.cn/anaconda/cloud/bioconda/
南京大学
https://mirror.nju.edu.cn/help/anaconda
channels:
  - defaults
show_channel_urls: true
default_channels:
  - https://mirror.nju.edu.cn/anaconda/pkgs/main
  - https://mirror.nju.edu.cn/anaconda/pkgs/r
  - https://mirror.nju.edu.cn/anaconda/pkgs/msys2
custom_channels:
  conda-forge: https://mirror.nju.edu.cn/anaconda/cloud
  msys2: https://mirror.nju.edu.cn/anaconda/cloud
  bioconda: https://mirror.nju.edu.cn/anaconda/cloud
  menpo: https://mirror.nju.edu.cn/anaconda/cloud
  pytorch: https://mirror.nju.edu.cn/anaconda/cloud
  simpleitk: https://mirror.nju.edu.cn/anaconda/cloud
auto_activate_base: false
- 1
- 2
- 3
- 4
- 5
- 6
- 7
- 8
- 9
- 10
- 11
- 12
- 13
- 14
- 15
2.1.2.6、conda源——北京交通大学
https://mirror.bjtu.edu.cn/anaconda/
https://mirror.bjtu.edu.cn/anaconda/pkgs/main/
https://mirror.bjtu.edu.cn/anaconda/cloud/conda-forge/
https://mirror.bjtu.edu.cn/anaconda/cloud/bioconda/
西安交通大学
https://mirrors.xjtu.edu.cn/
https://mirrors.xjtu.edu.cn/anaconda/pkgs/main/
https://mirrors.xjtu.edu.cn/anaconda/cloud/conda-forge/
https://mirrors.xjtu.edu.cn/anaconda/cloud/bioconda/
重庆邮电大学
https://mirrors.cqupt.edu.cn/anaconda/
https://mirrors.cqupt.edu.cn/anaconda/pkgs/main/
https://mirrors.cqupt.edu.cn/anaconda/cloud/conda-forge/
https://mirrors.cqupt.edu.cn/anaconda/cloud/bioconda/
2.1.2.7、conda源——南方科技大学
https://mirrors.sustech.edu.cn/help/anaconda.html
channels:
  - defaults
show_channel_urls: true
default_channels:
  - https://mirrors.sustech.edu.cn/anaconda/pkgs/main
  - https://mirrors.sustech.edu.cn/anaconda/pkgs/free
  - https://mirrors.sustech.edu.cn/anaconda/pkgs/r
  - https://mirrors.sustech.edu.cn/anaconda/pkgs/pro
  - https://mirrors.sustech.edu.cn/anaconda/pkgs/msys2
custom_channels:
  conda-forge: https://mirrors.sustech.edu.cn/anaconda/cloud
  msys2: https://mirrors.sustech.edu.cn/anaconda/cloud
  bioconda: https://mirrors.sustech.edu.cn/anaconda/cloud
  menpo: https://mirrors.sustech.edu.cn/anaconda/cloud
  pytorch: https://mirrors.sustech.edu.cn/anaconda/cloud
  simpleitk: https://mirrors.sustech.edu.cn/anaconda/cloud
  nvidia: https://mirrors.sustech.edu.cn/anaconda-extra/cloud
auto_activate_base: false
- 1
- 2
- 3
- 4
- 5
- 6
- 7
- 8
- 9
- 10
- 11
- 12
- 13
- 14
- 15
- 16
- 17
- 18
2.1.2.8、conda源——上海交通大学
https://mirror.sjtu.edu.cn/docs/anaconda
default_channels:
  - https://mirror.sjtu.edu.cn/anaconda/pkgs/r
  - https://mirror.sjtu.edu.cn/anaconda/pkgs/main
custom_channels:
  conda-forge: https://mirror.sjtu.edu.cn/anaconda/cloud/
  pytorch: https://mirror.sjtu.edu.cn/anaconda/cloud/
channels:
  - defaults
auto_activate_base: false
- 1
- 2
- 3
- 4
- 5
- 6
- 7
- 8
- 9
2.1.2.9、conda源——中科大镜像
https://mirrors.ustc.edu.cn/help/anaconda.html
由于合规性,Anaconda 源目前已经无限期停止服务。
更改完之后打开Anaconda Prompt在命令行输入
conda config --set show_channel_urls yes
- 1
2.3、conda源换源——命令行方式
以清华源为例
conda config --add channels https://mirrors.tuna.tsinghua.edu.cn/anaconda/pkgs/main
conda config --add channels https://mirrors.tuna.tsinghua.edu.cn/anaconda/pkgs/r
conda config --add channels https://mirrors.tuna.tsinghua.edu.cn/anaconda/pkgs/msys2
conda config --add https://mirrors.tuna.tsinghua.edu.cn/anaconda/cloud
conda config --add https://mirrors.tuna.tsinghua.edu.cn/anaconda/cloud
conda config --add https://mirrors.tuna.tsinghua.edu.cn/anaconda/cloud
conda config --add https://mirrors.tuna.tsinghua.edu.cn/anaconda/cloud
conda config --add https://mirrors.tuna.tsinghua.edu.cn/anaconda/cloud
conda config --add https://mirrors.tuna.tsinghua.edu.cn/anaconda/cloud
conda config --add https://mirrors.tuna.tsinghua.edu.cn/anaconda/cloud
conda config --add https://mirrors.tuna.tsinghua.edu.cn/anaconda/cloud/
conda config --set show_channel_urls yes
- 1
- 2
- 3
- 4
- 5
- 6
- 7
- 8
- 9
- 10
- 11
- 12
2.4、清除索引缓存
修改完.condarc文件之后,
修改保存后,即可添加 Anaconda Python 免费仓库。
运行
conda clean -i
- 1
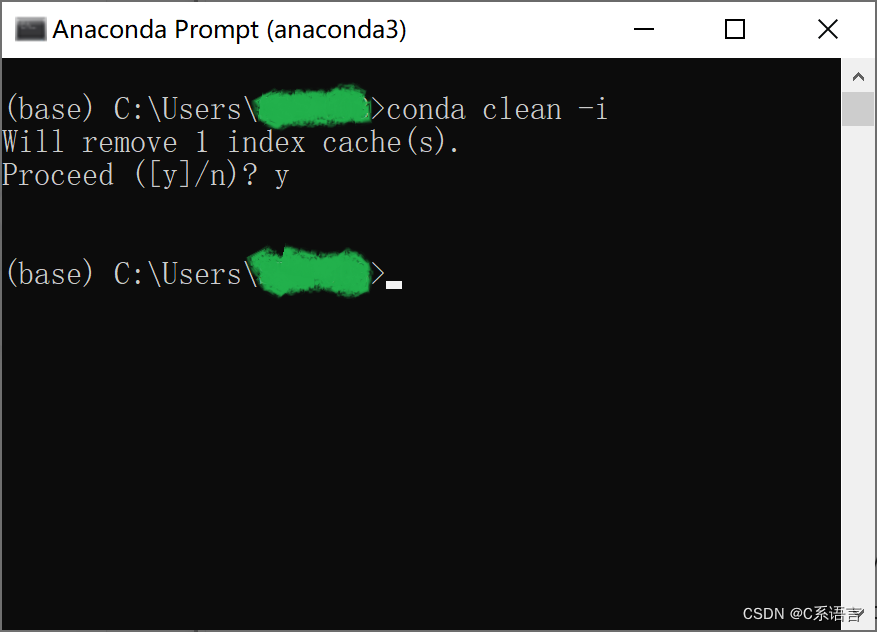
清除索引缓存,保证用的是镜像站提供的索引。
2.5、切换不同的镜像站点时记得清除缓存
conda clean -a
- 1
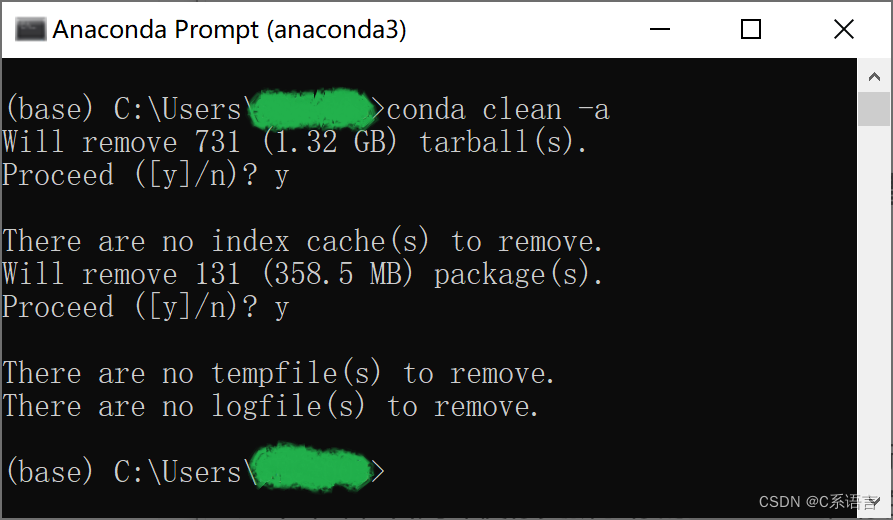
当你从一个站点切换到另一个站点的时候记得运行一下上面这个命令,否则即使你更新了你的~/.condarc,你的软件还是会从之前的站点下载。
会清除掉:
1.下载的安装包
2.解压开但是当前未安装的软件包
3.为镜像建立的index
至此,Anaconda配置完成。
这个是我的.condarc文件内容
channels:
 - defaults
show_channel_urls: true
default_channels:
 - https://mirrors.tuna.tsinghua.edu.cn/anaconda/pkgs/main
 - https://mirrors.tuna.tsinghua.edu.cn/anaconda/pkgs/r
 - https://mirrors.tuna.tsinghua.edu.cn/anaconda/pkgs/msys2
 - https://repo.anaconda.com/pkgs/main
 - https://repo.anaconda.com/pkgs/r
 - https://repo.anaconda.com/pkgs/msys2
custom_channels:
  conda-forge: https://mirrors.tuna.tsinghua.edu.cn/anaconda/cloud
  msys2: https://mirrors.tuna.tsinghua.edu.cn/anaconda/cloud
  bioconda: https://mirrors.tuna.tsinghua.edu.cn/anaconda/cloud
  menpo: https://mirrors.tuna.tsinghua.edu.cn/anaconda/cloud
  pytorch: https://mirrors.tuna.tsinghua.edu.cn/anaconda/cloud
  pytorch-lts: https://mirrors.tuna.tsinghua.edu.cn/anaconda/cloud
  simpleitk: https://mirrors.tuna.tsinghua.edu.cn/anaconda/cloud
  deepmodeling: https://mirrors.tuna.tsinghua.edu.cn/anaconda/cloud/
ssl_verify: false
auto_activate_base: false
- 1
- 2
- 3
- 4
- 5
- 6
- 7
- 8
- 9
- 10
- 11
- 12
- 13
- 14
- 15
- 16
- 17
- 18
- 19
- 20
- 21
2.6、查看源
conda config --show
- 1
2.6、恢复默认源——文件方式
将修改过后的.condarc文件删除,替换为备份的原始.condarc文件
2.7、恢复默认源——命令行方式
conda config --remove-key channels
- 1
3、Anaconda换源——PyPI源换源
清华:https://pypi.tuna.tsinghua.edu.cn/simple
北外:https://mirrors.bfsu.edu.cn/pypi/web/simple
阿里云:https://mirrors.aliyun.com/pypi/simple/
中国科技大学:https://pypi.mirrors.ustc.edu.cn/simple/
华中科技大学:http://pypi.hustunique.com/
山东理工大学:http://pypi.sdutlinux.org/
豆瓣:http://pypi.douban.com/simple/
因为conda源有时候一些包可能不太好装,此时可以用pip进行安装,所以我们要配置pypi源。
换源的方式分为永久换源和临时换源
3.1、永久换源
3.1.1、永久换源——配置pip.ini文件方式
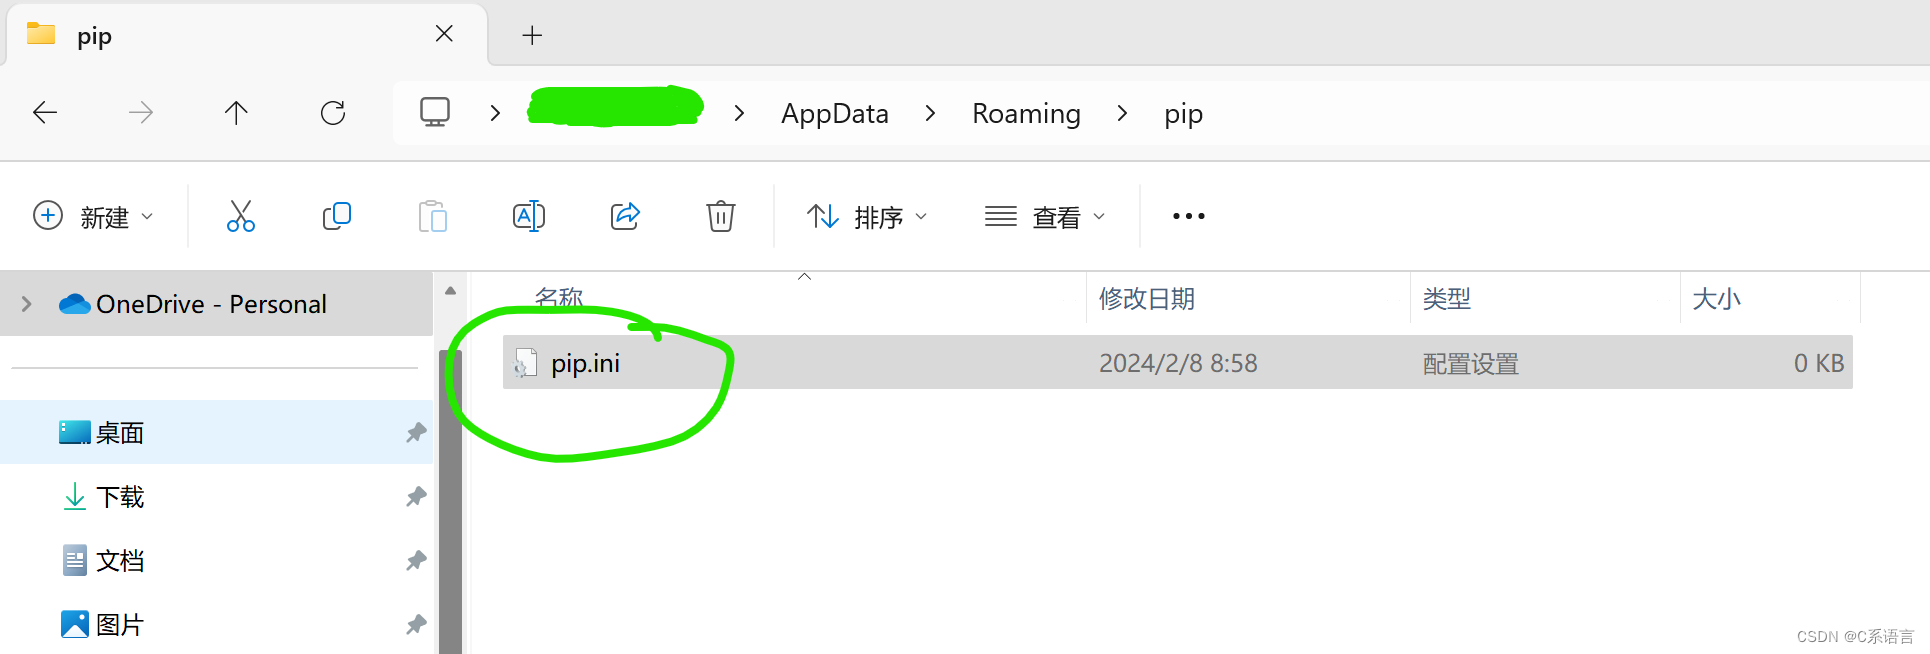
- 先在此电脑的地址栏中输入
%APPDATA%按回车进行跳转到Roaming文件夹中; - 如果在此文件夹下没有pip文件夹则新建一个
pip文件夹,并且新建文件pip.ini, - 并在里面输入以下内容(此处示例为清华源);
- 如果有pip文件夹并且有pip.ini文件则在对应的[]中添加以下内容即可。
[global]
timeout = 6000
index-url=https://pypi.tuna.tsinghua.edu.cn/simple/
[install]
trusted-host=mirrors.tsinghua.edu.cn
- 1
- 2
- 3
- 4
- 5
3.1.2、永久换源——命令行添加源方式
也可以使用命令行添加源
pip config set global.index-url --site https://pypi.tuna.tsinghua.edu.cn/simple
- 1
3.1.2、查看当前源
pip config list
- 1
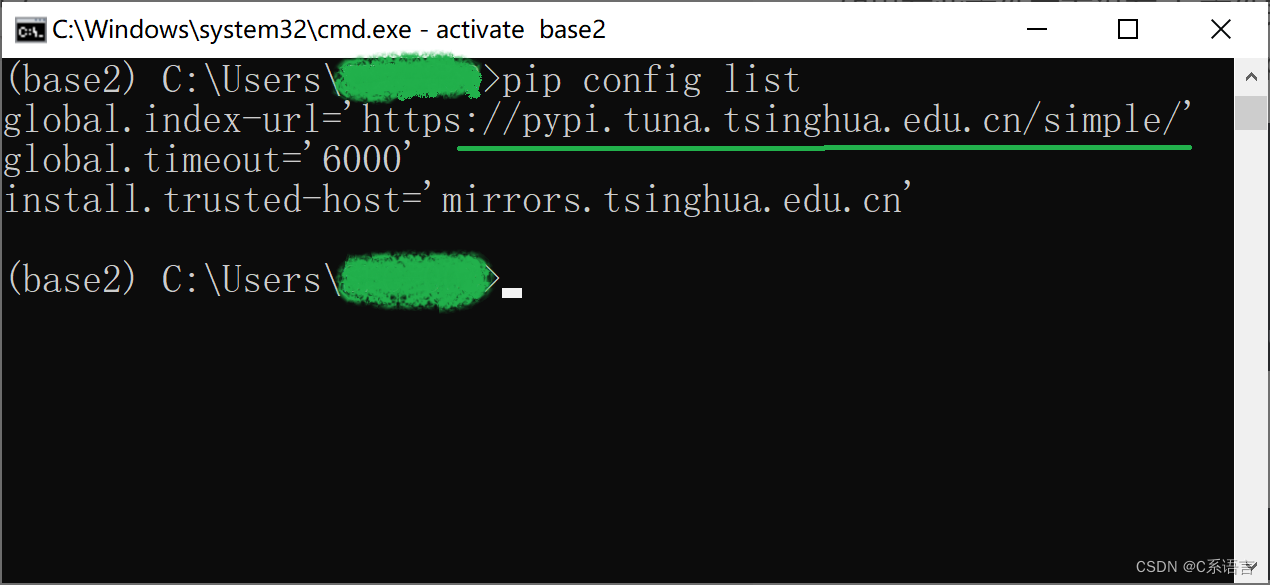
可以看到PyPI源已经换成了清华源
3.1.3、速度测试
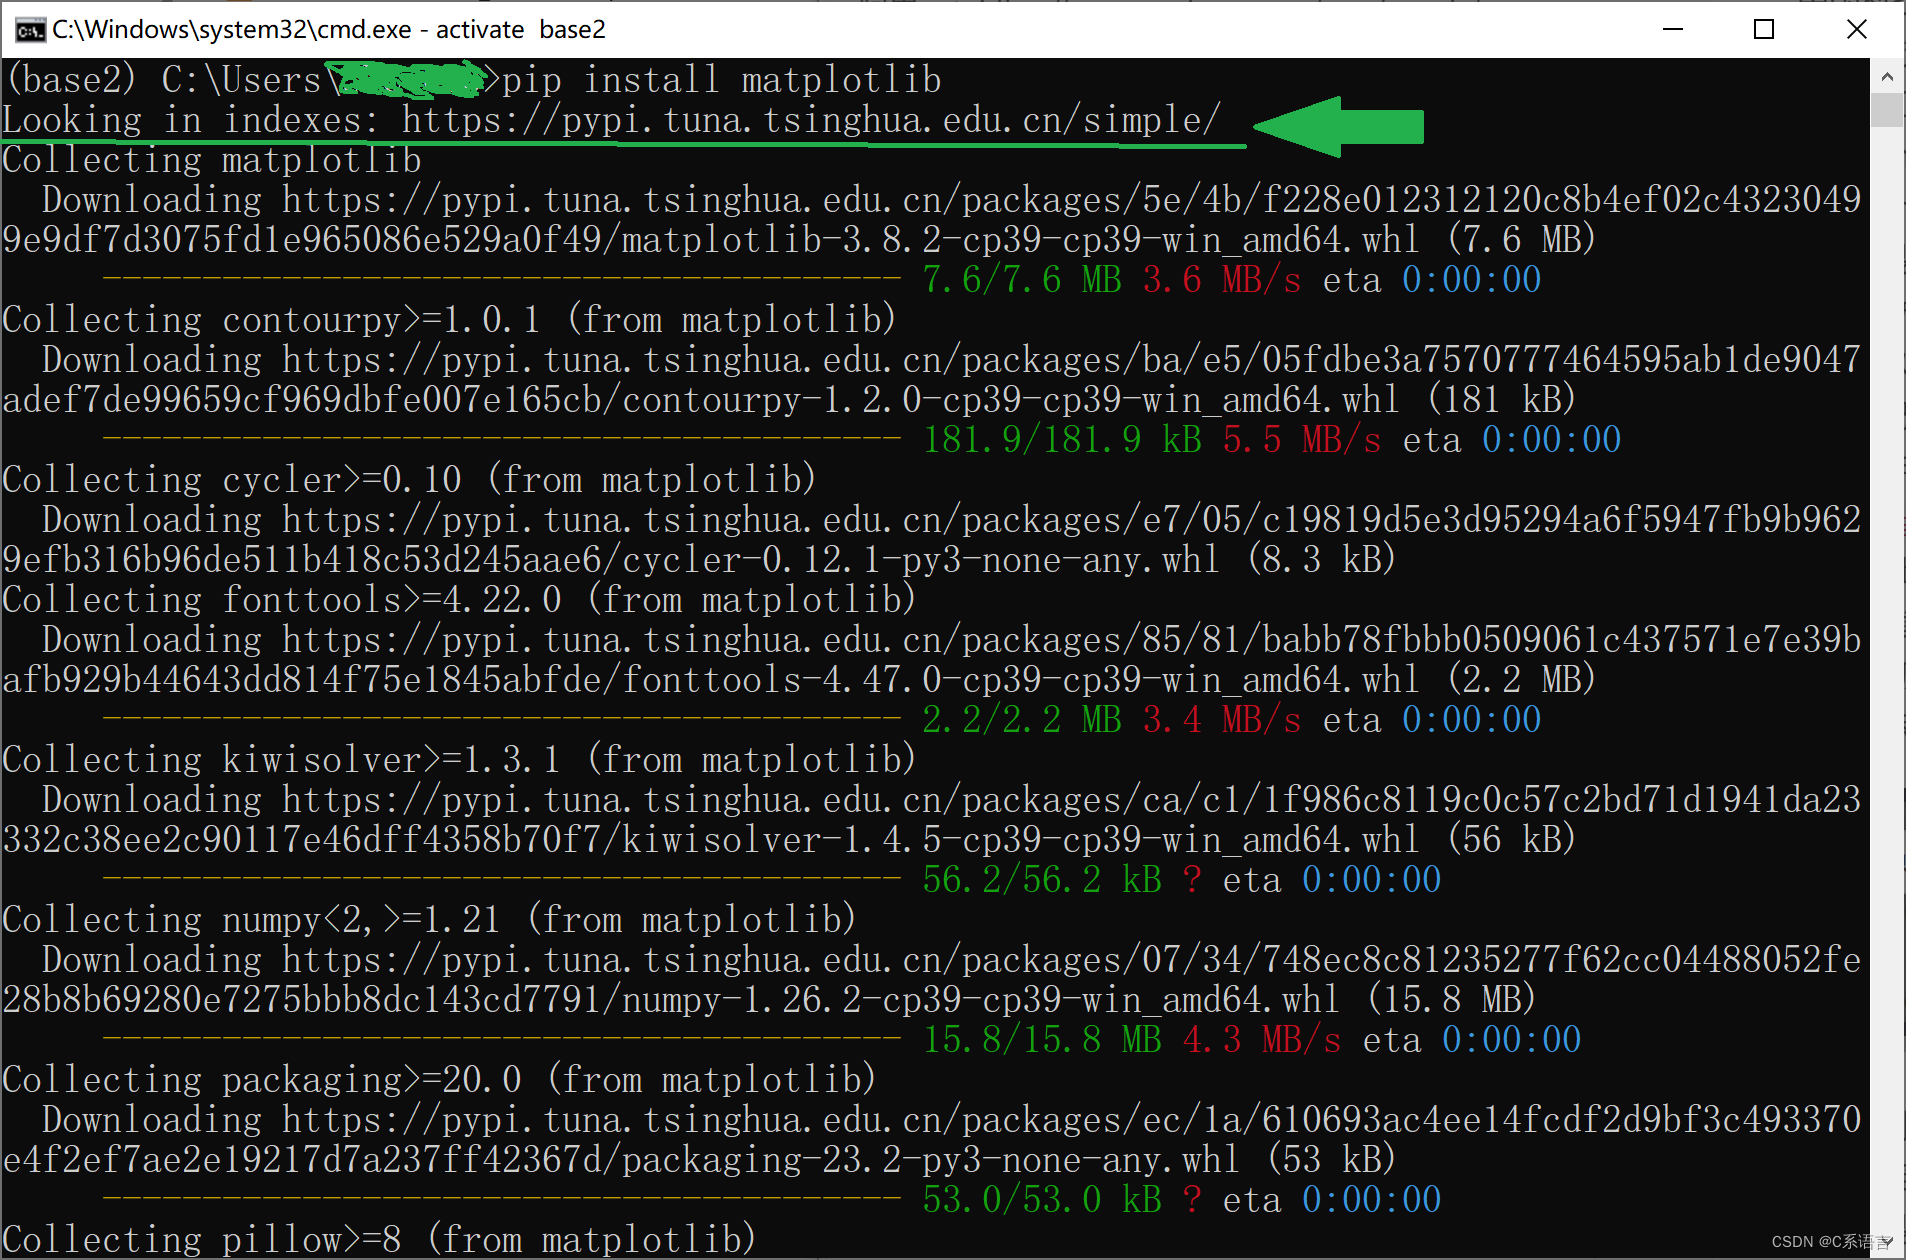
我这里是在一个虚拟环境里安装matplotlib包
pip install matplotlib
- 1
可以看到我这里默认源已经改为清华源了,并且下载速度达到了MB/s的速度
3.1.4、删除PyPI源——文件方式
直接修改pip.ini文件方式
- 此电脑的地址栏中输入
%APPDATA%按回车进行跳转到Roaming文件夹中 - 删除
pip.in文件
如果在此文件夹下没有pip文件夹则新建一个pip文件夹,
3.1.5、删除PyPI源——命令行方式
命令行删除源方式
pip config unset global.index-url
- 1
3.2、临时换源
pip 临时换源需要在要安装的包后面加上国内的镜像源,
这里以清华源举例-i https://pypi.tuna.tsinghua.edu.cn/simple
或者 -i https://pypi.tuna.tsinghua.edu.cn/simple --trusted-host pypi.tuna.tsinghua.edu.cn
只写网址
pip install tqdm -i https://pypi.tuna.tsinghua.edu.cn/simple
- 1
加信任
pip install tqdm -i https://pypi.tuna.tsinghua.edu.cn/simple --trusted-host pypi.tuna.tsinghua.edu.cn
- 1
4、jupyter-notebook的文件路径配置
Jupyter Notebook的默认路径在用户文件夹下,长期在这个文件夹里编写程序可能会造成文件数量的积累以及看的比较乱,所以我们这里把Jupyter Notebook 的文件路径位置给改一下。该方法是在Windows系统进行的,对于Linux系统也可以同样操作
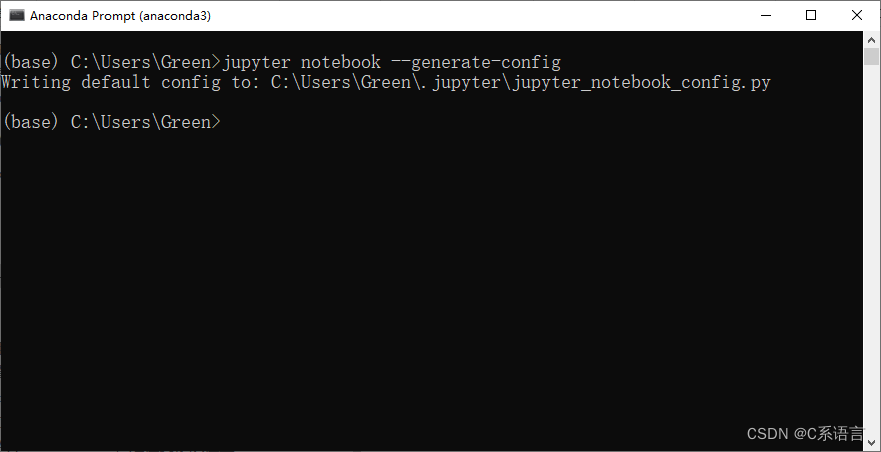
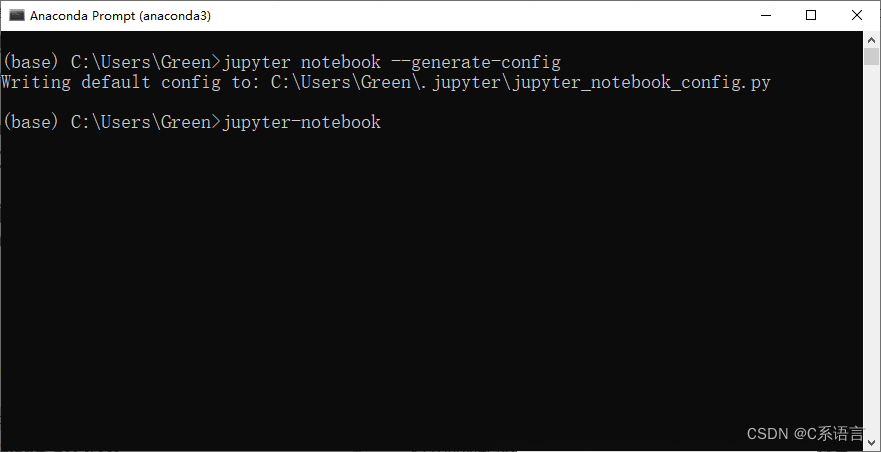
4.1、生成jupyter_notebook_config.py文件
- 打开Anaconda Prompt,
输入以下命令:
jupyter notebook --generate-config
- 1
4.2、对生成jupyter_notebook_config.py文件进行备份(如果不备份的话,第2大步也可以省略)
4.2.1、在用户名文件夹里新建备份文件夹

4.2.2、找到 C:\Users\用户名.jupyter文件夹

4.2.3、将.jupyter文件夹里的jupyter_notebook_config.py文件复制一份到备份文件夹里面

4.3、编辑jupyter_notebook_config.py文件
4.3.1、右键编辑.jupyter文件夹里的jupyter_notebook_config.py文件
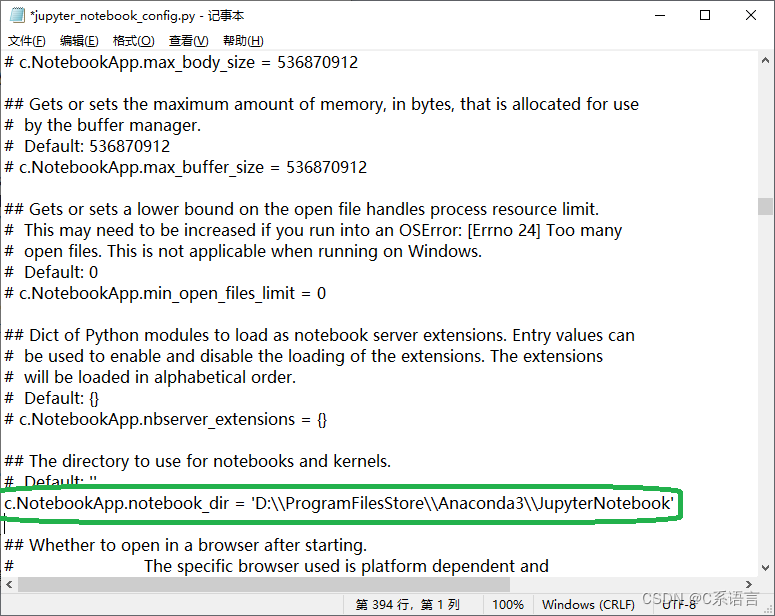
4.3.2、搜索c.NotebookApp.notebook_dir,定位到修改位置
c.NotebookApp.notebook_dir
- 1
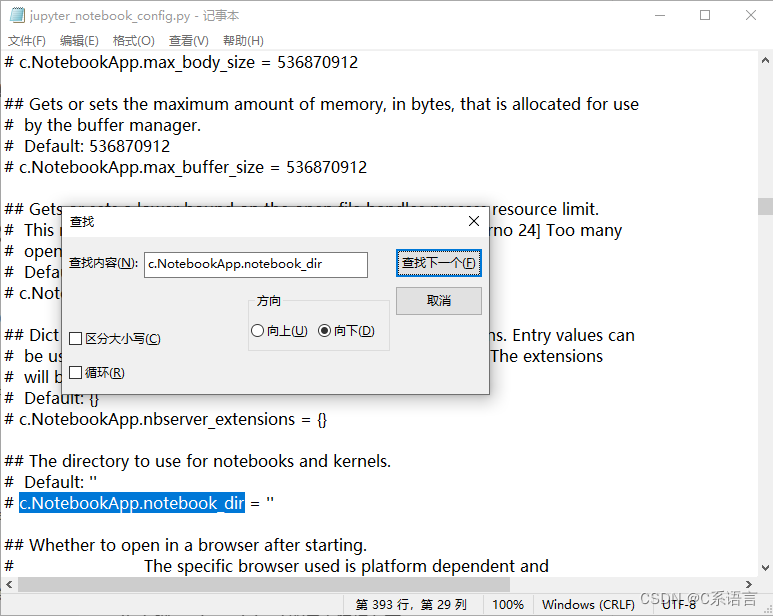
4.3.3、去掉前面的#号,将c.NotebookApp.notebook_dir = ''左对齐
4.3.4、在 ’ ’ (单引号中间)中间添加自己的目录,并对文件进行保存
例如我的是D:\ProgramFilesStore\Anaconda3\JupyterNotebook
注意:要用双斜线,D:\\ProgramFilesStore\\Anaconda3\\JupyterNotebook
修改完毕之后保存文件
4.4、验证是否修改成功
4.4.1、打开jupyter notebook,看起始目录有没有改变(大概率已经成功了),如果没有改变,则执行第4.2~4.3步
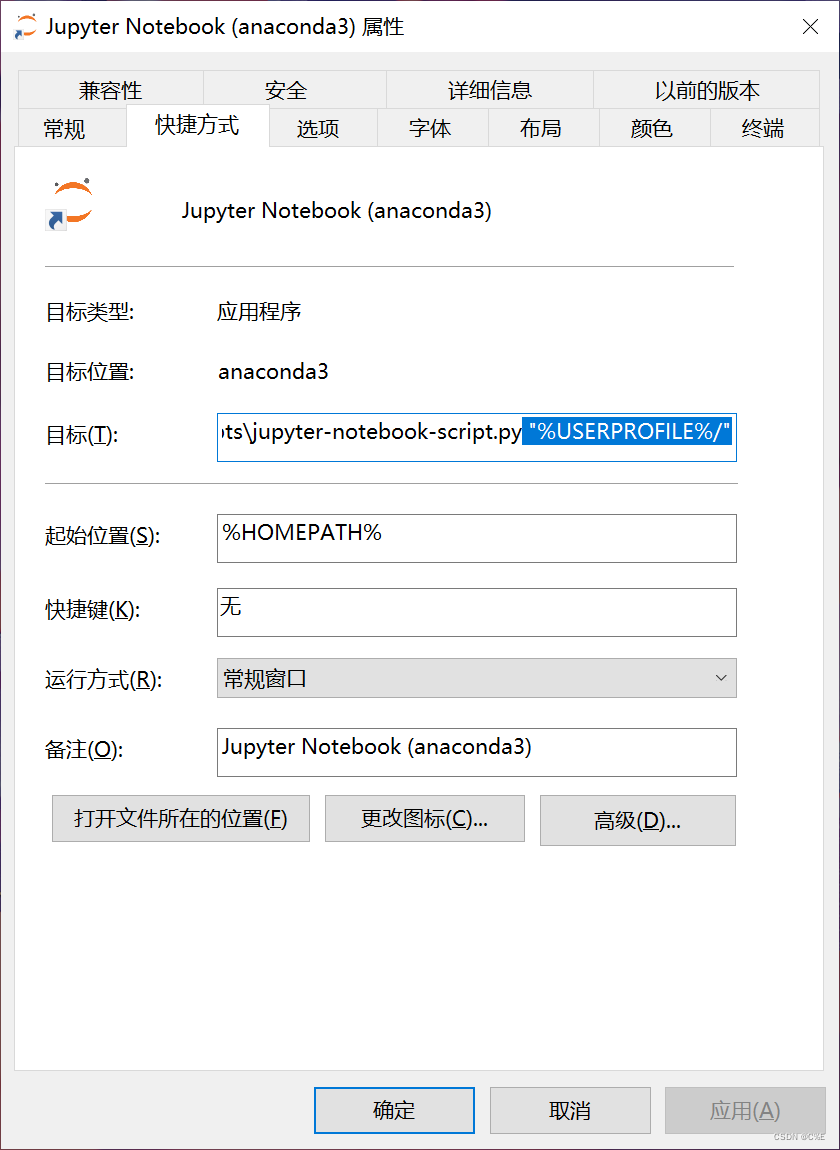
4.4.2、右键jupyter notebook的桌面快捷方式,点击属性

4.4.3、将目标里面最后的 "%USERPROFILE%/"删掉,并且应用+保存
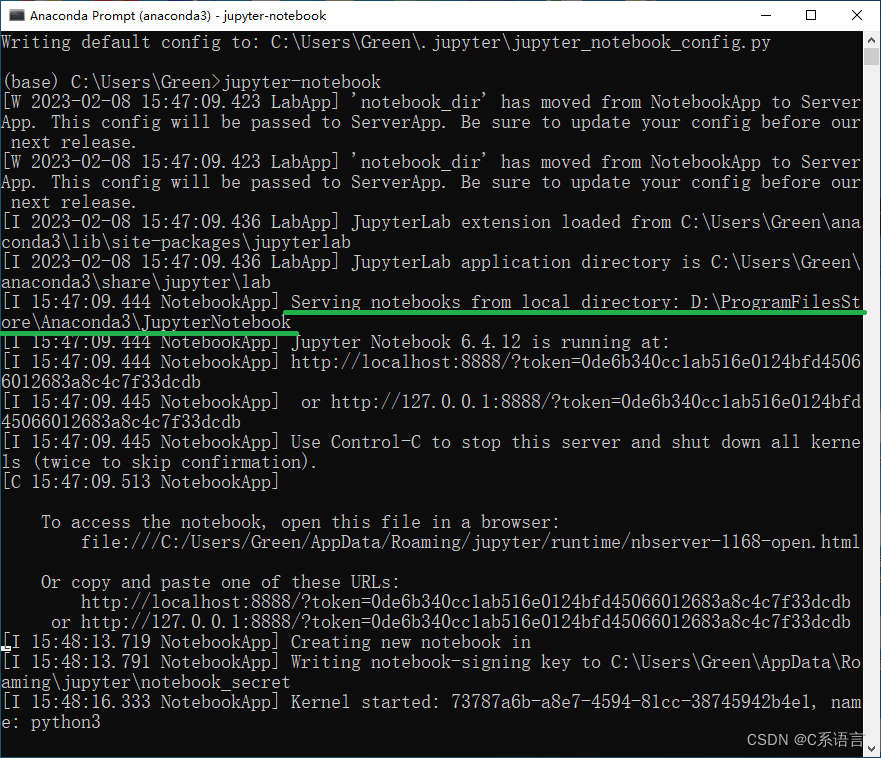
成功界面如下:
路径已经被改变
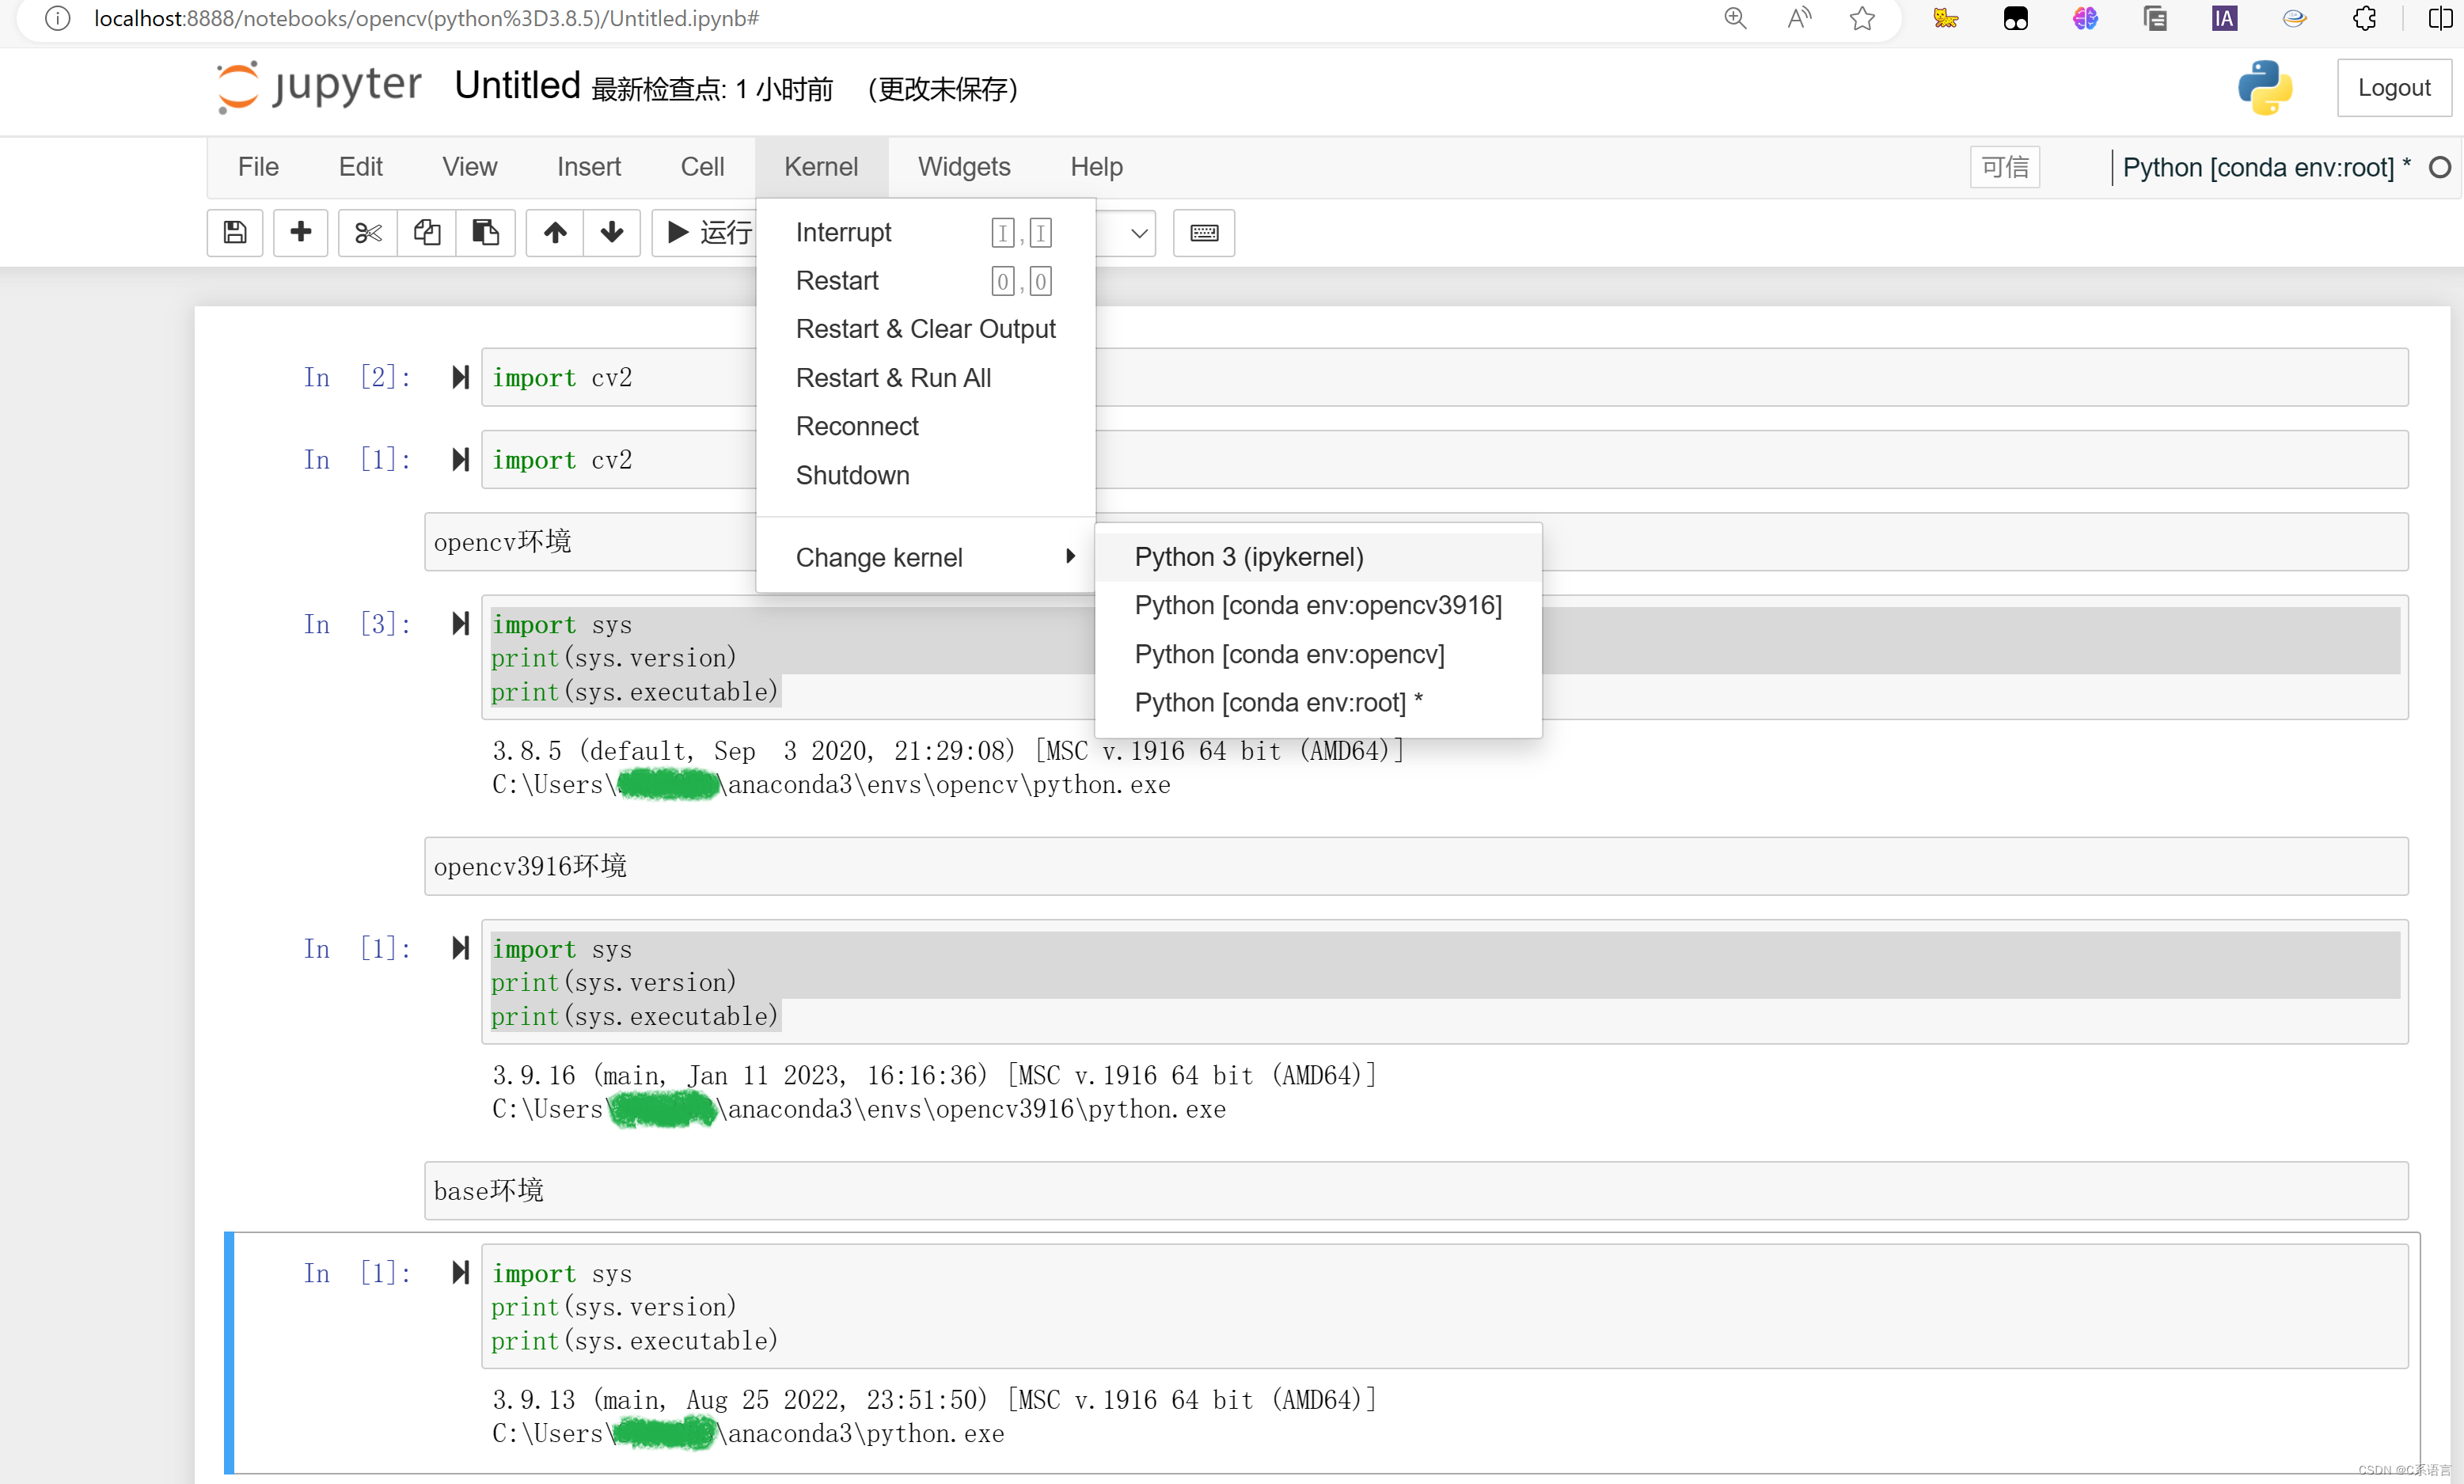
5、jupyter-notebook的kernel配置
使用 nb_conda_kernels 添加所有环境
分为两步
第一步,在base环境之外的其他虚拟环境均安装ipykernel
conda activate my-conda-env    # my-conda-env替换成自己的环境名字
conda install ipykernel
conda deactivate
- 1
- 2
- 3
第二步,在base环境安装nb_conda_kernels
conda activate base      # could be also some other environment
conda install nb_conda_kernels
jupyter notebook
- 1
- 2
- 3
安装好后,打开 jupyter notebook 就会显示所有的 conda 环境啦,点击随意切换。
查看python路径
import sys
print(sys.version)
print(sys.executable)
- 1
- 2
- 3
6、Jupyter自动补全配置
6.1、安装jupyter_contrib_nbextensions
激活base环境
conda activate base
- 1
或者
activate base
- 1
安装 jupyter_contrib_nbextensions
conda install conda-forge::jupyter_contrib_nbextensions
#这两个命令,选两者之一
conda install jupyter_contrib_nbextensions
- 1
- 2
- 3
6.2、启用 jupyter_contrib nbextensions 扩展
命令如下:
jupyter contrib nbextension install --user
- 1
6.3、配置nbextensions
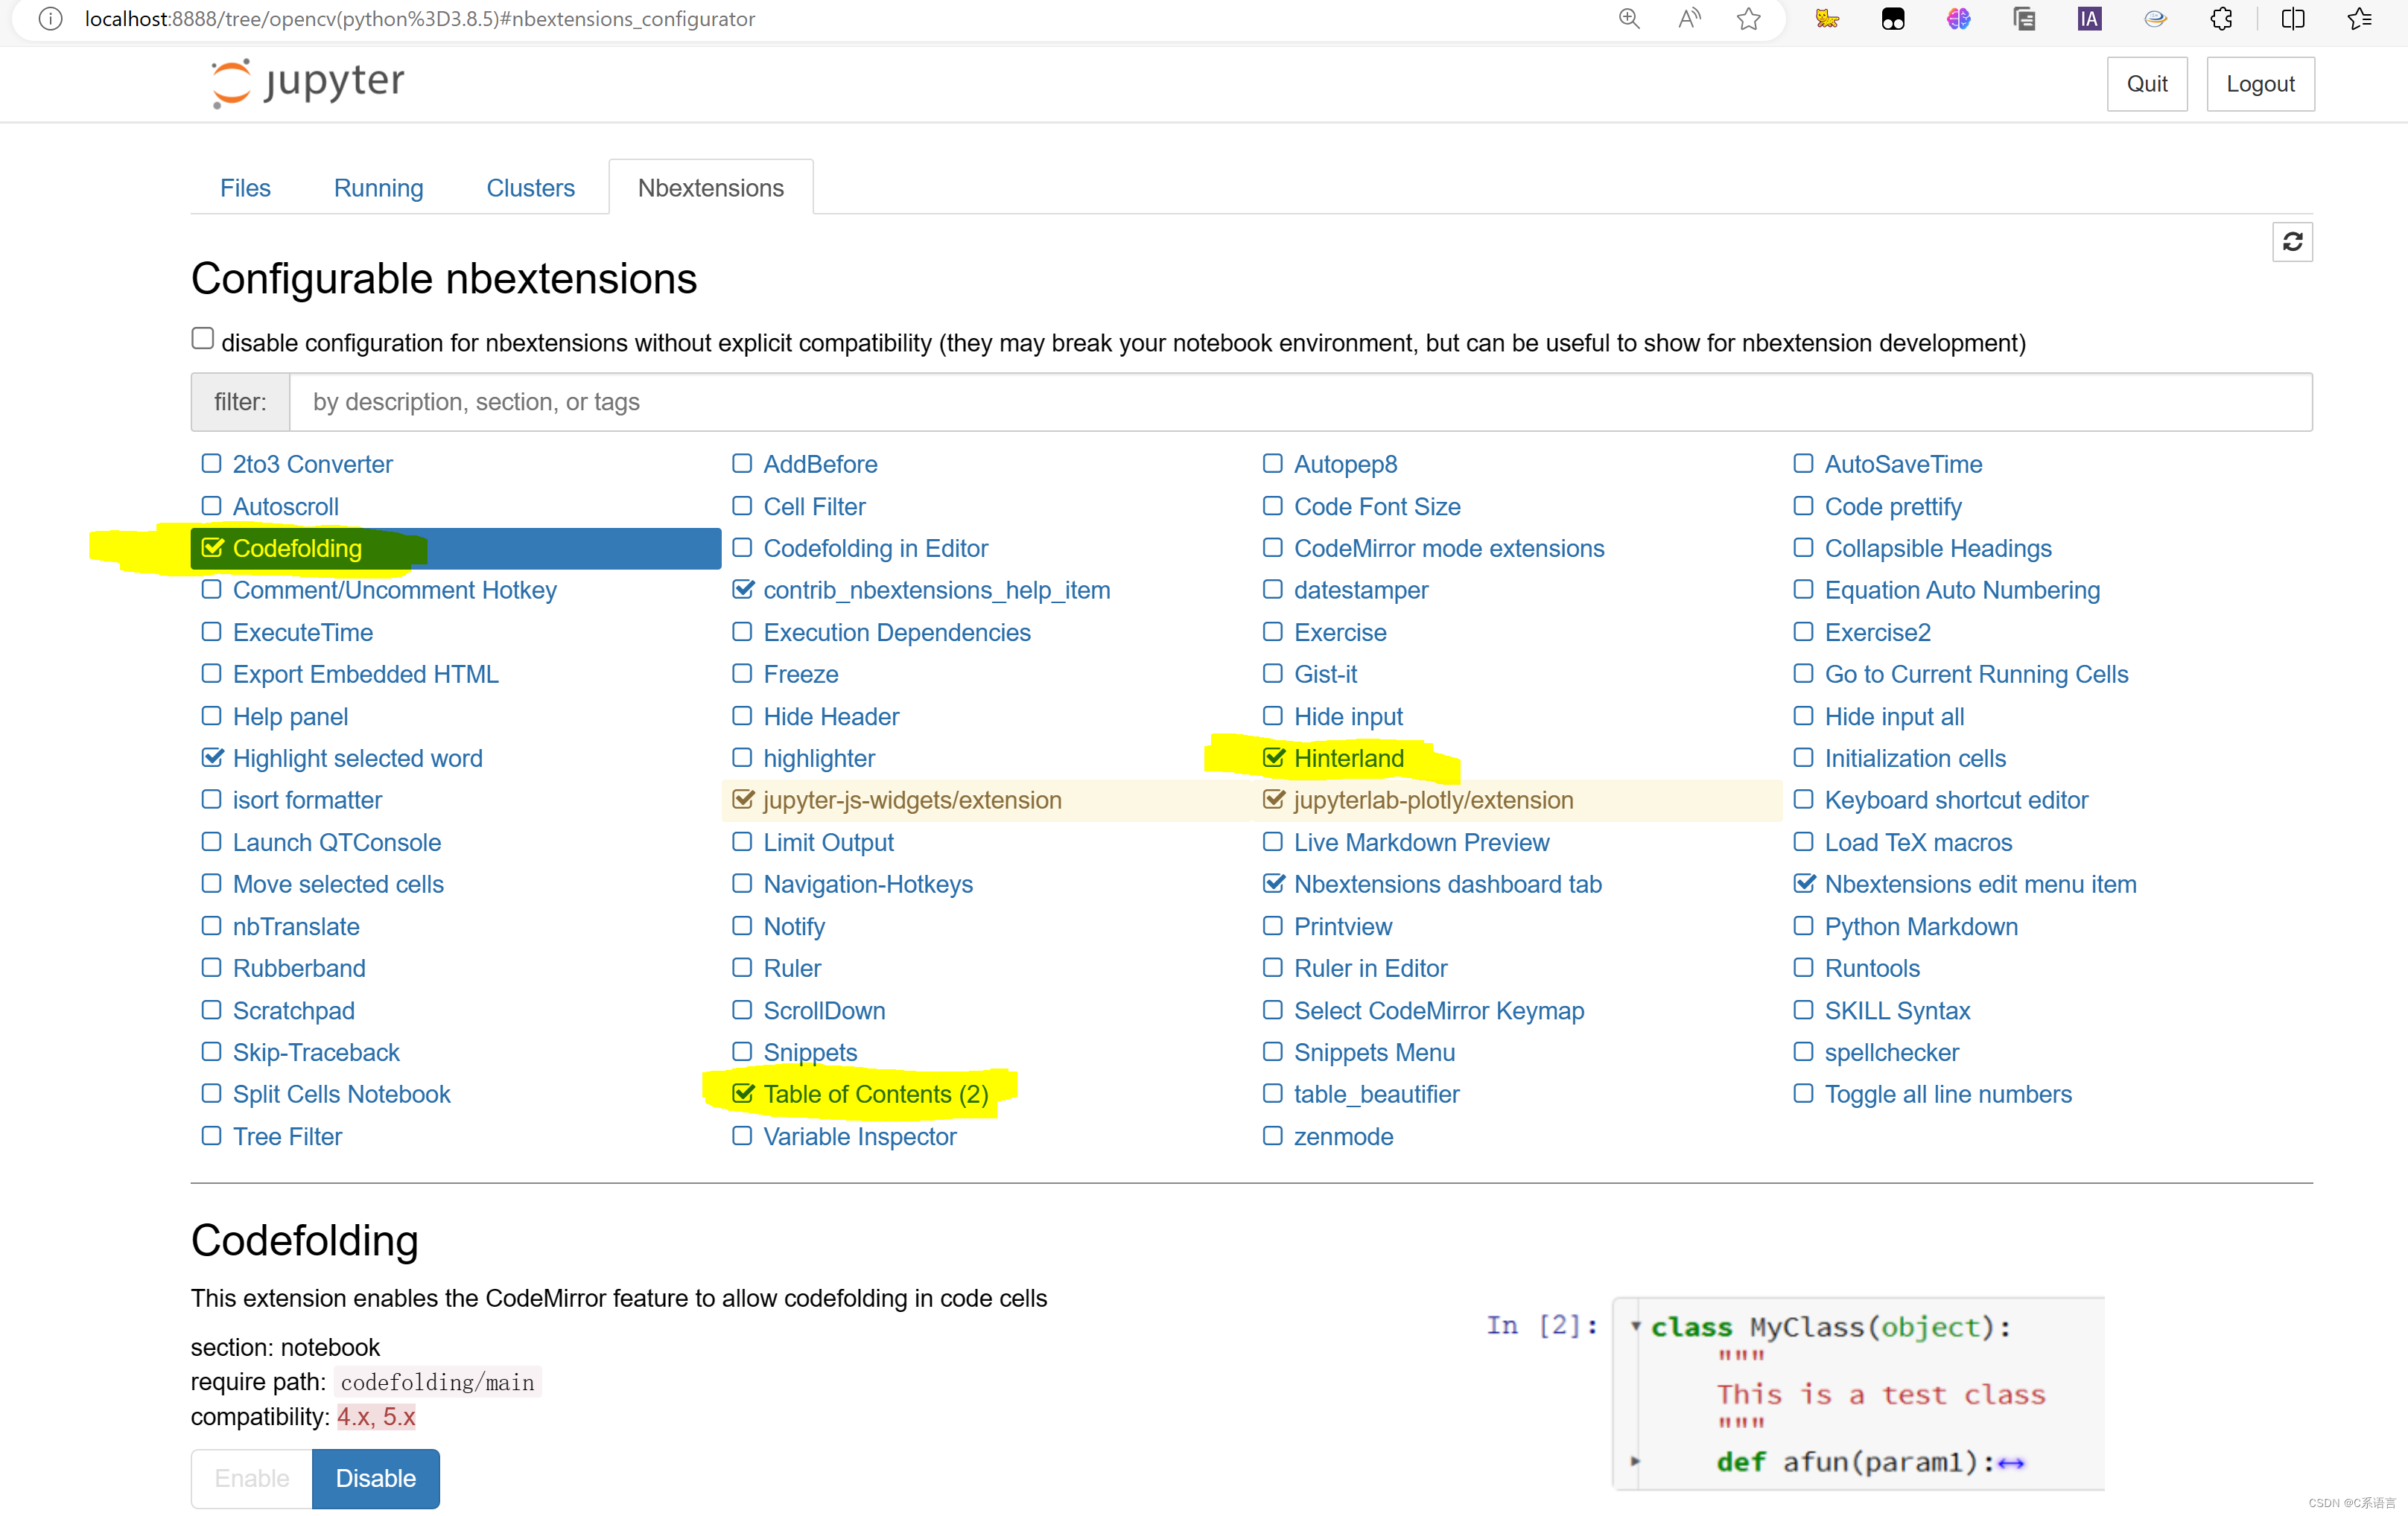
启用完成后,重启 Jupyter Notebook,然后再打开-个 Notebook,点击页面右上方的 Nbextensions 标签页,在列表中找到Codefolding 和 Hinterland 两个选项,并勾选它们。
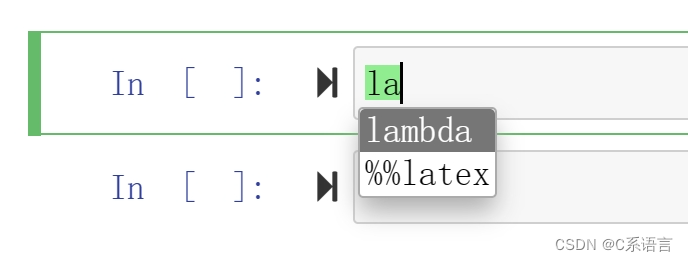
完成以上步骤后,你就可以在 Jupyter Notebok 中使用自动补全功能了。当你输入代码时,按下 Tab 键就可以触发自动补全提示。
将Table of Contents (2)勾选上,然后重启jupyter
成功
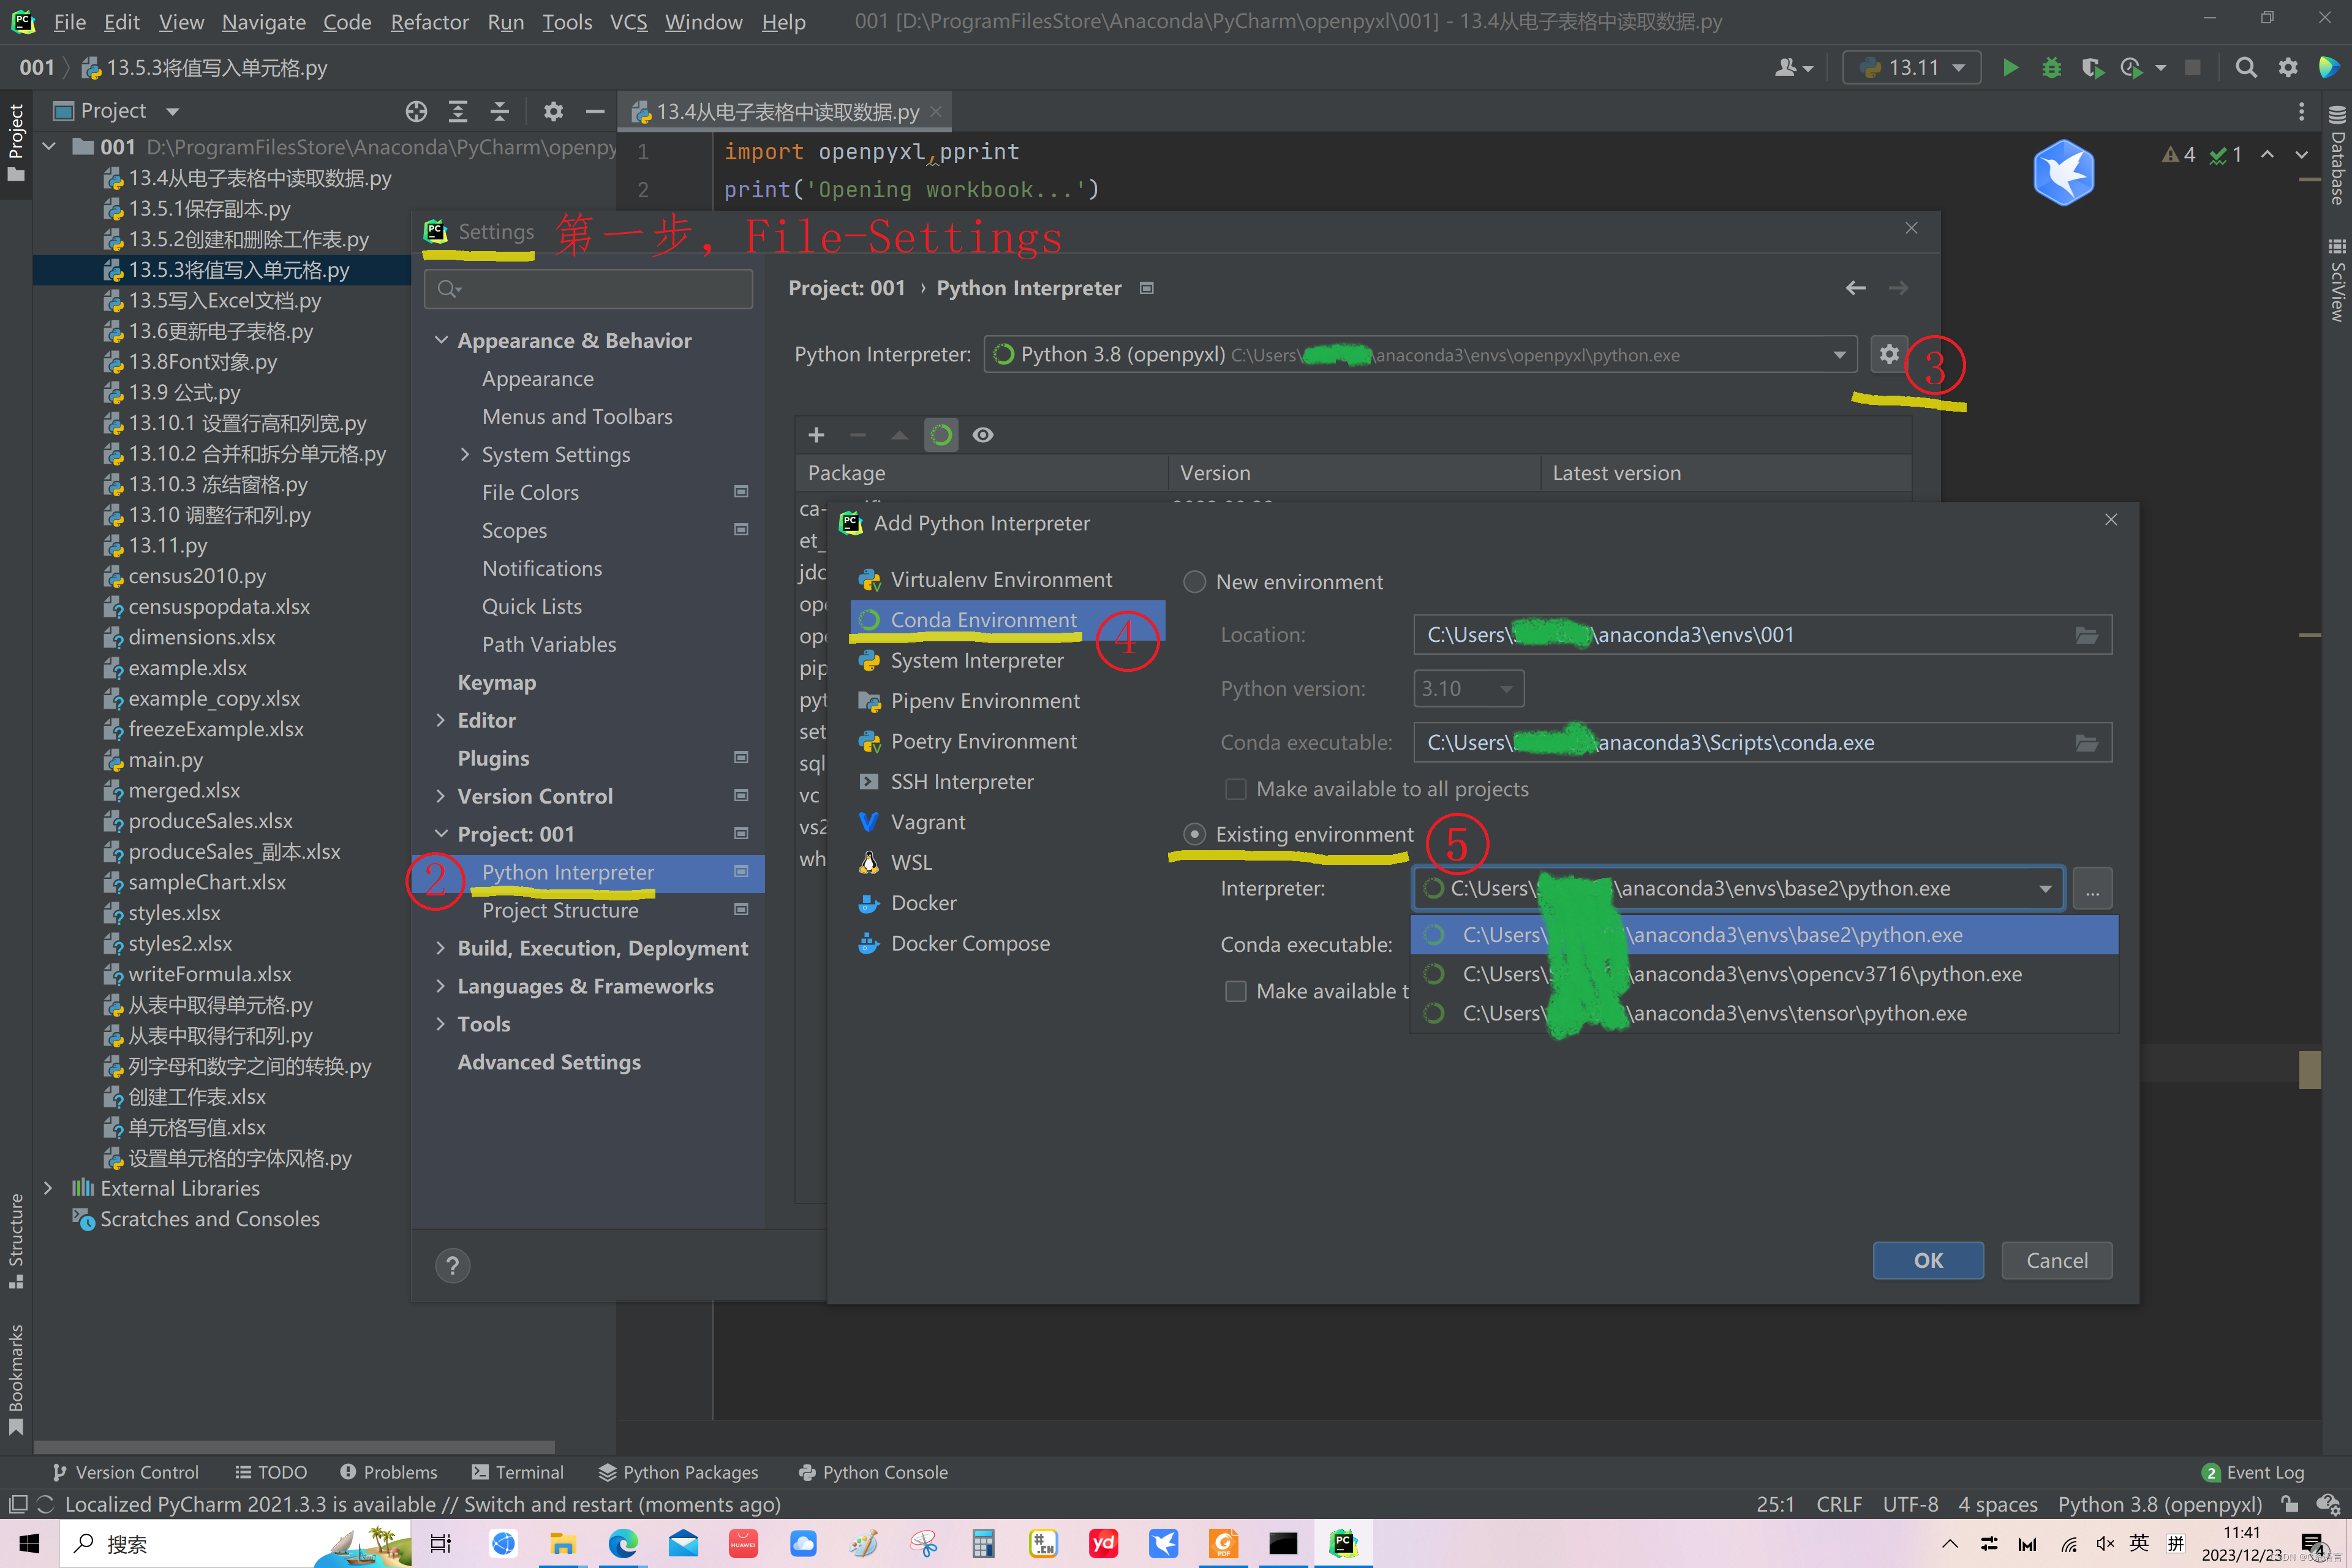
7、PyCharm 切换conda环境的python解释器
第一步:File——Settings
第二步:打开Project:xxx选项卡,点击Python Interpreter
第三步:点击右侧设置图标,点击Add
第四步:点击Conda Environment
第五步:选择Existing Environment
8、附录
- pip install和conda install区别
pip install 和 conda install 都可以正常在Anaconda Prompt 中下载各种包,但是它们有一定的区别,我在这里挑几点主要区别说明一下
1.1 安装源不同
pip是Python默认的包管理器,它将PyPI(Python Package Index)作为获取包的安装源,PyPI上的软件包特别多,因此pip可以访问到的数据包的量非常庞大(但我们一般选择更改默认源,后续会讲)。
conda是Anaconda的默认的包管理器,它将 Anaconda数据库作为获取包的安装源。conda重点专注于科学计算和数据计算等领域它的数据库中包含了许多常用的科学计算库,但总体的软件包数量要远小于pip,因此一些小众的软件包可以使用pip进行安装。
1.2 支持语言不同
pip作为python官方的默认软件包管理器,只能安装python包;
conda是一个跨平台(Window、Linux、MAC)的通用的软件包和环境管理器,除了能够安装Python包之外还能够安装C、C++、Go等多种语言的软件包。
1.3 软件包的依赖不同
pip 在安装软件包时对当前环境内其他的软件包依赖的检查方式复杂且不一致,因此可能会导致包与包之间发生冲突;
conda 在安装软件包时使用更为复杂的检查方式,解决软件包的冲突问题,保证安装的所有软件包都能够兼容。
1.4 环境管理方式不同
pip 没有内置的环境隔离,只能借助虚拟环境venv等其他工具来实现环境隔离;
conda 提供了环境管理的功能,允许用户创建、导出、导入和共享独立的软件环境。可以很方便的在不同的项目之间切换环境,每个环境都可以具有不同的软件包和版本。
1.5 安装位置不同
pip 安装的库 如果使用系统的的python,则库会被保存在 ~/.local/lib/python3.x/site-packages 文件夹中;如果使用的是conda内置的python,则会被保存到 anaconda3/envs/current_env/lib/site-packages中;
conda 安装的库都会放在anaconda3/pkgs目录下。这样的好处就是,当在某个环境下已经下载好了某个库,再在另一个环境中还需要这个库时,就可以直接从pkgs目录下将该库复制至新环境而不用重复下载。
1.6 小tips
个人认为:能用conda安装的库尽量用conda,因为conda对库的管理十分全面,而且不易产生冲突等各种乱七八糟的问题。
参考文献
https://www.jianshu.com/p/e39cb192bde0
https://blog.csdn.net/qq_38463737/article/details/107780440
https://blog.csdn.net/whc18858/article/details/127135973
https://blog.csdn.net/qq_40818172/article/details/134832382
https://blog.csdn.net/u014264373/article/details/119390267
https://blog.csdn.net/weixin_43590796/article/details/115689009


