
- 1史上最快的推理终端来啦!Groq API 新手入门指南
- 2软件测试面试题之自动化测试题合集(金九银十必备)_自动化测试笔试题
- 3Mybatis (plus 也适用)原生直接执行某句SQL_mybatis plus 直接执行sql
- 4重磅!2024智源大会完整日程公布——全球大模型先锋集结
- 5实验07 因子分析_因子分析实验
- 6鸿蒙一次开发,多端部署(七)响应式布局_鸿蒙breakpointsystem
- 7chatgpt赋能python:Python编译成C代码的完整指南_将python代码转换成c代码
- 8PHP设计网站登录功能_php用户名密码登录界面
- 9【Asp.Net Core】C#解析Markdown文档_c# markdown
- 10大数据 深度学习毕业论文(毕设)课题汇总_深度学习的毕设论文怎么写
RabbitMQ发布确认和消息回退(6)_rabbitmq取消消息确认
赞
踩
概念
发布确认原理
生产者将信道设置成 confirm 模式,一旦信道进入 confirm 模式,所有在该信道上面发布的消息都将会被指派一个唯一的 ID(从 1 开始),一旦消息被投递到所有匹配的队列之后,broker就会发送一个确认给生产者(包含消息的唯一 ID),这就使得生产者知道消息已经正确到达目的队列了,如果消息和队列是可持久化的,那么确认消息会在将消息写入磁盘之后发出,broker 回传给生产者的确认消息中 delivery-tag 域包含了确认消息的序列号,此外 broker 也可以设置basic.ack 的 multiple 域,表示到这个序列号之前的所有消息都已经得到了处理。
confirm 模式最大的好处在于他是异步的,一旦发布一条消息,生产者应用程序就可以在等信道返回确认的同时继续发送下一条消息,当消息最终得到确认之后,生产者应用便可以通过回调方法来处理该确认消息,如果 RabbitMQ 因为自身内部错误导致消息丢失,就会发送一条 nack 消息,生产者应用程序同样可以在回调方法中处理该 nack 消息。
两种模式
1.简单确认模式(Simple Publisher Confirm):
在简单确认模式下,每次生产者发送一条消息到 RabbitMQ,都会立即等待 RabbitMQ 返回一个确认消息。如果消息成功发送到 RabbitMQ 服务器上的交换机,并且至少一个队列接收到了消息,RabbitMQ 就会返回一个确认消息给生产者。否则,如果消息发送失败,则会返回一个 Nack 消息。在这种模式下,生产者可以针对每一条消息都进行确认处理,确保消息是否被正确地发送到了 RabbitMQ。
3.批量确认模式(Publisher Confirm with Batch):
在批量确认模式下,生产者可以将一批消息发送到 RabbitMQ,然后等待一段时间后再收到确认消息。这样可以降低每条消息发送的确认成本,并提高性能。批量确认模式通过指定一个大小来定义批量确认的数量,当达到指定的数量后,RabbitMQ 会一次性发送确认消息给生产者。这种模式适用于需要发送大量消息的场景,可以减少确认消息的数量,提高消息发送的效率。
这两种发布确认模式在实现上有一些不同,可以根据实际的业务需求和性能要求来选择合适的模式。简单确认模式更适用于需要对每一条消息进行实时确认的场景,而批量确认模式适用于需要发送大量消息并且希望降低确认消息成本的场景。
开启方法
-- 确认模式配置
spring.rabbitmq.publisher-confirm-type: correlated
- NONE
禁用发布确认模式,是默认值。
- CORRELATED
发布消息成功到交换器后会触发回调方法。
- SIMPLE
测试有两种效果,其一效果和 CORRELATED 值一样会触发回调方法,其二在发布消息成功后使用 rabbitTemplate 调用 waitForConfirms 或 waitForConfirmsOrDie 方法等待 broker 节点返回发送结果,根据返回结果来判定下一步的逻辑,要注意的点是 waitForConfirmsOrDie 方法如果返回 false 则会关闭 channel,则接下来无法发送消息到 broker。(相当于单一发布)
- spring:
- # 配置RabbitMQ
- rabbitmq:
- host: 192.168.0.70
- port: 5674
- username: guest
- password: guest
- # 虚拟主机
- virtual-host: my_vhost
- # 开启确认模式
- publisher-confirm-type: correlated
测试
为了方便测试,此机制单独编写类去测试,使用的模式为路由模式(其他模式也可以)
1.创建回调函数
- package com.model.callback;
-
- import lombok.extern.slf4j.Slf4j;
- import org.springframework.amqp.rabbit.connection.CorrelationData;
- import org.springframework.amqp.rabbit.core.RabbitTemplate;
- import org.springframework.stereotype.Component;
-
- /**
- * @Author: Haiven
- * @Time: 2024/4/22 17:26
- * @Description: TODO
- */
- @Component
- @Slf4j
- public class MyConfirmCallBack implements RabbitTemplate.ConfirmCallback {
- /**
- * 被调用的回调方法
- * @param correlationData 相关配置信息
- * @param ack 交换机是否成功收到消息 可以根据 ack 做相关的业务逻辑处理
- * @param cause 失败原因
- */
- @Override
- public void confirm(CorrelationData correlationData, boolean ack, String cause) {
- System.out.println("消息推送回调:配置信息="+correlationData+";结果="+ack+"失败原因="+cause);
- if(ack){
- //消息推送成功
- System.out.println("消息推送成功");
- }else{
- System.out.println("消息推送失败:" + cause);
- }
- }
- }

回调函数会在消息推送到队列后调用
2.配置回调函数
将上述回调函数设置到mq的配置中,这里再RabbitmqConfig文件中配置
- package com.model.config;
-
- import com.model.callback.MyConfirmCallBack;
- import org.springframework.amqp.core.Queue;
- import org.springframework.amqp.core.QueueBuilder;
- import org.springframework.amqp.rabbit.connection.ConnectionFactory;
- import org.springframework.amqp.rabbit.core.RabbitTemplate;
- import org.springframework.beans.factory.annotation.Value;
- import org.springframework.context.annotation.Bean;
- import org.springframework.context.annotation.Configuration;
-
- import javax.annotation.Resource;
-
- /**
- * @Author: Haiven
- * @Time: 2024/4/18 17:28
- * @Description: TODO
- */
- @Configuration
- public class RabbitmqConfig {
-
- @Value("${rabbitmq.work.queue}")
- private String workQueue;
-
- @Resource
- private MyConfirmCallBack myConfirmCallBack;
-
- /**
- * 工作模式的队列
- * @return 队列
- */
- @Bean(name = "workQueue")
- public Queue getWorkQueue(){
- return QueueBuilder.durable(workQueue).build();
- }
-
- @Bean
- public RabbitTemplate createRabbitTemplate(ConnectionFactory connectionFactory) {
- RabbitTemplate rabbitTemplate = new RabbitTemplate();
- rabbitTemplate.setConnectionFactory(connectionFactory);
- // 设置开启 Mandatory 强制执行调用回调函数
- rabbitTemplate.setMandatory(true);
- //设置回调
- rabbitTemplate.setConfirmCallback(myConfirmCallBack);
- //设置回退回调
- return rabbitTemplate;
- }
-
- }
3.创建交换机和队列
这里创建ConfirmConfig配置文件与其他队列进行区分
- package com.model.config;
-
- import org.springframework.amqp.core.*;
- import org.springframework.context.annotation.Bean;
- import org.springframework.context.annotation.Configuration;
-
- /**
- * @Author: Haiven
- * @Time: 2024/4/22 17:22
- * @Description: TODO
- */
- @Configuration
- public class ConfirmConfig {
-
- /**
- * 测试发布确认的交换机
- * @return exchange
- */
- @Bean(name = "confirmExchange")
- public Exchange getConfirmExchange(){
- return ExchangeBuilder
- .directExchange("exchange_confirm")
- .build();
- }
-
- /**
- * 队列
- * @return queue
- */
- @Bean(name = "confirmQueue")
- public Queue getConfirmQueue(){
- return QueueBuilder
- .durable("queue_confirm")
- .build();
- }
-
- /**
- * 绑定队列
- * @return binding
- */
- @Bean
- public Binding getConfirmBinding(){
- return BindingBuilder
- .bind(getConfirmQueue())
- .to(getConfirmExchange())
- //路由键 队列1接收debug级别的消息
- .with("confirm")
- .noargs();
- }
-
- }
4.创建消费者
- package com.model.listener;
-
- import org.springframework.amqp.rabbit.annotation.RabbitListener;
- import org.springframework.stereotype.Component;
-
- /**
- * @Author: Haiven
- * @Time: 2024/4/22 17:31
- * @Description: TODO
- */
- @Component
- public class ConfirmConsumer {
-
- @RabbitListener(queues = {"queue_confirm"})
- public void routingConfirm(String msg){
- System.out.println("消费者 -confirm- 接收消息:" + msg);
- }
- }
5.发送并接收消息
- package com.model.controller;
-
- import com.code.domain.Response;
- import com.model.service.RabbitService;
- import org.springframework.amqp.rabbit.core.RabbitTemplate;
- import org.springframework.web.bind.annotation.GetMapping;
- import org.springframework.web.bind.annotation.RequestMapping;
- import org.springframework.web.bind.annotation.RestController;
-
- import javax.annotation.Resource;
-
-
- /**
- * @Author: Haiven
- * @Time: 2024/4/19 9:46
- * @Description: TODO
- */
- @RestController
- @RequestMapping("/producer")
- public class ProducerController {
-
- @Resource
- private RabbitService rabbitService;
-
- @GetMapping("/simple")
- public Response<Void> simple(String msg){
- boolean res = rabbitService.simple(msg);
- return res ? Response.success() : Response.fail();
- }
-
- @GetMapping("/work")
- public Response<Void> work(String msg){
- boolean res = rabbitService.work(msg);
- return res ? Response.success() : Response.fail();
- }
-
- @GetMapping("/sub")
- public Response<Void> sub(String msg){
- boolean res = rabbitService.sub(msg);
- return res ? Response.success() : Response.fail();
- }
-
- @GetMapping("/routing")
- public Response<Void> routing(String msg, String type){
- boolean res = rabbitService.routing(msg, type);
- return res ? Response.success() : Response.fail();
- }
-
- @GetMapping("/topic")
- public Response<Void> topic(String msg, String type){
- boolean res = rabbitService.topic(msg, type);
- return res ? Response.success() : Response.fail();
- }
-
- @GetMapping("/confirm")
- public Response<Void> confirm(String msg, String type){
- boolean res = rabbitService.confirm(msg, type);
- return res ? Response.success() : Response.fail();
- }
- }
- package com.model.service.impl;
-
- import com.model.service.RabbitService;
- import lombok.extern.slf4j.Slf4j;
- import org.springframework.amqp.rabbit.core.RabbitTemplate;
- import org.springframework.beans.factory.annotation.Value;
- import org.springframework.stereotype.Service;
-
- import javax.annotation.Resource;
-
- /**
- * @Author: Haiven
- * @Time: 2024/4/19 10:51
- * @Description: TODO
- */
- @Service
- @Slf4j
- public class RabbitServiceImpl implements RabbitService {
-
- @Resource
- private RabbitTemplate rabbitTemplate;
-
- @Value("${rabbitmq.simple.queue}")
- private String simpleQueue;
-
- @Value("${rabbitmq.work.queue}")
- private String workQueue;
-
- @Override
- public boolean simple(String msg) {
- try {
- rabbitTemplate.convertAndSend(simpleQueue, msg);
- return true;
- }catch (Exception e){
- e.printStackTrace();
- return false;
- }
- }
-
- @Override
- public boolean work(String msg) {
- try {
- rabbitTemplate.convertAndSend(workQueue, msg);
- return true;
- }catch (Exception e){
- e.printStackTrace();
- return false;
- }
- }
-
- @Override
- public boolean sub(String msg) {
- try {
- //路由模式就不能直接发送消息到队列了, 而是发送到交换机,由交换机进行广播, routingKey为路由Key 订阅模式给""
- rabbitTemplate.convertAndSend("exchange_sub","", msg);
- return true;
- }catch (Exception e){
- e.printStackTrace();
- return false;
- }
- }
-
- @Override
- public boolean routing(String msg, String type) {
- System.out.println("理由模式发送消息:msg="+msg+",type="+type+"");
- try {
- //路由模式就不能直接发送消息到队列了, 而是发送到交换机,由交换机进行广播, routingKey为路由Key 订阅模式给""
- rabbitTemplate.convertAndSend("exchange_routing",type, msg);
- return true;
- }catch (Exception e){
- e.printStackTrace();
- return false;
- }
- }
-
- @Override
- public boolean topic(String msg, String type) {
- System.out.println("主题模式发送消息:msg="+msg+",type="+type+"");
- try {
- //主题模式会根据 type的通配符进行分发
- rabbitTemplate.convertAndSend("exchange_topic",type, msg);
- return true;
- }catch (Exception e){
- e.printStackTrace();
- return false;
- }
- }
-
- @Override
- public boolean confirm(String msg, String type) {
- System.out.println("发布确认模式发送消息:msg="+msg+",type="+type+"");
- try {
- rabbitTemplate.convertAndSend("exchange_confirm",type, msg);
- return true;
- }catch (Exception e){
- e.printStackTrace();
- return false;
- }
- }
- }
发送消息
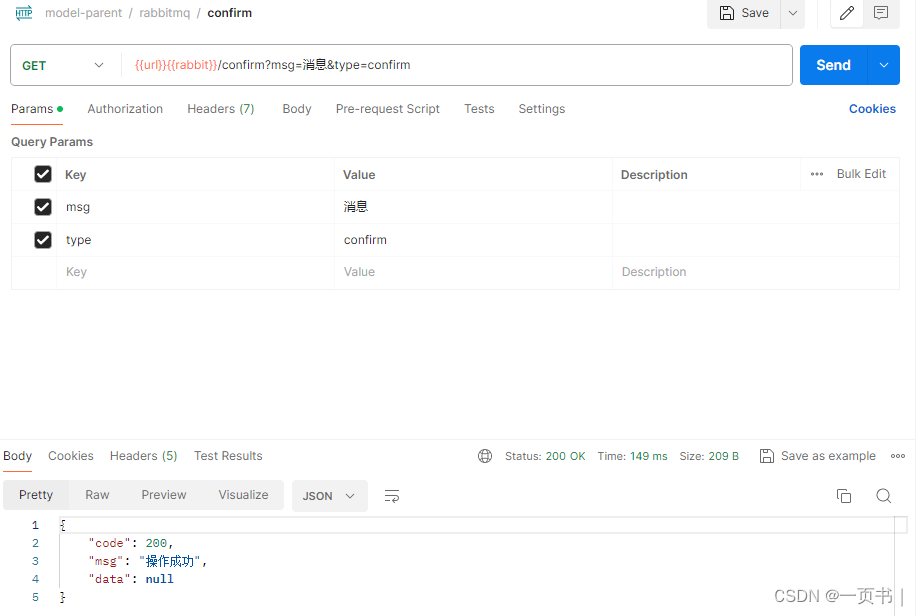
接收消息
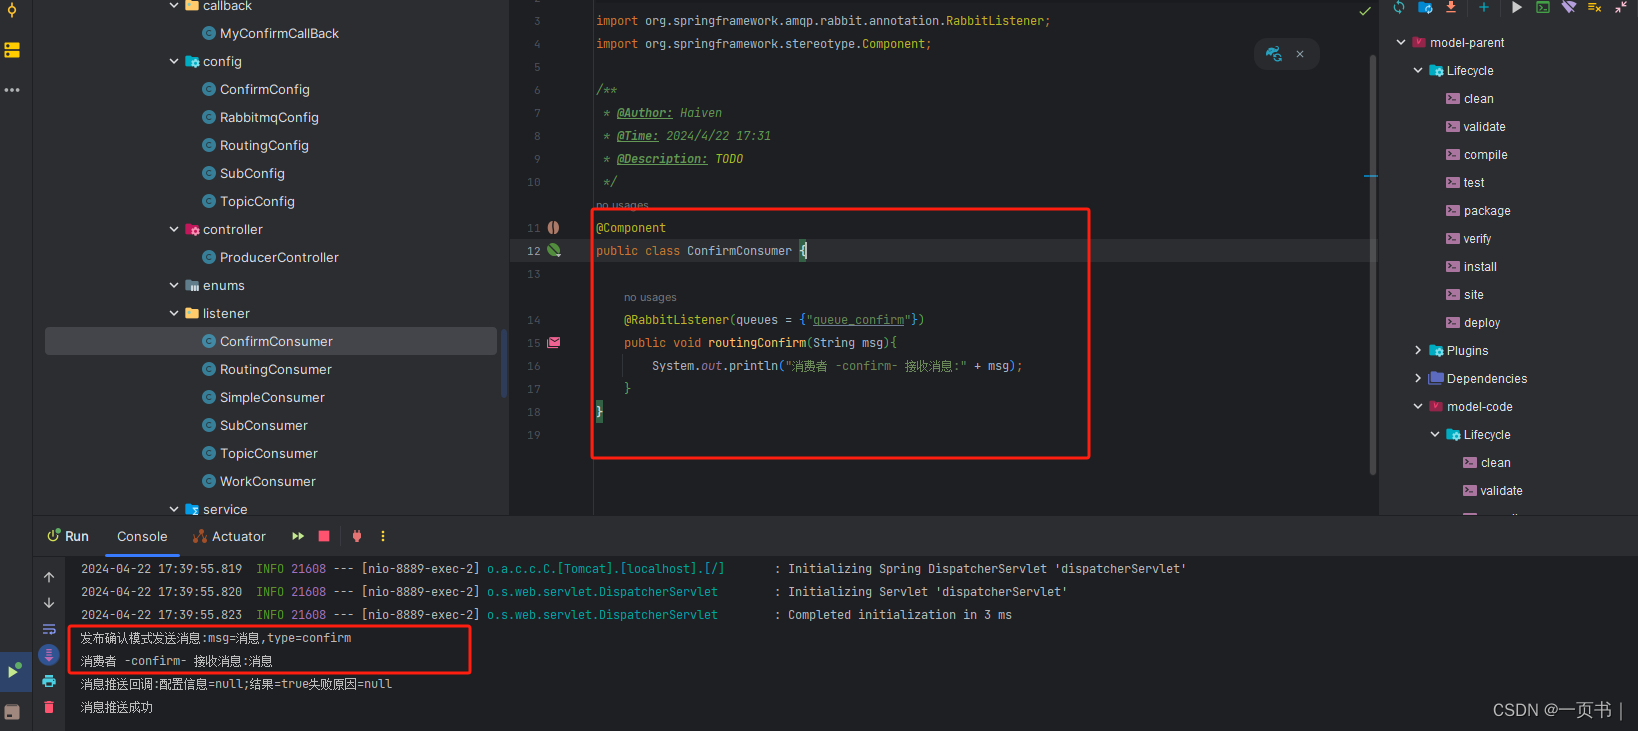
发送成功后回调函数会执行,即使消费者没有消费该消息,回调函数仍然会执行

消息回退
当第二条消息推送后消费者是没有消费消息的,虽然推送成功,但是却被丢弃了,而此时生产者需要知道此消息是否被消费成功,所有就使用到了消息回退机制
spring.rabbitmq.publisher-returns=true1.设置回调函数
MyReturnCallBack
- package com.model.callback;
-
- import lombok.extern.slf4j.Slf4j;
- import org.springframework.amqp.core.Message;
- import org.springframework.amqp.rabbit.core.RabbitTemplate;
- import org.springframework.stereotype.Component;
-
- /**
- * @Author: Haiven
- * @Time: 2024/4/23 10:16
- * @Description: TODO
- */
- @Component
- @Slf4j
- public class MyReturnCallBack implements RabbitTemplate.ReturnCallback {
- /**
- *
- * @param msg 消息对象
- * @param errCode 错误码
- * @param errMsg 错误信息
- * @param exchange 交换机
- * @param rout 路由键
- */
- @Override
- public void returnedMessage(Message msg, int errCode, String errMsg, String exchange, String rout) {
- log.debug("消息对象={},错误码={},错误消息={},交换机={},路由键={}", msg, errCode, errMsg, exchange, rout);
- }
- }
此函数会在消息被丢弃或者消费失败后回调
2.设置到配置中
在RabbitmqConfig配置文件设置
- package com.model.config;
-
- import com.model.callback.MyConfirmCallBack;
- import com.model.callback.MyReturnCallBack;
- import org.springframework.amqp.core.Queue;
- import org.springframework.amqp.core.QueueBuilder;
- import org.springframework.amqp.rabbit.connection.ConnectionFactory;
- import org.springframework.amqp.rabbit.core.RabbitTemplate;
- import org.springframework.beans.factory.annotation.Value;
- import org.springframework.context.annotation.Bean;
- import org.springframework.context.annotation.Configuration;
-
- import javax.annotation.Resource;
-
- /**
- * @Author: Haiven
- * @Time: 2024/4/18 17:28
- * @Description: TODO
- */
- @Configuration
- public class RabbitmqConfig {
-
- @Value("${rabbitmq.work.queue}")
- private String workQueue;
-
- @Resource
- private MyConfirmCallBack myConfirmCallBack;
-
- @Resource
- private MyReturnCallBack myReturnCallBack;
-
- /**
- * 工作模式的队列
- * @return 队列
- */
- @Bean(name = "workQueue")
- public Queue getWorkQueue(){
- return QueueBuilder.durable(workQueue).build();
- }
-
- @Bean
- public RabbitTemplate createRabbitTemplate(ConnectionFactory connectionFactory) {
- RabbitTemplate rabbitTemplate = new RabbitTemplate();
- rabbitTemplate.setConnectionFactory(connectionFactory);
- // 设置开启 Mandatory 强制执行调用回调函数
- rabbitTemplate.setMandatory(true);
- //设置发布确认
- rabbitTemplate.setConfirmCallback(myConfirmCallBack);
- //设置消息回退
- rabbitTemplate.setReturnCallback(myReturnCallBack);
- //设置回退回调
- return rabbitTemplate;
- }
-
- }
先注入,在设置到rabbitTemplate对象中,这样发送消息时就可以回调
3.发送并接收消息
此处使用confirm交换机测试
发送一条没有路由的消息
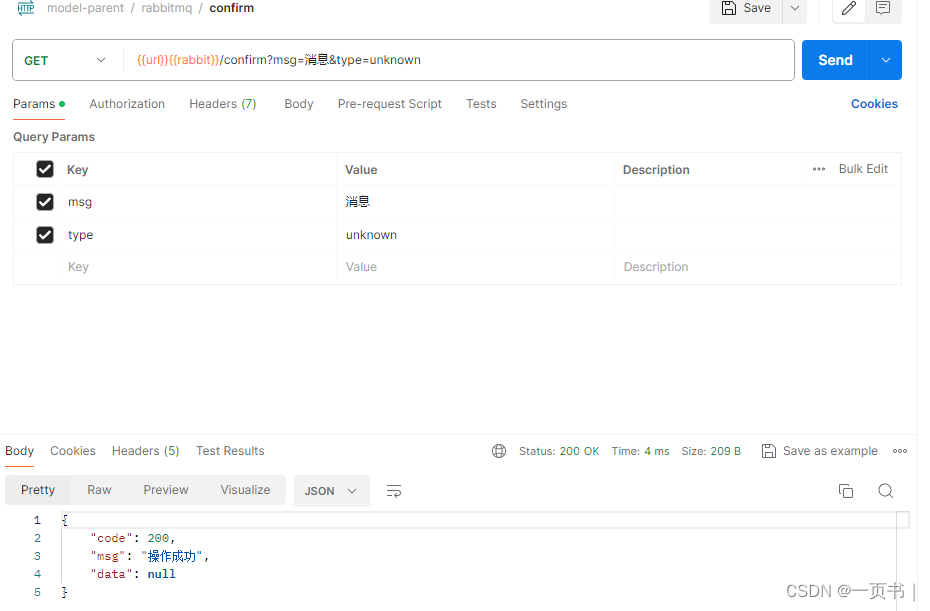

此时消息推送成功,但是没有被消费者消费,而是被丢弃,所有消息回退的回调函数执行:
消息对象=(
Body:'消息',
MessageProperties : [
headers={},
contentType=text/plain,
contentEncoding=UTF-8,
contentLength=0,
receivedDeliveryMode=PERSISTENT,
priority=0, deliveryTag=0])
错误码=312
错误消息=NO_ROUTE
交换机=exchange_confirm
路由键=unknown
发送一条路由的消息


消息推送到交换机成功,并被成功消费,回退消息的回调函数未执行
备份交换机
有了发布确认和回退消息,我们获得了对无法投递消息的感知能力,在生产者的消息无法被投递时发现并处理。但有时候,我们并不知道该如何处理这些无法路由的消息,最多打个日志,然后触发报警,再来手动处理。而通过日志来处理这些无法路由的消息是很不优雅的做法,特别是当生产者所在的服务有多台机器的时候,手动复制日志会更加麻烦而且容易出错。而且设置参数会增加生产者的复杂性,需要添加处理这些被退回的消息的逻辑。如果既不想丢失消息,又不想增加生产者的复杂性,就可以使用备份交换机
备份交换机可以理解为 RabbitMQ 中交换机的“备份”,当我们为某一个交换机声明一个对应的备份交换机时,就是为它创建一个 备份,当交换机接收到一条不可路由消息时,将会把这条消息转发到备份交换机中,由备份交换机来进行转发和处理,通常备份交换机的类型为 Fanout ,这样就能把所有消息都投递到与其绑定的队列中,然后我们在备份交换机下绑定一个队列,这样所有那些原交换机无法被路由的消息,就会都进 入这个队列了。当然,我们还可以建立一个报警队列,用独立的消费者来进行监测和报警。
1.创建备份交换机
为了方便区分,这里新建一个配置类ConfirmBackupConfig,用于创建虚拟机和队列,备份交换机的类型一定要为fanout
- package com.model.config;
-
- import org.springframework.amqp.core.*;
- import org.springframework.context.annotation.Bean;
- import org.springframework.context.annotation.Configuration;
- import org.springframework.context.annotation.DependsOn;
- import org.springframework.core.annotation.Order;
-
- /**
- * @Author: Haiven
- * @Time: 2024/4/23 15:07
- * @Description: TODO
- */
- @Configuration
- public class ConfirmBackupConfig {
- /**
- * exchange_confirm 交换机的备份交换机
- * @return exchange
- */
- @Bean(name = "confirmBackupExchange")
- public Exchange getConfirmBackupExchange(){
- return ExchangeBuilder
- .fanoutExchange("exchange_confirm_backup")
- .build();
- }
-
- @Bean("confirmBackupQueue")
- public Queue getConfirmBackupQueue(){
- return QueueBuilder
- .durable("queue_confirm_backup")
- .build();
- }
-
- @Bean("confirmBackupBinding")
- public Binding getConfirmBackupBinding(){
- return BindingBuilder
- .bind(getConfirmBackupQueue())
- .to(getConfirmBackupExchange())
- .with("")
- .noargs();
- }
- }
2.绑定备份交换机
这里我们用上面的消息回退测试用的交换机进行测试,就不额外再创建了,在ConfirmConfig配置文件中直接绑定:
.withArgument("alternate-exchange", "exchange_confirm_backup")
在创建交换机的时候直接指定 alternate-exchange,exchange_confirm_backup为备份交换的名称
- package com.model.config;
-
- import org.springframework.amqp.core.*;
- import org.springframework.boot.autoconfigure.AutoConfigureAfter;
- import org.springframework.context.annotation.Bean;
- import org.springframework.context.annotation.Configuration;
- import org.springframework.context.annotation.Import;
-
- /**
- * @Author: Haiven
- * @Time: 2024/4/22 17:22
- * @Description: TODO
- */
- @Configuration
- public class ConfirmConfig {
-
- /**
- * 测试发布确认的交换机
- * @return exchange
- */
- @Bean(name = "confirmExchange")
- public Exchange getConfirmExchange(){
- return ExchangeBuilder
- .directExchange("exchange_confirm")
- .withArgument("alternate-exchange", "exchange_confirm_backup")
- .durable(true)
- .build();
- }
-
- /**
- * 队列
- * @return queue
- */
- @Bean(name = "confirmQueue")
- public Queue getConfirmQueue(){
- return QueueBuilder
- .durable("queue_confirm")
- .build();
- }
-
- /**
- * 绑定队列
- * @return binding
- */
- @Bean
- public Binding getConfirmBinding(){
- return BindingBuilder
- .bind(getConfirmQueue())
- .to(getConfirmExchange())
- //路由键 队列1接收debug级别的消息
- .with("confirm")
- .noargs();
- }
-
- }
由于之前创建exchange_confirm交换机的时候没有指定备份交换机,所以这里要先将该交换机删掉,然后重新创建,备份交换机一定要在创建的时候指定
进入控制台删除,不想删可创建新的交换机用于测试

3.备份交换机消费者
直接在ConfirmConsumer配置文件中声明confirmBackupConsumer
- package com.model.listener;
-
- import lombok.extern.slf4j.Slf4j;
- import org.springframework.amqp.rabbit.annotation.RabbitListener;
- import org.springframework.stereotype.Component;
-
- /**
- * @Author: Haiven
- * @Time: 2024/4/22 17:31
- * @Description: TODO
- */
- @Component
- @Slf4j
- public class ConfirmConsumer {
-
- @RabbitListener(queues = {"queue_confirm"})
- public void confirmConsumer(String msg){
- System.out.println("消费者 -confirm- 接收消息:" + msg);
- }
-
- @RabbitListener(queues = {"queue_confirm_backup"})
- public void confirmBackupConsumer(String msg){
- log.debug("消费者 -- 备份队列 -- 接收消息:" + msg);
- }
- }
4.发送消息测试
发送一条没有路由的消息

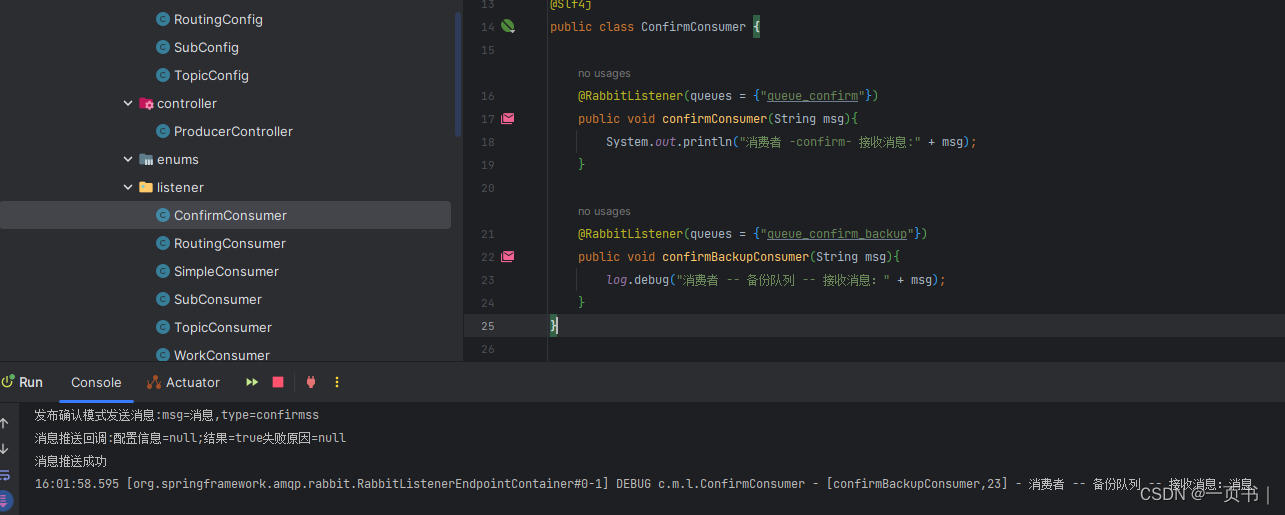
1.可以看到发布确认的消息回调执行,说明已经推送到交换机
2.但是消息回退的回调没有执行,但该消息没有被confirm的消费者消费
3.该消息被备份交换机的消费者消费
有了备份交换机,消息如果消费失败,消息不会回退,而会被备份队列的消费者接收

