
热门标签
热门文章
- 1GLUE榜单_glue排行榜
- 2Python计算机视觉编程第三章——图像到图像的映射_通过圆拟合计算单应性矩阵
- 3非spring项目Druid配置keepAlive参数不生效(附解决方案)_druidkeepalive不生效
- 4人工智能(pytorch)搭建模型25-基于pytorch搭建FPN特征金字塔网络的应用场景,模型结构介绍
- 5AIGC查重高怎么降:七个方法帮你轻松应对
- 6互联网摸鱼日报(2024-03-27)
- 7用Python靠接单外包赚钱是最不值得去做的,给你推荐几个靠谱的路子_python外包好不好做
- 8如何申请到免费SSL证书
- 9AI复试面试可能问到的问题总结II_考研复试人工智能常见问题
- 10微信小程序(总结三):uniapp开发,如何获取微信用户手机号(最新)_uniapp获取微信手机号
当前位置: article > 正文
记录I18n、@intlify/vite-plugin-vue-i18n、ElementPlus的那些事儿_@intlify/unplugin-vue-i18n/vite
作者:Monodyee | 2024-03-28 23:26:57
赞
踩
@intlify/unplugin-vue-i18n/vite
先上需求:如何在不刷新页面的情况下,切换elementplus组件库的国际化
本人用到的插件:I18n,elementPlus,@intlify/vite-plugin-vue-i18n
首先:直接使用全局配置ConfigProvider组件
代码如下:
- import zhCn from 'element-plus/lib/locale/lang/zh-cn';
-
- <ElConfigProvider :locale="zhCn">
- <RouterView></RouterView>
- </ElConfigProvider>
嗯,这样就可以全局配置了,but这玩意儿是静态的,而且只能引用官方的国际化文件,并且无法切换。
顺便提下@intlify/vite-plugin-vue-i18n插件,vite.config.ts中的配置代码如下:
- import path from 'path'
- import { defineConfig } from 'vite'
- import vue from '@vitejs/plugin-vue'
- import vueI18n from '@intlify/vite-plugin-vue-i18n'
-
- export default defineConfig({
- plugins: [
- vue(), // you need to install `@vitejs/plugin-vue`
- vueI18n({
- // if you want to use Vue I18n Legacy API, you need to set `compositionOnly: false`
- // compositionOnly: false,
- // you need to set i18n resource including paths !
- include: path.resolve(__dirname, '../locales/**')
- })
- ]
- })
这玩意儿可以直接加载整个文件夹内的配置文件,如
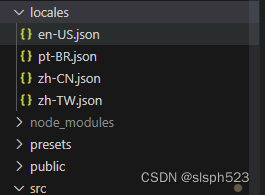
会自动加载locales文件夹中的四个json国际化文件。
新建一个lang.ts文件
- import { createI18n } from 'vue-i18n';
- import messages from '@intlify/vite-plugin-vue-i18n/messages';
-
- const i18n = createI18n({
- locale: 'en-US',
- globalInjection: true,
- messages,
- });
-
- export default i18n;
main.ts中使用国际化
- // i18n
- import i18n from './utils/lang';
-
- ...
-
- app.use(i18n) // 直接使用即可
-
- ...
-
-
国际化简单的配置好了,那如何才能动态切换elementplus组件库的国际化呢
首先我们在App.vue中引用
- import localesList from '@intlify/vite-plugin-vue-i18n/messages';
-
- ...
-
- // 这里引用I18n
- const { t, availableLocales, locale } = useI18n();
其次我们再新建一个计算属性 elementlocale
- const toJson = (json: any, k: string) => {
- const result: any = {};
- // eslint-disable-next-line no-restricted-syntax
- for (const key in json) {
- if (Object.prototype.hasOwnProperty.call(json, key)) {
- const element = json[key];
- if (typeof element === 'object') {
- result[key] = toJson(element, `${k}.${key}`)
- } else {
- result[key] = t(`${k}.${key}`);
- }
- }
- }
- return result;
- };
-
- const elementlocale = computed(()=>{
- const obj = {
- name: locale.value,
- el: toJson(localesList[locale.value].lang.el)
- };
- return obj;
- })
这里不得不说一下,为什么会有toJson这个函数,因为 @intlify/vite-plugin-vue-i18n/messages 获取到的国际化内容格式是这样的

对比了一下elementplus自带的国际化文件的数据
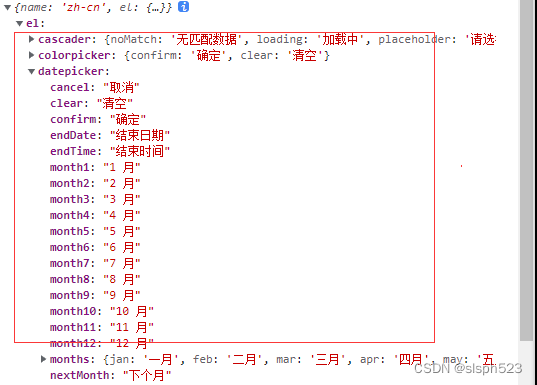
发现i18n国际化中多了一层source这个属性,debugger看了下源码,这里是直接返回一个函数,不是个字符串,导致之前怎么切换都无效果,所以这里我写了一个toJson函数转化了一下。
到这里就好了,把之前写的计算属性放到ConfigProvider中,后续只需要在其他页面更改locale.value即可,完整使用代码:
- <script setup lang="ts">
-
- import localesList from '@intlify/vite-plugin-vue-i18n/messages';
-
- ...
-
-
- const { t, availableLocales, locale } = useI18n();
-
- ...
-
- // i18n转json
- const toJson = (json: any) => {
- let result:any = {};
- for (const key in json) {
- if (Object.prototype.hasOwnProperty.call(json, key)) {
- const element = json[key];
- if(element.source){
- result[key] = element.source;
- }else{
- result[key] = toJson(element);
- }
- }
- }
- return result;
- }
-
- // 计算属性,监听locale
- const elementlocale = computed(()=>{
- const obj = {
- name: locale.value,
- el: toJson(localesList[locale.value].lang.el)
- };
- return obj;
- });
-
- </script>
-
- <template>
- <ElConfigProvider :locale="elementlocale">
- <RouterView></RouterView>
- </ElConfigProvider>
- </template>
-
声明:本文内容由网友自发贡献,不代表【wpsshop博客】立场,版权归原作者所有,本站不承担相应法律责任。如您发现有侵权的内容,请联系我们。转载请注明出处:https://www.wpsshop.cn/w/Monodyee/article/detail/332229
推荐阅读
相关标签

