
- 1Linux - tar (tape archive)
- 2Vue + Element ui 实现动态表单,包括新增行/删除行/动态表单验证/提交功能_vue 在el-dialog实现好看的点击按钮时,新增或删除一行表单元素
- 3Microsoft Visual C++ Runtime Library
- 4doccano——NLP标注工具新秀_docanno
- 5在gitee 创建仓库并关联到本地_gitee新建仓库时怎么关联项目
- 6淘宝扭蛋机小程序开发:创意、功能与实现_淘宝扭蛋机开发
- 7程序员的情人节「GitHub 热点速览 v.22.07」
- 8openplc nodered 树莓派的联合应用方式
- 9代码阅读方法与最佳实践_什么是阅读代码
- 10JavaScript 数组方法的整理_12 "*3==" ".join(["12","12","12"]) 的输出是true
Python 全栈系列239 使用消息队列完成分布式任务
赞
踩
说明
在Python - 深度学习系列32 - glm2接口部署实践提到,通过部署本地化大模型来完成特定的任务。
由于大模型的部署依赖显卡,且常规量级的任务需要大量的worker支持,从成本考虑,租用算力机是比较经济的。由于任务是属于超高计算传输比的类型,且算力机随时可能出现不稳定的情况。
所以,使用消息队列完成此项任务是比较合适的。本次目标:
- 1 回顾并快速搭建RabbitMQ和RabbitAgent服务的方法
- 2 在无端口算力租用商(AutoDL)下部署chatglm2服务,并启动Worker处理数据
- 3 在有端口算力租用商(仙宫云)下部署chatglm2服务,并用nginx反向代理,然后在异地启动worker测试
内容
1 构建消息队列(Server)
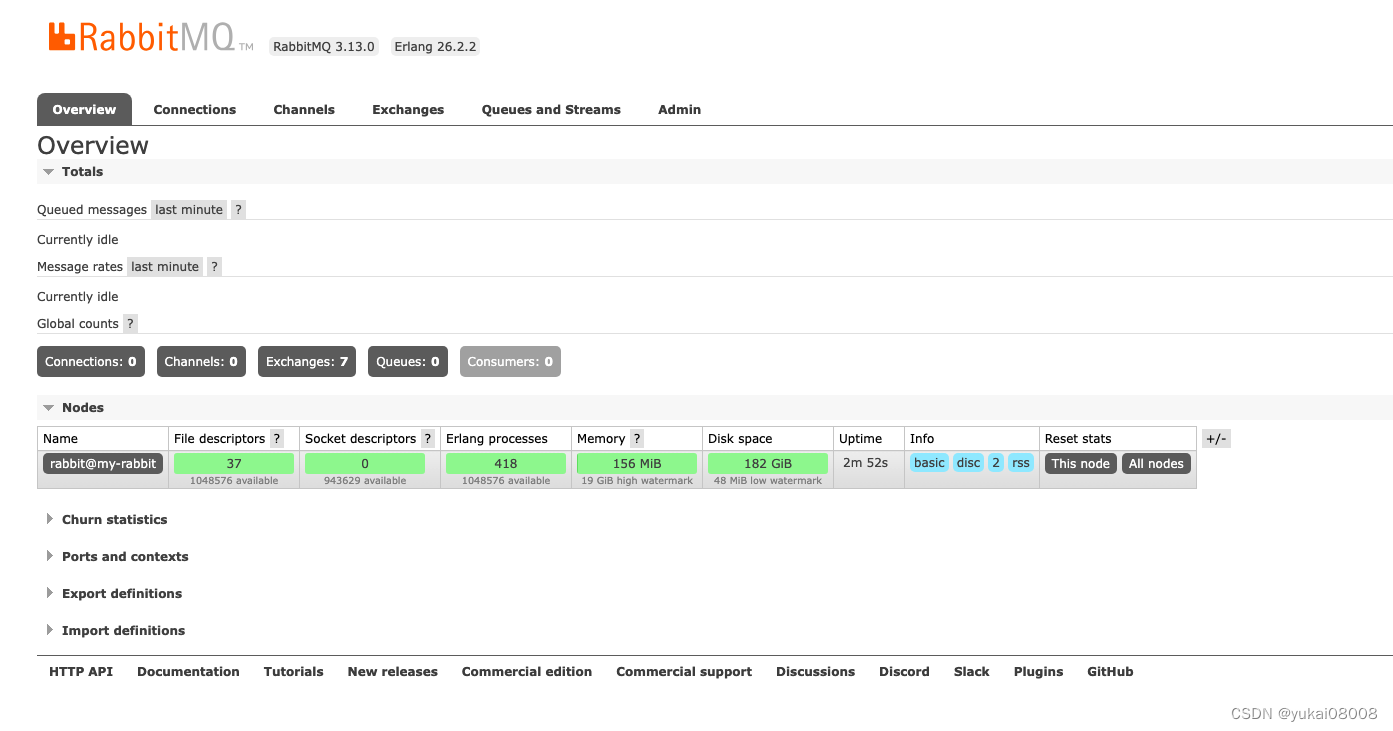
1.1 RabbitMQ镜像
先采用之前的命令启动
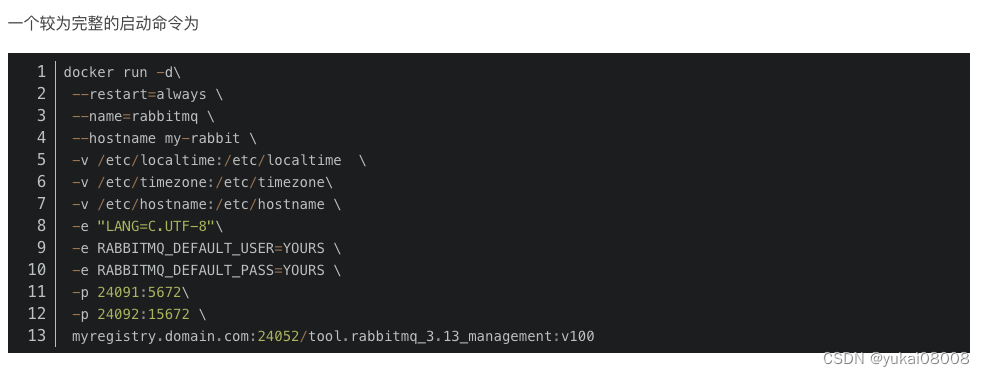
在算力机使用阿里云镜像仓库拉取,分钟级完成启动
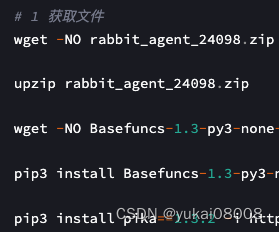
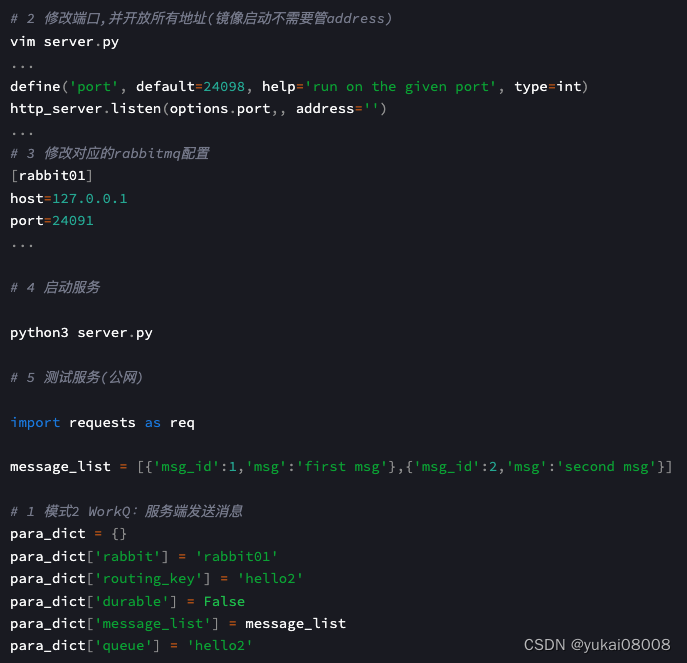
1.2 RabbitAgent服务
理论上,应该封装为镜像后,以容器方式启动。不过租用的算力机系统盘太小(50G),装完CUDA之后只剩下10G多的空间,所以这次就把项目文件搬过去,在宿主机启动。
以后这类轻量级的服务,可以用一个很小的python环境镜像封装。
res = req.post('http://IP:24098/send_workq_message/', json = para_dict)
<Response [200]>
# 6 永久启动服务

nohup python3 server.py  >/dev/null 2>&1 &
- 1
- 2
- 3
- 4
- 5

消费者(手动确认消息模式)
            import pika
            import json
            credentials = pika.PlainCredentials('user', 'passwd')
            connection = pika.BlockingConnection(pika.ConnectionParameters('IP', port, '/', credentials))

            channel = connection.channel()

            def callback(ch, method, properties, body):
                input_data = json.loads(body.decode())
                print(f" [x] Received ",input_data)
                # time.sleep(body.count(b'.'))
                print(" [x] Done")
                ch.basic_ack(delivery_tag = method.delivery_tag)


            # channel.queue_declare(queue='hello1',durable=True)
            # 消费者预取消息数
            channel.basic_qos(prefetch_count=3)
            # 1 消费持久化的队列
            #channel.basic_consume(queue='hello1',
            #                        on_message_callback=callback, auto_ack =False)
            # 2 消费非持久化队列
            channel.basic_consume(queue='hello2',
                                    on_message_callback=callback, auto_ack =False)

            print(' [*] Waiting for messages. To exit press CTRL+C')
            channel.start_consuming()

 [*] Waiting for messages. To exit press CTRL+C
 [x] Received  {'msg_id': 1, 'msg': 'first msg'}
 [x] Done
 [x] Received  {'msg_id': 2, 'msg': 'second msg'}
 [x] Done
 [x] Received  {'msg_id': 1, 'msg': 'first msg'}
 [x] Done
 [x] Received  {'msg_id': 2, 'msg': 'second msg'}
 [x] Done
- 1
- 2
- 3
- 4
- 5
- 6
- 7
- 8
- 9
- 10
- 11
- 12
- 13
- 14
- 15
- 16
- 17
- 18
- 19
- 20
- 21
- 22
- 23
- 24
- 25
- 26
- 27
- 28
- 29
- 30
- 31
- 32
- 33
- 34
- 35
- 36
- 37
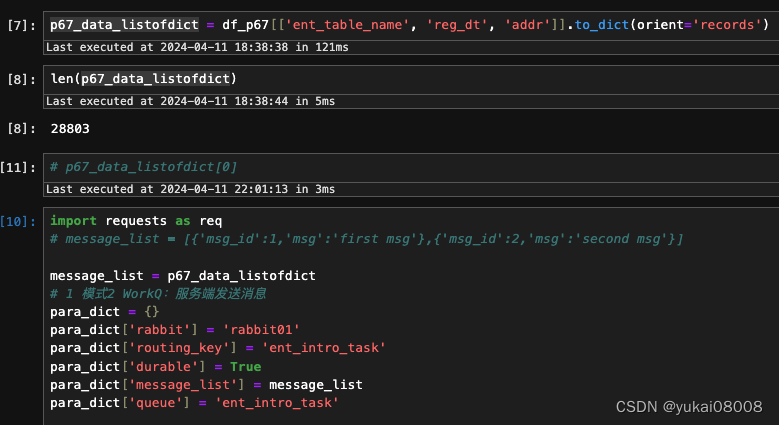
1.3 将任务数据通过RabbitAgent写入
写入2.8万条,耗时5秒。
2 无端口算力租用商Worker测试
除了一定要返回的结果数据,还应该加上机器名称,显卡配置与处理时长。
2.1 启动服务
无端口算力机的代表就是AutoDL了,他们家机器也偏贵,4090一小时2.5~2.6元,比仙宫云高不少(我还是比较prefer后者的)。目前暂时没发现AutoDL有什么特别的优点,中规中矩。

发送文件
rsync -rvltz -e 'ssh -p 44620' --progress /data/implement_container_file/chatglm2_6b_int4_api/workspace root@connect.westb.seetacloud.com:/root/autodl-tmp/
- 1
然后修改api.py中模型加载的位置和端口号,启动3个服务。
以下是获取单条数据并进行调试的方法
import pika
import json
credentials = pika.PlainCredentials('x', 'xxx')
connection = pika.BlockingConnection(pika.ConnectionParameters('xxxx', 24091, '/', credentials,heartbeat=600))
channel = connection.channel()
# 声明一个队列
channel.queue_declare(queue='ent_intro_task', durable=True)
# 从队列中获取一条消息
method_frame, header_frame, body = channel.basic_get(queue='ent_intro_task')
data = body.decode('utf-8')
data1 = json.loads(data)
...
connection.close()
- 1
- 2
- 3
- 4
- 5
- 6
- 7
- 8
- 9
- 10
- 11
- 12
- 13
完成测试之后,打包为ent_intro_worker.py,该脚本接受一个端口输入,以便将worker和server匹配起来,充分利用资源。
import pika
import json
import time

import sys
import requests as req

# 获取命令行参数
if len(sys.argv) > 1:
    parameter_value = sys.argv[1]
    print("传入的参数值为:", parameter_value)
else:
    print("未传入参数")
def send_resp(a_message):
    message_list = [a_message]
    para_dict = {}
    para_dict['rabbit'] = 'rabbit01'
    para_dict['routing_key'] = 'ent_intro_result'
    para_dict['durable'] = True
    para_dict['message_list'] = message_list
    para_dict['queue'] = 'ent_intro_result'

    resp = req.post('http://IP:PORT/send_workq_message/', json = para_dict)
    return True

tmp ='''
成立日期:%s
注册地址:%s
%s简介,字数在100-200字之间
'''
credentials = pika.PlainCredentials('andy', 'andy123')
connection = pika.BlockingConnection(pika.ConnectionParameters('IP', PORT, '/', credentials, heartbeat=600))

channel = connection.channel()

# 手动确认
def callback(ch, method, properties, body):
    input_data = json.loads(body.decode())
    print(f" [x] Received ",input_data)
    tick1 = time.time()
    prompt_content = {'prompt': tmp % (input_data['reg_dt'], input_data['addr'], input_data['ent_table_name'] )}
    res = req.post('http://127.0.0.1:%s/' % parameter_value, json =prompt_content).json()
    tick2 = time.time()

    a_message = {}
    a_message['company'] =  input_data['ent_table_name']
    a_message['intro'] =  res['response']
    a_message['spends'] = tick2-tick1

    send_resp(a_message)
    print(" [x] Done")
    ch.basic_ack(delivery_tag = method.delivery_tag)


channel.queue_declare(queue='ent_intro_task',durable=True)
channel.basic_qos(prefetch_count=3)
channel.basic_consume(queue='ent_intro_task',
                        on_message_callback=callback, auto_ack =False)

print(' [*] Waiting for messages. To exit press CTRL+C')
channel.start_consuming()
- 1
- 2
- 3
- 4
- 5
- 6
- 7
- 8
- 9
- 10
- 11
- 12
- 13
- 14
- 15
- 16
- 17
- 18
- 19
- 20
- 21
- 22
- 23
- 24
- 25
- 26
- 27
- 28
- 29
- 30
- 31
- 32
- 33
- 34
- 35
- 36
- 37
- 38
- 39
- 40
- 41
- 42
- 43
- 44
- 45
- 46
- 47
- 48
- 49
- 50
- 51
- 52
- 53
- 54
- 55
- 56
- 57
- 58
- 59
- 60
- 61
该worker获取数据,然后向本地大模型服务请求结果,然后将结果写到结果队列。启动worker进行测试,python3 ent_intro_worker.py 24096 。
没问题后就转入后台运行:nohup python3 ent_intro_worker.py 24096 >/dev/null 2>&1 &

3 有端口算力租用商Worker测试
3.1 负载均衡
由于单个的量化模型不足以充分利用显卡的性能,所以就要启动多个同样的服务。调用时需要进行多个服务的端口指定,这样就比较麻烦。
用nginx进行负载均衡,然后只暴露一个端口作为服务接口。然后接下来在远程主机调用这个服务接口(worker)。
租用一台仙宫云主机。数据上传有点问题,感觉它的云盘是外挂的,而且不稳定。最终我把数据先传到系统盘,再从系统盘传到云盘才成功。另外在启动服务时,模型的加载时间明显太长了。感觉云盘是机械盘。
rsync -rvltz  -e 'ssh -p 111'  --progress /data/implement_container_file/chatglm2_6b_int4_api/workspace  root@m1ehp5n70rxvg81b.ssh.x-gpu.com:/root/
==> /root/cloud/
- 1
- 2
安装包
pip3 install -r requirements.txt -i https://mirrors.aliyun.com/pypi/simple/
- 1
启动三个服务。
安装、配置并启动nginx。
events {
    #设置工作模式为epoll,除此之外还有select,poll,kqueue,rtsig和/dev/poll模式
    use epoll;
    #定义每个进程的最大连接数,受系统进程的最大打开文件数量限制
    worker_connections  1024;
}


http{
    # 配置nginx上传文件最大限制
    client_max_body_size 50000m;

    upstream multi_ma {
            # fair;
            server 172.17.0.1:10000 ;
            server 172.17.0.1:10001 ;
            server 172.17.0.1:10002 ;
        }

    server {
        listen 80;
        location / {
            proxy_pass http://multi_ma;
        }

    }

}
- 1
- 2
- 3
- 4
- 5
- 6
- 7
- 8
- 9
- 10
- 11
- 12
- 13
- 14
- 15
- 16
- 17
- 18
- 19
- 20
- 21
- 22
- 23
- 24
- 25
- 26
- 27
- 28
远端使用worker调用。
实操时发现,虽然仙宫云可以给一个80端口,但是似乎也是容器里的虚拟环境,不让再安装包了,所以也没法安装nginx。不过理论上应该可以实现。
最后,还是用类似AutoDL的方式启动3个worker。
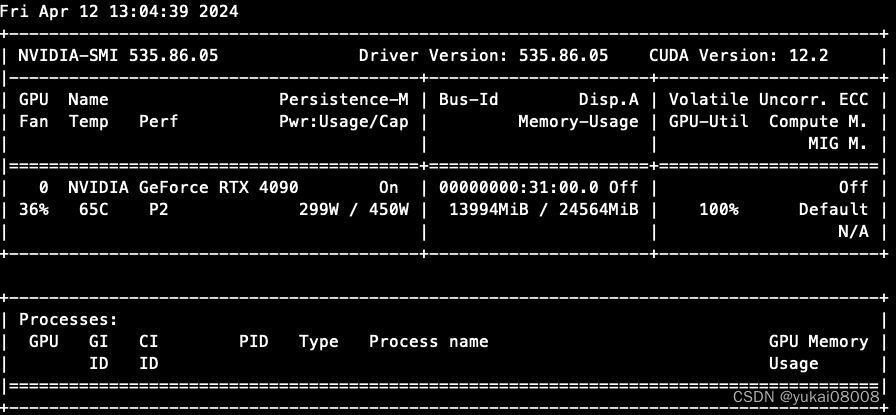
两块4090之后,速度明显快多了。

3.2 获取结果并入库
建立对应的表
# 2 导入包
from Basefuncs import *

# 快速载入连接
def make_local_wmongo_connect(server_name):
    try:
        tem_w = from_pickle(server_name)
        print('【Loading cur_w】from pickle')
    except:
        w = WMongo('w')
        tem_w = w.TryConnectionOnceAndForever(server_name =server_name)
        to_pickle(tem_w, server_name)
    return tem_w

m8_cur_w = make_local_wmongo_connect('m8.24003')

# 建立索引
m8_cur_w.set_a_index(tier1='llm', tier2 = 'company_intro', idx_var='pid')
m8_cur_w.set_a_index(tier1='llm', tier2 = 'company_intro', idx_var='company')
m8_cur_w.set_a_index(tier1='llm', tier2 = 'company_intro', idx_var='model_name')
- 1
- 2
- 3
- 4
- 5
- 6
- 7
- 8
- 9
- 10
- 11
- 12
- 13
- 14
- 15
- 16
- 17
- 18
- 19
- 20
- 21
从结果队列里取数,然后入库
# 封装函数
def get_some_batch_updated():
    credentials = pika.PlainCredentials('xxx', 'xxx')
    connection = pika.BlockingConnection(pika.ConnectionParameters('IP', port, '/', credentials, heartbeat=600))

    # 2 迭代的获取数据
    res_list = []
    with connection.channel() as channel:
        for i in range(100):
            # 声明一个队列
            channel.queue_declare(queue='ent_intro_result', durable=True)
            # 从队列中获取一条消息
            method_frame, header_frame, body = channel.basic_get(queue='ent_intro_result')
            res_dict = json.loads(body.decode())
            res_list.append(res_dict)
            channel.basic_ack(delivery_tag=method_frame.delivery_tag)

    # 3 拼凑为标准数据框
    res_df = pd.DataFrame(res_list)
    # 增加必要的模型字段
    res_df['model_name'] = 'chatglm2_6b_int4'
    res_df['pid'] = (res_df['company'] + res_df['model_name']).apply(md5_trans)

    m8_cur_w.insert_or_update_with_key(tier1 = 'llm', tier2 = 'company_intro', data_listofdict= res_df.to_dict(orient='records') , key_name='pid')
    connection.close()

# 获取并存储100条
get_some_batch_updated()
- 1
- 2
- 3
- 4
- 5
- 6
- 7
- 8
- 9
- 10
- 11
- 12
- 13
- 14
- 15
- 16
- 17
- 18
- 19
- 20
- 21
- 22
- 23
- 24
- 25
- 26
- 27
- 28
4 结语
本次完成了:
- 1 RabbitMQ 和 RabbitAgent的建立。这使得其他机器可以不必要使用端口,非常适合超高计算传输比的任务。
- 2 将原始数据通过rabbit agent 发布到任务队列
- 3 将chatglm2-6b部署到算力租用机:测试了主流的三家autodl, anygpu和仙宫云,都是ok的
- 4 在各算力机上启动worker进行处理
- 5 将结果获取,然后存在本地的mongo
没能成功完成的实践是在仙宫云使用nginx做负载均衡,简化worker的请求。
结论:用llm来做任务成本还是比较高的。价格折算下来,大约 ¥1/千条。所以,要把大模型用在高价值领域,例如替代人工打标,写函数这些。

