
- 1Python数据结构12:冒泡排序,选择排序,插入排序,希尔排序,归并排序,快速排序_对序列(55,22,97,13)冒泡排序,第一趟排序的结果是()
- 2华为fusionsphere整体架构及其各组件功能_华为数据之道:面向业务的信息架构建设...
- 3计算机科学与技术万金油专业,盘点工学大类里的“万金油”专业
- 4【基础】队列的插入和删除--C++源代码(g++ 7.2.0)_数据结构队列的插入和删除代码c++
- 5数据仓库知识随记-数据湖_data warehouses and data lakes
- 62024最全AI绘画Midjourney绘画提示词Prompt大全,AI换脸、垫图混图【宝藏级收藏】_ai绘图 prompt大全
- 7Python,课上练习,词云库wordcloud的安装与应用_wordcloud库的安装
- 8Vue实现Hello World_用vue 前端工程 hello word
- 9知攻善防应急靶场二
- 10FIFO_fifo usdw
Nginx05-负载均衡详解、LNMP+NFS、会话保持、负载均衡状态检查upstream-check、平滑升级
赞
踩
目录
写在前面
这是Nginx第五篇,内容为Nginx负载均衡详解、LNMP+NFS、会话保持、负载均衡状态检查upstream-check、平滑升级等。
上篇笔记 Nginx04-Nginx代理、反向代理实验、LNMP流程详解与排错思路
Nginx05
在nginx中,可以通过
$http_头字段的方式取出想要的内容,例如:
X-Forwarded-For:$http_x_forwarded_forX-Real-IP:$http_x_real_ipHost:$http_host
Nginx 负载均衡(upstream模块)
官方文档:https://nginx.org/en/docs/http/ngx_http_upstream_module.html#upstream
Nginx 以高并发、低消耗而闻名,这个特点使其很适合作为一个负载均衡器 (Load Balancer),有策略地分发请求给不同的后端服务器。避免单点故障之余,亦增强整个系统的可用性,简单说不容易宕机。负载均衡是反代的其中一个用途。
Nginx的负载均衡利用到了proxy和upstream模块
概述
常见选择
| 选型 | 选择 |
|---|---|
| 硬件 | F5, A10 |
| 软件 | Nginx, Tengine, Openresty(内置lua), Haproxy(专业负载), LVS(高性能) |
| 公有云服务 | SLB, CLB |
负载均衡和反向代理的区别
一般来说nginx的负载均衡是利用到反向代理的特性,但如果非要深究二者的区别时,则一般不是指用nginx负载均衡,而是lvs 这一类专门的负载均衡服务
| 内容 | 共同点 | 区别 | 服务 |
|---|---|---|---|
| 负载均衡 | 用户的请求分发到后端节点上. | 用户->lb(lvs,不是nginx)->web lb负载均衡做的是数据转发,不会产生新的请求. 1个请求1个响应 | lvs |
| 反向代理 | 用户的请求分发到后端节点上. | 中间有个中介,用户->nginx反向代理(proxy)->web 2个请求2个响应.代理代替用户去找web服务器. | nginx/tengine/openresty/haproxy |
Nginx负载均衡的方式
| 负载 | 说明 |
|---|---|
| rr轮询 | round robin 轮询,默认的循环访问。 |
| wrr 加权轮询 | 在轮询的基础上增加权重功能。server中 weight就是加权轮询。 |
| ip_hash | ip哈希,只要客户端ip一样,就会一直访问同一个后端节点。(用户请求与web服务器绑定。)解决会话保持/会话共享。可能导致负载不均。 |
| xxx_hash | url_hash,只要用户访问的url相同/uri相同,就访问相同的web服务器。缓存服务器:静态资源缓存。 |
| least_conn | 最小连接数,lc算法。也可以配合上权重 weight,wlc权重的最小连接数。 |
| 一致性哈希算法 | consistent hash,根据请求的哈希值将请求分发到后端服务器,主要用于缓存场景,可以在服务器集群中保持缓存的一致性,减少缓存失效的次数。 |
- 轮询 (round-robin)(默认)
upstream 名字{
        server xxx;
        server yyy;
        server zzz;
}
- 1
- 2
- 3
- 4
- 5
- 最小连接 (least-connected)
upstream 名字{
        least_conn;
        ...
}
- 1
- 2
- 3
- 4
- 源地址哈希 (ip-hash):用于跟踪用户操作,涉及身份认证时 (用户系统)
upstream 名字{
        ip_hash;
        ...
}
- 1
- 2
- 3
- 4
- url-hash:
upstream 名字{
        hash $request_uri;
        ...
}
- 1
- 2
- 3
- 4
- 加权负载均衡 (Weighted Load Balancing):设置权重,根据服务器性能,而不是单纯的连接数
upstream 名字{
        server xxx weight 10;
        server yyy weight 5;
        server zzz;
}
- 1
- 2
- 3
- 4
- 5
Nginx运行状况检查
根据 Nginx 的文档,max_fails 缺省值是 1,fail_timeout 缺省值是 10s。
如下,www.example.com 的健康检查会被关闭,一直都标记为可用;www2.example.com 连不上时先重试 2 次,如果还不行就退出服务,下线 1 天,方便运维人员排障。
upstream backend {
    server www.example.com max_fails=0;
    server www2.example.com max_fails=2 fail_timeout=1d;
}
- 1
- 2
- 3
- 4
备份服务器
- down指的是,在负载均衡选择服务器时,不会考虑该主机
- backup指的是,在别的服务器都失效后,启用该服务器
upstream 名字{
        server xxx;
        server yyy down;
        server yyy backup;
}
- 1
- 2
- 3
- 4
- 5
Nginx upstream模块选项说明
| server后面可以加的选项 | 说明 | 应用场景 |
|---|---|---|
| weight | 权重,根据权重ngx分配请求。 | 如果web服务端配置不同,1c2g,2c8g。代码更新与测试的时候,给测试服务器较小的权重。 |
| max_fails | ngx具备一些健康检查功能,指定失败的次数,超过这个次数就认为节点挂了。 | 一般情况下可以设置1-3即可。不太重要,缓存业务,可以设置为10。 |
| fail_timeout | 认为节点挂了后间隔多久再次检查健康情况。默认是10s。 | 根据要求设置时间即可,可以长一些。30/60s。 |
| backup | 备份服务器,其他所有服务器都挂了的时候,才启用。 | 使用的时候需要考虑雪崩的情况。 |
实验1 负载均衡两台front
front配置
两台主机配置一致,这里仅展示一台
[root@front02 conf.d]# cat cfg.test.com.conf
server {
        listen 80;
        server_name cfg.test.com;
        root /app/code/cfg;

        error_log /var/log/nginx/cfg-error.log notice;
        access_log /var/log/nginx/cfg-access.log main;

        location / {
                index index.html;
        }
}

[root@front02 conf.d]# mkdir -p /app/code/cfg

[root@front02 conf.d]# echo front02 > /app/code/cfg/index.html

- 1
- 2
- 3
- 4
- 5
- 6
- 7
- 8
- 9
- 10
- 11
- 12
- 13
- 14
- 15
- 16
- 17
- 18
lb01配置
[root@lb01 conf.d]# cat cfg.test.com.conf
#upstream定义一个上游组,name全局唯一
upstream cfg_pools {
        server 192.168.100.148:80;
        server 192.168.100.154:80;
}

#upstream和server同级
server {
        listen 80;
        server_name cfg.test.com; #使用文件中定义的上游组

        error_log /var/log/nginx/cfg-error.log notice;
        access_log /var/log/nginx/cfg-access.log main;

        location / {
                proxy_pass http://cfg_pools;
                proxy_set_header Host $http_host;
                proxy_set_header X-Real-IP $remote_addr;
                proxy_set_header X-Forwarded-For $proxy_add_x_forwarded_for;
        }
}
- 1
- 2
- 3
- 4
- 5
- 6
- 7
- 8
- 9
- 10
- 11
- 12
- 13
- 14
- 15
- 16
- 17
- 18
- 19
- 20
- 21
- 22
- 23
测试
#多次curl,可以发现出现的网页分别是两台front设置的内容
C:\Users\14765>curl -H Host:cfg.test.com http://192.168.100.153
front01

C:\Users\14765>curl -H Host:cfg.test.com http://192.168.100.153
front01

C:\Users\14765>curl -H Host:cfg.test.com http://192.168.100.153
front02

C:\Users\14765>curl -H Host:cfg.test.com http://192.168.100.153
front01

C:\Users\14765>curl -H Host:cfg.test.com http://192.168.100.153
front02
- 1
- 2
- 3
- 4
- 5
- 6
- 7
- 8
- 9
- 10
- 11
- 12
- 13
- 14
- 15
流程梳理
- 用户请求host为proxy.test.com,ip实际是lb01的ip
- 请求到达lb01,lb01匹配请求的对应server的server_name和listen,location匹配到uri后,proxy转发规则为upstream组。
根据upstream模块的server和负载规则,选择其中一台sever,根据proxy模块的转发规则,转发到对应的front主机上 - front主机处理请求,返回给lb01,lb01返回给用户
实验2 LNMP+NFS小实验
- 将nginx的站点目录存放到nfs上
- 需要注意统一用户(nginx、php、nfs),建议新建用户,修改对应的配置文件内容。/etc/nginx/nginx.conf、/etc/php-fpm.d/www.conf
- 需要放nfs的绝对路径是/app/code/blog/wp-content/uploads - 多front场景下,第二台wordpress会提示删除数据库内容
- 第一台完成的wordpress,将站点目录打包scp到其他的front上
NFS配置
# 先创建用户
useradd -u 1999 -s /sbin/nologin -M www
id www
uid=1999(www) gid=1999(www) groups=1999(www)

[root@storage ~]# tail -1 /etc/exports
/nfs/wordpress 192.168.100.0/24(rw,all_squash,anonuid=1999,anongid=1999)

[root@storage ~]# mkdir -p /nfs/wordpress
[root@storage ~]# chown www.www /nfs/wordpress/

systemclt reload nfs-server
- 1
- 2
- 3
- 4
- 5
- 6
- 7
- 8
- 9
- 10
- 11
- 12
DB配置
[root@db01 ~]# mysql -uroot -p

MariaDB [(none)]> create database wordpress;
MariaDB [(none)]> grant all on wordpress.* to 'wordpress'@'192.168.100.%' identified by 'wordpress';

MariaDB [(none)]> select user,host from mysql.user where user='wordpress';
+-----------+---------------+
| user      | host          |
+-----------+---------------+
| wordpress | 192.168.100.% |
+-----------+---------------+
MariaDB [(none)]> show databases;
+--------------------+
| Database           |
+--------------------+
| wordpress          |
+--------------------+
- 1
- 2
- 3
- 4
- 5
- 6
- 7
- 8
- 9
- 10
- 11
- 12
- 13
- 14
- 15
- 16
- 17
- 18
front配置
front01
- 新建用户并修改nginx和php的用户
useradd -u 1999 -s /sbin/nologin -M www
id www
uid=1999(www) gid=1999(www) groups=1999(www)

[root@front ~]# grep 'user' /etc/nginx/nginx.conf
user  www;

[root@front ~]# egrep '^user|^group' /etc/php-fpm.d/www.conf
user = www
group = www
- 1
- 2
- 3
- 4
- 5
- 6
- 7
- 8
- 9
- 10
- 子配置文件
[root@front ~]# cat /etc/nginx/conf.d/blog.test.com.conf
server {
        listen 80;
        server_name blog.test.com;
        root /app/code/blog;

        error_log /var/log/nginx/blog.test.com-error.log notice;
        access_log /var/log/nginx/blog.test.com-access.log main;

        location / {
                index index.php;
        }
        location ~* \.php$ {
                # foward to php
                fastcgi_pass 127.0.0.1:9000;
                fastcgi_index index.php;
                fastcgi_buffering on; #开启缓冲
                fastcgi_buffers 64 64K; #缓冲调大成64个64K
                # 修改以下
                fastcgi_param SCRIPT_FILENAME $document_root$fastcgi_script_name;
                include fastcgi_params;
        }
}


[root@front ~]# systemctl restart nginx php-fpm
- 1
- 2
- 3
- 4
- 5
- 6
- 7
- 8
- 9
- 10
- 11
- 12
- 13
- 14
- 15
- 16
- 17
- 18
- 19
- 20
- 21
- 22
- 23
- 24
- 25
- 26
- 挂载
mkdir -p /app/code/blog/wp-content/uploads
mount -t nfs 192.168.100.150:/nfs/wordpress /app/code/blog/wp-content/uploads/
- 1
- 2
- 解压wordpress并安装wordpress
#解压wordpress并上传到站点目录
[root@front ~]# unzip wordpress-6.1.1.zip
[root@front ~]# mv wordpress/* /app/code/blog/
[root@front ~]# chown -R www.www /app/code/blog/

# 安装不再演示,可查看我的之前笔记Nginx03
#安装实际就是在站点目录中创建了一个wp-config.php的文件
- 1
- 2
- 3
- 4
- 5
- 6
- 7
- 打包目录,排除上传目录
[root@front blog]# tar zcf ~/wp-no-uploads.tar.gz --exclude=./wp-content/uploads/* .

[root@front blog]# tar tf ~/wp-no-uploads.tar.gz | grep uplaods
- 1
- 2
- 3
- 4
front02
- 新建userid=1999的www用户,并修改nginx和php配置文件用户(如上)
- 安装环境nginx、php、nfs(略)
- 子配置文件(从front01 copy过来)
- 从front01 scp过来目录代码
#scp
[root@front blog]# scp /root/wp-no-uploads.tar.gz front02:`pwd`

#front02解压
[root@front02 blog]# tar xvf wp-no-uploads.tar.gz
- 1
- 2
- 3
- 4
- 5
- 6
- 挂载(和1相同)
lb配置
- 子配置文件
[root@lb01 conf.d]# cat blog.test.com.conf
upstream blog_pools {
        server 192.168.100.148;
        server 192.168.100.154;
}
server {
        listen 80;
        server_name blog.test.com;
        location / {
                proxy_pass http://blog_pools;
                proxy_set_header Host $http_host;
                proxy_set_header X-Forwarded-For $proxy_add_x_forwarded_for;
        }
}

[root@lb01 conf.d]# nginx -t
nginx: the configuration file /etc/nginx/nginx.conf syntax is ok
nginx: configuration file /etc/nginx/nginx.conf test is successful
[root@lb01 conf.d]# systemctl reload nginx
- 1
- 2
- 3
- 4
- 5
- 6
- 7
- 8
- 9
- 10
- 11
- 12
- 13
- 14
- 15
- 16
- 17
- 18
- 19
- 20
验证
浏览器访问blog.test.com,hosts以提前修改为lb的ip
抓包结果如下:

实验3 会话保持小实验(Redis+phpMyAdmin)
什么是会话保持
用户的请求可能涉及到会话保持(登陆密码、个性信息等),若在负载时将后续内容分配给多个服务器,会导致这些消息不同步。因此需要用到会话保持,去保证一个用户的需要保持会话的内容都会负载到同一台服务器中。
cookie和session
| 技术点 | 共同点 | 区别 | 其他 |
|---|---|---|---|
| cookie | 存放用户的信息,登录信息 | 存放在客户端浏览器 | 服务器给客户端响应,进行设置set-cookie,未来再次访问携带者cookie访问服务端 |
| session | 存放用户的信息,登录信息 | 存放在服务端(文件,数据库,。。。) | 浏览器cookie与服务端的session对应 |
F12查看cookie

会话保持方案
- 登陆状态写入cookie
- cookie+session方式 + 统一存放session服务器(会话保持服务器)
- 认证服务实现Oauth 2.0(token方式)
- ip_hash方式
- redis实现phpmyadmin/kodbox会话共享
- 部署:phpMyAdmin,web页面版本的数据库管理工具. SQL语句. PHP代码.
- 只需要ngx+php,不需要创建库,添加用户(权限大).
- 流程:
- db: phpmyadmin用户,权限大一些.
- web: 部署代码,传输到另外一个web上
- 准备redis环境(db01)
- 修改php配置(创建新的端口)
- 接入负载均衡.访问与测试
DB配置
db准备phpmyadmin的用户
grant all on *.* to 'phpmyadmin'@'192.168.100.%' identified by 'phpmyadmin';
- 1
front配置
部署phpmyadmin代码,传输到另外一个web上
官网:phpmyadmin.net
- 子配置文件
#vim 直接替换  :%s#blog#phpmyadmin#g
[root@front ~]# cat /etc/nginx/conf.d/phpmyadmin.test.com.conf
server {
        listen 80;
        server_name phpmyadmin.test.com;
        root /app/code/phpmyadmin;

        error_log /var/log/nginx/phpmyadmin.test.com-error.log notice;
        access_log /var/log/nginx/phpmyadmin.test.com-access.log main;

        location / {
                index index.php;
        }
        location ~* \.php$ {
                # foward to php
                fastcgi_pass 127.0.0.1:9000;
                fastcgi_index index.php;
                fastcgi_buffering on;
                fastcgi_buffers 64 64K;
                # 修改以下
                fastcgi_param SCRIPT_FILENAME $document_root$fastcgi_script_name;
                include fastcgi_params;
        }
}
- 1
- 2
- 3
- 4
- 5
- 6
- 7
- 8
- 9
- 10
- 11
- 12
- 13
- 14
- 15
- 16
- 17
- 18
- 19
- 20
- 21
- 22
- 23
- 24
- 25
- 创建目录并解压文件到站点目录
[root@front ~]# mkdir -p /app/code/phpmyadmin
#以上传好软件包
[root@front ~]# unzip phpMyAdmin-5.2.1-all-languages.zip

[root@front ~]# mv phpMyAdmin-5.2.1-all-languages/* /app/code/phpmyadmin/
- 1
- 2
- 3
- 4
- 5
- 重启服务
[root@front ~]#  nginx -t
nginx: the configuration file /etc/nginx/nginx.conf syntax is ok
nginx: configuration file /etc/nginx/nginx.conf test is successful
[root@front ~]# systemctl reload nginx
- 1
- 2
- 3
- 4
- 修改/var/lib/php/session属主
测试发现,会报错permission denied。出现在无法阅读session数据:/var/lib/php/session
[root@front ~]# chown -R www.www /var/lib/php/session/
- 1
- 2
- 手动创建连接数据库的配置文件
cp config.sample.inc.php config.inc.php
grep -wn host config.inc.php
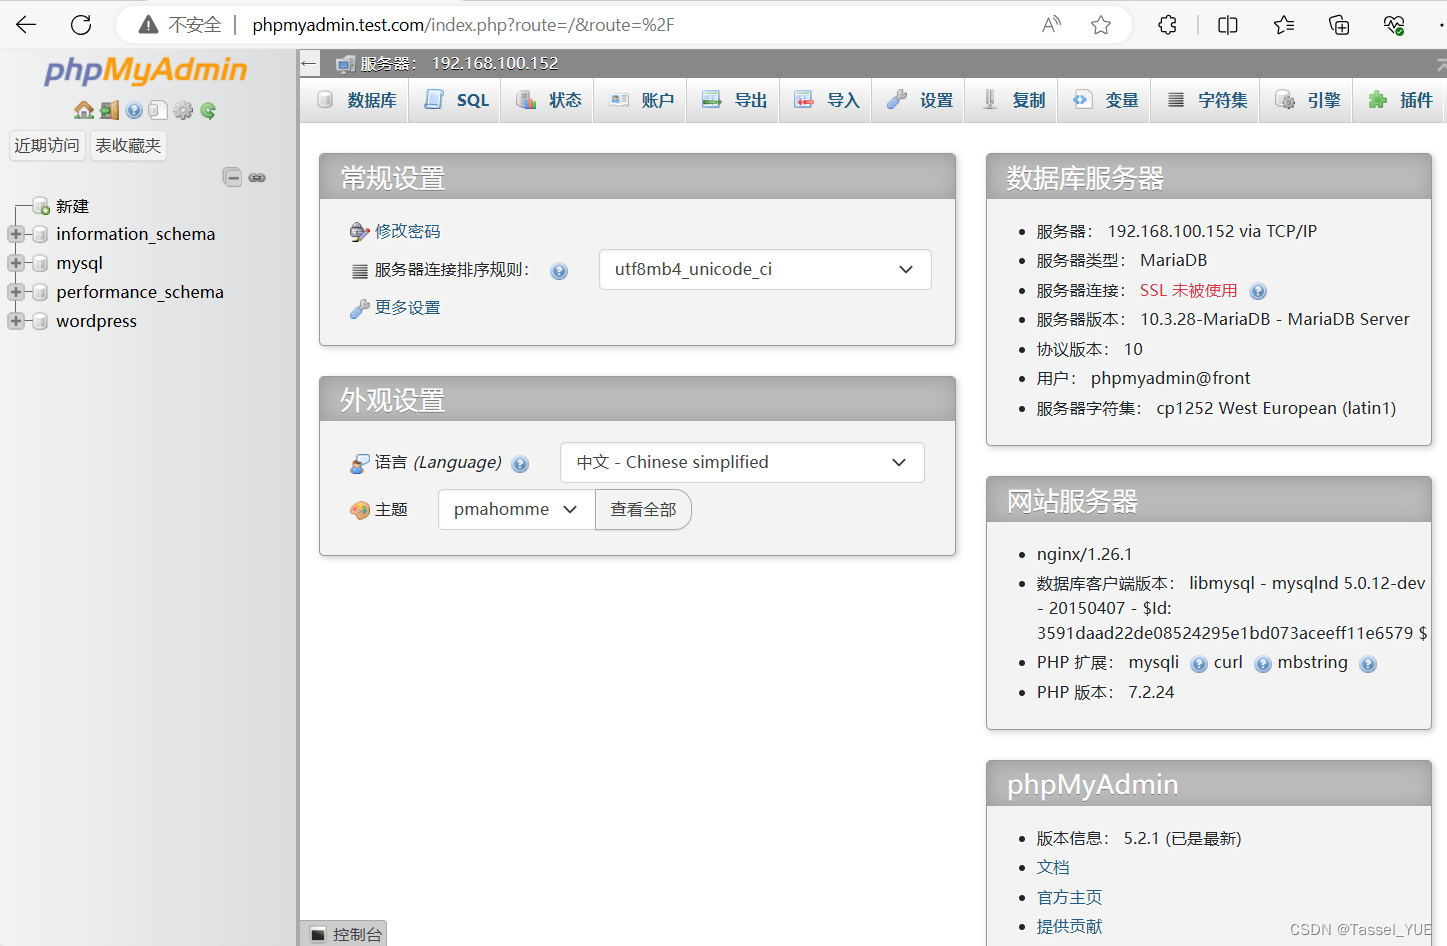
30:$cfg['Servers'][$i]['host'] = '192.168.100.152';
- 1
- 2
- 3
- 4
- 登陆测试

- front02 由front01 根据上述操作scp即可
[root@front code]# pwd
/app/code
[root@front code]# scp -r phpmyadmin/ front02:`pwd`

[root@front code]# cd /etc/nginx/conf.d/
[root@front conf.d]# scp phpmyadmin.test.com.conf front02:`pwd`

[root@front02 wp-content]# chown -R www.www /var/lib/php/session/
- 1
- 2
- 3
- 4
- 5
- 6
- 7
- 8
- 9
redis配置(db01上安装)
yum install -y redis

#修改/etc/redis.conf
bind 127.0.0.1 192.168.100.152   #redis默认本地访问,可以通过bind,以192.168.100.152访问redis

systemctl enable --now redis

ss -luntp |grep redis
ps -ef | grep redis
- 1
- 2
- 3
- 4
- 5
- 6
- 7
- 8
- 9
修改php配置(front主机上配置)
- 创建新的php子配置文件(www.conf->session.conf)
#复制一个新的文件
[root@front conf.d]# cp /etc/php-fpm.d/www.conf /etc/php-fpm.d/session.conf

# 编辑配置文件,修改名字、监听端口、session存储路径
[root@front conf.d]# cat /etc/php-fpm.d/session.conf
; 修改此行
[session]
user = www
group = www

; 修改此行
listen = 127.0.0.1:9001
listen.acl_users = apache,nginx
listen.allowed_clients = 127.0.0.1

pm = dynamic
pm.max_children = 50
pm.start_servers = 5
pm.min_spare_servers = 5
pm.max_spare_servers = 35

slowlog = /var/log/php-fpm/www-slow.log

php_admin_value[error_log] = /var/log/php-fpm/www-error.log
php_admin_flag[log_errors] = on
; 修改此行
php_value[session.save_handler] = redis
; 修改此行
php_value[session.save_path]    = tcp://192.168.100.152:6379
php_value[soap.wsdl_cache_dir]  = /var/lib/php/wsdlcache
- 1
- 2
- 3
- 4
- 5
- 6
- 7
- 8
- 9
- 10
- 11
- 12
- 13
- 14
- 15
- 16
- 17
- 18
- 19
- 20
- 21
- 22
- 23
- 24
- 25
- 26
- 27
- 28
- 29
- 30
- 31
- 修改nginx子配置文件,修改fastcgi_pass 端口为9001(front01和02都需要修改)
[root@front02 code]# grep 9001 /etc/nginx/conf.d/phpmyadmin.test.com.conf
                fastcgi_pass 127.0.0.1:9001;
- 1
- 2
- 3
- 配置文件传给front02
[root@front php-fpm.d]# pwd
/etc/php-fpm.d
[root@front php-fpm.d]# scp session.conf front02:`pwd`
- 1
- 2
- 3
- 4
lb配置
[root@lb01 conf.d]# cat phpmyadmin.test.com.conf
upstream phpmyadmin_pools {
        server 192.168.100.148;
        server 192.168.100.154;
}
server {
        listen 80;
        server_name phpmyadmin.test.com;
        location / {
                proxy_pass http://phpmyadmin_pools;
                proxy_set_header Host $http_host;
                proxy_set_header X-Forwarded-For $proxy_add_x_forwarded_for;
        }
}
- 1
- 2
- 3
- 4
- 5
- 6
- 7
- 8
- 9
- 10
- 11
- 12
- 13
- 14
- 15
测试
测试前,确保front、lb的服务已重启(nginx、php-fpm);db的redis已启动
在redis中查看
redis-cli
keys *
- 1
- 2
实验4 负载均衡状态检查小实验
负载均衡状态检查模块-upstream check模块
yum安装的nginx没有这个模块,可以用tengine生成命令后替换即可。
tengine官网:tengine.taobao.org/download.html
本文中使用2.4.1
安装tengine
找一台没有nginx的服务器
- 提前上传好tengine-2.4.1.tar.gz
# 提前上传好tengine-2.4.1.tar.gz
[root@db01 ~]# ls
anaconda-ks.cfg  tengine-2.4.1.tar.gz
# 没有安装nginx
[root@db01 ~]# rpm -qa | grep nginx
- 1
- 2
- 3
- 4
- 5
- 解压
## 解压
[root@db01 ~]# tar xf tengine-2.4.1.tar.gz
[root@db01 ~]# cd tengine-2.4.1/
- 1
- 2
- 3
- 安装依赖
## 安装依赖
yum install -y pcre-devel openssl-devel make
- 1
- 2
- 3
- 编译安装tengine,生成nginx命令
- 配置(生成makefile)到指定位置,需要和yum安装的nginx目录一致(默认是/usr/local下)
## 在已经安装了nginx的主机下查看configure用到的参数
[root@front ~]# nginx -V
nginx version: nginx/1.26.1
built by gcc 8.5.0 20210514 (Red Hat 8.5.0-18) (GCC)
built with OpenSSL 1.1.1k  FIPS 25 Mar 2021
TLS SNI support enabled
configure arguments: --prefix=/etc/nginx --sbin-path=/usr/sbin/nginx --modules-path=/usr/lib64/nginx/modules --conf-path=/etc/nginx/nginx.conf --error-log-path=/var/log/nginx/error.log --http-log-path=/var/log/nginx/access.log --pid-path=/var/run/nginx.pid --lock-path=/var/run/nginx.lock --http-client-body-temp-path=/var/cache/nginx/client_temp --http-proxy-temp-path=/var/cache/nginx/proxy_temp --http-fastcgi-temp-path=/var/cache/nginx/fastcgi_temp --http-uwsgi-temp-path=/var/cache/nginx/uwsgi_temp --http-scgi-temp-path=/var/cache/nginx/scgi_temp --user=nginx --group=nginx --with-compat --with-file-aio --with-threads --with-http_addition_module --with-http_auth_request_module --with-http_dav_module --with-http_flv_module --with-http_gunzip_module --with-http_gzip_static_module --with-http_mp4_module --with-http_random_index_module --with-http_realip_module --with-http_secure_link_module --with-http_slice_module --with-http_ssl_module --with-http_stub_status_module --with-http_sub_module --with-http_v2_module --with-http_v3_module --with-mail --with-mail_ssl_module --with-stream --with-stream_realip_module --with-stream_ssl_module --with-stream_ssl_preread_module --with-cc-opt='-O2 -g -pipe -Wall -Werror=format-security -Wp,-D_FORTIFY_SOURCE=2 -Wp,-D_GLIBCXX_ASSERTIONS -fexceptions -fstack-protector-strong -grecord-gcc-switches -specs=/usr/lib/rpm/redhat/redhat-hardened-cc1 -specs=/usr/lib/rpm/redhat/redhat-annobin-cc1 -m64 -mtune=generic -fasynchronous-unwind-tables -fstack-clash-protection -fcf-protection -fPIC' --with-ld-opt='-Wl,-z,relro -Wl,-z,now -pie'
- 1
- 2
- 3
- 4
- 5
- 6
- 7
tengine服务把ngx常用的第3方模块放在了源代码中的modules目录下面.
–add-module=modules/ngx_http_upstream_check_module 编译安装的时候增加upstream_check模块
–add-module=modules/ngx_http_upstream_session_sticky_module/ 增加会话共享模块
在编译时最后添加上述两条。即nginx -V的参数+上述两条语句
./configure --prefix=/etc/nginx --sbin-path=/usr/sbin/nginx --modules-path=/usr/lib64/nginx/modules --conf-path=/etc/nginx/nginx.conf --error-log-path=/var/log/nginx/error.log --http-log-path=/var/log/nginx/access.log --pid-path=/var/run/nginx.pid --lock-path=/var/run/nginx.lock --http-client-body-temp-path=/var/cache/nginx/client_temp --http-proxy-temp-path=/var/cache/nginx/proxy_temp --http-fastcgi-temp-path=/var/cache/nginx/fastcgi_temp --http-uwsgi-temp-path=/var/cache/nginx/uwsgi_temp --http-scgi-temp-path=/var/cache/nginx/scgi_temp --user=nginx --group=nginx  --add-module=modules/ngx_http_upstream_check_module  --add-module=modules/ngx_http_upstream_session_sticky_module/


[root@db01 tengine-2.4.1]# echo $?
0
- 1
- 2
- 3
- 4
- 5
- 6
- 编译(根据makefile进行编译,生成对应的命令)
make -j 4  #cpu核心总数决定. 加速编译

[root@db01 tengine-2.4.1]# echo $?
0
- 1
- 2
- 3
- 4
- 编译安装(创建目录、复制文件)(本实验中不需要)
替换lb上的nginx命令
- scp tengine的nginx命令到lb01
[root@db01 tengine-2.4.1]# scp ./objs/nginx lb01:~

# 测试
[root@lb01 ~]# ~/nginx -v
Tengine version: Tengine/2.4.1
nginx version: nginx/1.22.1
- 1
- 2
- 3
- 4
- 5
- 6
- 保留原本的nginx,移植新的nginx
# 备份
[root@lb01 ~]# cp /sbin/nginx /sbin/nginx-1.26.1

# 移植
[root@lb01 ~]# systemctl stop nginx.service
[root@lb01 ~]# cp ~/nginx /sbin/nginx

[root@lb01 ~]# nginx -v
Tengine version: Tengine/2.4.1
nginx version: nginx/1.22.1
[root@lb01 ~]# ss -tunlp | grep nginx
- 1
- 2
- 3
- 4
- 5
- 6
- 7
- 8
- 9
- 10
- 11
- 12
健康检查模块upstream-check配置
官网:https://tengine.taobao.org/document/http_upstream_check.html
upstream cluster1 {
        # simple round-robin
        server 192.168.0.1:80;
        server 192.168.0.2:80;

        check interval=3000 rise=2 fall=5 timeout=1000 type=http;
        check_http_send "HEAD / HTTP/1.0\r\n\r\n";
        check_http_expect_alive http_2xx http_3xx;
    }
server {
        listen 80;
        location /status {
            check_status;

            access_log   off;
            allow SOME.IP.ADD.RESS;
            deny all;
        }
    }
- 1
- 2
- 3
- 4
- 5
- 6
- 7
- 8
- 9
- 10
- 11
- 12
- 13
- 14
- 15
- 16
- 17
- 18
- 19
- 编辑子配置文件,添加upstream_check内容
[root@lb01 conf.d]# vim cfg.test.com.conf
        server 192.168.100.148:80;
        server 192.168.100.154:80;
        # 每隔3s检查,成功2次存活,失败5次下线,超时时间1s,检查类型http
        check interval=3000 rise=2 fall=5 timeout=1000 type=http;
        # 检查发送head请求
        check_http_send "HEAD / HTTP/1.0\r\n\r\n";
        # 认为检查成功的状态码是2xx和3xx
        check_http_expect_alive http_2xx http_3xx;
}

server {
        listen 80;
        server_name cfg.test.com;

        error_log /var/log/nginx/cfg-error.log notice;
        access_log /var/log/nginx/cfg-access.log main;

        location / {
                proxy_pass http://cfg_pools;
                proxy_set_header Host $http_host;
                proxy_set_header X-Real-IP $remote_addr;
                proxy_set_header X-Forwarded-For $proxy_add_x_forwarded_for;
        }
        location /check {
                # 开启负载均衡状态检查功能的web页面
                check_status;
                access_log off;
                # allow 白名单;
                # deny all;
        }
- 1
- 2
- 3
- 4
- 5
- 6
- 7
- 8
- 9
- 10
- 11
- 12
- 13
- 14
- 15
- 16
- 17
- 18
- 19
- 20
- 21
- 22
- 23
- 24
- 25
- 26
- 27
- 28
- 29
- 30
- 31
- 32
- 重启服务并验证
[root@lb01 conf.d]# nginx -t
nginx: the configuration file /etc/nginx/nginx.conf syntax is ok
nginx: configuration file /etc/nginx/nginx.conf test is successful
[root@lb01 conf.d]# systemctl reload nginx
- 1
- 2
- 3
- 4
- 5
| upstream_check模块指令 | 说明 |
|---|---|
| check | 指定检查频率,失败几次,成功几次,检查间隔,检查方式 |
| check_http_send | 通过http方式发出请求报文,请求报文起始行,请求方法,请求的URI,请求协议(默认使用的是ip方式访问。) |
| check_http_expect_alive | 收到指定的状态码,就认为是存活的。 |
| check_status | 开启负载均衡状态检查功能,web页面.location 使用 如果加强安全。 |
注意: 如果后端web有多个虚拟主机.
upstream check进行访问的时候默认使用的ip方式进行访问.
在发出http请求的时候指定域名
check_http_send "HEAD / HTTP/1.0\r\nHost: lb.oldboylinux.cn\r\n\r\n";
实验5 Nginx平滑升级小实验
| 平滑更新步骤 | 说明 |
|---|---|
| 准备好新的nginx命令(已经测试的) | 确保新的nginx配置文件已经过测试,可以正常工作。 |
| 把当前环境的nginx的命令备份,使用新的替换。 | 在替换之前,备份当前的nginx二进制文件和配置文件,以便在出现问题时可以回滚。 |
通过kill命令向当前运行ngx发出信号,准备被替代 -USR2 pid | 向当前运行的nginx主进程发送USR2信号,这将启动新的nginx主进程,而旧的主进程继续处理现有的连接。 |
| pid 把当前运行ngx的pid文件改个名,使用新的nginx命令启动ngx进程 | 重命名旧的nginx.pid文件(通常是/var/run/nginx.pid),然后启动新的nginx进程。 |
| 测试调试,关闭旧的ngx的进程即可。(kill即可。) | 一旦新的nginx进程启动并且确认工作正常,可以通过发送TERM或QUIT信号到旧的主进程来关闭它,从而完成平滑更新。 |
- 检查旧进程
p
[root@front ~]# ps -ef  | grep nginx
root        1326       1  0 16:22 ?        00:00:00 nginx: master process /usr/sbin/nginx -c /etc/nginx/nginx.conf
www         1331    1326  0 16:22 ?        00:00:00 nginx: worker process
www         1332    1326  0 16:22 ?        00:00:00 nginx: worker process
root        1936    1240  0 22:10 pts/1    00:00:00 grep --color=auto nginx

[root@front ~]# cat /var/run/nginx.pid
1326
- 1
- 2
- 3
- 4
- 5
- 6
- 7
- 8
- 9
- 10
- 备份旧nginx
[root@front ~]# cp /sbin/nginx /sbin/nginx-old-1.26.1
- 1
- 2
- 传一个新的nginx(用上文的tengine 2.4.1),替换旧的nginx
# scp传送过来即可

[root@front ~]# mv nginx /sbin/nginx
mv: overwrite '/sbin/nginx'? yes

[root@front ~]# nginx -v
Tengine version: Tengine/2.4.1
nginx version: nginx/1.22.1
- 1
- 2
- 3
- 4
- 5
- 6
- 7
- 8
- 通过kill发送
USR2指令到nginx,告知其需要更换
[root@front ~]# kill -USR2 1326
[root@front ~]# ps -ef | grep nginx
root        1326       1  0 16:22 ?        00:00:00 nginx: master process /usr/sbin/nginx -c /etc/nginx/nginx.conf
www         1331    1326  0 16:22 ?        00:00:00 nginx: worker process
www         1332    1326  0 16:22 ?        00:00:00 nginx: worker process
root        1962    1326  0 22:13 ?        00:00:00 nginx: master process /usr/sbin/nginx -c /etc/nginx/nginx.conf
www         1963    1962  0 22:13 ?        00:00:00 nginx: worker process
www         1964    1962  0 22:13 ?        00:00:00 nginx: worker process

# 1326是旧nginx的进程
# 1962是新nginx的进程

[root@front ~]# ll /var/run/nginx*
-rw-r--r-- 1 root root 5 Jun 11 22:13 /var/run/nginx.pid
-rw-r--r-- 1 root root 5 Jun 11 16:22 /var/run/nginx.pid.oldbin
[root@front ~]# cat /var/run/nginx.pid.oldbin
1326
[root@front ~]# cat /var/run/nginx.pid
1962
- 1
- 2
- 3
- 4
- 5
- 6
- 7
- 8
- 9
- 10
- 11
- 12
- 13
- 14
- 15
- 16
- 17
- 18
- 19
- 20
- kill旧nginx进程
[root@front ~]# kill 1326

[root@front ~]# ps -ef | grep nginx
root        1962       1  0 22:13 ?        00:00:00 nginx: master process /usr/sbin/nginx -c /etc/nginx/nginx.conf
www         1963    1962  0 22:13 ?        00:00:00 nginx: worker process
www         1964    1962  0 22:13 ?        00:00:00 nginx: worker process

[root@front ~]# ll /var/run/nginx*
-rw-r--r-- 1 root root 5 Jun 11 22:13 /var/run/nginx.pid
[root@front ~]# cat /var/run/nginx.pid
1962
- 1
- 2
- 3
- 4
- 5
- 6
- 7
- 8
- 9
- 10
- 11
- 12

