热门标签
热门文章
- 1oracle数据库从入门到精通之二
- 2云计算安全需求分析与网络_云计算平台的技术安全需求按照“端-管-云”的安全威胁分析方法,主要分成云端安全
- 3android分区dtbo,Android DTO和dtbo简介
- 4swap()函数,C语言中的使用_c语言swap函数怎么使用
- 5langchain优化方案
- 6NLP论文阅读记录 -ICLR 2023 | 您只需要复制即可_前缀编码器
- 74个详细步骤讲解Python爬取网页数据操作过程!(含实例代码)_python爬取网页详细教程_python爬取网页数据步骤图解
- 8消息总线(Spring Cloud Bus)
- 9Umi-OCR 图片文字智能识别软件,不需联网,Linux 下运行错误修复,AI 识文一文搞定!_umi-ocr 远程
- 10【MySQL】详解数据库约束、聚合查询和联合查询
当前位置: article > 正文
Centos 报错 One of the configured repositories failed
作者:weixin_40725706 | 2024-08-22 12:55:15
赞
踩
one of the configured repositories failed
一、问题描述
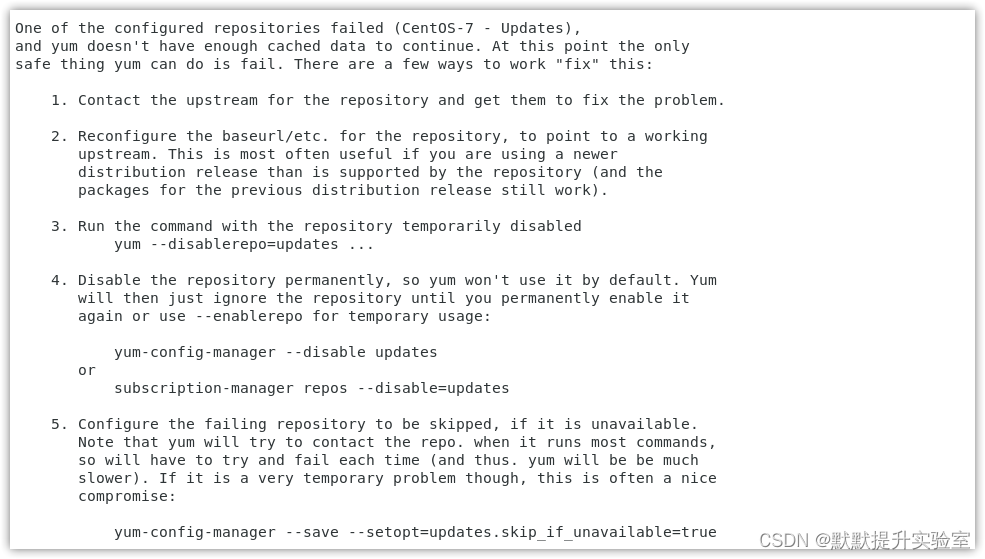
使用yum update更新命令就出现下面问题,系统是刚安装的,然后修改了一下IP变成手动。(排查问题前,先回顾自己做了哪些操作,方便进一步排错),然后就出现了以下代码(部分):
One of the configured repositories failed (CentOS-7 - Updates),
 and yum doesn't have enough cached data to continue. At this point the only
 safe thing yum can do is fail. There are a few ways to work "fix" this:

     1. Contact the upstream for the repository and get them to fix the problem.

     2. Reconfigure the baseurl/etc. for the repository, to point to a working
        upstream. This is most often useful if you are using a newer
        distribution release than is supported by the repository (and the
        packages for the previous distribution release still work).

     3. Run the command with the repository temporarily disabled
            yum --disablerepo=updates ...

     4. Disable the repository permanently, so yum won't use it by default. Yum
        will then just ignore the repository until you permanently enable it
        again or use --enablerepo for temporary usage:

            yum-config-manager --disable updates
        or
            subscription-manager repos --disable=updates

     5. Configure the failing repository to be skipped, if it is unavailable.
        Note that yum will try to contact the repo. when it runs most commands,
        so will have to try and fail each time (and thus. yum will be be much
        slower). If it is a very temporary problem though, this is often a nice
        compromise:

            yum-config-manager --save --setopt=updates.skip_if_unavailable=true
- 1
- 2
- 3
- 4
- 5
- 6
- 7
- 8
- 9
- 10
- 11
- 12
- 13
- 14
- 15
- 16
- 17
- 18
- 19
- 20
- 21
- 22
- 23
- 24
- 25
- 26
- 27
- 28
- 29
- 30

二、原因分析
通过对自己步骤的分析(设置为DHCP可以正常,设置手动就报错),可以确定是我修改IP不正确导致的。
设置手动IP的时候:
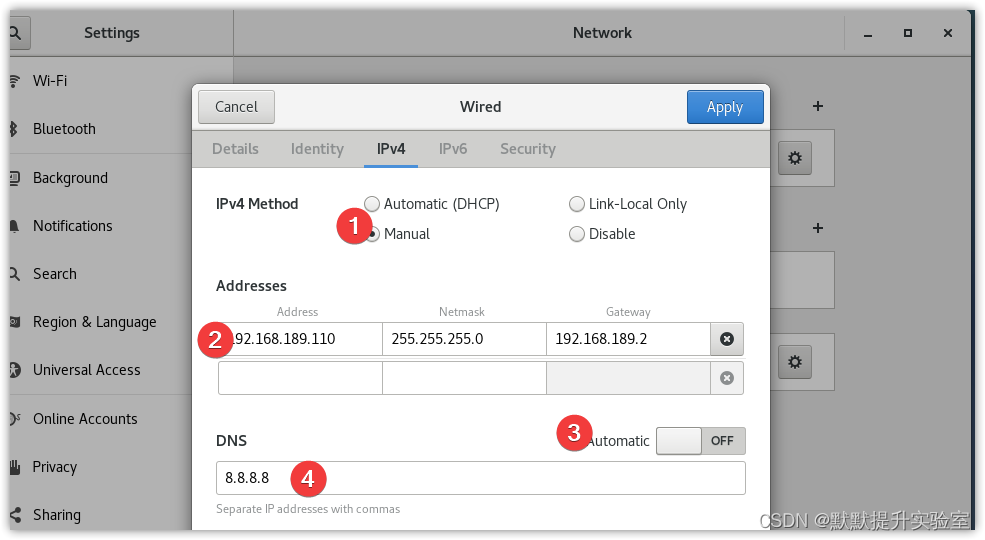
- 想都没想就将网关设置254了
- 并且DNS没有修改成手动,后面发现就是这2个问题。
其他原因见参考链接。
三、解决方案
- 进入图形化界面

- 修改IP和DNS

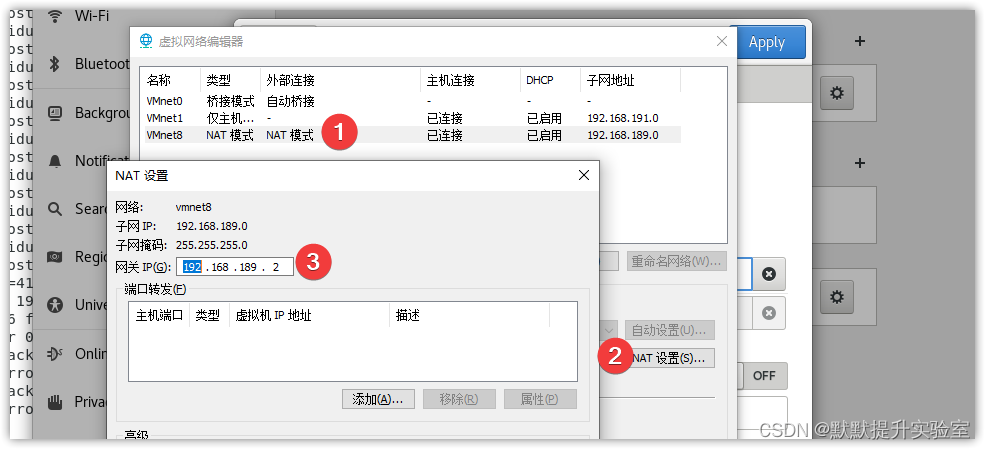
这里需要注意的是gateway的设置,不是192.168.189.254,而是VMware中nat网卡的网关地址:
- 打开VM中编辑里的虚拟网络编辑器点击NAT设置:

- NAT设置中就可以看到网关IP

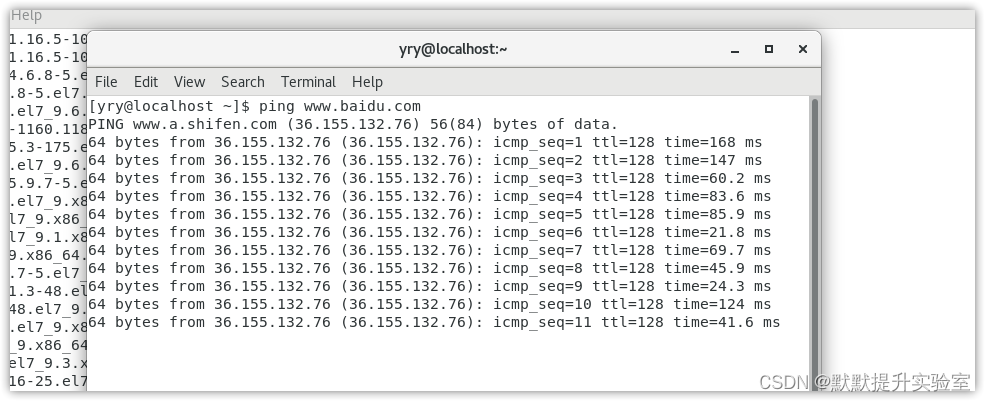
- 然后关闭DNS的自动,设置为8.8.8.8(其他也可以)。设置完成后,点击应用(Apply),然后将右上角的网断开连接,再连接就可以了。我们可以在终端ping一下看看可不可以上网就欧克啦。

四、参考链接
如能帮你解决问题,请点赞收藏评论,帮助更多的人解决问题。
声明:本文内容由网友自发贡献,不代表【wpsshop博客】立场,版权归原作者所有,本站不承担相应法律责任。如您发现有侵权的内容,请联系我们。转载请注明出处:https://www.wpsshop.cn/w/weixin_40725706/article/detail/1016407
推荐阅读
相关标签


