热门标签
热门文章
- 1chipmunk创建和销毁刚体过程_chipmunk 创建移动刚体
- 2unity导出安卓apk环境配置_unity安卓导出配置
- 3【Unity3D 灵巧小知识点】☀️ | Unity 中 怎样切换 天空盒 背景_unity的天空背景怎么改颜色
- 4查找对象数组中的指定对象_对象数组中找获取某个对象
- 5echarts地图带光柱标记_echarts 中国地图标注所在点
- 6Unity功能-将模型适配展示到UI界面_unity物体在适应在部分ui
- 7Python如何比较两张图片的相似度_python 图片相似度
- 8Android 自定义卫星扇形菜单栏 可自行修改参数_安卓 自定义扇形菜单
- 9人工智能_普通服务器CPU_安装清华开源人工智能AI大模型ChatGlm-6B_001---人工智能工作笔记0096
- 10Fabric自动化部署的简单使用_fab deploy 命令的用法
当前位置: article > 正文
powershell搞定烦人的Windows Defender_powershell 删除 windows derfender
作者:weixin_40725706 | 2024-02-27 12:17:40
赞
踩
powershell 删除 windows derfender
0x00 Windows Defender真烦
最近装了不少虚拟机,发现目前较新版本的windows Defender是真的烦,关了一段时间后,自己又打开。特别是装了域控后的winserver 2016,半都关不掉,做个实验是真烦。
顺手去查了下如何使用powershell搞定Windows Defneder,记录一下,以备查用。
0x01 powershell好使
powershell.exe Get-MpPreference //查看Defender配置
- 1
把重要的几个选项作了注释。
C:\Windows\system32>powershell.exe Get-MpPreference


CheckForSignaturesBeforeRunningScan           : False
ComputerID                                    : 4AD8F002-2FA4-48CA-BA56-528BCAF23B16
DisableArchiveScanning                        : False
DisableAutoExclusions                         : False
DisableBehaviorMonitoring                     : False  //行为监视
DisableBlockAtFirstSeen                       : False
DisableCatchupFullScan                        : True
DisableCatchupQuickScan                       : True
DisableEmailScanning                          : True
DisableIntrusionPreventionSystem              :			//是否启用入侵防范系统 (IPS)
DisableIOAVProtection                         : False  //读取/写入操作期间对I/O访问进行检查和拦截
DisablePrivacyMode                            : False
DisableRealtimeMonitoring                     : True  //实时保护
DisableRemovableDriveScanning                 : True
DisableRestorePoint                           : True
DisableScanningMappedNetworkDrivesForFullScan : True
DisableScanningNetworkFiles                   : False  //扫描网络文件
DisableScriptScanning                         : False
ExclusionExtension                            :
ExclusionPath                                 :
ExclusionProcess                              :
HighThreatDefaultAction                       : 0
LowThreatDefaultAction                        : 0
MAPSReporting                                 : 2
ModerateThreatDefaultAction                   : 0
PUAProtection                                 : 0
QuarantinePurgeItemsAfterDelay                : 90
RandomizeScheduleTaskTimes                    : True
RealTimeScanDirection                         : 0
RemediationScheduleDay                        : 0
RemediationScheduleTime                       : 02:00:00
ReportingAdditionalActionTimeOut              : 10080
ReportingCriticalFailureTimeOut               : 10080
ReportingNonCriticalTimeOut                   : 1440
ScanAvgCPULoadFactor                          : 50
ScanOnlyIfIdleEnabled                         : True
ScanParameters                                : 1
ScanPurgeItemsAfterDelay                      : 15
ScanScheduleDay                               : 0
ScanScheduleQuickScanTime                     : 00:00:00
ScanScheduleTime                              : 02:00:00
SevereThreatDefaultAction                     : 0
SignatureAuGracePeriod                        : 1440
SignatureDefinitionUpdateFileSharesSources    :
SignatureDisableUpdateOnStartupWithoutEngine  : False
SignatureFallbackOrder                        : MicrosoftUpdateServer|MMPC
SignatureFirstAuGracePeriod                   : 120
SignatureScheduleDay                          : 8
SignatureScheduleTime                         : 01:45:00
SignatureUpdateCatchupInterval                : 1
SignatureUpdateInterval                       : 0
SubmitSamplesConsent                          : 1  //自动提交未知文件以进行分析
ThreatIDDefaultAction_Actions                 :
ThreatIDDefaultAction_Ids                     :
UILockdown                                    : False
UnknownThreatDefaultAction                    : 0
PSComputerName                                :
- 1
- 2
- 3
- 4
- 5
- 6
- 7
- 8
- 9
- 10
- 11
- 12
- 13
- 14
- 15
- 16
- 17
- 18
- 19
- 20
- 21
- 22
- 23
- 24
- 25
- 26
- 27
- 28
- 29
- 30
- 31
- 32
- 33
- 34
- 35
- 36
- 37
- 38
- 39
- 40
- 41
- 42
- 43
- 44
- 45
- 46
- 47
- 48
- 49
- 50
- 51
- 52
- 53
- 54
- 55
- 56
- 57
- 58
- 59
- 60
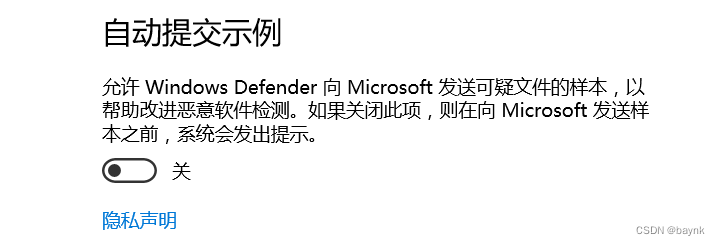
可以使用powershell.exe Set-MpPreference -DisableRealtimeMonitoring $true命令来进行关闭实时保护功能,这里本来就已经关闭了,演示关闭自动提交未知样本功能。
powershell.exe Set-MpPreference -SubmitSamplesConsent 0 //这里用0和2好像都行,组管理策略里面有答案
- 1

可以看到已经成功关闭,如果上述命令无法生效时,需要先关闭篡改防护。

也可以尝试使用注册表命令reg add "HKEY_LOCAL_MACHINE\SOFTWARE\Policies\Microsoft\Windows Defender" /v "DisableAntiSpyware" /d 1 /t REG_DWORD /f来进行关闭

世界清静了,真好。
声明:本文内容由网友自发贡献,不代表【wpsshop博客】立场,版权归原作者所有,本站不承担相应法律责任。如您发现有侵权的内容,请联系我们。转载请注明出处:https://www.wpsshop.cn/w/weixin_40725706/article/detail/152878?site
推荐阅读
相关标签


