
- 12019年区块链安全事件总结,全球损失超60亿美元 | 盘点
- 2数据库原理与应用课程设计------实验室设备管理系统sql_实验室设备管理系统数据库
- 3python pip安装依赖的常用软件源:清华源、阿里源、中科大源、豆瓣源_python源
- 4软件测试员面临35岁危机?挑战与机遇并存_软件测试工程师35岁
- 5python图形界面教程(tkinter)
- 67款免费的原型设计工具,总有一个是你的菜!_免费原型设计工具
- 7GPT4.5人工智能即将来临,ChatGPT的正面影响和负面影响(好处和坏处),利弊分析_cheat gbt对大学生的好处和坏处
- 8mysql执行计划与性能优化(待改进)_mysql8 explain update
- 9python3 pip3 安装包报错 Could not find a version that satisfies the requirement 解决方法
- 10JavaSE基础 (全网最全知识点)
RK3568笔记二十八:CRNN车牌识别部署_lprnet rknn
赞
踩
若该文为原创文章,转载请注明原文出处。
想在RK3568上实现车牌识别,想到的方法是使用LPRNet网络识别或CRNN识别,本篇记录使用CRNN识别车牌,也可以换成LPRNet模型,原理一样。
一、平台介绍
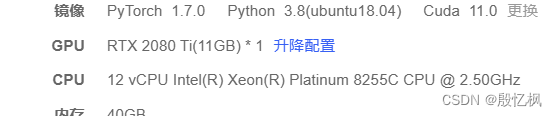
1、训练平台:Autodl
2、运行板子:ATK-DLRK3568
二、环境搭建
使用Autodl平台的GPU训练测试
1、创建虚拟环境
conda create -n cnn_plate_env python=3.82、激活
conda activate cnn_plate_env3、安装依赖项
- pip install easydict -i https://pypi.tuna.tsinghua.edu.cn/simple
- pip install pyyaml -i https://pypi.tuna.tsinghua.edu.cn/simple
- pip install opencv-python -i https://pypi.tuna.tsinghua.edu.cn/simple
- pip install tensorboardX -i https://pypi.tuna.tsinghua.edu.cn/simple
- pip install imgaug -i https://pypi.tuna.tsinghua.edu.cn/simple
- pip install torch -i https://pypi.tuna.tsinghua.edu.cn/simple
- pip install torchvision -i https://pypi.tuna.tsinghua.edu.cn/simple
- pip install tensorboardX -i https://pypi.tuna.tsinghua.edu.cn/simple
4、下载源码
- # 源码地址
- https://github.com/we0091234/crnn_plate_recognition
5、准备数据集
车牌识别数据集CCPD+CRPD
-
从CCPD和CRPD截下来的车牌小图以及我自己收集的一部分车牌
-
数据集打上标签,生成train.txt和val.txt
如有需要,联系博主。
然后执行如下命令,得到train.txt和val.txt
- python plateLabel.py --image_path your/train/img/path/ --label_file datasets/train.txt
- python plateLabel.py --image_path your/val/img/path/ --label_file datasets/val.txt
数据格式如下:

6、修改配置文件
将train.txt val.txt路径写入lib/config/360CC_config.yaml 中
JSON_FILE: {'train': '/root/crnn_plate_recognition/datasets/train.txt', 'val': '/root/crnn_plate_recognition/datasets/val.txt'}注意路径
7、修改trian.py
由于安装的ymal版本过高,会导致无法加载。所以需要修改加载方式。
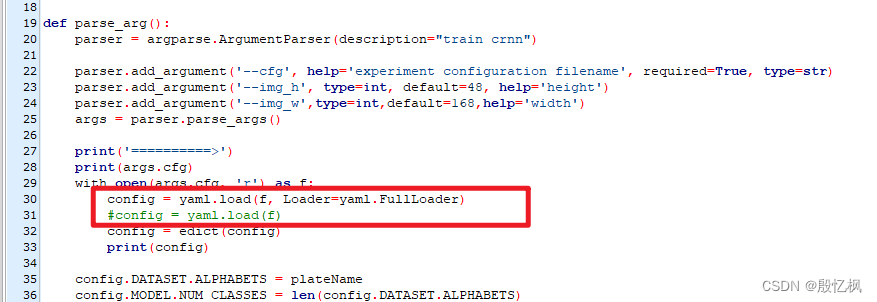
出错:TypeError: load() missing 1 required positional argument: 'Loader'
处理:TypeError: load() missing 1 required positional argument: ‘Loader‘-CSDN博客
8、训练
python train.py --cfg lib/config/360CC_config.yaml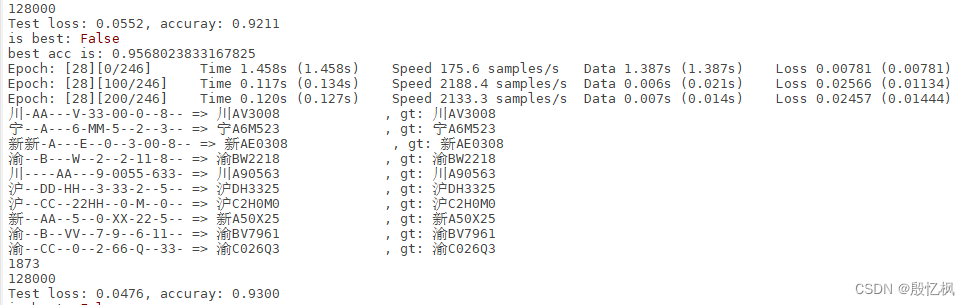
默认100轮,计时2-3小时,结果保存再output文件夹中
9、测试
python demo.py --model_path saved_model/best.pth --image_path images/test.jpg
三、导出ONNX并推理测试
导出需要安装onnx
- pip install onnx
- pip install onnxsim
1、导出ONNX
python export.py --weights saved_model/best.pth --save_path saved_model/best.onnx --simplify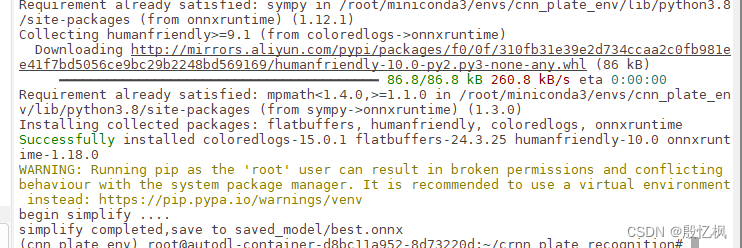
2、推理测试
python onnx_infer.py --onnx_file saved_model/best.onnx --image_path images/test.jpg
四、转成RKNN
转成RKNN和部署需要用到rknn-toolkit2-1.5.0
把训练转换后的onn拷贝到同级目录下,执行下面转换程序,即可导出RKNN
recongniton_cov_rknn.py
- import numpy as np
- import cv2
- from rknn.api import RKNN
- from PIL import Image, ImageDraw, ImageFont
-
-
-
- if __name__ == '__main__':
-
- # Create RKNN object
-
- rknn2 = RKNN(verbose=False)
- # pre-process config
- print('--> Config model')
- rknn2.config(mean_values=[[150.54, 150.54, 150.54]], std_values=[[49.215, 49.215, 49.215]], target_platform="rk3568")
- print('done')
-
- # Load ONNX model
- print('--> Loading model')
- ret = rknn2.load_onnx(model="./best.onnx")
- if ret != 0:
- print('Load model failed!')
- exit(ret)
- print('done')
-
- # Build model
- print('--> Building model')
- ret = rknn2.build(do_quantization=False)
- if ret != 0:
- print('Build model failed!')
- exit(ret)
- print('done')
-
- # Export RKNN model
- print('--> Export rknn model')
- ret = rknn2.export_rknn("./best.rknn")
- if ret != 0:
- print('Export rknn model failed!')
- exit(ret)
- print('done')
-
- # Init runtime environment
- print('--> Init runtime environment')
- ret = rknn2.init_runtime()
- if ret != 0:
- print('Init runtime environment failed!')
- exit(ret)
- print('done')
-
- rknn2.release()

五、部署测试
把转换后的RKNN模型拷贝到虚拟机内。
测试RKNN模型
- import numpy as np
- import cv2
- from rknn.api import RKNN
- from PIL import Image, ImageDraw, ImageFont
-
- plate_chr = "#京沪津渝冀晋蒙辽吉黑苏浙皖闽赣鲁豫鄂湘粤桂琼川贵云藏陕甘青宁新学警港澳挂使领民航危0123456789ABCDEFGHJKLMNPQRSTUVWXYZ险品"
-
-
- OBJ_THRESH = 0.25
- NMS_THRESH = 0.45
- IMG_SIZE = 640
-
- CLASSES = ("plate", )
-
- def decodePlate(preds): # 识别后处理
- pre = 0
- newPreds = []
- for i in range(len(preds[0])):
- if (preds[0][i] != 0).all() and (preds[0][i] != pre).all():
- newPreds.append(preds[0][i])
- pre = preds[0][i]
- plate = ""
- for i in newPreds:
- plate += plate_chr[int(i)]
- print(plate)
- return plate
-
-
- def cv2ImgAddText(img, text, left, top, textColor=(0, 255, 0), textSize=20):
- if (isinstance(img, np.ndarray)): # 判断是否OpenCV图片类型
- img = Image.fromarray(cv2.cvtColor(img, cv2.COLOR_BGR2RGB))
- # 创建一个可以在给定图像上绘图的对象
- draw = ImageDraw.Draw(img)
- # 字体的格式
- fontStyle = ImageFont.truetype(
- "simsun.ttc", textSize, encoding="utf-8")
- # 绘制文本
- draw.text((left, top), text, textColor, font=fontStyle)
- # 转换回OpenCV格式
- return cv2.cvtColor(np.asarray(img), cv2.COLOR_RGB2BGR)
-
- def sigmoid(x):
- # return 1 / (1 + np.exp(-x))
- return x
-
- def xywh2xyxy(x):
- # Convert [x, y, w, h] to [x1, y1, x2, y2]
- y = np.copy(x)
- y[:, 0] = x[:, 0] - x[:, 2] / 2 # top left x
- y[:, 1] = x[:, 1] - x[:, 3] / 2 # top left y
- y[:, 2] = x[:, 0] + x[:, 2] / 2 # bottom right x
- y[:, 3] = x[:, 1] + x[:, 3] / 2 # bottom right y
- return y
-
-
- def process(input, mask, anchors):
-
- anchors = [anchors[i] for i in mask]
- grid_h, grid_w = map(int, input.shape[0:2])
-
- box_confidence = sigmoid(input[..., 4])
- box_confidence = np.expand_dims(box_confidence, axis=-1)
-
- box_class_probs = sigmoid(input[..., 5:])
-
- box_xy = sigmoid(input[..., :2])*2 - 0.5
-
- col = np.tile(np.arange(0, grid_w), grid_w).reshape(-1, grid_w)
- row = np.tile(np.arange(0, grid_h).reshape(-1, 1), grid_h)
- col = col.reshape(grid_h, grid_w, 1, 1).repeat(3, axis=-2)
- row = row.reshape(grid_h, grid_w, 1, 1).repeat(3, axis=-2)
- grid = np.concatenate((col, row), axis=-1)
- box_xy += grid
- box_xy *= int(IMG_SIZE/grid_h)
-
- box_wh = pow(sigmoid(input[..., 2:4])*2, 2)
- box_wh = box_wh * anchors
-
- box = np.concatenate((box_xy, box_wh), axis=-1)
-
- return box, box_confidence, box_class_probs
-
-
- def filter_boxes(boxes, box_confidences, box_class_probs):
- """Filter boxes with box threshold. It's a bit different with origin yolov5 post process!
- # Arguments
- boxes: ndarray, boxes of objects.
- box_confidences: ndarray, confidences of objects.
- box_class_probs: ndarray, class_probs of objects.
- # Returns
- boxes: ndarray, filtered boxes.
- classes: ndarray, classes for boxes.
- scores: ndarray, scores for boxes.
- """
- boxes = boxes.reshape(-1, 4)
- box_confidences = box_confidences.reshape(-1)
- box_class_probs = box_class_probs.reshape(-1, box_class_probs.shape[-1])
-
- _box_pos = np.where(box_confidences >= OBJ_THRESH)
- boxes = boxes[_box_pos]
- box_confidences = box_confidences[_box_pos]
- box_class_probs = box_class_probs[_box_pos]
-
- class_max_score = np.max(box_class_probs, axis=-1)
- classes = np.argmax(box_class_probs, axis=-1)
- _class_pos = np.where(class_max_score >= OBJ_THRESH)
-
- boxes = boxes[_class_pos]
- classes = classes[_class_pos]
- scores = (class_max_score* box_confidences)[_class_pos]
-
- return boxes, classes, scores
-
-
- def nms_boxes(boxes, scores):
- """Suppress non-maximal boxes.
- # Arguments
- boxes: ndarray, boxes of objects.
- scores: ndarray, scores of objects.
- # Returns
- keep: ndarray, index of effective boxes.
- """
- x = boxes[:, 0]
- y = boxes[:, 1]
- w = boxes[:, 2] - boxes[:, 0]
- h = boxes[:, 3] - boxes[:, 1]
-
- areas = w * h
- order = scores.argsort()[::-1]
-
- keep = []
- while order.size > 0:
- i = order[0]
- keep.append(i)
-
- xx1 = np.maximum(x[i], x[order[1:]])
- yy1 = np.maximum(y[i], y[order[1:]])
- xx2 = np.minimum(x[i] + w[i], x[order[1:]] + w[order[1:]])
- yy2 = np.minimum(y[i] + h[i], y[order[1:]] + h[order[1:]])
-
- w1 = np.maximum(0.0, xx2 - xx1 + 0.00001)
- h1 = np.maximum(0.0, yy2 - yy1 + 0.00001)
- inter = w1 * h1
-
- ovr = inter / (areas[i] + areas[order[1:]] - inter)
- inds = np.where(ovr <= NMS_THRESH)[0]
- order = order[inds + 1]
- keep = np.array(keep)
- return keep
-
-
- def yolov5_post_process(input_data):
- masks = [[0, 1, 2], [3, 4, 5], [6, 7, 8]]
- anchors = [[10, 13], [16, 30], [33, 23], [30, 61], [62, 45],
- [59, 119], [116, 90], [156, 198], [373, 326]]
-
- boxes, classes, scores = [], [], []
- for input, mask in zip(input_data, masks):
- b, c, s = process(input, mask, anchors)
- b, c, s = filter_boxes(b, c, s)
- boxes.append(b)
- classes.append(c)
- scores.append(s)
-
- boxes = np.concatenate(boxes)
- boxes = xywh2xyxy(boxes)
- classes = np.concatenate(classes)
- scores = np.concatenate(scores)
-
- nboxes, nclasses, nscores = [], [], []
- for c in set(classes):
- inds = np.where(classes == c)
- b = boxes[inds]
- c = classes[inds]
- s = scores[inds]
-
- keep = nms_boxes(b, s)
-
- nboxes.append(b[keep])
- nclasses.append(c[keep])
- nscores.append(s[keep])
-
- if not nclasses and not nscores:
- return None, None, None
-
- boxes = np.concatenate(nboxes)
- classes = np.concatenate(nclasses)
- scores = np.concatenate(nscores)
-
- return boxes, classes, scores
-
-
- def draw(image, boxes, scores, classes):
- """Draw the boxes on the image.
- # Argument:
- image: original image.
- boxes: ndarray, boxes of objects.
- classes: ndarray, classes of objects.
- scores: ndarray, scores of objects.
- all_classes: all classes name.
- """
- for box, score, cl in zip(boxes, scores, classes):
- top, left, right, bottom = box
- # print('class: {}, score: {}'.format(CLASSES[cl], score))
- # print('box coordinate left,top,right,down: [{}, {}, {}, {}]'.format(top, left, right, bottom))
- top = int(top)
- left = int(left)
- right = int(right)
- bottom = int(bottom)
-
- cv2.rectangle(image, (top, left), (right, bottom), (255, 0, 0), 2)
- cv2.putText(image, '{0} {1:.2f}'.format(CLASSES[cl], score),
- (top, left - 6),
- cv2.FONT_HERSHEY_SIMPLEX,
- 0.6, (0, 0, 255), 2)
-
-
- def letterbox(im, new_shape=(640, 640), color=(0, 0, 0)):
- # Resize and pad image while meeting stride-multiple constraints
- shape = im.shape[:2] # current shape [height, width]
- if isinstance(new_shape, int):
- new_shape = (new_shape, new_shape)
-
- # Scale ratio (new / old)
- r = min(new_shape[0] / shape[0], new_shape[1] / shape[1])
-
- # Compute padding
- ratio = r, r # width, height ratios
- new_unpad = int(round(shape[1] * r)), int(round(shape[0] * r))
- dw, dh = new_shape[1] - new_unpad[0], new_shape[0] - new_unpad[1] # wh padding
-
- dw /= 2 # divide padding into 2 sides
- dh /= 2
-
- if shape[::-1] != new_unpad: # resize
- im = cv2.resize(im, new_unpad, interpolation=cv2.INTER_LINEAR)
- top, bottom = int(round(dh - 0.1)), int(round(dh + 0.1))
- left, right = int(round(dw - 0.1)), int(round(dw + 0.1))
- im = cv2.copyMakeBorder(im, top, bottom, left, right, cv2.BORDER_CONSTANT, value=color) # add border
- return im, ratio, (dw, dh)
-
-
- if __name__ == '__main__':
-
- # Create RKNN object
- rknn1 = RKNN(verbose=False)
- rknn2 = RKNN(verbose=False)
- # pre-process config
- print('--> Config model')
- rknn1.config(mean_values=[[0, 0, 0]], std_values=[[255, 255, 255]], target_platform="rk3568")
- rknn2.config(mean_values=[[150.54, 150.54, 150.54]], std_values=[[49.215, 49.215, 49.215]], target_platform="rk3568")
- print('done')
-
- # Load ONNX model
- print('--> Loading model')
- ret = rknn1.load_onnx(model="./yolov5n.onnx")
- ret = rknn2.load_onnx(model="./best.onnx")
- if ret != 0:
- print('Load model failed!')
- exit(ret)
- print('done')
-
- # Build model
- print('--> Building model')
- ret = rknn1.build(do_quantization=True, dataset="dataset.txt")
- ret = rknn2.build(do_quantization=False)
- if ret != 0:
- print('Build model failed!')
- exit(ret)
- print('done')
-
- # Export RKNN model
- print('--> Export rknn model')
- ret = rknn1.export_rknn("./yolov5n.rknn")
- ret = rknn2.export_rknn("./best.rknn")
- if ret != 0:
- print('Export rknn model failed!')
- exit(ret)
- print('done')
-
- # Init runtime environment
- print('--> Init runtime environment')
- ret = rknn1.init_runtime()
- ret = rknn2.init_runtime()
- if ret != 0:
- print('Init runtime environment failed!')
- exit(ret)
- print('done')
-
- # Set inputs
- img = cv2.imread("./car.jpg")
- # img, ratio, (dw, dh) = letterbox(img, new_shape=(IMG_SIZE, IMG_SIZE))
- img = cv2.cvtColor(img, cv2.COLOR_BGR2RGB)
- img = cv2.resize(img, (IMG_SIZE, IMG_SIZE))
-
- # Inference
- print('--> Running model')
- outputs = rknn1.inference(inputs=[img])
- print('done')
-
- # post process
- input0_data = outputs[0]
- input1_data = outputs[1]
- input2_data = outputs[2]
-
- input0_data = input0_data.reshape([3, -1]+list(input0_data.shape[-2:]))
- input1_data = input1_data.reshape([3, -1]+list(input1_data.shape[-2:]))
- input2_data = input2_data.reshape([3, -1]+list(input2_data.shape[-2:]))
-
- input_data = list()
- input_data.append(np.transpose(input0_data, (2, 3, 0, 1)))
- input_data.append(np.transpose(input1_data, (2, 3, 0, 1)))
- input_data.append(np.transpose(input2_data, (2, 3, 0, 1)))
-
- boxes, classes, scores = yolov5_post_process(input_data)
-
- img_1 = cv2.cvtColor(img, cv2.COLOR_RGB2BGR)
- if boxes is not None:
- print(boxes)
- # draw(img_1, boxes, scores, classes)
- for box in boxes:
- x1, y1, x2, y2 = box
- x1 = int(x1)
- x2 = int(x2)
- y1 = int(y1)
- y2 = int(y2)
- cv2.rectangle(img_1, (x1, y1), (x2, y2), (0, 255, 0), 1, 1)
- roi = img[y1:y2, x1:x2]
- try:
- roi = cv2.resize(roi, (168, 48))
- print('333')
- output = rknn2.inference(inputs=[roi])
- input_data = np.swapaxes(output[0], 1, 2)
- index = np.argmax(input_data, axis=1)
- plate_no = decodePlate(index)
- img_1 = cv2ImgAddText(img_1, str(plate_no), x1, y1-30, (0, 255, 0), 30)
- print(str(plate_no))
- except:
- continue
- # show output
- cv2.imshow("post process result", img_1)
- cv2.waitKey(0)
- cv2.destroyAllWindows()
-
- rknn1.release()
- rknn2.release()
程序大概思路是:
1、读取图片
2、加载模型
3、检测车牌
4、识别车牌
5、显示图片
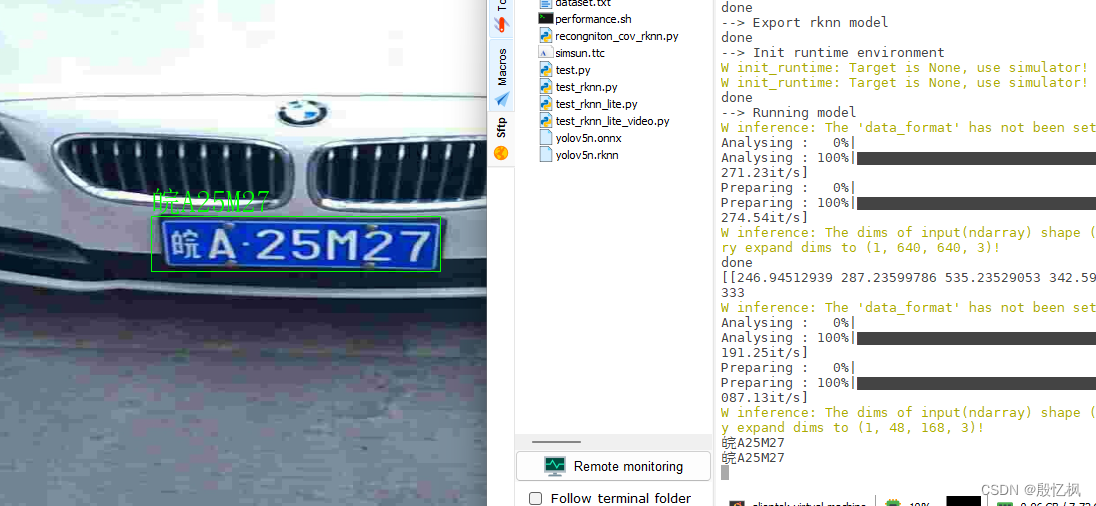
上面是在虚拟机模拟运行,结果正常。
六、C++板载部署
自行部署,参考讯为电子的程序,可以部署成功。
如有侵权,或需要完整代码,请及时联系博主。

