- 1Homestead切换PHP版本_php 无法将“update-alternatives”项识
- 2使用matlab训练卷积神经网络_matlab卷积神经网络
- 3Java装箱拆箱和重载重写(五)_integer i1 = 40;integer i2 = 40;相等吗
- 4python中常用的序列化模块_Python中的序列化和反序列化
- 5应用(接口)被刷的解决方案(接口防止机器刷数据的处理方案)
- 6SpringBoot 面试题(六)
- 7用python实现SM2数字证书的坑
- 8Python爬虫天津景点数据可视化和景点推荐系统
- 9基于Hadoop的网上购物行为大数据分析及预测系统【flask+echarts+机器学习】前后端交互_基于hadoop的购物行为分析系统
- 10算法工程师的日常工作内容?你想知道的可能都在这里
微信小程序 之 原生开发_微信小程序原生开发
赞
踩

一、前期预备
1. 预备知识
小程序的核心技术主要是三个:
- 页面布局:WXML,类似HTML
- 页面样式:WXSS,几乎就是CSS(某些不支持,某些进行了增强,但是基本是一致的)
- 页面脚本:JavaScript+WXS(WeixinScript)
网址 : 微信小程序
3. 下载小程序开发工具
4. 小程序项目结构
Vue的MVVM和小程序MVVM对比

MVVM :
- DOM Listeners: ViewModel层可以将DOM的监听绑定到Model层
- Data Bindings: ViewModel层可以将数据的变量, 响应式的反应到View层
- MVVM架构将 命令式编程 转移到 声明式编程
二、创建小程序项目
1. 查看注册的appId
网址 : 小程序
01 - 创建text页面文件夹
可能会自动注册完成
ps : 也可以反向注册,在这里直接配置,文件夹会自动生成
01 - text.wxml
- <!--pages/text/text.wxml-->
- <!-- 1. 普通文本 -->
- <view>text页面</view>
-
- <!-- 2. 数据绑定,使用 {{}} 这个语法 -->
- <view>{{message}}</view>
-
- <!-- 3. 列表渲染 -->
- <block wx:for="{{movies}}" wx:key="item">
- <view>item : {{item}} => index: {{index}}</view>
- </block>
-
- <!-- 4. 事件监听 -->
- <view style="text-align: center">当前计数 : {{counter}}</view>
- <button bindtap="increment">+1</button>
- <button bindtap="decrement">-1</button>

02 - text.js
直接修改data中的数据,不会引起页面的刷新
小程序和react中都不会,只有vue劫持了属性才能直接操作
ps : 修改data并且希望页面重新渲染,必须使用 this.setData()
- // pages/text/text.js
- Page({
- /**
- * 页面的初始数据
- */
- data: {
- // 1. 数据绑定,{{}} 语法
- message: 'star',
- // 2. 列表渲染数据
- movies: ['迪迦大战肯德基', '图图和小新抢东西吃'],
- // 3. 计数器参数
- counter: 0
- },
- // 监听计数器增加按钮触发
- increment() {
- // 此方法修改后的数据不会在页面上响应
- // this.data.counter += 1
- this.setData({
- counter: this.data.counter + 1
- })
- },
- // 监听计数器减少按钮触发
- decrement() {
- this.setData({
- counter: this.data.counter - 1
- })
- },
- })

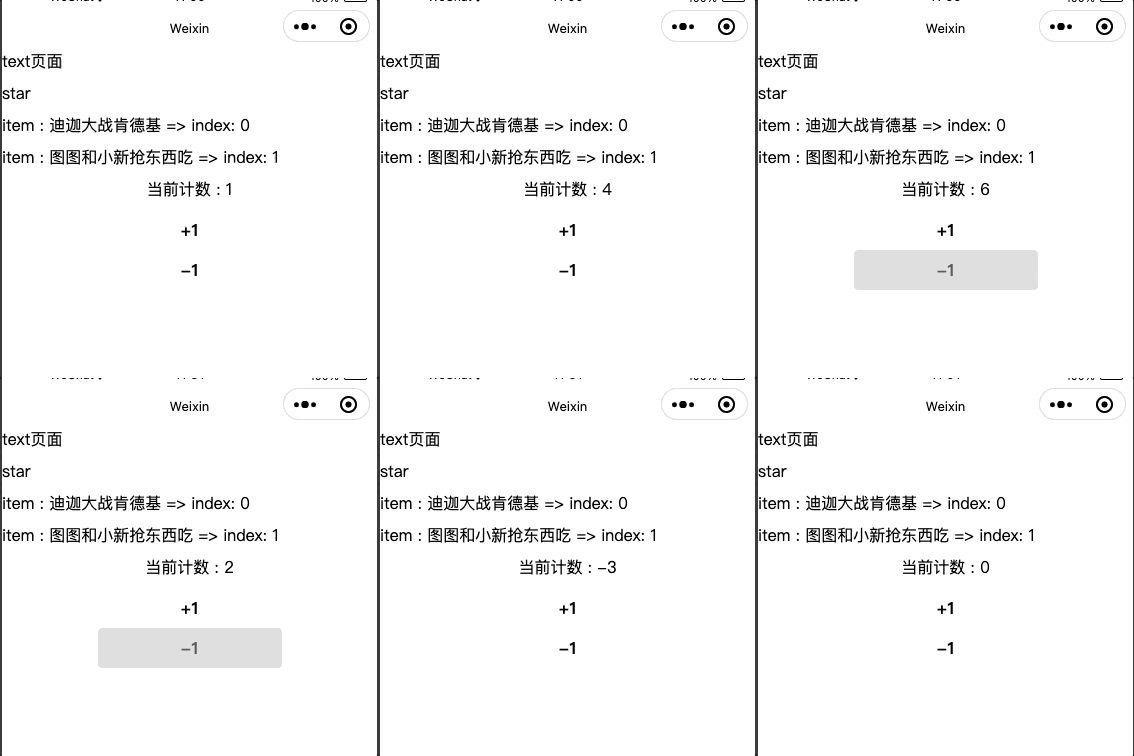
03 - 效果
三、小程序的架构和配置
1. 小程序的架构模型
01 - 宿主环境
小程序的宿主环境 => 微信客户端
ps : 宿主环境为了执行小程序的各种文件:wxml文件、wxss文件、js文件
02 - 双线程模型
- 当小程序基于 WebView 环境下时,WebView 的 JS 逻辑、DOM 树创建、CSS 解析、样式计算、Layout、Paint (Composite) 都发生在同一线程,在 WebView 上执行过多的 JS 逻辑可能阻塞渲染,导致界面卡顿
- 以此为前提,小程序同时考虑了性能与安全,采用了目前称为「双线程模型」的架构
双线程模型 :
- WXML模块和WXSS样式运行于 渲染层,渲染层使用WebView线程渲染(一个程序有多个页面,会使用多个WebView的线程)
- JS脚本(app.js/home.js等)运行于 逻辑层,逻辑层使用JsCore运行JS脚本
- 这两个线程都会经由微信客户端(Native)进行中转交互
- 注 : wxs是和渲染层呆在一起的
01 - project.config.json
项目配置文件 => 比如项目名称、appid等
网址 : 项目配置文件 | 微信开放文档
02 - sitemap.json
小程序搜索相关的
网址 : sitemap 配置 | 微信开放文档
03 - app.json
全局配置
网址 : 全局配置 | 微信开放文档

- pages : 页面路径列表
- 用于指定小程序由哪些页面组成,每一项都对应一个页面的 路径(含文件名) 信息
- 小程序中所有的页面都是必须在pages中进行注册的
- 全局配置 - pages | 微信开放文档
- window : 全局的默认窗口展示
- 用户指定窗口如何展示, 其中还包含了很多其他的属性
- 全局配置 - window | 微信开放文档
- tabBar : 顶部tab栏的展示
代码
- {
- "pages": [
- // 默认显示的页面
- "pages/text/text",
- "pages/index/index",
- "pages/logs/logs"
- ],
- "window": {
- // 下拉 loading 的样式,仅支持 dark 黑色 / light 白色
- // 需要到页面的.json中加入 "enablePullDownRefresh": true , 开启即可
- // 最好别在全局开启下拉刷新
- "backgroundTextStyle": "dark",
- // 导航栏背景颜色
- "navigationBarBackgroundColor": "#f00",
- // 导航栏标题文字内容
- "navigationBarTitleText": "Weixin",
- // 导航栏标题颜色,仅支持 black / white
- "navigationBarTextStyle": "black"
- },
- // 底部导航按钮
- "tabBar": {
- // 文字默认的颜色
- "color":"#fff",
- // 选中时文字的颜色
- "selectedColor":"#ff8189",
- // 导航是一个数组
- "list": [
- {
- // 页面路径
- "pagePath": "pages/index/index",
- // 文本
- "text": "首页",
- // 默认显示的图标
- "iconPath": "assets/images/tabbar/home.png",
- // 选中时显示的图标
- "selectedIconPath": "assets/images/tabbar/home_active.png"
- },
- {
- "pagePath": "pages/text/text",
- "text": "记录",
- "iconPath": "assets/images/tabbar/category.png",
- "selectedIconPath": "assets/images/tabbar/category_active.png"
- }
- ]
- },
- // 表明启用新版的组件样式
- "style": "v2",
- // 配置搜索相关文件,基本不需更改
- "sitemapLocation": "sitemap.json"
- }

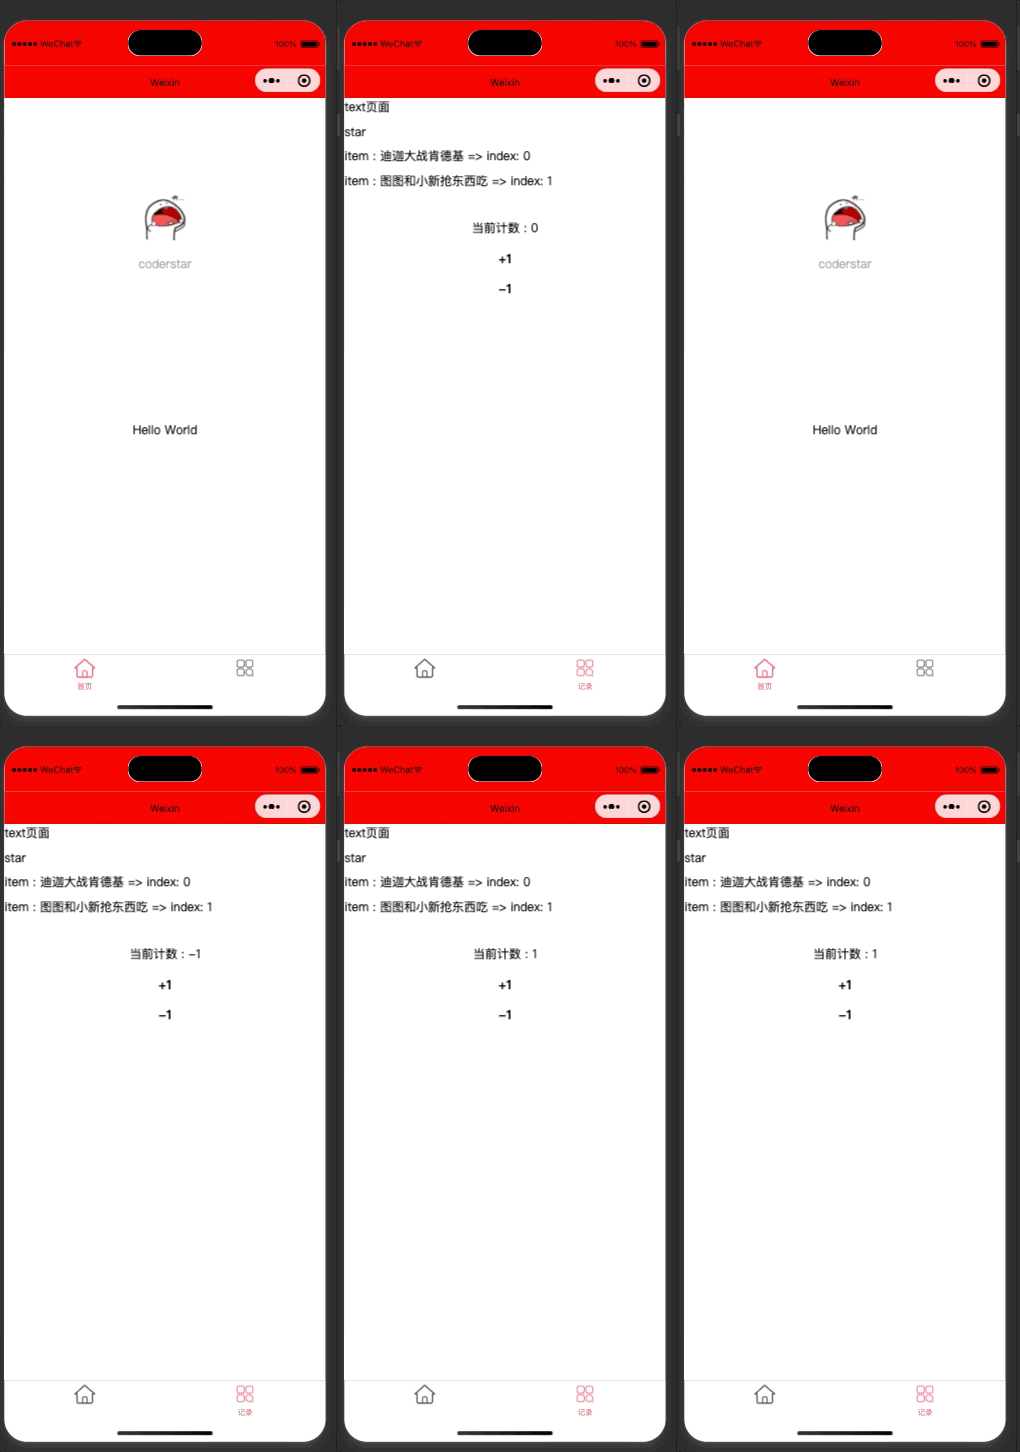
效果
页面配置
每一个小程序页面也可以使用 .json 文件来对本页面的窗口表现进行配置
页面中配置项在当前页面会覆盖 app.json 的 window 中相同的配置项
网址 : 页面配置 | 微信开放文档
代码
- {
- // 是否使用组件
- "usingComponents": {
- // 需要在这里配置
- },
- // 页面顶部标题文字
- "navigationBarTitleText": "冲啊",
- // 页面顶部标题颜色
- "navigationBarTextStyle": "white",
- // 页面顶部背景颜色
- "navigationBarBackgroundColor": "#0f0",
-
- // 是否开启下拉刷新
- // Page.js 中,onPullDownRefresh 开启这个,可以监听到是否下拉刷新了
- "enablePullDownRefresh": true,
- }

效果
每个小程序都需要在 app.js 中调用 App 函数 注册小程序示例
- 在注册时, 可以绑定对应的生命周期函数
- 在生命周期函数中, 执行对应的代码
注册App时,一般做如下事情 :
- 监听生命周期函数,在生命周期中执行对应的业务逻辑,比如在某个生命周期函数中进行登录操作或者请求网络数据
- 判断小程序的进入场景
- 因为App()实例只有一个,并且是全局共享的(单例对象),所以我们可以将一些共享数据放在这里
01 - 常见场景
小程序的打开场景较多 :
- 常见的打开场景
- 群聊会话中打开
- 小程序列表中打开
- 微信扫一扫打开
- 另一个小程序打开
- 场景值 : 微信开放文档 - 场景值列表
02 - 确定场景
在 onLaunch 和 onShow 生命周期回调函数中,会有options参数,其中有scene值
代码
- // app.js
- App({
- /**
- * 生命周期回调——监听小程序初始化。
- * 小程序初始化时触发,只有执行一次
- */
- onLaunch(options) {
- console.log('onLaunch =>', 'scene :', options.scene);
- // 登录
- wx.login({
- success: res => {
- // 发送 res.code 到后台换取 openId, sessionKey, unionId
- }
- })
- },
- /**
- * 生命周期回调——监听小程序启动或切前台
- * 每次打开小程序都会执行
- */
- onShow(options) {
- console.log('onShow =>', 'scene :', options.scene);
- // 可根据场景值,跳转到对应的页面
- wx.navigateTo({
- // url: 'url',
- })
- },
- onHide() {
- console.log('onHide => 隐藏~');
- }
- })

效果
注意 : 定义在全局的数据不会响应式
共享的数据通常是一些固定的数据
app.js
- // app.js
- App({
- // 定义的全局变量
- globalData: {
- token: '',
- userInfo: {
- name: 'coder',
- age: 18
- }
- },
- // 页面初始化调用的回调函数
- onLaunch(options) {
- // 登录
- wx.login({
- success: res => {
- console.log('code =>', res.code);
- // 发送 res.code 到后台换取 openId, sessionKey, unionId
- this.globalData.token = res.token || 'abcdefghijklmnopqrstuvwxyz'
- }
- })
- }
- })

page.js
- // pages/text/text.js
- Page({
- // 页面加载的时候触发
- /**
- * 获取页面所需数据
- */
- onLoad() {
- // 获取共享的数据
- // 1. 获取app实例对象
- const app = getApp()
- // 2. 从app实例对象中获取数据
- const token = app.globalData.token
- const userInfo = app.globalData.userInfo
- console.log('userInfo :', userInfo);
- console.log('token :', token);
- // 3. 拿到token后发送网络请求
- // wx.request({
- // url: 'url',
- // token
- // })
- // 4. 展示数据到页面
- this.setData({
- userInfo
- })
- },
- /**
- * 页面的初始数据
- */
- data: {
- userInfo: {}
- },
- })

效果
在生命周期函数中,完成应用程序启动后的初始化操作
- 比如登录操作
- 比如读取本地数据(类似于token,然后保存在全局方便使用)
- 比如请求整个应用程序需要的数据
这里简单写写,详细的登录操作在下方
- // app.js
- App({
- // globalData
- globalData: {
- userState: {
- openId: '',
- sessionKey: '',
- unionId: ''
- },
- userInfo: {}
- },
- // 页面初始化调用的回调函数
- onLaunch(options) {
- // 从本地获取用户状态信息,判断是否需要登录
- const userState = wx.getStorageSync('userState')
- // 如果不存在,则进行登录
- if (!userState || !userState.openId) {
- wx.login({
- success: res => {
- console.log('code =>', res.code);
- // 发送 res.code 到后台换取 openId, sessionKey, unionId
- this.getUserState(res.code)
- }
- })
- }
- },
- // 获取用户信息
- getUserState(code) {
- wx.request({
- // 填入请求地址
- url: 'url',
- code,
- success: (res) => {
- const { openId, unionId, sessionKey, userInfo } = res
- // 将登录成功的数据,保存在storage中
- wx.setStorageSync('userState', {
- openId,
- unionId,
- sessionKey,
- })
- wx.setStorageSync('userInfo', userInfo)
-
- // 将登录成功的数据,保存在globalData中
- this.globalData.userState = {
- openId,
- unionId,
- sessionKey,
- }
- this.globalData.userInfo = userInfo
- }
- })
- //
- }
- })

五、注册页面 – Page函数 - (page).js
小程序中的每个页面, 都有一个对应的js文件, 其中调用 Page函数 注册页面示例
- 在注册时, 可以绑定初始化数据、生命周期回调、事件处理函数等
注册Page页面时,一般做如下事情 :
- 在生命周期函数中发送网络请求,从服务器获取数据
- 初始化一些数据,以方便被wxml引用展示
- 监听wxml中的事件,绑定对应的事件函数
- 其他一些监听(比如页面滚动、上拉刷新、下拉加载更多等)
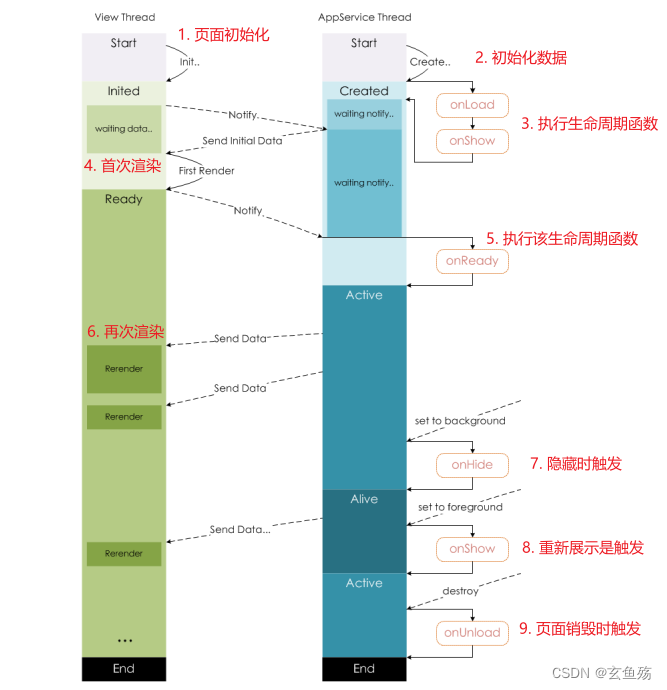
0. 生命周期
网址 : 生命周期 | 微信开放文档
1. 发送网络请求
- // logs.js
- Page({
- data: {
- pagaData: {}
- },
- // 页面加载时促发
- onLoad() {
- const _this = this
- // 发送网络请求
- wx.request({
- url: 'www.baidu.com',
- success: (res) => {
- console.log(this, res);
- this.setData({
- pagaData: res.pagaData || {}
- })
- },
- error(err) {
- console.log(_this, err);
- }
- })
- }
- })

2. 初始数据
- // logs.js
- Page({
- data: {
- // 定义初始化数据
- movies: ['葫芦娃大战喜羊羊', '蜡笔小新殴打图图'],
- },
- // 页面加载时促发
- onLoad() { }
- })
3. 绑定事件函数
wxml
- <!--logs.wxml-->
- <view>
- <button bindtap="handClick">事件触发</button>
- <button>------</button>
- <button bindtap="clickQuery"
- data-query="abc">触发并传递参数</button>
- <button>------</button>
- <button wx:for="{{btns}}"
- wx:key="*this"
- bindtap="btnsClick"
- data-index="{{index}}"
- data-item="{{item}}"
- style="background-color: {{item}};">
- {{item}} - {{index}}
- </button>
- </view>

js
- // logs.js
- Page({
- data: {
- // 定义初始化数据
- btns: ['red', 'blue', 'green', 'pink', 'yellow'],
- },
- // 页面加载时促发
- onLoad() { },
- // 绑定事件
- handClick() {
- console.log('我被点击了');
- },
- // 传递参数
- clickQuery(e) {
- console.log('我被点击了,参数是 : ', e.target.dataset);
- },
- btnsClick(e) {
- console.log('循环出的按钮', e.target.dataset);
- }
- })

4. 其他的监听
01 - 下拉刷新
logs.json
- {
- "usingComponents": {},
- // 开启下拉刷新
- "enablePullDownRefresh": true
- }
logs.js
- // logs.js
- Page({
- data: {
- },
- // 监听用户下拉刷新
- onPullDownRefresh() {
- console.log('用户下拉刷新');
- // 模拟网络请求
- setTimeout(() => {
- // api: 停止下拉刷新
- wx.stopPullDownRefresh({
- success: (res) => {
- console.log('成功关闭下拉刷新', res);
- },
- fail: (err) => {
- console.log('关闭失败', err);
- }
- })
- }, 1000);
- }
- })

效果
logs.json
- {
- "usingComponents": {},
- // 页面上拉触底事件触发时距页面底部距离,单位为px
- // 距离底部多少距离,触发
- "onReachBottomDistance": 100
- }
logs.js
- // logs.js
- Page({
- data: {
- // 默认展示50条数据
- countsNum: 50,
- // 到达底部后,需要增加的数量
- countsSize: 40
- },
- // 监听页面是否滚动到达底部
- onReachBottom() {
- this.setData({
- // 到达底部后,增加
- countsNum: this.data.countsNum + this.data.countsSize
- })
- console.log('滚动到底部');
- }
- })

logs.wxml
- <!--logs.wxml-->
- <view wx:for="{{countsNum}}" wx:key="*this">
- 页面数据 : {{item}}
- </view>
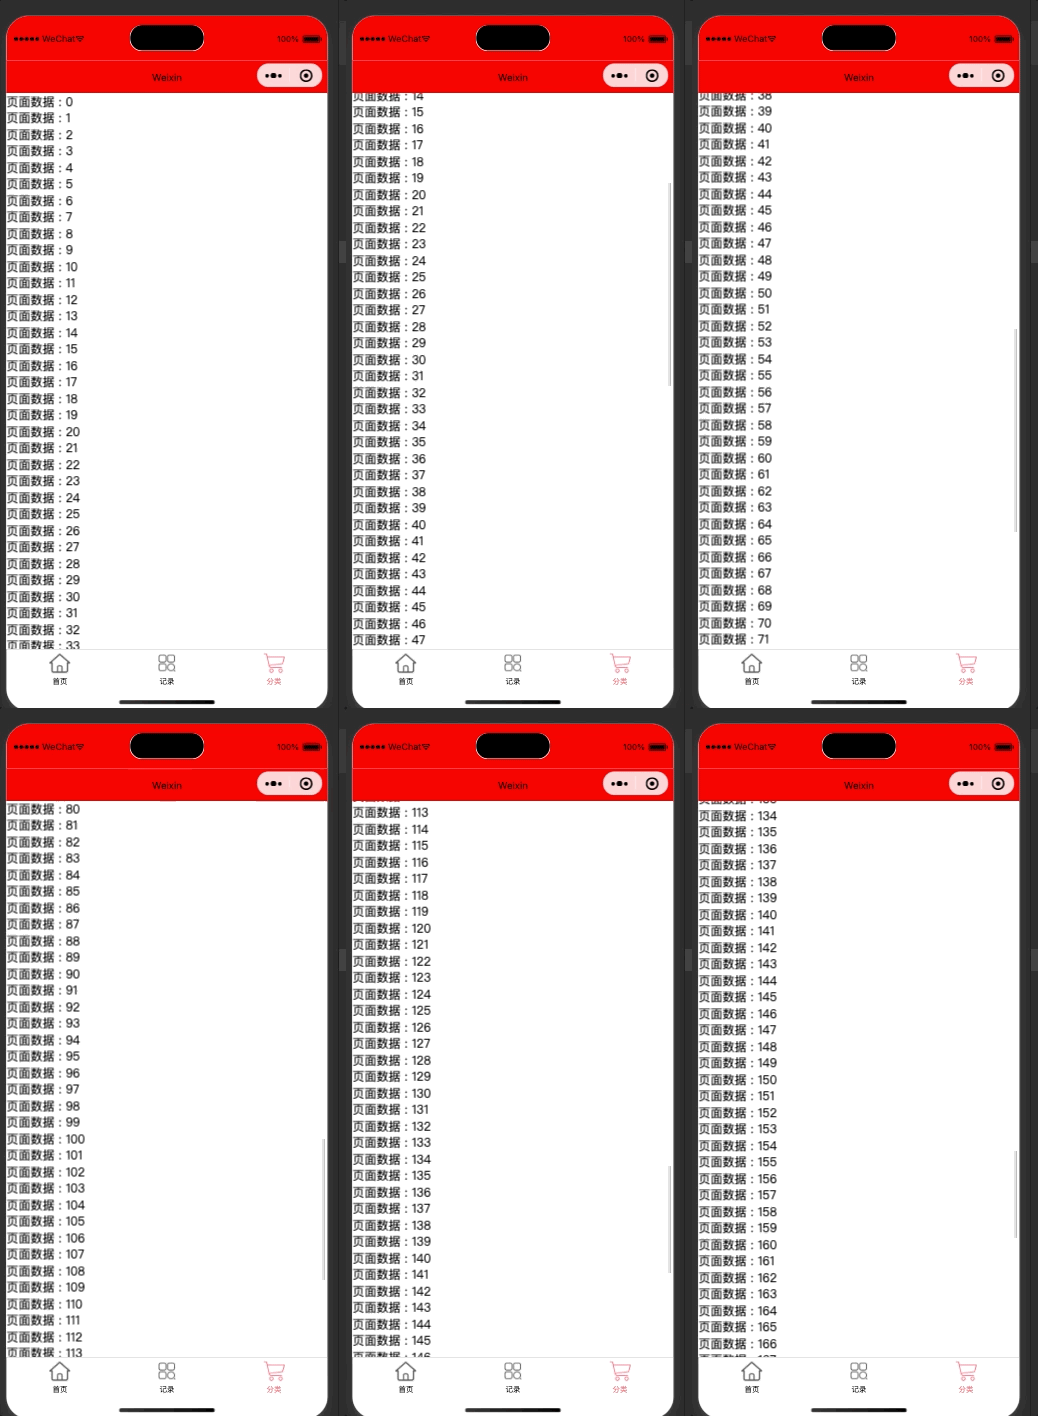
效果
- // logs.js
- Page({
- data: {
- // 定义初始化数据
- btns: ['red', 'blue', 'green', 'pink', 'yellow'],
- },
- // 页面加载时促发
- onLoad() { },
-
- // 页面滚动
- onPageScroll(e) {
- console.log(e); // 距离顶部的距离
- },
- })
六、常见的内置组件
Text : 文本组件
Text组件 : 用于显示文本, 类似于span标签, 是行内元素
- <!-- 基本用法 -->
- <text>Hello world</text>
-
- <!-- 使用js中定义的数据 -->
- <text>{{message}}</text>
-
- <!-- 长按可选择,可用来复制 -->
- <text user-select>{{message}}</text>
-
- <!-- 解码 -->
- <text decode>></text>
Button : 按钮组件
Button组件用于创建按钮,默认块级元素
基本用法
- <!-- 默认 => 独占一行 -->
- <button>按钮</button>
-
- <!-- size属性 => 变成了inline-block -->
- <button size="mini">size属性</button>
-
- <!-- type属性 => 可更改背景、颜色 -->
- <button size="mini"
- type="default">文字颜色变绿</button>
- <button size="mini"
- type="primary">背景颜色变绿</button>
- <button size="mini"
- type="warn">文字颜色变红</button>
-
- <!-- plain => 镂空效果 -->
- <button size="mini"
- plain> 镂空效果,有边框 </button>
-
- <!-- 禁用 -->
- <button size="mini"
- disabled> 禁止交互 </button>
-
- <!-- 加载效果 => 前方有个小圆圈在转,可动态绑定 -->
- <button size="mini"
- loading='{{true}}'> 等待加载 </button>

open-type属性
open-type用户获取一些特殊性的权限,可以绑定一些特殊的事件

获取用户信息
wxml
- <!-- 获取用户信息 -->
- <button bindtap="getUserProfile">获取用户信息</button>
js
- Page({
- getUserProfile(e) {
- // 推荐使用 wx.getUserProfile 获取用户信息,开发者每次通过该接口获取用户个人信息均需用户确认
- // 开发者妥善保管用户快速填写的头像昵称,避免重复弹窗
- wx.getUserProfile({
- desc: '用于完善会员资料', // 声明获取用户个人信息后的用途,后续会展示在弹窗中,请谨慎填写
- // 点击允许
- success: (res) => {
- console.log('success', res);
- },
- // 点击拒绝
- fail: (err) => {
- console.log('fail', err);
- }
- })
- }
- })

获取用户手机
wxml
- <!-- 获取用户手机号 -->
- <button open-type="getPhoneNumber"
- bindgetphonenumber="getPhoneNumber">获取用户手机号</button>
js
- Page({
- getPhoneNumber(e) {
- // 如果点击了拒绝
- if (e.target.errMsg !== 'getPhoneNumber:ok') {
- return wx.showToast({
- title: '用户未同意授权手机号',
- icon: 'none'
- })
- }
- // 如果点击确认
- cosnt { code, encryptedData, iv } = e.target
- // 把数据传给后端,后端会去解密拿到手机号的
- wx.request({
- url: 'https://example.com/onLogin',
- data: {
- appId: '',
- openId: '',
- code,
- encryptedData,
- iv
- },
- method: "post",
- success: function (res) {
- console.log(res);
- }
- })
- }
- })

View : 视图组件
View视图组件 : 块级元素,独占一行,通常用作容器组件,和div差不多
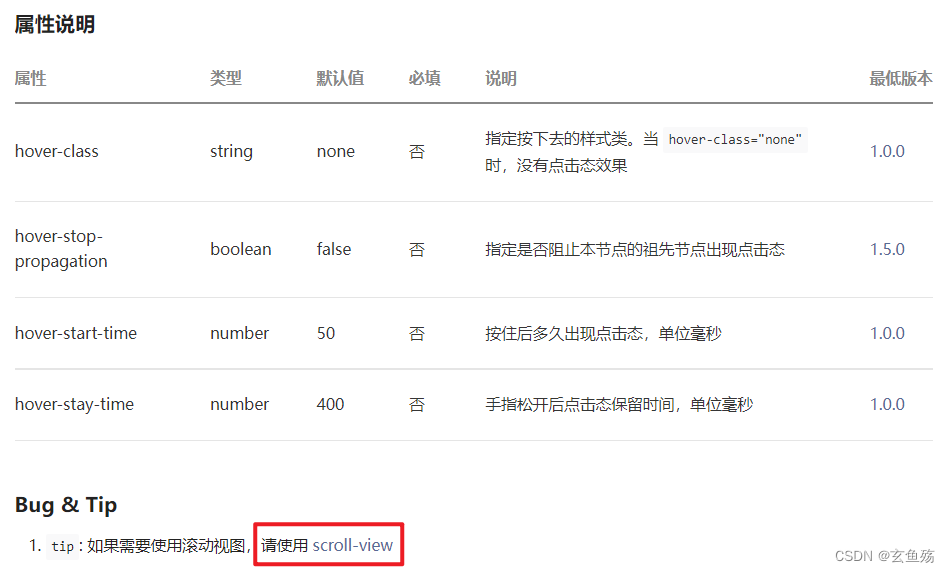
ScrollView滚动组件
scroll-view : 可以实现局部滚动
上下滚动
wxml
- <!-- 固定高度,上下滚动,( y轴 : scroll-y ) -->
- <scroll-view class="contain scroll-y"
- scroll-y
- bindscrolltoupper="scrollTop"
- bindscrolltolower="scrollBottom"
- bindscroll='scrollIng'>
- <block wx:for="{{viewColors}}"
- wx:key="*this">
- <view class="box"
- style="background-color: {{item}}">
- {{item}}
- </view>
- </block>
- </scroll-view>
css
- .contain {
- height: 300px;
- }
-
- .box {
- height: 100px;
- color: white;
- font-weight: bold;
- }
js
- Page({
- data: {
- viewColors: ['red', 'pink', 'green', 'blue']
- },
- scrollTop() {
- console.log('到达顶部');
- },
- scrollBottom() {
- console.log('到达底部');
- },
- // 滚动中触发
- scrollIng({ detail }) {
- console.log(detail);
- }
- })
左右滚动
注 : 若要开启flex布局,须加上enable-flex这个属性
wxml
- <!-- 固定宽度,左右滚动,( x轴 : scroll-x ) -->
- <scroll-view class="contain scroll-x"
- scroll-x
- enable-flex
- bindscrolltoupper="scrollLeft"
- bindscrolltolower="scrollRight"
- bindscroll='scrollIng'>
- <block wx:for="{{viewColors}}"
- wx:key="*this">
- <view class="box"
- style="background-color: {{item}}">
- {{item}}
- </view>
- </block>
- </scroll-view>
css
- .contain {
- display: flex;
- }
-
- .box {
- /* 不压缩 */
- flex-shrink: 0;
- width: 150px;
- height: 150px;
- color: white;
- font-weight: bold;
- }
js
- Page({
- data: {
- viewColors: ['red', 'pink', 'green', 'blue']
- },
- scrollLeft() {
- console.log('到达左侧');
- },
- scrollRight() {
- console.log('到达右侧');
- },
- // 滚动中触发
- scrollIng({ detail }) {
- console.log(detail);
- // detail.deltaX > 0,往左滚动
- // detail.deltaX < 0,往右滚动
- }
- })

Image : 图片组件
Image组件 : 用于显示图片
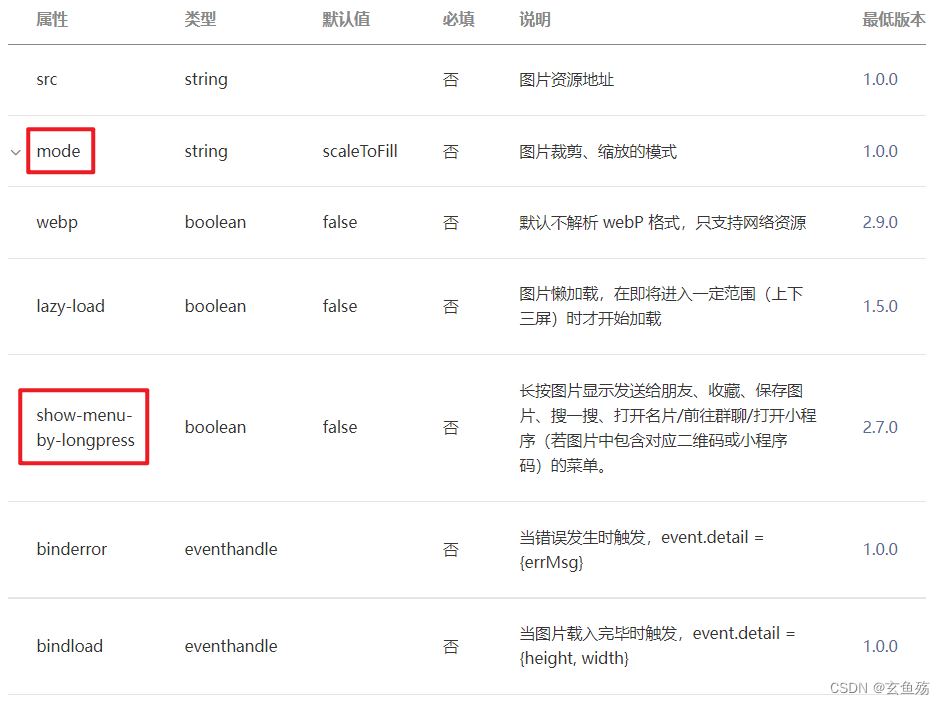
基本使用
- <!-- image : 默认自带宽度和高度 => 320 * 240 -->
-
- <!-- 根目录 : / 表示根目录,有些地方能用,有些不行 -->
- <!-- <image src="/assets/images/zznh.png" /> -->
-
- <!-- 加载本地图片 -->
- <image src="../../assets/images/zznh.png" />
- <!-- 加载网络图片 -->
- <image src="https://uploadfile.bizhizu.cn/up/9d/8d/1e/9d8d1e3fba7895d13a639f464ef147b1.jpg.source.jpg" />
-
- <!-- 使用mode属性 -->
- <image src="../../assets/images/zznh.png" mode="widthFix" />
-
-
使用手机本地图片 wx.chooseMedia
wxml
- <!-- 选择手机本地图片,将本地图片展示出来 -->
- <button bindtap="choseImage"
- type="primary">进入相册选择图片</button>
-
- <image wx:if="{{imgUrl}}"
- src="{{imgUrl}}"
- style="width: 100%;"
- mode="widthFix" />
js
- Page({
- data: {
- imgUrl: ''
- },
- choseImage() {
- // 选择本地图片
- wx.chooseMedia({
- // 最多可以选择的文件个数
- count: 1,
- // 只能拍摄图片或从相册选择图片
- mediaType: 'image',
- }).then(res => {
- if (res.errMsg !== 'chooseMedia:ok') return
- console.log(res);
- const imageList = res.tempFiles || []
- const imgUrl = imageList[0].tempFilePath || ''
- this.setData({
- imgUrl
- })
- })
- }
- })

Swiper : 组件
Swiper组件 => 用来做轮播图效果
简单轮播
效果

wxml
- <view>
- <!--
- circular : 是否开启衔接滑动
- autoplay : 自动轮播
- interval : 多少秒轮播一次
- duration : 显示多长时间
- -->
- <swiper class="s-swiper"
- autoplay
- circular
- interval="1000"
- duration="500">
- <block wx:for="{{swiperData}}"
- wx:key="index">
- <swiper-item class="s-item"
- style="background-color: {{item.color}};">
- {{item.text}}
- </swiper-item>
- </block>
- </swiper>
- </view>

wxss
- .s-swiper {
- /* 注意 : swiper默认有个150px的高度 */
- height: 300rpx;
- }
-
- .s-item {
- color: #fff;
- font-weight: 800;
- text-align: center;
- line-height: 300rpx;
- }
js
- Page({
- data: {
- // 轮播数据
- swiperData: [{
- text: 'A',
- color: 'green'
- },
- {
- text: 'B',
- color: 'black'
- },
- {
- text: 'C',
- color: 'skyblue'
- },
- {
- text: 'D',
- color: 'pink'
- },
- {
- text: 'E',
- color: 'blue'
- }],
- }
- })

前露后露轮播
效果
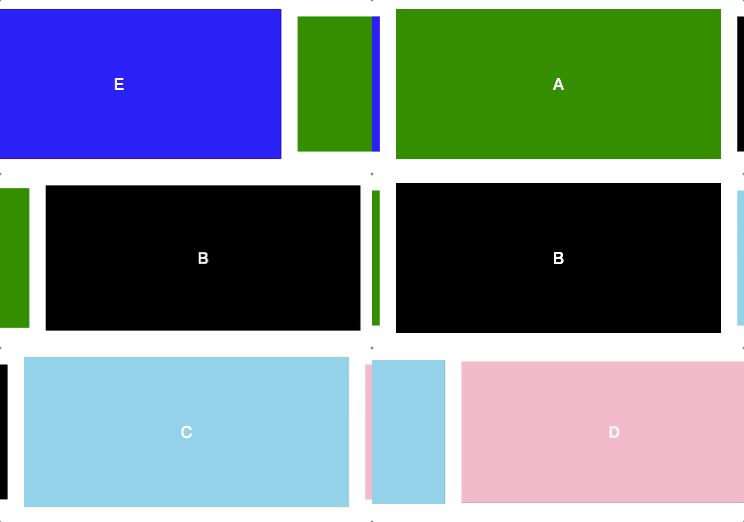
wxml
- <view>
- <!--
- circular : 是否开启衔接滑动
- autoplay : 自动轮播
- previous-margin : 露出多少前部分
- next-margin : 露出多少后部分
- interval : 多少秒轮播一次
- duration : 显示多长时间
- -->
- <swiper class="s-swiper"
- autoplay
- circular
- previous-margin="50rpx"
- next-margin="50rpx"
- interval="1000"
- duration="500"
- bindchange="handleChange">
- <block wx:for="{{swiperData}}"
- wx:key="index">
- <swiper-item class="s-item">
- <view class="content {{currentIndex === index ? 'active' : ''}}"
- style="background-color: {{item.color}};">
- {{item.text}}
- </view>
- </swiper-item>
- </block>
- </swiper>
- </view>

wxss
- .s-swiper {
- /* 注意 : swiper默认有个150px的高度 */
- height: 300rpx;
- margin-top: 20rpx;
- }
-
- .s-item {
- /* 用来做间距的颜色 */
- background-color: #fff;
- display: flex;
- /* 使其居中 */
- justify-content: center;
- }
-
- .content {
- /* 重要 */
- width: 100%;
- color: #fff;
- font-weight: 800;
- text-align: center;
- line-height: 300rpx;
-
- /* 加入动画 */
- transform: scale(.9);
- transition: transform .6s ease-in-out 0s;
- }
-
- .active {
- transform: scale(1);
- }

js
- Page({
- data: {
- // 轮播数据
- swiperData: [{
- text: 'A',
- color: 'green'
- },
- {
- text: 'B',
- color: 'black'
- },
- {
- text: 'C',
- color: 'skyblue'
- },
- {
- text: 'D',
- color: 'pink'
- },
- {
- text: 'E',
- color: 'blue'
- }],
- // 当前轮播模块索引
- currentIndex: 0
- },
- /**
- * 监听方法
- */
- // 轮播图滚动
- handleChange(e) {
- this.setData({
- currentIndex: e.detail.current
- })
- }
- })

Input : 组件
model:value => 双向绑定功能
wxml
<input type="text" model:value='{{message}}' />js
- Page({
- data: {
- message: 'abc'
- },
- })
组件的共同属性

七、小程序基础语法
1. Wxss
01 - 样式写法
页面样式的三种写法:行内样式、页面样式、全局样式
优先级依次是:行内样式 > 页面样式 > 全局样式
02 - 选择器

权重

03 - 尺寸单位
rpx(responsive pixel): 可以根据屏幕宽度进行自适应,规定屏幕宽为750rpx
在iphone6上,屏幕宽度为375px,共有750个物理像素,1px === 2rpx

iphone6为标准,设计稿是375,1px === 2rpx => 设计稿16px,我们写32rpx
iphone6为标准,设计稿是750,1px === 1rpx => 设计稿20px,我们写20rpx
- .view {
- /* 在375的设计稿中,200rpx === 100px */
- width: 200rpx;
- height: 200rpx;
- background-color: blue;
- line-height: 200rpx;
- text-align: center;
- color: #fff;
- }
2. Wxml
01 - 逻辑判断
wx:if --- wx:elif --- wx:else
- <view>
- <text wx:if="{{counter >= 90}}">优秀</text>
- <text wx:elif='{{counter >= 60}}'>及格</text>
- <text wx:else>不及格</text>
- </view>
02 - hidden
hidden属性:
- hidden是所有的组件都默认拥有的属性
- 当hidden属性为true时, 组件会被隐藏
- 当hidden属性为false时, 组件会显示出来
hidden和wx:if的区别
hidden => 控制隐藏和显示是控制是否添加hidden属性,相当于display:none
wx:if => 是控制组件是否渲染的
03 - block
block : 并不是一个组件,它仅仅是一个包装元素,不会在页面中做任何渲染,只接受控制属性
- 将需要进行遍历或者判断的内容进行包裹
- 将遍历和判断的属性放在block便签中,不影响普通属性的阅读,提高代码的可读性
04 - 列表渲染
wx:for
index : 遍历后在wxml中可以使用一个变量index,保存的是当前遍历数据的下标值
item : 数组中对应某项的数据
- <!-- 遍历一个数组 => a,b,c -->
- <view wx:for="{{['a','b','c']}}"
- wx:key="*this">{{item}} --- {{index}}</view>
-
- <!-- 遍历一个字符串 => p,o,i,p,o,i -->
- <view wx:for="{{'poipoi'}}"
- wx:key="item">{{item}} --- {{index}}</view>
-
- <!-- 遍历数字 => 0 - 9 -->
- <view wx:for="{{10}}"
- wx:key="*this">{{item}} --- {{index}}</view>
item - index
wx:for-item = ' ' => item 重命名
wx:for-index = ' ' => index 重命名
- <view wx:for="{{['a','b','c']}}"
- wx:for-item='str'
- wx:for-index='key'
- wx:key="*this">{{str}} --- {{key}}</view>
key
使用wx:for时,可以添加一个key来提供性能
wx:key 的值以两种形式提供 :
- 字符串 => 代表在 for 循环的 array 中 item 的某个 property,该 property 的值需要是列表中唯一的字符串或数字,且不能 动态改变
- 保留关键字 *this => 代表在 for 循环中的 item 本身,这种表示需要 item 本身是一个唯一的字符串或者数字

3. Wxs
01 - 概念
WXS(WeiXin Script)是小程序的一套脚本语言,结合 WXML,可以构建出页面的结构
为什么要设计WXS语言
- 在WXML中是不能直接调用Page/Component中定义的函数的 ( 底层没有进行封装 )
- 但是某些情况, 我们可以希望使用函数来处理WXML中的数据(类似于Vue中的过滤器),这个时候就使用WXS了
WXS使用的限制和特点 :
- WXS 不依赖于运行时的基础库版本,可以在所有版本的小程序中运行
- WXS 的运行环境和其他 JavaScript 代码是隔离的,WXS 中不能调用其他 JavaScript 文件中定义的函数,也不能调用小程序 提供的API
- 由于运行环境的差异,在 iOS 设备上小程序内的 WXS 会比 JavaScript 代码快 2 ~ 20 倍。在 android 设备 上二者运行效率 无差异
- 最好使用ES6之前的语法,否则可能会有问题
02 - 写法
WXS有两种写法 :写在标签中 || 写在以.wxs结尾的文件中
WXS标签的属性 :

wxs :
- 每一个 .wxs 文件和 标签都是一个单独的模块
- 每个模块都有自己独立的作用域。即在一个模块里面定义的变量与函数,默认为私有的,对其他模块不可见
- 一个模块要想对外暴露其内部的私有变量与函数,只能通过 module.exports 实现
写法一 : 直接写在标签内
- <!-- 1. 定义wxs标签,设定模块名 -->
- <wxs module="format">
- // 2. 定义函数
- function priceFormat(price) {
- return price + '元'
- }
- // 3. 导出 : 必须导出后,才能被使用,且必须被CommonJs导出
- module.exports = {
- priceFormat: priceFormat
- }
- </wxs>
-
- <!-- 4. 使用 : 使用模块名.函数 => 进行使用 -->
- <view wx:for="{{['111','222','333']}}"
- wx:for-item='money'
- wx:for-index='key'
- wx:key="*this">{{format.priceFormat(money)}}</view>
- <!-- 5. 输出 : 111元、222元、333元 -->

写法二 : 独立的文件,通过src引入
定义format.wxs
- // 1. 定义函数
- function priceFormat(price) {
- return price + '元'
- }
- // 2. 导出 : 必须导出后,才能被使用,且必须被CommonJs导出
- module.exports = {
- priceFormat: priceFormat
- }
wxml
- <!-- 3. 定义wxs标签,设定模块名,引入wxs文件 -->
- <wxs module="format" src='./format.wxs' />
-
- <!-- 4. 使用 : 使用模块名.函数 => 进行使用 -->
- <view wx:for="{{['111','222','333']}}"
- wx:for-item='money'
- wx:for-index='key'
- wx:key="*this">{{format.priceFormat(money)}}</view>
- <!-- 5. 输出 : 111元、222元、333元 -->
4. setData
['对象.属性']: 修改的值
01 - 对象
- data: {
- dataObj: {
- name: 'aaa',
- age:15
- }
- }
-
- // 修改对象的属性
- this.setData({
- ['dataObj.age']: 77
- })
-
- // 删除对象的属性
- delete this.data.dataObj.age
- this.setData({
- dataObj: this.data.dataObj
- })

02 - 数组
- data: {
- arr: [{
- name: '123'
- }, {
- name: 'abc'
- }]
- }
-
- // 修改第二个元素的属性
- const index = 2
- this.setData({
- [`arr[${index}].name`]: '555'
- })
-
- // 删除某个数组元素
- this.data.dataList.splice(index, 1)
- this.setData({
- dataList: this.data.dataList
- })

八、小程序的事件处理
1. 组件事件类型

某些组件会有自己特性的事件类型
input : bindinput || bindblur || bindfocus
scroll-view : bindscrolltowpper || bindscrolltolower
2. 事件对象event
当某个事件触发时, 会产生一个事件对象, 并且这个对象被传入到回调函数中
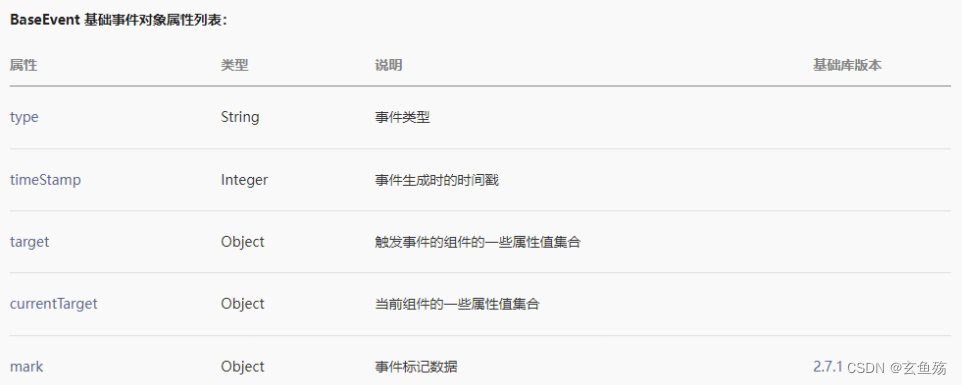
01 - currentTarget && target
target : 触发事件的元素
currentTarget : 处理事件的元素(大部分情况使用target)
wxml
- <view id="outer" class="outer" bindtap="outerClick">
- <view id="inner" class="inner">
- </view>
- </view>
wxss
- .outer {
- width: 400rpx;
- height: 400rpx;
- background-color: #0f0;
- display: flex;
- justify-content: center;
- align-items: center;
- margin: 100rpx auto;
- }
-
- .inner {
- width: 150rpx;
- height: 150rpx;
- background-color: #00f;
- }
js
- Page({
- outerClick(e) {
- console.log(e);
- // target : 触发事件的元素 => 点击的是蓝色,所以 target === inner
- console.log('target:', e.target);
- // currentTarget : 处理事件的元素 => 冒泡到外层了,所以 currentTarget === outer
- console.log('currentTarget:', e.currentTarget);
- }
- })
02 - touches && changedTouches
touches : 当前屏幕上有多少个手指
changedTouches : 较上一个状态,改变了多少个手指
区别一 : touchend中不同
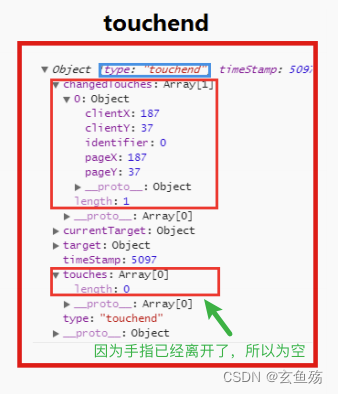
区别二 : 多手指触摸时不同

03 - 事件参数的传递
方式一 : 使用data-*
方式二 : 使用mark ( 2.7.1版本以上 ) => 事件 | 微信开放文档
data- : 需要区分currnetTarget 和 target,一般使用currnetTarget即可
mark : 会自动合并所有的mark数据,不受影响
wxml
- <view id="outer"
- class="outer"
- bindtap="outerClick"
- data-name='coder'
- data-age='18'
- mark:address='地球声明:本文内容由网友自发贡献,版权归原作者所有,本站不承担相应法律责任。如您发现有侵权的内容,请联系我们。转载请注明出处:【wpsshop博客】推荐阅读
相关标签
Copyright © 2003-2013 www.wpsshop.cn 版权所有,并保留所有权利。


