- 1SpringBoot超大文件上传(总结)_springboot大于一1g文件上传
- 2【MySQL新手入门系列三】:MySQL的新增、删除与修改操作
- 3陀螺仪姿态角解算——深挖MPU6050_陀螺仪计算角度
- 4六、子查询——介绍
- 5python中sqlite3对数据库的增删改查_python sqlite3 增删改查
- 6Deep Learning for 3D Point Clouds: A Survey(三维点云深度学习研究综述)
- 7XDOJ密码强度判断_标题 密码强度 类别 字符串处理 时间限制 1s 内存限制 256kb 问题描述 每个人
- 8npm安装yarn和pnpm_npm下载pnpm
- 9【深度学习】从30+场秋招面试中总结出的超强面经——目标检测篇(含答案)...
- 10python一些使用小技巧_ipynb文件如何设置断点跟踪】
Linux服务器系统安全加固(centos7系列)_centos7安全加固
赞
踩
Linux服务器系统安全加固
系统安全加固的目的:
1. 操作系统之上的各种应用,要想获得信息的完整性、机密性、可用性和可控性,必须依赖于操作系统通用CentOs Linux 7操作系统缺省配置通常不满足系统安全性的要求。
2. 操作系统的薄弱环节有安装和运行了冗余的服务、弱密码及匿名访问、开放了不必要的对外通讯端口、易受攻击的TCP/IP参数配置等,都容易成为日常运行和管理过程中的弱点。
3. 安全加固就是对系统进行优化配置,杜绝系统配置不当出现的弱点,提高操作系统和服务器的防御能力,防止黑客攻击和病毒入侵,提升系统和网络安全。
系统安全加固的方法:
1. 账户安全:
1.1 锁定系统中多余的自建账号
查看账户、口令文件、与系统管理员确认不必要的账户。
查看账户文件:
cat /etc/passwd
- 1
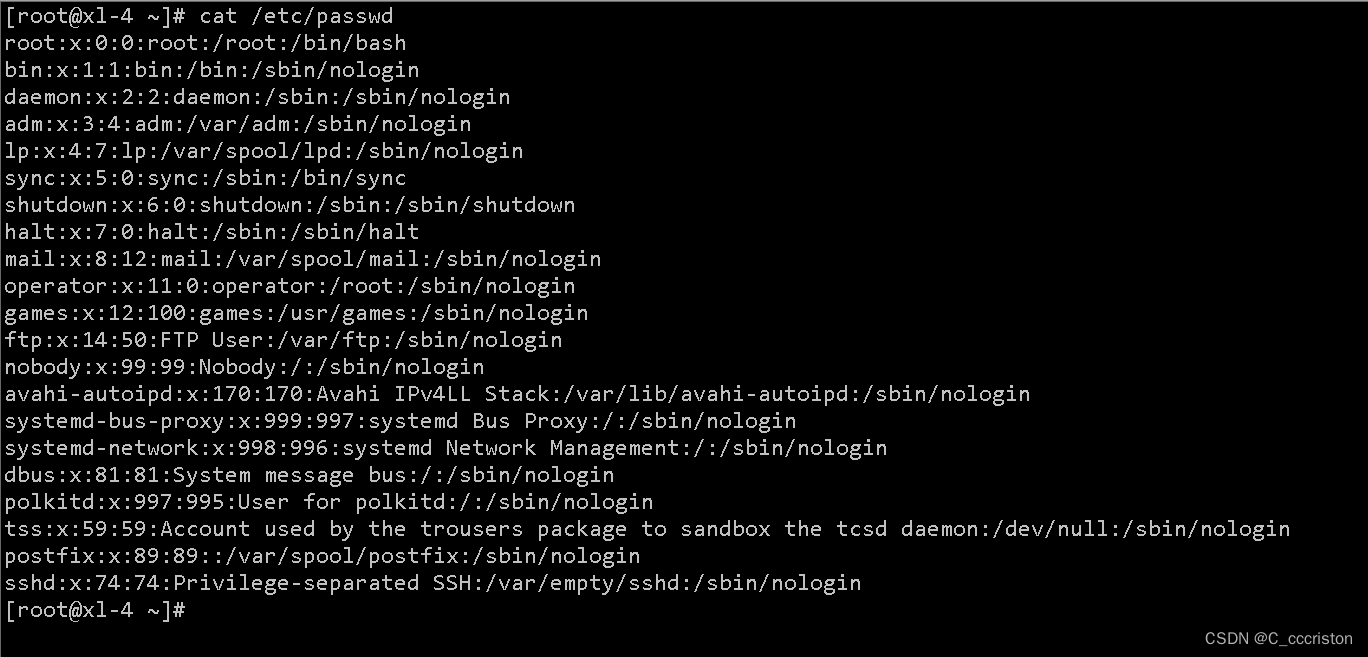
用户信息详解: 格式:login_name:password:user_ID:group_ID:comment:home_dir:command login_name:用户名 password:加密后的用户密码 user_ID:用户ID,(1 ~ 6000) 若用户ID=0,则该用户拥有超级用户的权限。查看此处是否有多个ID=0。 group_ID:用户组ID comment:用户全名或其它注释信息 home_dir:用户根目录 command:用户登录后的执行命令 例:test :1001:1001::/home/test:/bin/bash 用户名:test 加密后的用户密码:x 用户id:1001 组id:1001 用户根目录:/home/test 用户登录后执行的命令:/bin/bash
- 1
- 2
- 3
- 4
- 5
- 6
- 7
- 8
- 9
- 10
- 11
- 12
- 13
- 14
- 15
- 16
- 17
- 18
- 19
- 20
- 21
- 22
- 23
- 24
- 25
- 26
- 27
查看口令文件:
cat /etc/shadow
- 1
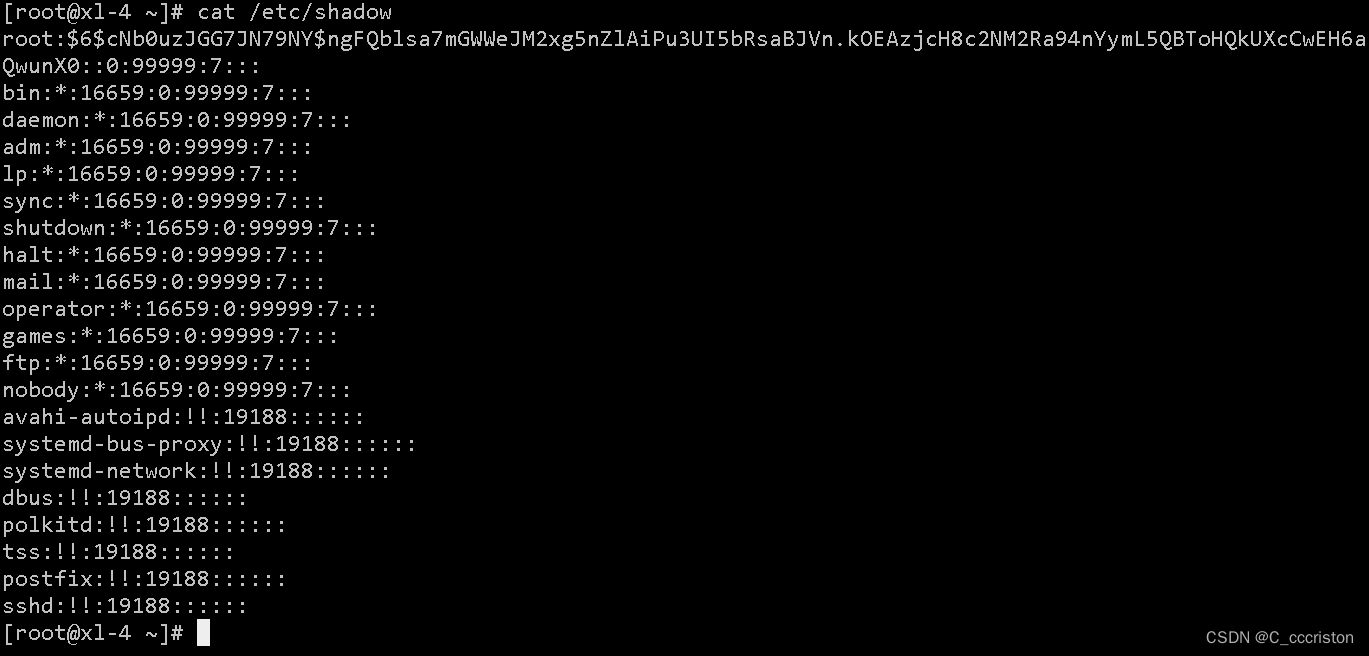
注: 对于一些保留的系统伪帐户如:bin, sys,adm,uucp,lp, nuucp,hpdb, www, daemon等可根据需要锁定登陆。
备份方法:
 cp -p /etc/passwd /etc/passwd_bak
 cp -p /etc/shadow /etc/shadow_bak
- 1
- 2
加固方法:
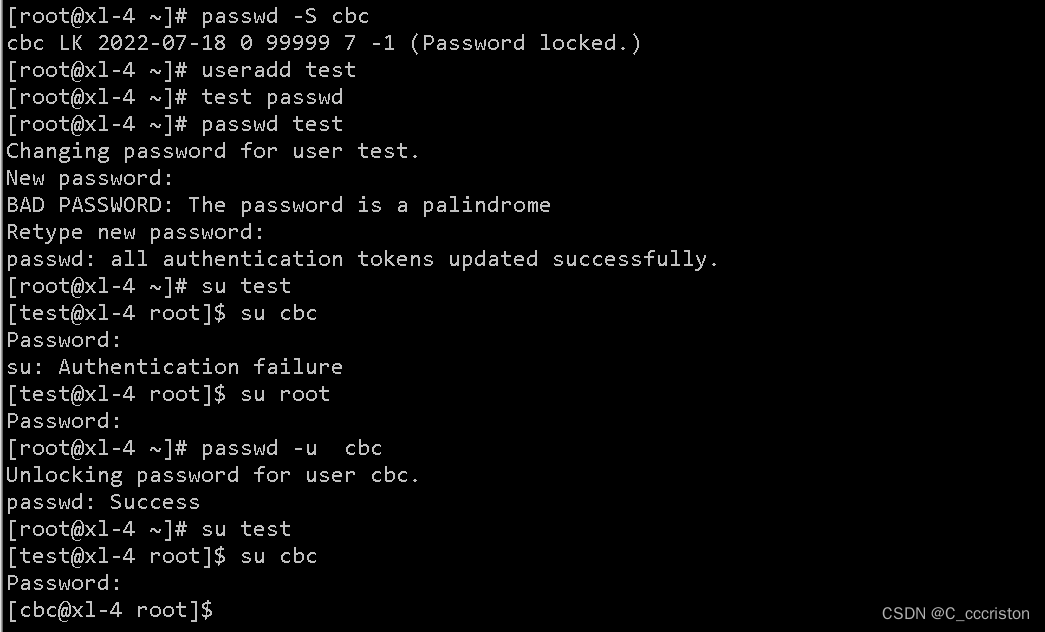
使用  passwd -l 用户名    #锁定不必要的用户账号

使用 passwd -S 用户名   #查看账户状态

使用 passwd -u 用户名   #解锁用户账号
- 1
- 2
- 3
- 4
- 5
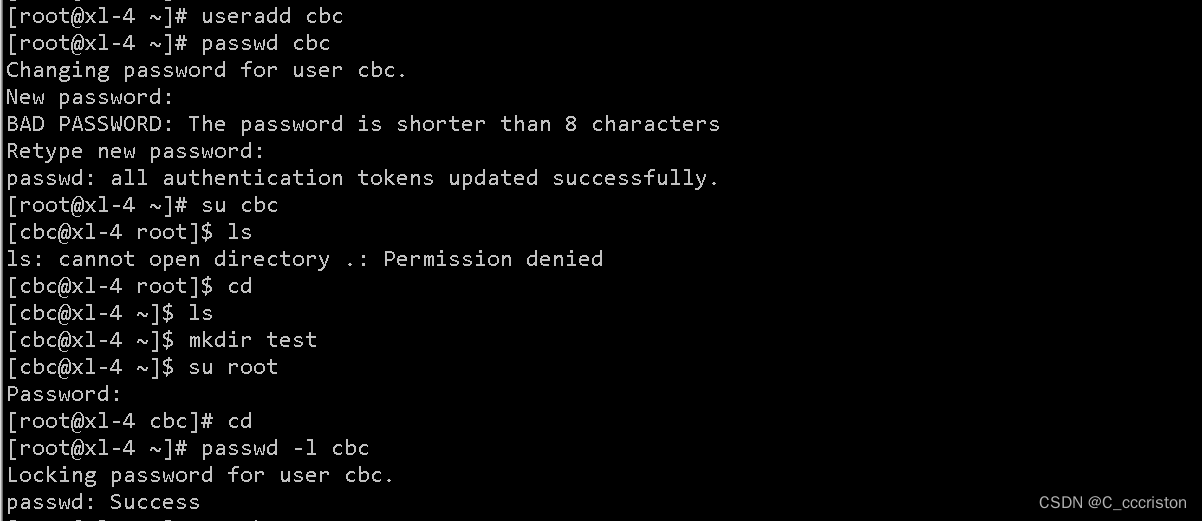
注意: 切换测试时不要用root用户,超管用户切换任意用户都是免密的,是看不出来密码锁定效果的
1.2 设置系统口令密码策略
查看密码关键策略
[root@xl-4 ~]# cat /etc/login.defs |grep PASS
#       PASS_MAX_DAYS   Maximum number of days a password may be used.
#       PASS_MIN_DAYS   Minimum number of days allowed between password changes.
#       PASS_MIN_LEN    Minimum acceptable password length.
#       PASS_WARN_AGE   Number of days warning given before a password expires.
PASS_MAX_DAYS   99999
PASS_MIN_DAYS   0
PASS_MIN_LEN    5
PASS_WARN_AGE   7
- 1
- 2
- 3
- 4
- 5
- 6
- 7
- 8
- 9
备份方法:
cp -p /etc/login.defs /etc/login.defs_bak
- 1
加固方法:
vim /etc/login.defs

PASS_MAX_DAYS		  可以使用密码的最大天数。

PASS_MIN_DAYS		   密码更改之间允许的最小天数。

PASS_MIN_LEN			 最小可接受密码长度。

PASS_WARN_AGE 		密码过期前发出警告的天数。
- 1
- 2
- 3
- 4
- 5
- 6
- 7
- 8
- 9
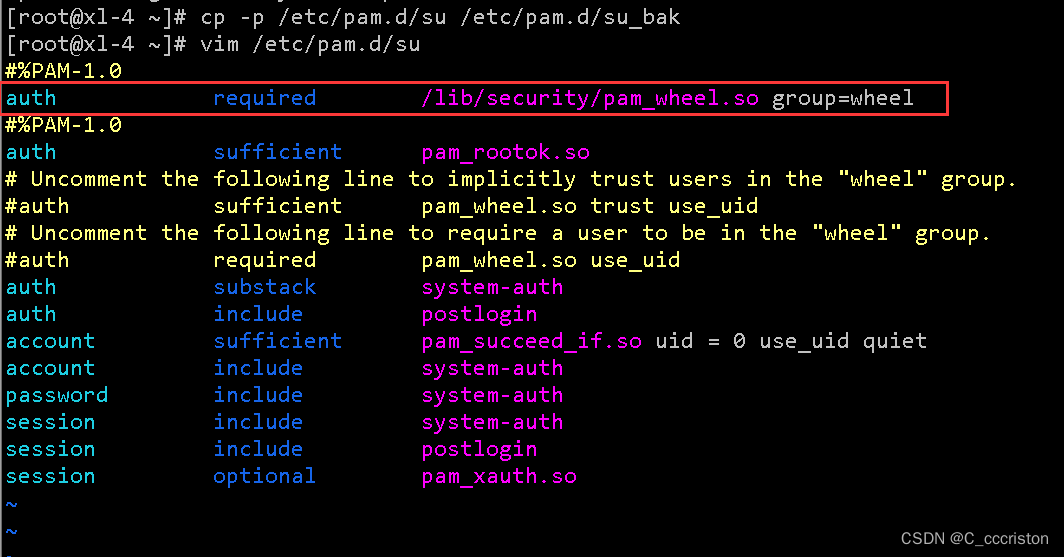
1.3 限制su为root的用户:
备份方法:
cp -p /etc/pam.d/su /etc/pam.d/su_bak
- 1
加固方法:
头部添加一行,这一行的目的是,只有wheel组的用户可以 su 到root
 vim /etc/pam.d/su
auth            required        /lib/security/pam_wheel.so group=wheel
- 1
- 2
1.4 多次登录失败锁定用户
备份方法:
cp -p /etc/pam.d/system-auth /etc/pam.d/system-auth_bak
- 1
加固方法:
添加一行
vim /etc/pam.d/system-auth
auth        requisite     pam_tally.so per_user onerr=fail deny=4 unlock_time=3600
- 1
- 2
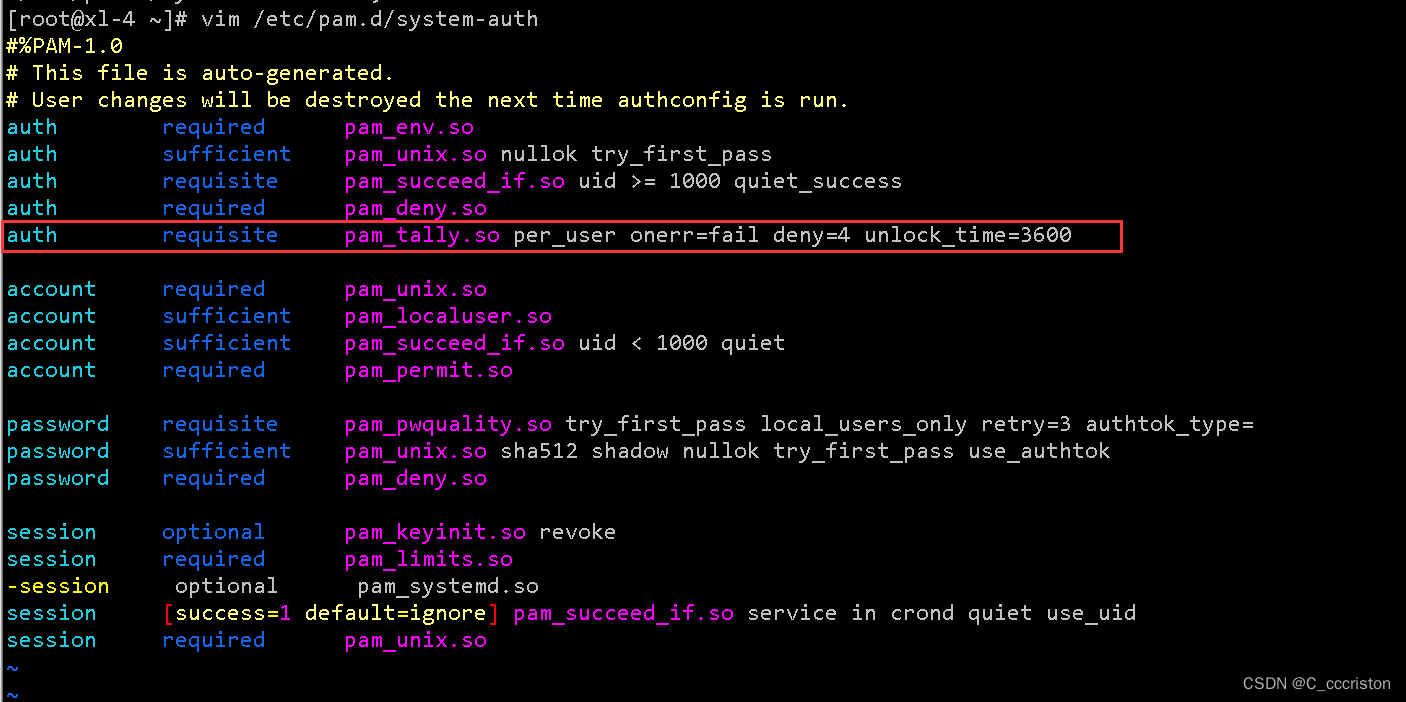
注:超过4次错误就会lock user,为了防止拒绝服务攻击,加入per_user参数
2. 最小化服务
2.1 查看系统运行级别
查看方法:
who -r 或 runlevel
- 1
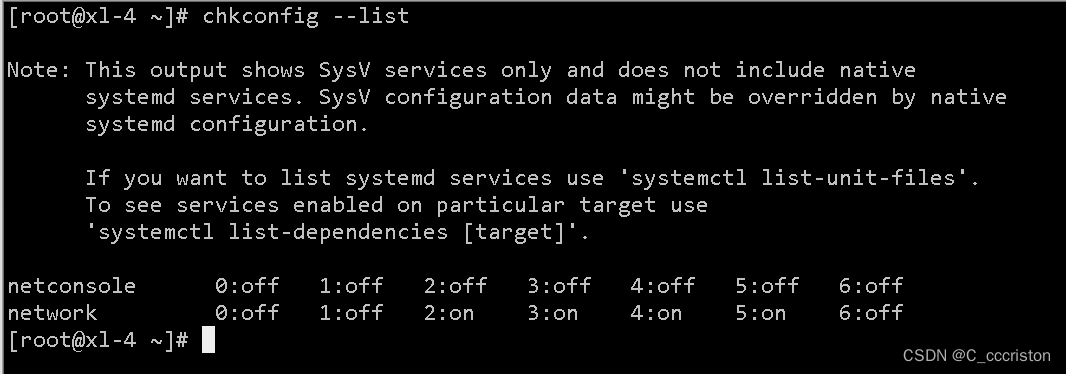
查看所有服务的状态
chkconfig 处理的命令类似于我们平时执行的 /etc/init.d/sshd restart这样的命令每一个运行级别(0-6)对应一个 /etc/rc.d/rc3.d/ 这样的 目录
查看命令:
chkconfig --list
- 1
init级别对应表
⛅运行级别 0: shutdown.target (系统停机状态,系统默认运行级别不能设为0,否则不能正常启动)
⛅运行级别 1: emergency.target (单用户工作状态,root权限,用于系统维护,禁止远程登陆)
⛅运行级别 2: rescure.target (多用户状态(没有NFS))
⛅运行级别 3: multi-user.target (完全的多用户状态(有NFS),登陆后进入控制台命令行模式)
⛅运行级别 4: 系统未使用,保留
⛅运行级别 5: graphical.target (X11控制台,登陆后进入图形GUI模式)
⛅运行级别 6: reboot.target (系统正常关闭并重启,默认运行级别不能设为6,否则不能正常启动)
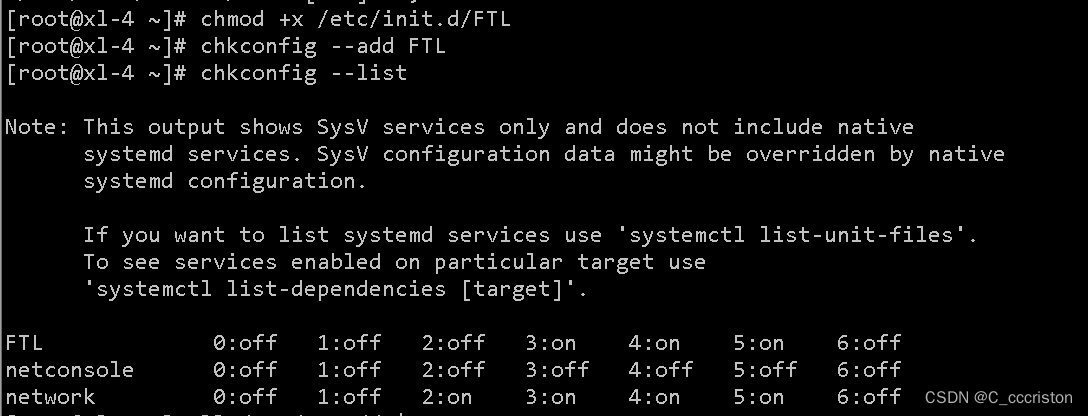
自定义一个启动服务:
vim /etc/init.d/FTL
# chkconfig: 345 77 69
# description: FTL  is a protocol for secure remote shell access. \
# This serddvice starts up the OpenSSH server daemon.
.  /etc/init.d/functions
    case  "$1"  in
       start)
           action "FTL Linux is  $1ing"/bin/true
           ;;
    esac
- 1
- 2
- 3
- 4
- 5
- 6
- 7
- 8
- 9
- 10

chmod` `+x ``/etc/init``.d``/FTL`        `# 增加执行权限
chkconfig --add FTL          ``# 添加到启动服务
chkconfig --list FTL          ``# 查看启动服务,显示默认的345级别开, 默认修改/etc/rc3.d/ /etc/rc5.d/
- 1
- 2
- 3
加固方法:
chkconfig --level <级别> <service> on|off|reset # 设置服务在第N个init级别下的启动或关闭或重新设置
- 1
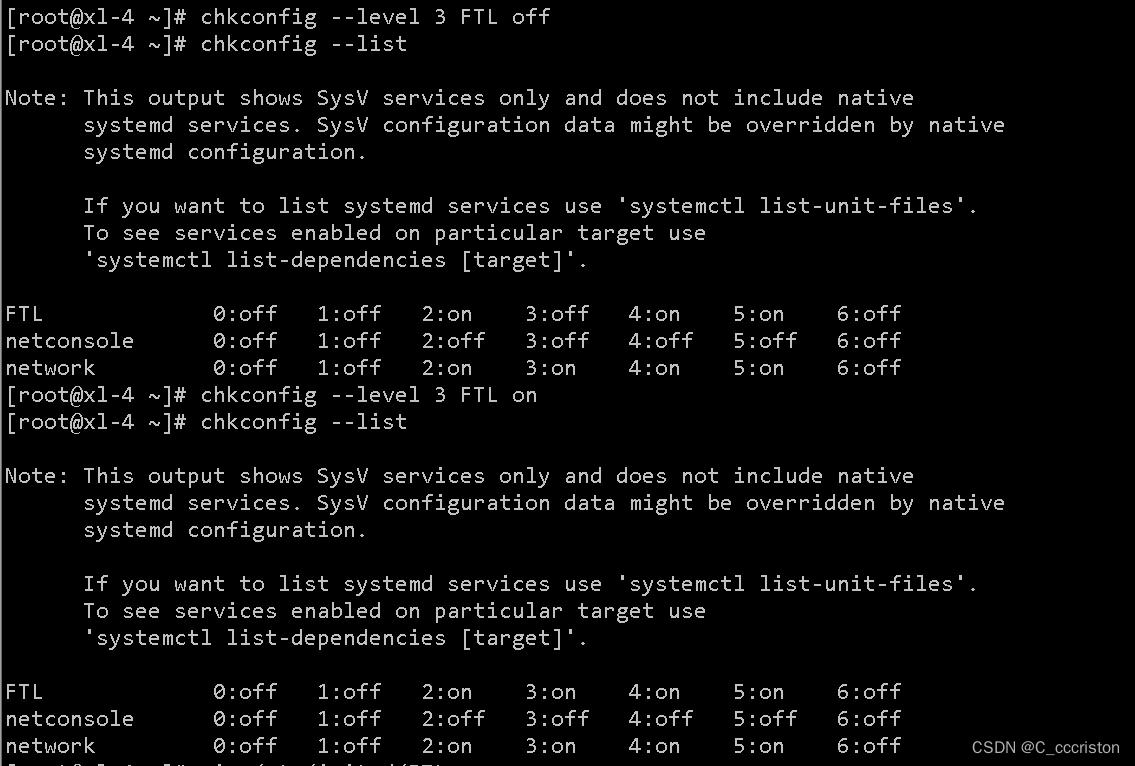
3. 数据访问控制
3.1设置合理的初始文件权限
对umask的解释:
1.对于root用户,系统默认的umask值是0022;对于普通用户,系统默认的umask值是0002
2.一共有4组数字,其中第1组数字用于定义特殊权限,我们一般不予考虑,与一般权限有关的是后3组数字
1.查看umask值:
[root@xl-4 ~]# umask
0022
- 1
- 2
-
默认情况下,对于目录,用户所能拥有的最大权限是777;对于文件,用户所能拥有的最大权限是目录的最大权限去掉执行权限,即666。因为x执行权限对于目录是必须的,没有执行权限就无法进入目录,而对于文件则不必默认赋予x执行权限。
-
对于root用户,他的umask值是022。当root用户创建目录时,默认的权限就是用最大权限777去掉相应位置的umask值权限,即对于所有者不必去掉任何权限,对于所属组要去掉w权限,对于其他用户也要去掉w权限,所以目录的默认权限就是755;当root用户创建文件时,默认的权限则是用最大权限666去掉相应位置的umask值,即文件的默认权限是644。
-
对于umask值权限的理解,即:系统默认的权限—umask值=文件/目录的权限
例:umask=0022 系统默认root的目录权限为777 即:777-22=755 因此,在root用户下,默认umask值,创建的目录权限为 755。文件的权限也可借助上述方法计算。

备份方法:
cp -p /etc/profile /etc/profile_bak
- 1
加固方法1:
临时修改umask值:
注:临时修改重启或刷新以后会失效
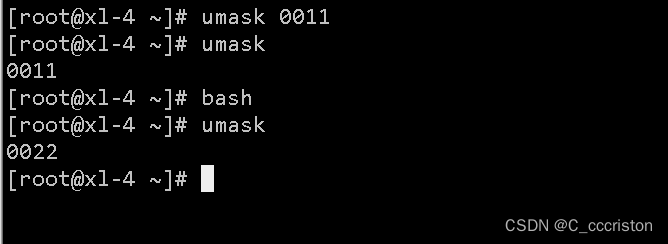
加固方法2:
-
如果要永久修改umask值,需要修改/etc/profile文件或是修改/etc/bashrc文件,例如要将默认umask值设置为027,那么可以在文件中增加一行“umask 027”
-
在/etc/profile和/etc/bashrc 中都可以用于设置用户登录系统时自动执行某些操作,他们的区别是/etc/profile只在用户第一次登录时被执行,而/etc/bashrc则在用户每次登录加载Bash Shell时都会被执行。
-
因而,如果是修改/etc/profile文件,将只对新创建的用户生效;而如果是修改/etc/bashrc文件,则对所有用户都生效。
vim /etc/profile
umask 027


vim /etc/bashrc
umask 027
- 1
- 2
- 3
- 4
- 5
- 6
- 7
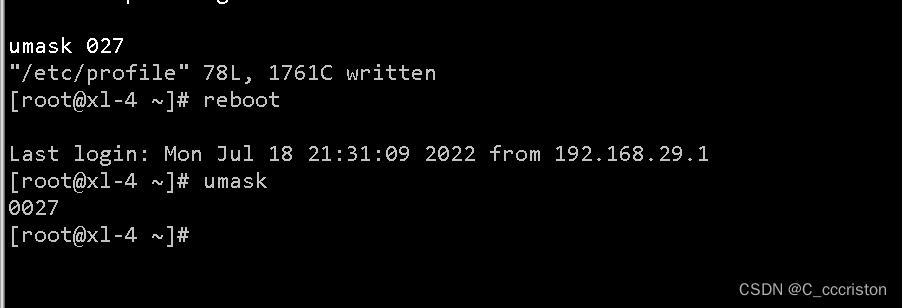
4. 网络访问控制
4.1 使用SSH进行管理
ssh远程登录密码认证的方式有三种,password、Keyboard Interactive、Public Key 。前面两种方式就是密码认证,只展示一种ip限制登陆,含义都是一样大同小异。第三种是登录方式最安全的一种。
密码管理:
检查sshd服务是否存在
[root@xl-5 ~]# ps -ef |grep sshd
root       1469      1  0 18:07 ?        00:00:00 /usr/sbin/sshd -D
root       2634   1469  0 18:08 ?        00:00:00 sshd: root@pts/0
root       2656   2638  0 18:08 pts/0    00:00:00 grep --color=auto sshd
- 1
- 2
- 3
- 4
若不存在,则使用命令开启ssh服务
systemctl start sshd
- 1
允许远程登录的ip或某个ip网段
vim /etc/hosts.allow

sshd:192.168.29.24	#允许此ip使用ssh远程登录
- 1
- 2
- 3
限制某个ip或网段使用ssh进行远程登录
 vim /etc/hosts.deny

sshd:192.168.29.23	#限制此ip使用ssh远程登录
- 1
- 2
- 3
修改完成重启sshd服务
systemctl restart sshd
- 1
允许访问实验测试:
使用24主机ip,即可正常访问,未被限制

被限制访问测试:
使用23主机ip进行ssh访问测试,无法正常登录

Public key (公钥)
- 服务端生成秘钥
ssh-keygen -t rsa
- 1
回车 回车 回车 即可
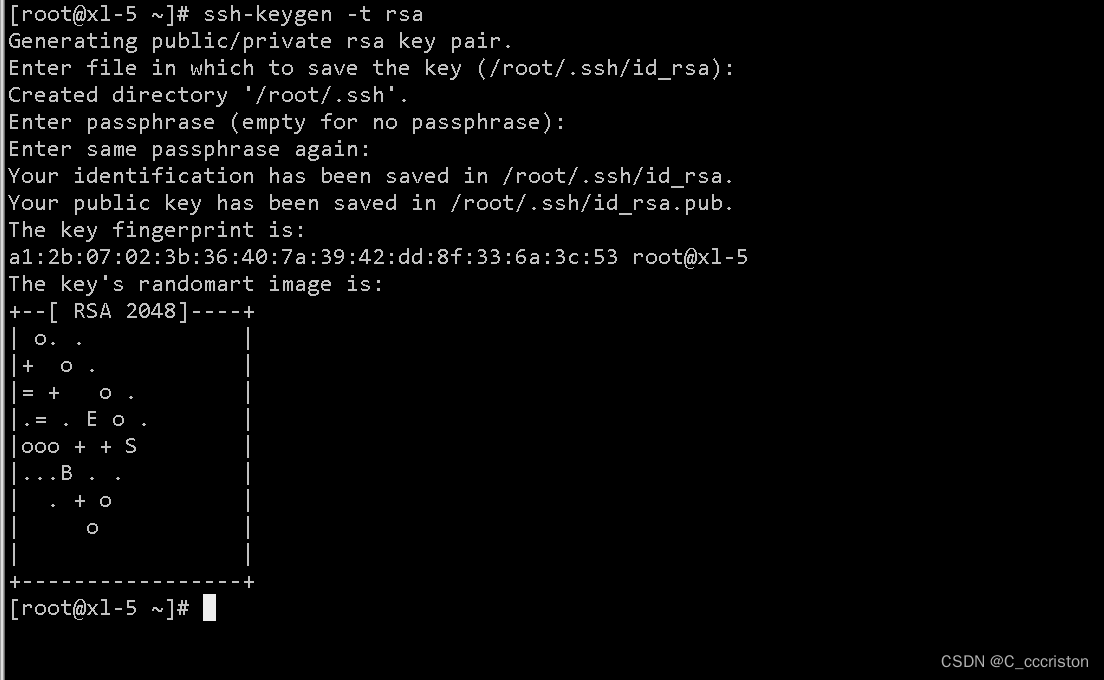
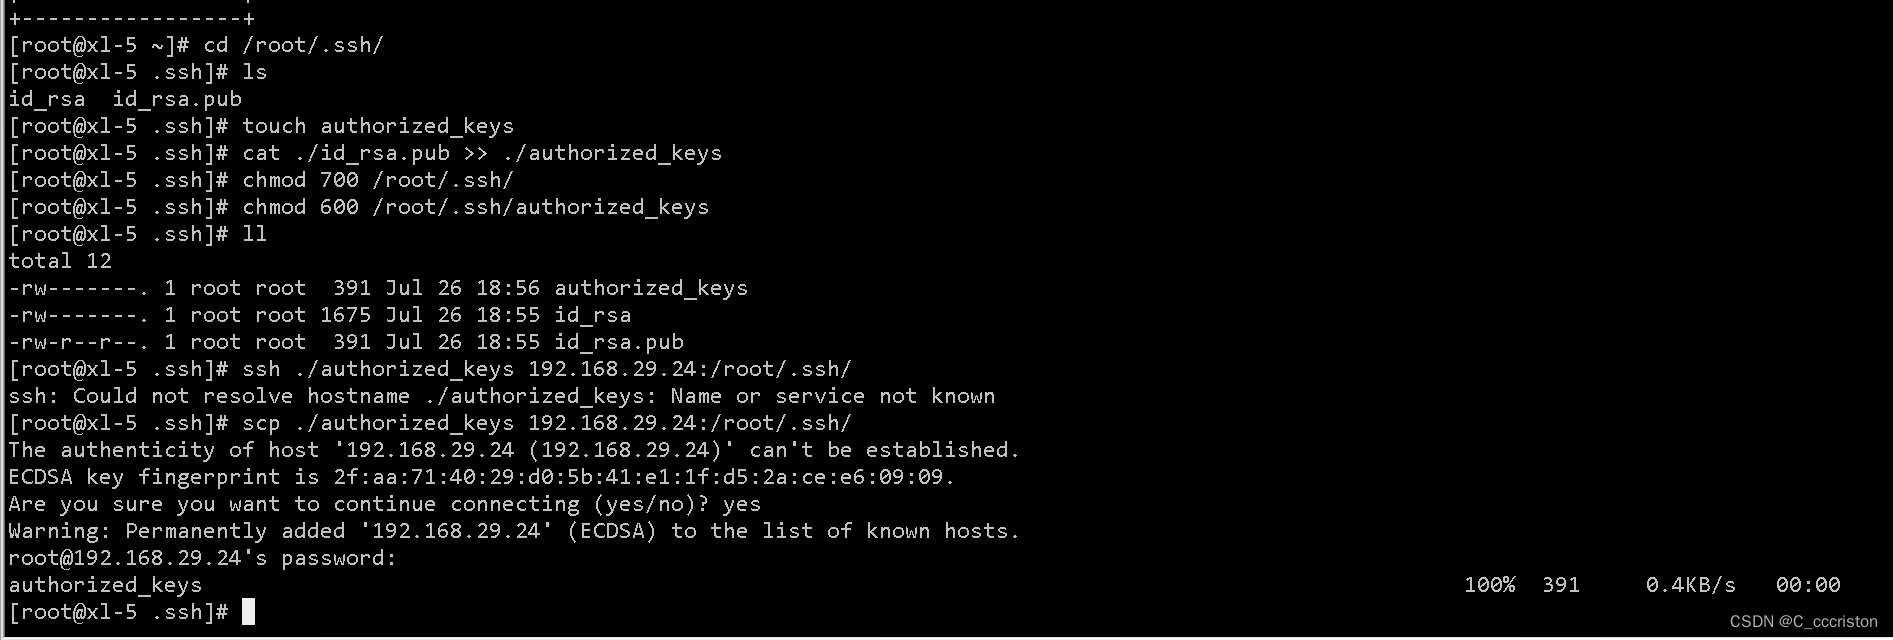
cd /root/.ssh/

touch authorized_keys

cat ./id_rsa.pub >> ./authorized_keys

chmod 600 /root/.ssh/authorized_keys
- 1
- 2
- 3
- 4
- 5
- 6
- 7
修改.ssh的权限为700, authorized_keys的权限为600或者更严格的400,否则登录的时候会提示server refuse you key。
然后将其发送到客户主机中
注:刚刚测试的实验修改的配置文件要还原回去
修改sshd的配置文件
 vim /etc/ssh/sshd_config

PermitEmptyPasswords yes 			#限制使用密码登录 yes即为开启
PasswordAuthentication yes 			#使用密钥登录 yes即为开启
- 1
- 2
- 3
- 4

重启sshd服务
systemctl restart sshd
- 1
4.2 禁止root用户远程登录:
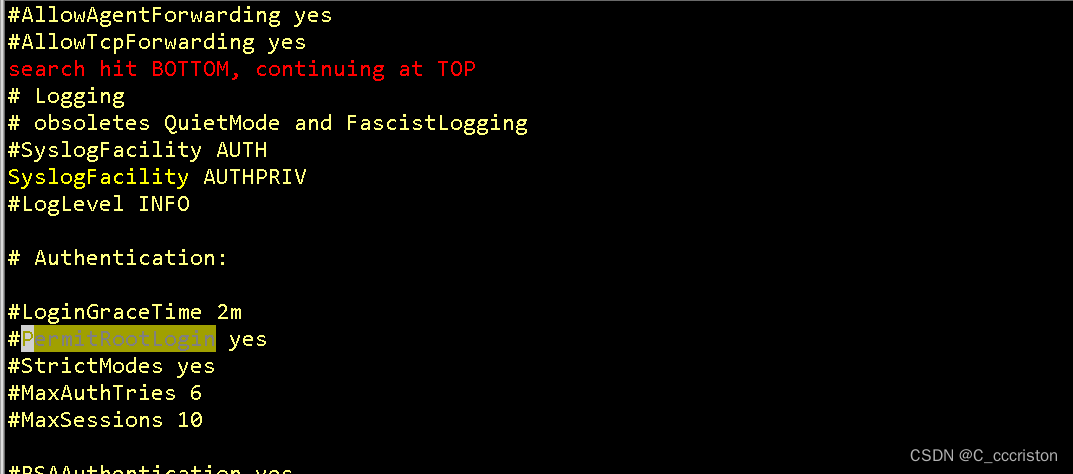
检查方法:
#cat /etc/ssh/sshd_config

查看PermitRootLogin是否为no
- 1
- 2
- 3
备份方法:
#cp -p /etc/ssh/sshd_config /etc/ssh/sshd_config_bak
- 1
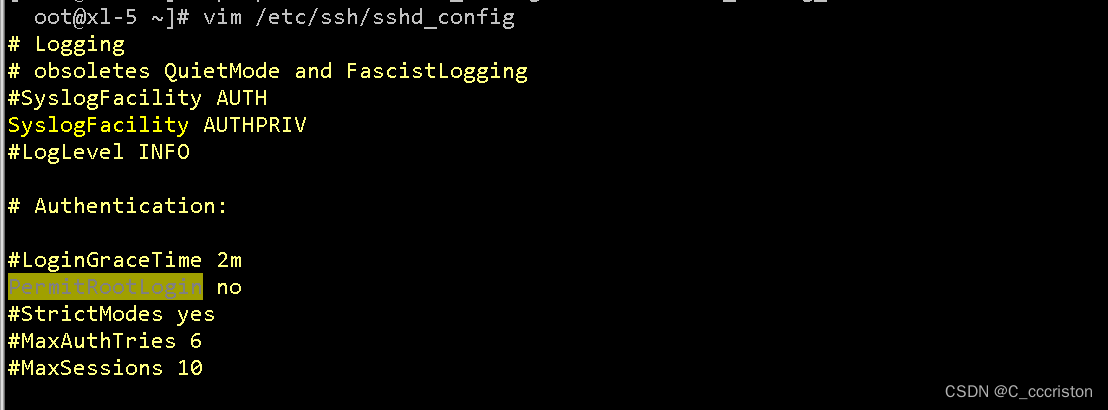
加固方法:
vim /etc/ssh/sshd_config

PermitRootLogin no
- 1
- 2
- 3
重启服务:
systemctl restart sshd
- 1
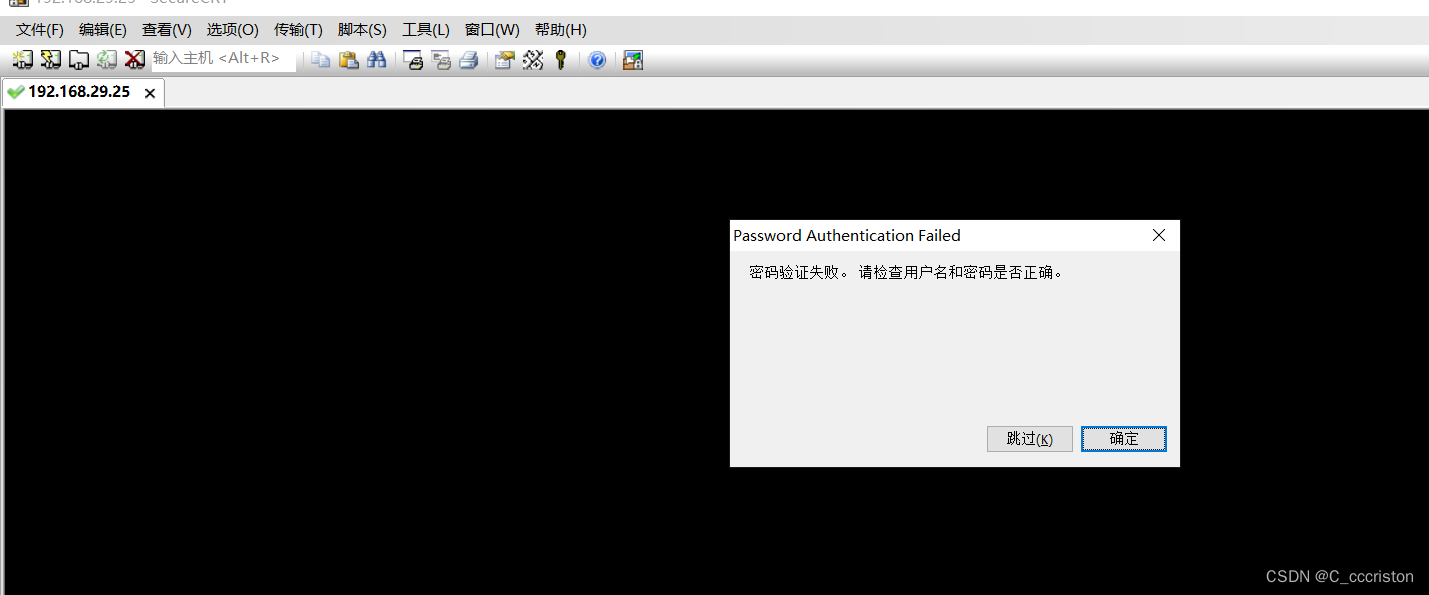
重启以后就会生效了,或者刷新退出登录
验证:
4.6 屏蔽登录banner信息
一些应用的banner信息,容易让黑客更快的匹配到漏洞信息,所以隐藏起来可以提升一定的安全性。
查看方法:
查看文件中是否存在Banner字段,或banner字段为NONE
cat /etc/ssh/sshd_config
- 1

cat /etc/motd
- 1
查看文件内容,该处内容将作为banner信息显示给登录用户。
备份方法:
cp -p /etc/ssh/sshd_config /etc/ssh/sshd_config_bak

cp -p /etc/motd /etc/motd_bak
- 1
- 2
- 3
加固方法:
vi /etc/ssh/sshd_config

banner NONE
- 1
- 2
- 3
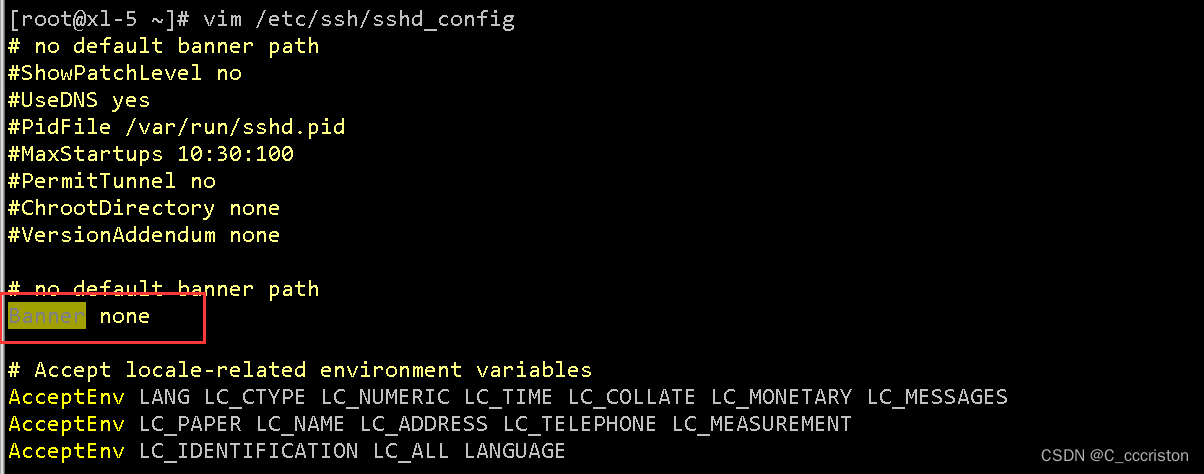
vi /etc/motd
- 1
删除全部内容或更新成自己想要添加的内容,此处一般为空
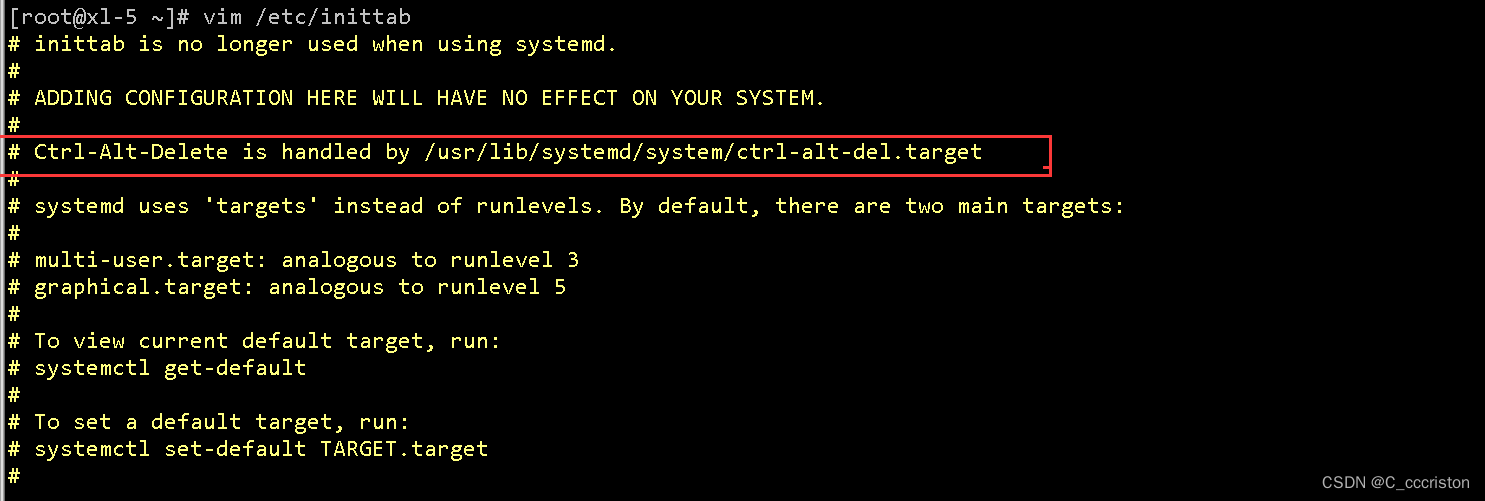
4.4 防止误使用Ctrl+Alt+Del重启系统
centos 5 6 7 ,不同版本有不同的配置文件和方法,大同小异
检查方法:
[root@xl-5 ~]# cat /etc/inittab |grep ctrl

查看输入行是否被注释
Ctrl-Alt-Delete is handled by /usr/lib/systemd/system/ctrl-alt-del.target`
- 1
- 2
- 3
- 4
备份方法:
cp -p /etc/inittab /etc/inittab_bak
- 1
加固方法:
 vim /etc/inittab

我这默认是已经被注释
- 1
- 2
- 3
5. 用户鉴别
5.1 设置登录超时:
 vim /etc/profile

#添加一行

TMOUT=300	#单位是秒 (S)
- 1
- 2
- 3
- 4
- 5
限制FTP登录
yum install -y vsftpd
- 1
检查方法:
cat /etc/vsftpd/ftpusers

Users that are not allowed to login via ftp #不允许通过ftp登录的用户
- 1
- 2
- 3
加固方法:
 vim /etc/vsftpd/ftpusers

添加一行,添加的用户将被禁止登录FTP服务
- 1
- 2
- 3
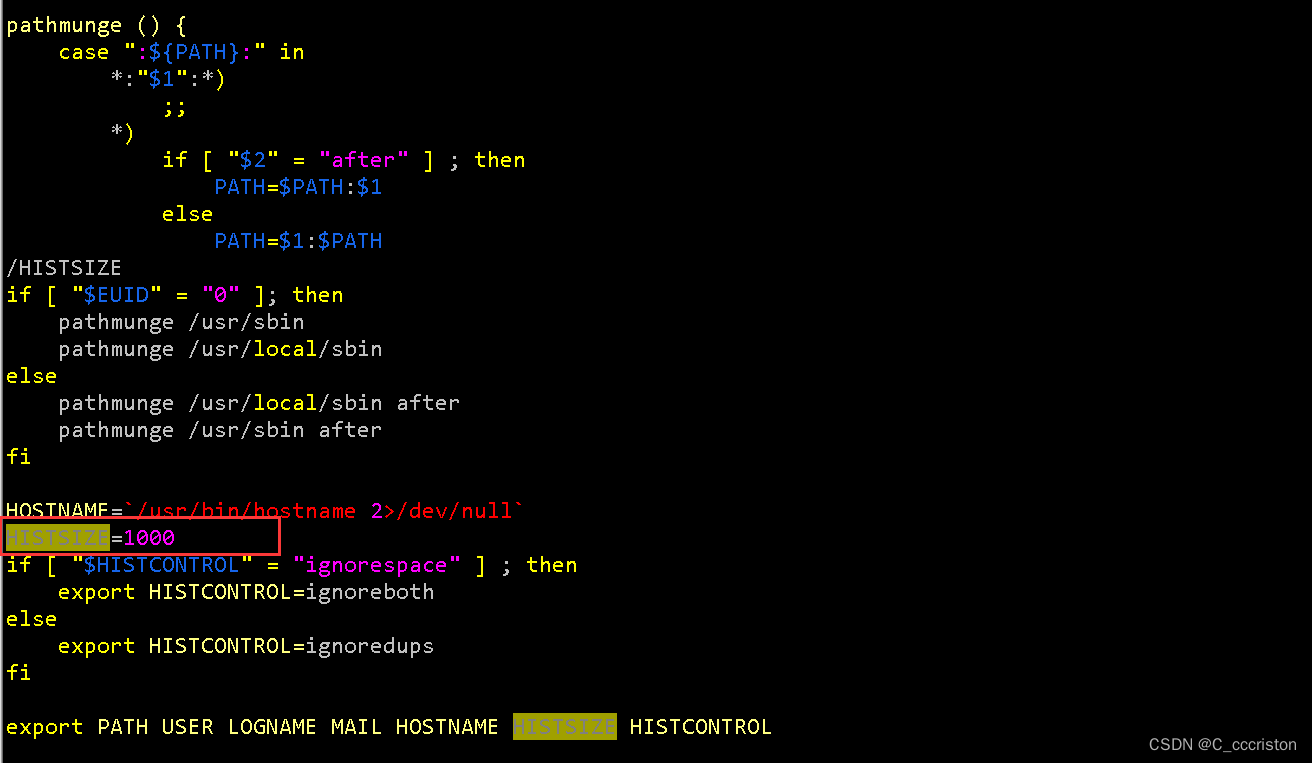
5.2 设置Bash保留历史命令的条数
检查方法:
查看保留历史命令条数
cat /etc/profile|grep HISTSIZE=
- 1
备份方法:
cp -p /etc/profile /etc/profile_bak
- 1
加固方法:
vim /etc/profile

HISTSIZE=1000	#这个值就是保留命令的条数
- 1
- 2
- 3
6. 审计策略
6.1日志审计策略配置
检查方法:
[root@localhost ~]# ps -ef |grep syslog
root        893      1  0 20:24 ?        00:00:00 /usr/sbin/rsyslogd -n
root       3057   3038  0 22:13 pts/1    00:00:00 grep --color=auto syslog
- 1
- 2
- 3
查看syslogd的配置,并确认日志文件是否存在
[root@localhost ~]#  cat /etc/audisp/plugins.d/syslog.conf
# This file controls the configuration of the syslog plugin.
# It simply takes events and writes them to syslog. The
# arguments provided can be the default priority that you
# want the events written with. And optionally, you can give
# a second argument indicating the facility that you want events
# logged to. Valid options are LOG_LOCAL0 through 7.

active = no
direction = out
path = builtin_syslog
type = builtin
args = LOG_INFO
format = string
- 1
- 2
- 3
- 4
- 5
- 6
- 7
- 8
- 9
- 10
- 11
- 12
- 13
- 14
系统日志(默认)/var/log/messages
cron日志(默认)/var/log/cron
安全日志(默认)/var/log/secure
备份方法:
cp /etc/audisp/plugins.d/syslog.conf /etc/audisp/plugins.d/syslog_bak.conf
- 1
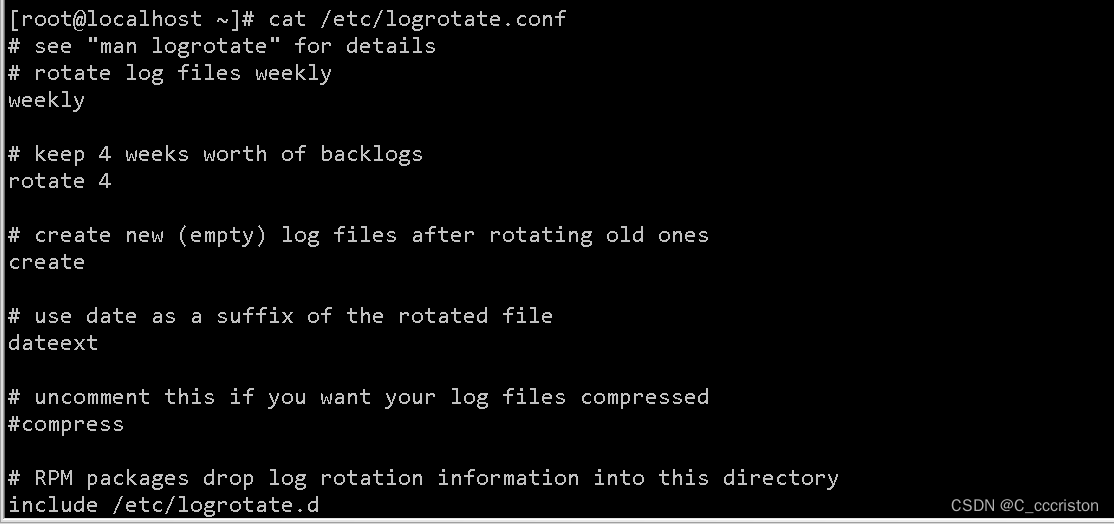
6.2 为审计产生的数据分配合理的存储空间和存储时间
查看系统轮询配置,有无以下内容
[root@localhost ~]# cat /etc/logrotate.conf |grep rotate
# see "man logrotate" for details
# rotate log files weekly
rotate 4
# use date as a suffix of the rotated file
include /etc/logrotate.d
# no packages own wtmp and btmp -- we'll rotate them here
    rotate 1
    rotate 1
- 1
- 2
- 3
- 4
- 5
- 6
- 7
- 8
- 9
缺省配置 logrotate
备份方法:
cp -p /etc/logrotate.conf /etc/logrotate.conf_bak
- 1
加固方法:
vi /etc/logrotate.d/syslog
# see "man logrotate" for details
# rotate log files weekly
weekly

# keep 4 weeks worth of backlogs
rotate 4

# send errors to root
errors root
# create new (empty) log files after rotating old ones
create

# uncomment this if you want your log files compressed
#compress
1
# RPM packages drop log rotation information into this directory
include /etc/logrotate.d

# no packages own lastlog or wtmp --we'll rotate them here
/var/log/wtmp {
monthly
create 0664 root utmp
rotate 1
}

/var/log/lastlog {
monthly
rotate 1
}

# system-specific logs may be configured here
- 1
- 2
- 3
- 4
- 5
- 6
- 7
- 8
- 9
- 10
- 11
- 12
- 13
- 14
- 15
- 16
- 17
- 18
- 19
- 20
- 21
- 22
- 23
- 24
- 25
- 26
- 27
- 28
- 29
- 30
- 31
- 32
缺省的配置一般放在logrotate.conf 文件的最开始处,影响整个系统。在本例中就是前面12行。

第三行weekly 指定所有的日志文件每周转储一次。
第五行 rotate 4 指定转储文件的保留 4份。
第七行 errors root 指定错误信息发送给root。
第九行create 指定 logrotate 自动建立新的日志文件,新的日志文件具有和
原来的文件一样的权限。
第11行 #compress 指定不压缩转储文件,如果需要压缩,去掉注释就可以了。
- 1
- 2
- 3
- 4
- 5
- 6
- 7
- 8
7. 关闭自动更新
7.1 关闭系统自动更新
vim  /etc/yum/yum-cron.conf

update_messages = no

download_updates = no
- 1
- 2
- 3
- 4
- 5

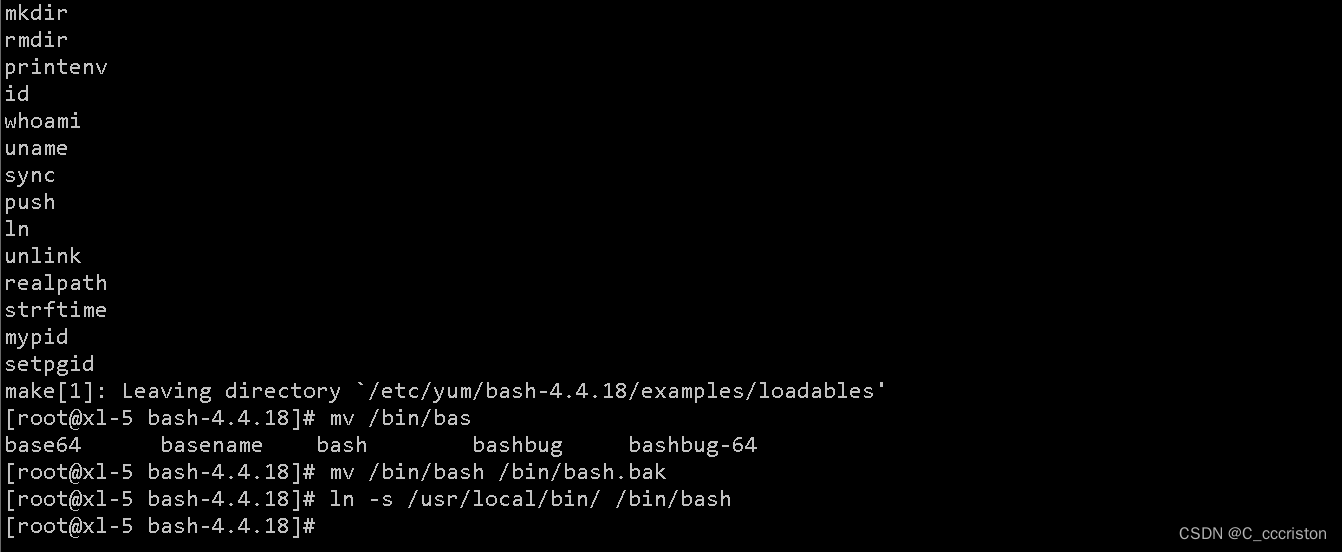
7.2 升级GUN bash
下载地址http://ftp.gnu.org/gnu/bash/
wget http://ftp.gnu.org/gnu/bash/bash-4.4.18.tar.gz

yum install -y gcc*

tar xvf bash-4.4.18.tar.gz

cd bash-4.4.18/

./configure && make && make install

mv /bin/bash /bin/bash.bak

ln -s /usr/local/bin/bash /bin/bash
- 1
- 2
- 3
- 4
- 5
- 6
- 7
- 8
- 9
- 10
- 11
- 12
- 13
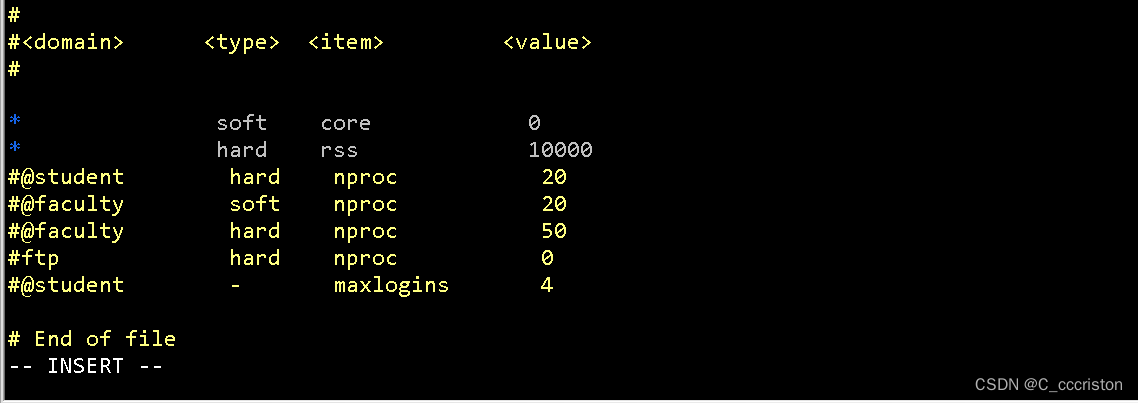
7.3 配置dump备份工具
vim /etc/security/limits.conf

去掉两行注释即可

*               soft    core            0
*               hard    rss             10000
- 1
- 2
- 3
- 4
- 5
- 6


![【Linux】服务器时区 [ CST | UTC | GMT | RTC ]_linux上服务器时区](https://img-blog.csdnimg.cn/img_convert/7ca7738362d74dc0867c0c0ec139a490.png?x-oss-process=image/resize,m_fixed,h_300,image/format,png)


