
- 1初识人脸识别---人脸识别研究报告(概述篇)_机器视觉的人脸识别报告
- 2专科程序员VS本科程序员,如何摆脱学历「魔咒」?_大专选择程序员摆脱了蓝领
- 3基于Java的连连看游戏设计与实现_java数字连连看程序设计项目背景
- 4交换二叉树的左右子树——非递归方式_非递归实现二叉树左右子树交换
- 5Hbase伪分布式搭建时HQuorumeer启动不成功_hquorumpeer进程没起来是什么原因
- 6git命令删除缓存区(git add)的内容_git删除缓冲区文件
- 7使用MacOS M1(ARM)芯片系统搭建CentOS虚拟机,并基于kubeadm部署搭建k8s集群_m1 vmware centos
- 8[python] 使用scikit-learn工具计算文本TF-IDF值(转载学习)_tf-idf算法调用
- 9android radiobutton 设置选中问题_android recyclerview把第一个item的radiobutton设置成选中状态
- 10Java技能点--switch支持的数据类型解释_java 类常量和接口常量 switch
YOLOv3(keras)训练自己的数据集(voc)_训练voc图片
赞
踩
YOLOv3(keras)训练自己的voc数据集
最近在学习YOLOv3,现在简单的写一篇博客来分享一下自己训练数据集的过程,顺便算是记录一下工作进度和,希望能和大家共同探讨。
一.操作系统及环境
操作系统:windows10
环境:tensorflow-gpu keras-gpu spyder
二.运行测试
首先在 https://github.com/qqwweee/keras-yolo3 上下载好相关代码,然后在YOLO官网上下载预先训练好的权重文件并放置在代码主文件夹内;(下载地址:https://pjreddie.com/media/files/yolov3.weights) 然后使用以下命令来转化权重文件:
python convert.py yolov3.cfg yolov3.weights model_data/yolo.h5
- 1
转化结果完成如下图所示:

最后使用以下命令来运行测试(单张图像):
python yolo_video.py --image
- 1
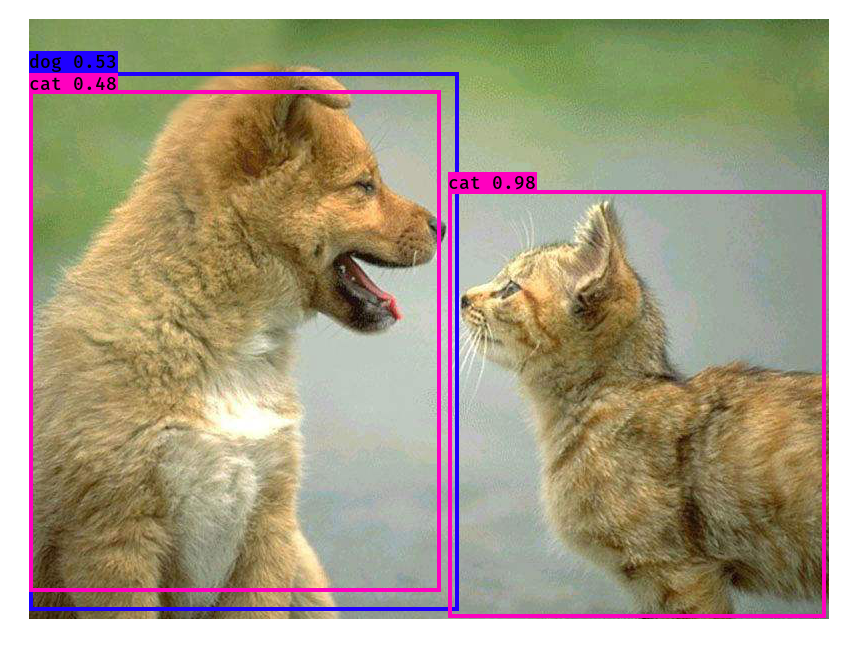
随便找了一张图,结果居然不是很好?!
三.数据集准备
在代码文件夹内建立名为VOCdevkit的文件夹并且包含以下子文件夹,具体菜单结构及命名如下图所示:

下载labelmg工具(https://github.com/tzutalin/labelImg) 来制作制作数据集的标签文件。图片放在JPEGImages文件夹内,标签文件存储在Annotations文件夹内。需要注意:图像的w可以和h不相等但都必须是32的倍数,(64x64,128x128…)。
标注工作完成后,在VOC2007文件夹下建立txt.py并运行,代码如下:
import os
import random

trainval_percent = 0.2
train_percent = 0.8
xmlfilepath = 'Annotations'
txtsavepath = 'ImageSets\Main'
total_xml = os.listdir(xmlfilepath)

num = len(total_xml)
list = range(num)
tv = int(num * trainval_percent)
tr = int(tv * train_percent)
trainval = random.sample(list, tv)
train = random.sample(trainval, tr)

ftrainval = open('ImageSets/Main/trainval.txt', 'w')
ftest = open('ImageSets/Main/test.txt', 'w')
ftrain = open('ImageSets/Main/train.txt', 'w')
fval = open('ImageSets/Main/val.txt', 'w')

for i in list:
    name = total_xml[i][:-4] + '\n'
    if i in trainval:
        ftrainval.write(name)
        if i in train:
            ftest.write(name)
        else:
            fval.write(name)
    else:
        ftrain.write(name)

ftrainval.close()
ftrain.close()
fval.close()
ftest.close()

- 1
- 2
- 3
- 4
- 5
- 6
- 7
- 8
- 9
- 10
- 11
- 12
- 13
- 14
- 15
- 16
- 17
- 18
- 19
- 20
- 21
- 22
- 23
- 24
- 25
- 26
- 27
- 28
- 29
- 30
- 31
- 32
- 33
- 34
- 35
- 36
- 37
运行完毕后,在ImageSets\Main文件夹内生成以下四个txt文件:

修改voc_annotation.py文件,将classes中的标签名改为自己标注时所使用的标签,如下图所示:

然后运行,会在主文件夹内出现以下三个文本文件:

然后修改voc_classes.txt 文件,将里面的内容改为自己建立的标签,如下图所示:

下面划重点:
修改yolov3.cfg文件内的参数

首先将Testing下的batch和subdivisions注释掉,将Training下的的batch和subdivisions注释去掉(测试模型的时候需要改回来),然后根据自己的硬件配置情况修改batch和subdivisions(根据自己硬件显存及内存情况修改,增加batch可以提高训练精度,提高subdivisions可降低硬件负荷,具体可以参考 https://blog.csdn.net/phinoo/article/details/83022101 );
然后依照训练集内参数的图片尺寸对width和height进行修改。
查找关键字yolo,然后修改每个yolo层以及上面的卷积层中的参数参数(下图中标记出来的三个),其中filters=3x(5+‘classes’);classes=’‘数据集中标签的种类个数’’。切记三处全部文件共有三处yolo层,都需要修改。

然后将train.py修改为以下代码:
"""
Retrain the YOLO model for your own dataset.
"""
import numpy as np
import keras.backend as K
from keras.layers import Input, Lambda
from keras.models import Model
from keras.callbacks import TensorBoard, ModelCheckpoint, EarlyStopping
from yolo3.model import preprocess_true_boxes, yolo_body, tiny_yolo_body, yolo_loss
from yolo3.utils import get_random_data
import os

def _main():
    annotation_path = '2007_train.txt'
    log_dir = 'logs/000/'
    classes_path = 'model_data/voc_classes.txt'
    anchors_path = 'model_data/yolo_anchors.txt'
    class_names = get_classes(classes_path)
    anchors = get_anchors(anchors_path)
    input_shape = (64,64)
    model = create_model(input_shape, anchors, len(class_names) )
    train(model, annotation_path, input_shape, anchors, len(class_names), log_dir=log_dir)

def train(model, annotation_path, input_shape, anchors, num_classes, log_dir='logs/'):
    model.compile(optimizer='adam', loss={
        'yolo_loss': lambda y_true, y_pred: y_pred})
    logging = TensorBoard(log_dir=log_dir)
    checkpoint = ModelCheckpoint(log_dir + "ep{epoch:03d}-loss{loss:.3f}-val_loss{val_loss:.3f}.h5",
        monitor='val_loss', save_weights_only=True, save_best_only=True, period=1)
    batch_size = 10
    val_split = 0.1
    with open(annotation_path) as f:
        lines = f.readlines()
    np.random.shuffle(lines)
    num_val = int(len(lines)*val_split)
    num_train = len(lines) - num_val
    print('Train on {} samples, val on {} samples, with batch size {}.'.format(num_train, num_val, batch_size))

    model.fit_generator(data_generator_wrap(lines[:num_train], batch_size, input_shape, anchors, num_classes),
            steps_per_epoch=max(1, num_train//batch_size),
            validation_data=data_generator_wrap(lines[num_train:], batch_size, input_shape, anchors, num_classes),
            validation_steps=max(1, num_val//batch_size),
            epochs=500,
            initial_epoch=0)
    model.save_weights(log_dir + 'trained_weights.h5')

def get_classes(classes_path):
    with open(classes_path) as f:
        class_names = f.readlines()
    class_names = [c.strip() for c in class_names]
    return class_names

def get_anchors(anchors_path):
    with open(anchors_path) as f:
        anchors = f.readline()
    anchors = [float(x) for x in anchors.split(',')]
    return np.array(anchors).reshape(-1, 2)

def create_model(input_shape, anchors, num_classes, load_pretrained=False, freeze_body=False,
            weights_path='model_data/yolo_weights.h5'):
    K.clear_session() # get a new session
    image_input = Input(shape=(None, None, 3))
    h, w = input_shape
    num_anchors = len(anchors)
    y_true = [Input(shape=(h//{0:32, 1:16, 2:8}[l], w//{0:32, 1:16, 2:8}[l], \
        num_anchors//3, num_classes+5)) for l in range(3)]

    model_body = yolo_body(image_input, num_anchors//3, num_classes)
    print('Create YOLOv3 model with {} anchors and {} classes.'.format(num_anchors, num_classes))

    if load_pretrained:
        model_body.load_weights(weights_path, by_name=True, skip_mismatch=True)
        print('Load weights {}.'.format(weights_path))
        if freeze_body:
            # Do not freeze 3 output layers.
            num = len(model_body.layers)-7
            for i in range(num): model_body.layers[i].trainable = False
            print('Freeze the first {} layers of total {} layers.'.format(num, len(model_body.layers)))

    model_loss = Lambda(yolo_loss, output_shape=(1,), name='yolo_loss',
        arguments={'anchors': anchors, 'num_classes': num_classes, 'ignore_thresh': 0.5})(
        [*model_body.output, *y_true])
    model = Model([model_body.input, *y_true], model_loss)
    return model
def data_generator(annotation_lines, batch_size, input_shape, anchors, num_classes):
    n = len(annotation_lines)
    np.random.shuffle(annotation_lines)
    i = 0
    while True:
        image_data = []
        box_data = []
        for b in range(batch_size):
            i %= n
            image, box = get_random_data(annotation_lines[i], input_shape, random=True)
            image_data.append(image)
            box_data.append(box)
            i += 1
        image_data = np.array(image_data)
        box_data = np.array(box_data)
        y_true = preprocess_true_boxes(box_data, input_shape, anchors, num_classes)
        yield [image_data, *y_true], np.zeros(batch_size)

def data_generator_wrap(annotation_lines, batch_size, input_shape, anchors, num_classes):
    n = len(annotation_lines)
    if n==0 or batch_size<=0: return None
    return data_generator(annotation_lines, batch_size, input_shape, anchors, num_classes)

if __name__ == '__main__':
    _main()
- 1
- 2
- 3
- 4
- 5
- 6
- 7
- 8
- 9
- 10
- 11
- 12
- 13
- 14
- 15
- 16
- 17
- 18
- 19
- 20
- 21
- 22
- 23
- 24
- 25
- 26
- 27
- 28
- 29
- 30
- 31
- 32
- 33
- 34
- 35
- 36
- 37
- 38
- 39
- 40
- 41
- 42
- 43
- 44
- 45
- 46
- 47
- 48
- 49
- 50
- 51
- 52
- 53
- 54
- 55
- 56
- 57
- 58
- 59
- 60
- 61
- 62
- 63
- 64
- 65
- 66
- 67
- 68
- 69
- 70
- 71
- 72
- 73
- 74
- 75
- 76
- 77
- 78
- 79
- 80
- 81
- 82
- 83
- 84
- 85
- 86
- 87
- 88
- 89
- 90
- 91
- 92
- 93
- 94
- 95
- 96
- 97
- 98
- 99
- 100
- 101
- 102
- 103
- 104
- 105
- 106
- 107
- 108
- 109
- 110
需要将以上代码中的 input_shape改为自己数据集图片的尺寸;然后在主文件夹下建立’名为log的文件夹及000子文件夹来存放训练的权重文件,然后运行开始训练。
若一直爆显存,可以添加以下代码,来使用CPU进行训练:
GPU = 0 #Change it to 0 in order to use CPU
if GPU == 0:
    os.environ['CUDA_VISIBLE_DEVICES'] = '-1'
- 1
- 2
- 3
训练完成后,,修改yolo文件,将"model_path"、“anchors_path”、"classes_path"指向自己训练的自己的数据,如下图所示:
我将训练好的权重文件,也就是trained_weights.h5放到了model_data文件夹内,model_image_size我也做了修改;
修改yolov3.cfg文件,改回Testing模式,然后开始测试。

首次训练,仅仅参照了很多版本的训练帖子来跑通了一遍整个训练过程,但是结果果然是很不理想,还需要在数据集和调参方面多下点功夫,再接着考虑网络结构的调整。。。。
参考
源代码:https://github.com/qqwweee/keras-yolo3
参考1:https://blog.csdn.net/u012746060/article/details/81183006
参考2:https://blog.csdn.net/phinoo/article/details/83022101
参考3:https://blog.csdn.net/dong_ma/article/details/84339007

