- 1JMeter--逻辑控制器--IF 控制器
- 2企业如何进行等保自测和自评定级?_等保测评 自评
- 3Android自学,android面试八股文_android 八股文
- 4一键生成视频!用 PAI-EAS 部署 AI 视频生成模型 SVD 工作流_svd视频生成 部署
- 5阿里云Nodejs SDK——子设备接入物联网平台_const iot = require('./utils/aliyun-iot-sdk.js');
- 6Django注册rest_framework报错(已安装但是只要一注册就报错NO Model ‘rest_framework’)_no module named 'rest_framework
- 7Mac 下安装flutter图解_mac 安装flutter
- 8银行API安全解决方案_引入银行的api
- 9创建自己数据集全套流程_如何制作自己的数据集
- 10蓝桥杯python组算法模板与习题_蓝桥杯python题库
git日常使用合集_git clone 指定commit
赞
踩
文章目录
- 0. 常见使用
- 1. git add相关
- 2. git clone项目的分支
- 3. 更新本地仓库至远程最新版
- 4. git删除本地文件push到远程
- 5. git提交一个空文件夹
- 6. 将本地文件夹上传至github
- 7. 在线更新git工具
- 8. 同步时,某个本地仓库修改没有提交,再pull的时候报错Please commit your changes or stash them before you merge
- 9. 查看commit的内容/删除还没有push的commit里的东西
- 10. git clone --depth=1
- 11. github和gitlab账号共存
- 12. 在某个repo中创建自己的分支
- 13. 查看分支关系图
- 14. 修改一个已有项目的remote url指向(push一个已有的git项目)
- 15. push一个已有的文件夹
- 16. git文件夹重命名
- 17. merge
- 18. Updates were rejected because the remote contains work that you do not have locally
- 19. git回退单个文件到指定版本
- 20. git push HTTP/2 stream 1 was not closed cleanly before end of the underlying stream
- 21. git push不上去/速度慢
- 其他
0. 常见使用
团队使用gitlab,但是使用的语法还是git。创建项目的时候显示了很多常见语句,整理如下:
# Git global setup
git config --global user.name "XXX"
git config --global user.email "XXX"

# Create a new repository
git clone XXXX/extract_frame.git
cd extract_frame
touch README.md
git add README.md
git commit -m "add README"
git push -u origin master

# Push an existing folder
cd existing_folder
git init
git remote add origin XXX/extract_frame.git
git add .
git commit -m "Initial commit"
git push -u origin master

# Push an existing Git repository
cd existing_repo
git remote rename origin old-origin
git remote add origin XXX/extract_frame.git
git push -u origin --all
git push -u origin --tags
- 1
- 2
- 3
- 4
- 5
- 6
- 7
- 8
- 9
- 10
- 11
- 12
- 13
- 14
- 15
- 16
- 17
- 18
- 19
- 20
- 21
- 22
- 23
- 24
- 25
- 26
1. git add相关
参考:【git】git add 添加错文件 撤销
要上传的文件名进行不要出现中文,不然在使用status查看add的文件时,就会出现一些意料之外的字符。。。。
git add *
git add .
# 上面两个都可以起到添加当前文件夹下全部文件的效果
git status
# 查看add的文件

# 添加错文件想要撤销
git reset HEAD
# 如果后面什么都不跟的话 就是上一次add 里面的全部撤销了
git reset HEAD XXX/XXX/XXX.java
# 就是对某个文件进行撤销了
- 1
- 2
- 3
- 4
- 5
- 6
- 7
- 8
- 9
- 10
- 11
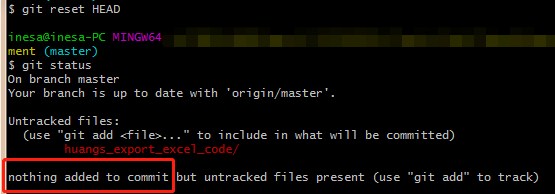
撤销后再查看状态,可以看到没有被添加要提交的内容这样的提示。
2. git clone项目的分支
2.1 查看branch分支
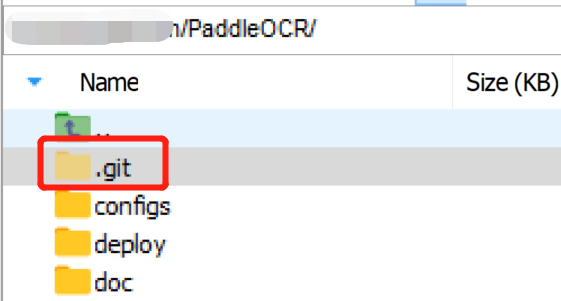
定位到包含.git文件夹的目录,使用git branch就可以看到当前仓库存在的分支(通常我们只会git clone一个分支,所以此时返回的内容就是当前仓库的版本号信息。)
git branch
git branch -r/-a

To see local branches, run this command:
$ git branch
To see remote branches, run this command:
$ git branch -r
To see all local and remote branches, run this command:
$ git branch -a
- 1
- 2
- 3
- 4
- 5
- 6
- 7
- 8
- 9

参考:https://www.nobledesktop.com/learn/git/git-branches
另外,也可以直接在config文件中查看:
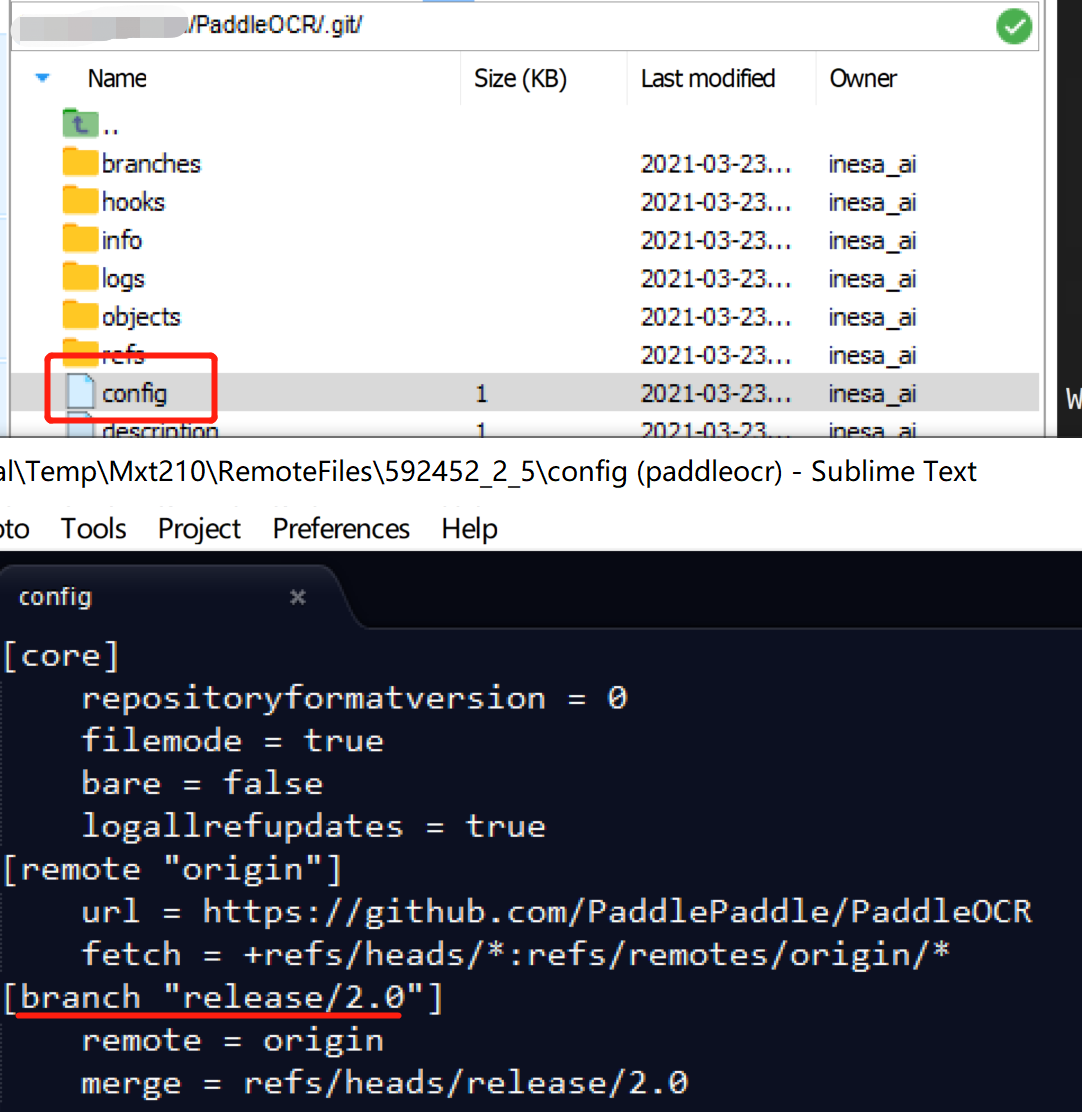
另外,也可以
git log
- 1

这里有一个commit+提交的版本号,其实和gitlab上显示的这个SHA序号是一致的,这里只显示了一部分,复制就可以看到全部序列是一串很长的字符。

2.2 clone某个分支
使用-b参数指定要访问的分支
git clone -b XXXbranch http://XXXX/XXX.git
- 1
3. 更新本地仓库至远程最新版
3.1 git clone指定分支(branch/tag)
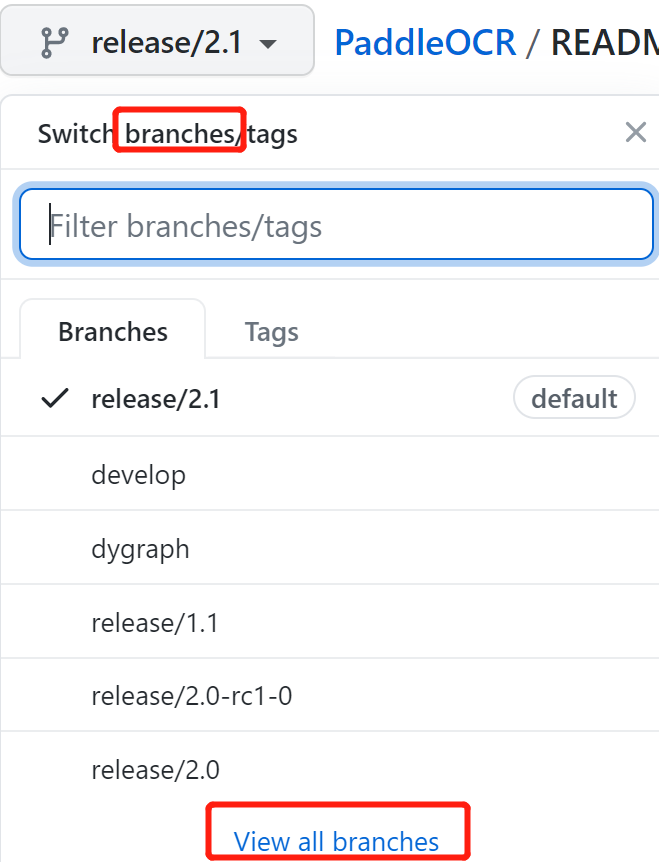
最简单的一种lowB方式就是换个文件夹重新git clone,以PaddlePaddleOCR为例,默认就是最新的版本,但是切换分支后发现,这些分支对应的https链接都是一样的,
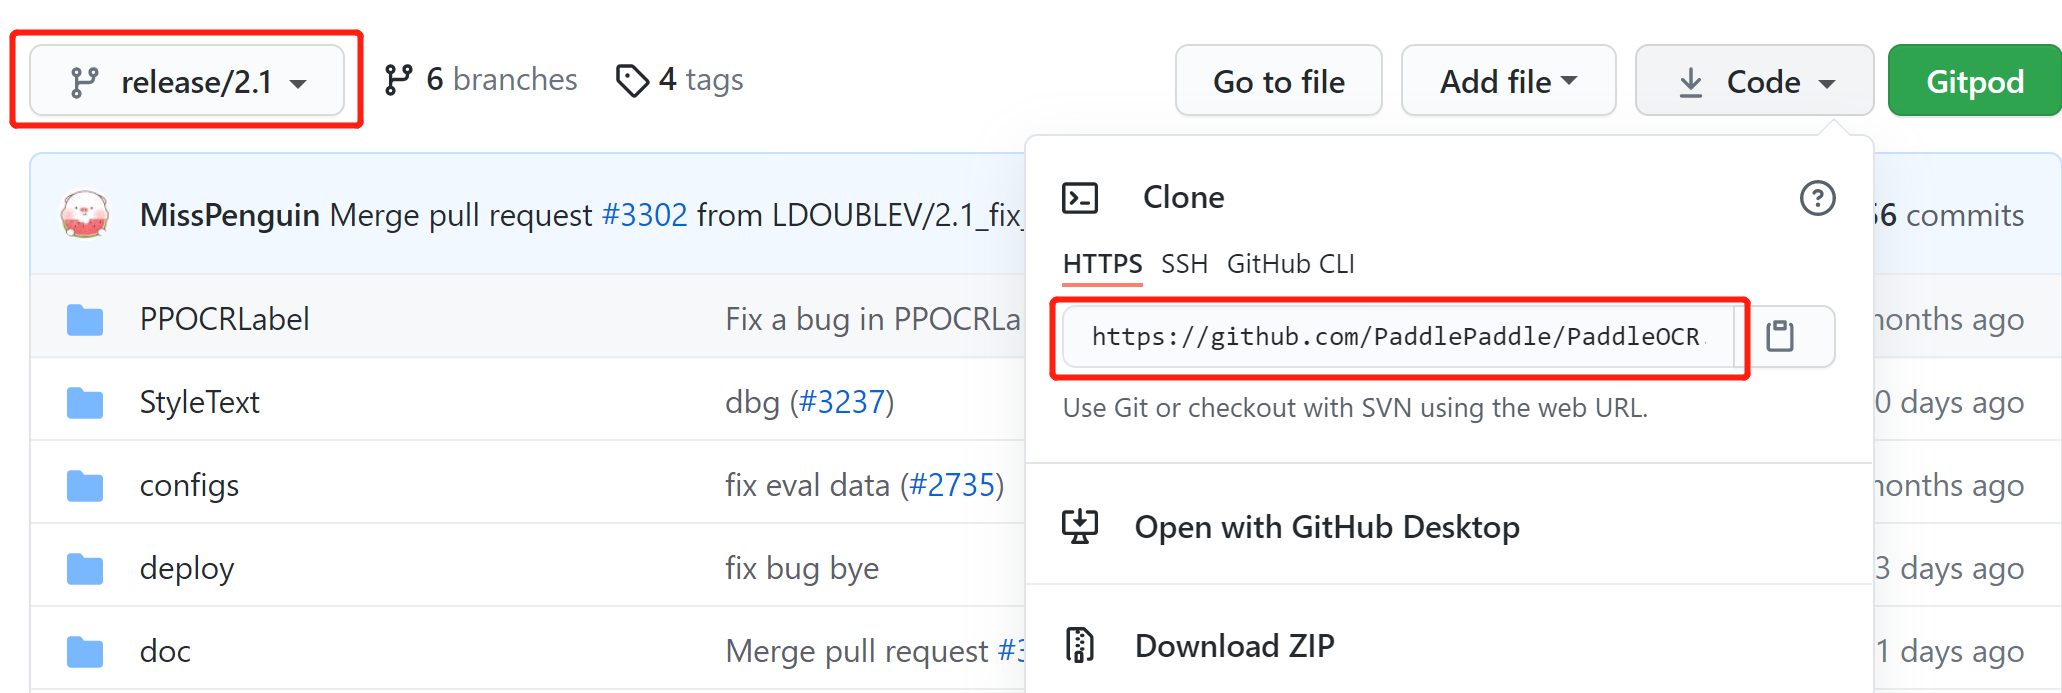
根据:使用git克隆指定分支的代码可知,下载指定分支release/2.1的命令如下:
git clone -b 分支名 仓库地址
# 其中分支名 就是github上看到的`release/2.1`
git clone -b release/2.1 https://github.com/PaddlePaddle/PaddleOCR.git
"""
会报错
fatal: unable to access 'https://github.com/PaddlePaddle/PaddleOCR.git/':
gnutls_handshake() failed: The TLS connection was non-properly terminated.
"""
# 下面这个是对的
git clone -b v2.1.1 https://github.com/PaddlePaddle/PaddleOCR.git
- 1
- 2
- 3
- 4
- 5
- 6
- 7
- 8
- 9
- 10

有些branch分支是没有代码的,无法使用,所以最好使用tags,参考GitHub下载克隆clone指定的分支tag代码
git clone --branch [tags标签] [git地址] 或者 git clone --b [tags标签] [git地址]
# 这里-b最好给tags标签
git clone -b 1.4.1 https://github.com/jumpserver/coco.git
- 1
- 2
- 3
3.2 git clone 指定commit或者hash
简单来说,就是正常下载repo,然后用checkout切到对应的commit记录上去
git clone [remote_address_here] my_repo
cd my_repo
git reset --hard [ENTER HERE THE COMMIT HASH YOU WANT]
- 1
- 2
- 3
参考:
3.2 更新本地仓库与远程仓库同步
参考:git 更新本地代码
大致分为几种情况:
3.2.1 直接更新
——本地代码未修改,只有master分支,直接更新
git pull
- 1
但前提必须是本地的代码没更改过。比如,你提交了代码到 github 后,随后别人也提交代码到 github,然后你需要更新别人提交的代码到你本地,
就可以直接使用该命令。假如你提交代码后再修改过你本地的代码,就会产生冲突,直接使用该命令会失败的。
3.2.2 多分支
——本地代码有修改,多分支。
//切换到master分支
git checkout master

//更新master分支
git pull

//切换到自己的分支isso
git checkout isso

//把master分支合并到自己分支
git merger master
- 1
- 2
- 3
- 4
- 5
- 6
- 7
- 8
- 9
- 10
- 11
3.2.3 强制覆盖本地
——本地代码有修改,只有master分支,直接覆盖本地代码
//重置索引和工作目录
git reset --hard

//更新代码
git pull
- 1
- 2
- 3
- 4
- 5
3.2.4 强制覆盖远程
——本地代码有修改,直接覆盖远程仓库代码
// 覆盖isso分支
git push --force origin isso

// 覆盖主分支
git push --force origin master
- 1
- 2
- 3
- 4
- 5
3.3 删除本地分支和对应的远程分支
# 删除remote的分支
git push -d <remote_name> <branchname>

>git push -d origin CastleDream/support_BDD100K
To github.com:CastleDream/mmsegmentation.git
 - [deleted]         CastleDream/support_BDD100K

# 删除本地的分支,-d是delete,-D是delete force,都可以
git branch -d <branchname>
> git branch -D CastleDream/support_BDD100K
Deleted branch CastleDream/support_BDD100K (was 221ac91).
- 1
- 2
- 3
- 4
- 5
- 6
- 7
- 8
- 9
- 10
- 11
参考:
3.4 删除远程文件
比如:不小心把.ipynb_checkpoint文件上传到github中了,想要对远程仓库中的文件进行删除,可以
git rm --cached 'file name'
git commit -m'message'
git push -u origin branch
- 1
- 2
- 3
参考:
4. git删除本地文件push到远程
在windows操作系统上,一开始直接在文件管理器上进行删除,然后
git add *
git commit -m
git push
- 1
- 2
- 3
然后就报错,说本地和远程存在不一致文件

正确删除本地文件,再push到远程的做法是:
$ git rm -r  '需要删除的文件夹'
# 执行这句后,文件管理器就已经看不见这个文件夹了
$ git  commit -m "delete data"
$ git push -u origin master
- 1
- 2
- 3
- 4
一开始直接写错文件夹路径,然后直接把要删除的文件夹拖进git bash这个CLI中,就可以看到路径了
可以看到,其实还是完整路径,c/表示c盘。。。
PS:如果还是报错,那就先执行一下git pull,保证本地和远程一致之后,再进行上面的rm操作序列
5. git提交一个空文件夹
参考:如何在Git提交空文件夹
.gitkeep是一个占位文件。
Git是不会把一个完全空的文件夹添加到版本控制里,为了让空文件夹被跟踪,常规做法是在空文件夹里添加.gitkeep。
注意:.gitkeep并不是Git的特性。Git没有对占位文件名有要求,你可以放一个README也行。
Git:.gitignore和.gitkeep文件的使用 https://majing.io/posts/10000001781172
6. 将本地文件夹上传至github
其实分两部分操作
第一部分:本地操作,在需要上传到github的文件夹中,执行以下命令
# 把这个文件夹变成Git可管理的仓库
git init
# 登陆github账号 global也可以换成local 看自己情况
$ git config --global user.name 'catalinaLi' #公司账号名称
$ git config --global user.email 'catalinaLi@companyName.com' #公司账号邮箱

# 然后需要添加要上传的内容
git add *
# 提交的信息提示
git commit -m "first commit"
# 连接远程仓库
git remote add origin https://github.com/XXX/XXXX.git
# 上传内容
git push -u origin master
- 1
- 2
- 3
- 4
- 5
- 6
- 7
- 8
- 9
- 10
- 11
- 12
- 13
- 14
第二部分: github上操作,新建一个repo,不要勾选readme选项,这样下面会有使用的命令提示。
参考:
7. 在线更新git工具
今天想push一个项目的时候,走神,把git后面的参数写成了 update,然后就自动更新了??哈哈

8. 同步时,某个本地仓库修改没有提交,再pull的时候报错Please commit your changes or stash them before you merge
常见的方式有三种:
先把修改过的内容commit上去
git commit -m "My message"
- 1
不保留本地改动 直接覆盖
git reset --hard
# 或者
git checkout -t -f remote/branch
# 或者,单纯放弃某个文件的更改
git checkout filename
- 1
- 2
- 3
- 4
- 5
想要保留本地的更改
git stash # 将改动藏起来
git pull  # 用新代码覆盖本地代码
git stash pop # 将刚藏起来的改动恢复
- 1
- 2
- 3
参考:
- 简书文章:Git: pull时提示Please commit your changes or stash them before you merge.
- Stack Overflow-How do I resolve git saying “Commit your changes or stash them before you can merge”?
9. 查看commit的内容/删除还没有push的commit里的东西
add *并提交之后,才从提交的打印信息里看到有些内容被错误添加了,因此使用rm删除(删除当前commit里不想要push的内容),但是不确定剩余的commit内容是否正确
git add *
git commit XXX
git rm XXX # 这里删除也只是删除了工作区
git commit --amend -CHEAD # 再次提交会覆盖上次提交的内容,然后push就可以了
- 1
- 2
- 3
- 4
如果想要查看某次提交的具体内容,可以:
git log  #找到最新一次提交的 hash ID,一般只需要前6位字符即可
git show 79ac00 # 就可以看到具体信息了
- 1
- 2
10. git clone --depth=1
只克隆下包含最近一次commit的一个分支,可以使用depth来指定深度
git clone --depth 1 --branch english https://github.com/labuladong/fucking-algorithm.git
- 1
参考:
11. github和gitlab账号共存
一般做法是:gitlab设为global,github设为local
可以直接打开对应repo的.git,打开其中的config文件,直接添加用户名和邮箱,如果没有在用户根目录下设置全局账户,则这个config的设置就是对应的repo的局部用户名
因为公司使用gitlab,用处会多一些,所以可以将公司gitlab的账号设置为global的,例如:
$ git config --global user.name 'catalinaLi' #公司账号名称
$ git config --global user.email 'catalinaLi@companyName.com' #公司账号邮箱
- 1
- 2
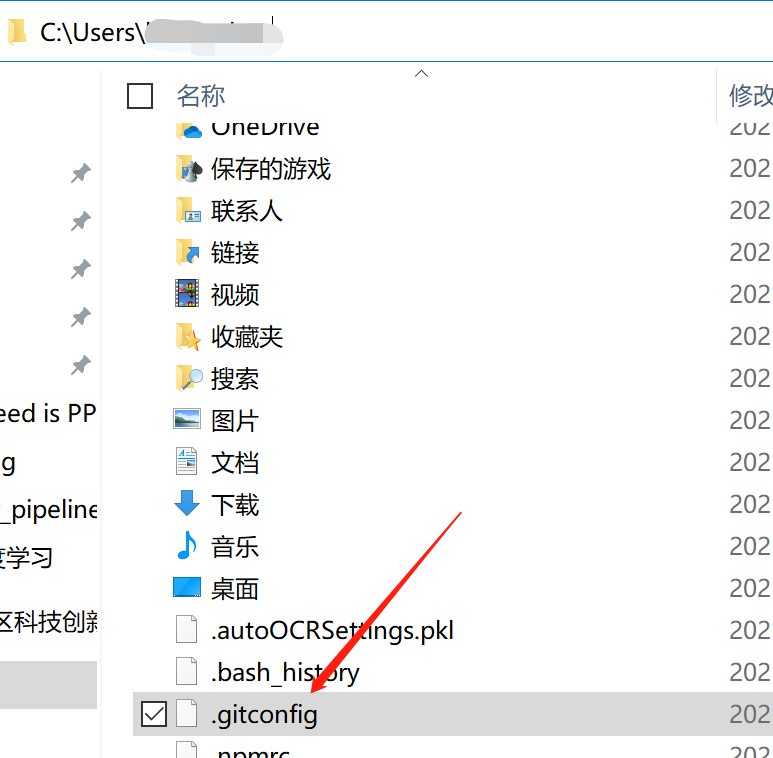
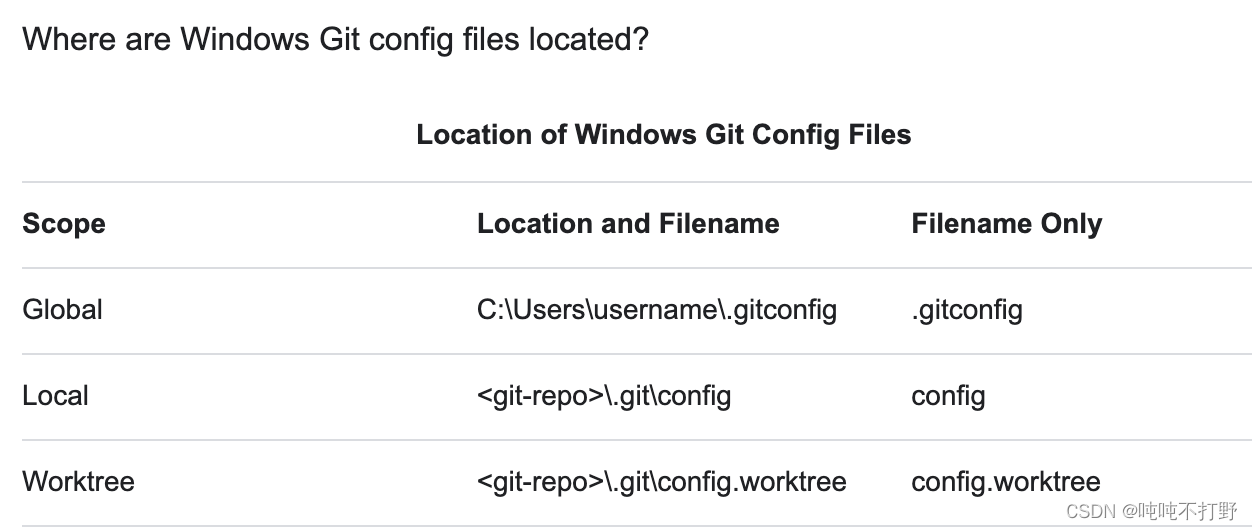
global(用户级别):
位于~/.gitconfig,具体到你的用户。你可以通过传递–global 选项使Git 读或写这个特定的文件。
以我本机为例,Windows系统下,在C:\Users\username\.gitconfig:
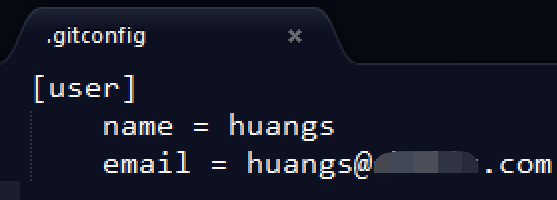
内容也非常简单,就是用户名和邮箱:
而如果是个人的github项目,可以设为local,例如:
$ git config --local user.name 'username' #github账号名称
$ git config --local user.email 'username@gmail.com' #github账号邮箱
- 1
- 2
这个需要先进入一个github的repo,init之后使用上述命令。
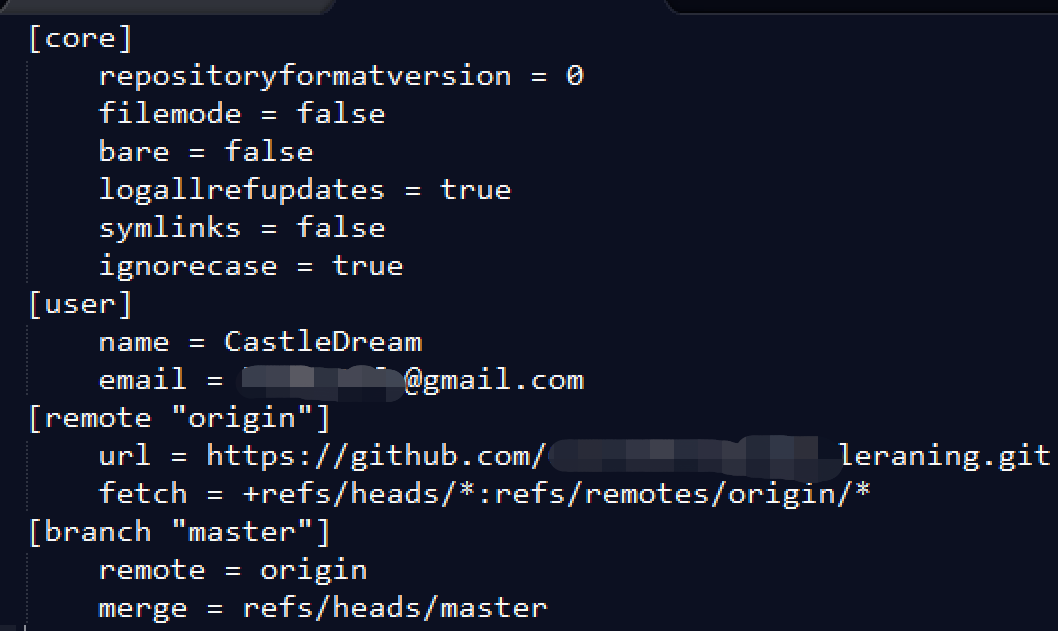
local(仓库级别):
位于 .git/config,无论你当前在用的库是什么,特定指向该单一的库。每个级别重写前一个级别的值。
以我本机的一个为例:
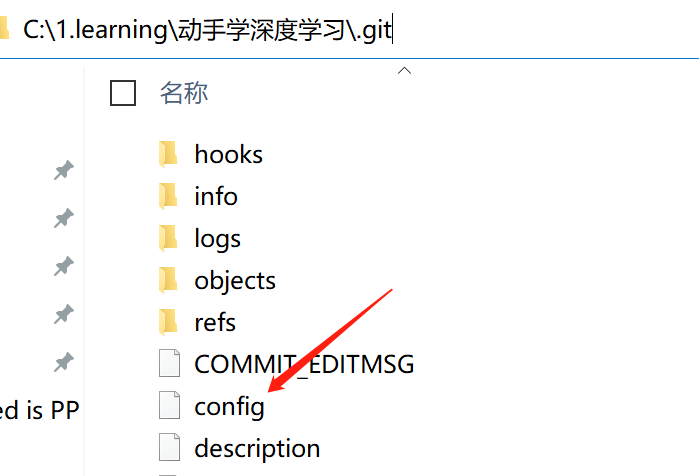
其中的内容就会多一些,有明确的repo的指向
参考:
12. 在某个repo中创建自己的分支
12.1 创建自己的分支
英语可以搜索关键词git create branch from master
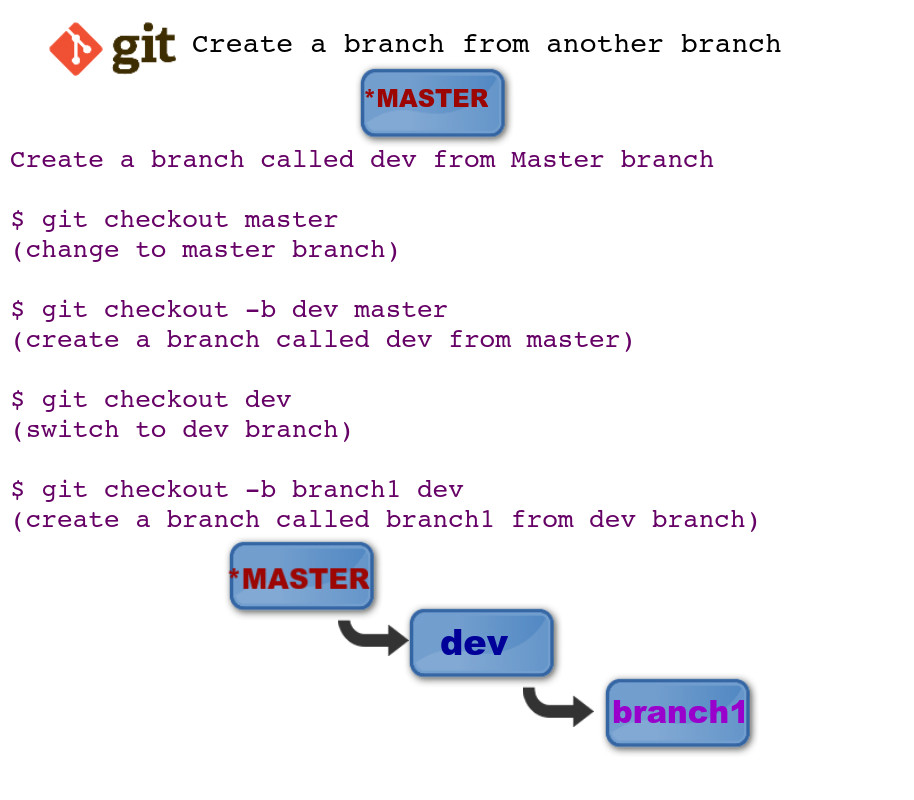
简单来说,就是
# 只创建 不切换
git branch <branch_name>
# 创建并立即切换到新分支
git checkout -b <sub-branch> branch
# -b 你要创建的新的子分支
# branch 创建的分支所基于的分支

# 例如
$ git checkout -b huangs master
Switched to a new branch 'huangs'
# 执行完上面的命令后,会默认帮你切换到自己新建立的那个分支
$ git checkout huangs
# 也可以使用这个方式来切换到huangs分支上去

git push origin huangs
# 将当前内容(上一句命令已经切换到huangs分支了)推送到 origin路径里的huangs分支里去

If you want to create a new branch to retain commits you create, you may
do so (now or later) by using -c with the switch command. Example:

  git switch -c <new-branch-name>

Or undo this operation with:

  git switch -
- 1
- 2
- 3
- 4
- 5
- 6
- 7
- 8
- 9
- 10
- 11
- 12
- 13
- 14
- 15
- 16
- 17
- 18
- 19
- 20
- 21
- 22
- 23
- 24
- 25
- 26
注意,要在这个repo的目录里运行。。。
主要参考
- Stack Overflow:Create a branch in Git from another branch
- atlassian:Git Checkout
12.2 后续提交到自己的分支
报错:
error: src refspec huangs does not match any.
error: failed to push some refs to
- 1
- 2
建议:
- 先切换到自己的分支,再进行文件编辑等操作
- 不然会报错,需要先把修改保存,才能切换分支
git add *
git commit -m "XXXX"
# 可能会提示你输入用户名密码
git config --global user.email "XXX@XXX.com"
git config --global user.name "XXX"

# 输完用户名之后,再去提交
git commit -m "first update"
[dev 68ae78b] first update
 3 files changed, 792 insertions(+)
 create mode 100644 segVol/config/train_test_heart.cfg
 create mode 100644 segVol/config/train_test_hematoncus.cfg
 create mode 100644 segVol/runSegMain.py

# 一开始我以为可以保存后直接提交到自己的分支,但是报错必须先把之前的提交或者换分支之前stash了
git checkout huangs
error: Your local changes to the following files would be overwritten by checkout:
        XXX/.gitignore
Please commit your changes or stash them before you switch branches.
Aborting

# 想要保留本地的更改,可以
git stash # 将改动藏起来
> Saved working directory and index state WIP on dev: XXX first update

git pull  # 用新代码覆盖本地代码
> Username for 'http://XXXX': XXXX
Password for 'http://XXX@XXX':
Already up to date.

# pull把远程更新到本地,就可以切换分支了
git checkout huangs
Branch 'XXX、' set up to track remote branch 'XXX' from 'origin'.
Switched to a new branch 'XXX'

# 切换分支之后就可以把刚刚的更新恢复
git stash pop # 将刚藏起来的改动恢复
> Auto-merging XXX/.gitignore
CONFLICT (content): Merge conflict in XXX/.gitignore

# 然后push到远程
git push origin huangs
Username for 'http://XXXX': XXX
Password for 'http://XXX':
Everything up-to-date

# 可以看到现在就在自己的分支了
git branch
  dev
* huangs
- 1
- 2
- 3
- 4
- 5
- 6
- 7
- 8
- 9
- 10
- 11
- 12
- 13
- 14
- 15
- 16
- 17
- 18
- 19
- 20
- 21
- 22
- 23
- 24
- 25
- 26
- 27
- 28
- 29
- 30
- 31
- 32
- 33
- 34
- 35
- 36
- 37
- 38
- 39
- 40
- 41
- 42
- 43
- 44
- 45
- 46
- 47
- 48
- 49
- 50
但是还是有些问题,之前编辑的文件消失了。。但是其实问题很简单,
- 之前的文件默认是在
dev分支上做的修改,上面的操作其实也只是在修改文件没有commit无法切换分支的解决方式 - 因此如果想看到之前的文件,只需要切换到
dev分支即可,即git checkout dev
13. 查看分支关系图
根据Stack Oveflow:Relationship between n git branches
直接使用以下命令:
$ git log --graph --decorate --oneline --simplify-by-decoration --all

* f3f616b (origin/dev) Merge branch 'abc' into 'dev'
| * 9b07710 (origin/abc) add RandomAffine
|/
* 7b7f92c (origin/drf) update configuration
* 3d03b4f (HEAD -> master, origin/master, origin/123, origin/HEAD) merge from master
* 7873e87 init dev for XXX
- 1
- 2
- 3
- 4
- 5
- 6
- 7
- 8
如果想查看特定分支的,把--all改成相应的分支即可,例如
$ git log --graph --decorate --oneline --simplify-by-decoration master
- 1
也可以参考git graph 图线,中文的,比较好懂。
14. 修改一个已有项目的remote url指向(push一个已有的git项目)
我的情景是:我clone了某个repo,进行修改后,要把它传到另一个新建的repo上去。
"方式1,直接重新设置url"
git remote -v   #查看原始的fetch和push路径
> origin  http://XXXX/user/test.git (fetch)
  origin  http://XXXX/user/test.git (push)

git remote set-url origin https://github.com/xxx/xxx.git   # 更换新的仓库地址

"方式2,重命名旧的url,然后指向新的"
cd existing_repo
git remote rename origin old-origin
git remote add origin http://10.70.21.10:8888/ai/miccai-challenge.git
- 1
- 2
- 3
- 4
- 5
- 6
- 7
- 8
- 9
- 10
- 11
- 其实方式2就是0.常见使用的最后一部分,
- 也是在GitHub或者gitlab上创建一个新项目,项目主页会显示的一些基础命令
参考:
15. push一个已有的文件夹
这其实也是0.常见使用的靠后的命令
cd existing_folder
git init
git remote add origin http://10.70.21.10:8888/ai/miccai-challenge.git
git add .
git commit -m "Initial commit"
- 1
- 2
- 3
- 4
- 5
16. git文件夹重命名
git mv <oldname> <newname>
# 例如
git mv testAD  1.testAD
# 注意新名字里不要有空格,必须加空格的话就 1.\ testAD 加个转义符
- 1
- 2
- 3
- 4
参考:
- [Git] git重命名文件和文件夹详解
- In a Git repository, how to properly rename a directory?
- 这个回答很久了,目前如果是修改文件夹大小写,一步
mv就可以,不需要两步
- 这个回答很久了,目前如果是修改文件夹大小写,一步
17. merge
参考:
18. Updates were rejected because the remote contains work that you do not have locally
完整提示信息如下:

出现这一问题的原因是:
- 我只add了几个自己修改过的文件
- 但是远程的其他文件被别人修改了,所以会提示容易有不一致问题
- 如果确定自己添加的这几个文件不会与远程冲突
那么根据stackoverflow的回答:Updates were rejected because the remote contains work that you do not have locally
- 直接强制上传就行,即
git push -f origin master- 如果是某个分支,就
git push -f origin branch_name
19. git回退单个文件到指定版本
如果不想整个项目都回退到某个commit,尤其是多人开发的时候。可能会有想回退单个文件,或者单个文件夹到指定版本的需求。
假设要回退到的commit的hash是c5f567,则可以使用checkout命令
git checkout c5f567 -- file1/to/restore file2/to/restore

# 加上~序号,表示回滚到c5f567的上几个commit(~1,就是回滚到c5f567的前一个commit)
git checkout c5f567~1 -- file1/to/restore file2/to/restore
- 1
- 2
- 3
- 4
也可以去看git的官方手册:git-checkout

参考:
- stackoverflow:How do I reset or revert a file to a specific revision?
20. git push HTTP/2 stream 1 was not closed cleanly before end of the underlying stream
报这个错就是网络有问题,要么就是代理有问题
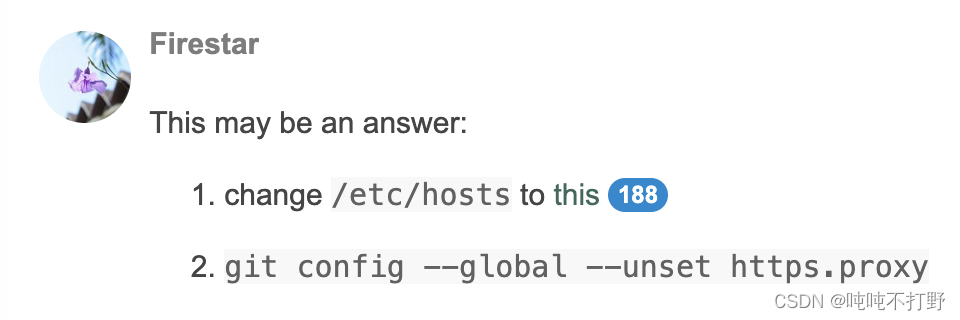
macOS下git的config文件位置:$HOME/. gitconfig

参考:
- HTTP/2 stream 1 was not closed cleanly before end of the underlying stream
- unable to connect to git server via http: HTTP/2 stream 0 was not closed cleanly: PROTOCOL_ERROR (err 1)
21. git push不上去/速度慢
windows下设置终端代理命令,根据文章 命令终端设置全局代理的两种方法,例如:
 # v2rayN + https/socks
set http_proxy=http://127.0.0.1:10811
set https_proxy=http://127.0.0.1:10811

# 和自己的代理设置一样即可,这里使用socks5代理,这都是临时性设置,关闭终端后就消失了
> set http_proxy=socks5://127.0.0.1:10810
> set https_proxy=socks5://127.0.0.1:10810
- 1
- 2
- 3
- 4
- 5
- 6
- 7
可以使用set命令,查看当前终端的设置
> set
- 1

设置之后,速度飞快,NB啊,
Copyright © 2003-2013 www.wpsshop.cn 版权所有,并保留所有权利。


