
- 1使用 Flink CDC 实现 MySQL 数据,表结构实时入 Apache Doris_flinkcdc同步mysql到doris
- 2你肯定不知道RocketMQ生产者是如何规避故障Broker的_rocketmq如何确保broker正常
- 3stable diffusion API 调用,超级详细代码示例和说明_stable diffusio api
- 4AI智慧医疗:探索机器学习在医疗保健中的应用与进展_人工智能在医疗虚拟助手和聊天机器人应用
- 5智能办公指南 | ONLYOFFICE 8.0新特性_onlyoffice word书签替换
- 6基于STM32的四旋翼无人机项目(一):基础知识篇_stm32无人机制作全过程教程_开源四轴无人机stm32
- 7Yaml基本语法及读取配置的方法_yaml文件配置环境变量
- 8axios 统一配置请求超时时间_axios超时时间设置
- 9C语言各种预编译宏总结_c语言预编译宏
- 10PS滤镜功能详解_ps滤镜库照亮边缘作用
边缘计算:客户端 + 人工智能_客户端和边缘端的区别
赞
踩
有人说人工智能会是继互联网之后的下一次工业革命,不可否认,大到汽车、小到手表,AI技术已经广泛应用在我们周围,随便一个APP都试图跟AI发生点关系以证明自己的与时俱进。
AI的普及为客户端开发带来了挑战,同时也是机遇。挑战在于客户端技术相对于AI等新兴技术正被逐渐边缘化;机遇在于移动设备仍将长期作为连接AI与用户的重要载体,随着硬件能力逐升级,移动端甚至可以自主完成一些机器学习和推理,让用户更快捷地享受到AI的带来的便利。
边缘计算(Edge AI)的意义
“模型” 是对一组训练数据应用机器学习算法而得到的结果。使用模型对一些输入的数据进行预测的过程叫“推理”。有很多依靠编写代码仅能低效甚至很难完成的任务,使用模型推理能更好地完成。例如,可以训练模型来归类照片,或者识别照片内的特定对象等。
长久以来,模型推理大多运行在服务端,客户端只作为结果展示的载体。但随着移动端的硬件性能越来越高,很多深度学习的数据模型可以以二进制形式下载到手机上,基于这些模型可以进行端上的AI处理,“边缘计算”的概念由此诞生,边缘计算有以下好处
- 数据本地化,解决云端存储及隐私问题;
- 计算本地化,解决云端计算过载问题;
- 低通信成本,解决交互和体验问题;
- 去中心化计算,故障规避与极致个性化。

边缘计算的技术现状
严格来说,边缘AI(Edge AI)是边缘计算的一个方向,边缘AI等能力主要借助移动端的机器学习(Machine Learning,后文简称ML)库实现。
移动端的KL库主要服务于模型下发和移动端推理引擎的执行,由于移动端的计算能力相对较弱,模型文件不宜过大,需要进行一些裁剪和压缩。目前主流的ML库有Tensorflow Lite、PyTorch Mobile、MediaPipe、Firebase ML Kit等,本文就这些技术做一个简单的介绍,帮大家扩大技术视野。
TensorFlow Lite
https://www.tensorflow.org/lite/guide
TensorFlow Lite 是将 TensorFlow 用于移动设备和嵌入式设备的轻量级解决方案,可以在Android、iOS以及其他嵌入式系统上使用。 借由 TensorFlow Lite Converter 将模型转化的压缩后的格式.tflite。TFLite Converter 提供 Python和 CLI 工具,推荐使用Python API。
下面代码是通过 TFLite Converter 将 tensorflow 和 tf.keras 的模型文件转换为 TFLite 格式的模型
import tensorflow as tf

# 转换 saved_model
converter = tf.lite.TFLiteConverter.from_saved_model(export_dir)
tflite_model = converter.convert()
with open('model.tflite', 'wb') as f:
    f.write(tflite_model)

# 转换 keras_model
keras_model = tf.keras.models.load_model(filepath)
converter = tf.lite.TFLiteConverter.from_keras_model(keras_model)
keras_tflite_model = converter.convert()
with open('keras_model.tflite', 'wb') as f:
    f.write(keras_tflite_model)
- 1
- 2
- 3
- 4
- 5
- 6
- 7
- 8
- 9
- 10
- 11
- 12
- 13
- 14

转换后的模型文件可以通过 TFLite 下载到手机上使用。 以 Android 为例,代码如下:
class TFLiteActivity : AppCompatActivity() {
    /* 模型下载 */
    private fun initializeTFLite(device: String = "NNAPI", numThreads: Int = 4) {
        val delegate = when (device) {
            "NNAPI" -> NnApiDelegate()
            "GPU" -> GpuDelegate()
            "CPU" -> "" }
        if (delegate != "") tfliteOptions.addDelegate(delegate)

        tfliteOptions.setNumThreads(numThreads)
        tfliteModel = FileUtil.loadMappedFile(this, tflite_model_path)
        tfliteInterpreter = Interpreter(tfliteModel, tfliteOptions)
        inputImageBuffer = TensorImage(tfliteInterpreter.getInputTensor(0).dataType())
        outputProbabilityBuffer = TensorBuffer.createFixedSize(
            tfliteInterpreter.getOutputTensor(0).shape(),
            tfliteInterpreter.getInputTensor(0).dataType())

        probabilityProcessor = TensorProcessor
            .Builder()
            .add(NormalizeOp(0.0f, 1.0f))
            .build()
    }

    /* 处理处理 */
    @WorkerThread
    override fun analyzeImage(image: ImageProxy, rotationDegrees: Int): Map<String, Float> {
        val bitmap = Utils.imageToBitmap(image)
        val cropSize = Math.min(bitmap.width, bitmap.height)
        inputImageBuffer.load(bitmap)
        val inputImage = ImageProcessor
            .Builder()
            .add(ResizeWithCropOrPadOp(cropSize, cropSize))
            .add(ResizeOp(224, 224, ResizeMethod.NEAREST_NEIGHBOR))
            .add(NormalizeOp(127.5f, 127.5f))
            .build()
            .process(inputImageBuffer)

        tfliteInterpreter.run(inputImage!!.buffer, outputProbabilityBuffer.buffer.rewind())
        val labeledProbability: Map<String, Float> = TensorLabel(
            labelsList, probabilityProcessor.process(outputProbabilityBuffer)
        ).mapWithFloatValue
        return labeledProbability
    }
}

- 1
- 2
- 3
- 4
- 5
- 6
- 7
- 8
- 9
- 10
- 11
- 12
- 13
- 14
- 15
- 16
- 17
- 18
- 19
- 20
- 21
- 22
- 23
- 24
- 25
- 26
- 27
- 28
- 29
- 30
- 31
- 32
- 33
- 34
- 35
- 36
- 37
- 38
- 39
- 40
- 41
- 42
- 43
- 44
TFLite 的 API 非常易用,即使没有太多的客户端开发经验也可以驾驭。
PyTorch Mobile
https://pytorch.org/mobile/home/
Facebook 于 19 年底发布了 PyTorch Mobile, 以 PyTorch 的移动端解决方案。PyTorch Mobile将 Pytorchscript 的模型进行 JIT 编译为 .pt 格式的文件。2020年,PyTorch Developer Day 宣布开始支持 Android 的 NNAPI 和 iOS 的 MetalAPI。

PyTorch 中使用 torch.jit.trace 处理模型转换
import torch
import torchvision

model = torchvision.models.resnet18(pretrained=True)
model.eval()
example = torch.rand(1, 3, 224, 224)
traced_script_module = torch.jit.trace(model, example)
traced_script_module.save("model.pt")
- 1
- 2
- 3
- 4
- 5
- 6
- 7
- 8

经转换的模型可以在 Android 和 iOS 中加载。 以 Android 为例,代码如下:
class PyTorchActivity : AppCompatActivity() {
    /* 模型下载 */
    private fun initializePyTorch() {
        val pytorchModule = Module.load(Utils.assetFilePath(
            this,
            pytorch_mobile_model_path))
        val mInputTensorBuffer = Tensor.allocateFloatBuffer(3 * 224 * 224)
        val mInputTensor = Tensor.fromBlob(
            mInputTensorBuffer,
            longArrayOf(1, 3, 224L, 224L)
        )
    }

    /* 模型处理 */
    @WorkerThread
    override fun analyzeImage(image: ImageProxy, rotationDegrees: Int): Map<String, Float> {
        TensorImageUtils.imageYUV420CenterCropToFloatBuffer(
            image.image,
            rotationDegrees,
            224,
            224,
            TensorImageUtils.TORCHVISION_NORM_MEAN_RGB,
            TensorImageUtils.TORCHVISION_NORM_STD_RGB,
            mInputTensorBuffer,
            0
        )
        val outputModule = pytorchModule.forward(IValue.from(mInputTensor)).toTensor()
        val scores = outputModule.dataAsFloatArray
        val labeledProbability: MutableMap<String, Float> = mutableMapOf()
        for (i in 0 until labelsList.size - 1) {
            labeledProbability[labelsList[i + 1]] = score[i]
        }
        return labeledProbability
    }
}
- 1
- 2
- 3
- 4
- 5
- 6
- 7
- 8
- 9
- 10
- 11
- 12
- 13
- 14
- 15
- 16
- 17
- 18
- 19
- 20
- 21
- 22
- 23
- 24
- 25
- 26
- 27
- 28
- 29
- 30
- 31
- 32
- 33
- 34
- 35
MediaPipe
https://google.github.io/mediapipe/
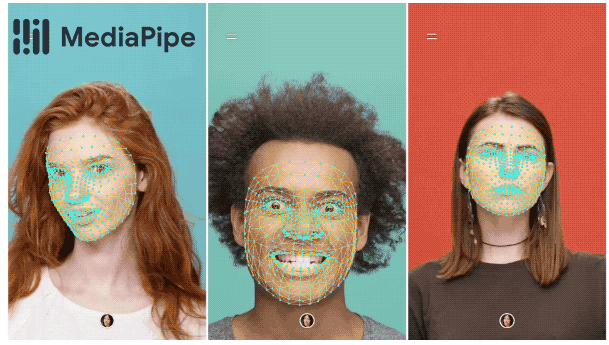
MediaPipe 与 Tensorflow Lite 和 PyTorch Mobile 不同,并不是从已有的深度学习库派生出来的。MediaPipe 专注于计算机视觉和多媒体处理的 ML管道框架,在2019年6月举行的 CVPR 大会,MeidaPipe 正式开源,版本是v0.5.0。自那以后,谷歌陆续发布了一系列的ML管道示例。MediaPipe 为 Android 、 iOS 等多平台提供了人脸、物体检测、动作捕捉等能力。
MediaPipe 图形库可以通过 bazel 编译成供 Androd端使用的 .aar 或者 iOS 的 .ipa
# MediaPipe graph that performs face mesh with TensorFlow Lite on GPU.

# GPU buffer. (GpuBuffer)
input_stream: "input_video"

# Output image with rendered results. (GpuBuffer)
output_stream: "output_video"
# Detected faces. (std::vector<Detection>)
output_stream: "face_detections"

# Throttles the images flowing downstream for flow control. It passes through
# the very first incoming image unaltered, and waits for downstream nodes
# (calculators and subgraphs) in the graph to finish their tasks before it
# passes through another image. All images that come in while waiting are
# dropped, limiting the number of in-flight images in most part of the graph to
# 1. This prevents the downstream nodes from queuing up incoming images and data
# excessively, which leads to increased latency and memory usage, unwanted in
# real-time mobile applications. It also eliminates unnecessarily computation,
# e.g., the output produced by a node may get dropped downstream if the
# subsequent nodes are still busy processing previous inputs.
node {
  calculator: "FlowLimiterCalculator"
  input_stream: "input_video"
  input_stream: "FINISHED:output_video"
  input_stream_info: {
    tag_index: "FINISHED"
    back_edge: true
  }
  output_stream: "throttled_input_video"
}

# Subgraph that detects faces.
node {
  calculator: "FaceDetectionFrontGpu"
  input_stream: "IMAGE:throttled_input_video"
  output_stream: "DETECTIONS:face_detections"
}

# Converts the detections to drawing primitives for annotation overlay.
node {
  calculator: "DetectionsToRenderDataCalculator"
  input_stream: "DETECTIONS:face_detections"
  output_stream: "RENDER_DATA:render_data"
  node_options: {
    [type.googleapis.com/mediapipe.DetectionsToRenderDataCalculatorOptions] {
      thickness: 4.0
      color { r: 255 g: 0 b: 0 }
    }
  }
}

# Draws annotations and overlays them on top of the input images.
node {
  calculator: "AnnotationOverlayCalculator"
  input_stream: "IMAGE_GPU:throttled_input_video"
  input_stream: "render_data"
  output_stream: "IMAGE_GPU:output_video"
}
- 1
- 2
- 3
- 4
- 5
- 6
- 7
- 8
- 9
- 10
- 11
- 12
- 13
- 14
- 15
- 16
- 17
- 18
- 19
- 20
- 21
- 22
- 23
- 24
- 25
- 26
- 27
- 28
- 29
- 30
- 31
- 32
- 33
- 34
- 35
- 36
- 37
- 38
- 39
- 40
- 41
- 42
- 43
- 44
- 45
- 46
- 47
- 48
- 49
- 50
- 51
- 52
- 53
- 54
- 55
- 56
- 57
- 58

上面是人脸识别的处理过程, 经历了图像输入、人脸检测、特征点绘制等一系列过程,这也正好是 MediaPipe 的特点,不只是简单的ML推理,而是可以将输入、前处理、推理、后处理,输出等一系列流程进行组合编排。
Firebase ML Kit
https://firebase.google.com/docs/ml
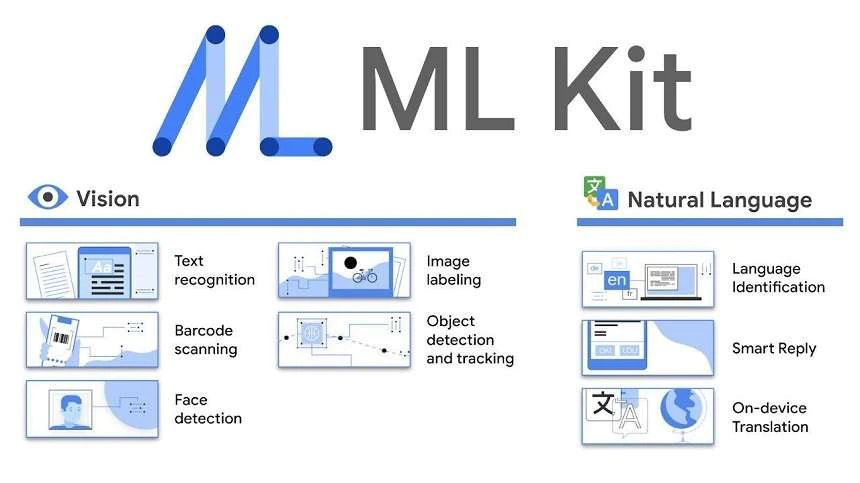
Firebase 由 Google 提供支持,基于 Google Mobile Service 的移动开放平台,为移动开发这提供了 APM、埋点等功能,ML Kit 是 Firebase 功能的面向移动端的机器学习库, 面向 Android/iOS 提供模型的分发、推理、学习、日志收集等能力。目前只支持 Tensorflow Lite 格式的模型。
例如使用 ML Kit 识别图片中的物体,代码如下:
private class ObjectDetection : ImageAnalysis.Analyzer {
    val options = FirebaseVisionObjectDetectorOptions.Builder()
        .setDetectorMode(FirebaseVisionObjectDetectorOptions.STREAM_MODE)
        .enableClassification()
        .build()
    val objectDetector = FirebaseVision.getInstance().getOnDeviceObjectDetector(options)

    private fun degreesToFirebaseRotation(degrees: Int): Int = when(degrees) {
        0 -> FirebaseVisionImageMetadata.ROTATION_0
        90 -> FirebaseVisionImageMetadata.ROTATION_90
        180 -> FirebaseVisionImageMetadata.ROTATION_180
        270 -> FirebaseVisionImageMetadata.ROTATION_270
        else -> throw Exception("Rotation must be 0, 90, 180, or 270.")
    }

    override fun analyze(imageProxy: ImageProxy?, degrees: Int) {
        val mediaImage = imageProxy?.image
        val imageRotation = degreesToFirebaseRotation(degrees)
        if (mediaImage != null) {
            val image = FirebaseVisionImage.fromMediaImage(mediaImage, imageRotation)
            objectDetector.processImage(image)
                    .addOnSuccessListener { detectedObjects ->
                        for (obj in detectedObjects) {
                            val id = obj.trackingId
                            val bounds = obj.boundingBox
                            val category = obj.classificationCategory
                            val confidence = obj.classificationConfidence
                            // Do Something
                        }
                    }
                    .addOnFailureListener { e ->
                        // Do Something
                    }
        }
    }
}
- 1
- 2
- 3
- 4
- 5
- 6
- 7
- 8
- 9
- 10
- 11
- 12
- 13
- 14
- 15
- 16
- 17
- 18
- 19
- 20
- 21
- 22
- 23
- 24
- 25
- 26
- 27
- 28
- 29
- 30
- 31
- 32
- 33
- 34
- 35
- 36
上面介绍的ML库都需要下发推理引擎到客户端,其实 Android、iOS 也有自带的推理引擎
iOS (Core ML)
https://developer.apple.com/cn/documentation/coreml/
iOS提供了
iOS 提供 CoreML ,可以将各种机器学习模型集成到应用中,并进行推理。CoreML不仅支持TFLite格式的模型,还支持 ONNX、Pytorch、XGBoost、Scikit-learn 等其他模型格式。这些模型通过 coremltools 转换为 CoreML 专用格式后加载到本地。iPhone 搭载了专用的神经网络处理器,可以低功耗地进行模型推理。想用iOS进行机器学习的话,CoreML是一个好选择。


Android (NNAPI)
https://developer.android.com/ndk/guides/neuralnetworks
Android 端提供了 NNAPI(Android Neural Networks API)用于模型推理。NNAPI 是 Android 8.1(API等级27)以后提供的专门处理机械学习的 Native 库。NNAPI 会根据手机当前的硬件性能、负荷状况等,将处理跑在特定设备上(GPU、DSP、专用处理器),当然也可以统一交由 CPU 执行。

Web端
Tensorflow.js
https://www.tensorflow.org/js
浏览器也可以进行机器学习和推理。Web浏览器中进行AI计算的主要语言是Javascript, 使用的ML库是Tensorflow.js。学习和推理都要在浏览器执行,相对于Android 、 iOS 来说性能不找优势,但是通过 WebGL 和 WASM 的辅助,也可以相对高效地完成计算,满足Web端需求
tf.keras 和 saved model 可以转换为 tensorflow.js 可处理的json格式,其中包含了神经网络结构和权重。整个转换通过 tensorflowjs_converter 进行
# saved_model转换
tensorflowjs_converter \
    --input_format=tf_saved_model \
    --output_node_names='MobilenetV1/Predictions/Reshape_1' \
    --saved_model_tags=serve \
    /mobilenet/saved_model \
    /mobilenet/web_model

# Keras_model変換
tensorflowjs_converter \
    --input_format keras \
    path/to/my_model.h5 \
    path/to/tfjs_target_dir
- 1
- 2
- 3
- 4
- 5
- 6
- 7
- 8
- 9
- 10
- 11
- 12
- 13
- 14
- 15
tensorflow.js 可以嵌入到 html 中使用,代码如下:
<script src="https://cdn.jsdelivr.net/npm/@tensorflow/tfjs@1.0.1"> </script>
<script src="https://cdn.jsdelivr.net/npm/@tensorflow-models/mobilenet@1.0.0"> </script>

<img id="img" src="cat.jpg"></img>

<script>
  const img = document.getElementById('img');
  // Load the model.
  mobilenet.load().then(model => {
    // Classify the image.
    model.classify(img).then(predictions => {
      console.log('Predictions: ');
      console.log(predictions);
    });
  });
</script>
- 1
- 2
- 3
- 4
- 5
- 6
- 7
- 8
- 9
- 10
- 11
- 12
- 13
- 14
- 15
- 16
- 17
- 18
当然也可以在js中使用
import * as tf from "@tensorflow/tfjs";

import { IMAGENET_CLASSES } from "./imagenet_classes";

const MOBILENET_MODEL_PATH =
  "https://storage.googleapis.com/tfjs-models/tfjs/mobilenet_v1_0.25_224/model.json";

const IMAGE_SIZE = 224;
const TOPK_PREDICTIONS = 10;

let mobilenet;
const mobilenetDemo = async () => {
  status("Loading model...");

  mobilenet = await tf.loadLayersModel(MOBILENET_MODEL_PATH);
  mobilenet.predict(tf.zeros([1, IMAGE_SIZE, IMAGE_SIZE, 3])).dispose();

  status("");

  const catElement = document.getElementById("cat");
  if (catElement.complete && catElement.naturalHeight !== 0) {
    predict(catElement);
    catElement.style.display = "";
  } else {
    catElement.onload = () => {
      predict(catElement);
      catElement.style.display = "";
    };
  }
};

async function predict(imgElement) {
  status("Predicting...");
  const logits = tf.tidy(() => {
    const img = tf.browser.fromPixels(imgElement).toFloat();

    const offset = tf.scalar(127.5);

    const normalized = img.sub(offset).div(offset);

    const batched = normalized.reshape([1, IMAGE_SIZE, IMAGE_SIZE, 3]);

    return mobilenet.predict(batched);
  });
}
- 1
- 2
- 3
- 4
- 5
- 6
- 7
- 8
- 9
- 10
- 11
- 12
- 13
- 14
- 15
- 16
- 17
- 18
- 19
- 20
- 21
- 22
- 23
- 24
- 25
- 26
- 27
- 28
- 29
- 30
- 31
- 32
- 33
- 34
- 35
- 36
- 37
- 38
- 39
- 40
- 41
- 42
- 43
- 44
- 45
ml5.js
https://learn.ml5js.org/#/
ml5.js 是对 tensorflow.js 的封装,它的 API 更加简单易懂,适合机器学习初学者使用。在ml5.js中 提供了图像、语言、声音等媒体中频繁使用的分类、转换API,API风格更加符合 Javascript 的习惯。
下面是使用 ml5.js 进行推理的代码示例:
let classifier;

let img;

function preload() {
  classifier = ml5.imageClassifier("MobileNet");
  img = loadImage("images/bird.png");
}

function setup() {
  createCanvas(400, 400);
  classifier.classify(img, gotResult);
  image(img, 0, 0);
}

function gotResult(error, results) {
  if (error) {
    console.error(error);
  } else {
    console.log(results);
    createDiv(`Label: ${results[0].label}`);
    createDiv(`Confidence: ${nf(results[0].confidence, 0, 2)}`);
  }
}
- 1
- 2
- 3
- 4
- 5
- 6
- 7
- 8
- 9
- 10
- 11
- 12
- 13
- 14
- 15
- 16
- 17
- 18
- 19
- 20
- 21
- 22
- 23
- 24
模型压缩
前文提到过,模型压缩更利于端上进行推理,最后介绍几种常见的模型压缩方法:
- 参数量化(Parameter Quantization)
- 网络剪枝(Network Pruning)
- 知识蒸馏(Knowledge Distillation)
量化(Quantization)
量化就是使用更少的bits来表示一个参数。例如在创建模型的时候使用32位浮点数进行学习,在进行推理之前,将其转化为16位、8位、甚至1位(boolean)。通过减少模型体积降低了计算量。当然量化会导致精度的劣化,有可能使计算产生偏差,这也是一种面向性能的妥协。

剪枝(Pruning)
神经网络中的一些冗余的权重和神经元是可以被剪枝的,因为这些权重较低或者神经元的输出大多数时候为零。通过删除这些内容可以减轻模型的重量。另外通过共享的手段,在多个节点之间共享权重,也可以减少模型的容量。跟量化一样,删除一些权重可能导致精读劣化。

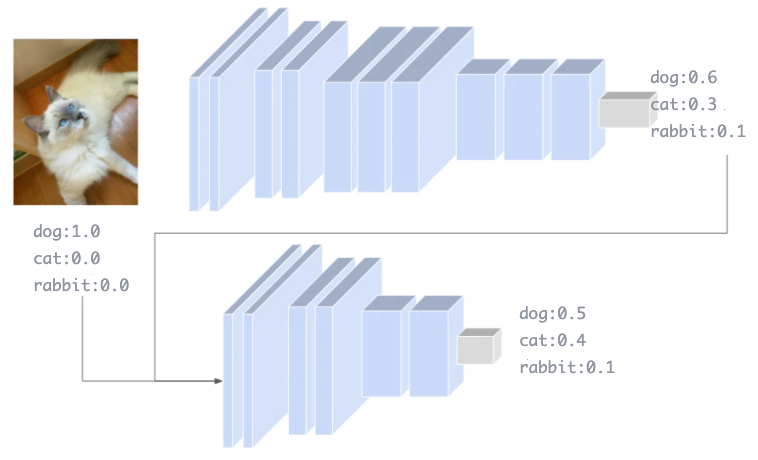
蒸馏(Distillation)
蒸馏是通过在学习方法上下功夫来提高压缩模型精度的方法。
蒸馏现以高精度的大容量模型进行学习,以大容量模型的推理结果作为特征参考,参与轻量模型的计算中,以提高准确率。由于大容量模型的推理结果是一个标签的概率分布,所以轻量模型从标签的概率中学习各个数据标签的相似性。例如,有一张猫的画像,分布在猫60%、狗30%、兔子10%的情况下,猫的图像是猫:狗:兔子=6:3:1的特征。
总结
我们在学习计算机组成原理的时候知道一个常识是,CPU 的运力是过剩的,但硬件的性能瓶颈受制于内存和主线的速度。如果把 Cloud 比作CPU,那么连接云/端的网络就是内存和总线。4G网络条件下,云/端巨大的通信开销使得计算的实时性较差。即使到了5G时代,传输速度虽然大大提升,但是过多的链接又会造成“CPU”的高负荷。因此人们急需找到一种适合云端协同环境下的AI处理方案。

