- 1今日招生通知+16!浙大计算机+南大软院+南大NLP+中科院信工所+…夏令营招生通知发布!_浙大计算机学院夏令营
- 2深度学习(基于Tensorflow2.0)学习笔记——Tensorflow2.0环境搭建_import tensorflow as tf tf version
- 3Redis登陆客户端需要密码_redis client 如何输入密码
- 4网络安全里的蓝队需要掌握哪些技术栈?_网络安全技术栈
- 5C语言初学 学习笔记_c语言入门自学零基础
- 6技术人员转行项目管理,除了掌握PMP知识外,还需要注意这几点!_做npi工程师是不是很容易转项目管理员
- 7Mac终端:pip command not found_mac pip command not found
- 8Android studio打包生成jar包文件_androidstudio打包jar
- 90-MQTT基础使用教程【学习】_mqtt教程
- 10手把手教你学AltiumDesigner之入门安装篇_altium designer安装教程
微信小程序开发——入门-01(附带练手小程序)_微信小程序适合练手发布的项目
赞
踩
一、项目展示
二、项目gitee开源地址
三、基础
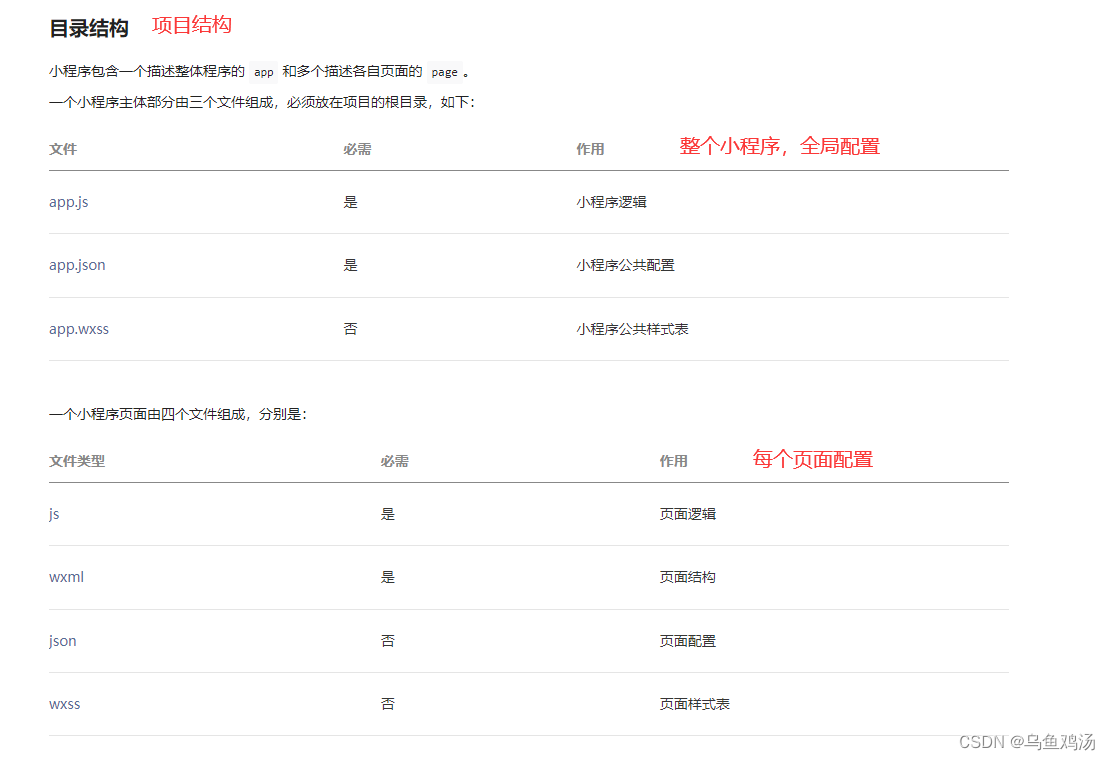
(一)项目结构
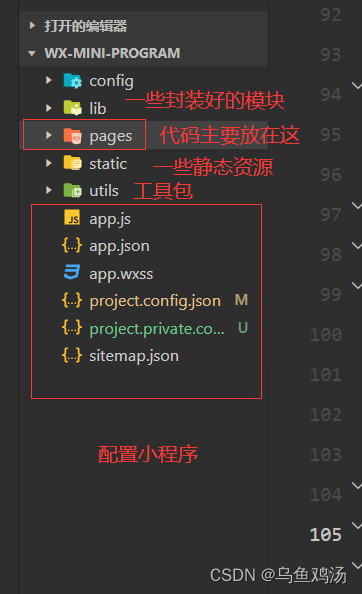
(二)全局配置 (app.json)
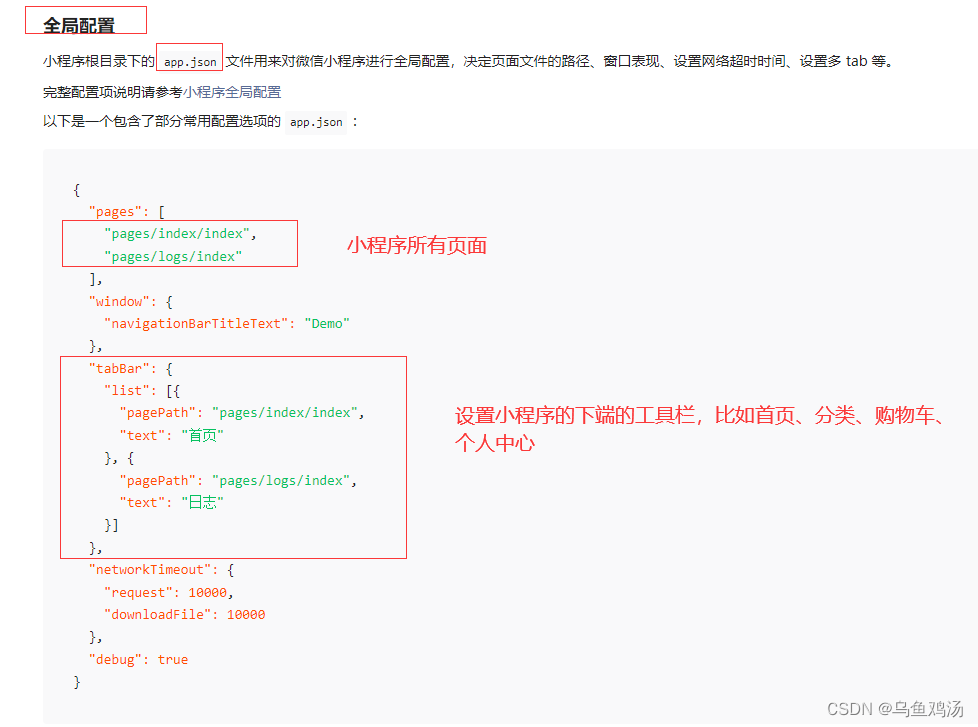
(三)页面配置
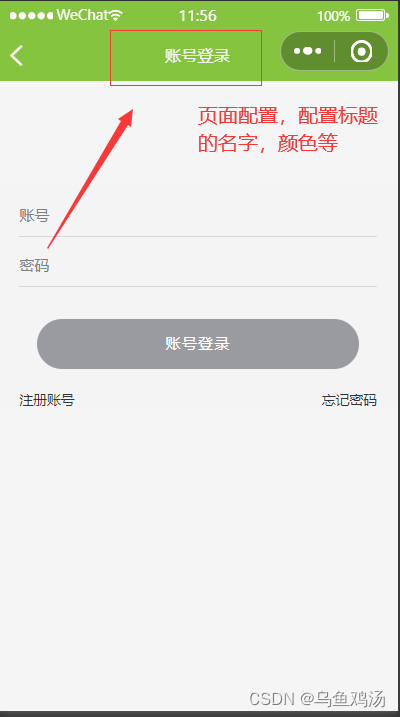
每个页面都有四个文件。页面配置是指配置下面的.json文件。
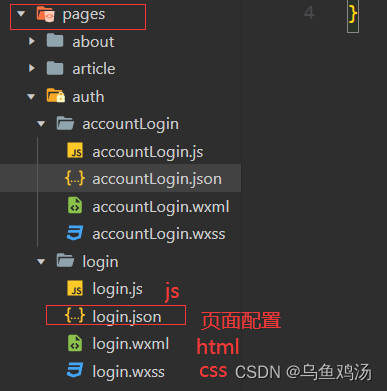
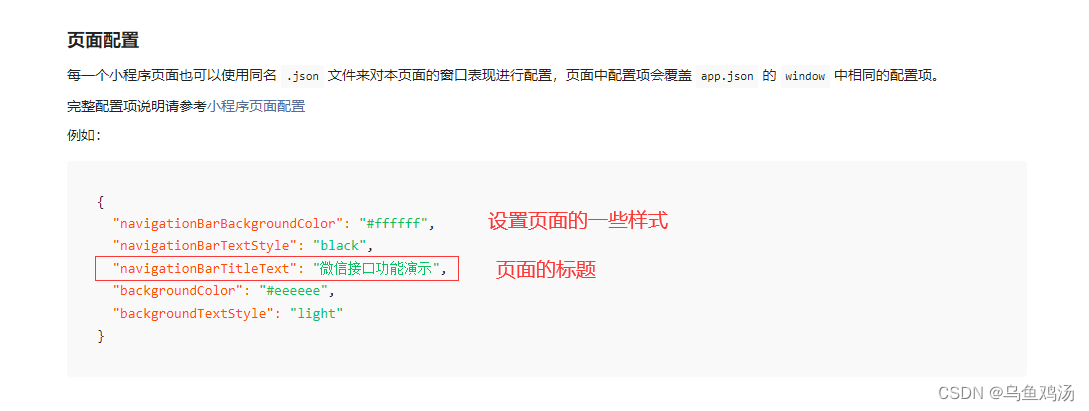
在小程序中的体现如下:
(四)微信搜索索引到小程序(sitemap.json)
微信现已开放小程序内搜索,开发者可以通过 sitemap.json 配置,或者管理后台页面收录开关来配置其小程序页面是否允许微信索引。当开发者允许微信索引时,微信会通过爬虫的形式,为小程序的页面内容建立索引。当用户的搜索词条触发该索引时,小程序的页面将可能展示在搜索结果中。 爬虫访问小程序内页面时,会携带特定的 user-agent:mpcrawler 及场景值:1129。需要注意的是,若小程序爬虫发现的页面数据和真实用户的呈现不一致,那么该页面将不会进入索引中。
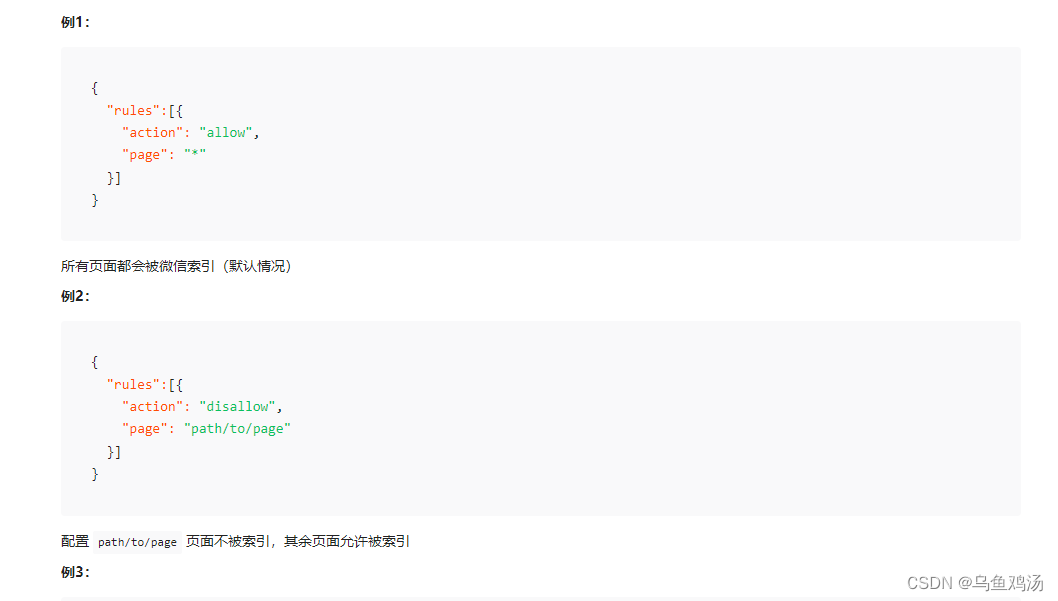
更多:参考官网
(五)数据绑定
微信小程序页面通过{{}}获取数据。数据一般来自后台,比如java程序。
获取到数据后,将数据放到data中。页面通过{{}}动态绑定数据。
- 页面通过
{{}}绑定数据 - 在js中通过this.setData({ username: “lihua”}); 设置值
- 在js中通过this.; 设置值this.data.username;获取值
例子:登录
	<view class="form-item">
    	<input class="username" value="{{username}}" bindinput="bindUsernameInput" placeholder="账号"/>
    </view>
   	<view class="form-item">
   		<input class="password" value="{{password}}" password bindinput="bindPasswordInput" placeholder="密码"/>
   	</view>
- 1
- 2
- 3
- 4
- 5
- 6
Page({
  data: {
    username: '',
    password: '',
    code: '',
    loginErrorCount: 0
  },
  onLoad: function(options) {
    // 页面初始化 options为页面跳转所带来的参数
    // 页面渲染完成

  },
  onReady: function() {

  },
  onShow: function() {
    // 页面显示
  },
  onHide: function() {
    // 页面隐藏

  },
  onUnload: function() {
    // 页面关闭

  },
 //通过this.setData()设置数据
  bindUsernameInput: function(e) {

    this.setData({
      username: e.detail.value
    });
  },
  bindPasswordInput: function(e) {

    this.setData({
      password: e.detail.value
    });
  },
  bindCodeInput: function(e) {

    this.setData({
      code: e.detail.value
    });
  },
accountLogin: function() {
    var that = this;

    if (this.data.password.length < 1 || this.data.username.length < 1) {
      wx.showModal({
        title: '错误信息',
        content: '请输入用户名和密码',
        showCancel: false
      });
      return false;
    }

    wx.request({
      url: api.AuthLoginByAccount,
      data: {
      //通过this.data获取数据。
        username: that.data.username,
        password: that.data.password
      },
      method: 'POST',
      header: {
        'content-type': 'application/json'
      },
      success: function(res) {
        if (res.data.errno == 0) {
          that.setData({
            loginErrorCount: 0
          });
          app.globalData.hasLogin = true;
          wx.setStorageSync('userInfo', res.data.data.userInfo);
          wx.setStorage({
            key: "token",
            data: res.data.data.token,
            success: function() {
              wx.switchTab({
                url: '/pages/ucenter/index/index'
              });
            }
          });
        } else {
          that.setData({
            loginErrorCount: that.data.loginErrorCount + 1
          });
          app.globalData.hasLogin = false;
          util.showErrorToast('账户登录失败');
        }
      }
    });
  },
  clearInput: function(e) {
    switch (e.currentTarget.id) {
      case 'clear-username':
        this.setData({
          username: ''
        });
        break;
      case 'clear-password':
        this.setData({
          password: ''
        });
        break;
      case 'clear-code':
        this.setData({
          code: ''
        });
        break;
    }
  }
})
- 1
- 2
- 3
- 4
- 5
- 6
- 7
- 8
- 9
- 10
- 11
- 12
- 13
- 14
- 15
- 16
- 17
- 18
- 19
- 20
- 21
- 22
- 23
- 24
- 25
- 26
- 27
- 28
- 29
- 30
- 31
- 32
- 33
- 34
- 35
- 36
- 37
- 38
- 39
- 40
- 41
- 42
- 43
- 44
- 45
- 46
- 47
- 48
- 49
- 50
- 51
- 52
- 53
- 54
- 55
- 56
- 57
- 58
- 59
- 60
- 61
- 62
- 63
- 64
- 65
- 66
- 67
- 68
- 69
- 70
- 71
- 72
- 73
- 74
- 75
- 76
- 77
- 78
- 79
- 80
- 81
- 82
- 83
- 84
- 85
- 86
- 87
- 88
- 89
- 90
- 91
- 92
- 93
- 94
- 95
- 96
- 97
- 98
- 99
- 100
- 101
- 102
- 103
- 104
- 105
- 106
- 107
- 108
- 109
- 110
- 111
- 112
- 113
- 114
- wx:if
<view wx:if="{{condition}}"> True </view>
- 1
wx:if vs hidden
因为 wx:if 之中的模板也可能包含数据绑定,所以当 wx:if 的条件值切换时,框架有一个局部渲染的过程,因为它会确保条件块在切换时销毁或重新渲染。
同时 wx:if 也是惰性的,如果在初始渲染条件为 false,框架什么也不做,在条件第一次变成真的时候才开始局部渲染。
相比之下,hidden 就简单的多,组件始终会被渲染,只是简单的控制显示与隐藏。
一般来说,wx:if 有更高的切换消耗而 hidden 有更高的初始渲染消耗。因此,如果需要频繁切换的情景下,用 hidden 更好,如果在运行时条件不大可能改变则 wx:if 较好。
- wx:for
<view wx:for="{{array}}" wx:for-index="idx" wx:for-item="itemName">
  {{idx}}: {{itemName.message}}
</view>
- 1
- 2
- 3
- block标签,不渲染的标签
并不是一个组件,它仅仅是一个包装元素,不会在页面中做任何渲染,只接受控制属性。
<block wx:if="{{true}}">
  <view> view1 </view>
  <view> view2 </view>
</block>
- 1
- 2
- 3
- 4
- template
WXML提供模板(template),可以在模板中定义代码片段,然后在不同的地方调用
更多
(六)场景值(用户进入小程序的方式)
场景值用来描述用户进入小程序的路径。完整场景值的含义请查看场景值列表

(七)注册小程序(app.js)
每个小程序都需要在 app.js 中调用 App() 方法注册小程序实例,绑定生命周期回调函数、错误监听和页面不存在监听函数等。
App() 必须在 app.js 中调用,必须调用且只能调用一次。不然会出现无法预期的后果。
app.js 中可以存放一些全局常量、变量。通过getApp()获取
// xxx.js
const appInstance = getApp()
console.log(appInstance.globalData) // I am global data
- 1
- 2
- 3
(八)路由方式(页面跳转)
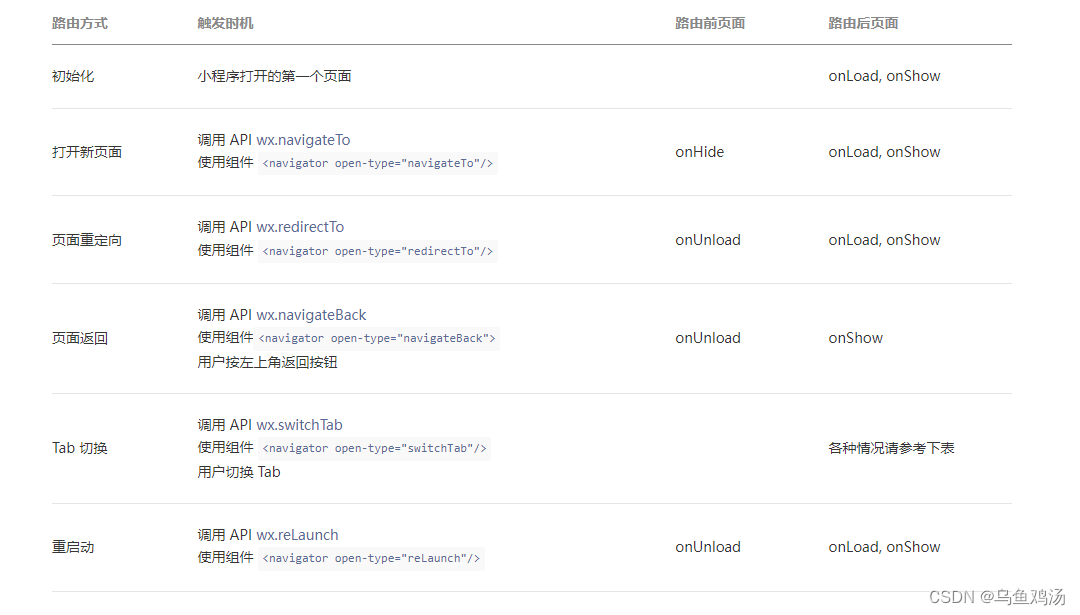
例子:
<button type="primary" class="account-login-btn" bindtap="accountLogin">账号登录</button>
- 1
accountLogin: function() {
    wx.navigateTo({
      url: "/pages/auth/accountLogin/accountLogin"
    });
  }
- 1
- 2
- 3
- 4
- 5
(九)模块化(将一些通用的方法公有化)
可以将一些公共的代码抽离成为一个单独的 js 文件,作为一个模块。模块只有通过 module.exports 或者 exports 才能对外暴露接口。然后需要调用接口的js通过 require 引入 var util= require(‘…/utils/util.js’);
比如:util工具类,这个工具类,任何js应该都能引用。
var api = require('../config/api.js');
var app = getApp();

function formatTime(date) {
  var year = date.getFullYear()
  var month = date.getMonth() + 1
  var day = date.getDate()

  var hour = date.getHours()
  var minute = date.getMinutes()
  var second = date.getSeconds()


  return [year, month, day].map(formatNumber).join('-') + ' ' + [hour, minute, second].map(formatNumber).join(':')
}

function formatNumber(n) {
  n = n.toString()
  return n[1] ? n : '0' + n
}

/**
 * 封封微信的的request
 */
function request(url, data = {}, method = "GET") {
  return new Promise(function(resolve, reject) {
    wx.request({
      url: url,
      data: data,
      method: method,
      header: {
        'Content-Type': 'application/json',
        'X-Dts-Token': wx.getStorageSync('token')
      },
      success: function(res) {

        if (res.statusCode == 200) {

          if (res.data.errno == 501) {
            // 清除登录相关内容
            try {
              wx.removeStorageSync('userInfo');
              wx.removeStorageSync('token');
            } catch (e) {
              // Do something when catch error
            }
            // 切换到登录页面
            wx.navigateTo({
              url: '/pages/auth/login/login'
            });
          } else {
            resolve(res.data);
          }
        } else {
          reject(res.errMsg);
        }

      },
      fail: function(err) {
        reject(err)
      }
    })
  });
}

function redirect(url) {

  //判断页面是否需要登录
  if (false) {
    wx.redirectTo({
      url: '/pages/auth/login/login'
    });
    return false;
  } else {
    wx.redirectTo({
      url: url
    });
  }
}

function showErrorToast(msg) {
  wx.showToast({
    title: msg,
    image: '/static/images/icon_error.png'
  })
}

function jhxLoadShow(message) {
  if (wx.showLoading) {  // 基础库 1.1.0 微信6.5.6版本开始支持,低版本需做兼容处理
    wx.showLoading({
      title: message,
      mask: true
    });
  } else {    // 低版本采用Toast兼容处理并将时间设为20秒以免自动消失
    wx.showToast({
      title: message,
      icon: 'loading',
      mask: true,
      duration: 20000
    });
  }
}

function jhxLoadHide() {
  if (wx.hideLoading) {    // 基础库 1.1.0 微信6.5.6版本开始支持,低版本需做兼容处理
    wx.hideLoading();
  } else {
    wx.hideToast();
  }
}
//暴露接口
module.exports = {
  formatTime,
  request,
  redirect,
  showErrorToast,
  jhxLoadShow,
  jhxLoadHide
}
- 1
- 2
- 3
- 4
- 5
- 6
- 7
- 8
- 9
- 10
- 11
- 12
- 13
- 14
- 15
- 16
- 17
- 18
- 19
- 20
- 21
- 22
- 23
- 24
- 25
- 26
- 27
- 28
- 29
- 30
- 31
- 32
- 33
- 34
- 35
- 36
- 37
- 38
- 39
- 40
- 41
- 42
- 43
- 44
- 45
- 46
- 47
- 48
- 49
- 50
- 51
- 52
- 53
- 54
- 55
- 56
- 57
- 58
- 59
- 60
- 61
- 62
- 63
- 64
- 65
- 66
- 67
- 68
- 69
- 70
- 71
- 72
- 73
- 74
- 75
- 76
- 77
- 78
- 79
- 80
- 81
- 82
- 83
- 84
- 85
- 86
- 87
- 88
- 89
- 90
- 91
- 92
- 93
- 94
- 95
- 96
- 97
- 98
- 99
- 100
- 101
- 102
- 103
- 104
- 105
- 106
- 107
- 108
- 109
- 110
- 111
- 112
- 113
- 114
- 115
- 116
- 117
- 118
- 119
调用:
const util = require('../utils/util.js');
//调用
util.request
- 1
- 2
- 3
(十)简易双向绑定
WXML和js的数据同步更新
如果使用 this.setData({ value: ‘leaf’ }) 来更新 value ,this.data.value 和输入框的中显示的值都会被更新为 leaf ;但如果用户修改了输入框里的值,却不会同时改变 this.data.value 。
如果需要在用户输入的同时改变 this.data.value ,需要借助简易双向绑定机制。此时,可以在对应项目之前加入 model: 前缀:
//单向绑定,页面修改了值,js中的data不会跟随变化
<input value="{{value}}" />
//双向绑定,页面修改了值,js的data也会变化
<input model:value="{{value}}" />
- 1
- 2
- 3
- 4
(十一)事件绑定(点击事件)
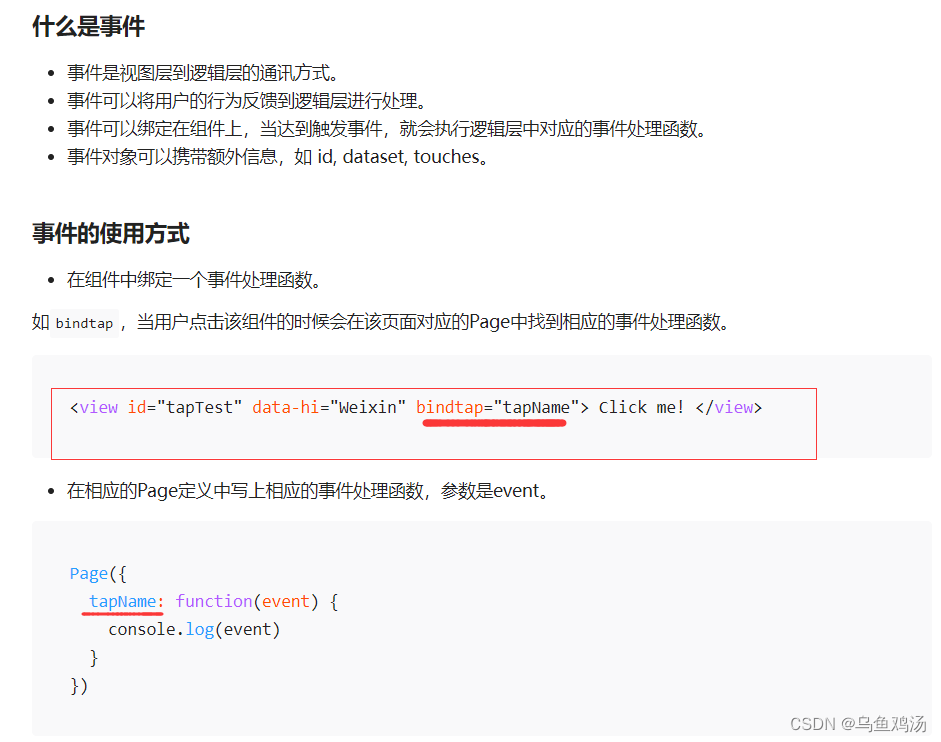
触发事件时,将一些数据(变量,比如根据id查询时,传入id)传入函数
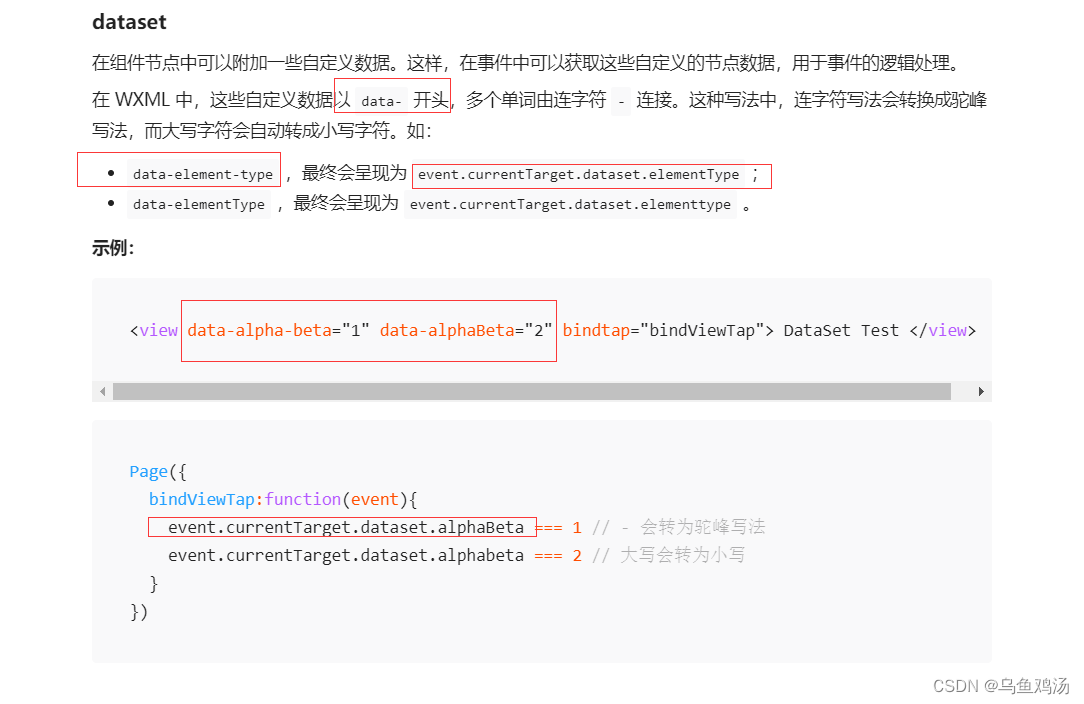
例子:
<block wx:for="{{recruitAll}}" wx:key="_id"  wx:for-index='i' >
  <view class="father">
        <view class="applicationList iconfont icon-jianliliebiao" bindtap="applicationsList" data-id="{{item._id}}"              style="display: {{isShow[i]}};">
        </view>
  </view>
</block>
- 1
- 2
- 3
- 4
- 5
- 6
applicationsList:function(e){
    console.log(e)
    const id = e.currentTarget.dataset.id
    wx.navigateTo({
      //这里的id可以通过 onLoad: function(options) 的options 获取
      url: '/pages/applicationsList/applicationsList?id='+id,
    })
  },
- 1
- 2
- 3
- 4
- 5
- 6
- 7
- 8
获取id
  onLoad: function(options) {
    // 页面初始化 options为页面跳转所带来的参数
    // 页面渲染完成
    const id = options.id
  },
- 1
- 2
- 3
- 4
- 5
四、WXML
之前学过HTML,里面常用的标签是div、span、img、a,现在小程序里面wxml文件里面写结构,相对应的写法是:
div——>view
span——>text
img——>image
a——>navigator
比如跳转:<navigator url="/pages/index/index"></navigator>
五、微信小程序云开发
使用微信小程序平台提供的云函数(相当于Java的service层,能调用云数据库、云存储)、云数据库(数据层)、云存储(能存放一些照片等静态资源)实现。
1、wxml常用知识
之前学过HTML,里面常用的标签是div、span、img、a,现在小程序里面wxml文件里面写结构,相对应的写法是:
div——>view
span——>text
img——>image
a——>navigator
比如跳转:<navigator url="/pages/index/index"></navigator>
1)wx:for遍历
<view class="card-all" >
    <view class="van-card" wx:for="{{hotRecruits}}" wx:key="_id"  bindtap="toDetailsTap" data-id="{{item._id}}"  >
      <view class="van-card_left">
        <image class="van-card_img" mode="aspectFill"  src="{{item.imgs[0]}}">
        </image>
      </view>
      <view class="van-card_right" >
          <view class="introduce" >
            <view class="van-card__title text-deal-1">{{item.recruitName}}</view>
          <view class="van-card__desc text-deal jianjie">{{item.recruitIntroduce}}</view>
          </view>
          <view class="van-card__bottom">
            <view class="van-card__price">
              <view class="van-card__price-integer recruit-num text-deal-1">招募人数:{{item.recruitNumber}}</view>
              <view class="line-box">
                <view class="van-card__price-decimal apply-num">已报名人数:{{item.applicationNum}}</view>
                <view class="endtime">【进行中】</view>
              </view>
            </view>
          </view>
      </view>
  </view>
  </view>

   <view class="van-card" wx:for="{{hotRecruits}}" wx:key="_id"  bindtap="toDetailsTap" data-id="{{item._id}}"  >
1、关键语句 wx:for 要遍历的数组
2 、wx:key给这个遍历一个索引,为了提高遍历性能 一般选择id 当遍历的对象本身就是一个主键时,可以使用 wx:key="*this" 比如:<swiper-item wx:for="{{[0,1,2,3]}}"  wx:key="*this">
3、wx:for-index='i' 获取当前遍历的下边,当有两个数组他们的长度是一样、并且需要同时遍历的时候用到
比如:
<block wx:for="{{getMyApplications}}" wx:key="_id" wx:for-index='i'>
    <view class="box-private " style="display: {{isShow[i]}};" bindtap="goDetails" data-id='{{item.recruit._id}}'>
        <view class="name">{{item.recruit.recruitName}}</view>
        <view class="content">{{item.recruit.recruitIntroduce}}</view>
        <view class="van-line">
            <view class="nick-name bottom-content">{{item.recruit.personLiable}}</view>  <view class="time bottom-   content">{{startTime[i]}}</view>
            <view class="liulanliang ">
                <text class="iconfont icon-liulanliang">111</text>
                <text class="state">【{{timeState[i]}}】</text>
            </view>
        </view>
    </view>
</block>
4、 bindtap="goDetails" data-id='{{item.recruit._id}}'
bindtap 绑定一个点击事件goDetails  data-id 当触发这个事件的时候携带的参数 [data-参数名]
这里携带的参数可以是对象,一般会传递对象和字符串id
5 、style="display: {{isShow[i]}};"
当我们需要动态加载样式的时候可以通过js传递样式的值即可
- 1
- 2
- 3
- 4
- 5
- 6
- 7
- 8
- 9
- 10
- 11
- 12
- 13
- 14
- 15
- 16
- 17
- 18
- 19
- 20
- 21
- 22
- 23
- 24
- 25
- 26
- 27
- 28
- 29
- 30
- 31
- 32
- 33
- 34
- 35
- 36
- 37
- 38
- 39
- 40
- 41
- 42
- 43
- 44
- 45
- 46
- 47
2) wx:if判断 和hidden=“ture” (ture 为隐藏)
这两个常用于判断知否加载标签
wx:if 是直接不渲染标签,hidden=“ture” 是将标签隐藏
wx:if 案例
<view class="iconfront btn_buy" bind:tap="submit" data-id="{{recruit._id}}" wx:if="{{submitBtnType==0}}">立即报名</view>
<view class="iconfront btn_buy_end"  data-id="{{recruit._id}}" wx:if="{{submitBtnType==2}}">已结束</view>
- 1
- 2
3) 轮播图
需要注意的是、在我开发的时候轮播图我使用了4~5M的图片导致加载很慢造成主页非常卡顿 。因此需要在使用网路图片的时候不要太大、最好小于1M
案例
<view class="swiper-container">
  <swiper class="swiper1" indicator-dots="true" indicator-active-color="#fff" autoplay circular>
    <swiper-item>
      <image mode="aspectFill"  src="cloud://cloud1-2guh9tam1ee71336.636c-cloud1-2guh9tam1ee71336-1305678983/imgs/tmp/1.jpg" />
    </swiper-item>
    <swiper-item>
      <image mode="aspectFill"  src="cloud://cloud1-2guh9tam1ee71336.636c-cloud1-2guh9tam1ee71336-1305678983/imgs/tmp/2.jpg" />
    </swiper-item>
  </swiper>
  <view class="goodsDynamic">
    <swiper class="swiper2" autoplay circular vertical>
      <navigator  url="">
        <swiper-item>
          <view class="goodsDynamic-item">
            <image mode="aspectFill" src="https://t7.baidu.com/it/u=2621658848,3952322712&fm=193&f=GIF"></image>
            <text> 测试版本(1.0) </text>
          </view>
        </swiper-item>
        <swiper-item>
          <view class="goodsDynamic-item">
            <image mode="aspectFill" src="https://t7.baidu.com/it/u=2621658848,3952322712&fm=193&f=GIF"></image>
            <text> (联系我们:) </text>
          </view>
        </swiper-item>
      </navigator>
    </swiper>
  </view>
</view>
其中autoplay 是自动播放 circular 是衔接播放  vertical 是垂直轮播 ,默认水平轮播
view 等价于 html 的div
text 等价于 html span
并且 只有 text能实现按压复制文本
- 1
- 2
- 3
- 4
- 5
- 6
- 7
- 8
- 9
- 10
- 11
- 12
- 13
- 14
- 15
- 16
- 17
- 18
- 19
- 20
- 21
- 22
- 23
- 24
- 25
- 26
- 27
- 28
- 29
- 30
- 31
- 32
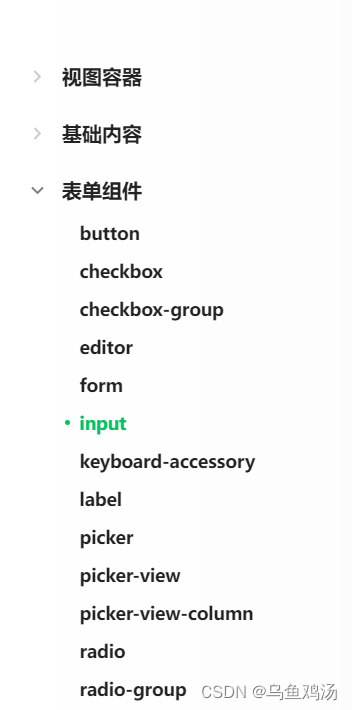
4) 表单
input
<view class="section">
    <label>招募名称</label>
    <input name="recruitName" maxlength="20"  placeholder="请输入招募名" />
</view>
<view class="section">
     <label>招募人数</label>
     <input name="recruitNumber" type="number" maxlength="10" placeholder="请输入招募人数" />
 </view>
 maxlength="20" 现在输入字符的最多长度
 type="number" 限制只能输入数字
- 1
- 2
- 3
- 4
- 5
- 6
- 7
- 8
- 9
- 10
单选框、复选框
控制 items 的值就能实现单选和复选
html代码
<view class="section_gap">
   <label>选择封面</label>
    <radio-group class="radio-group" bindchange="radioChange">
        <radio class="radio" wx:for-items="{{items}}" wx:key="name" value="{{item.name}}" checked="{{item.checked}}">
            <text>{{item.value}}</text>
        </radio>
    </radio-group>
</view>
 js代码
 data{
  items: [
      { name: 'cover1', value: '默认封面1' },
      { name: 'cover2', value: '默认封面2', checked: 'true'},
      { name: 'cover3', value: '默认封面3' },
      { name: 'customCover', value: '自定义' }
    ],
    radioValue:'',
}
 radioChange: function (e) {
    console.log('radio发生change事件,携带value值为:', e.detail.value)
    this.setData({
      radioValue:e.detail.value,
    })
    console.log('radio选择的value值为:', this.data.radioValue)
}
- 1
- 2
- 3
- 4
- 5
- 6
- 7
- 8
- 9
- 10
- 11
- 12
- 13
- 14
- 15
- 16
- 17
- 18
- 19
- 20
- 21
- 22
- 23
- 24
- 25
- 26
获取form 表单输入框input的值
<!--pages/resume/resume.wxml-->
<view class="all">
  <form bindsubmit="formSubmit" bindreset="formReset" >
    <view class="container">
      <view id="name">
        <text class="view-left">姓名</text>
        <input type="text" placeholder="请输入姓名" class="view-right" name="name" maxlength="10" ></input>
      </view>
      <view>
        <text class="view-left">性别</text>
        <view class="view-right">
          <radio-group class="radio-group" bindchange="radioChange">
            <radio class="radio" wx:for-items="{{items}}" wx:key="name" value="{{item.name}}" checked="{{item.checked}}">
                <text>{{item.value}}</text>
            </radio>
        </radio-group>
        </view>
      </view>
      <view>
        <text class="view-left">学院</text>
        <input type="text" placeholder="请输入学院名称" class="view-right" name="college" maxlength="15"></input>
      </view>
      <view>
        <text class="view-left">专业班级</text>
        <input type="text" placeholder="请输入专业班级" class="view-right" name="major" maxlength="20"></input>
      </view>
      <view>
        <text class="view-left">学号</text>
        <input type="number" placeholder="请输入学号" class="view-right" name="studentID" maxlength="20"></input>
      </view>
      <view>
        <text class="view-left">手机号</text>
        <input type="number" placeholder="请输入手机号" class="view-right" name="telephone" maxlength="15"></input>
      </view>
      <view>
        <text class="view-left">电子邮箱</text>
        <input type="email" placeholder="请输入电子邮箱" class="view-right" name="email"></input>
      </view>
      <view class="scjl">
        <text class="view-left scjl-left">上传简历</text>
        <view class="view-right fileName">{{fileName}}</view>
        <view class="view-right-file" bindtap="chooseMessageFile"><text class="iconfont icon-shangchuan view-right-file-tb"></text> 上传简历</view>
      </view>
    </view>
    <button style="background: #00a8f3; margin-top: 80rpx; margin-bottom:10rpx; width: 50%" formType="submit">提交</button>
  </form>
</view>

获取里面的值有3个步骤
1、<form bindsubmit="formSubmit" bindreset="formReset" > 给form 绑定事件   绑定为bindsubmit="formSubmit"
2、<input type="text" placeholder="请输入姓名" class="view-right" name="name" maxlength="10" ></input> 给需要通过form获取值的input一个name属性 例如这里的name="name" ,因为后面是通过键值对获取输入的
3、提交类型要为 formType="submit" 这样点击了按钮提交后就会触发绑定的事件,并获取到输入的值
<button style="background: #00a8f3; margin-top: 80rpx; margin-bottom:10rpx; width: 50%" formType="submit">提交</button>

js代码

formSubmit:function(e){
通过这里的参数e来获取输入的值
let name = e.detail.value.name
console.log('这个就是我们输入的name',e.detail.value.name)
}
- 1
- 2
- 3
- 4
- 5
- 6
- 7
- 8
- 9
- 10
- 11
- 12
- 13
- 14
- 15
- 16
- 17
- 18
- 19
- 20
- 21
- 22
- 23
- 24
- 25
- 26
- 27
- 28
- 29
- 30
- 31
- 32
- 33
- 34
- 35
- 36
- 37
- 38
- 39
- 40
- 41
- 42
- 43
- 44
- 45
- 46
- 47
- 48
- 49
- 50
- 51
- 52
- 53
- 54
- 55
- 56
- 57
- 58
- 59
- 60
- 61
5)时间选择器
html代码
<view class="section">
        <label >开始时间</label>
        <picker mode="date"   start="{{nowDate}}" end="2999-09-01" bindchange="bindDateChangeStart">
            <view class="picker">
                <text class="iconfont icon-piliangshezhishijian" ></text>:{{startDate}}
            </view>
        </picker>
    </view>
    <view class="line"></view>
    <view class="section">
        <label>结束时间</label>
        <picker mode="date"   start="{{nowDate}}" end="2999-09-01" bindchange="bindDateChangeEnd">
            <view class="picker">
                <text class="iconfont icon-piliangshezhishijian"></text>:{{endDate}}
            </view>
        </picker>
    </view>
1、start="{{nowDate}}"为开始时间,就是能从什么时间开始选 比如  start="2021-6-6" 那么只能选 2021-6-6 ~以后 的时间
2、end="2999-09-01"  与开始时间相反
这里需要注意的是
我们传入的开始的时间动态的选择为当前时间nowDate  好像要传入时间戳,不然时间会不准  具体怎么将标准时间和时间戳相互转换写在了后面

js代码
data: {
    nowDate:dataTime,
    startDate: dataTime,//起始时间
    endDate:dataTime,//结束时间
    }
     //-------------------------------------------选择时间开始--------------
  //起始时间调用方法
  bindDateChangeStart: function (e) {
    // console.log('picker发送选择改变,携带值为', e.detail.value)
    this.setData({
      startDate: e.detail.value
    })
  },
  //结束时间调用方法
  bindDateChangeEnd: function (e) {
    // console.log('picker发送选择改变,携带值为', e.detail.value)
    this.setData({
      endDate: e.detail.value
    })
  },
- 1
- 2
- 3
- 4
- 5
- 6
- 7
- 8
- 9
- 10
- 11
- 12
- 13
- 14
- 15
- 16
- 17
- 18
- 19
- 20
- 21
- 22
- 23
- 24
- 25
- 26
- 27
- 28
- 29
- 30
- 31
- 32
- 33
- 34
- 35
- 36
- 37
- 38
- 39
- 40
- 41
- 42
- 43
- 44
2、wxss常用知识
1) 使标签一行显示
.van-line {
  display: flex;
}
- 1
- 2
- 3
2) 显示不全用…表示
常用来展示长文本、防止长文本挤压盒子,造成盒子变形
/* 显示不全用... */
.text-deal{
  overflow : hidden;
  text-overflow: ellipsis;
  display: -webkit-box;
  -webkit-line-clamp: 2; /* 这里指定几行 ,2指超过两行后用...表示剩下的文字 */
  -webkit-box-orient: vertical;
  word-break: break-all;
}

 /* 灰色 的 分割线 */
.space {
  height: 25rpx;
  background-color: #ecebeb;
}
- 1
- 2
- 3
- 4
- 5
- 6
- 7
- 8
- 9
- 10
- 11
- 12
- 13
- 14
- 15
3) 灰色 的 分割线
 /* 灰色 的 分割线 */
.space {
  height: 25rpx;
  background-color: #ecebeb;
}
- 1
- 2
- 3
- 4
- 5
4)带下边框阴影的圆角盒子
/*带下边框阴影的圆角盒子*/
.box {
  width: 97%;
  border-radius: 20rpx;
  margin-top: 30rpx;
  padding: 3vw;
  box-shadow: 10rpx 10rpx 10rpx rgba(0, 0, 0, 0.2);
}
- 1
- 2
- 3
- 4
- 5
- 6
- 7
- 8
样式展示

5)导入外部样式
导入外部样式
只能用绝对路径
@import "./styles/iconfont.wxss";
- 1
- 2
- 3
6)导入字体图标 (以阿里巴巴图标库为例)
搜索想要的图标、加入购物车


添加进项目 在这里之前需要创建一个项目
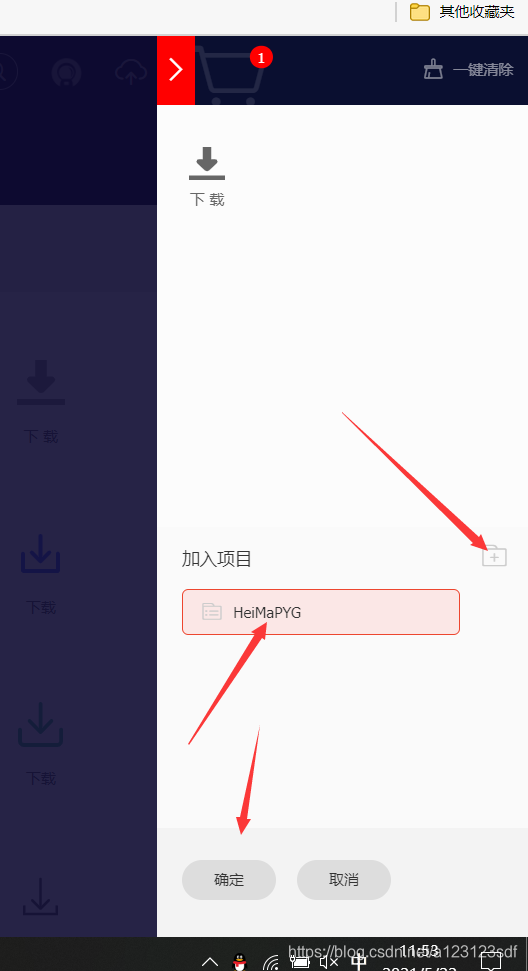


复制代码

全选复制
然后到开发工具里面创建一个存放图标的wxss

使用字体图标

想要在哪个页面使用就添加class
比如要使用 下载的图标 就导入 class=" iconfont " 。 例如下载图标( class=“iconfont icon-xiazai1”)
这些名字就是图标的id想要使用哪个就导入哪个

像这样就能使用下载的字体图标
<view class="iconfont icon-xiazai1"></view>
- 1
- 2
7)设置圆角边框
.box
  border-radius: 20rpx;   大小表示弧度
}
- 1
- 2
- 3
8)标题左右两边横线

利用父盒子相对定位子盒子绝对定位实现
 <view class="rmzm">
    <view class="xian-l"></view>
    <text class="rmzmTB iconfont icon-remen"></text>
    <view class="table-text van-divider ">热门招募</view>
    <view class="xian-r"></view>
  </view>
.rmzm{
  width: 100%;
  height: 60rpx;
  position: relative;
  display: flex;
  padding: 10rpx 0 10rpx 0;
}
.table-text {
  position: absolute;
  color: black ;
  font-size: 38rpx ;
  /* padding: 0 28rpx; */
  left: 43%;
  width: 20%;
}
.xian-l{
  left: 2%;
  position: absolute;
  top: 54%;
  height: 2rpx ;
  width: 33%;
  background:#dfdede;
}
.xian-r{
  position: absolute;
  top: 54%;
  right: 2%;
  height: 2rpx ;
  width: 33%;
  background:#dfdede;
}
.rmzmTB{
  position: absolute;
  left: 37%;
  width: 10%;
  top: 15rpx;
  color: rgb(217,44,30);
}
- 1
- 2
- 3
- 4
- 5
- 6
- 7
- 8
- 9
- 10
- 11
- 12
- 13
- 14
- 15
- 16
- 17
- 18
- 19
- 20
- 21
- 22
- 23
- 24
- 25
- 26
- 27
- 28
- 29
- 30
- 31
- 32
- 33
- 34
- 35
- 36
- 37
- 38
- 39
- 40
- 41
- 42
- 43
- 44
- 45
9)遮罩层
<!-- 遮罩层 -->
<view class="zzc" style="display:{{zzc}} ;" bindtap="zzc"></view>

/* 遮罩层 */
.zzc{
  position: fixed;
  width: 100%;
  height: 100%;
  top: 0px;left: 0px;
  display: none;
  z-index:99;
  background-color:rgba(0,0,0,0.5);
}
js通过更改 style="display:{{zzc}} ;"的display的值(none 隐藏 block 显示)控制遮罩层是否显示,默认不显示

z-index:99; 用于指定视图的处于第几层(遮罩层一般位于第二层)值越大层数越靠前
- 1
- 2
- 3
- 4
- 5
- 6
- 7
- 8
- 9
- 10
- 11
- 12
- 13
- 14
- 15
- 16
例如

10)查询手机屏幕的宽度
调用这个就可以 wx.getSystemInfoSync().windowHeight
具体使用
注意这里的单位是px
<view style=" height: {{height}}px; background-color: #F2f2f2; ">
data: {
    height: null,
},
onLoad: function (options) {
this.setData({
    height:wx.getSystemInfoSync().windowHeight
})
}
- 1
- 2
- 3
- 4
- 5
- 6
- 7
- 8
- 9
- 10
11) 分栏显示(左右滑动转换页面)
效果图
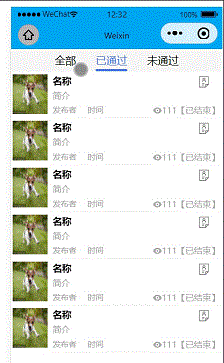
html代码
<view >
    <scroll-view scroll-x="true" class="tab-h" scroll-left="{{scrollLeft}}">
        <view class="tab-item {{currentTab==0?'active':''}}"  data-current="0" bindtap="swichNav">全部</view>
        <view class="tab-item {{currentTab==1?'active':''}}" data-current="1" bindtap="swichNav">已通过</view>
        <view class="tab-item {{currentTab==2?'active':''}}" data-current="2" bindtap="swichNav">未通过</view>
    </scroll-view>
    <swiper class="tab-content" current="{{currentTab}}" duration="300" bindchange="switchTab"
     style="height:{{winHeight}}rpx">
        <swiper-item wx:for="{{[0,1,2]}}">
            <scroll-view scroll-y="true" class="scoll-h" >
                <block wx:for="{{[1,2,3,4,5,6,7,8]}}" wx:key="*this">
                    <view class="item-ans">
                        <view class="avatar">
                            <!-- 查看申请列表 -->
                            <text class="applicationList iconfont icon-jianliliebiao"></text>
                            <image class="img" mode="" src="https://t7.baidu.com/it/u=1951548898,3927145&fm=193&f=GIF"></image>
                        </view>
                        <view class="box-private ">
                            <view class="name">名称</view>
                            <view class="content">简介</view>
                            <view class="van-line">
                                <view class="nick-name bottom-content">发布者</view>  <view class="time bottom-content">时间</view>
                                <view class="liulanliang ">
                                    <text class="iconfont icon-liulanliang">111</text>
                                    <text class="state">【已结束】</text>
                                </view>
                            </view>
                        </view>
                    </view>
                </block>
            </scroll-view>
        </swiper-item>
    </swiper>
</view>

css代码
.tab-h{
  height: 80rpx;width: 100%; box-sizing: border-box;overflow: hidden;line-height: 80rpx;background: #F7F7F7; font-size: 16px; white-space: nowrap;position: fixed;top: 0; left: 0; z-index: 99;
  text-align: center
}
.tab-item{
  margin:0 36rpx;display: inline-block;
}
.tab-item.active{
  color: #4675F9;position: relative;
}
.tab-item.active:after{
  content: "";display: block;height: 8rpx;width:100%;background: #4675F9;position: absolute; bottom: 0;
  border-radius: 16rpx;
}
.avatar{width: 150rpx;height: 150rpx;position: relative; padding-left: 5rpx;padding-top: 10rpx;}
.avatar .img{width: 100%;height: 100%;}
/* .avatar .doyen{width: 40rpx;height: 40rpx;position: absolute;bottom: -2px;right: 20rpx;} */

.applicationList {
  color: rgb(121, 121, 121);
  font-size: 50rpx;
  position: absolute;
  top: 10rpx;
  right: -450%;
}
.tab-content{
  margin-top: 80rpx;
}
.scoll-h{
  height: 100%;
}
.item-ans {
  display: flex;
}
.box-private{
  width: 95%;
  padding: 10rpx;
  margin-left: 10rpx;
  border-bottom: 1px solid #F2F2F2;
}
.line-title{
  width:100%;
  height:1rpx;
  background:#aaa;
}

.van-line {
  margin-top: 15rpx;
  width: 100%;
  display: flex;
  font-size: 30rpx;
  color: #aaa;
  position: relative;
}
.name{
  font-size: 35rpx;
  font-weight: 750;
}
.content {
  margin-top: 10rpx;
  font-size: 32rpx;
  color: #aaa;
}
.bottom-content{
  margin-right: 40rpx;
}
.liulanliang {
  text-align: right;
  position: absolute;
  right: 0;
}
.liulanliang text {
  font-size: 32rpx;
  color: #aaa;
}

js代码
var app = getApp();
Page({
    data:{
        winHeight:"",//窗口高度
        currentTab:0, //预设当前项的值
        scrollLeft:0, //tab标题的滚动条位置

    },
    // 滚动切换标签样式
    switchTab:function(e){
        this.setData({
            currentTab:e.detail.current
        });
        this.checkCor();
    },
    // 点击标题切换当前页时改变样式
    swichNav:function(e){
        var cur=e.target.dataset.current;
        if(this.data.currentTaB==cur){return false;}
        else{
            this.setData({
                currentTab:cur
            })
        }
    },
    //判断当前滚动超过一屏时,设置tab标题滚动条。
    checkCor:function(){
      if (this.data.currentTab>4){
        this.setData({
          scrollLeft:300
        })
      }else{
        this.setData({
          scrollLeft:0
        })
      }
    },
    onLoad: function() {
        // console.log('Date.now()',Date.now()/1000)
        // console.log('Date.parse(new Date())/1000',Date.parse(new Date())/1000)
        var that = this;
        //  高度自适应
        wx.getSystemInfo( {
            success: function( res ) {
                var clientHeight=res.windowHeight,
                    clientWidth=res.windowWidth,
                    rpxR=750/clientWidth;
              var  calc=clientHeight*rpxR-180;
                console.log(calc)
                that.setData( {
                    winHeight: calc
                });
            }
        });
    },
    footerTap:app.footerTap
})
- 1
- 2
- 3
- 4
- 5
- 6
- 7
- 8
- 9
- 10
- 11
- 12
- 13
- 14
- 15
- 16
- 17
- 18
- 19
- 20
- 21
- 22
- 23
- 24
- 25
- 26
- 27
- 28
- 29
- 30
- 31
- 32
- 33
- 34
- 35
- 36
- 37
- 38
- 39
- 40
- 41
- 42
- 43
- 44
- 45
- 46
- 47
- 48
- 49
- 50
- 51
- 52
- 53
- 54
- 55
- 56
- 57
- 58
- 59
- 60
- 61
- 62
- 63
- 64
- 65
- 66
- 67
- 68
- 69
- 70
- 71
- 72
- 73
- 74
- 75
- 76
- 77
- 78
- 79
- 80
- 81
- 82
- 83
- 84
- 85
- 86
- 87
- 88
- 89
- 90
- 91
- 92
- 93
- 94
- 95
- 96
- 97
- 98
- 99
- 100
- 101
- 102
- 103
- 104
- 105
- 106
- 107
- 108
- 109
- 110
- 111
- 112
- 113
- 114
- 115
- 116
- 117
- 118
- 119
- 120
- 121
- 122
- 123
- 124
- 125
- 126
- 127
- 128
- 129
- 130
- 131
- 132
- 133
- 134
- 135
- 136
- 137
- 138
- 139
- 140
- 141
- 142
- 143
- 144
- 145
- 146
- 147
- 148
- 149
- 150
- 151
- 152
- 153
- 154
- 155
- 156
- 157
- 158
- 159
- 160
- 161
- 162
- 163
- 164
- 165
- 166
- 167
- 168
- 169
- 170
- 171
3、js常用知识
1) 在app.js 封装好的函数调用
在需要调用 的 js 里面 加上 var app = getApp()
然后通过app.调用
2) 数组的push和concat操作
//push:往数组里面添加一个元素
let imgs = []
imgs.push('1.jpg')

//concat:将一个数组复制到另外一个数组后面,会返回一个新的数组
let imgs = ['1.jpg','2.jpg']
let imgs1 = ['3.jpg','4.jpg']
imgs = imgs.concat(imgs1)
//imgs = ['1.jpg','2.jpg','3.jpg','4.jpg']
- 1
- 2
- 3
- 4
- 5
- 6
- 7
- 8
- 9
3) 标准时间与时间戳相互转换
创建一个utils包(好像默认是创建好了的)

2、创建一个 util.js文件,如果已经存在就创建另外的
util.js
function formatTime(date) {
  var year = date.getFullYear()
  var month = date.getMonth() + 1
  var day = date.getDate()

  var hour = date.getHours()
  var minute = date.getMinutes()
  var second = date.getSeconds()


  return [year, month, day].map(formatNumber).join('/') + ' ' + [hour, minute, second].map(formatNumber).join(':')
}

function formatNumber(n) {
  n = n.toString()
  return n[1] ? n : '0' + n
}

/**
* 时间戳转化为年 月 日 时 分 秒
* number: 传入时间戳
* format:返回格式,支持自定义,但参数必须与formateArr里保持一致
*/
function formatTimeTwo(number, format) {

  var formateArr = ['Y', 'M', 'D', 'h', 'm', 's'];
  var returnArr = [];

  var date = new Date(number * 1000);
  returnArr.push(date.getFullYear());
  returnArr.push(formatNumber(date.getMonth() + 1));
  returnArr.push(formatNumber(date.getDate()));

  returnArr.push(formatNumber(date.getHours()));
  returnArr.push(formatNumber(date.getMinutes()));
  returnArr.push(formatNumber(date.getSeconds()));

  for (var i in returnArr) {
      format = format.replace(formateArr[i], returnArr[i]);
  }
  return format;
}

module.exports = {
  formatTime: formatTime,  //时间戳转为日期
  formatTimeTwo: formatTimeTwo  //日期转为时间戳
}
- 1
- 2
- 3
- 4
- 5
- 6
- 7
- 8
- 9
- 10
- 11
- 12
- 13
- 14
- 15
- 16
- 17
- 18
- 19
- 20
- 21
- 22
- 23
- 24
- 25
- 26
- 27
- 28
- 29
- 30
- 31
- 32
- 33
- 34
- 35
- 36
- 37
- 38
- 39
- 40
- 41
- 42
- 43
- 44
- 45
- 46
- 47
- 48
3、在需要转换的js里面导入util.js

4、通过var time= require(“…/…/utils/util.js”); 调用
获取当前时间的时间戳
var timeTamp = Date.parse(new Date()) / 1000; //获取当前时间的时间戳
- 1
标准时间转为时间戳
//日期转为时间戳
let date = '2021-4-30';
var repTime = date.replace(/-/g, '/');  //将'2021-4-30'时间格式转换为'2021/4/30' 为了兼容苹果端
console.log('当前时间为:',repTime)
var timeTamp = Date.parse(repTime) / 1000;  //转换
console.log('时间戳为:',timeTamp)
- 1
- 2
- 3
- 4
- 5
- 6
时间戳转换为指定格式的日期时间
// //时间戳转为日期
let dataTime = time.formatTimeTwo(timeTamp,'Y/M/D')  //timeTamp 为传入的时间戳, 'Y/M/D'为输入格式 也可以是其他格式比如'Y-M-D' Y.M.D
console.log(time.formatTimeTwo(timeTamp,'Y/M/D'))
- 1
- 2
- 3
4) 利用ES6的 Promise 解决小程序异步引发的问题
多任务阻塞
//创建一个数组用来存放异步运行的代码,比如利用云函数查询数据库
let promiseArr = [];
promiseArr.push(new Promise((reslove, reject) => {
  //将这个异步任务加入队列 ,里面的参数 reslove是调用成功后返回的数据 等价于return  reject是调用失败后返回的数据 等价于return (比如调用成功reslove(res) 、调用失败 reject(msg))
	wx.cloud.callFunction({
       name:'personal',
       data:{
         parameter:'getApplications',
       },
       success: (res) => {
         reslove(res.result);
         console.log('更新用户提交的申请信息成功',res)
         wx.setStorageSync('getMyApplications',res.result)
       },
       fail: (msg) => {
         reject('请求失败');
       }
   })
}
Promise.all(promiseArr).then(res => { //等队列里面的所有异步任务做完后再执行then里面的代码
    console.log(res)
}.catch(err=>{
    console.log(err)
})
注意点:在编写promiseArr.push(new Promise((reslove, reject) => {

}的时候里面
不要用  than(res=>{console.log(err)}) 和catch(err=>{console.log(err)})
 要使用
 success: (res) => {
   reslove(res.result);
   console.log('更新用户提交的申请信息成功',res)
   wx.setStorageSync('getMyApplications',res.result)
 },
fail: (msg) => {
   reject('请求失败');
 }
- 1
- 2
- 3
- 4
- 5
- 6
- 7
- 8
- 9
- 10
- 11
- 12
- 13
- 14
- 15
- 16
- 17
- 18
- 19
- 20
- 21
- 22
- 23
- 24
- 25
- 26
- 27
- 28
- 29
- 30
- 31
- 32
- 33
- 34
- 35
- 36
- 37
单任务阻塞
getApplications:function() {
    return new Promise((reslove, reject) => {
    //申请状态默认为0,0审核中,通过1,不通过2
     wx.cloud.callFunction({
       name:'personal',
       data:{
         parameter:'getApplications',
       },
       success: (res) => {
         reslove(res.result);
         console.log('更新用户提交的申请信息成功',res)
         wx.setStorageSync('getMyApplications',res.result)
       },
       fail: (msg) => {
         reject('请求失败');
       }
     })
   })
//调用
app.getApplications().then(res=>{
     this.setData({
       recruits:res,
     })
   }).catch(err=>{
      console.log(err)
   })
- 1
- 2
- 3
- 4
- 5
- 6
- 7
- 8
- 9
- 10
- 11
- 12
- 13
- 14
- 15
- 16
- 17
- 18
- 19
- 20
- 21
- 22
- 23
- 24
- 25
- 26
4、上传图片和文件到云存储、删除云文件
1) 上传图片
1、选择图片
选择图片的简单讲解
我们想要长传图片首先需要选择图片,
选择图片后会返回一个图片的临时地址,(后面就用这个地址上传图片),
像这个案例里面res.tempFilePaths 返回的就是图片的临时地址,这是一个数组
2、当我们选择了一个图片之后如何显示这张图片。
在1、已经说了选择图片后会返回一个图片的临时地址,把这个地址放到src属性里面就能显示了
<image class='img' src='{{tempFilePath}}' mode="aspectFill"></image>
- 1
  chooseImage: function(e) {
  wx.chooseImage({
    count: 1, //设置一次能选多少张图片
    sizeType: ['original', 'compressed'], // 可以指定是原图还是压缩图,默认二者都有
    sourceType: ['album', 'camera'], // 可以指定来源是相册还是相机,默认二者都有
    success: function(res) {
      // console.log('tempFilePaths',res.tempFilePaths)
      // 返回选定照片的本地文件路径列表,tempFilePath可以作为img标签的src属性显示图片
      var tempFilePaths = res.tempFilePaths
      //如果想要上传多张图片我们就要将每次选择的图片的临时地址给保留下来。这样用 imgbox = imgbox.concat(tempFilePaths); 就能将每次返回的临时地址数组拼接起来
      if(imgbox.length+tempFilePaths.length<5){  //这里默认需要上传4张图片
        imgbox = imgbox.concat(tempFilePaths);
      }
      this.setData({     //保存每次选择的图片的临时路径,用于上传
        imgbox: imgbox
      });
      console.log('imgbox',that.data.imgbox)
    }
  })
},
- 1
- 2
- 3
- 4
- 5
- 6
- 7
- 8
- 9
- 10
- 11
- 12
- 13
- 14
- 15
- 16
- 17
- 18
- 19
- 20
3、删除一张已经选择的图片
我么只需要把对应的图片的临时路径从等待上传的数组里面移除就可以了,这样上传的时候就不会上传这张图片
//这里的imgbox 就是用来存放所有选择的图片的临时路径
imgDelete1: function(e) {
  let that = this;
  let index = e.currentTarget.dataset.deindex;
  let imgbox = this.data.imgbox;
  imgbox.splice(index, 1)  //根据数组下标移除存放的临时路径
  that.setData({
    imgbox: imgbox
  });
  // console.log('imgbox',that.data.imgbox)
},
- 1
- 2
- 3
- 4
- 5
- 6
- 7
- 8
- 9
- 10
- 11
4、上传图片
根据存放临时路径的数组进行上传图片。
1、我们需要给上传的图片一个路径,这样才能知道图片上传到哪个文件夹
2、我们需要给上传图片的起一个名字,并且根据选择图片后获取到的临时地址来获取上传图片的扩展名
3、通过正则表达式返回文件的扩展名,判断图片的扩展名
let item = this.data.imgbox[i]; //获取选择图片时保存的临时地址
let suffix = /\.\w+$/.exec(item)[0]; //正则表达式返回文件的扩展名
 var that = this
 var timestamp = Date.parse(new Date());  //通过获取当前时间的时间戳来对图片进行命名
 wx.cloud.uploadFile({
   cloudPath:'imgs/recruitImgs/'+timestamp+i+suffix,   //将图片上传到云储存的哪个位置。这个路径需要先创建好
   filePath:item,  //图片的临时地址
   success:res=>{
     that.setData({
       fileIDs: that.data.fileIDs.concat(res.fileID)    //成功后会返回一个图片的 fileID 通过这个fileID我们就能知道这个图片在哪里,并且打开它。这里返回的fileID很重要,如果我们要展示这张图片就需要将这张图片的fileID存放当数据库里面,后面就能通过fileID进行访问图片了。
    //fileID可以直接放到image 的src里面
     });
     reslove();
   },
   fail(err){
     console.log(res)
     reject();
   }
 })
- 1
- 2
- 3
- 4
- 5
- 6
- 7
- 8
- 9
- 10
- 11
- 12
- 13
- 14
- 15
- 16
- 17
- 18
- 19
5、展示上传的图片
只需要根据上传图片返回的fileID就能访问图片
<image class='img' src='{{fileID}}' mode="aspectFill"></image>
- 1
6、总结
上传图片可以分为以下步骤
1、选择图片,并将返回的临时地址记录下来
2、获取临时地址的扩展名
3、根据 临时地址 上传图片 ,上传图片前,我们需要给出图片的名称和存放路径
4、上传图片成功后需要记录返回的fileID,用来展示图片
2) 上传文件
上传文件跟上传图片是一个原理的
只是调用的方法不一样
选择文件
chooseEnclosure:function(e){
    var that = this;
    wx.chooseMessageFile({
      count: 1,  //能选择文件的数量
      type: 'file', //能选择文件的类型,我这里只允许上传文件.还有视频,图片,或者都可以
      success(res) {
        // console.log('文件res',res)
        var size = res.tempFiles[0].size;
        var filename = res.tempFiles[0].path;
        var newfilename = filename + "";
        let ext = newfilename.substr(newfilename.lastIndexOf(".")).replace('.', ''); //获取文件名后缀
        // console.log(ext)
        if (size > 4194304){ //限制了文件的大小和具体文件类型 ||(ext!='docx'&&ext!='pdf')
          wx.showToast({
          title: '文件大小不能超过4MB,格式必须为pdf、docx、doc!',
          icon: "none",
          duration: 2000,
          mask: true
          })
        }else{
          that.setData({
            enclosureTmp: res.tempFiles[0].path, //将文件的路径保存在页面的变量上,方便 wx.uploadFile调用
            fileName:res.tempFiles[0].name, //回显文件名
          })
          console.log('enclosureTmp',that.data.enclosureTmp)
        }
      }
    })
  },
- 1
- 2
- 3
- 4
- 5
- 6
- 7
- 8
- 9
- 10
- 11
- 12
- 13
- 14
- 15
- 16
- 17
- 18
- 19
- 20
- 21
- 22
- 23
- 24
- 25
- 26
- 27
- 28
- 29
- 30
上传
let enclosureTmp = this.data.enclosureTmp;
let suffix = /\.\w+$/.exec(enclosureTmp)[0]; //正则表达式返回文件的扩展名
 var that = this
 var timestamp = Date.parse(new Date());
 wx.cloud.uploadFile({
   cloudPath:'file/enclosure/'+timestamp+suffix,
   filePath:enclosureTmp,
   success:res=>{
     that.setData({
       enclosureCloudUrl: res.fileID
     });
     console.log(that.data.enclosureCloudUrl) //输出上传后图片的返回地址
     reslove();
   },
   fail(err){
     console.log(res)
     reject()
   }
 })
- 1
- 2
- 3
- 4
- 5
- 6
- 7
- 8
- 9
- 10
- 11
- 12
- 13
- 14
- 15
- 16
- 17
- 18
- 19
- 20
- 21
3) 删除文件
//根据fileID进行删除
deleteFile:function(fileList){  //fileList是云文件的id数组
    wx.cloud.deleteFile({
      fileList: fileList
    }).then(res => {
      // handle success
      console.log('成功删除以下静态资源',res.fileList)
    }).catch(error => {
      // handle error
    })
  },
- 1
- 2
- 3
- 4
- 5
- 6
- 7
- 8
- 9
- 10
- 11

