
- 1健身管理系统及会员微信小程序的设计与实现+ssm
- 2docker部署Mysql时遇到的坑_docker部署mysql被劫持
- 3使用 Footprint Analytics 提升 Web3 项目的空投活动
- 4链接全球数十亿台设备!物联网行业如何应对数据管理、实时分析和供应链优化的挑战?
- 5使用 OpenCV 通过 SIFT 算法进行对象跟踪
- 6解决电脑能上QQ,却打不开网页的问题_电脑可以等qq却上不了网
- 7VSCode中如何创建React项目_mac 怎么从 vscode 种新建一个 react 项目
- 8Qt如何实现进程间通信_qt 进程发消息给 另外一个进程
- 9MySQL的下载、安装和配置_mysql下载地址
- 10Linux之字符设备驱动框架
Intellij IDEA 插件开发 | 京东云技术团队_idea 插件idea-version
赞
踩
写在前面
很多idea插件文档更多的是介绍如何创建一个简单的idea插件,本篇文章从开发环境、demo、生态组件、添加依赖包、源码解读、网络请求、渲染数据、页面交互等方面介绍,是一篇能够满足基本的插件开发工程要求的文章。
如有疏漏欢迎指正,如想深入了解欢迎探讨。
一、简介
IntelliJ IDEA 与 IntelliJ Platform
IntelliJ IDEA 简称 IDEA,是 Jetbrains 公司旗下的一款 JAVA 开发工具,支持 Java、Scala、Groovy 等语言的开发,同时具备支持目前主流的技术和框架,擅长于企业应用、移动应用和 Web 应用的开发,提供了丰富的功能,智能代码助手、代码自动提示、重构、J2EE支持、各类版本工具(git、svn等)、JUnit、CVS整合、代码分析、 创新的GUI设计等。
IntelliJ Platform 是一个构建 IDE 的开源平台,基于它构建的 IDE 有 IntelliJ IDEA、WebStorm、DataGrip、以及 Android Studio 等等。IDEA 插件也是基于 IntelliJ Platform 开发的。
二、开发环境搭建
注意各软件版本要对应
1、开发工具
IDEA 2020.1 各版本下载地址:https://www.jetbrains.com/idea/download/other.html
gradle 6.1 各版本下载地址:https://gradle.org/releases/
org.jetbrains.intellij 0.4.22
jdk 1.8
首先看一下目前idea版本的变动,找到自己当前idea对应的版本需要的jdk版本
https://plugins.jetbrains.com/docs/intellij/build-number-ranges.html?from=jetbrains.org#intellij-platform-based-products-of-recent-ide-versions
接下来需要找idea对应版本的gradle版本
https://www.jetbrains.com/legal/third-party-software/?product=iic&version=2020.1.1
最后就是找 gradle版本对应的 org.jetbrains.intellij 插件版本,在gradle-intellij-plugin插件的releases页面,这里会在描述中指出有各个插件版本对应最低的gradle版本。
https://github.com/JetBrains/gradle-intellij-plugin/releases?page=1
添加依赖到gradel配置文件,获取相关依赖配置
https://mvnrepository.com/artifact/org.springframework/spring-web
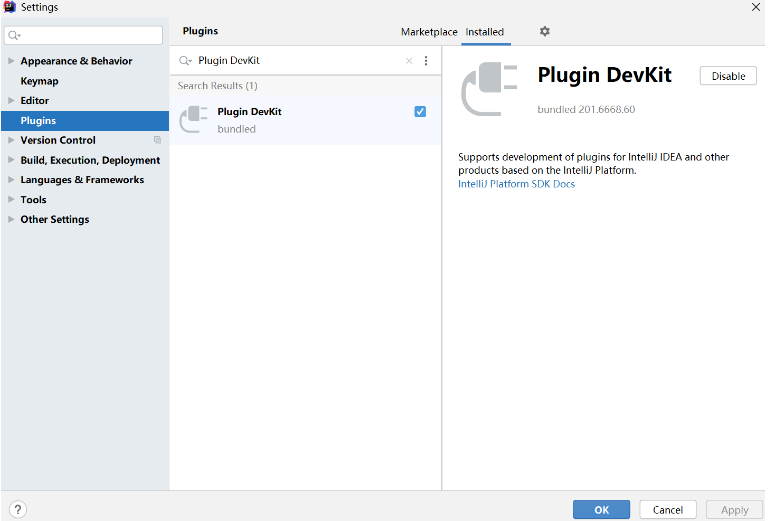
2、启用Plugin DevKit
Plugin DevKit 是 IntelliJ 的一个插件,它使用 IntelliJ IDEA 自己的构建系统来为开发 IDEA 插件提供支持。开发 IDEA 插件之前需要安装并启用 Plugin DevKit 。
打开 IDEA,导航到 Settings | Plugins,若插件列表中没有 Plugin DevKit,点击 Install JetBrains plugin,搜索并安装。
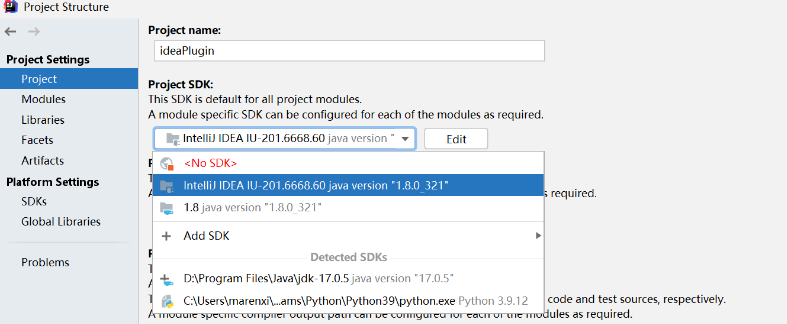
3、配置IntelliJ Platform Plugin SDK
IntelliJ Platform Plugin SDK 就是开发 IntelliJ 平台插件的SDK, 是基于 JDK 之上运行的,类似于开发 Android 应用需要 Android SDK。
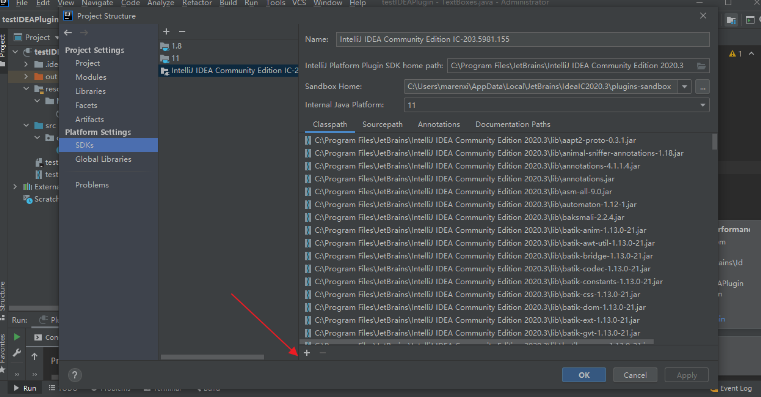
3.1导航到 File | Project Structure,选择对话框左侧栏 Platform Settings 下的 SDKs
3.2点击 + 按钮,先选择 JDK,指定 JDK 的路径;再创建 IntelliJ Platform Plugin SDK,指定 home path 为 IDEA 的安装路径,如图
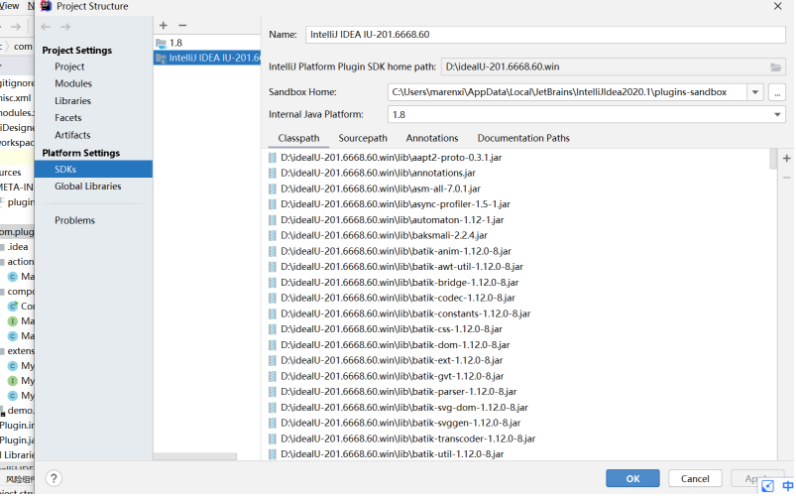
创建好 IntelliJ Platform Plugin SDK 后,选择左侧栏 Project Settings 下的 Projects,在 Project SDK 下选择刚创建的 IntelliJ Platform Plugin SDK。
4、设置源码路径(可选)
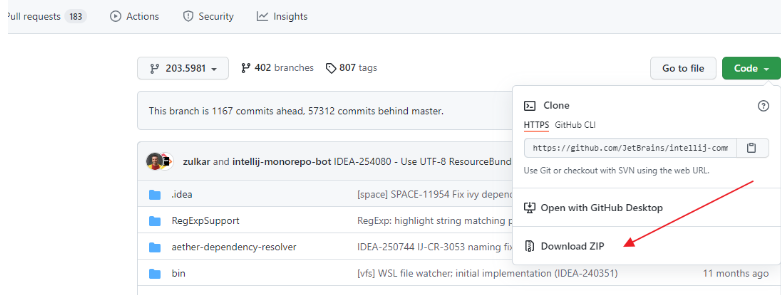
4.1查看 build 号:打开 IDEA,Help | About,查看版本号及 build 号
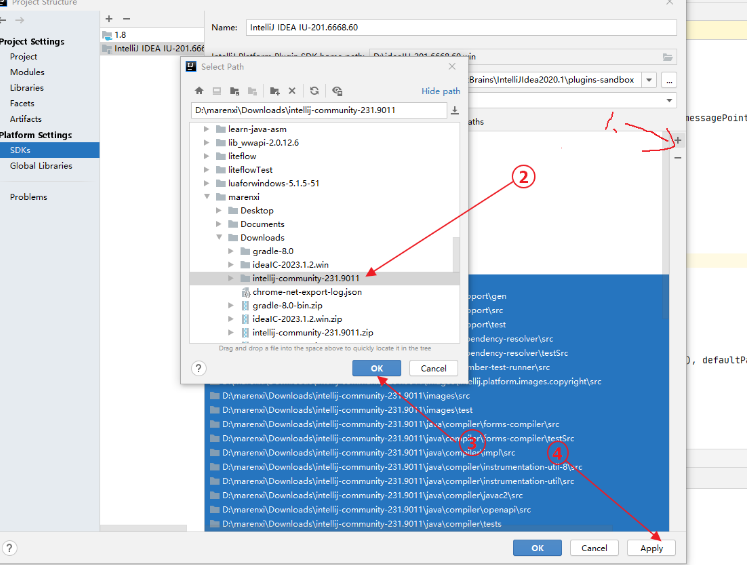
4.2IDEA Community 源码(https://github.com/JetBrains/intellij-community/):切换到与 build 号相同的分支,点击 Clone or download 按钮,选择 Download ZIP
4.3选择工程结构设置后选择SDKs->选中之前在第3步添加的sdk点击SourcePath后按如下1点击添加一个sourcePath,选择上面下载额源码后点击OK、点击Applay
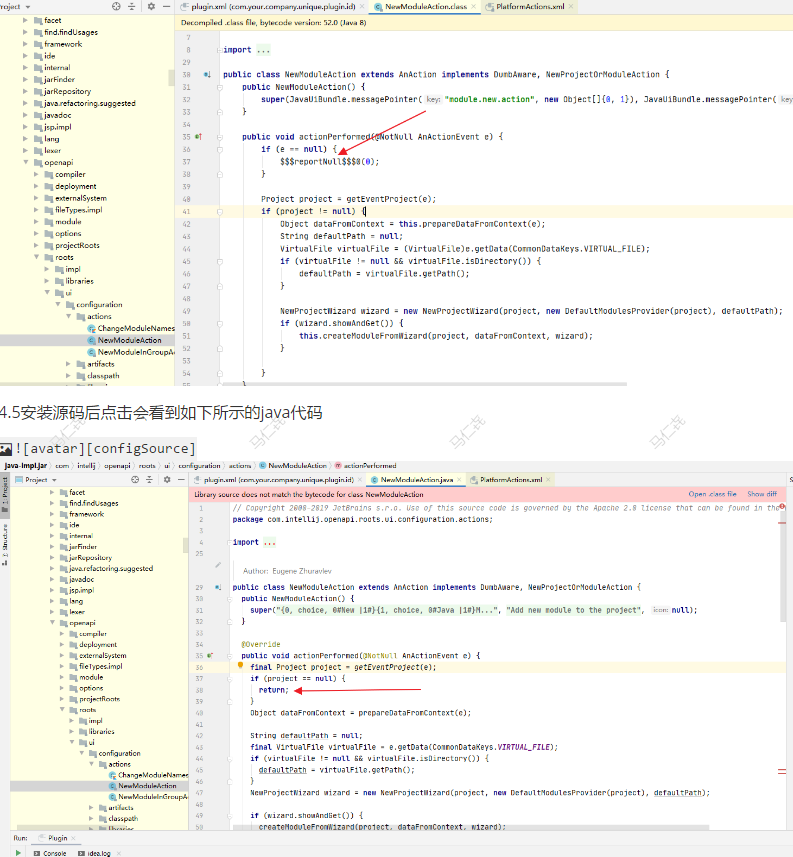
4.4未安装源码时点击某一个action(NewModuleAction)会看到如下所示阅读起来会比较晦涩难懂。
5、Sandbox
IntelliJ IDEA 插件以 Debug/Run 模式运行时是在 SandBox 中进行的,不会影响当前的 IntelliJ IDEA;但是同一台机器同时开发多个插件时默认使用的同一个 sandbox,即在创建 IntelliJ Platform SDK 时默认指定的 Sandbox Home
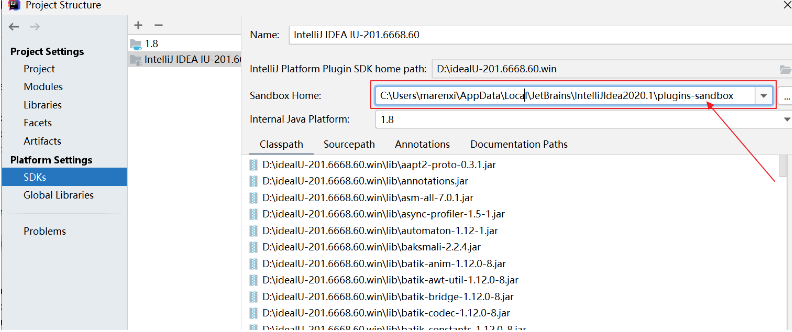
如果需要每个插件的开发环境是相互独立的,可以创建多个 IntelliJ Platform SDK,为 Sandbox Home 指定不同的目录 。
三、开发一个简单插件
插件的创建、配置、运行、打包流程,以及 action
1、创建一个插件工程
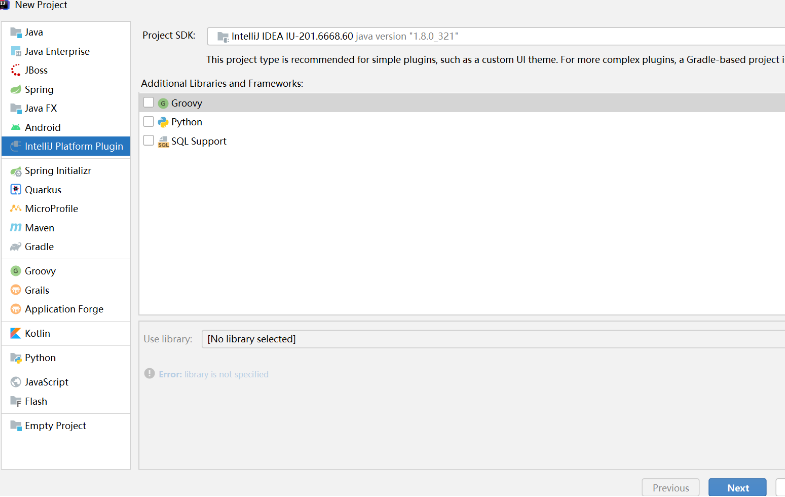
选择 File | New | Project,左侧栏中选择 IntelliJ Platform Plugin 工程类型
点击 Next,设置工程名称及位置,点击 Finish 完成创建。可以到 File | Project Structure 来自定义工程设置。
除了在idea创建插件项目外,我们还可以下载github模板代码进行修改:https://github.com/JetBrains/intellij-platform-plugin-template
2、插件工程结构
插件工程内容:
PluginDemo/
    resources/
      META-INF/
        plugin.xml
    src/
      com/foo/...
      ...
      ...
- 1
- 2
- 3
- 4
- 5
- 6
- 7
- 8
- 9
- 10
-
src 实现插件功能的classes
-
resources/META-INF/plugin.xml 插件的配置文件,指定插件名称、描述、版本号、支持的 IntelliJ IDEA 版本、插件的 components 和 actions 以及软件商等信息。
3、plugin.xml
下面示例描述了可在 plugin.xml 文件配置的主要元素:
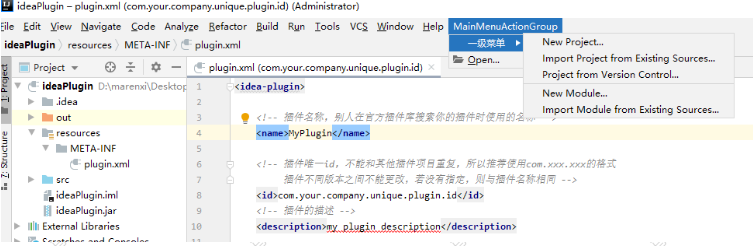
<idea-plugin>
  <!-- 插件名称,别人在官方插件库搜索你的插件时使用的名称 -->
  <name>MyPlugin</name>
  <!-- 插件唯一id,不能和其他插件项目重复,所以推荐使用com.xxx.xxx的格式
       插件不同版本之间不能更改,若没有指定,则与插件名称相同 -->
  <id>com.example.plugin.myplugin</id>
  <!-- 插件的描述 -->
  <description>my plugin description</description>
  <!-- 插件版本变更信息,支持HTML标签;
       将展示在 settings | Plugins 对话框和插件仓库的Web页面 -->
  <change-notes>Initial release of the plugin.</change-notes>
  <!-- 插件版本 -->
  <version>1.0</version>
  <!-- 供应商主页和email-->
  <vendor url="http://www.jetbrains.com" email="support@jetbrains.com" />
  <!-- 插件所依赖的其他插件的id -->
  <depends>MyFirstPlugin</depends>
  <!-- 插件兼容IDEA的最大和最小 build 号,两个属性可以任选一个或者同时使用
       官网详细介绍:http://www.jetbrains.org/intellij/sdk/docs/basics/getting_started/build_number_ranges.html-->
  <idea-version since-build="3000" until-build="3999"/>
  <!-- application components -->
  <application-components>
    <component>
      <!-- 组件接口 -->
      <interface-class>com.plugin.demo.Component1Interface</interface-class>
      <!-- 组件的实现类 -->
      <implementation-class>com.plugin.demo.impl.Component1Impl</implementation-class>
    </component>
  </application-components>
  <!-- project components -->
  <project-components>
    <component>
      <!-- 接口和实现类相同 -->
      <interface-class>com.plugin.demo.impl.Component2</interface-class>
    </component>
  </project-components>
  <!-- module components -->
  <module-components>
    <component>
      <interface-class>com.plugin.demo.impl.Component3</interface-class>
    </component>
  </module-components>
  <!-- Actions -->
  <actions>
    ...
  </actions>
  <!-- 插件定义的扩展点,以供其他插件扩展该插件 -->
  <extensionPoints>
    ...
  </extensionPoints>
  <!-- 声明该插件对IDEA core或其他插件的扩展 -->
  <extensions xmlns="com.intellij">
    ...
  </extensions>
</idea-plugin>

- 1
- 2
- 3
- 4
- 5
- 6
- 7
- 8
- 9
- 10
- 11
- 12
- 13
- 14
- 15
- 16
- 17
- 18
- 19
- 20
- 21
- 22
- 23
- 24
- 25
- 26
- 27
- 28
- 29
- 30
- 31
- 32
- 33
- 34
- 35
- 36
- 37
- 38
- 39
- 40
- 41
- 42
- 43
- 44
- 45
- 46
- 47
- 48
- 49
- 50
- 51
- 52
- 53
- 54
- 55
- 56
- 57
4、创建 Action
Action是实现插件功能的类, 一个Action类需要继承AnAction并且实现actionPerformed方法。当用户点击菜单或者工具栏按钮, 按快捷键,或者通过Help | Find Action点击时, IntelliJ Platform系统会回调对应Action的actionPerformed方法。
一个 Action 表示 IDEA 菜单里的一个 menu item 或工具栏上的一个按钮,通过继承 AnAction class 实现,当选择一个 menu item 或点击工具栏上的按钮时,就会调用 AnAction 类的 actionPerformed 方法。
实现自定义 Action 分两步:
-
定义一个或多个 action
-
注册 action,将 item 添加到菜单或工具栏上
4.1、定义 Action
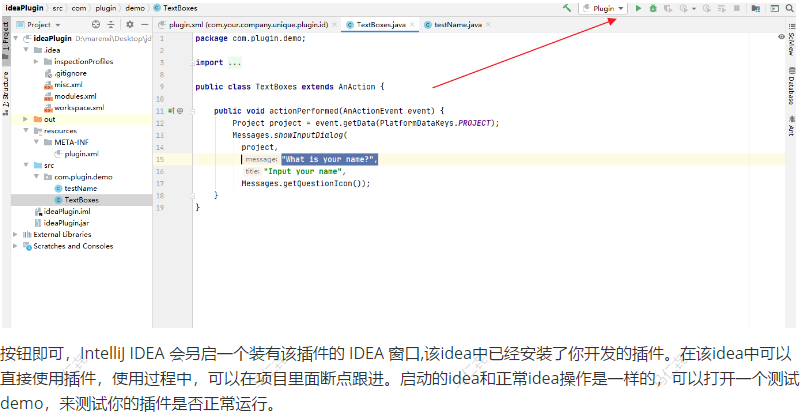
定义一个 Java class,继承 AnAction 类,并重写 actionPerformed 方法, 如
public class ActionDemo extends AnAction {

    public void actionPerformed(AnActionEvent event) {
        Project project = event.getData(PlatformDataKeys.PROJECT);
        Messages.showInputDialog(
          project,
          "What is your name?",
          "Input your name",
          Messages.getQuestionIcon());
    }
}
- 1
- 2
- 3
- 4
- 5
- 6
- 7
- 8
- 9
- 10
- 11
- 12
- 13
4.2、注册 Action
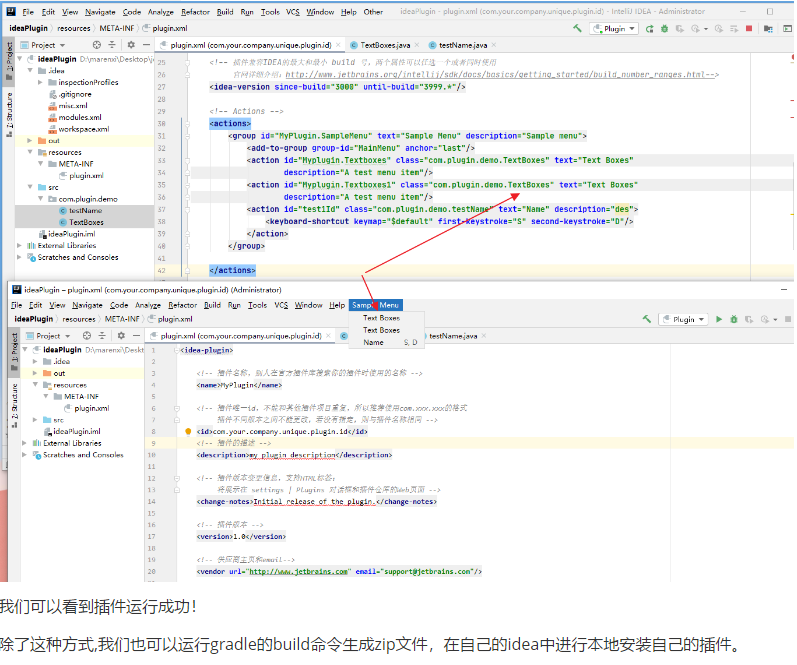
在 plugin.xml 文件的<actions>元素内注册
<actions>
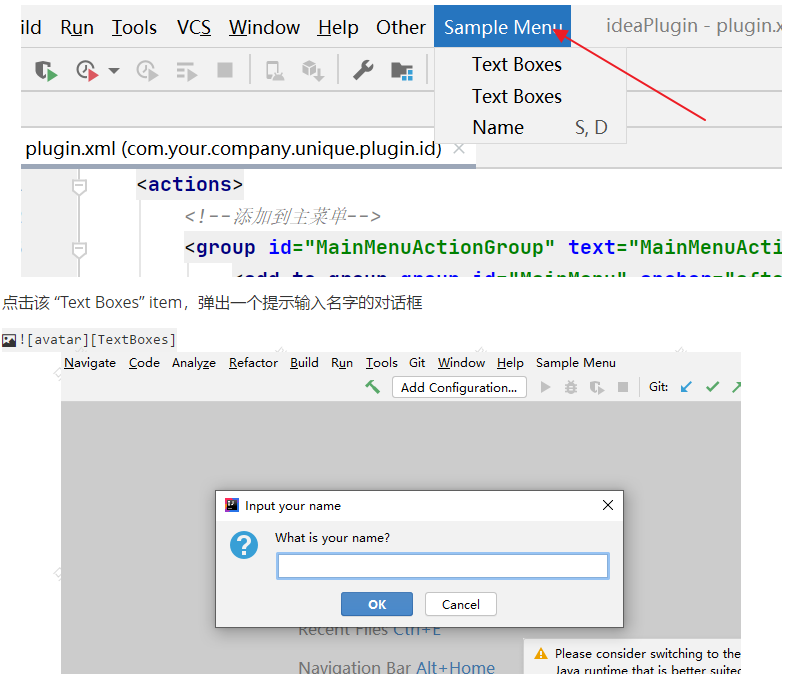
<group id="MyPlugin.SampleMenu" text="Sample Menu" description="Sample menu">
<add-to-group group-id="MainMenu" anchor="last" />
<action id="Myplugin.ActionDemo" class="Mypackage.ActionDemo" text="Text Boxes" description="A test menu item" />
</group>
</actions>
- 1
- 2
- 3
- 4
- 5
- 6
- 7
- 8
-
元素会定义一个 action,指定 action 的 id、实现类、显示文本、描述
-
元素会定义一个 action group(多个action),设置 action group 的 id、文本、描述
-
元素指定其外部 action 或 action group 被添加到的位置
上面示例会定义一个被添加到 IDEA 主菜单的最后面的 “SampleMenu” 的菜单,点击该菜单将弹出一个 “Text Boxes” item,如图
4.3、快速创建 Action
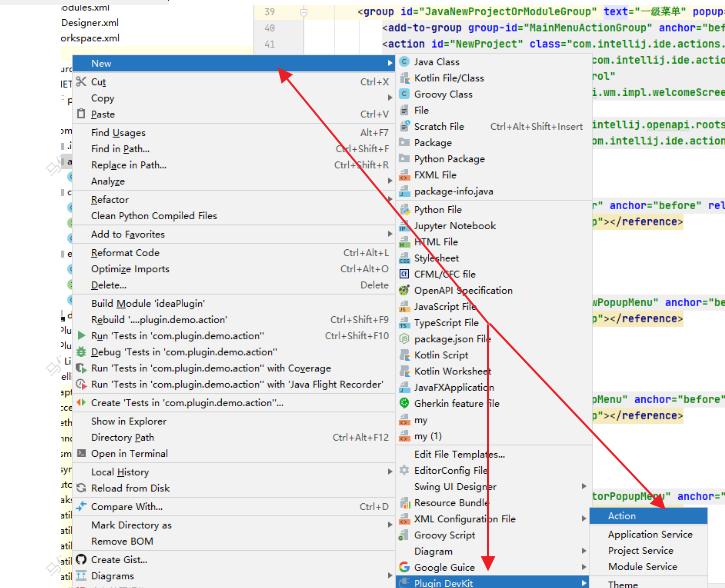
IntelliJ Platform 提供了 New Action 向导,它会帮助我们创建 action class 并配置 plugin.xml 文件:
在目标 package 上右键,选择 New | Plugin DevKit | Action:
-
Action ID: action 唯一 id,推荐 format: PluginName.ID
-
Class Name: 要被创建的 action class 名称
-
Name: menu item 的文本
-
Description: action 描述,toolbar 上按钮的提示文本,可选
-
Add to Group:选择新 action 要被添加到的 action group(Groups, Actions)以及相对其他 actions 的位置(Anchor)
-
Keyboard Shortcuts:指定 action 的第一和第二快捷键
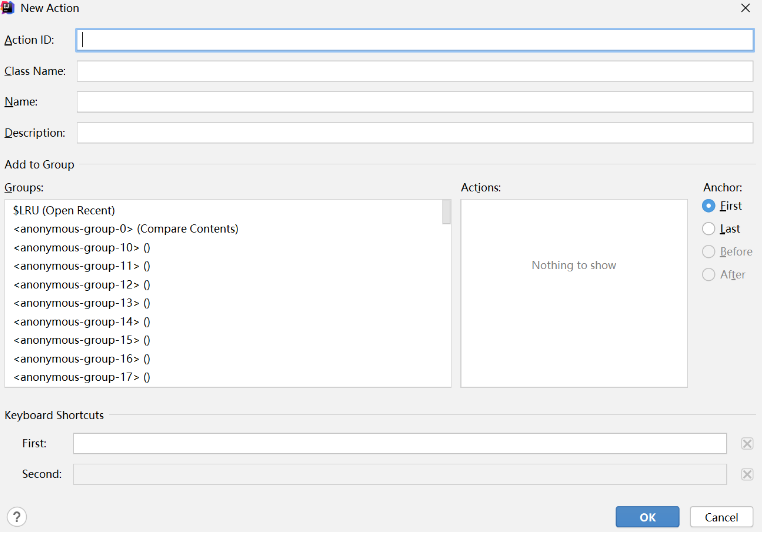
注意:该向导只能向主菜单中已存在的 action group 或工具栏上添加 action,若要创建新的 action group,请参考前面的内容。
5、运行调试插件
运行/调试插件可直接在 IntelliJ IDEA 进行,选择 Run | Edit Configurations…,若左侧栏没有 Plugin 类型的 Configuration, 点击右上角 + 按钮,选择 Plugin 类型, 如图
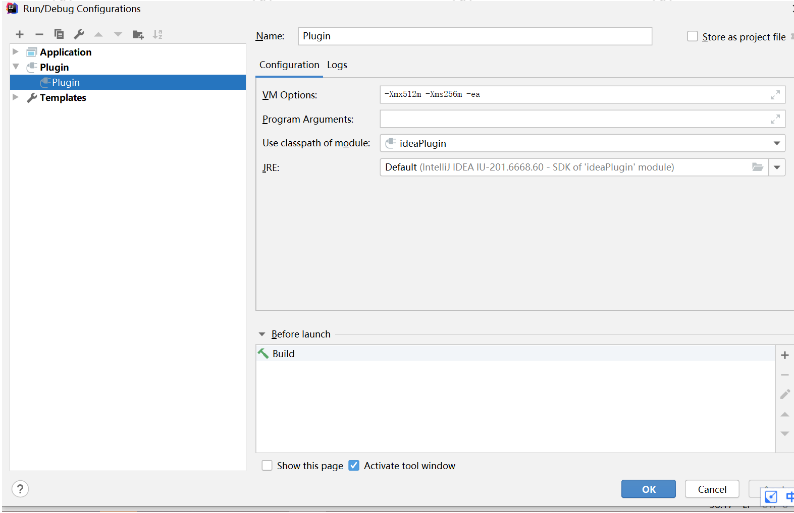
Use classpath of module 选择要调试的 module,其余配置一般默认即可;切换到 Logs 选项卡,如果勾选了 idea.log,运行插件时 idea.log 文件的内容将输出到 idea.log console。
运行插件点击工具栏上运行按钮Run
6、打包安装插件
6.1、打包插件
选择 Build | Prepare Plugin Module ‘module name’ for Deployment 来打包插件:
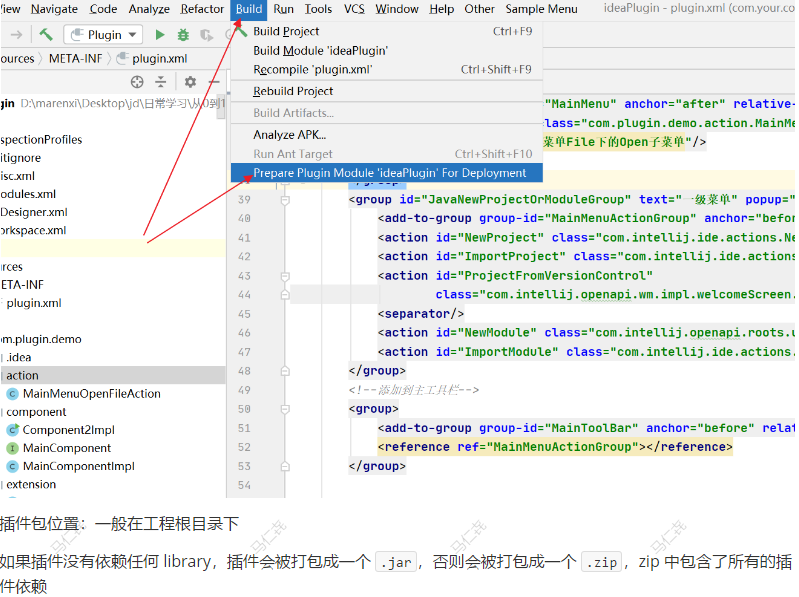
jar类型的插件包:
    PluginDemo.jar/
      com/xxx/...
      ...
      ...
      META-INF/
        plugin.xml
- 1
- 2
- 3
- 4
- 5
- 6
- 7
- 8
zip类型的插件包:
PluginDemo.zip/
  lib/
    libxxx.jar
    libbar.jar
    PluginDemo.jar/
      com/xxx/...
      ...
      ...
      META-INF/
        plugin.xml
- 1
- 2
- 3
- 4
- 5
- 6
- 7
- 8
- 9
- 10
- 11
- 12
6.2、安装插件
导航到 File | Settings | Plugins 页面,点击 Install plugin from disk…
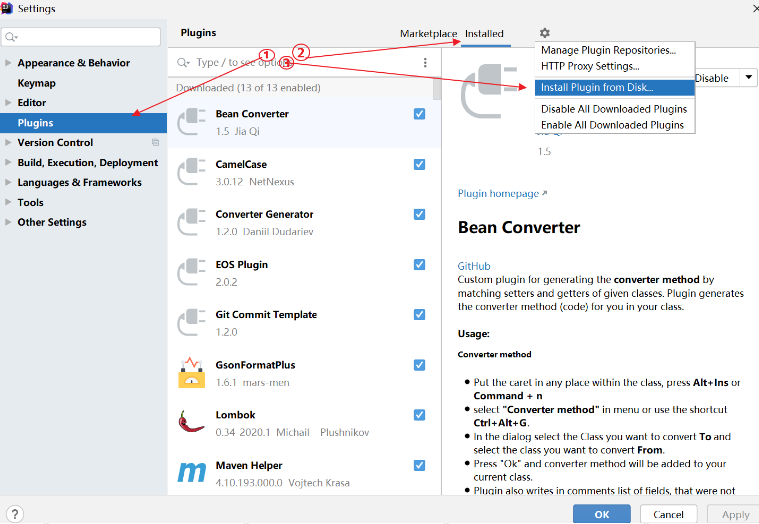
-
选择插件包的位置,点击 OK
-
在插件列表中,勾选插件名字后面的 check-box 来启用插件,点击 OK
-
重启 IDEA
Install JetBrains plugin… 从 JetBrains 仓库(https://plugins.jetbrains.com/)中安装插件
Browse repositories… 添加并管理自己的仓库
四、Action允许添加的位置
这个时候我们了解的都比较浅显还停留在demo层面,如何进行深入的了解呢?
eg:我们怎么知道都有哪些 action 或 action group 可以被我们添加呢?
1.添加主菜单MainMenu
1、我们可以点击配置group-id="MainMenu"下的MainMenu
<actions>
  <group id="MyPlugin.SampleMenu" text="Sample Menu" description="Sample menu">
    <add-to-group group-id="MainMenu" anchor="last"  />
       <action id="Myplugin.Textboxes" class="Mypackage.TextBoxes" text="Text Boxes" description="A test menu item" />
  </group>
</actions>
- 1
- 2
- 3
- 4
- 5
- 6
- 7
- 8
2、进入PlatformActions.xml如下图,这个时候不难看出这里就是主菜单的第一列子菜单
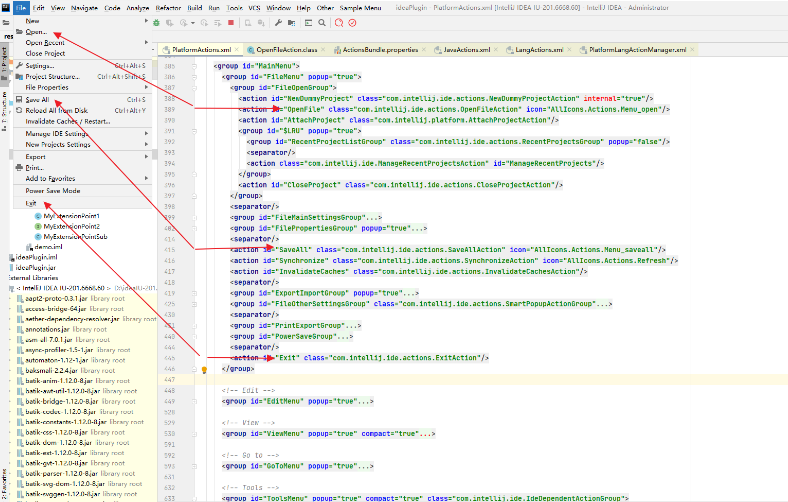
3.这个时候如果我们想新建个类似与File–>New和Open的菜单该怎么做呢?
3.1我们应该先实现布局,添加主菜单MainMenu
  <!-- Actions -->
    <actions>
        <group id="MainMenuActionGroup" text="MainMenuActionGroup" description="MainMenuActionGroup" popup="true">
            <add-to-group group-id="MainMenu" anchor="after" relative-to-action="HelpMenu"/>
            <action id="OpenFile" class="com.plugin.demo.action.MainMenuOpenFileAction" text="Open"
                    description="主菜单File下的Open子菜单"/>
            <separator/>
        </group>
        <group id="JavaNewProjectOrModuleGroup" text="一级菜单" popup="true">
            <add-to-group group-id="MainMenuActionGroup" anchor="before" relative-to-action="OpenFile"/>
            <action id="NewProject" class="com.intellij.ide.actions.NewProjectAction"/>
            <action id="ImportProject" class="com.intellij.ide.actions.ImportProjectAction"/>
            <action id="ProjectFromVersionControl"
class="com.intellij.openapi.wm.impl.welcomeScreen.ProjectFromVersionControlAction"/>
            <separator/>
            <action id="NewModule" class="com.intellij.openapi.roots.ui.configuration.actions.NewModuleAction"/>
            <action id="ImportModule" class="com.intellij.ide.actions.ImportModuleAction"/>
        </group>
    </actions>
- 1
- 2
- 3
- 4
- 5
- 6
- 7
- 8
- 9
- 10
- 11
- 12
- 13
- 14
- 15
- 16
- 17
- 18
- 19
- 20
- 21
3.2实现自定义的打开文件
其实是通过下面的action配置的OpenFileAction找到源码
<action id="OpenFile" class="com.intellij.ide.actions.OpenFileAction" icon="AllIcons.Actions.Menu_open"/>
- 1
- 2
- 3
在将源码拷贝出来粘贴到自己的action内。这样就可以实现自己的主菜单File下的Open子菜单
3.3这个时候有人会有疑问我不知道去哪找New对应的action呀?
这个时候我们通过界面可以看到Project from Existing Sources…,这里我们就可以去搜这个文本呀。既然显示在页面上。必然有地方定义了它。 ActionBundle.properties
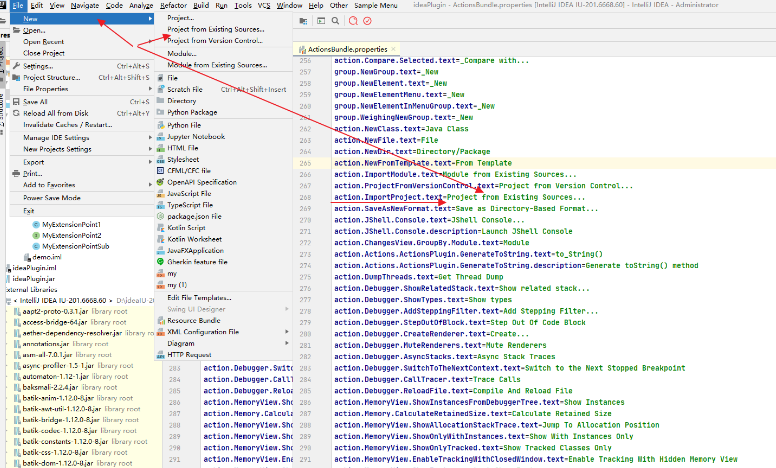
这个时候我们在根据对应的action定义的文本在去搜索对应的action,com.intellij.ide.actions.ImportProjectAction
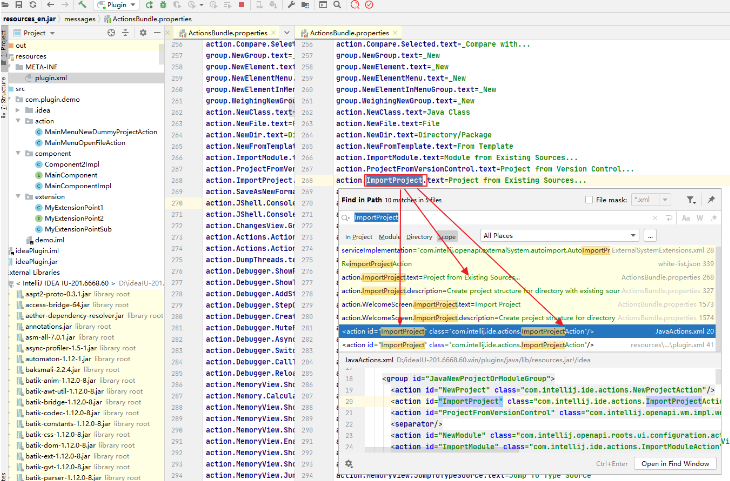
3.4这个时候我们将对应的action拷贝到自己的插件定义的配置上也就形成了3.1的一级和二级菜单
2.添加主工具栏MainToolBar
添加主工具栏MainToolBar(如果不清楚哪里是主菜单、主工具栏、导航栏、上下文菜单、弹出菜单参考https://www.w3cschool.cn/intellij\\_idea\\_doc/intellij\\_idea\\_doc-34852d55.html)
   <group>
            <add-to-group group-id="MainToolBar" anchor="before" relative-to-action="SearchEverywhere"/>
            <reference ref="MainMenuActionGroup"></reference>
        </group>
- 1
- 2
- 3
- 4
- 5
- 6

3、添加上下文菜单ProjectViewPopupMenu
   <group>
            <add-to-group group-id="ProjectViewPopupMenu" anchor="before" relative-to-action="WeighingNewGroup"/>
            <reference ref="MainMenuActionGroup"></reference>
        </group>
- 1
- 2
- 3
- 4
- 5
- 6
4、添加弹出菜单EditorPopupMenu
 <!--添加到弹出框右键-->
        <group>
            <add-to-group group-id="EditorPopupMenu" anchor="before" relative-to-action="ShowIntentionsGroup"/>
            <reference ref="MainMenuActionGroup"></reference>
        </group>
- 1
- 2
- 3
- 4
- 5
- 6
- 7
5、添加打印ConsoleEditorPopupMenu
    <!--添加到控制台打印右键-->
        <group>
            <add-to-group group-id="ConsoleEditorPopupMenu" anchor="before" relative-to-action="CutCopyPasteGroup"/>
            <reference ref="MainMenuActionGroup"></reference>
        </group>
- 1
- 2
- 3
- 4
- 5
- 6
- 7
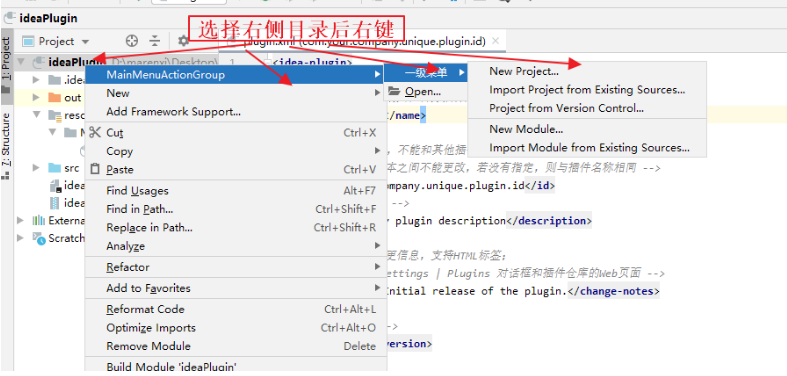
6、右键新建action时也可以直接选择添加的位置。
1.筛选后查找要添加的group
2.选择对应的action
3.选择要添加到这个action的某个位置
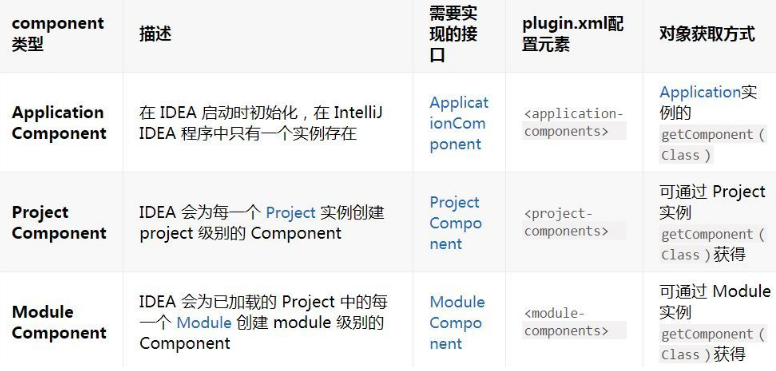
五、Components(已不建议使用)
IntelliJ IDEA 的组件模型是基于 PicoContainer 的,组件都包含在这些容器中,但容器有三种级别:application container,project container 以及 module container。application container 可以包含多个 project container,而 project container 可以包含多个 module container。
1、Components 类型
Components 是插件开发的基础,Components 有三种类型:
2、注册 Components
components 需要配置在 plugin.xml 中,并指定 interface 和 implementation,interface 类用于从其他组件中检索组件,implementation 类用于实例化组件。示例:
//创建一个 application level component
public interface Component1 extends ApplicationComponent {
}

public class Component1Impl implements Component1 {

    @Override
    public String getComponentName() {
        return "PluginDemo.Component1";
    }
}
- 1
- 2
- 3
- 4
- 5
- 6
- 7
- 8
- 9
- 10
- 11
- 12
- 13
plugin.xml
<application-components>
    <component>
      <interface-class>com.example.test.Component1</interface-class>
      <implementation-class>com.example.test.Component1Impl</implementation-class>
    </component>
 </application-components>
- 1
- 2
- 3
- 4
- 5
- 6
- 7
- 8
注意:一个 interface-class 不能有多个 implementation-class,如下图:

-
若组件没有创建 interface 类,而是直接实现了 ApplicationComponent 等接口,interface 和 implementation 可以指定为同一个类。
-
每一个组件都应该有一个唯一的名字,通过 getComponentName() 返回,推荐使用 <plugin_name>.<component_name> 格式。
3、Component 周期方法
ApplicationComponent 的生命周期方法:
//构造方法
public constructor(){
}
//初始化
public void initComponent() {
}

public void disposeComponent() {
}
- 1
- 2
- 3
- 4
- 5
- 6
- 7
- 8
- 9
- 10
- 11
ProjectComponent 的生命周期方法:
//构造方法
public constructor(){
}
//通知一个project已经完成加载
public void projectOpened() {
}

public void projectClosed() {
}
//执行初始化操作以及与其他 components 的通信
public void initComponent() {
}
//释放系统资源或执行其他清理
public void disposeComponent() {
}
- 1
- 2
- 3
- 4
- 5
- 6
- 7
- 8
- 9
- 10
- 11
- 12
- 13
- 14
- 15
- 16
- 17
ModuleComponent 的生命周期方法:
ModuleComponent 的生命周期方法中比 ProjectComponent 多一个 moduleAdded(),用于通知 module 已经被添加到 project 中。
4、Component 加载
Application 级别的 components 在 IDEA 启动时加载,Project 和 Module 级别的 components 在项目启动时共同加载。
一个组件加载过程:
-
创建:调用构造方法
-
初始化:调用 initComponent() 方法
-
如果是 Project 组件,会调用 projectOpened() 方法; 如果是 Module 组件,会依次调用 moduleAdded() 和 projectOpened() 方法
如果 component 在加载时需要用到其他 component,我们只需在该 component 的构造方法的参数列表声明即可,在这种情况下,IntelliJ IDEA 会按正确的顺序实例化所依赖的 component。
示例:
public class MyComponent implements ApplicationComponent {
    private final MyOtherComponent otherComponent;

    public MyComponent(MyOtherComponent otherComponent) {
       this.otherComponent = otherComponent;
    }
    ...
}
- 1
- 2
- 3
- 4
- 5
- 6
- 7
- 8
- 9
- 10
5、Component 卸载
一个组件卸载过程:
-
如果是 Project 或 Module 组件,调用 projectClosed()
-
接下来 disposeComponent() 将被调用
6、Component 容器
前面我们提到有三种不同的容器,application container 实现 Application 接口; project container 实现 Project 接口;
module container 实现 Module 接口。每一个容器都有自己的方法去获取容器内的 component。
获取 application 容器及其内部的组件:
/获取application容器
Application application = ApplicationManager.getApplication();
//获取application容器中的组件
MyComponent myComponent = application.getComponent(MyComponent.class);
- 1
- 2
- 3
- 4
- 5
- 6
获取 project / module 容器及其内部的组件:
在 component 构造方法的参数列表中声明:
public class MyComponent implements ProjectComponent {
Project project;
public MyComponent(Project project){
this.project = project;
}

public void initComponent() {
OtherComponent otherComponent = project.getComponent(OtherComponent.class);
}
}
- 1
- 2
- 3
- 4
- 5
- 6
- 7
- 8
- 9
- 10
- 11
- 12
在这个例子中,组件在构造方法中获取了容器对象,将其保存,然后在 component 其他地方进行引用。
7、 各组件使用时机
7.1创建一个ApplicationComponent
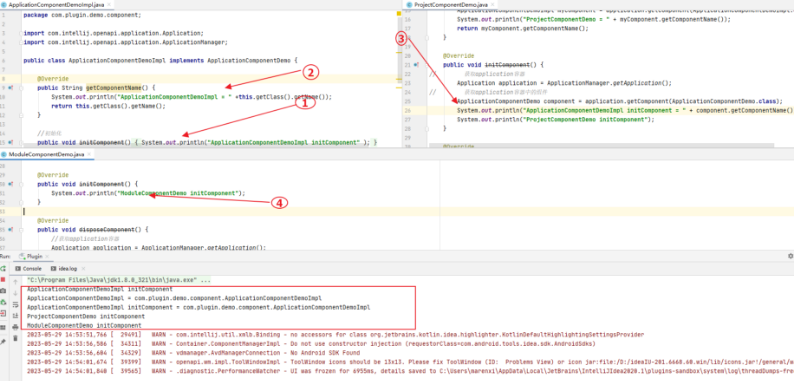
package com.plugin.demo.component;

import com.intellij.openapi.components.ApplicationComponent;

//创建一个 application level component
public interface ApplicationComponentDemo extends ApplicationComponent {
}


package com.plugin.demo.component;

import com.intellij.openapi.application.Application;
import com.intellij.openapi.application.ApplicationManager;

public class ApplicationComponentDemoImpl implements ApplicationComponentDemo {

    @Override
    public String getComponentName() {
        System.out.println("ApplicationComponentDemoImpl = " +this.getClass().getName());
        return this.getClass().getName();
    }

    //初始化
    public void initComponent() {
        System.out.println("ApplicationComponentDemoImpl initComponent" );
    }

    public void disposeComponent() {
        //获取application容器
        Application application = ApplicationManager.getApplication();
        //获取application容器中的组件
        ApplicationComponentDemoImpl myComponent = application.getComponent(ApplicationComponentDemoImpl.class);
        System.out.println("disposeComponent = " + myComponent.getComponentName());
    }
}
- 1
- 2
- 3
- 4
- 5
- 6
- 7
- 8
- 9
- 10
- 11
- 12
- 13
- 14
- 15
- 16
- 17
- 18
- 19
- 20
- 21
- 22
- 23
- 24
- 25
- 26
- 27
- 28
- 29
- 30
- 31
- 32
- 33
- 34
- 35
- 36
- 37
7.2 创建一个ProjectComponent
package com.plugin.demo.component;

import com.intellij.openapi.application.Application;
import com.intellij.openapi.application.ApplicationManager;
import com.intellij.openapi.components.ProjectComponent;
import org.jetbrains.annotations.NotNull;

public class ProjectComponentDemo implements ProjectComponent {
    @NotNull
    @Override
    public String getComponentName() {
        //获取application容器
        Application application = ApplicationManager.getApplication();
        //获取application容器中的组件
        ApplicationComponentDemoImpl myComponent = application.getComponent(ApplicationComponentDemoImpl.class);
        System.out.println("ProjectComponentDemo = " + myComponent.getComponentName());
        return myComponent.getComponentName();
    }

    @Override
    public void initComponent() {
//        获取application容器
        Application application = ApplicationManager.getApplication();
//        获取application容器中的组件
        ApplicationComponentDemo component = application.getComponent(ApplicationComponentDemo.class);
        System.out.println("ApplicationComponentDemoImpl initComponent = " + component.getComponentName());
        System.out.println("ProjectComponentDemo initComponent");
    }

    @Override
    public void disposeComponent() {
        //获取application容器
        Application application = ApplicationManager.getApplication();
        //获取application容器中的组件
        ApplicationComponentDemoImpl myComponent = application.getComponent(ApplicationComponentDemoImpl.class);
        System.out.println("disposeComponent = " + myComponent.getComponentName());
    }
}
- 1
- 2
- 3
- 4
- 5
- 6
- 7
- 8
- 9
- 10
- 11
- 12
- 13
- 14
- 15
- 16
- 17
- 18
- 19
- 20
- 21
- 22
- 23
- 24
- 25
- 26
- 27
- 28
- 29
- 30
- 31
- 32
- 33
- 34
- 35
- 36
- 37
- 38
- 39
- 40
7.3创建一个ModuleComponent
package com.plugin.demo.component;

import com.intellij.openapi.application.Application;
import com.intellij.openapi.application.ApplicationManager;
import com.intellij.openapi.components.ApplicationComponent;
import com.intellij.openapi.module.ModuleComponent;
import com.intellij.openapi.project.Project;
import com.intellij.openapi.project.ProjectManager;
import org.jetbrains.annotations.NotNull;

public class ModuleComponentDemo implements ModuleComponent {


    @NotNull
    @Override
    public String getComponentName() {
        //获取application容器
        Application application = ApplicationManager.getApplication();
        //获取application容器中的组件
        ApplicationComponentDemoImpl myComponent = application.getComponent(ApplicationComponentDemoImpl.class);
        System.out.println("ApplicationComponentDemoImpl initComponent = " + myComponent.getComponentName());
        ProjectManager projectManager = ProjectManager.getInstance();
        Project defaultProject = projectManager.getDefaultProject();
        ProjectComponentDemo component = defaultProject.getComponent(ProjectComponentDemo.class);
        System.out.println("ProjectComponentDemo initComponent" + component.getComponentName());
        return myComponent.getComponentName();
    }

    @Override
    public void initComponent() {
        System.out.println("ModuleComponentDemo initComponent");
    }

    @Override
    public void disposeComponent() {
        //获取application容器
        Application application = ApplicationManager.getApplication();
        //获取application容器中的组件
        ApplicationComponentDemoImpl myComponent = application.getComponent(ApplicationComponentDemoImpl.class);
        System.out.println("disposeComponent = " + myComponent.getComponentName());
    }
}
- 1
- 2
- 3
- 4
- 5
- 6
- 7
- 8
- 9
- 10
- 11
- 12
- 13
- 14
- 15
- 16
- 17
- 18
- 19
- 20
- 21
- 22
- 23
- 24
- 25
- 26
- 27
- 28
- 29
- 30
- 31
- 32
- 33
- 34
- 35
- 36
- 37
- 38
- 39
- 40
- 41
- 42
- 43
- 44
7.4注册配置Component
 <application-components>
        <component>
             <interface-class>com.plugin.demo.component.ApplicationComponentDemo</interface-class>
             <implementation-class>com.plugin.demo.component.ApplicationComponentDemoImpl</implementation-class>
        </component>
    </application-components>
    <project-components>
        <component>
             <interface-class>com.plugin.demo.component.ProjectComponentDemo</interface-class>
             <implementation-class>com.plugin.demo.component.ProjectComponentDemo</implementation-class>
        </component>
    </project-components>
    <module-components>
        <component>
             <interface-class>com.plugin.demo.component.ModuleComponentDemo</interface-class>
             <implementation-class>com.plugin.demo.component.ModuleComponentDemo</implementation-class>
        </component>
    </module-components>
- 1
- 2
- 3
- 4
- 5
- 6
- 7
- 8
- 9
- 10
- 11
- 12
- 13
- 14
- 15
- 16
- 17
- 18
- 19
- 20
7.5运行后的预期是先执行应用层组件,在执行工程级组件,在执行模块级组件
六、Extensions and Extension Points
如果插件需要扩展 IDEA Platform 或 其他插件的功能,或为其他插件提供可以扩展自己的接口,那么就要用到 extensions 和 extension points,用于与 IDEA 和其他插件交互。
1、Extension points 扩展点
extension point 用于数据信息扩展,使其他插件可以扩展本插件的功能,可通过plugin.xml 的 元素声明,如下示例:
<extensionPoints>
    <!--使用beanClass声明-->
    <extensionPoint name="MyExtensionPoint1" beanClass="MyPackage.MyBeanClass" area="IDEA_APPLICATION">
        <with attribute="implementationClass" implements="MyPackage.MyAbstractClass"/>
    </extensionPoint>
    <!--使用interface声明-->
    <extensionPoint name="MyExtensionPoint2" interface="MyPlugin.MyInterface" area="IDEA_PROJECT" />
</extensionPoints>
- 1
- 2
- 3
- 4
- 5
- 6
- 7
- 8
- 9
- 10
-
name 指定 extension point 的名字,当其他插件扩展该extensionPoint时,需要指定该name
-
area 有三种值,IDEAAPPLICATION,IDEAPROJECT,IDEA_MODULE,指定extension point的级别
-
interface 指定需要扩展此 extension point 的插件必须要实现的接口
-
beanClass 指定一个类,该类有一个或多个被 @Attribute 注解的属性
-
声明 extension point 有两种方式,指定 beanClass 或 interface
-
如果某个属性需要是某个类的子类,或某个接口的实现类,需要通过 指明类名或接口名。
示例上述代码中的 MyExtensionPoint1 的 beanClass:
public class MyBeanClass extends AbstractExtensionPointBean {
  @Attribute("key")
  public String key;

  @Attribute("implementationClass")
  public String implementationClass;

  ...
}
- 1
- 2
- 3
- 4
- 5
- 6
- 7
- 8
- 9
- 10
- 11
2、Extension 扩展其他插件功能
如果插件需要扩展 IntelliJ Platform 或其他插件的功能,需要声明一个或多个 extension。
-
设置 的 defaultExtensionNs 属性若是扩展 IntelliJ Platform,设为 com.intellij若是扩展其他插件,则设为 pluginId
-
指定要扩展哪个 extension point内部的子标签的名字必须与 extension point 的 name 属性相同
-
如果 extension point
-
是通过 interface 声明的,那么使用 implementation 属性指明 interface 的实现类
-
是通过 beanClass 声明的,那么就要为 beanClass 中被 @Attribute 注解的属性指定属性值
示例:
<!-- 扩展 interface 声明的 extensionPoint -->
  <extensions defaultExtensionNs="com.intellij">
    <appStarter implementation="MyPackage.MyExtension1" />
    <applicationConfigurable implementation="MyPackage.MyExtension2" />
  </extensions>

  <!-- 扩展 beanClass 声明的 extensionPoint -->
  <extensions defaultExtensionNs="pluginId">
     <MyExtensionPoint1 key="keyValue" implementationClass="MyPackage.MyClassImpl"></MyExtensionPoint1>
  </extensions>
- 1
- 2
- 3
- 4
- 5
- 6
- 7
- 8
- 9
- 10
- 11
- 12
插件的 service 的实现就是扩展 IDEA Platform 的 applicationService 或 projectService 两个 extension points
3、获取 extension points
IntelliJ Platform 的部分 extension points
 <extensionPoints>
    <extensionPoint name="languageBundle" beanClass="com.intellij.DynamicBundle$LanguageBundleEP"/>
    <!--suppress PluginXmlValidity -->
    <extensionPoint name="applicationService" beanClass="com.intellij.openapi.components.ServiceDescriptor" dynamic="true"/>
    <!--suppress PluginXmlValidity -->
    <extensionPoint name="projectService" beanClass="com.intellij.openapi.components.ServiceDescriptor" dynamic="true"/>
    <!--suppress PluginXmlValidity -->
    <extensionPoint name="moduleService" beanClass="com.intellij.openapi.components.ServiceDescriptor" dynamic="true"/>
    <extensionPoint name="virtualFileManagerListener" interface="com.intellij.openapi.vfs.VirtualFileManagerListener" dynamic="true"/>
    <extensionPoint name="vfs.asyncListener" interface="com.intellij.openapi.vfs.AsyncFileListener" dynamic="true"/>

    <!-- only bundled plugin can define startupActivity -->
    <extensionPoint name="startupActivity" interface="com.intellij.openapi.startup.StartupActivity"/>
    <extensionPoint name="postStartupActivity" interface="com.intellij.openapi.startup.StartupActivity" dynamic="true"/>
    <extensionPoint name="backgroundPostStartupActivity" interface="com.intellij.openapi.startup.StartupActivity" dynamic="true"/>

    <extensionPoint name="fileTypeDetector" interface="com.intellij.openapi.fileTypes.FileTypeRegistry$FileTypeDetector" dynamic="true"/>
    <extensionPoint name="editorFactoryDocumentListener" interface="com.intellij.openapi.editor.event.DocumentListener" dynamic="true"/>
    <extensionPoint name="multiHostInjector" interface="com.intellij.lang.injection.MultiHostInjector" area="IDEA_PROJECT" dynamic="true"/>
    <extensionPoint name="writingAccessProvider" area="IDEA_PROJECT" interface="com.intellij.openapi.vfs.WritingAccessProvider" dynamic="true"/>
    <extensionPoint name="metaLanguage" interface="com.intellij.lang.MetaLanguage"/>
    <extensionPoint name="lang.parserDefinition" beanClass="com.intellij.lang.LanguageExtensionPoint" dynamic="true">
      <with attribute="implementationClass" implements="com.intellij.lang.ParserDefinition"/>
    </extensionPoint>
    <extensionPoint name="lang.elementManipulator" beanClass="com.intellij.openapi.util.ClassExtensionPoint" dynamic="true">
      <with attribute="implementationClass" implements="com.intellij.psi.ElementManipulator"/>
    </extensionPoint>
    <!--suppress PluginXmlValidity -->
    <extensionPoint name="stubElementTypeHolder" beanClass="com.intellij.psi.stubs.StubElementTypeHolderEP" dynamic="true"/>
  </extensionPoints>
  <extensions defaultExtensionNs="com.intellij">
    <applicationService serviceInterface="com.intellij.util.messages.MessageBusFactory"
                        serviceImplementation="com.intellij.util.messages.impl.MessageBusFactoryImpl"/>
  </extensions>
- 1
- 2
- 3
- 4
- 5
- 6
- 7
- 8
- 9
- 10
- 11
- 12
- 13
- 14
- 15
- 16
- 17
- 18
- 19
- 20
- 21
- 22
- 23
- 24
- 25
- 26
- 27
- 28
- 29
- 30
- 31
- 32
- 33
- 34
- 35
- 36
其他可以从被扩展插件的 plugin.xml 文件中获取
https://plugins.jetbrains.com/intellij-platform-explorer/extensions
七、Service
参考:https://plugins.jetbrains.com/docs/intellij/plugin-services.html#examples
Service 也是一种按需加载的 component,在调用 ServiceManager.getService(Class)时才会加载,且程序中只有一个实例。
Service是插件的一个组件, 是为了把公共的逻辑放到一起,Service的实例是单例的。
Serivce 在 IntelliJ IDEA 中是以 extension point 形式提供的,实现自己的 service 需要扩展相应 extension point。
-
applicationService: application level service
-
projectService: project level service
-
moduleService: module level service
声明 service 时必须包含 serviceImplementation 属性用于实例化 service, serviceInterface 属性是可选的,可用于获取 service 实例。
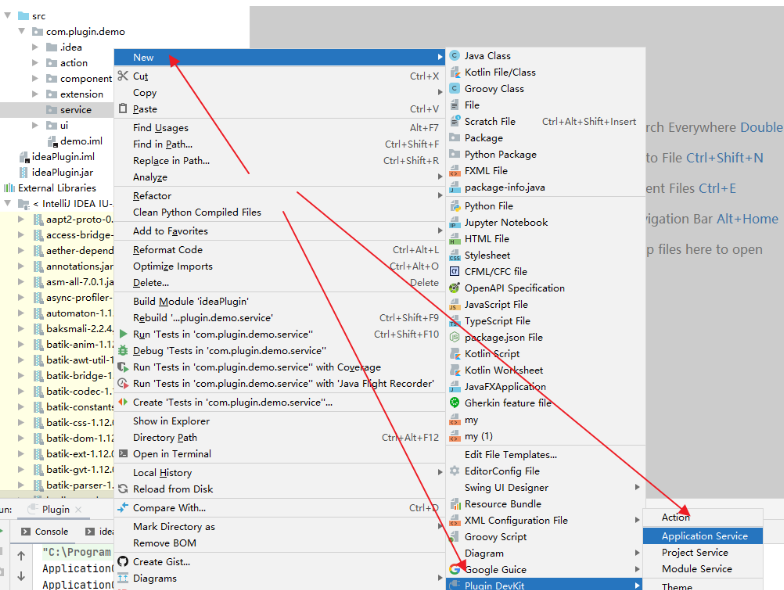
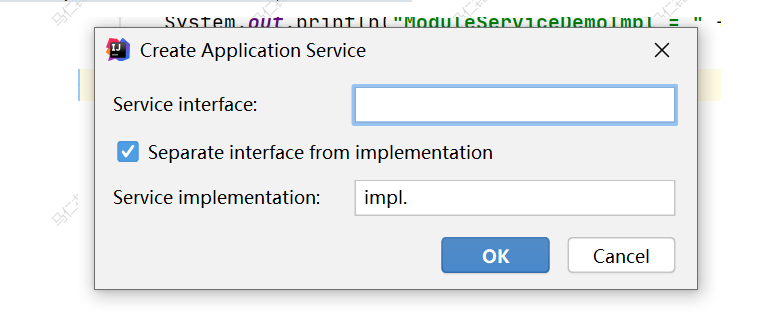
1、创建 Service
在需要放置 service 的 package 上右键, New | Plugin DevKit | xxxxService,如图
选择相应 service,弹出如下对话框,填写 interface 类和 implementation 类,若不勾选 Separate interface from implementation,只需填写 implementation 类。
IntelliJ IDEA 会自动创建相应类并配置 plugin.xml 文件。
示例:plugin.xml:
 <extensions defaultExtensionNs="com.intellij">
        <applicationService serviceInterface="com.plugin.demo.service.ApplicationServiceDemo"
                            serviceImplementation="com.plugin.demo.service.impl.ApplicationServiceDemoImpl"/>
        <projectService serviceInterface="com.plugin.demo.service.ProjectServiceDemo"
                        serviceImplementation="com.plugin.demo.service.impl.ProjectServiceDemoImpl"/>
        <moduleService serviceInterface="com.plugin.demo.service.ModuleServiceDemo"
                       serviceImplementation="com.plugin.demo.service.impl.ModuleServiceDemoImpl"/>
    </extensions>
- 1
- 2
- 3
- 4
- 5
- 6
- 7
- 8
- 9
- 10
生成的 service 类:
public interface ApplicationServiceDemo {
    static ApplicationServiceDemo getInstance() {
        return ServiceManager.getService(ApplicationServiceDemo.class);
    }
}
public interface ProjectServiceDemo {
    static ProjectServiceDemo getInstance(@NotNull Project project) {
        return ServiceManager.getService(project, ProjectServiceDemo.class);
    }
}
public interface ModuleServiceDemo {
    static ModuleServiceDemo getInstance(@NotNull Module module) {
        return module.getService(ModuleServiceDemo.class);
    }
}
- 1
- 2
- 3
- 4
- 5
- 6
- 7
- 8
- 9
- 10
- 11
- 12
- 13
- 14
- 15
- 16
- 17
public class ApplicationServiceDemoImpl implements ApplicationServiceDemo {

    public ApplicationServiceDemoImpl() {
        System.out.println("ApplicationServiceDemoImpl = ");
    }
}
public class ProjectServiceDemoImpl implements ProjectServiceDemo {
    public ProjectServiceDemoImpl(Project project) {

        System.out.println("ProjectServiceDemoImpl = " + project);
    }
}
public class ModuleServiceDemoImpl implements ModuleServiceDemo {
    public ModuleServiceDemoImpl(Module project) {
        System.out.println("ModuleServiceDemoImpl = " + project);
    }
}
- 1
- 2
- 3
- 4
- 5
- 6
- 7
- 8
- 9
- 10
- 11
- 12
- 13
- 14
- 15
- 16
- 17
- 18
- 19
2、获取 Service
MyApplicationService applicationService = ServiceManager.getService(MyApplicationService.class);

//获取 project 级别的 service,需要提供 project 对象
MyProjectService projectService = ServiceManager.getService(project, MyProjectService.class);

//获取 module 级别的 service,需要提供 module 对象
MyModuleService moduleService = ModuleServiceManager.getService(module, MyModuleService.class);
- 1
- 2
- 3
- 4
- 5
- 6
- 7
- 8
- 9
八、持久化状态
我们在使用 IDE 开始开发工作之前,总是要先在 settings 页面进行一些设置,且每次重新打开 IDE 后这些设置仍然保留着,那么这些设置是如何保存下来的呢?
IntelliJ Platform 提供了一些 API,可以使 components 或 services 在每次打开 IDE 时仍然使用之前的数据,即持久化其状态。
1、PropertiesComponent
对于一些简单少量的值,我们可以使用 PropertiesComponent,它可以保存 application 级别和 project 级别的值。
下面方法用于获取 PropertiesComponent 对象:
//获取 application 级别的 PropertiesComponent
PropertiesComponent.getInstance()
//获取 project 级别的 PropertiesComponent,指定相应的 project
PropertiesComponent.getInstance(Project)

propertiesComponent.setValue(name, value)
propertiesComponent.getValue(name)
- 1
- 2
- 3
- 4
- 5
- 6
- 7
- 8
- 9
PropertiesComponent 保存的是键值对,由于所有插件使用的是同一个 namespace,强烈建议使用前缀来命名 name,比如使用 plugin id。
2、PersistentStateComponent
PersistentStateComponent 用于持久化比较复杂的 components 或 services,可以指定需要持久化的值、值的格式以及存储位置。
要使用 PersistentStateComponent 持久化状态:
-
需要提供一个 PersistentStateComponent 接口的实现类(component 或 service),指定类型参数,重写 getState() 和 loadState() 方法
-
类型参数就是要被持久化的类,它可以是一个 bean class,也可以是 PersistentStateComponent实现类本身。
-
在 PersistentStateComponent 的实现类上,通过 @com.intellij.openapi.components.State 注解指定存储的位置
下面通过两个例子进行说明:
class MyService implements PersistentStateComponent<MyService.State> {
  //这里 state 是一个 bean class
  static class State {
    public String value;
    ...
  }

  //用于保存当前的状态
  State myState;

  // 从当前对象里获取状态
  public State getState() {
    return myState;
  }
  // 从外部加载状态,设置给当前对象的相应字段
  public void loadState(State state) {
    myState = state;
  }
}
- 1
- 2
- 3
- 4
- 5
- 6
- 7
- 8
- 9
- 10
- 11
- 12
- 13
- 14
- 15
- 16
- 17
- 18
- 19
- 20
- 21
// 这里的 state 就是实现类本身
class MyService implements PersistentStateComponent<MyService> {
  public String stateValue;
  ...

  public MyService getState() {
    return this;
  }

  public void loadState(MyService state) {
    XmlSerializerUtil.copyBean(state, this);
  }
}
- 1
- 2
- 3
- 4
- 5
- 6
- 7
- 8
- 9
- 10
- 11
- 12
- 13
- 14
- 15
2.1、实现 State 类
a、字段要求
state 类中可能有多个字段,但不是所有字段都可以被持久化,可以被持久化的字段:
-
public 字段
-
bean 属性:提供 getter 和 setter 方法
-
被注解的私有字段:使用 @Tag, @Attribute, @Property, @MapAnnotation, @AbstractCollection 等注解来自定义存储格式,一般在实现向后兼容时才考虑使用这些注解
这些字段也有类型要求:
-
数字(包括基础类型,如int,和封装类型,如Integer)
-
布尔值
-
字符串
-
集合
-
map
-
枚举
如果不希望某个字段被持久化,可以使用 @com.intellij.util.xmlb.annotations.Transient 注解。
b、构造器要求
state 类必须有一个默认构造器,这个构造器返回的 state 对象被认为是默认状态,只有当当前状态与默认状态不同时,状态才会被持久化。
2.2、定义存储位置
我们可以使用 @State 注解来定义存储位置
@State(name = "PersistentDemo", storages = {@Storage(value = "PluginDemo.xml")})
public class PersistentDemo implements PersistentStateComponent<PersistentDemo> {
  ...
}
- 1
- 2
- 3
- 4
- 5
- 6
name: 定义 xml 文件根标签的名称
storages: 一个或多个 @Storage,定义存储的位置
-
若是 application 级别的组件运行调试时 xml 文件的位置: ~/IdeaICxxxx/system/plugins-sandbox/config/options正式环境时 xml 文件的位置: ~/IdeaICxxxx/config/options
-
若是 project 级别的组件,默认为项目的 .idea/misc.xml,若指定为 StoragePathMacros.WORKSPACE_FILE,则会被保存在 .idea/worksapce.xml
2.3、生命周期
-
loadState() 当组件被创建或 xml 文件被外部改变(比如被版本控制系统更新)时被调用
-
getState() 当 settings 被保存(比如settings窗口失去焦点,关闭IDE)时,该方法会被调用并保存状态值。如果 getState() 返回的状态与默认状态相同,那么什么都不会被保存。
-
noStateLoaded() 该方法不是必须实现的,当初始化组件,但是没有状态被持久化时会被调用
2.4、组件声明
持久化组件可以声明为 component,也可以声明为 service
声明为 service,plugin.xml 文件如下配置:
<extensions defaultExtensionNs="com.intellij">
    <applicationService serviceImplementation="com.example.test.persisting.PersistentDemo"/>
    <projectService serviceImplementation="com.example.test.persisting.PersistentDemo2"/>
  </extensions>
- 1
- 2
- 3
- 4
- 5
- 6
代码中获取状态与获取 service 的方式一样:
PersistentDemo persistDemo = ServiceManager.getService(PersistentDemo.class);
PersistentDemo2 persistDemo2 = ServiceManager.getService(project,PersistentDemo.class);
- 1
- 2
- 3
- 4
声明为 component,plugin.xml 文件如下配置:
<application-components>
  <!--将持久化组件声明为component-->
  <component>
    <implementation-class>com.example.persistentdemo.PersistentComponent</implementation-class>
  </component>
</application-components>
- 1
- 2
- 3
- 4
- 5
- 6
- 7
- 8
获取状态与获取 component 的方式一样:
public static PersistentComponent getInstance() {
    return ApplicationManager.getApplication().getComponent(PersistentComponent.class);
}
public static PersistentComponent getInstance(Project project) {
    return project.getComponent(PersistentComponent.class);
}
- 1
- 2
- 3
- 4
- 5
- 6
- 7
- 8
九、插件依赖
开发插件时可能会用到其他插件,可能是 IDEA 绑定的,也可能是第三方的插件。
配置插件依赖需要将插件包添加到 SDK 的 classpath 中,并在 plugin.xml 配置。
-
确定插件包的位置如果插件是 IDEA 捆绑的插件,那么插件包在 IDEA 安装目录的 plugins/ 或 plugins//lib 下。如果插件是第三方或自己的,那么需要先运行一次 sandbox(其实我们在运行调试插件的时候就是在运行sandbox)并从本地或插件仓库安装依赖插件。安装好后,插件包会放在 sandbox 目录下的 config/plugins/ 或 config/plugins//lib,查看 sandbox 目录:打开 IntelliJ Platform SDK 配置页面,其中 Sandbox Home 就是其目录。
-
将插件包添加到 SDK 的 classpath 中导航到 File | Project Structure | SDKs,选择插件使用的 IntelliJ Platform SDK,点击右侧 + 号,在弹出的文件选择框中选择要依赖的插件包,点击 OK。
配置 plugin.xml在 plugin.xml 的 部分添加所依赖插件的id。
org.jetbrains.kotlin
- 1
- 2
- 3
plugin id 可以从插件包的 plugin.xml 文件查看。
十、GUI 介绍
GUI 是 IntelliJ IDEA 提供的一个自动生成 java 布局代码的工具,它使用 JDK 中的 Swing 控件来实现 UI 界面。
使用步骤:
1.配置
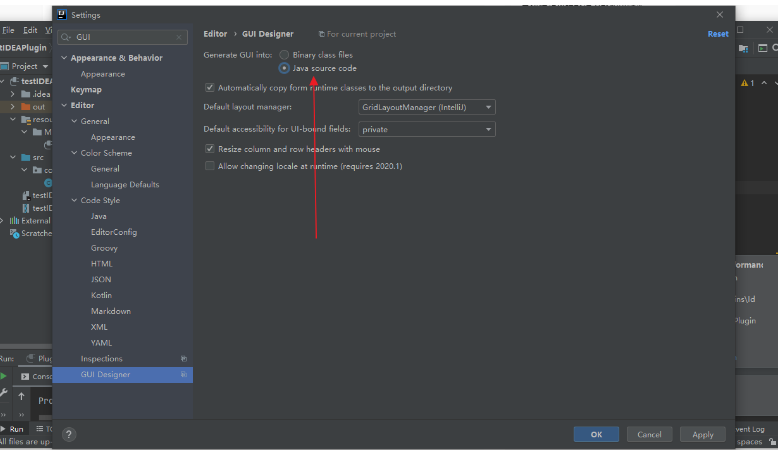
配置 GUI首先打开 Settings 对话框,选择 Editor | GUI Designer,如图,在 Generate GUI into: 有两个选项,生成 class 文件或 java 代码,我们选择生成 java 代码,因为建好布局后可能需要修改代码。其他默认即可。
2.创建 form
创建 form 文件form 文件用于记录界面布局。在相应的 package 上右键,选择 New | GUI Form,如图,输入 form 文件名,一般与 java 文件名相同,点击 OK 创建 form 与 java 文件。

3.面板介绍
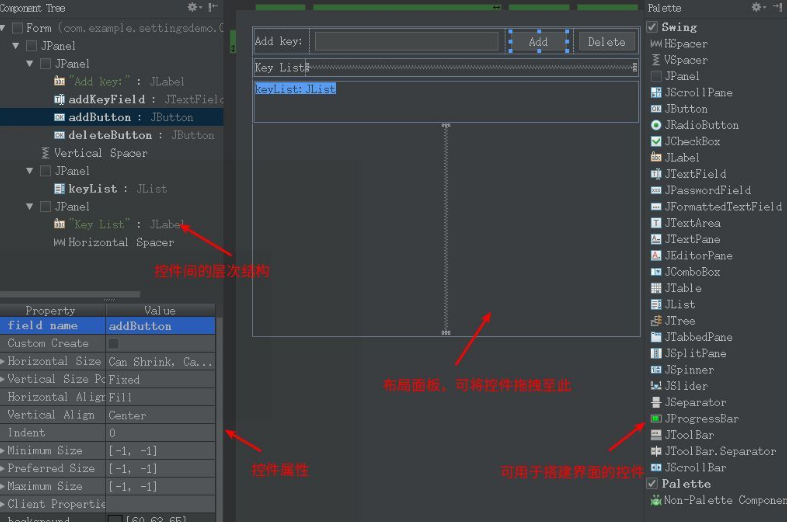
编辑界面打开 form 文件,如图,通过拖拽控件来搭建布局。每个form文件布局的 root 控件都是一个 JPanel,可将该 root 对象传给需要该布局的类。注意:左下角的属性面板,只有当填写了 field name 属性时该控件的对象才会被当成成员变量,否则为局部变量。
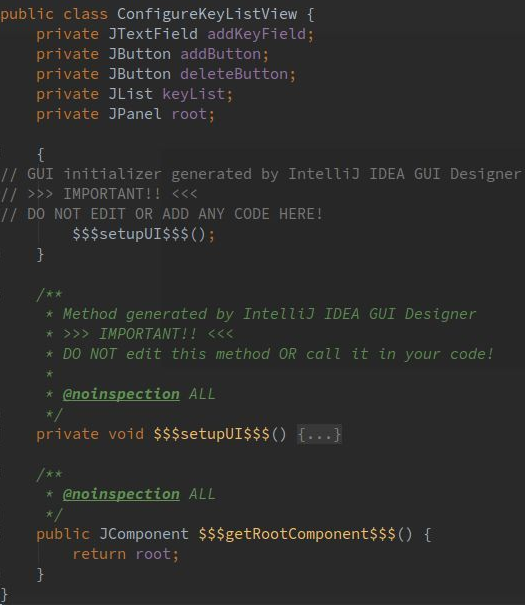
4.构建
生成 java 代码搭建好布局后,点击 build
编译按钮,即可生成 java 的源码文件。
GUI 生成的方法名前后都有三个 标识,当再次修改布局时, G U I 只会修改 标识,当再次修改布局时,GUI 只会修改 标识,当再次修改布局时,GUI只会修改 标识的方法。
十一、源码分析SmartConverter
SmartConverter – POJO Object Converter
项目地址:https://github.com/zitiger/smartconverter
1、项目背景
在分层开发中,我们总是面临着各种POJO(DTO,DO,JO,VO)对象之间的相互转换。当对象比较复杂时,编写转换代码耗时较多,且非常容易出错。以至于可能会出现写一天代码,半天在写各种convert的囧境。
为了实现自动转换,出现了BeanUtil和ModelMapper等解决方案。这些方案,在少量对象转换时,性能损耗可以忽略,但是当转换数量达到一定量级时,这种损耗会对性能产生影响。
本插件可以自动生成POJO之间的转换代码,省去手工转换的麻烦,也不会损失性能。
2、安装
下载SmartConverter.zip,并在Intellij Idea中安装;
3、四个转换函数
-
把光标放到函数中,不能是函数内.
-
光标移动到函数体内,按下⌘+N,在弹出的Generate菜单中选择Smart Converter;
-
插件自动生成一下四个转换函数
-
A -> B
-
B -> A
-
List-> List
-
List**-> List**
4、单个抓换函数
-
在编辑器中,确定返回值和参数,完成空转换函数;
public static List<UserJO> toDTOList(List<UserDTO> userDTOList) { }- 1
- 2
- 3
- 4
- 5
-
光标移动到函数体内,按下⌘+N,在弹出的Generate菜单中选择Smart Converter;
-
插件根据入参和出参推断出需要转换的POJO。

5、插件特色
插件自动从转换函数的参数和返回值推断出转换POJO;
支持List之间的转换。
如果存在单个转换的函数,则直接使用
如果不存在单个转换的函数,创建单个转换函数
支持嵌套转换

6、源码解读
6.1.如何将ConvertGeneratorAction 添加到菜单
因为使用SmartConvert是使用alt+insert弹出或者右键点击Generate显示SmartConvertAction,所以根据前文的添加位置不难推断添加在弹出菜单EditorPopupMenu下,这个时候我们可以从两个方向找他添加的位置。
首先从项目的配置文件进入找到plugin.xml下配置的action。由此不难看出它实际是添加在了GenerateGroup这个组上的
 <actions>
        <group id="com.zitiger.plugin.converter.generate.group" popup="true">
            <separator/>
            <!-- Add your actions here -->
            <action id="com.zitiger.plugin.converter.action.generator" class="com.zitiger.plugin.converter.action.ConvertGeneratorAction"
                    text="Smart Converter" description="Smart Converter">
                <keyboard-shortcut keymap="$default" first-keystroke="shift meta N"/>
            </action>
            <add-to-group group-id="GenerateGroup" anchor="last"/>
        </group>
    </actions>
- 1
- 2
- 3
- 4
- 5
- 6
- 7
- 8
- 9
- 10
- 11
- 12
- 13
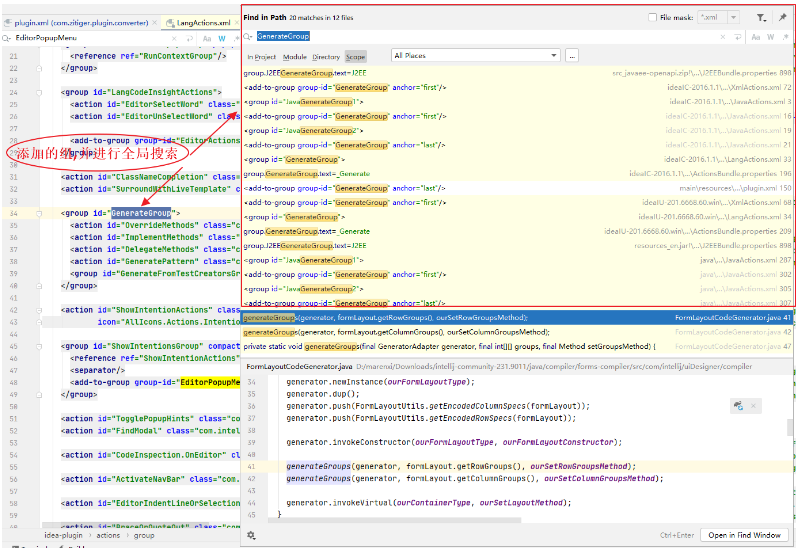
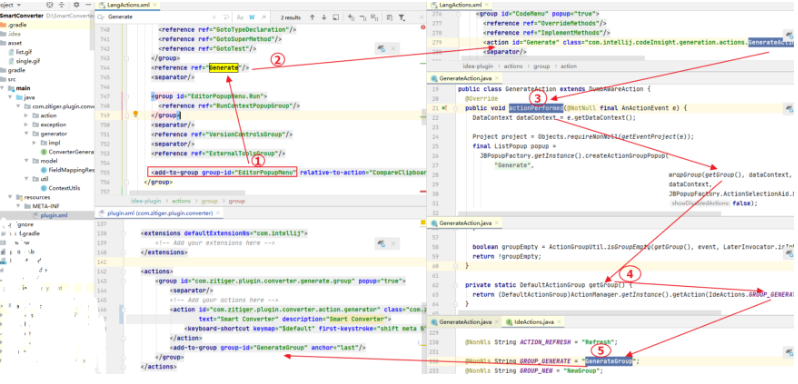
这个时候我们不难看出并没有地方引用这个组,这个时候我们不防从使用的地方入手,我们是右键点击Generate或者alt+insert弹出的EditorLangPopupMenu下的Generate的组。这个时候我们去全局搜索EditorPopupMenu
发现这里有一个添加到右键菜单下的
 <group id="EditorLangPopupMenu">
      <separator/>
      <group id="EditorPopupMenu.GoTo" popup="true">
        <reference ref="ShowNavBar"/>
        <reference ref="GotoDeclaration"/>
        <reference ref="GotoImplementation"/>
        <reference ref="GotoTypeDeclaration"/>
        <reference ref="GotoSuperMethod"/>
        <reference ref="GotoTest"/>
      </group>
      <reference ref="Generate"/>
      <separator/>
      <group id="EditorPopupMenu.Run">
        <reference ref="RunContextPopupGroup"/>
      </group>
      <separator/>
      <reference ref="VersionControlsGroup"/>
      <separator/>
      <reference ref="ExternalToolsGroup"/>
      <add-to-group group-id="EditorPopupMenu" relative-to-action="CompareClipboardWithSelection" anchor="before"/>
    </group>
- 1
- 2
- 3
- 4
- 5
- 6
- 7
- 8
- 9
- 10
- 11
- 12
- 13
- 14
- 15
- 16
- 17
- 18
- 19
- 20
- 21
- 22
- 23
点击后跳转的是
<action id="Generate" class="com.intellij.codeInsight.generation.actions.GenerateAction"/>
- 1
- 2
- 3
GenerateAction的点击方法actionPerformed内动态生成了ActionGroup
JBPopupFactory.getInstance().createActionGroupPopup(CodeInsightBundle.message("generate.list.popup.title"), wrapGroup(getGroup(),dataContext,project),dataContext,JBPopupFactory.ActionSelectionAid.SPEEDSEARCH, false);
- 1
- 2
- 3
而getGroup() 通过指定groupid 获取到GenerateGroup的Action组
return (DefaultActionGroup)ActionManager.getInstance().getAction(IdeActions.GROUP_GENERATE);
- 1
- 2
- 3
6.2.如何实现实体~~~~转换
2.1Program Structure Interface (PSI)
https://plugins.jetbrains.com/docs/intellij/psi-files.html
程序结构接口,通常简称为 PSI,负责解析文件并创建语法和语义代码模型,为平台的众多功能提供支持。
PSI文件是结构的根,将文件内容表示为特定编程语言中元素的层次结构
PsiFile是所有 PSI 文件的公共基类,而特定语言的文件通常由其子类表示。例如PsiJavaFile类代表一个Java文件,类XmlFile代表一个XML文件。
2.2查看某一个文件的PSI结构
参考文档:PSI Viewer
未配置开启查看PIS结构时如下图
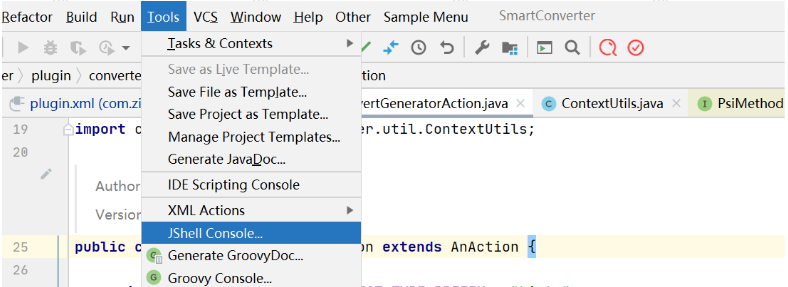
开启查看PIS结构 找到idea安装路径下的bin目录下的idea.properties配置如下
idea.is.internal=true
- 1
- 2
- 3
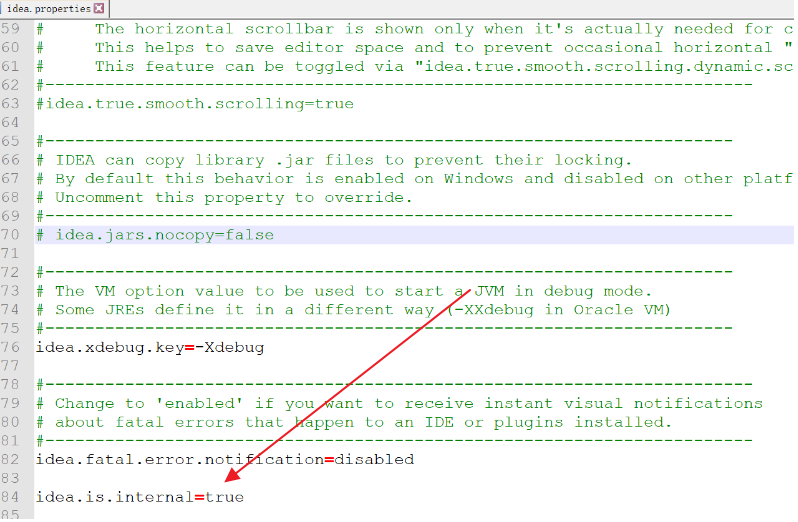
开启后显示了View PSI Structure 和View PSI Structure of Current File
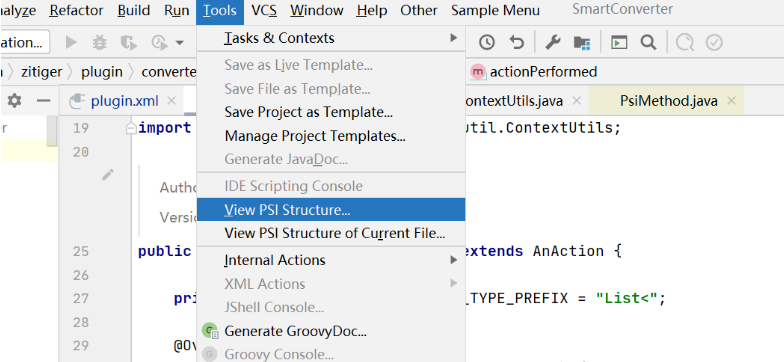
进入要查看结构的文件后点击View PSI Structure of Current File
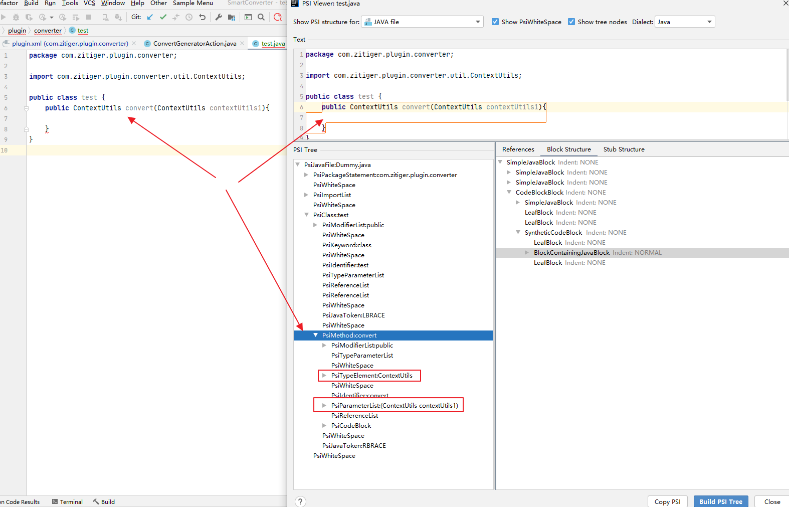
查看某一个文件的psi结构
2.3查看插件源码
进入ConvertGeneratorAction的点击事件方法不难看到如下的根据PSI获取当前类和方法的代码
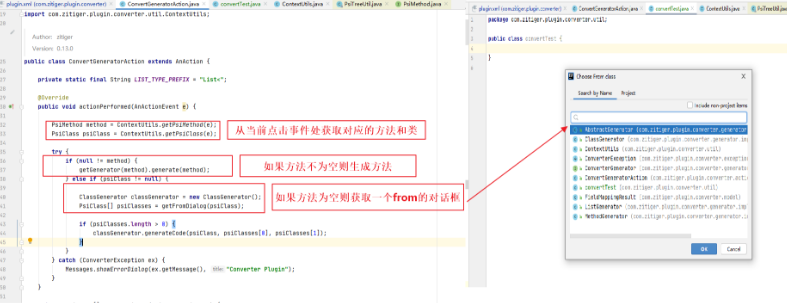
2.4继续跟踪生成方法转换代码
这里主要是根据返回类型获取到了一个MethodGenerator并执行对应的generateCode方法

2.5MethodGenerator下的generateCode
MethodGenerator下的generateCode主要获取了当前方法的入参fromClass与toClass,并进行了字符串的组装和生成代码块。
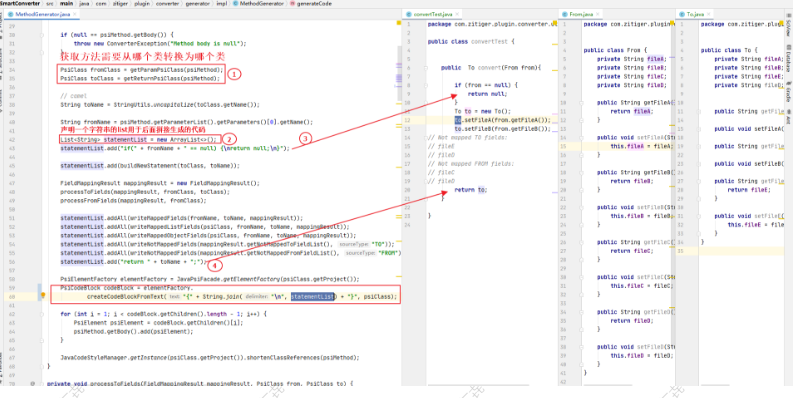
PsiCodeBlock codeBlock = elementFactory.
createCodeBlockFromText(“{” + String.join(“\n”, statementList) + “}”, psiClass);
源码分析就到这里,如果有兴趣的同学可以自行深入分析并欢迎补充。
十二、武魂融合
1.定位
想编写一个什么样的插件(功能)
插件要实现的能力是什么,eg:进行方法入参快速转为出参、获取选择的文本添加为笔记、idea激活弹出框、数据库Database…等。
2.拆解
实现插件需要具备哪些能力(功能拆解)
需要页面操作交互能力(java swing)
需要发送http请求能力(添加依赖的能力)
需要添加action的能力(插件需要放在哪里,插件的生命周期是什么等级的等。)
需要读写文件的能里(new BufferedWriter(new OutputStreamWriter(new FileOutputStream(file),“utf-8”))

Copyright © 2003-2013 www.wpsshop.cn 版权所有,并保留所有权利。

