- 1python学习:zip文件_deflated lzma
- 2Bat脚本编写之Dos 基本操作命令_dos命令运行bat脚本怎么写
- 3Linux系统中常用的压缩、解压缩命令(tar、zip、gzip、bzip2、xz)_linux tar 压缩文件的时候忽略绝对路径 只压缩文件名
- 4WDS迁移注意事项
- 5香港高防服务器租用应该如何选择?
- 6Linux环境下Qt应用程序安装器(installer)制作_qtifw在linux中应用
- 7mysql数据库常用函数_使用mysql语句比较s1和s2两个字符串
- 8Go 工程化标准实践_go internal最佳实践
- 9理解RTF和RTX指标_asr rtf
- 10windows安装docker 异常解决_docker desktop requires windows 10 pro/enterprise/
使用tflite_convert命令工具将keras h5文件转换为tflite文件简易指南
赞
踩
问题来源
网上查询了各种资料,也看了tensorflow lite官网转换模型的章节,不是这里错就是那里搞不定.
最后终于通过两次转换将keras生成的h5文件转换成了tflite文件.遂记录之以备来日查看或做前车之鉴.
注意事项
1. 环境
我所使用的环境是ubuntu 18.04 + python3.6 + tensorflow-gpu1.9 + keras 2.2.0
整个python虚拟环境使用conda进行创建
不保证其他tensorflow版本能够按照步骤成功,特别是tensorflow2.x版本改了一些api
貌似win10有些命令不能用或包缺失,所以windows系统也不能保证成功
2. h5模型
保存模型时不能只保存权重[model.save_weights()],要使用model.save()把模型结构也保存下来
3. tflite_convert工具
从TensorFlow 1.9开始,命令行工具tflite_convert作为Python包的一部分随之安装
translated from : https://tensorflow.google.cn/lite/convert/cmdline_examples
转换
1. h5文件转换为pb文件
谷歌推荐的保存模型的方式是保存模型为 PB 文件,它具有语言独立性,可独立运行,封闭的序列化格式,任何语言都可以解析它,它允许其他语言和深度学习框架读取、继续训练和迁移 TensorFlow 的模型。
它的主要使用场景是实现创建模型与使用模型的解耦, 使得前向推导 inference的代码统一。
另外的好处是保存为 PB 文件时候,模型的变量都会变成固定的,导致模型的大小会大大减小,适合在手机端运行。
还有一个就是,真正离线测试使用的时候,pb格式的数据能够保证数据不会更新变动,就是不会进行反馈调节啦。
abstract from : https://blog.csdn.net/fu6543210/article/details/80343345
使用keras_to_tensorflow.py文件在命令行中转换
1.1 获取keras_to_tensorflow.py文件
从github仓库克隆代码
git clone http://www.github.com/amir-abdi/keras_to_tensorflow.git
- 1
1.2 转到keras_to_tensorflow目录
cd ./keras_to_tensorflow
- 1
1.3使用keras_to_tensorflow.py进行转换
python keras_to_tensorflow.py --input_model=[h5文件目录] --output_model=[待生成的pb文件目录]
- 1
假设在当前目录有model.h5文件,转换后的名字规定为model.pb.下面是转换示例
python keras_to_tensorflow.py --input_model=./model.h5 --output_model=./model.pb
- 1
下面是命令执行后可能的类似的输出结果(截取片段)
2020-05-19 11:24:40.739310: I tensorflow/core/common_runtime/gpu/gpu_device.cc:1471] Adding visible gpu devices: 0
2020-05-19 11:24:40.985216: I tensorflow/core/common_runtime/gpu/gpu_device.cc:952] Device interconnect StreamExecutor with strength 1 edge matrix:
2020-05-19 11:24:40.985249: I tensorflow/core/common_runtime/gpu/gpu_device.cc:958]      0
2020-05-19 11:24:40.985256: I tensorflow/core/common_runtime/gpu/gpu_device.cc:971] 0:   N
2020-05-19 11:24:40.985451: I tensorflow/core/common_runtime/gpu/gpu_device.cc:1084] Created TensorFlow device (/job:localhost/replica:0/task:0/device:GPU:0 with 1103 MB memory) -> physical GPU (device: 0, name: GeForce GTX 1050, pci bus id: 0000:01:00.0, compute capability: 6.1)
I0519 11:24:45.570705 139866333914944 keras_to_tensorflow.py:146] Converted output node names are: ['dense_3/Softmax']
INFO:tensorflow:Froze 24 variables.
I0519 11:24:45.613275 139866333914944 tf_logging.py:115] Froze 24 variables.
INFO:tensorflow:Converted 24 variables to const ops.
I0519 11:24:45.835598 139866333914944 tf_logging.py:115] Converted 24 variables to const ops.
I0519 11:24:47.002808 139866333914944 keras_to_tensorflow.py:178] Saved the freezed graph at ../classifydishes/data/logs/model.pb
- 1
- 2
- 3
- 4
- 5
- 6
- 7
- 8
- 9
- 10
- 11
- 12
2. pb文件转换为tflite文件
2.1 了解使用tflite_convert命令的参数
下面是一条典型的转换命令
tflite_convert --output_file=[tflite文件生成的路径] --graph_def_file=[pb文件所在的路径] --input_arrays=[输入数组] --output_arrays=[输出数组]
- 1
命令中最重要的参数是input_arrays与output_arrays
2.2 查看pb文件的input_arrays & output_arrays
使用以下python代码进行查看(部分代码来源于网络)
import os
import tensorflow as tf


def create_graph(model_path):
    with tf.gfile.FastGFile(os.path.join(model_path), 'rb') as f:
        graph_def = tf.GraphDef()
        graph_def.ParseFromString(f.read())
        tf.import_graph_def(graph_def, name='')


def print_io_arrays(pb):
    gf = tf.GraphDef()
    m_file = open(pb, 'rb')
    gf.ParseFromString(m_file.read())

    with open('gfnode.txt', 'a') as the_file:
        for n in gf.node:
            the_file.write(n.name + '\n')

    file = open('gfnode.txt', 'r')
    data = file.readlines()
    print("output name = ")
    print(data[len(data) - 1])
    print("Input name = ")
    file.seek(0)
    print(file.readline())


if __name__ == "__main__":
    pd_file_path = './model.pb'
    print_io_arrays(pd_file_path)
- 1
- 2
- 3
- 4
- 5
- 6
- 7
- 8
- 9
- 10
- 11
- 12
- 13
- 14
- 15
- 16
- 17
- 18
- 19
- 20
- 21
- 22
- 23
- 24
- 25
- 26
- 27
- 28
- 29
- 30
- 31
- 32
- 33
请将pd_file_path变量改为为自己pd文件所在路径
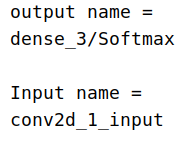
代码运行后可能的输出示例如下

可以看到input_arrays为conv2d_1_input,output_arrays为dense_3/Softmax
2.3 转换
已经获得了输入输出结点,可以使用前面提到的tflite_convert命令进行转换了
假设当前目录有model.pd文件,其input_arrays为conv2d_1_input,output_arrays为dense_3/Softmax,
规定在当前目录生成model.tflite文件
转换命令如下:
tflite_convert --output_file=./model.tflite --graph_def_file=./model.pb --input_arrays=conv2d_1_input --output_arrays=dense_3/Softmax
- 1


