- 1最新自然语言处理库transformers
- 2Python实现自然语言处理:文字转语音(含完整源码)_将文字转化为语音python代码
- 3flutter 底部弹窗 showModalBottomSheet 自定义样式和回调_flutter showmodalbottomsheet 隐藏
- 4基于Bert和通用句子编码的Spark-NLP文本分类_agnews数据集下载
- 5Ubuntu22.04安装WordPress教程
- 6[文本纠错] pycorrector框架训练_pycorrector训练自己的模型
- 7SER | 语音情绪识别 | TIM-NET_SER项目实现,以及训练自己的语音数据集,后期修改网络_timnet
- 8springboot使用百度智能云文本纠错_百度文本纠错怎么弄
- 9游戏包体大小优化 -- 实用篇_不简化代码会让包体变大吗
- 10单位网站被黑被下达整改进行行政处罚_网站被黑了可以报警吗有用吗
Centos7.7安装SQL Server 2019的问题_sqlservr: this program requires a machine with at
赞
踩
准备工作: vmware >2G内存 >2G内存 >2G内存
系统版本:Centos7.7 ,内存4G(SQL Server内存要求至少3G),硬盘40G,1核CPU
要不然启动失败。
选择 SQL Server 的语言:
(1) English
(2) Deutsch
(3) Español
(4) Français
(5) Italiano
(6) 日本語
(7) 한국어
(8) Português
(9) Руѝѝкий
(10) 中文 – 简体
(11) 中文 (繝体)
输入选项 1-11:10
输入 SQL Server 系统管理员密码:
确认 SQL Server 系统管理员密码:
正在配置 SQL Server...

sqlservr: This program requires a machine with at least 2000 megabytes of memory.
/opt/mssql/bin/sqlservr: This program requires a machine with at least 2000 megabytes of memory.

Microsoft SQL Server 的初始安装失败。请参考错误日志

2G内存  2G内存  2G内存
- 1
- 2
- 3
- 4
- 5
- 6
- 7
- 8
- 9
- 10
- 11
- 12
- 13
- 14
- 15
- 16
- 17
- 18
- 19
- 20
- 21
- 22
- 23
下载地址
SQL Server版本:SQL Server 2019:
https://packages.microsoft.com/rhel/7/mssql-server-2019/mssql-server-15.0.4003.23-3.x86_64.rpm
- 1
[root@localhost ~]# sed -i '/^SELINUX/s/enforcing/disabled/g' /etc/selinux/config && setenforce 0
- 1
添加软件源并安装依赖包
[root@localhost ~]# curl https://packages.microsoft.com/config/rhel/7/prod.repo -o /etc/yum.repos.d/msprod.repo
[root@localhost ~]# yum -y install mssql-tools unixODBC-devel bzip2 gdb libsss_nss_idmap cyrus-sasl cyrus-sasl-gssapi
- 1
- 2
安装SQL Server2019
安装之前上面的地址可以直接下载SQL Server2019,上传到服务器并安装 上传到
首先  cd /usr/local/soft/
  用xftp7 在本地下载好的直接拖进去 其它方法也可以,比如 rz sz
  之后 在这个目录中运行
[root@localhost ~]# rpm -ivh mssql-server-15.0.4003.23-3.x86_64.rpm
- 1
- 2
- 3
- 4
- 5
- 6
运行初始化配制
[root@localhost ~]# /opt/mssql/bin/mssql-conf setup
usermod: no changes
Choose an edition of SQL Server:
  1) Evaluation (free, no production use rights, 180-day limit)
  2) Developer (free, no production use rights)
  3) Express (free)
  4) Web (PAID)
  5) Standard (PAID)
  6) Enterprise (PAID) - CPU Core utilization restricted to 20 physical/40 hyperthreaded
  7) Enterprise Core (PAID) - CPU Core utilization up to Operating System Maximum
  8) I bought a license through a retail sales channel and have a product key to enter.

Details about editions can be found at
https://go.microsoft.com/fwlink/?LinkId=2109348&clcid=0x409

Use of PAID editions of this software requires separate licensing through a
Microsoft Volume Licensing program.
By choosing a PAID edition, you are verifying that you have the appropriate
number of licenses in place to install and run this software.

Enter your edition(1-8): 2 		#这里选择Developer 版本,
The license terms for this product can be found in
/usr/share/doc/mssql-server or downloaded from:
https://go.microsoft.com/fwlink/?LinkId=2104294&clcid=0x409

The privacy statement can be viewed at:
https://go.microsoft.com/fwlink/?LinkId=853010&clcid=0x409

Do you accept the license terms? [Yes/No]:Yes	#输入Yes接受许可条目

Enter the SQL Server system administrator password: 		#设置SA管理员密码  root.123
Confirm the SQL Server system administrator password:
Configuring SQL Server...

The licensing PID was successfully processed. The new edition is [Express Edition].
ForceFlush is enabled for this instance.
ForceFlush feature is enabled for log durability.
Created symlink from /etc/systemd/system/multi-user.target.wants/mssql-server.service to /usr/lib/systemd/system/mssql-server.service.
Setup has completed successfully. SQL Server is now starting.
- 1
- 2
- 3
- 4
- 5
- 6
- 7
- 8
- 9
- 10
- 11
- 12
- 13
- 14
- 15
- 16
- 17
- 18
- 19
- 20
- 21
- 22
- 23
- 24
- 25
- 26
- 27
- 28
- 29
- 30
- 31
- 32
- 33
- 34
- 35
- 36
- 37
- 38
- 39
添加环境变量
[root@localhost ~]# echo 'export PATH=$PATH:/opt/mssql-tools/bin' > /etc/profile.d/mssql.sh
[root@localhost ~]# source !$
source /etc/profile.d/mssql.sh
- 1
- 2
- 3
防火墙添加服务
[root@localhost ~]# firewall-cmd --permanent --add-service=mssql
success
[root@localhost ~]# firewall-cmd --reload
success
- 1
- 2
- 3
- 4
关闭防火墙:systemctl stop firewalld
这是使用命令
开启防火墙:systemctl start firewalld

关闭防火墙:systemctl stop firewalld

查看防火墙状态:systemctl status firewalld
- 1
- 2
- 3
- 4
- 5
- 6
开启后再执行
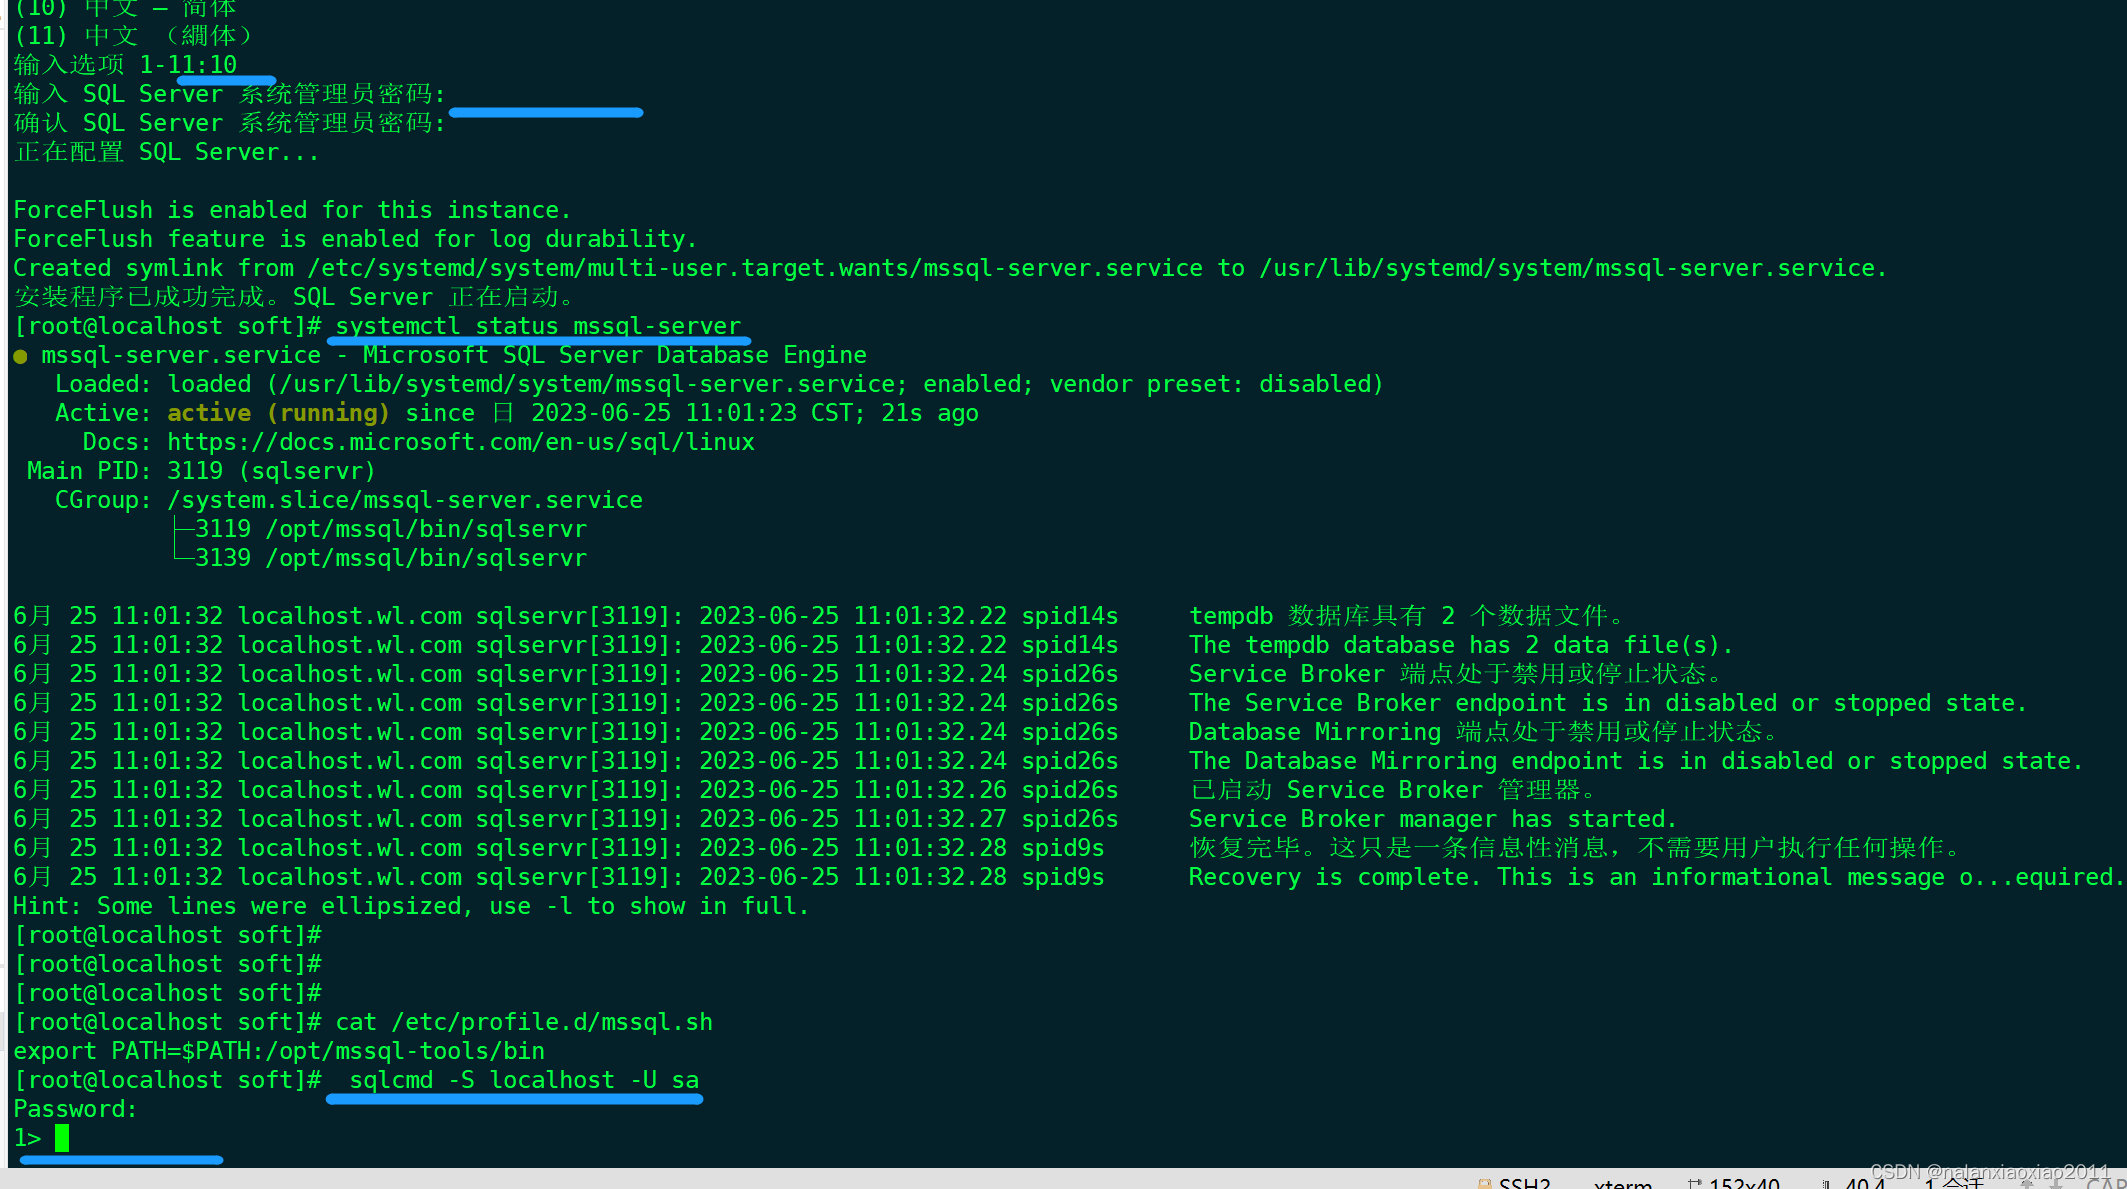
命令行工具连接测试
[root@localhost ~]# sqlcmd -S localhost -U sa
Password:
# 显示系统数据库
1> select name,database_id from sys.databases;
# 执行
2> go
name                                                                                                                             database_id
-------------------------------------------------------------------------------------------------------------------------------- -----------
master                                                                                                                                     1
tempdb                                                                                                                                     2
model                                                                                                                                      3
msdb                                                                                                                                       4

(4 rows affected)
# 查看软件版本

1> SELECT @@VERSION
2> go

------------------------------------------------------------------------------------------------------------------------------------------------------------------------------------------------------------------------------------------------------------------------------------------------------------
Microsoft SQL Server 2019 (RTM-CU1) (KB4527376) - 15.0.4003.23 (X64)
	Dec  6 2019 14:53:33
	Copyright (C) 2019 Microsoft Corporation
	Express Edition (64-bit) on Linux (CentOS Linux 7 (Core))

(1 rows affected)
1>
- 1
- 2
- 3
- 4
- 5
- 6
- 7
- 8
- 9
- 10
- 11
- 12
- 13
- 14
- 15
- 16
- 17
- 18
- 19
- 20
- 21
- 22
- 23
- 24
- 25
- 26
- 27
在客户端连接数据库
打开
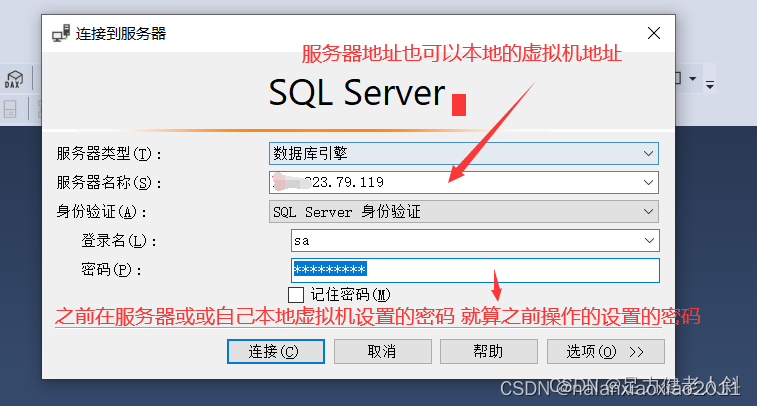
如果链接不上的话 一般就算就是没有添加端口或者密码错误
设置服务器的安全组
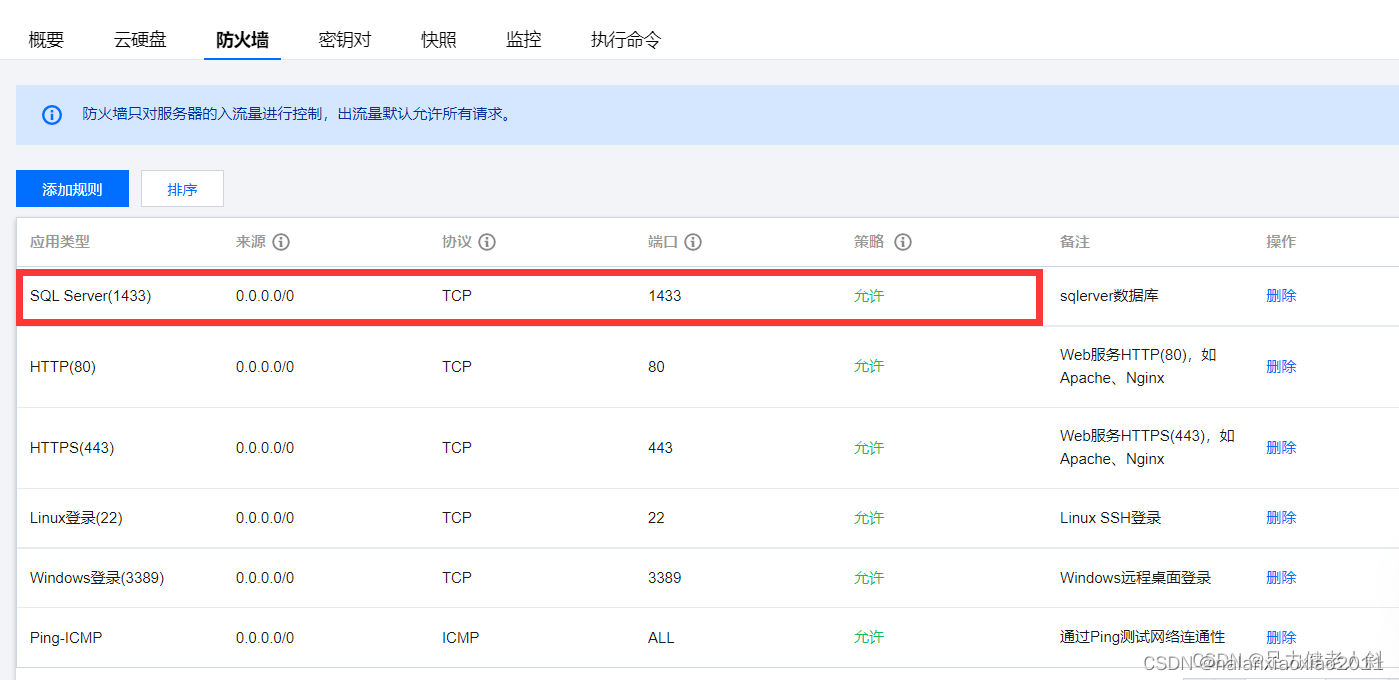
不管是什么服务器都记得添加1433的端口
本地服务器的设置
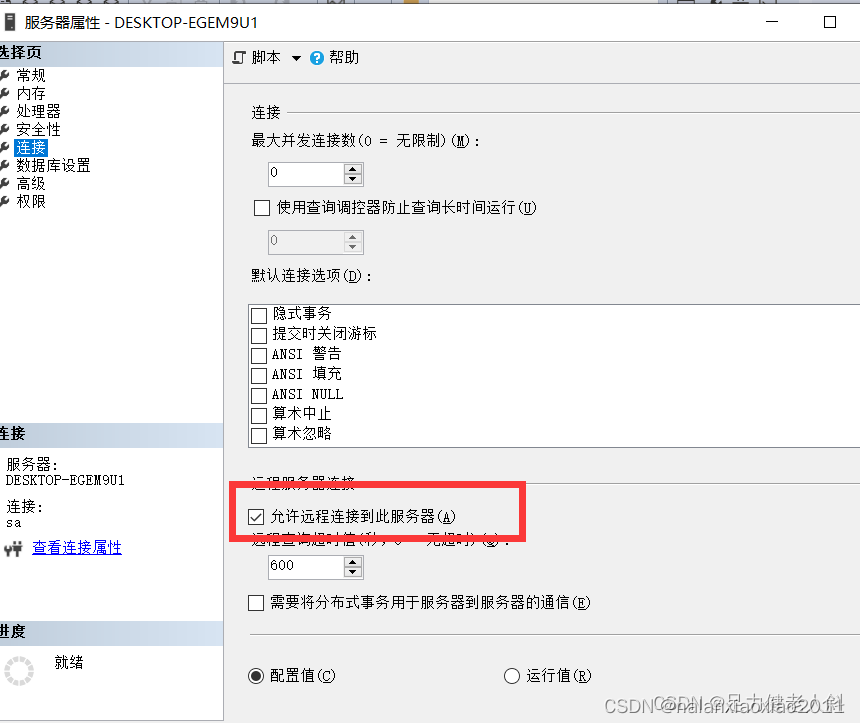
(二)为微软SQL服务器(MSSQLServer)配置相应协议。
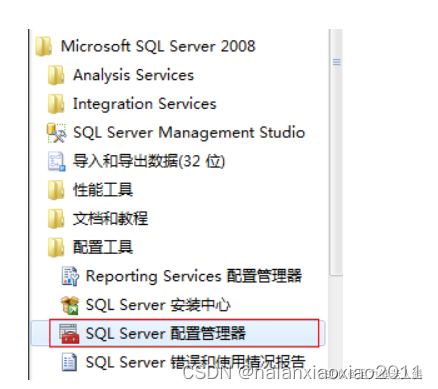
(1)依次选择:开始-〉所有程序-〉Microsoft SQL Server 2008-〉配置工具-〉SQL Server配置管理器,如下图所示:
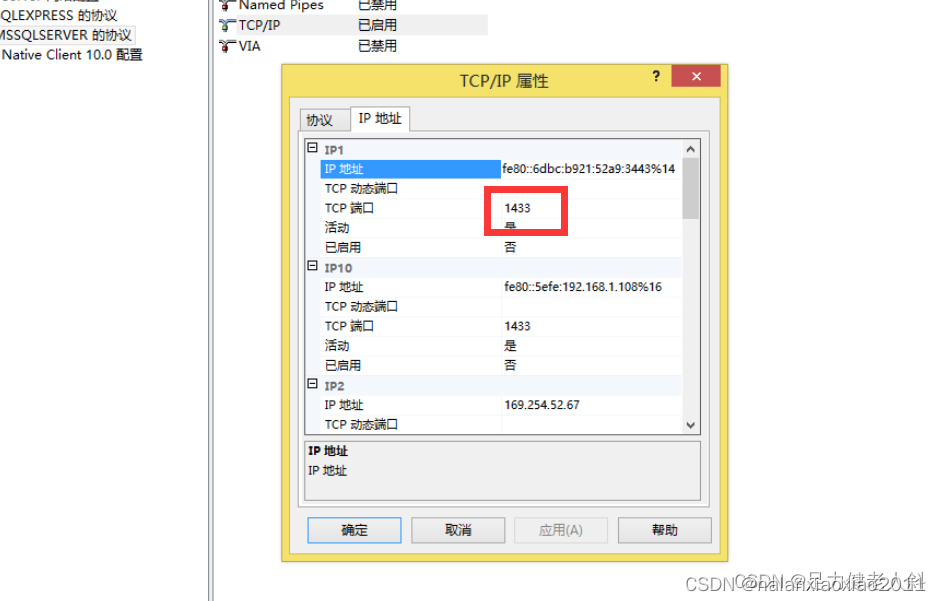
(2)打开SQL Server配置管理器后,选择SQL Server网络配置下面的MSSQLSERVER,然后看右边里面的TCP/IP是否为“已启用”,如下图所示:
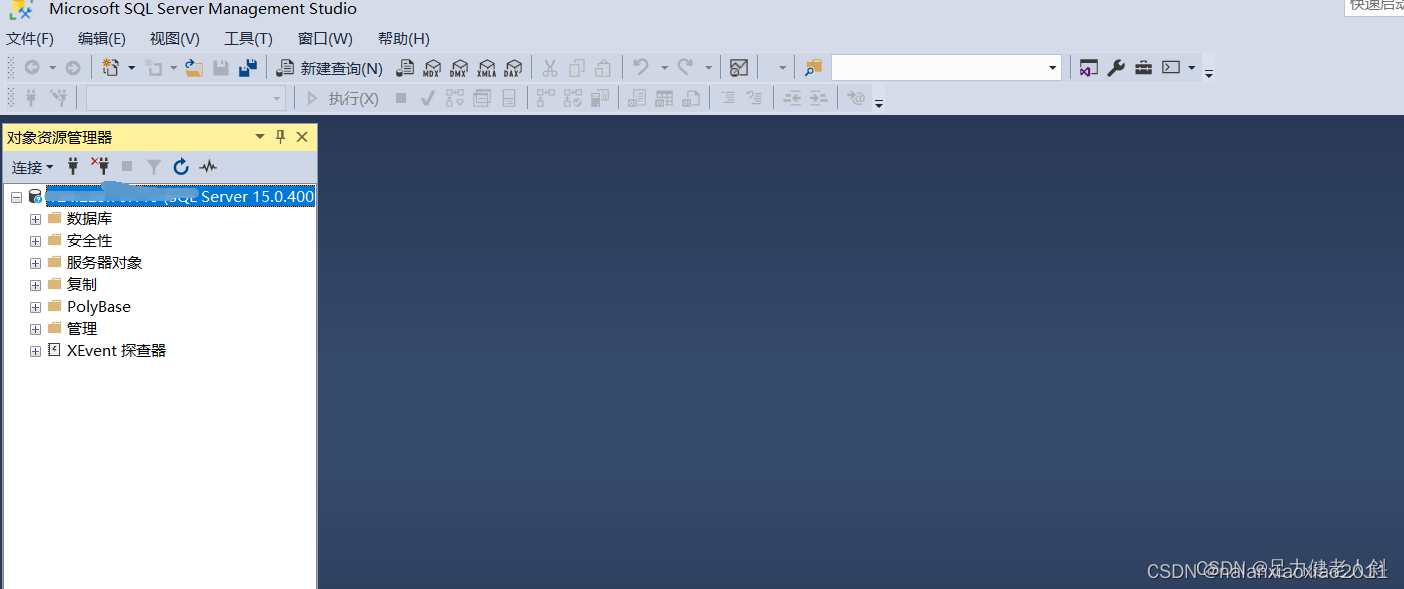
这样就大公告成啦 连接后
(二)Sql Server的基本配置以及使用Navicat连接Sql Server
一.sql server连接的验证方式
分为两种:
- Windows 身份认证: 使用windows的用户名密码验证
- SQL Server 身份认证 : 使用sql server的用户名 + 密码的方式登录()
二.sqlserver的环境配置
实际生产环境服务器肯定是需要远程连接的,所以我们需要对本机的sqlserver进行一下的基本配置:
- 配置支持tcp连接 (否则无法使用连接工具进行远程连接)
- 配置支持SQL Server 身份认证 (一般情况下都会使用这种验证方式而不是windows验证)
- 配置支持远程连接 (否则不支持远程连接)
- 修改SA账号密码并启用(sa用户为内置的账号,一般使用这个账号连接sql server)
1.win + s 搜索sql , 打开SQL Server 2019 管理器配置 ,配置启用tcp协议
2.win + s 搜 sql 打开ssms
打开后采用默认的windows验证先连接上sql server
配置验证方式以及”支持远程连接”
修改sa账号的密码并启用
三.使用Navicat工具连接Sql Server
用什么工具连接全自己的喜好,当然如果你没有安装Navicat也可用之前安装的SSMS进行连接,都是差不多的,使用Navicat是因为之前用mysql用的比较多,且一直是用的是Navicat,习惯了,所以一般比较喜欢用navicat连接并操作数据库
使用navicat 连接sql server需要先安装sql server 驱动,否则连接时会报错找不到驱动
在navicat的安装目录下找到sqlserver的驱动双击安装即可
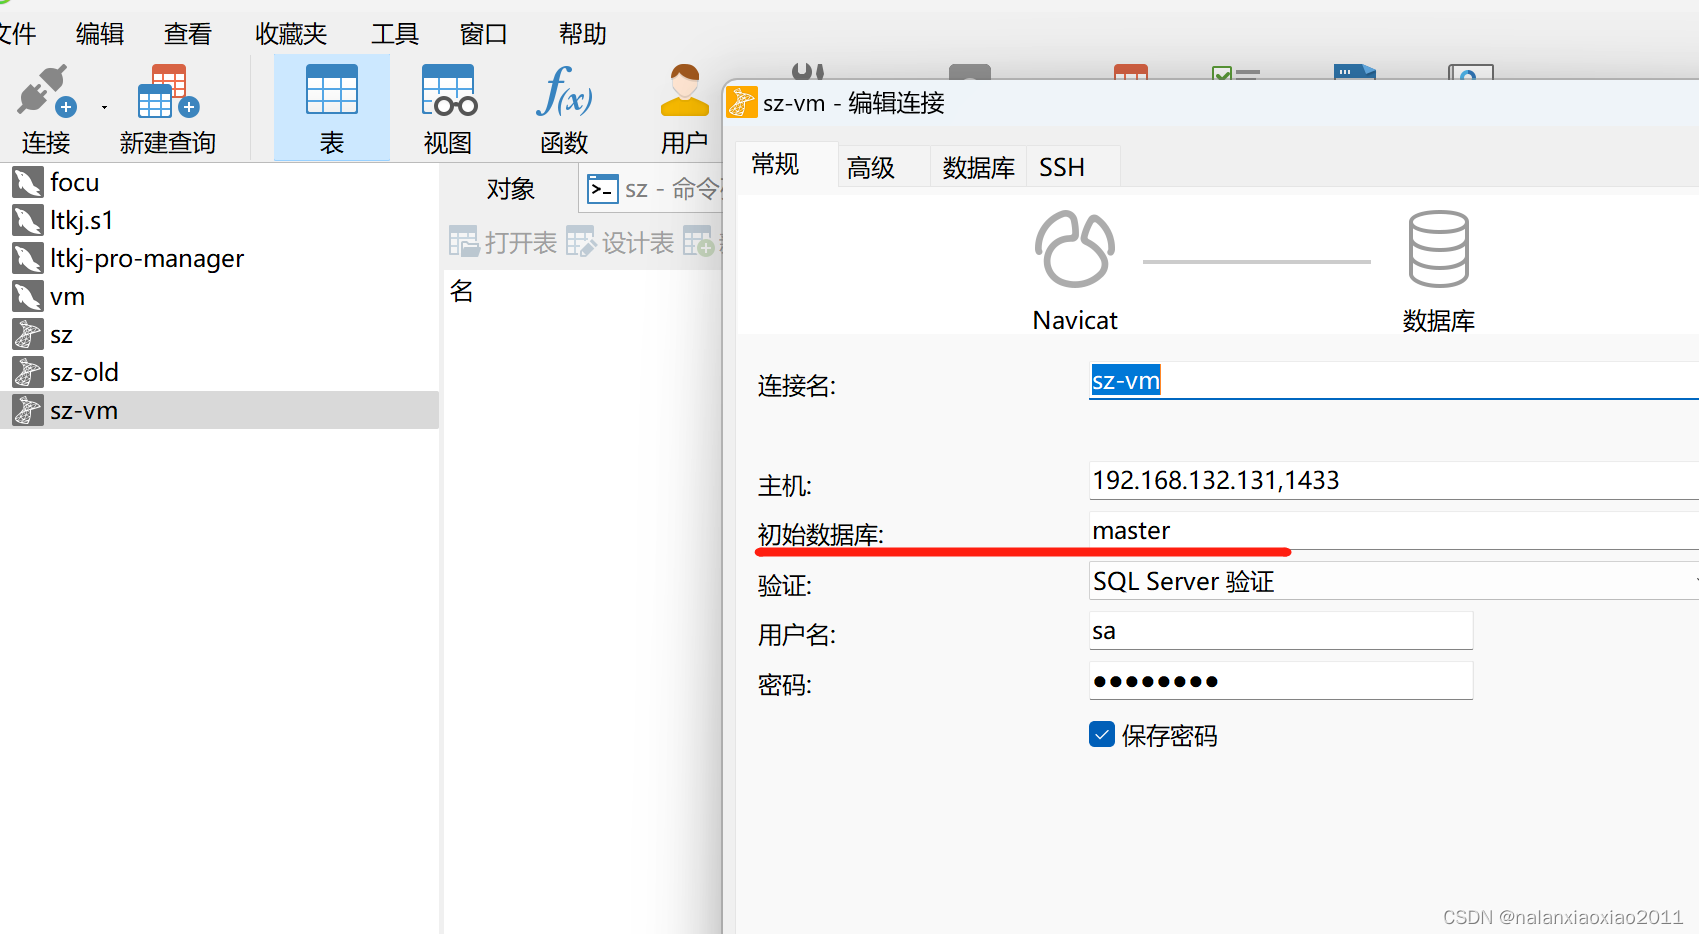
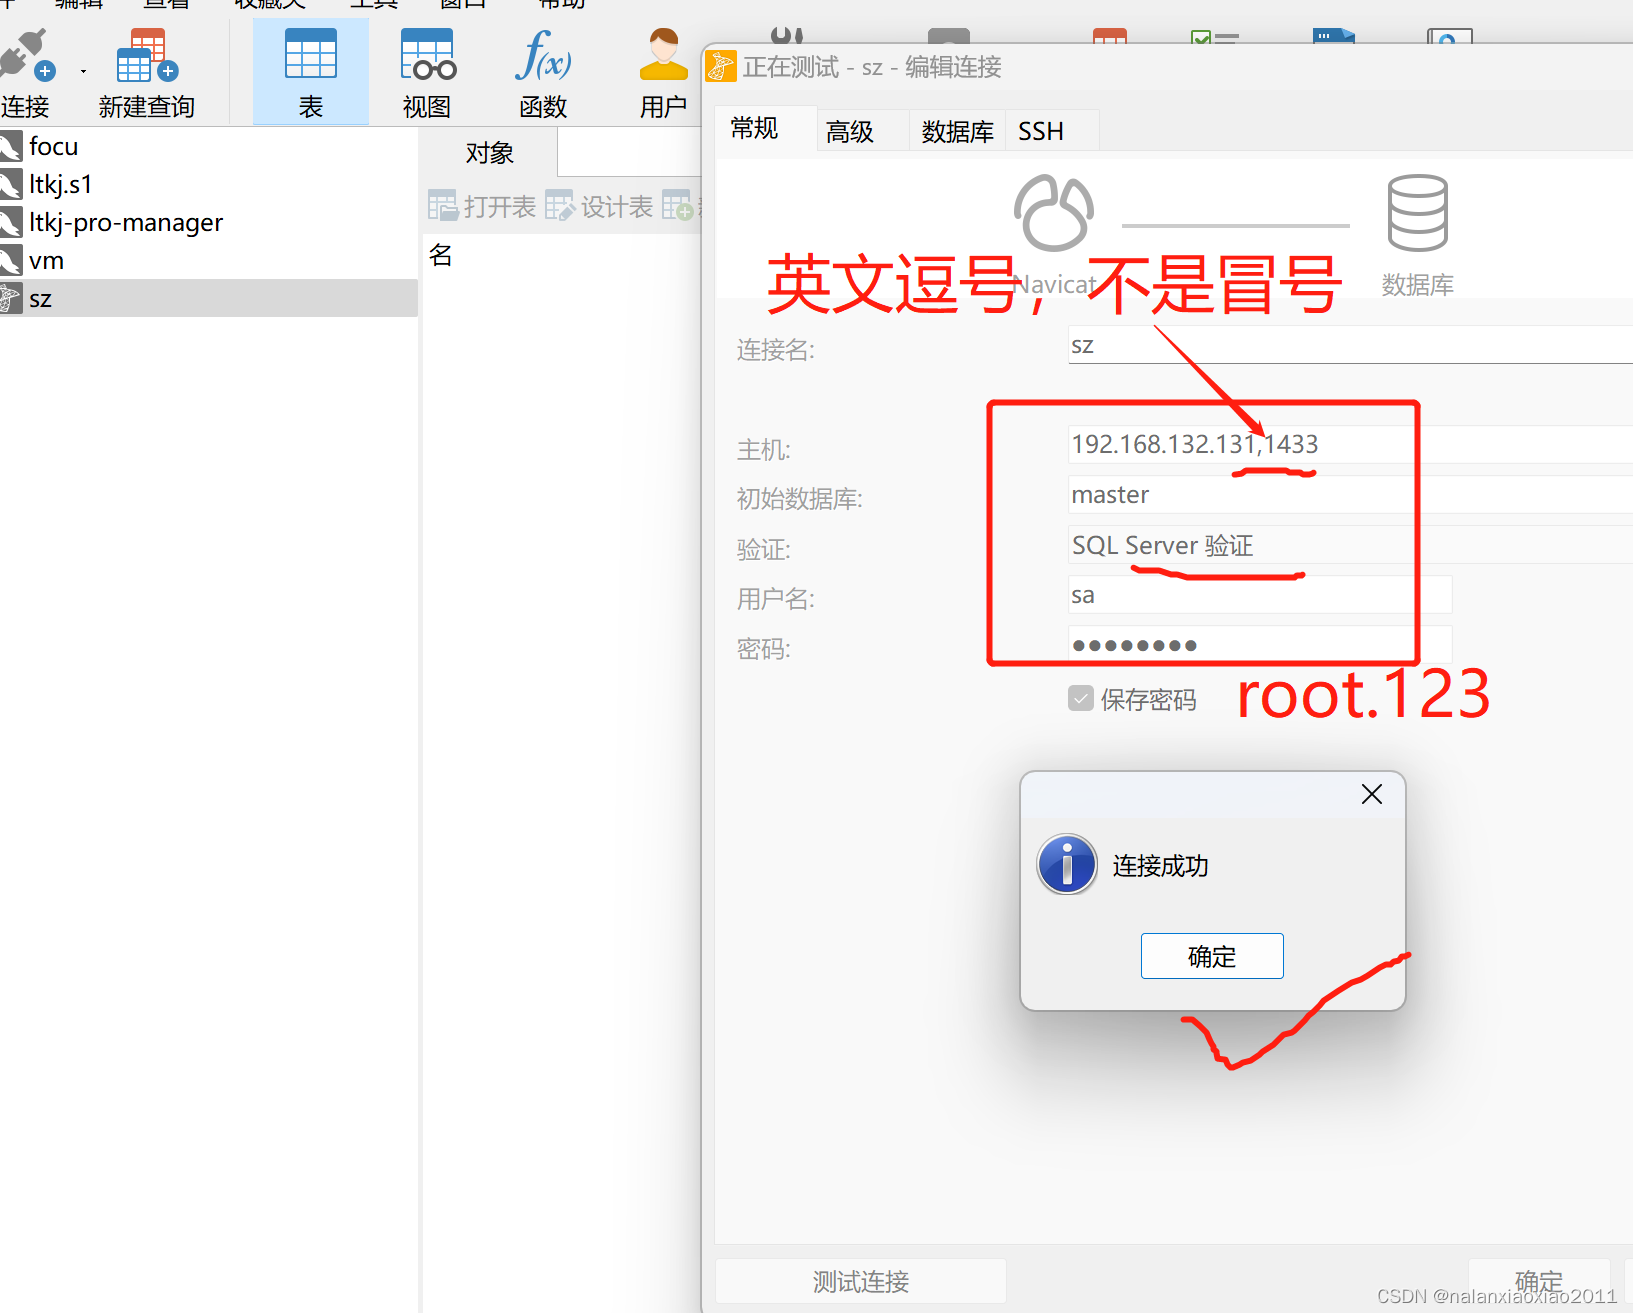
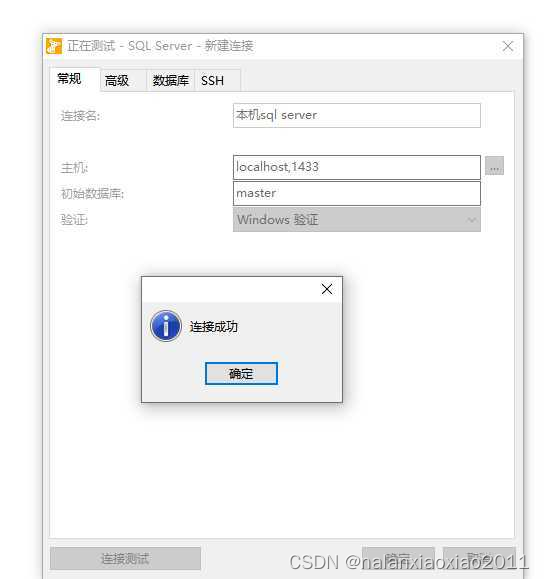
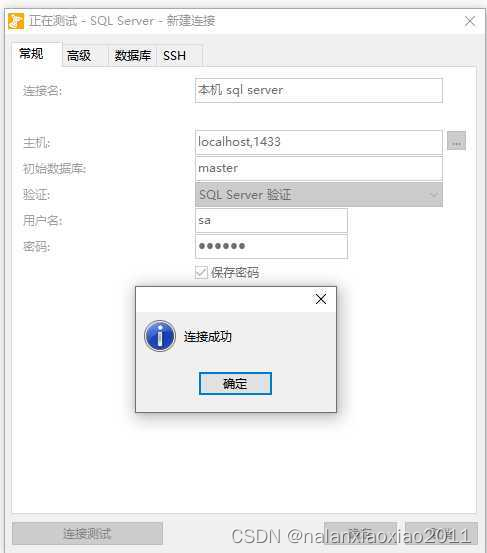
现在我们就可以连接Navicat了,需注意的是连接名后面需要使用半角的逗号去指定端口,而mysql则不需要,算是一个坑吧,sql server默认的端口为1433,这个端口是可以修改的,怎么修改可以自己搜索教程.
1.windows 验证方式连接 sql server
这里连接时会采用你登录windows系统的这个账号密码,所以这里连接不需要输入用户名和密码
2.sql server方式验证连接
------------------------------------------- 备份与还原 ------------------------------------
Linux中备份mssql数据库,出现了权限错误的解决
在Linux中安装了mssql的数据库并存了一些数据,使用sqlcmd备份的时候
use SZPT
go

backup database SZPT to disk='/data/bk/db/mssql/SZPT20230627.bak' with format, medianame='SZPT',	name='full backup of SZPT'
go
- 1
- 2
- 3
- 4
- 5
发现总是报错没有权限,
如
Msg 3201, Level 16, State 1, Server test-srv, Line 7
Cannot open backup device ‘/data/bk/db/mssql/SZPT20230627.bak’. Operating system error 5(Access is denied.).
Msg 3013, Level 16, State 1, Server test-srv, Line 7
BACKUP DATABASE is terminating abnormally.
可是我已经是root用户了,怎么会还报告没有权限了,后来想起来也许在sqlcmd中的执行用户并非root,查了下passwd文件,果然有一个mssql的用户,它的home目录是/var/opt/mssql,尝试修改备份命令
use SZPT
go

backup database SZPT to disk='/var/opt/mssql/backup/SZPT20230627.bak' with format, medianame='SZPT',	name='full backup of SZPT'
go
- 1
- 2
- 3
- 4
- 5
成功
Processed 480 pages for database 'xxxx', file 'xxxx' on file 1.
Processed 2 pages for database 'xxxx', file 'xxxx' on file 1.
- 1
- 2
SQL Server恢复失败,提示无法获得独占访问,因为数据库正在使用中,请尝试以下6种方法解决问题。
或 删除dbo失败
方式2、将SQL Server切换到单用户模式
由于数据库被其他用户使用可能会导致SQL Server恢复失败,所以可以将SQL Server切换到单用户模式,完事儿后,后再设置回多用户模式。这也将关闭所有活动连接。
2-1. 新建命令窗口
use master;
go
再 ---
RESTORE DATABASE [SZPT]
FROM
  DISK = N'/var/opt/mssql/bk\SZPT20230627-pro.bak'
WITH
  FILE = 1,
  REPLACE,
  RECOVERY,
  STATS = 5;

  右键--切回多用户模式
- 1
- 2
- 3
- 4
- 5
- 6
- 7
- 8
- 9
- 10
- 11
- 12
- 13
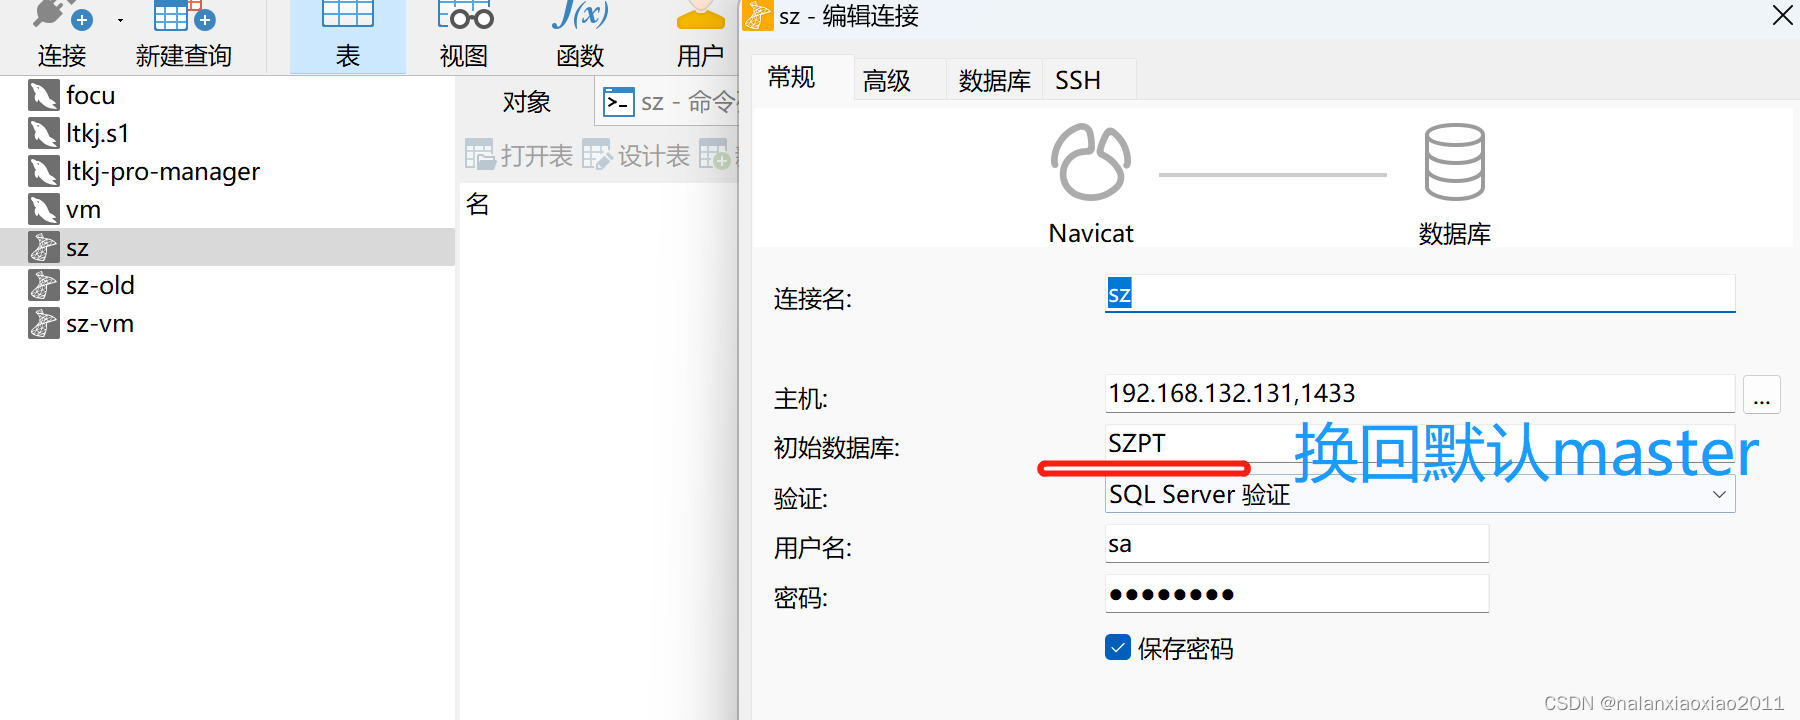
方式 4. 将默认数据库改回 master
怀疑: SQL Server 数据库恢复问题有时是由于您使用了目标数据库作为其默认数据库登录,这将始终保持连接会话活动。要修复它,您需要将默认数据库更改回“master”。
–>
