
热门标签
热门文章
- 1关于Ubuntu下is not in the sudoers file解决方法
- 2Linux配置yum源
- 3Pytorch使用tensorboard监视网络训练过程_torch环境能用tensorboard监测训练过程吗
- 4【STM32+OPENMV】二维云台颜色识别及追踪_openmv二维云台
- 5记录——TortoiseGit合并分支操作_tortoisegit 合并分支
- 6如何使用在线工具将手机相册中的图片转换为JPG格式
- 7【2024年MathorCup数模竞赛】C题第一问代码与技术文档_(24小时季节性时间序列预测模型)24年mathorcup的c题第一问matlab代码的提取地
- 8渗透测试入门教程(非常详细)从零基础入门到精通,看完这一篇就够了_网络渗透技术自学
- 9在conda环境下,安装第三方库出现:You must use Visual Studio to build a python extension on windows
- 10教程:利用LLaMA_Factory微调llama3:8b大模型_llama3模型微调保存_llama3 8b的模型文件
当前位置: article > 正文
python opencv中文显示cv2 imshow()窗口中文标题乱码解决办法 python win32gui按装_cv2显示中文
作者:寸_铁 | 2024-07-20 17:12:48
赞
踩
cv2显示中文
pip按装win32gui
pip install pywin32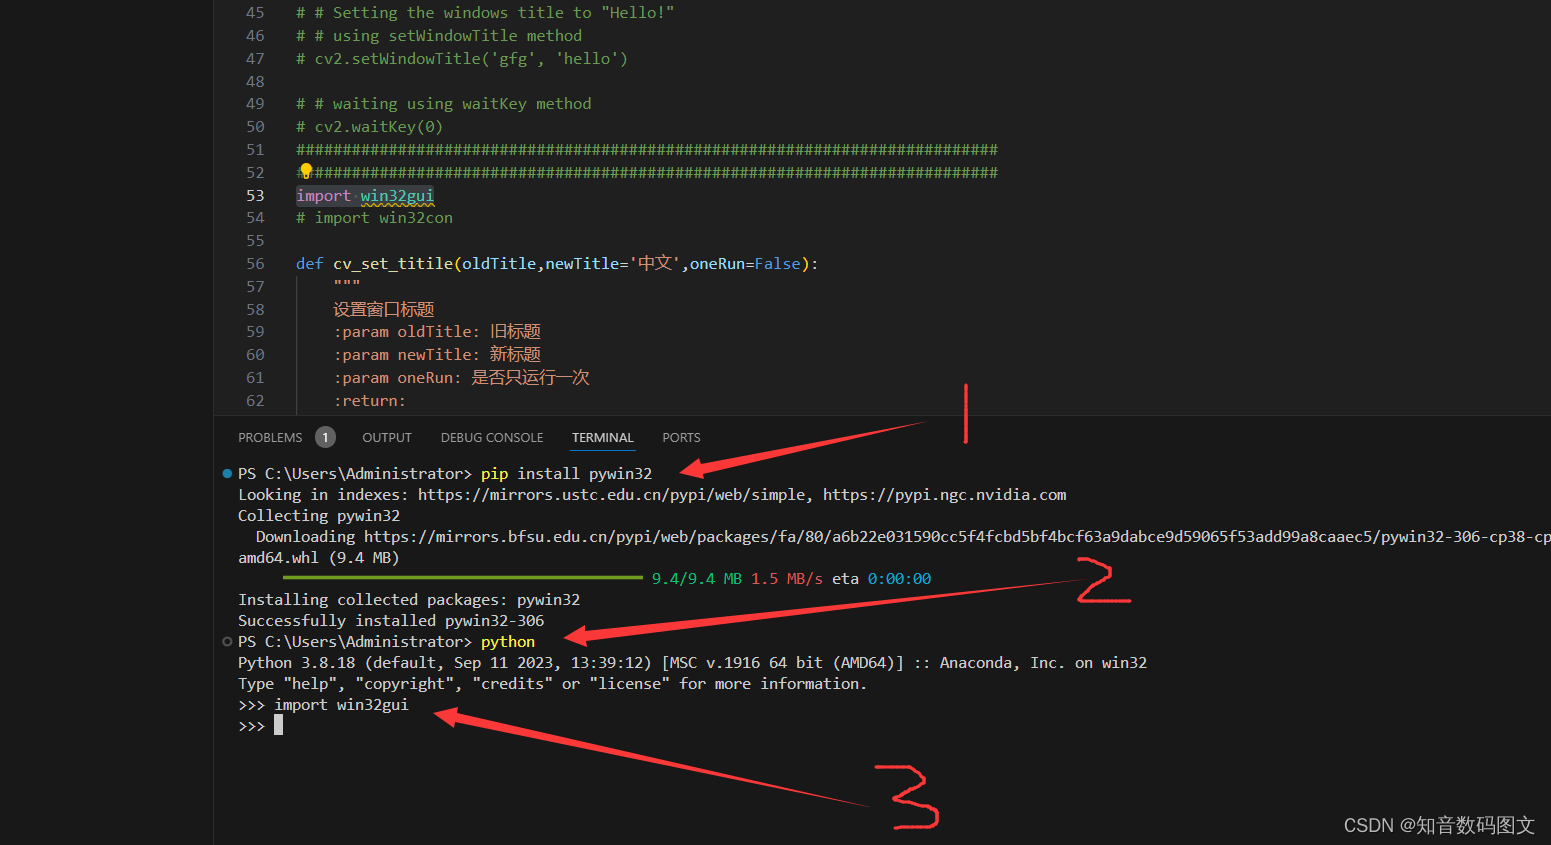
使用Windows API函数修改窗口标题
- ###########################################################################
- import cv2
- import numpy as np
- # 安装pillow : pip install pillow
- # 使用Pillow包绘制中文文本.
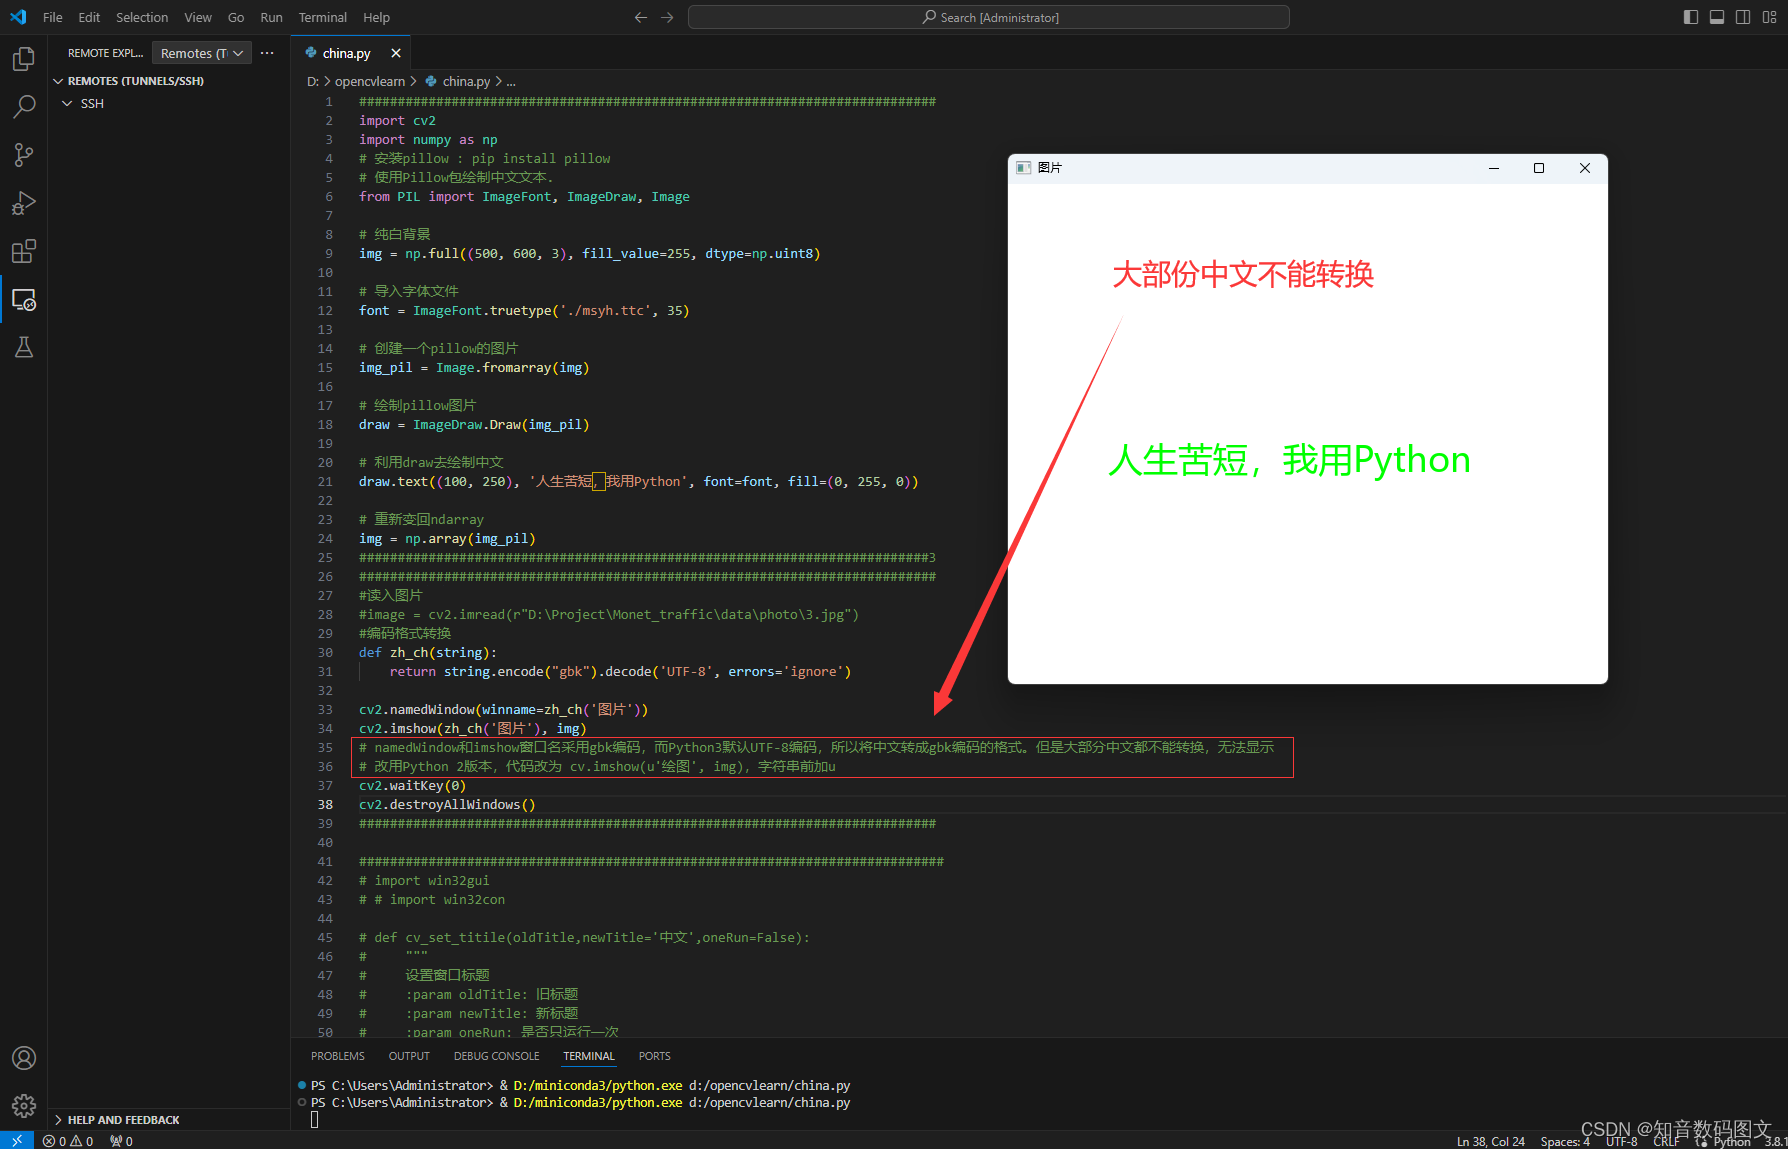
- from PIL import ImageFont, ImageDraw, Image
- # 纯白背景
- img = np.full((500, 600, 3), fill_value=255, dtype=np.uint8)
- # 导入字体文件
- font = ImageFont.truetype('./msyh.ttc', 35)
- # 创建一个pillow的图片
- img_pil = Image.fromarray(img)
- # 绘制pillow图片
- draw = ImageDraw.Draw(img_pil)
- # 利用draw去绘制中文
- draw.text((100, 250), '人生苦短,我用Python', font=font, fill=(0, 255, 0))
- # 重新变回ndarray
- img = np.array(img_pil)
- ##########################################################################3
- ############################################################################
- import win32gui
- # import win32con
-
- def cv_set_titile(oldTitle,newTitle='中文',oneRun=False):
- """
- 设置窗口标题
- :param oldTitle: 旧标题
- :param newTitle: 新标题
- :param oneRun: 是否只运行一次
- :return:
- """
- if oneRun == False:
- # 根据窗口名称查找其句柄 然后使用函数修改其标题
- # 尽量选择一个不常见的英文名 防止误该已有#的窗口标题 初始化时通常取无意义的名字 比如这里取‘aa’
- handle = win32gui.FindWindow(0, oldTitle)
- win32gui.SetWindowText(handle, newTitle)
- oneRun= True
- return oneRun
- cv2.imshow("aaa", img) #事先随便取一个英文名字 aaa, 后面我们便通过aa名称能找到该窗口句柄 尽量选择一个不常见的英文名 防止误改已有的窗口标题 取无意义的名字即可
- cv_set_titile("aaa", newTitle='欢迎使用本系统')
- cv2.waitKey(0)
- cv2.destroyAllWindows()
- ############################################################################
- ###########################################################################
- # #读入图片
- # #image = cv2.imread(r"D:\Project\Monet_traffic\data\photo\3.jpg")
- # #编码格式转换
- # def zh_ch(string):
- # return string.encode("gbk").decode('UTF-8', errors='ignore')
-
- # cv2.namedWindow(winname=zh_ch('图片'))
- # cv2.imshow(zh_ch('图片'), img)
- # # namedWindow和imshow窗口名采用gbk编码,而Python3默认UTF-8编码,所以将中文转成gbk编码的格式。但是大部分中文都不能转换,无法显示
- # # 改用Python 2版本,代码改为 cv.imshow(u'绘图', img),字符串前加u
- # cv2.waitKey(0)
- # cv2.destroyAllWindows()
- ###########################################################################
- ###########################################################################
- # #img = cv2.imread("gfg_logo.png")
-
- # # showing the image
- # cv2.imshow('gfg', img)
-
- # # Setting the windows title to "Hello!"
- # # using setWindowTitle method
- # cv2.setWindowTitle('gfg', 'hello')
-
- # # waiting using waitKey method
- # cv2.waitKey(0)
- ############################################################################
- ###########################################################################
- # import cv2
- # import numpy as np
- # #创建一个黑色的图像
- # img=np.zeros((512,680,3),np.uint8)
- # #定义字体文件路径
- # font_path='C:\Windows\Fonts\STFANGSO.TTF'
- # #加载中文字体
- # font = cv2.FONT_HERSHEY_SIMPLEX
- # # #绘制中文字体,在img上的(10,300)坐标处添加文本“世界你好”,字体为font,4像素大小,颜色为白色,粗细为10px
- # cv2.putText(img,"hello", (200,300), font, 4, (255,255,255), 10)
- # #显示图像
- # cv2.imshow('Image', img)
- # cv2.waitKey(0)
- # cv2.destroyAllWindows()
- ############################################################################
- # cv2.FONT_HERSHEY_SIMPLEX - 正常大小无衬线字体。
- # cv2.FONT_HERSHEY_PLAIN - 小号无衬线字体。
- # cv2.FONT_HERSHEY_DUPLEX - 正常大小无衬线字体比 cv2.FONT_HERSHEY_SIMPLEX 更复杂)
- # cv2.FONT_HERSHEY_COMPLEX - 正常大小有衬线字体。
- # cv2.FONT_HERSHEY_TRIPLEX - 正常大小有衬线字体 ( 比 cv2.FONT_HERSHEY_COMPLEX更复杂)
- # cv2.FONT_HERSHEY_COMPLEX_SMALL - cv2.FONT_HERSHEY_COMPLEX 的小译本。
- # cv2.FONT_HERSHEY_SCRIPT_SIMPLEX - 手写风格字体。
- # cv2.FONT_HERSHEY_SCRIPT_COMPLEX - 比 cv2.FONT_HERSHEY_SCRIPT_SIMPLEX 更复杂


中文转gbk
- ###########################################################################
- import cv2
- import numpy as np
- # 安装pillow : pip install pillow
- # 使用Pillow包绘制中文文本.
- from PIL import ImageFont, ImageDraw, Image
- # 纯白背景
- img = np.full((500, 600, 3), fill_value=255, dtype=np.uint8)
- # 导入字体文件
- font = ImageFont.truetype('./msyh.ttc', 35)
- # 创建一个pillow的图片
- img_pil = Image.fromarray(img)
- # 绘制pillow图片
- draw = ImageDraw.Draw(img_pil)
- # 利用draw去绘制中文
- draw.text((100, 250), '人生苦短,我用Python', font=font, fill=(0, 255, 0))
- # 重新变回ndarray
- img = np.array(img_pil)
- ##########################################################################3
- ###########################################################################
- #读入图片
- #image = cv2.imread(r"D:\Project\Monet_traffic\data\photo\3.jpg")
- #编码格式转换
- def zh_ch(string):
- return string.encode("gbk").decode('UTF-8', errors='ignore')
-
- cv2.namedWindow(winname=zh_ch('图片'))
- cv2.imshow(zh_ch('图片'), img)
- # namedWindow和imshow窗口名采用gbk编码,而Python3默认UTF-8编码,所以将中文转成gbk编码的格式。但是大部分中文都不能转换,无法显示
- # 改用Python 2版本,代码改为 cv.imshow(u'绘图', img),字符串前加u
- cv2.waitKey(0)
- cv2.destroyAllWindows()
- ###########################################################################
- ############################################################################
- # import win32gui
- # # import win32con
-
- # def cv_set_titile(oldTitle,newTitle='中文',oneRun=False):
- # """
- # 设置窗口标题
- # :param oldTitle: 旧标题
- # :param newTitle: 新标题
- # :param oneRun: 是否只运行一次
- # :return:
- # """
- # if oneRun == False:
- # # 根据窗口名称查找其句柄 然后使用函数修改其标题
- # # 尽量选择一个不常见的英文名 防止误该已有#的窗口标题 初始化时通常取无意义的名字 比如这里取‘aa’
- # handle = win32gui.FindWindow(0, oldTitle)
- # win32gui.SetWindowText(handle, newTitle)
- # oneRun= True
- # return oneRun
- # cv2.imshow("aaa", img) #事先随便取一个英文名字 aaa, 后面我们便通过aa名称能找到该窗口句柄 尽量选择一个不常见的英文名 防止误改已有的窗口标题 取无意义的名字即可
- # cv_set_titile("aaa", newTitle='欢迎使用本系统')
- # cv2.waitKey(0)
- # cv2.destroyAllWindows()
- ############################################################################
- ###########################################################################
- # #img = cv2.imread("gfg_logo.png")
-
- # # showing the image
- # cv2.imshow('gfg', img)
-
- # # Setting the windows title to "Hello!"
- # # using setWindowTitle method
- # cv2.setWindowTitle('gfg', 'hello')
-
- # # waiting using waitKey method
- # cv2.waitKey(0)
- ############################################################################
- ###########################################################################
- # import cv2
- # import numpy as np
- # #创建一个黑色的图像
- # img=np.zeros((512,680,3),np.uint8)
- # #定义字体文件路径
- # font_path='C:\Windows\Fonts\STFANGSO.TTF'
- # #加载中文字体
- # font = cv2.FONT_HERSHEY_SIMPLEX
- # # #绘制中文字体,在img上的(10,300)坐标处添加文本“世界你好”,字体为font,4像素大小,颜色为白色,粗细为10px
- # cv2.putText(img,"hello", (200,300), font, 4, (255,255,255), 10)
- # #显示图像
- # cv2.imshow('Image', img)
- # cv2.waitKey(0)
- # cv2.destroyAllWindows()
- ############################################################################
- # cv2.FONT_HERSHEY_SIMPLEX - 正常大小无衬线字体。
- # cv2.FONT_HERSHEY_PLAIN - 小号无衬线字体。
- # cv2.FONT_HERSHEY_DUPLEX - 正常大小无衬线字体比 cv2.FONT_HERSHEY_SIMPLEX 更复杂)
- # cv2.FONT_HERSHEY_COMPLEX - 正常大小有衬线字体。
- # cv2.FONT_HERSHEY_TRIPLEX - 正常大小有衬线字体 ( 比 cv2.FONT_HERSHEY_COMPLEX更复杂)
- # cv2.FONT_HERSHEY_COMPLEX_SMALL - cv2.FONT_HERSHEY_COMPLEX 的小译本。
- # cv2.FONT_HERSHEY_SCRIPT_SIMPLEX - 手写风格字体。
- # cv2.FONT_HERSHEY_SCRIPT_COMPLEX - 比 cv2.FONT_HERSHEY_SCRIPT_SIMPLEX 更复杂
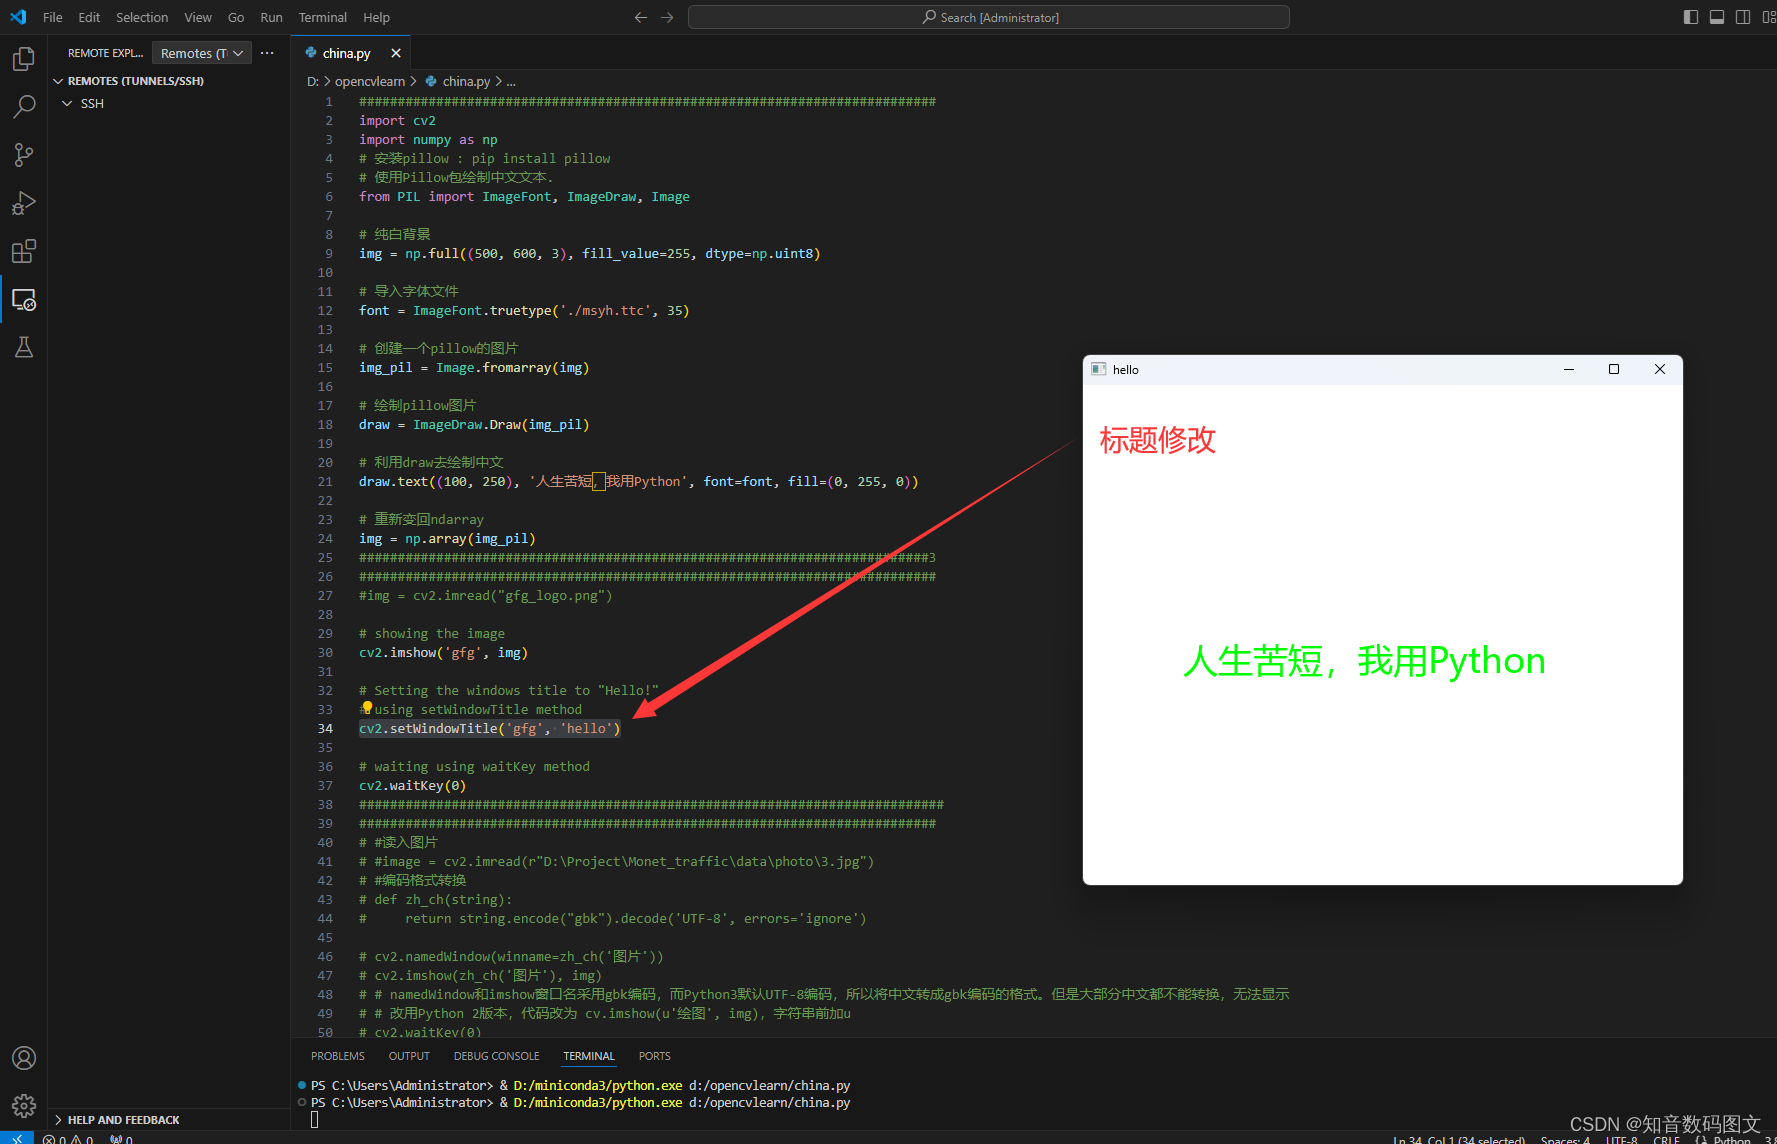
使用 setWindowTitle() 方法将 Windows 标题从默认名称更改为 自已想要的名称
- ###########################################################################
- import cv2
- import numpy as np
- # 安装pillow : pip install pillow
- # 使用Pillow包绘制中文文本.
- from PIL import ImageFont, ImageDraw, Image
- # 纯白背景
- img = np.full((500, 600, 3), fill_value=255, dtype=np.uint8)
- # 导入字体文件
- font = ImageFont.truetype('./msyh.ttc', 35)
- # 创建一个pillow的图片
- img_pil = Image.fromarray(img)
- # 绘制pillow图片
- draw = ImageDraw.Draw(img_pil)
- # 利用draw去绘制中文
- draw.text((100, 250), '人生苦短,我用Python', font=font, fill=(0, 255, 0))
- # 重新变回ndarray
- img = np.array(img_pil)
- ##########################################################################3
- ###########################################################################
- #img = cv2.imread("gfg_logo.png")
-
- # showing the image
- cv2.imshow('gfg', img)
-
- # Setting the windows title to "Hello!"
- # using setWindowTitle method
- cv2.setWindowTitle('gfg', 'hello')
-
- # waiting using waitKey method
- cv2.waitKey(0)
- ############################################################################
- ###########################################################################
- # #读入图片
- # #image = cv2.imread(r"D:\Project\Monet_traffic\data\photo\3.jpg")
- # #编码格式转换
- # def zh_ch(string):
- # return string.encode("gbk").decode('UTF-8', errors='ignore')
-
- # cv2.namedWindow(winname=zh_ch('图片'))
- # cv2.imshow(zh_ch('图片'), img)
- # # namedWindow和imshow窗口名采用gbk编码,而Python3默认UTF-8编码,所以将中文转成gbk编码的格式。但是大部分中文都不能转换,无法显示
- # # 改用Python 2版本,代码改为 cv.imshow(u'绘图', img),字符串前加u
- # cv2.waitKey(0)
- # cv2.destroyAllWindows()
- ###########################################################################
- ############################################################################
- # import win32gui
- # # import win32con
-
- # def cv_set_titile(oldTitle,newTitle='中文',oneRun=False):
- # """
- # 设置窗口标题
- # :param oldTitle: 旧标题
- # :param newTitle: 新标题
- # :param oneRun: 是否只运行一次
- # :return:
- # """
- # if oneRun == False:
- # # 根据窗口名称查找其句柄 然后使用函数修改其标题
- # # 尽量选择一个不常见的英文名 防止误该已有#的窗口标题 初始化时通常取无意义的名字 比如这里取‘aa’
- # handle = win32gui.FindWindow(0, oldTitle)
- # win32gui.SetWindowText(handle, newTitle)
- # oneRun= True
- # return oneRun
- # cv2.imshow("aaa", img) #事先随便取一个英文名字 aaa, 后面我们便通过aa名称能找到该窗口句柄 尽量选择一个不常见的英文名 防止误改已有的窗口标题 取无意义的名字即可
- # cv_set_titile("aaa", newTitle='欢迎使用本系统')
- # cv2.waitKey(0)
- # cv2.destroyAllWindows()
- ############################################################################
- ###########################################################################
- # import cv2
- # import numpy as np
- # #创建一个黑色的图像
- # img=np.zeros((512,680,3),np.uint8)
- # #定义字体文件路径
- # font_path='C:\Windows\Fonts\STFANGSO.TTF'
- # #加载中文字体
- # font = cv2.FONT_HERSHEY_SIMPLEX
- # # #绘制中文字体,在img上的(10,300)坐标处添加文本“世界你好”,字体为font,4像素大小,颜色为白色,粗细为10px
- # cv2.putText(img,"hello", (200,300), font, 4, (255,255,255), 10)
- # #显示图像
- # cv2.imshow('Image', img)
- # cv2.waitKey(0)
- # cv2.destroyAllWindows()
- ############################################################################
- # cv2.FONT_HERSHEY_SIMPLEX - 正常大小无衬线字体。
- # cv2.FONT_HERSHEY_PLAIN - 小号无衬线字体。
- # cv2.FONT_HERSHEY_DUPLEX - 正常大小无衬线字体比 cv2.FONT_HERSHEY_SIMPLEX 更复杂)
- # cv2.FONT_HERSHEY_COMPLEX - 正常大小有衬线字体。
- # cv2.FONT_HERSHEY_TRIPLEX - 正常大小有衬线字体 ( 比 cv2.FONT_HERSHEY_COMPLEX更复杂)
- # cv2.FONT_HERSHEY_COMPLEX_SMALL - cv2.FONT_HERSHEY_COMPLEX 的小译本。
- # cv2.FONT_HERSHEY_SCRIPT_SIMPLEX - 手写风格字体。
- # cv2.FONT_HERSHEY_SCRIPT_COMPLEX - 比 cv2.FONT_HERSHEY_SCRIPT_SIMPLEX 更复杂
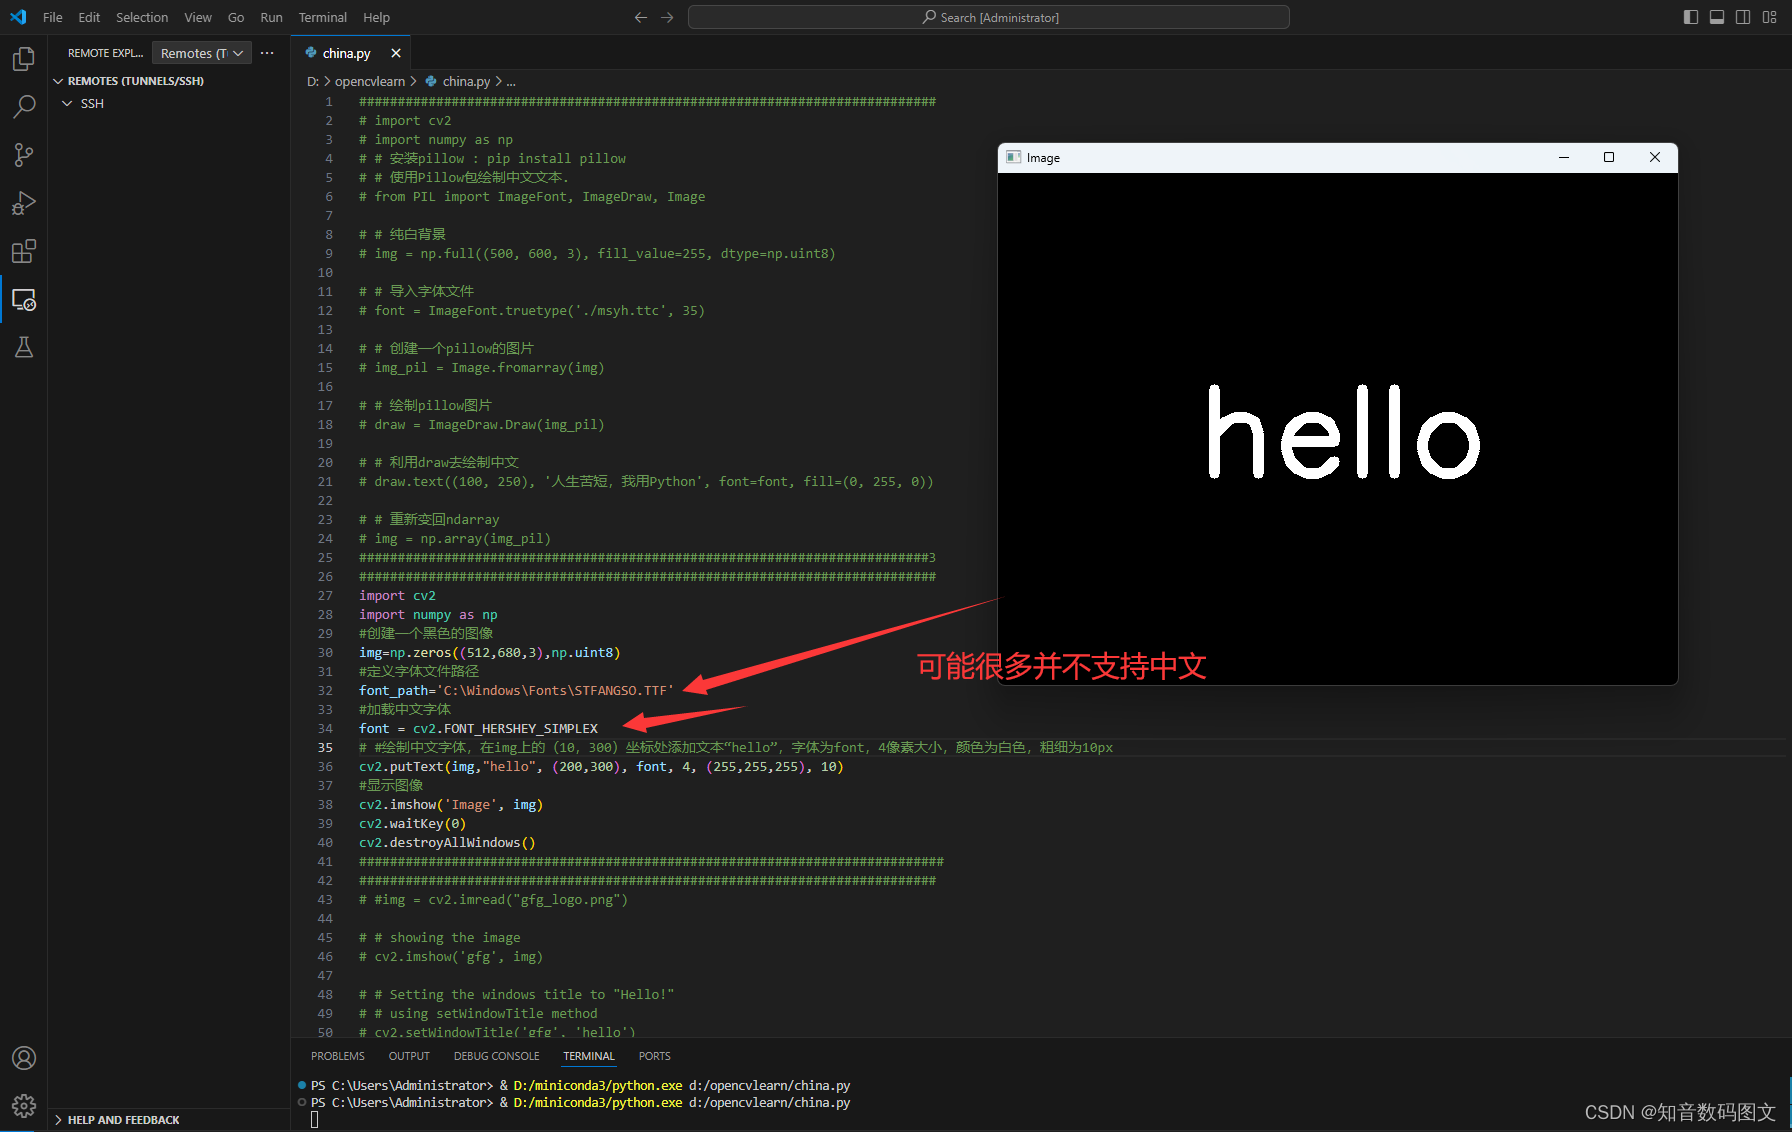
 加载字体方法 可能是很多字体不支持
- ###########################################################################
- # import cv2
- # import numpy as np
- # # 安装pillow : pip install pillow
- # # 使用Pillow包绘制中文文本.
- # from PIL import ImageFont, ImageDraw, Image
- # # 纯白背景
- # img = np.full((500, 600, 3), fill_value=255, dtype=np.uint8)
- # # 导入字体文件
- # font = ImageFont.truetype('./msyh.ttc', 35)
- # # 创建一个pillow的图片
- # img_pil = Image.fromarray(img)
- # # 绘制pillow图片
- # draw = ImageDraw.Draw(img_pil)
- # # 利用draw去绘制中文
- # draw.text((100, 250), '人生苦短,我用Python', font=font, fill=(0, 255, 0))
- # # 重新变回ndarray
- # img = np.array(img_pil)
- ##########################################################################3
- ###########################################################################
- import cv2
- import numpy as np
- #创建一个黑色的图像
- img=np.zeros((512,680,3),np.uint8)
- #定义字体文件路径
- font_path='C:\Windows\Fonts\STFANGSO.TTF'
- #加载中文字体
- font = cv2.FONT_HERSHEY_SIMPLEX
- # #绘制中文字体,在img上的(10,300)坐标处添加文本“hello”,字体为font,4像素大小,颜色为白色,粗细为10px
- cv2.putText(img,"hello", (200,300), font, 4, (255,255,255), 10)
- #显示图像
- cv2.imshow('Image', img)
- cv2.waitKey(0)
- cv2.destroyAllWindows()
- ############################################################################
- ###########################################################################
- # #img = cv2.imread("gfg_logo.png")
-
- # # showing the image
- # cv2.imshow('gfg', img)
-
- # # Setting the windows title to "Hello!"
- # # using setWindowTitle method
- # cv2.setWindowTitle('gfg', 'hello')
-
- # # waiting using waitKey method
- # cv2.waitKey(0)
- ############################################################################
- ###########################################################################
- # #读入图片
- # #image = cv2.imread(r"D:\Project\Monet_traffic\data\photo\3.jpg")
- # #编码格式转换
- # def zh_ch(string):
- # return string.encode("gbk").decode('UTF-8', errors='ignore')
-
- # cv2.namedWindow(winname=zh_ch('图片'))
- # cv2.imshow(zh_ch('图片'), img)
- # # namedWindow和imshow窗口名采用gbk编码,而Python3默认UTF-8编码,所以将中文转成gbk编码的格式。但是大部分中文都不能转换,无法显示
- # # 改用Python 2版本,代码改为 cv.imshow(u'绘图', img),字符串前加u
- # cv2.waitKey(0)
- # cv2.destroyAllWindows()
- ###########################################################################
- ############################################################################
- # import win32gui
- # # import win32con
-
- # def cv_set_titile(oldTitle,newTitle='中文',oneRun=False):
- # """
- # 设置窗口标题
- # :param oldTitle: 旧标题
- # :param newTitle: 新标题
- # :param oneRun: 是否只运行一次
- # :return:
- # """
- # if oneRun == False:
- # # 根据窗口名称查找其句柄 然后使用函数修改其标题
- # # 尽量选择一个不常见的英文名 防止误该已有#的窗口标题 初始化时通常取无意义的名字 比如这里取‘aa’
- # handle = win32gui.FindWindow(0, oldTitle)
- # win32gui.SetWindowText(handle, newTitle)
- # oneRun= True
- # return oneRun
- # cv2.imshow("aaa", img) #事先随便取一个英文名字 aaa, 后面我们便通过aa名称能找到该窗口句柄 尽量选择一个不常见的英文名 防止误改已有的窗口标题 取无意义的名字即可
- # cv_set_titile("aaa", newTitle='欢迎使用本系统')
- # cv2.waitKey(0)
- # cv2.destroyAllWindows()
- ############################################################################
- # cv2.FONT_HERSHEY_SIMPLEX - 正常大小无衬线字体。
- # cv2.FONT_HERSHEY_PLAIN - 小号无衬线字体。
- # cv2.FONT_HERSHEY_DUPLEX - 正常大小无衬线字体比 cv2.FONT_HERSHEY_SIMPLEX 更复杂)
- # cv2.FONT_HERSHEY_COMPLEX - 正常大小有衬线字体。
- # cv2.FONT_HERSHEY_TRIPLEX - 正常大小有衬线字体 ( 比 cv2.FONT_HERSHEY_COMPLEX更复杂)
- # cv2.FONT_HERSHEY_COMPLEX_SMALL - cv2.FONT_HERSHEY_COMPLEX 的小译本。
- # cv2.FONT_HERSHEY_SCRIPT_SIMPLEX - 手写风格字体。
- # cv2.FONT_HERSHEY_SCRIPT_COMPLEX - 比 cv2.FONT_HERSHEY_SCRIPT_SIMPLEX 更复杂
声明:本文内容由网友自发贡献,不代表【wpsshop博客】立场,版权归原作者所有,本站不承担相应法律责任。如您发现有侵权的内容,请联系我们。转载请注明出处:https://www.wpsshop.cn/w/寸_铁/article/detail/857707?site
推荐阅读
相关标签

