- 1【Zerotier】通过docker自建PLANET服务器_docker部署plane
- 2【生成式AI】ChatGPT 原理解析(2/3)- 预训练 Pre-train
- 3为什么ssh 执行完命令以后 挂了, hang , stop respond
- 4layui 整合UEditor 百度编辑器_layui ueditor
- 5MIPI DSI的linux kernel驱动原理 | 基于RK3399_kernel dsi
- 6DataX使用之MongoDB2HDFS
- 7深度学习中Epoch、Batch以及Batch size的设定_深度学习epoch
- 8python 常用转义字符对照表 键盘各键对应的ASCII码值_python转义字符表
- 9阿里云服务器安装mysql并用idea连接_idea远程连接阿里云服务器
- 10详解:驱动程序无法通过使用安全套接字层(SSL)加密与SQL Server 建立安全连接。_sqlserver usessl
一种踩内存的定位方法(C++)_c踩内存定位手段
赞
踩
在嵌入式应用开发过程中,踩内存的问题常常让人束手无策。使用gdb调试工具,可以大幅加快问题的定位。不过,对于某些踩内存的问题,它的表现是间接的,应用崩溃的位置也是不固定的,这就给问题定位带来了更大的困难。
笔者见过带有虚函数C++的类对象在试图调用虚函数时,因指向虚函数的表指针被踩了,导致获取虚函数的地址是错识的,从而应用崩溃。此问题的表现就是间接的:在踩内存发生时,应用没有崩溃;当应用崩溃时,执行的代码是踩内存的“历史遗迹”。为了让应用在踩内存时就发生崩溃(这样可以使用gdb调试,或分析其coredump),一种方法是将C++类对象配置成只读属性;可用的系统调用为mprotect,它可以配置一段对页对齐的内存区域内存的读写属性。
下面笔者对此问题进行了抽象和简化,完整的代码如下(memory-test.cpp):
- #include <new>
- #include <cstdio>
- #include <cerrno>
- #include <cstring>
- #include <cstdlib>
- #include <sys/types.h>
- #include <sys/mman.h>
- #include <fcntl.h>
- #include <unistd.h>
- #include <malloc.h>
-
- #define MEM_PAGESIZE 4096
-
- class MemBase {
- public:
- MemBase(int x_ = 1, int y_ = 9);
- virtual void testFunc0();
- virtual void testFunc1();
- virtual ~MemBase();
-
- protected:
- void memProtect(bool readonly);
-
- protected:
- unsigned char area[MEM_PAGESIZE * 3];
- int x, y;
- };
-
- class MemDeriv : public MemBase {
- public:
- MemDeriv(int x_ = 2, int y_ = 8);
- virtual void testFunc0();
- virtual void testFunc1();
- virtual ~MemDeriv();
-
- protected:
- int z;
- };
-
- int main(int argc, char *argv[])
- {
- MemDeriv * obj0;
-
- obj0 = new MemDeriv(3, 6);
- obj0->testFunc0();
- obj0->testFunc1();
-
- delete obj0;
- obj0 = NULL;
- return 0;
- }
-
- void MemBase::memProtect(bool readonly)
- {
- int ret;
- size_t msize;
- unsigned long pa;
-
- pa = (unsigned long) area;
- pa -= sizeof(void *); /* sizeof the TAB, what ever it is */
- if (pa & (MEM_PAGESIZE - 1)) {
- pa &= ~(MEM_PAGESIZE - 1);
- pa += MEM_PAGESIZE;
- msize = MEM_PAGESIZE * 2;
- } else {
- msize = MEM_PAGESIZE * 3;
- }
-
- if (readonly) {
- /* initialize the memory */
- memset(area, 0xA5, sizeof(area));
- }
-
- ret = mprotect((void *) pa, msize,
- readonly ? PROT_READ /* or PROT_NONE */ : PROT_READ | PROT_WRITE);
- if (ret != 0) {
- fprintf(stderr, "Error, failed to mprotect(%p): %s\n",
- (void *) pa, strerror(errno));
- fflush(stderr);
- }
- }
-
- MemBase::MemBase(int x_, int y_)
- {
- x = x_;
- y = y_;
- fprintf(stdout, "Constructing MemBase, this: %p, area: %p, x: %d (%p), y: %d (%p)\n",
- (void *) this, (void *) area, x, &x, y, &y);
- fflush(stdout);
- }
-
- void MemBase::testFunc0()
- {
- fprintf(stdout, "In function [%s], x: %d\n", __FUNCTION__, x);
- fflush(stdout);
- }
-
- void MemBase::testFunc1()
- {
- fprintf(stdout, "In function [%s], y: %d\n", __FUNCTION__, y);
- fflush(stdout);
- }
-
- MemBase::~MemBase()
- {
- fprintf(stdout, "Deconstructing MemBase, this: %p\n", (void *) this);
- fflush(stdout);
- }
-
- MemDeriv::MemDeriv(int x_, int y_) : MemBase(x_, y_)
- {
- z = x + y;
- fprintf(stdout, "Construction MemDeriv, this: %p, z: %d (%p)\n",
- (void *) this, z, &z);
- fflush(stdout);
- memProtect(true);
- }
-
- void MemDeriv::testFunc0()
- {
- fprintf(stdout, "In function [%s], z: %d\n", __FUNCTION__, z);
- fflush(stdout);
- }
-
- void MemDeriv::testFunc1()
- {
- fprintf(stdout, "In function [%s], z: %d\n", __FUNCTION__, z);
- fflush(stdout);
- }
-
- MemDeriv::~MemDeriv()
- {
- memProtect(false);
- fprintf(stdout, "Deconstructing MemDeriv, this: %p\n", (void *) this);
- fflush(stdout);
- }

由于mprotect系统调用的限制,我们只能对基类(MemBase)中增加的3个页大小的内存区域area(中的两个页大小的内存区域)设置只读属性(假设设备的内存页大小为4096字节)。不过,在某些情况下,我们也希望对函数表指针进行保护,于是就有了第60行代码:
pa -= sizeof(void *); /* sizeof the TAB, what ever it is */这样做是有原因的。当创建C++类对象时,大多数情况下,area缓存的起始地址并不是页对齐的;当类对象的起始地址(即this指针)是页对齐的,那么area就偏移了sizeof(void *)字节,这样一来被配置为只读属性的起始地址就是在this指针偏移了4096字节之后:有时候,被踩内存的大小不足一个页的大小,就不会发生踩内存时的崩溃问题了。这是加入第60行代码的原因。
试着运行一下,此方法确定可行的,测试应用可以正常运行:

见上图,这里没有测试踩内的异常情况,因此应用可以正常退出。下面让我们来测试一下上面假设的情况,即创建的C++类对象恰好在页对齐的地址上。我们将完整的代码重命名为memory-test1.cpp,将重写main函数,确保创建的类对像this指针是页对齐的,这样就可以对虚函数表指针进行mprotect保护了:
- int main(int argc, char *argv[])
- {
- void * palign;
- MemDeriv * obj0;
-
- palign = memalign(MEM_PAGESIZE, sizeof(MemDeriv));
- if (palign == NULL) {
- fprintf(stderr, "malloc(%#x) has failed: %s\n",
- (unsigned int) sizeof(MemDeriv), strerror(errno));
- fflush(stderr);
- exit(1);
- }
-
- obj0 = new(palign) MemDeriv(4, 5);
- obj0->testFunc0();
- obj0->testFunc1();
- obj0->~MemDeriv();
-
- free(obj0);
- obj0 = NULL;
- return 0;
- }

如果一切顺利,memory-test1.cpp编译得到的test1就能够正常运行:

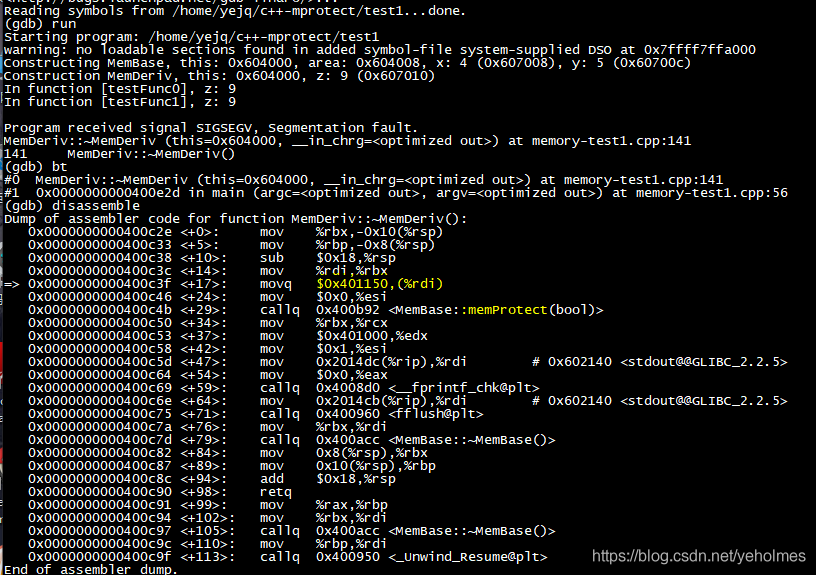
结果却是应用崩溃了!使用gdb试一下,发现应用崩溃发生在子类的析构函数中,在调用memProtect成员函数前,就会对虚函数表指针进行写操作。一方面,我们得知mprotect确实能够正常工作,将一段内存设置为只读;另一方面,我们知道,在子类析构函数中,会操作虚函数表,因此该定位踩内存的方法存在严重缺陷——所有的工作都浪费了:

这样的结果是不可接受的。我们不希望浪费这些工作,需要继续改进此方法;而改进此方法的手段,就是让C++子类的析构函数在调用memProtect成员函数之后再对虚函数表指针进行写操作。这样在memory-test1.cpp的基础上,改成了memory-test2.cpp,对MemDeriv的析构函数增加了很多nop指令:
- MemDeriv::~MemDeriv()
- {
- asm volatile (
- "\tnop\n"
- "\tnop\n"
- "\tnop\n"
- "\tnop\n"
- "\tnop\n"
- "\tnop\n" : : : "memory");
- memProtect(false);
- asm volatile (
- "\tnop\n"
- "\tnop\n"
- "\tnop\n"
- "\tnop\n"
- "\tnop\n"
- "\tnop\n"
- "\tnop\n"
- "\tnop\n"
- "\tnop\n"
- "\tnop\n"
- "\tnop\n"
- "\tnop\n"
- "\tnop\n" : : : "memory");
- fprintf(stdout, "Deconstructing MemDeriv, this: %p\n", (void *) this);
- fflush(stdout);
- }

相应的,析构函数的反汇编如下(反汇编test2):

有了足够的nop指令填充代码段的空间,就可以对test2进行修改了,编写简单hed操作指令,对test2进行修改(hed的源码在下载页的压缩包中)。修改完成后,对析构函数的反汇编就变成了:

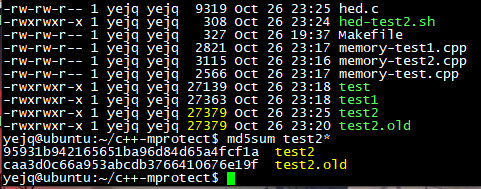
可以看到,test2在修改前后,文件大小未改变,但MD5较验值不同:

接下来最后一搏,对test2进行测试,就能够正常运行了:

至此,我们的调试C++类被踩内存的方法就成功了:它将我们从踩内存的第二现场带到了案发第一现场。不过在应用崩溃时,还是需要gdb的协助,才得到定位。需要注意的是,该方案有几点要说明一下:
- 需要对基类增加页大小整数倍的area缓存成员变量,且需要是第一个成员变量(这样在area与this之间,不存在其他成员变量);
- 由子类的构造函数和析构函数调用memProtect,分别设置area(及其之前的虚函数表指针)的只读、可读可写属性;
- 若修改源码,每次编译生成的可执行文件或动态库,都需重新构造hed指令,修改子类析构函数,在调用memProtect之后对虚函数表进行写操作。


