
- 1关于显著性检验,你想要的都在这儿了!!(基础篇)
- 2大模型惨遭人类大范围攻击!国内各领域专家组团投毒,GPT-4 也 Hold 不住
- 3Android Studio电脑上怎么下载-Android Studio下载和安装图文教程[超详细]_android studio 下载.zip文件
- 4C#通过代码的方式模拟键盘按下_c# 模拟键盘输入
- 5iOS15 Xcode13 UITableView Xib 自定义Cell 闪退问题_changing the translatesautoresizingmaskintoconstra
- 6路由协议&OSPF的互备分流相关模拟实验(一)✍_使用ospf协议使内部pc可以正常互访
- 7从“手写病例”到“AI家庭医生”,人工智能大数据如何走进我们的生活?
- 8android逻辑分辨率,手机ui设计dpi如何把握,看这3个平台各自的画布设置情况
- 9Kotlin在Android端的使用方法_import kotlinx.android.synthetic
- 10IDEA删除项目_clion删除项目
Linux基本常用命令大全(附案例实战)_linux命令大全手册
赞
踩
目录
1、基本命令
1.1 命令入门
1.1.1 命令提示符详解
- [root@localhost ~]# #/root
- [gtjin@localhost ~]$ #/home/gtjin
- [root@node1 ~]# #/root
用户名@主机名 当前目录 #系统权限 $普通权限
1.1.2 命令格式
命令 [选项] [参数] (三者之间要有空格,区分大小写)
command [-options] [args]
案例演示
- [root@node1 ~]# ls
- anaconda-ks.cfg
- [root@node1 ~]# ls -a
- . .. anaconda-ks.cfg .bash_history .bash_logout .bash_profile .bashrc .cshrc .tcshrc .viminfo
- [root@node1 ~]# ls -a -l
- 总用量 32
- dr-xr-x---. 2 root root 151 8月 18 12:13.
- dr-xr-xr-x. 17 root root 244 8月 16 21:30..
- -rw-------. 1 root root 1201 8月 17 17:51anaconda-ks.cfg
- -rw-------. 1 root root 2660 8月 17 18:21.bash_history
- -rw-r--r--. 1 root root 18 12月 29 2013.bash_logout
- -rw-r--r--. 1 root root 176 12月 29 2013.bash_profile
- -rw-r--r--. 1 root root 176 12月 29 2013.bashrc
- -rw-r--r--. 1 root root 100 12月 29 2013.cshrc
- -rw-r--r--. 1 root root 129 12月 29 2013.tcshrc
- -rw------- 1 root root 3948 8月 17 18:15.viminfo
1.2 获取命令的帮助
查手册
man 命令
命令 --help
1.2.1 查手册&搜索引擎
手册见《参考手册&资料》
搜索:必应 www.bing.com、谷歌、百度 等
1.2.2 man
[root@node1 ~]# man ls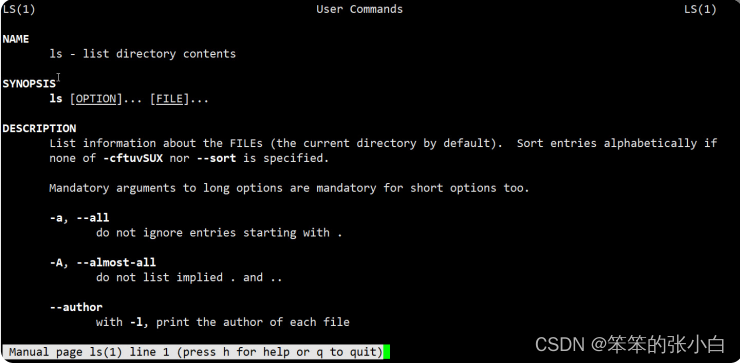
q退出命令查看 看到的全是英文,是不是很酸爽,慢慢多看看就好了。如果你英语 烂到完全看不懂,那我再教你一招,汉化man提示信息。 要想汉化man提示信息,系统中需要安装man-pages-zh-CN软件 包。
- [root@node1 ~]# yum search man-pages-zh-CN
- [root@node1 ~]# yum install man-pages-zh-CN -y
是不是可以使用了呢,相信你已经迫不及待的想要测试一把了。
[root@node1 ~]# man ls
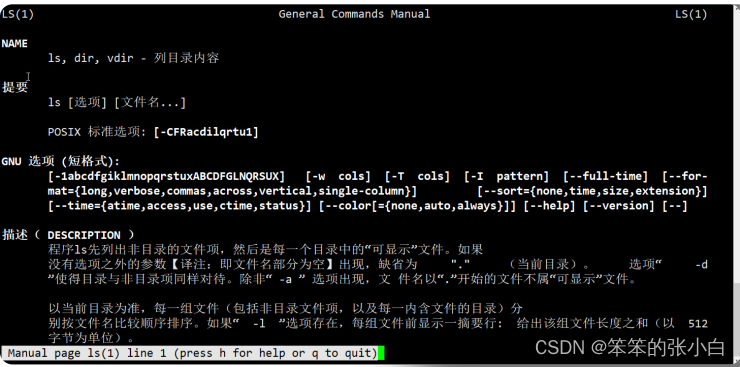
但是有的同学发现还是英文,怎么回事?安装系统的时候,没有修 改安装语言环境,还是使用的默认英语的语言环境。虽然你安装了 man的中文包,但是系统的语言还是英文环境,
- [root@node1 ~]# echo $LANG
- en_US.UTF-8
所以需要修改系统的语言环境。
- #查看系当前语言包
- [root@node1 ~]# locale
- #临时修改,重启服务器之后就会还原之前的设置
- [root@node1 ~]# LANG="zh_CN.UTF-8" #修改为中
- 文
- [root@node1 ~]# LANG="en_US.UTF-8" #修改为英
- 文
- #永久修改就要把配置写入文件里面
- [root@node1 ~]# vim /etc/locale.conf
- LANG=zh_CN.UTF8
- #如果将来遇到没有中文包的系统,需要:
- #查看系统拥有语言包
- [root@node1 ~]# locale -a|grep zh_CN*
- (zh_CN.UTF-8是简体中文,如果没有zh_CN.UTF-8,就安装语言包,如果存在可以直接设置)
- #安装简体中文语言包
- [root@node1 ~]# yum install kde-l10n-Chinese
然后再次测试便有中文信息了。
man的使用:
- enter向下一行
- 空格按页向下翻 b向上翻页
- p直接翻到首页
- 查找按 /要查找的内容,查找 下一个/上一个:按n/N;
- 退出按q
1.2.3 命令 --help
[root@node1 ~]# mv --help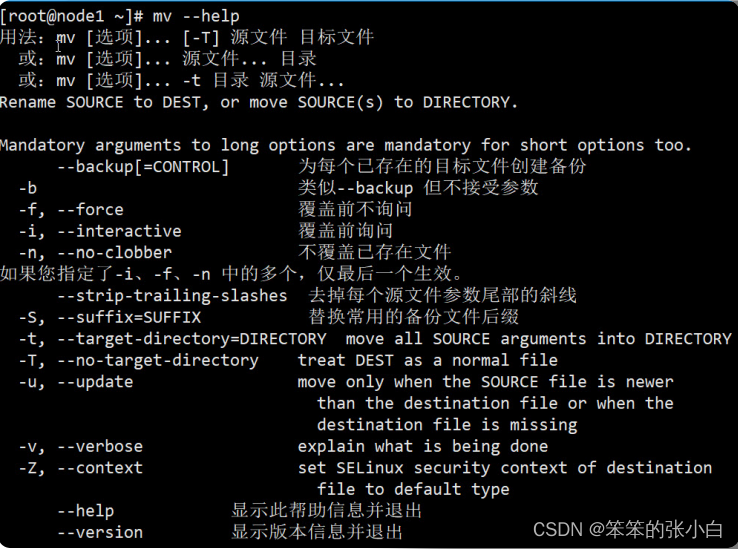
1.3 echo
[root@node1 ~]# help echo 
- #echo -n表示不要另起新行
- [root@node1 ~]# echo "hello world"
- hello world
- [root@node1 ~]# echo -n "hello world"
- hello world[root@node1 ~]#
- #-e表示解释逃逸字符
- [root@node1 ~]# echo -e "hello \nworld"
- hello
- world
- [root@node1 ~]# echo "hello \nworld"
- hello \nworld
1.4 环境变量:PATH
当在shell中执行命令的时候,默认到PATH指定的路径中查找可执 行文件。 如果在PATH中的多个目录都包含该可执行文件,则执行最先找到 的。
- [root@node1 ~]# echo $PATH
- /usr/local/sbin:/usr/local/bin:/sbin:/bin:/usr/sbin:/usr/bin:/root/bin
如果找不到,这提示命令不识别。
1.5 ls
ls命令用于列出目录内容
ls :添加-l以长格式输出,列出根目录下内容的详细列表
ls -l :也可以后面跟多个目录,列出多个目录的内容
ls / /usr :也可以通过命令的别名列出详细列表
1.6 pwd
打印当前工作目录路径
- [root@node1 ~]# pwd
- /root
1.7 cd
cd用于更改shell工作目录,也就是切换目录 change directory
- #如果cd后什么都不写,表示直接回当前用户家目录
- cd
- cd /etc
- #cd后跟波浪线,也表示回用户家目录
- cd ~
- #cd后也可以跟减号(-)用以表示回到最后一次切换之前的
- 目录,多次使用减号在最近两个目录之间切换
- cd /etc/sysconfig/network-scritps
- cd -
- #root用户可以直接通过绝对路径进到普通用户的家目录
- cd /home/god
- cd ..
- ll
- #也可以直接跟波浪线用户名表示直接进入到某个用户的家目录
1.8 mkdir
mkdir用于创建目录
- mkdir abc
- mkdir a1 a2 a3
- #如果直接创建多层目录,则报错,因为默认只能创建最后一级目录
- mkdir a/b/c
- #可以添加-p选项,用以创建多层目录,因为系统发现某一级目录不存在的时候创建父目录
- mkdir -p a/b/c
- #也可以在mkdir后跟多个目录,用于一次性创建多个目录
- mkdir ./abc/1dir ./abc/2dir ./abc/3dir
- #但是可以使用大括号高效创建相似的目录
- mkdir ./abc/{x,y,z}dir
- mkdir abc/{a..c}dir
1.9 cp
cp 文件… 目标目录
拷贝文件…到目标目录,可以同时拷贝多个文件,文件名之间用空 格隔开
- [root@node1 ~]# ls
- anaconda-ks.cfg test
- [root@node1 ~]# ls test/
- a a1 a2 a3 abc
- [root@node1 ~]# cp anaconda-ks.cfg test/abc/
- [root@node1 ~]# ls test/abc/
- 1dir 2dir 3dir adir anaconda-ks.cfg bdir cdir xdir ydir zdir
- [root@node1 ~]# cd test/abc/xdir/
- [root@node1 xdir]# pwd
- /root/test/abc/xdir
- [root@node1 xdir]# ls
- #太麻烦了
- [root@node1 xdir]# cp /root/anaconda-ks.cfg /root/test/abc/xdir/
- [root@node1 xdir]# ls
- anaconda-ks.cfg
- #简化版
- [root@node1 xdir]# cp ~/anaconda-ks.cfg .
- cp:是否覆盖"./anaconda-ks.cfg"? y
- [root@node1 xdir]#
cp -r 目录 目标目录
拷贝目录到目标目录
- [root@node1 test]# mkdir xyz
- [root@node1 test]# ls
- a a1 a2 a3 abc xyz
- [root@node1 test]# cp abc xyz/
- cp: 略过目录"abc"
- [root@node1 test]# cp -r abc xyz/
- [root@node1 test]# ls
- a a1 a2 a3 abc xyz
- [root@node1 test]# ls xyz
- abc
- [root@node1 test]# ls -R xyz/
- xyz/:
- abc
- xyz/abc:
- 1dir 2dir 3dir adir anaconda-ks.cfg
- bdir cdir xdir ydir zdir
- xyz/abc/1dir:
- xyz/abc/2dir:
- xyz/abc/3dir:
- xyz/abc/adir:
- xyz/abc/bdir:
- xyz/abc/cdir:
- xyz/abc/xdir:
- anaconda-ks.cfg
- xyz/abc/ydir:
- xyz/abc/zdir:
1.10 mv
mv用于移动或重命名文件
• 移动文件/目录 #mv 源文件/[源文件1 源文件2] 目标目录
- [root@node1 test]# ls
- a a1 a2 a3 abc xyz
- [root@node1 test]# cd abc/
- [root@node1 abc]# ls
- 1dir 2dir 3dir adir anaconda-ks.cfg bdir cdir xdir ydir zdir
- [root@node1 abc]# mkdir -p x/y/z
- [root@node1 abc]# ls
- 1dir 2dir 3dir adir anaconda-ks.cfg bdir cdir x xdir ydir zdir
- [root@node1 abc]# mv anaconda-ks.cfg x/y/
- [root@node1 abc]# ls x/y/
- anaconda-ks.cfg z
- [root@node1 abc]# ls
- 1dir 2dir 3dir adir bdir cdir x xdir ydir zdir
- [root@node1 abc]# mv x /root/
- [root@node1 abc]# ls
- 1dir 2dir 3dir adir bdir cdir xdir ydir zdir
- [root@node1 abc]# cd /root/
- [root@node1 ~]# ls
- anaconda-ks.cfg test x
- [root@node1 ~]# ls -R x/
- x/:
- y
- x/y:
- anaconda-ks.cfg z
- x/y/z:
• Linux中没有专门改名的命令,兼职改名工作:
- [root@node1 ~]# cd test/
- [root@node1 test]# ls
- a a1 a2 a3 abc xyz
- #修改目录名称 mv 旧名称 新名称
- [root@node1 test]# mv a3 ao3
- [root@node1 test]# ls
- a a1 a2 abc ao3 xyz
- [root@node1 test]# cp ~/anaconda-ks.cfg .
- [root@node1 test]# ls
- a a1 a2 abc anaconda-ks.cfg ao3 xyz
- #修改文件
- [root@node1 test]# mv anaconda-ks.cfg ks.cfg
- [root@node1 test]# ls
- a a1 a2 abc ao3 ks.cfg xyz
1.11 rm
rm用于删除文件
直接删除,需要确认yes
rm file
添加-f选项可以不用确认强制删除
- [root@node1 ~]# ls
- anaconda-ks.cfg ln1 profile test x
- [root@node1 ~]# rm profile
- rm:是否删除普通文件 "profile"?y
- [root@node1 ~]# ls
- anaconda-ks.cfg ln1 test x
- [root@node1 ~]# rm -f anaconda-ks.cfg
如果rm的参数是目录,则会提示需要迭代删除而不能成功
- [root@node1 ~]# ls
- ln1 test x
- [root@node1 ~]# rm x
- rm: 无法删除"x": 是一个目录
- #此时可以添加-r参数表示迭代删除
- [root@node1 ~]# rm -r x
- rm:是否进入目录"x"? y
- rm:是否进入目录"x/y"? y
- rm:是否删除目录 "x/y/z"?y
- rm:是否删除普通文件 "x/y/anaconda-ks.cfg"?n
- rm:是否删除目录 "x/y"?n
- rm:是否删除目录 "x"?n
- [root@node1 ~]# ls
- ln1 test x
- #也可以使用-rf选项,迭代强制删除某个文件或目录,此命
- 令慎用。尤其是rm -rf /
- [root@node1 ~]# rm -rf x
- [root@node1 ~]# ls
- ln1 test
2、文件系统命令
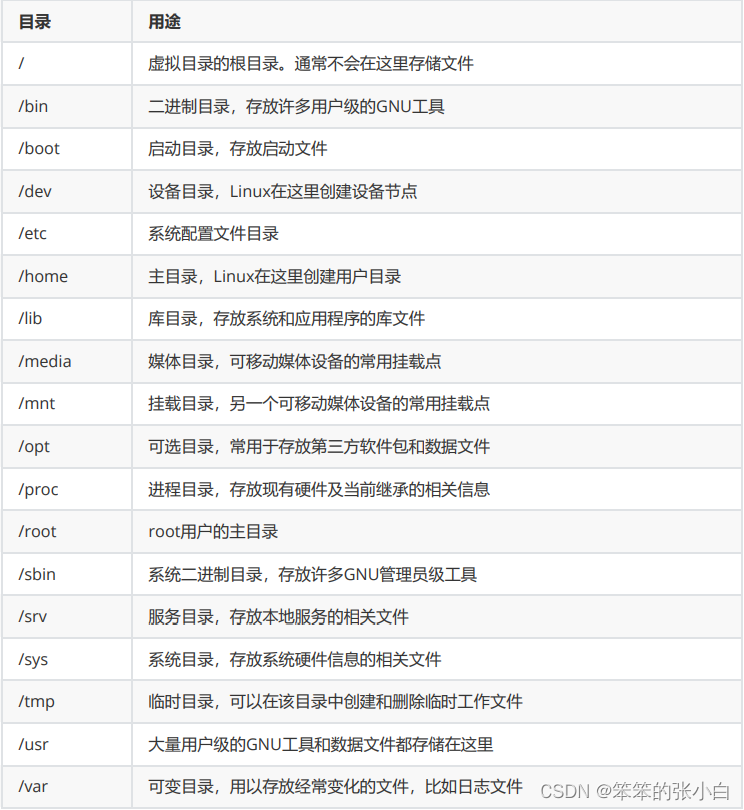
2.1 虚拟目录树
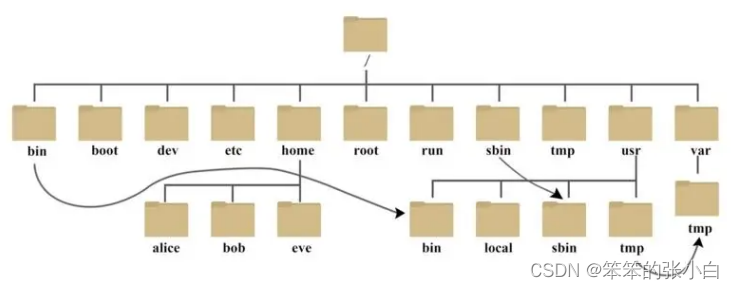
虚拟目录树的各个目录用途
2.2 df
查看系统挂载的磁盘情况
- [root@node1 ~]# df
- 文件系统 1K-块 已用 可用 已用% 挂载点
- devtmpfs 485816 0 485816 0% /dev
- tmpfs 497852 0 497852 0% /dev/shm
- tmpfs 497852 7788 490064 2% /run
- tmpfs 497852 0 497852 0% /sys/fs/cgroup
- /dev/mapper/centos-root 17811456 146482816346628 9% /
- /dev/sda1 1038336 140368 897968 14% /boot
- tmpfs 99572 0 99572 0% /run/user/0
以人能看懂的格式显示
- [root@node1 ~]# df -h
- 文件系统 容量 已用 可用 已用%挂载点
- devtmpfs 475M 0 475M 0% /dev
- tmpfs 487M 0 487M 0% /dev/shm
- tmpfs 487M 7.7M 479M 2% /run
- tmpfs 487M 0 487M 0% /sys/fs/cgroup
- /dev/mapper/centos-root 17G 1.4G 16G 9% /
- /dev/sda1 1014M 138M 877M 14% /boot
- tmpfs 98M 0 98M 0% /run/user/0
- #列出根目录下的内容
- [root@node1 ~]# ls /
- #进到boot目录
- [root@node1 ~]# cd /boot
在linux中用到了虚拟目录树,它的存在就是为了解耦应用和底层存储。
2.3 mount
将光驱挂载到/mnt目录:
- [root@node1 ~]# mount /dev/cdrom /mnt
- #进入到/mnt目录
- [root@node1 ~]# cd /mnt
- #查看磁盘分区的挂载情况:
- [root@node1 mnt]# df -h
2.4 umount
卸载掉挂载的分区/mnt
[root@node1 mnt]# umount /mnt
注意卸载/mnt时,当前目录不能在/mnt下面,否则报出如下图所示 提示:

- #再次查看磁盘分区的挂载情况:
- [root@node1 ~]# df -h
- #重新挂载
- [root@node1 ~]# mount /dev/cdrom /mnt
- #再次查看
- [root@node1 ~]# df -h
3、系统操作命令
3.1 du
du可以为目录递归地汇总每个FILE的磁盘使用情况。
• du:文件系统的磁盘使用量或是目录使用量
ᅳ a :列出所有的文件与目录容量
ᅳ h :以人们较易读的容量格式(G/M)显示 重要
ᅳ s :列出总量而已,而不列出每个各别的目录占用容量
ᅳ k :以 KBytes 列出容量显示
ᅳ m :以 MBytes 列出容量显示
- [root@node1 ~]# cd /usr
- [root@node1 usr]# du
- .......
- 0 ./etc
- 0 ./games
- 36 ./include/python2.7
- 36 ./include
- 24 ./libexec/getconf
- 16 ./libexec/awk
- .......
- #添加-s参数可以生成指定目录的汇总信息,也就是共占用多大的磁盘空间
- [root@node1 usr]# du -s ./
- 1218820 ./
- #添加-h参数可以显示为人类可以读懂的格式
- [root@node1 usr]# du -sh ./
- 1.2G ./
- #将路径写成./*统计当前目录下每项内容占用的磁盘空间信息
- [root@node1 usr]# du -sh ./*
- 61M ./bin
- 0 ./etc
- 0 ./games
- 36K ./include
- 695M ./lib
- 126M ./lib64
- 12M ./libexec
- 0 ./local
- 43M ./sbin
- 256M ./share
- 0 ./src
- 0 ./tmp
查看/etc目录下共占用多大磁盘空间
- [root@node1 usr]# du -sh /etc/
- 32M /etc/
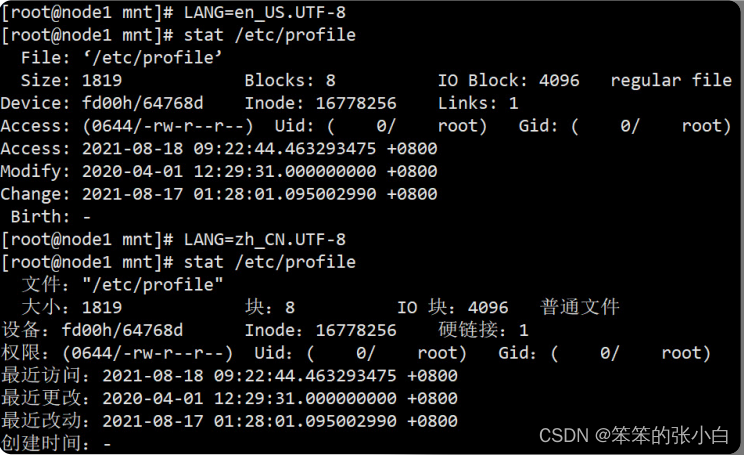
3.2 stat
stat file :显示文件的元数据
change和modify的不同
modify指的是文件内容被修改的时间
change表示文件元数据被修改的时间
3.3 history
查看历史命令
- [root@node1 ~]# history
- 1 clear
- 2 pwd
- 3 hostname
- 4 vi /etc/hostname
- 5 vi /etc/hosts
- 6 ping node0
- 7 ping node1
- ......
3.4 date
基本语法
date [OPTION]... [+FORMAT]
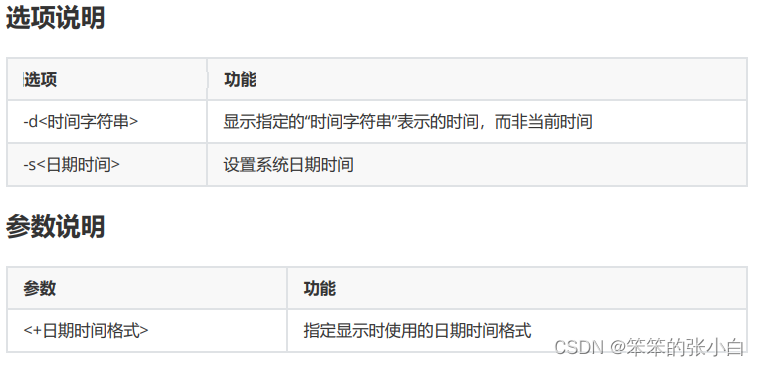
获取当前时间
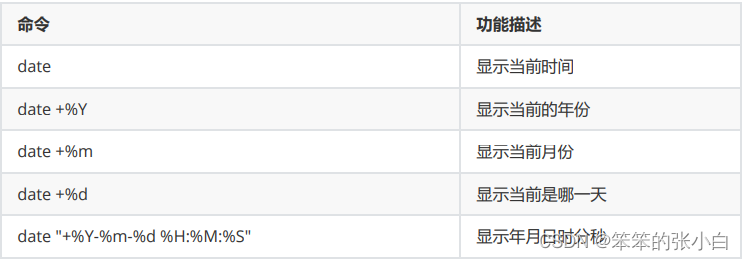
案例演示:
- [root@node1 ~]# date +%Y
- 2021
- [root@node1 ~]# date +%m
- 08
- [root@node1 ~]# date +%d
- 18
- [root@node1 ~]# date +%Y%m%d
- 20210818
- [root@node1 ~]# date +%Y%m%d%H:%M:%S
- 2021081809:24:08
- #指定时间的格式中出现空格是需要使用 ''或""括起来
- [root@node1 ~]# date +%Y%m%d %H:%M:%S
- date: 额外的操作数 "%H:%M:%S"
- Try 'date --help' for more information.
- [root@node1 ~]# date '+%Y%m%d %H:%M:%S'
- 20210818 09:25:01
- [root@node1 ~]# date "+%Y%m%d %H:%M:%S"
- 20210818 09:26:43
- [root@node1 ~]# date "+%Y-%m-%d %H:%M:%S"
- 2021-08-18 09:26:43
获取非当前时间
- #显示昨天的时间
- [root@node1 ~]# date -d '1 days ago'
- 2021年 08月 17日 星期二 09:28:02 CST
- #显示明天的时间
- [root@node1 ~]# date -d '-1 days ago'
- 2021年 08月 19日 星期四 09:28:06 CST
设置系统时间
基本语法: date -s 字符串时间
[root@node1 ~]# date -s "2021-08-18 09:36:43"
扩展了解:cal显示日历
- [root@node1 ~]# cal
- 八月 2021
- 日 一 二 三 四 五 六
- 1 2 3 4 5 6 7
- 8 9 10 11 12 13 14
- 15 16 17 18 19 20 21
- 22 23 24 25 26 27 28
- 29 30 31
3.5 进程相关命令
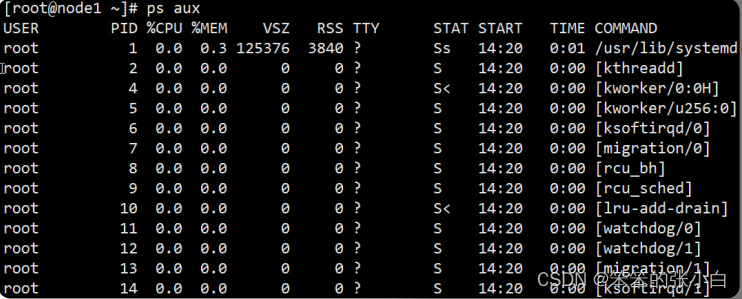
3.5.1 ps
可以通过命令查看系统内进程信息

进程查看命令
ps(process status) :将某个时间点的程序运作情况截取下来
选项和参数
- a :和输入终端(terminal) 关联的所有 process,通常与x一起使用,列出完整信息。
- x :后台进程,通常与 a 这个参数一起使用,可列出较完整信息
- u :有效使用者 (effective user) 相关的 process
常用组合
ps aux 观察系统所有的程序数据 (常用)


3.5.2 kill
基本语法
kill [选项] 进程号 :通过进程号杀死进程(只会杀死进程号对应 的一个进程)
killall 进程名称 :通过进程名称杀死进程,也支持通配符(杀 死对应的一个或多个进程)
选项说明

- [root@node1 ~]# tail -f /etc/profile &
- [1] 1267
- [root@node1 ~]# ps aux|grep tail
- root 1267 0.0 0.0 108092 616 pts/0
- S 09:38 0:00 tail -f /etc/profile
- root 1270 84.0 0.0 112824 976 pts/0
- R+ 09:39 0:00 grep --color=auto tail
- [root@node1 ~]# kill -9 1267
- [root@node1 ~]# ps aux|grep tail
- root 1272 0.0 0.0 112824 972 pts/0
- S+ 09:39 0:00 grep --color=auto tail
- [1]+ 已杀死 tail -f
- /etc/profile
- #killall 演示
- [root@node1 ~]# tail -f /etc/profile &
- [2] 1277
- [root@node1 ~]# tail -f /etc/passwd &
- [3] 1278
- [root@node1 ~]# tail -f /etc/group &
- [4] 1279
- [root@node1 ~]# ps aux|grep tail
- root 1274 0.0 0.0 108092 616 pts/0
- S 09:42 0:00 tail -f /etc/profile
- root 1277 0.0 0.0 108092 616 pts/0
- S 09:42 0:00 tail -f /etc/profile
- root 1278 0.0 0.0 108092 616 pts/0
- S 09:43 0:00 tail -f /etc/passwd
- root 1279 0.0 0.0 108092 616 pts/0
- S 09:43 0:00 tail -f /etc/group
- root 1282 0.0 0.0 112824 976 pts/0
- S+ 09:43 0:00 grep --color=auto tail
- [root@node1 ~]# killall tail
- -bash: killall: 未找到命令
centos7精简安装后,使用中发现没有killall命令,于是我们想到需要 安装killall:
- [root@node1 ~]# yum install killall -y
- 已加载插件:fastestmirror
- ......
- 没有可用软件包 killall。
- 错误:无须任何处理
这是因为对应的yum源上并没有一个名字为killall的安装包,而是给 我们提供了一个psmisc安装包,安装它之后killall便可以使用了,另 外pstree也是这样。
- [root@node1 ~]# yum install psmisc -y
- 已加载插件:fastestmirror
- Loading mirror speeds from cached hostfile
- * base: mirrors.163.com
- * extras: mirrors.163.com
- * updates: mirrors.163.com
- 正在解决依赖关系
- --> 正在检查事务
- ---> 软件包 psmisc.x86_64.0.22.20-17.el7 将被
- 安装
- --> 解决依赖关系完成
- ......
- 已安装:
- psmisc.x86_64 0:22.20-17.el7
-
- 完毕!
- [root@node1 ~]# killall tail
- [1] 已终止 tail -f
- /etc/profile
- [2] 已终止 tail -f
- /etc/profile
- [3]- 已终止 tail -f
- /etc/passwd
- [root@node1 ~]# ps aux|grep tail
- root 1299 0.0 0.0 112824 972 pts/0
- S+ 09:47 0:00 grep --color=auto tail
- [4]+ 已终止 tail -f /etc/group
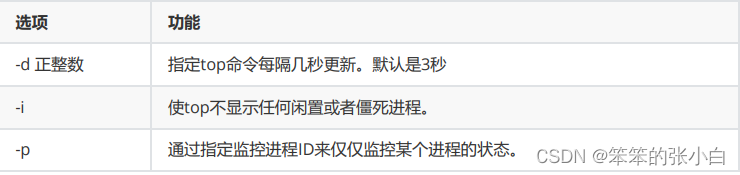
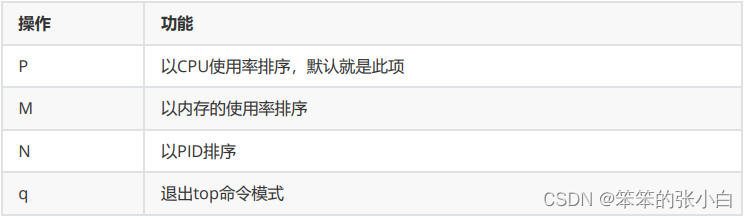
3.5.4 top
基本命令
top [选项] [参数]
选项说明
操作说明
3.5.5 netstat
基本语法
netstat [选项]
选项说明

常用命令组合
- netstat -anp :查看进程网络信息
- netstat -nlp :查看网络端口号占用情况
- netstat -anp |grep 进程号 :查看该进程网络信息
- netstat -nlp | grep 端口号 :查看该网络端口号占用情况
注意:centos7简易版安装后不带netstat命令,需要进行手动安装
- [root@node1 ~]# netstat -nlp
- -bash: netstat: 未找到命令
- [root@node1 ~]# yum install net-tools -y
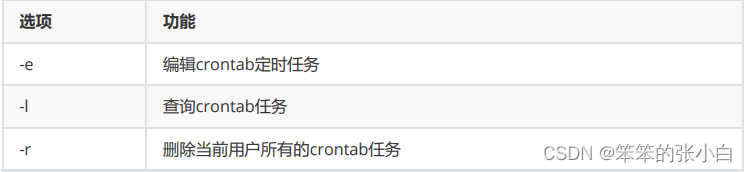
3.6 设置定时任务
基本语法
crontab [选项]
选项说明
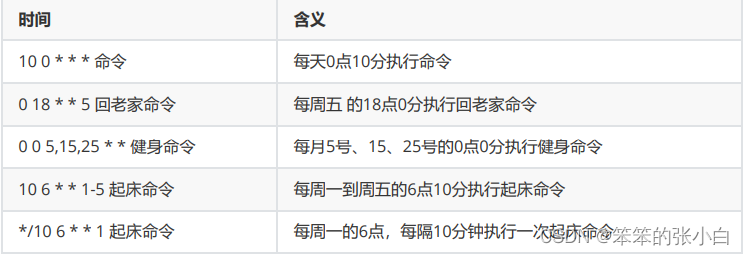
实战:添加一个定时任务,每分钟记录一次系统当前时间。
- [root@node2 ~]# crontab -l
- no crontab for root
- [root@node1 ~]# crontab -e
- */1 * * * * /bin/echo `date` >>
- /root/crontest.txt
- [root@node1 ~]# systemctl restart crond #重启
- crond服务才会生效
- [root@node2 ~]# crontab -l
- */1 * * * * /bin/echo `date` >>
- /root/crontest.txt
格式: * 命令

特定时间执行命令
 查看定时任务的结果:
- [root@node1 ~]# cat crontest.txt
- 2021年 08月 18日 星期三 11:01:01 CST
- 2021年 08月 18日 星期三 11:02:01 CST
- 2021年 08月 18日 星期三 11:03:02 CST
- 2021年 08月 18日 星期三 11:04:01 CST
- 2021年 08月 18日 星期三 11:05:01 CST
- 2021年 08月 18日 星期三 11:06:01 CST
- [root@node2 ~]# crontab -l
- */1 * * * * /bin/echo `date` >>
- /root/crontest.txt
- [root@node2 ~]# crontab -r
- [root@node2 ~]# crontab -l
- no crontab for root
4、文本操作命令
4.1 touch
touch 已存在的文件,抹平各个时间
touch 不存在的文件,则创建文件
- [root@node1 ~]# ll
- 总用量 4
- -rw-------. 1 root root 1201 8月 17 01:33 anaconda-ks.cfg
- [root@node1 ~]# touch anaconda-ks.cfg
- [root@node1 ~]# ll
- 总用量 4
- -rw-------. 1 root root 1201 8月 17 17:51 anaconda-ks.cfg
- [root@node1 ~]# touch names.txt
- [root@node1 ~]# ll
- 总用量 4
- -rw-------. 1 root root 1201 8月 17 17:51 anaconda-ks.cfg
- -rw-r--r-- 1 root root 0 8月 17 17:51 names.txt
- [root@node1 ~]# rm -f names.txt
4.2 cat
直接查看一个文件的内容可以使用cat,tac,nl这几个指令 cat是concatenate的缩写,其功能时间一个文件的内容连续的输出。 该命令适合看行数较少的文件。另外,需要查看一般DOS文件时,可以 通过-A选项来显示换行符和[tab]。
- [root@node1 ~]# cat /etc/issue
- \S
- Kernel \r on an \m
tac(反向输出):
- [root@node1 ~]# tac /etc/issue
- Kernel \r on an \m
- \S
与上面的cat命令进行比较,是由最后一行先显示。
tac功能与cat类似,但是是由文件最后一行反向连续输出到屏幕上。
nl(添加行号打印):
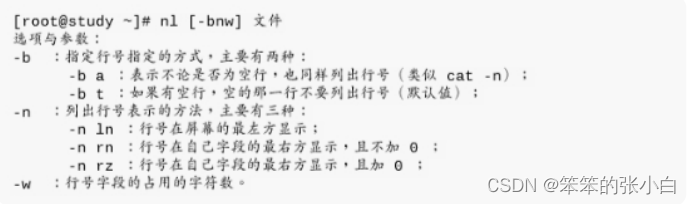
nl可以将输出的文件内容自动的加上行号。
- [root@node1 ~]# nl /etc/issue
- 1 \S
- 2 Kernel \r on an \m
- [root@node1 ~]# nl -b a /etc/issue
- 1 \S
- 2 Kernel \r on an \m
- 3
- [root@node1 ~]# nl -b t /etc/issue
- 1 \S
- 2 Kernel \r on an \m
-
- [root@node1 ~]#
4.3 head
格式:head [-n number] 文件
- 默认获取前10行(省略 -n number)
- number>0,取出前面number行。
- number<0,除了最后number行外的所有行。
4.4 tail
命令格式:tail [ -n number] 文件
选项与参数:
-n:后面接数字,代表显示几行的意思
-f:表示持续侦测后面文件内容的改变,知道按下Ctrl+c才会结束tail 的侦测。
- #默认情况下显示最后10行:
- [root@node1 ~]# tail /etc/profile
- #如果先要显示最后20行,就要如下:
- [root@node1 ~]# tail -n 20 profile
- #检测文件变化,一般用于边测试,边查看日志
- [root@node1 ~]# tail -f profile
4.5 管道|
管道左侧的输出作为右侧的输入
- [root@node1 ~]# ps aux |grep ssh
- [root@node1 ~]# yum list |grep mysql
- 如何显示文件中间的几行?
- [root@node1 ~]# head -n 20 profile |tail -n 10
- 可以省略为:
- [root@node1 ~]# head -20 profile |tail -10
- #显示/etc/profile文件中包含if关键字的行
- [root@node1 ~]# grep if /etc/profile
echo "/" | ls -l 显示内容错误(不是预期的结果),因为ls不需要输 入,只需要参数
4.6 xargs
将前面输出作为后面命令的参数
1 echo "/" | xargs ls -l 4.7 cut
cut:显示切割的行数据
- s:不显示没有分隔符的行
- d:指定分隔符对源文件的行进行分割
- -f 选定显示哪些列
- m-n m列到n列
- -n 第一列到n列
- m- 第m列到最后一列
- n 第n列
- x,y,z获取第x,y,z列
案例实战:
- #以:作为分隔符,切割passwd,输出从第3个字段到第5个字段
- [root@node1 ~]# cut -d ":" -f 3-5
- /etc/passwd
- 0:0:root
- 1:1:bin
- 2:2:daemon
- 3:4:adm
- 4:7:lp
- ......
- #输出前两列内容:
- [root@node1 ~]# cp /etc/passwd ./
- [root@node1 ~]# cut -d ":" -f -2 passwd
- root:x
- bin:x
- daemon:x
- adm:x
- ......
- #输出字段3到最后一个字段
- [root@node1 ~]# cut -d ":" -f 3- passwd
- 0:0:root:/root:/bin/bash
- 1:1:bin:/bin:/sbin/nologin
- 2:2:daemon:/sbin:/sbin/nologin
- 3:4:adm:/var/adm:/sbin/nologin
- ......
- #指定输出的分隔符:
- [root@node1 ~]# cut -d ":" -f 3- --outputdelimiter=".." passwd
- 0..0..root../root../bin/bash
- 1..1..bin../bin../sbin/nologin
- 2..2..daemon../sbin../sbin/nologin
- ......
- #输出第7个字段
- [root@node1 ~]# cut -d ":" -f 7 passwd
- /bin/bash
- /sbin/nologin
- /sbin/nologin
- ......
- #如果有的行没有分隔符,则输出会包含脏数据
- [root@node1 ~]# echo helloworld 1>> passwd
- [root@node1 ~]#
- [root@node1 ~]# cut -d ":" -f1 passwd
- root
- bin
- ......
- ntp
- helloworld
- #可以使用-s选项:不打印没有分隔符的行:
- [root@node1 ~]# cut -sd ":" -f1 passwd
- root
- bin
- daemon
- adm
- ......
- #显示1,3,7列
- [root@node1 ~]# cut -sd ":" -f 1,3,7
- passwd
- #显示1,3,7列 -- output-delimiter指定输出的时候
- 的各字符分隔符
- [root@node1 ~]# cut -sd ":" -f 1,3,7 --
- output-delimiter="|" passwd
- root|0|/bin/bash
- bin|1|/sbin/nologin
- ......
4.8 sort
sort排序:字典序和数值序
-
- n:按数值排序
-
- r:倒序 reverse
-
- t:自定义分隔符
-
- k:选择排序列
-
- f:忽略大小写
sort.txt内容如下
- a b 1
- dfdsa fdsa 15
- fds fds 6
- fdsa fdsa 8
- fda s 9
- aa dd 10
- h h 11
案例实战:
- #1.默认字典序排序
- [root@node1 ~]# sort sort.txt
- aa dd 10
- a b 1
- dfdsa fdsa 15
- fda s 9
- fdsa fdsa 8
- fds fds 6
- h h 11
- #2指定字段分隔符,按照第2个字段的字典序排序
- [root@node1 ~]# sort -t ' ' -k 2 sort.txt
- a b 1
- aa dd 10
- fds fds 6
- dfdsa fdsa 15
- fdsa fdsa 8
- h h 11
- fda s 9
- #3.指定字段分隔符,按照第3个字段字典序排序
- [root@node1 ~]# sort -t ' ' -k 3 sort.txt
- a b 1
- aa dd 10
- h h 11
- dfdsa fdsa 15
- fds fds 6
- fdsa fdsa 8
- fda s 9
- #4.指定字段分隔符,按照第3个字段的数值序排序
- [root@node1 ~]# sort -t ' ' -k 3 -n sort.txt
- a b 1
- fds fds 6
- fdsa fdsa 8
- fda s 9
- aa dd 10
- h h 11
- dfdsa fdsa 15
- #可以简短
- [root@node1 ~]# sort -t ' ' -nk 3 sort.txt
- a b 1
- fds fds 6
- fdsa fdsa 8
- fda s 9
- aa dd 10
- h h 11
- dfdsa fdsa 15
- #指定字段分隔符,按照第3个字段的值数值倒序
- [root@node1 ~]# sort -t ' ' -nrk 3 sort.txt
- dfdsa fdsa 15
- h h 11
- aa dd 10
- fda s 9
- fdsa fdsa 8
- fds fds 6
- a b 1
4.9 sed
sed:行编辑器
sed [选项] 'AddressCommand' file…
[选项]
- -i:直接修改源文件
- -r:表示使用扩展正则表达式
'AddressCommand'
- d:删除符合条件的行
- a\string:在指定的行后追加新行,内容为string
- i\string:在指定行前添加新行,内容是string
- s/string1/string2/:查找并替换,默认只替换每行第一次模式匹 配到的字符串
- g:行内全局替换
- i:忽略大小写
\1\2
4.10 awk
awk概述:
- 是一个强大的文本分析工具
- 相对于grep查找,sed编辑,awk在对数据分析并生成报告时更为强大
- 把文件逐行读入,以空格和制表符作为默认分隔符将每行切片,切开的部分再进行各种分析处理。
awk -F [':'] '{pattern + action}' filename
- 支持自定义分隔符
- 支持正则表达式匹配
- 支持自定义变量,数组 a[1] a[tom] map(key)
- 支持内置变量
- NF 浏览记录的域的个数(列数)
- NR 已读的记录数(行号)
- 支持函数
- print、split、substr、sub、gsub
- 支持流程控制语句,类C语言
- if、while、do/while、for、break、continue
4.11 wc
wc [选项列表]... [文件名列表]...
对每个文件输出行、单词、和字节统计数,如果指定了多于一个文 件则还有一个行数的总计。
选项:
- -c, --bytes, --chars(字符) 输出字节统计数。
- -l, --lines 输出换行符统计数。
- -L, --max-line-length 输出最长的行的长度。
- -w, --words 输出单词统计数。
- --help 显示帮助并退出
- --version 输出版本信息并退出
- [root@node1 ~]# wc sort.txt
- 7 21 66 sort.txt
- [root@node1 ~]# wc -l sort.txt
- 7 sort.txt
- [root@node1 ~]# cat sort.txt | wc -l
- 7
- [root@node1 ~]# wc -w sort.txt
- 21 sort.txt
- # 在UTF-8模式下,一个中文字占用3个字节
- [root@node1 ~]# wc -c sort.txt
- 66 sort.txt
- #统计字符数 一个中文字算一个字符
- [root@node1 ~]# wc --chars sort.txt
4.12 vi/vim编辑器的使用

模式切换相关
- i 进入编辑模式
- a 在选定字符后插入字符
- o 在当前行下添加新行
- O 在当前行上添加新行
- I 在当前行首进入编辑模式
- A 在当前行末进入编辑模式
- ESC 退出编辑模式
- : 末行模式
- ESC,ESC 退出末行模式
- ZZ 在命令模式保存并退出编辑器
- :wq 保存并退出编辑器
- :w 保存编辑器内容
- :q! 不保存退出编辑器
移动光标
- h左j下k上l右
- w 移动到下一个单词的词首
- e:跳至当前或下一个单词的词尾
- b:跳至当前或下一个单词的词首
- 0:绝对行首
- ^:行首的第一个非空白字符
- $:绝对行尾
- G:文档末尾
- 3G:第三行
- gg:文档开头
翻页
- ctrl-f 向下翻页 forward
- ctrl-b 向上翻页 backward
删除替换
- x:删除光标位置字符
- 3x:删除光标开始3个字符
- r:替换光标位置字符
- dw 删除单词
- dd 删除整行
- D:删除光标所在位置到行尾
复制粘贴
- yw 复制单词
- yy 复制1行
- nyy 复制n行,n是数字
- p 粘贴 paste P
撤销与重做
- u:撤销
- undo ctrl+r:重做 操作结束后使用u退回到上次操作,则ctrl+r重做
- . 重复上一步操作
set:设置
- :set nu number 显示行号
- :set nonu nunumber 取消行号的显示
- :set readonly 设置只读
查找
- :/after 向下查找 n 下一个,N 上一个
- ?向上查找
- :! 执行命令
查找并替换
s/str1/str2/gi
- /:临近s的第一个为边界字符:/ @ #(为了防止内容和边界字符重复,可以使用@和#做边 界字符)
- g:一行内全部替换
- i:忽略大小写
末行操作
- .:当前光标行
- +n:偏移n行
- $:末尾行,$-3
- %:全文 :%d 删除全文
- :.,$-1d 从当前行删除到倒数第二行
- :.,+3d 从当前行再往下数三行删除
- :.,13d 从当前行到第13行删除
5、文件压缩与打包
压缩:指通过某些算法,将文件尺寸进行相应的缩小,同时不损失 文件的内容。 比如:zip、gzip、tar。
打包:指将多个文件(或目录)合并成一个文件,方便传递或部 署。比如:tar
5.1 zip与unzip
zip [选项] XXX.zip 将要压缩的内容 :压缩文件和目录的命令
选项说明 -r 压缩目录
unzip [选项] XXX.zip :解压缩文件
选项说明 -d 指定解压后文件的存放目录
注意:zip 压缩命令在window/linux都通用,可以压缩目录且保留 源文件。
5.2 gzip和gunzip
gzip 文件 :压缩文件,只能将文件压缩为*.gz文件
gunzip 文件.gz :解压缩文件命令
注意: (1)只能压缩文件不能压缩目录 (2)不保留原来的文件
5.3 tar
压缩文件或打包文件常见的扩展名: *.tar.gz, *.tar.bz2;linux系统 一般文件的扩展名用途不大,但是压缩或打包文件的扩展名是必须 的,因为linux支持的压缩命令较多,不同的压缩技术使用的压缩算 法区别较大,根据扩展名能够使用对应的解压算法。
常见文件扩展名:
- *.tar.gz tar程序打包的文件,并且经过 gzip 的压缩
- *.tar.bz2 tar程序打包的文件,并且经过 bzip2 的压缩
tar命令,选项与参数:
- -c :建立打包文件
- -t :查看打包文件的内容含有哪些文件
- -x :解打包或解压缩的功能,可以搭配-C(大写)在特定到特定目录解开
- -j :通过bzip2的支持进行压缩/解压缩:此时文件最好为 *.tar.bz2
- -z :通过gzip的支持进行压缩/解压缩:此时文件最好为 *.tar.gz
- -v :在压缩/解压缩的过程中,将正在处理的文件名显示出来
- -f filename:-f 后面跟处理后文件的全名称(路径+文件名+后缀名)
- -C 目录:这个选项用在解压缩,若要在特定目录解压缩,可以使用这个 选项
- -p :保留备份数据的原本权限与属性,常用于备份(-c)重要的配置文件
- 注意 -c, -t, -x 不可同时出现在一串指令列中
打包与压缩:
tar –zcvf [/路径/]filename.tar.gz 被压缩的文件或目录
tar –jcvf [/路径/] filename.tar.bz2 被压缩的文件或目录
查询:
tar –ztvf [/路径/] filename.tar.gz
tar –jtvf [/路径/] filename.tar.bz2
备份:
tar –zpcv –f [/路径/]filename.tar.gz 被备份文件或目录
tar –jpcv –f [/路径/]filename.tar.bz2 被备份文件或目录
解压到当前目录:
tar –jxv –f [/路径/] filename.tar.bz2
tar –zxv –f [/路径/] filename.tar.gz
解压到指定目录:
tar -jxv -f [/路径/] filename.tar.bz2 –C 指定目录
tar -zxv -f [/路径/] filename.tar.gz -C 指定目录
注意:filename前带路径表示该路径下的,反之表示当前目录下
案例实战:
- #将/etc压缩到/tmp/下etc01.tar.gz
- #方式一:filename.tar.gz前不带路径
- [root@node1 ~]# cd /tmp/
- [root@node1 tmp]# tar -zcvf etc01.tar.gz /etc/
- #方式二:filename.tar.gz前带路径
- [root@node1 ~]# tar -zcvf /tmp/etc01.tar.gz /etc
- #将/tmp/下etc01.tar.gz解压到/tmp/目录下
- [root@tedu ~]# cd /tmp/ #首先进入对应目录
- [root@tedu tmp]# tar -zxvf etc01.tar.gz
- #将/tmp/下etc01.tar.gz解压到/usr/目录下
- [root@node1 tmp]# tar -zxvf etc01.tar.gz -C /usr
- #或者
- [root@node1 tmp]# tar -zxvC /usr -f etc01.tar.gz

