
热门标签
热门文章
- 1图像检索:基于内容的图像检索技术
- 2SpringBoot集成redis乱码问题以及工具类_java 读取redis对象乱码
- 3【AIGC调研系列】大模型的system prompt破解调研
- 4AndroidStudio项目根目录下build.gradle和build.gradle.kts区别_build.gradle.kts和build.gradle
- 5MPAndroidChart使用之HalfPieChart_com.github.mikephil.charting.charts.piechart实现半圆
- 6山西省对口高考计算机专业教材,2017年山西省对口升学专业课考试大纲--信息技术类.doc...
- 7【Linux】Shell 脚本实战:一线工作必备的18个高效工具_shell工具
- 8android view canvas 绘制导致的闪屏问题发现及解决_android view重绘闪屏
- 9【C语言】printf的输出格式控制符、格式修饰符、转义字符_c语言打印字符串用%什么
- 10java学习笔记21——JDBC_connection 创建表
当前位置: article > 正文
大模型学习与实践笔记(九)_running bdist_wheel guessing wheel url
作者:小丑西瓜9 | 2024-03-20 03:38:41
赞
踩
running bdist_wheel guessing wheel url
一、LMDeply方式部署
使用 LMDeploy 以本地对话方式部署 InternLM-Chat-7B 模型,生成 300 字的小故事

2.api 方式部署
运行

结果:

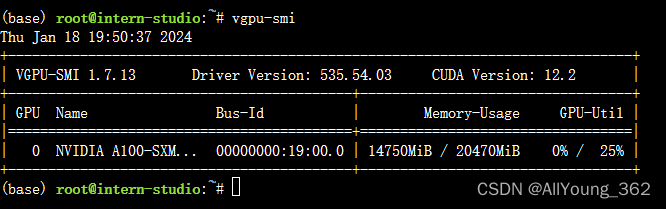
显存占用:
二、报错与解决方案
在使用命令,对lmdeploy 进行源码安装是时,报错
1.源码安装语句
pip install 'lmdeploy[all]==v0.1.0'2.报错语句:
- Building wheels for collected packages: flash-attn
- Building wheel for flash-attn (setup.py) ... error
- error: subprocess-exited-with-error
-
- × python setup.py bdist_wheel did not run successfully.
- │ exit code: 1
- ╰─> [9 lines of output]
- fatal: not a git repository (or any of the parent directories): .git
-
-
- torch.__version__ = 2.0.1
-
-
- running bdist_wheel
- Guessing wheel URL: https://github.com/Dao-AILab/flash-attention/releases/download/v2.4.2/flash_attn-2.4.2+cu118torch2.0cxx11abiFALSE-cp310-cp310-linux_x86_64.whl
- error: <urlopen error Tunnel connection failed: 503 Service Unavailable>
- [end of output]
-
- note: This error originates from a subprocess, and is likely not a problem with pip.
- ERROR: Failed building wheel for flash-attn
- Running setup.py clean for flash-attn
- Failed to build flash-attn
- ERROR: Could not build wheels for flash-attn, which is required to install pyproject.toml-based projects

3.解决方法
(1)在https://github.com/Dao-AILab/flash-attention/releases/ 下载对应版本的安装包
(2)通过pip 进行安装
pip install flash_attn-2.3.5+cu117torch2.0cxx11abiFALSE-cp310-cp310-linux_x86_64.whl4.参考链接
声明:本文内容由网友自发贡献,不代表【wpsshop博客】立场,版权归原作者所有,本站不承担相应法律责任。如您发现有侵权的内容,请联系我们。转载请注明出处:https://www.wpsshop.cn/w/小丑西瓜9/article/detail/270411
推荐阅读
相关标签

